What is Custom Field in WordPress
When you start using WordPress to build your website, you’ll quickly encounter a powerful feature called custom fields.
A custom field in WordPress lets you add extra information to your posts and pages. This helps you create richer content and tailor your site to your needs.
Imagine having total control over how your content is displayed. With custom fields, you can add any type of metadata, like ratings for a product review, a custom author’s bio, or even details about an event.
This flexibility makes your site more interactive and informative for your visitors.
Displaying content using a custom field in WordPress can significantly enhance your content management capabilities. By integrating these fields, you can provide your audience with more personalized and detailed information, ensuring that your site stands out in a crowded web space.
What is a custom field in WordPress?
A custom field in WordPress contains additional data you can add to your posts, pages, or custom post types. This data, known as metadata, is stored in WordPress’s database in key/value pairs.

The key is the name of the custom field, and the value is the information you want to store.
For example, if you run a book review site, you might create a custom field called “Author,” with the value being the book’s author’s name.
You can create custom fields using plugins like Advanced Custom Fields (ACF) or by enabling the custom fields option within the WordPress editor.
The significance of custom fields
Custom fields can significantly expand what you can do with your WordPress site. They allow you to add unique attributes to your content, making it possible to display tailored information for different posts or pages.
This flexibility is especially useful for custom post types, where specific data fields not covered by default WordPress options might be needed.
Using custom fields, you can streamline your content management. For instance, if you run a product review blog, custom fields can hold data like product ratings, prices, and purchase links.
This keeps your posts organized and makes it easier to maintain consistency across your site. Using custom fields in WordPress can also improve site performance since they store data efficiently in the database.
How to enable and add a custom field
To use a custom field in WordPress, you’ll need to enable it and learn how to add it to posts or pages. Once added, these fields can be set up with specific values and displayed on your site.
Enabling custom fields
First, you need to enable the custom fields option in your WordPress editor.
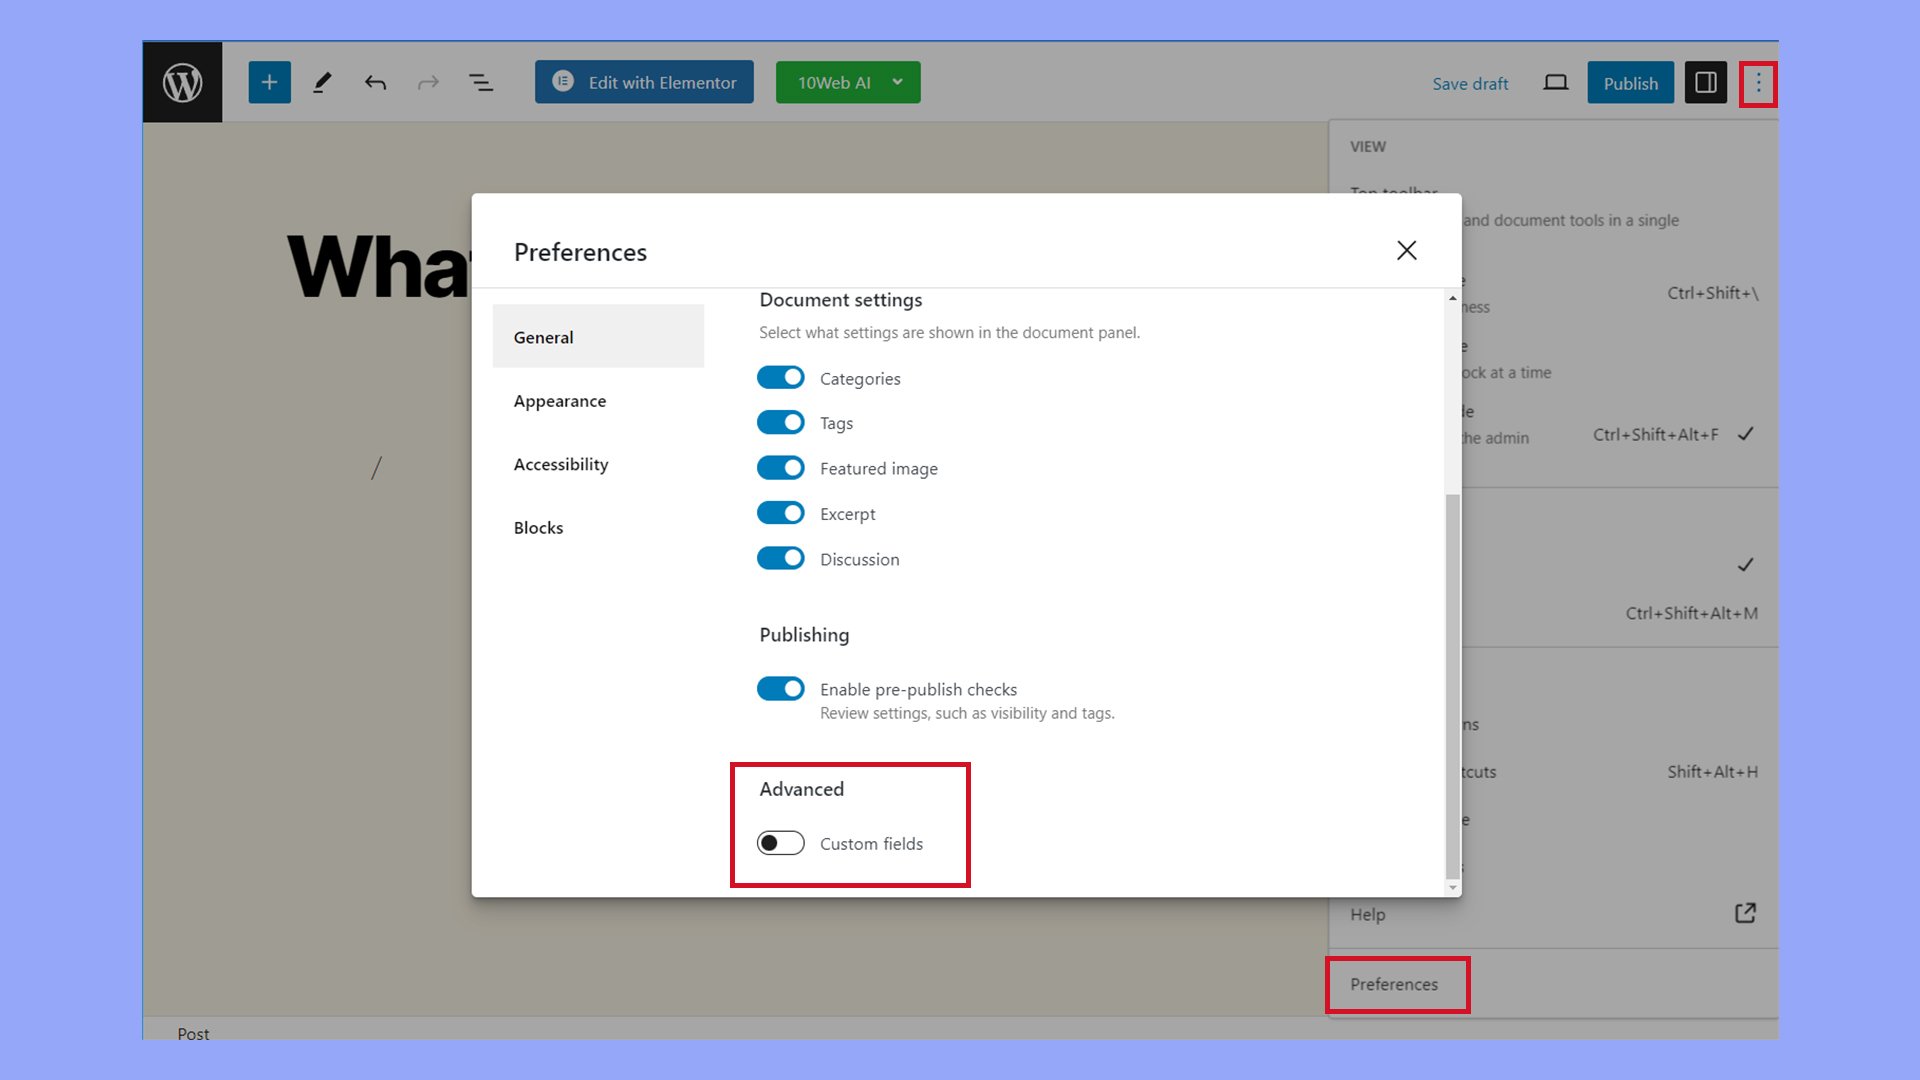
Go to your block editor, click on the three-dot icon to open the settings menu, then select Preferences. In the pop-up window, toggle the Custom Fields option on, and click Save and reload.

Adding custom fields to posts or pages
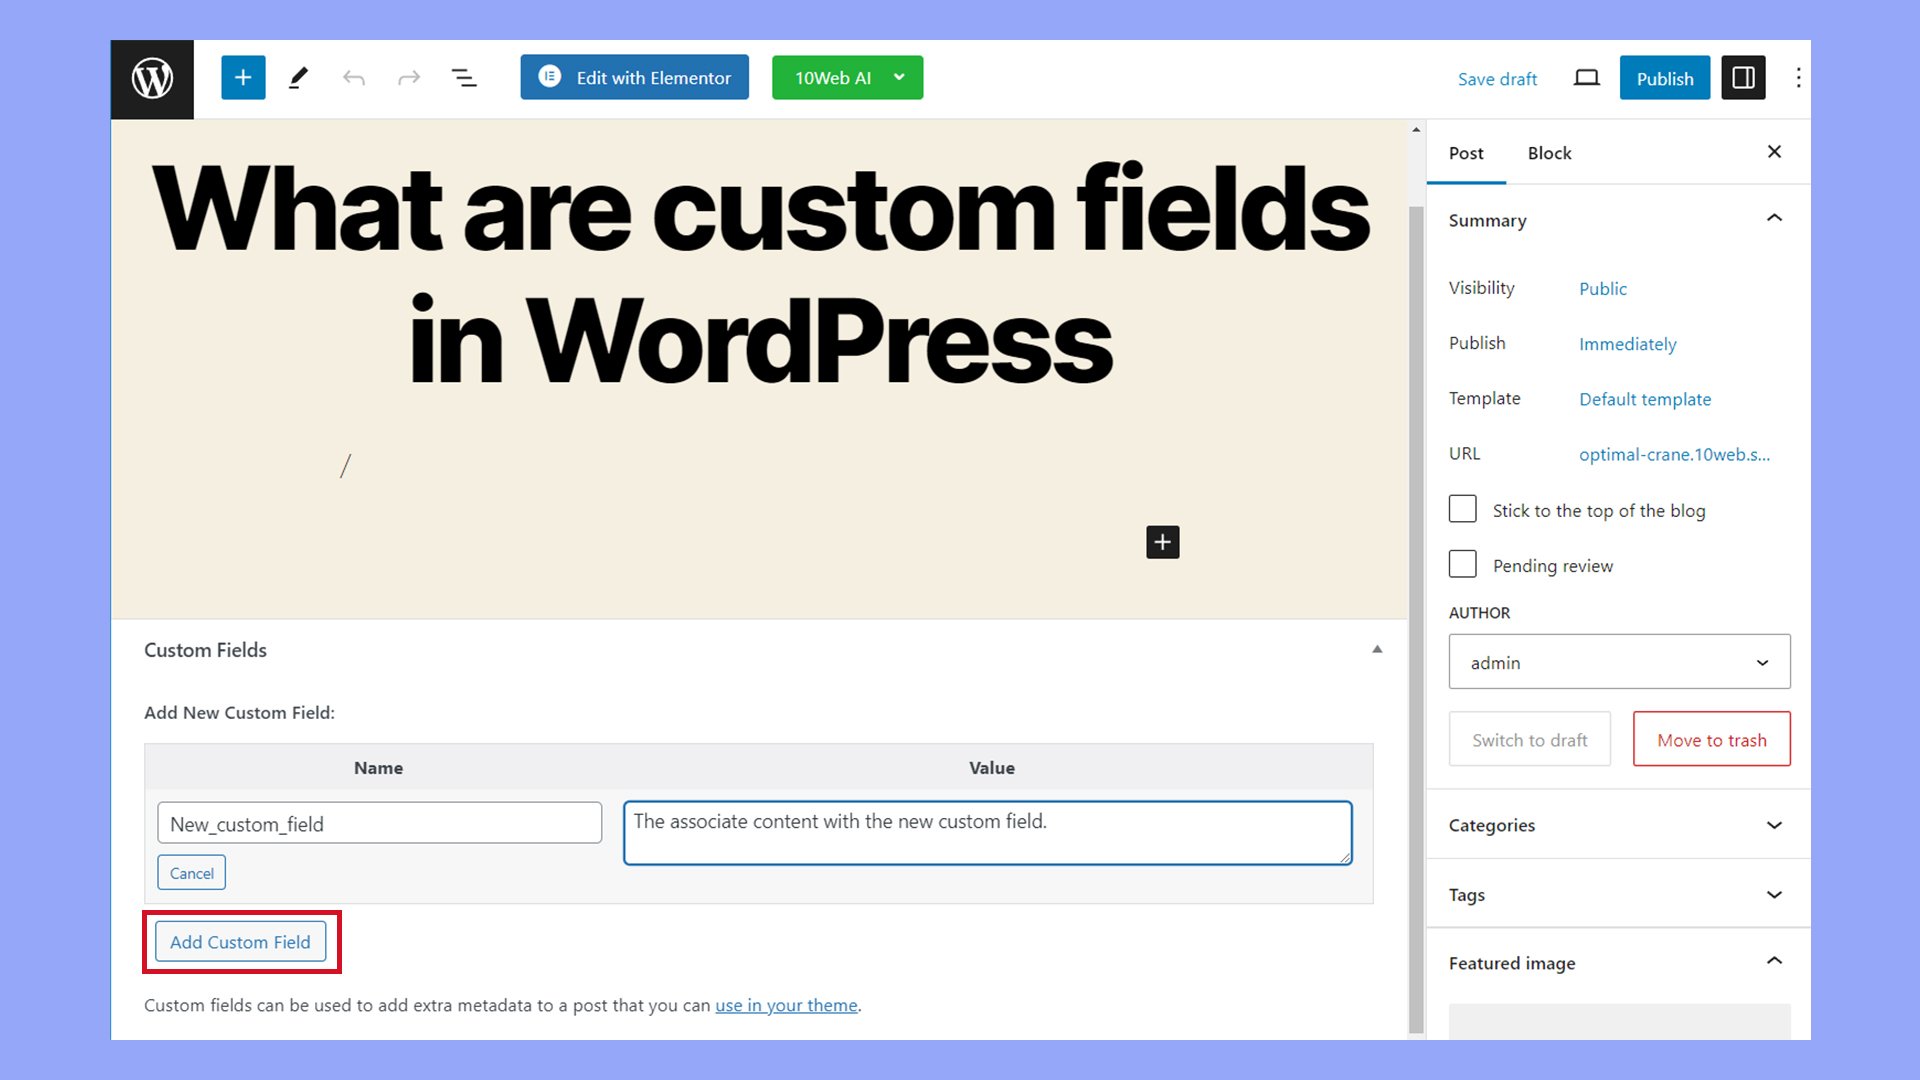
After enabling custom fields in WordPress, navigate to a post or page in your editor. You’ll see a custom fields meta box below the content area.
Setting up a custom field in WordPress involves defining its name and value.
- Name: This is the name of your custom field (e.g., “Client Name”).
- Value: This could be any content related to your key (e.g., “John Doe”).
To add a new custom field in WordPress, select an existing custom field from the Name dropdown menu, or click Enter new. Type a name for your custom field, and provide a value. Click Add Custom Field to save it.

Repeat this process to create additional custom fields.
Using functions like get_post_meta() in your theme’s PHP files can help fetch these values.
Displaying custom fields on the WordPress frontend
To display custom fields on the frontend, you’ll need to edit your theme files.
Insert PHP template tags such as:
echo get_post_meta($post->ID, 'Your Custom Field Key', true);
Adding custom fields with plugins
Adding custom fields with plugins can make your WordPress site more dynamic and customizable. This process allows you to display additional information seamlessly in your posts and pages.
Utilizing Advanced Custom Fields (ACF) Plugin
The Advanced Custom Fields (ACF) plugin is a popular choice for adding custom fields.
First, install and activate the plugin from your WordPress dashboard.
To get started, navigate to Custom Fields → Add New. Here, you can create a field group, which is a set of custom fields that will appear together.
Each field group can have multiple fields with different types like text, images, or select boxes.
Once you create a field group, you can assign it to posts, pages, or custom post types. This way, the fields will appear in the editor when you add or edit content.
ACF also offers conditional logic, allowing fields to display only under certain conditions, making your content management flexible and efficient.
For more user-friendly methods of displaying custom fields on the frontend, ACF provides shortcodes and template tags.
For example, use to display a field’s value directly in posts or pages.
Managing custom fields in WordPress themes and templates
Managing custom fields in WordPress involves integrating them into your theme files and ensuring they work well with page builders like Elementor and Divi. This helps you customize your website efficiently.
Integrating custom fields in theme files
To use a custom field in WordPress theme files, you need to edit the theme’s template files (.php).
First, make sure your custom fields are defined and have values assigned to them. Use the get_post_meta() function to retrieve this data.
Example:
$custom_value = get_post_meta(get_the_ID(), 'your_custom_field_name', true);
if ($custom_value) {
    echo '<p>' . esc_html($custom_value) . '</p>';
}
Remember to create a child theme when making customizations. This prevents losing changes during updates.
It’s as easy as copying template files into the child theme directory and making your edits there.
This keeps your custom fields intact and reusable across different parts of your site.
Custom fields and page builders compatibility
Page builders like Elementor, Divi, and Gutenberg Block work well with custom fields.
For Elementor, use the Dynamic Tags feature. Add a widget, click the Dynamic Tags icon, select ACF Field, and choose your field.
Divi users can enable custom fields in modules by selecting Custom Field from the content options.
Navigate to Divi Builder, use a text module, and add custom fields using shortcodes.
Gutenberg Block users should enable the custom field option from the settings menu.
Add a Custom HTML Block, and insert custom field data using do_shortcode('').
Best practices and advanced techniques
When working with custom fields in WordPress, it is important to maintain consistency and explore advanced techniques. Here are some key practices for handling custom fields effectively.
Maintaining consistency across custom fields
Maintaining consistency ensures that your data is organized and easy to manage.
Use clear and descriptive names for your fields to avoid confusion. Stick to a naming convention; for example, use underscores instead of spaces (e.g., post_excerpt).
When dealing with large sets of custom fields, group related fields together.
Advanced Custom Fields (ACF) allows you to create field groups. This helps in managing fields better within the WordPress editor.
Always remember to document your custom fields.
Keep a record of field names and their purposes, making it easier for anyone who might work on your site in the future.
Advanced techniques for power users
For power users, Advanced Custom Fields (ACF) offers several techniques to enhance the capabilities of custom fields.
Utilize conditional logic to display custom fields only when specific conditions are met. This makes your editor cleaner and more user-friendly.
For instance, show certain fields only if a specific checkbox is ticked.
Take advantage of ACF Blocks to create custom Gutenberg blocks. This allows you to integrate custom fields directly into the blocks editor, making it easier to input and style your content.
Lastly, ensure your custom fields display properly on the front end. Use PHP and the ACF functions to retrieve and show data from your custom fields in templates. This makes your site more dynamic and tailored to your needs.
In conclusion, understanding custom fields in WordPress is essential for maximizing the platform’s flexibility and power. Using a custom field in WordPress allows you to add unique metadata to your posts, pages, or custom post types, enhancing content management and user experience. Whether using built-in options or plugins like Advanced Custom Fields (ACF), custom fields can help you tailor your WordPress site to meet your needs better and provide a richer, more personalized experience for your visitors.


