What is Time to Interactive, and how to improve it?
Most businesses are in a rush to establish an online presence, expand their audience, and possibly turn some of their audience into paying customers. However, establishing an online presence and creating content with which users can interact is not enough. In an increasingly digital world, a more interactive website is required to engage customers, build their trust, and eventually convert them.
To keep up with the performance and interactivity of your website, you need to pay close attention to various metrics. These metrics give key insights to developers, web admins, or anyone who cares about user experience and the performance of a web page during key moments of page load. Apart from the conventional loading time metrics, there are three user-centric metrics worth paying attention to, and these include First Paint (FP), First Contentful Paint (FCP), and Time to Interactive (TTI).
Time to Interactive is perhaps one of the most important user-centric metrics you should aim to get right. This metric ensures that you do not focus on content visibility at the expense of interactivity and usability. In this article, we will discuss Time to Interactive, how to measure it, calculate it, improve TTI on WordPress sites, and how 10Web improves TTI.
What is Time to Interactive?
Time to Interactive (TTI) is a metric used to measure how long it takes for a page to become fully interactive and usable after it loads. TTI is intended to assess the time taken from when the browser renders the first bit of content from the DOM (FCP) until when users can carry out their first interaction with the page, such as clicking a button. TTI is known to be much better and more accurate than the typical performance metrics such as Onload and page load.
What does Time to Interactive measure?
According to Google Lighthouse, a website is said to be fully interactive when:
- It displays useful content to the user. This is measured by First Contentful Paint(FCP)
- All event handlers for the displayed elements are registered.
- And that the event handlers can readily respond to user requests in less than 50 milliseconds.
From the above statements, an “interactive” state can be achieved only after FCP. Once the web page starts showing the first useful content, event handlers should be able to respond to events such as scrolling and clicks and do so without delay. Timely response to user actions improves the user’s experience and reduces frustration. TTI is an important metric in this process, allowing you to measure how long it takes before the web page is consistently interactive.
Load time vs. Time to Interactivity
Load time is the time it takes for a web page to show up on your screen once you have submitted the URL for that page. In simpler terms, this means the time it takes for all page elements, including HTML, CSS, javascript, images, and third-party resources, to download. Load time is equally an important metric and can significantly impact the performance of your web page. A higher load time means users have to wait a bit longer before viewing your page, leading to frustration. Frustrated users will impact your sales and conversion rates.
However, there is a clear distinction between Load time and TTI, which may not be immediately obvious. While load time is important and should be optimized, focusing on the load time at the expense of interactivity is a bad idea. Users are likely to think the website is broken if it is not responsive even though the content was displayed in a record time. Monitoring and optimizing the load time and TTI will guarantee users a seamless experience. On the other hand, one should not wait for the entire page content to be loaded to make the page interactive and usable.
How is Time to Interactive calculated?
Time to Interactive is a metric measuring the time from when the web page renders its first piece of content until it can reliably respond to user actions.
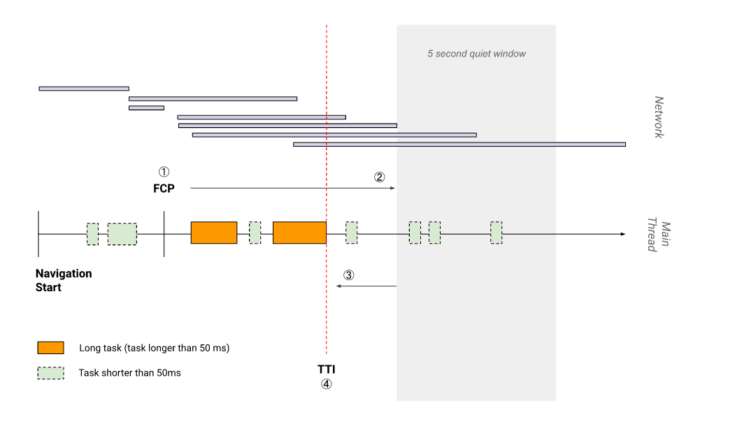
According to Google Lighthouse, TTI can be calculated based on the performance trace of a web page by following the steps outlined below:
- Begin at the First Contentful Page (FCP).
- Search forward in time for a quiet window of at least five seconds. A quiet window happens when no long tasks are running in the browser and no more than two in-flight networks GET requests.
- Search backward for the last long task before the quiet window, stopping at FCP if no long tasks are found.
- TTI is the end time of the last long task before the quiet window (or the same value as FCP if no long tasks are found).
Here is a visual of the steps outlined above.
What is a good TTI score?
A TTI performance of 3.8 seconds and below is considered fast. However, for your web page performance to be in the 99th percentile, a TTI performance of about 2.2 seconds is required. Pages with a TTI score of between 3.8 and 7.3 seconds are moderate, but you should consider an improvement.
TTI is best measured using lab tools. Some of the tools best known for this task are.
- Google’s Lighthouse
- WebPageTest
Apart from measuring the time to interactive of your web page, these tools also give you various diagnostics and suggestions on how you can improve the performance score.
How TTI affects performance score
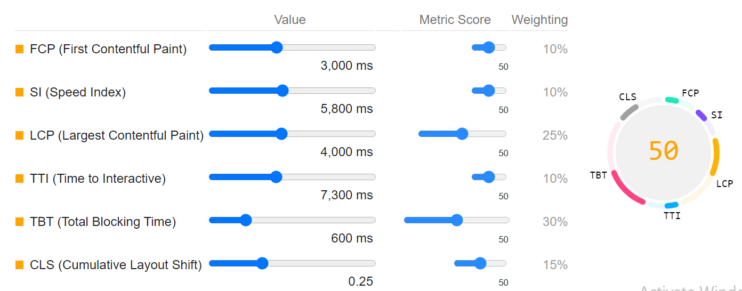
Lighthouse combines six metrics to generate the overall performance score of your website.
The TTI metric score accounts for 10% of the overall PageSpeed score of your web page. Therefore, improving the TTI score could significantly impact the user experience and how users rate your web page.
How to improve TTI score on WordPress sites.
Reducing the Time to Interactive score can have a significant boost on the performance of your web page. This section discusses some practices that can help improve your site’s TTI score and, consequently, the overall performance score.
1. Delay JS
The usage of Javascript on the web has grown exponentially by nearly 5x in the last six years. The process of parsing and executing Javascript consumes most of the CPU resources. It has been observed that as the usage of Javascript in web pages grows, the browser’s CPU time also increases.
For these reasons optimizing Javascript will almost certainly improve the TTI score of your site. Techniques for delaying JS, including JS defer, can improve the performance of your web page and the TTI score. Deferring the parsing of Javascript entails instructing the browser to ignore the parsing and running of non-essential Javascript until part of the page has been displayed.
Examples of non-critical JS that should be delayed are chat services, social media APIs, A/B testing scripts, and cookie consent. In practice, most JS can be loaded after a visitor starts to interact with the page (e.g., hovering on the page). Some notable exceptions are sliders or scripts loading content and rendering it in the above-the-fold part of the webpage dynamically through asynchronous requests.
Lab tools such as Google’s Lighthouse identify such issues, and under the Opportunities section, you’d see suggestions such as “eliminate render-blocking resources” and “reduce unused javascript.”
One can use various methods to defer non-essential JS in WordPress sites.
These include:
1. Plugins
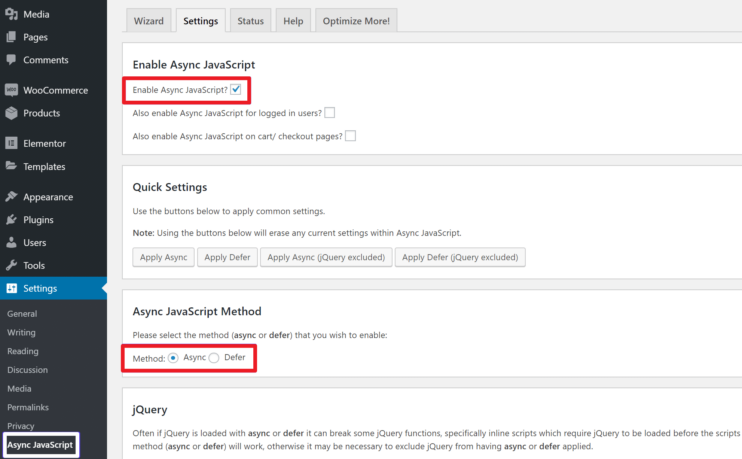
There are several free and premium plugins that you can leverage to defer non-essential JS code. One of the popular plugins is the Async Javascript plugin by Frank Goosens. This plugin gives you control over render-blocking Javascript and the freedom to determine which scripts to add an async or defer attribute to.
To install the plugin:
- Upload the zip file and unzip it in the /wp-content/plugins/ directory
- Activate the plugin through the ‘Plugins’ menu in WordPress
- Go to Settings > Async JavaScript menu to configure the plugin.
At the top of the page, you can enable the plugging and process to allow the defer functionality at the bottom of that page, among other functionalities.
2. Editing the Functions.php file
For those with knowledge of web technologies, you can edit the functions.php file and add the defer attribute shown below.
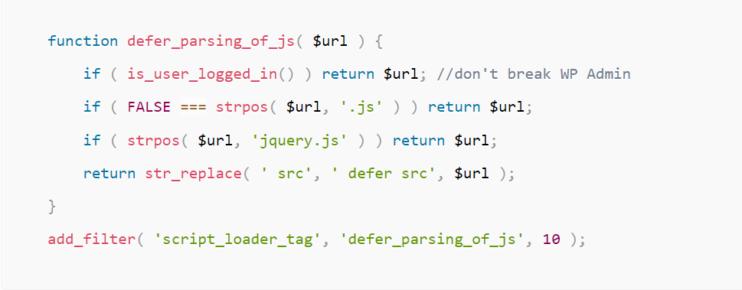
The defer attribute instructs WordPress to add the defer attribute to all your JS files except for JQuery.
3. Edit WordPress site’s code directly
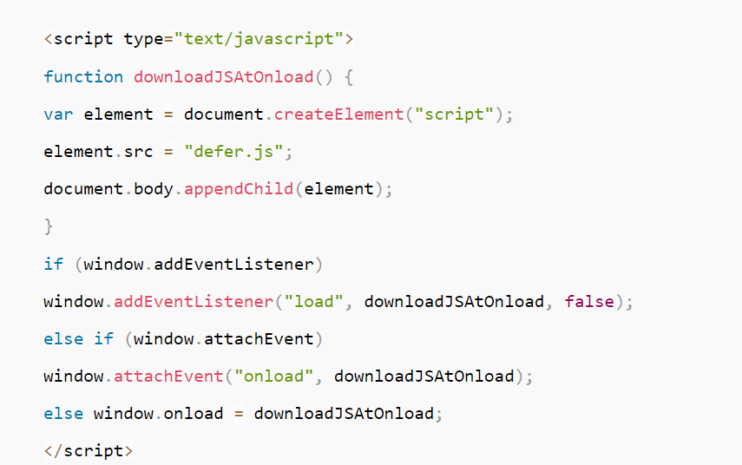
If you have coding experience, you can also edit your WordPress site’s code directly, as recommended by Patrick Sexton of Varry. Here is the snippet, but remember to change the name “defer.js” to the actual name of the Javascript file whose code you want to defer.
2. Minification and Compression.
Minification is the act of removing unnecessary punctuation marks, comments, and white spaces and retaining only code that is valid and not necessarily readable for deployment purposes. Minification of code can dramatically reduce the size of your HTML, CSS, and JS files and thus improve the speed and accessibility of your site.
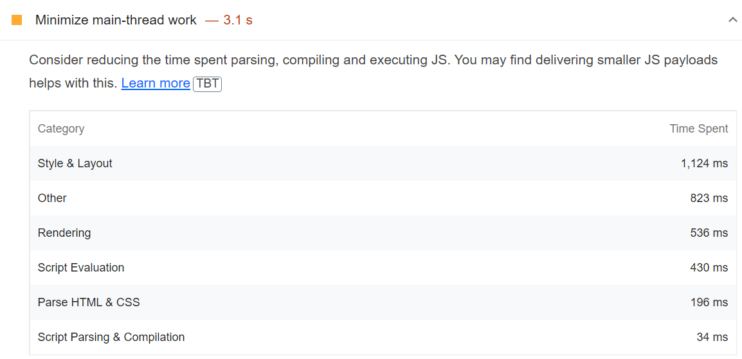
The Time to Interactive (TTI) and First Input Delay (FID) scores are closely tied to the execution time of Javascript files. Therefore, minifying Javascript can improve your site’s interactivity and, thus, the TTI score. Using the Lighthouse tool, you can identify that you need to minify the HTML, CSS, and JS files when issues such as “Reduce JavaScript Execution Time”, “Minimize main thread work”,” Minify JS”, and “Minify CSS” are raised.
There are quite a number of options when it comes to minifying your CSS or JS files. To begin with, you can opt to edit your files using code editors manually. Alternatively, you can leverage online minifying platforms where you input CSS, HTML, or JS files and get minified versions of your files.
Plugins are a great way to minify your WordPress sites’ HTML, CSS, and JS files. For instance, the 10Web booster plugin can help minify your HTML, CSS, and JS files and ultimately boost your Google PageSpeed score. 10Web Booster eliminates all the unnecessary data from HTML, CSS, and JS files and leaves only the mandatory information used by the browser for page display.
Large files require a longer load time. File compression can significantly reduce the load time and improve the PageSpeed score of your website. Therefore, you should also consider compressing your JS, HTML, and CSS files apart from minification.
Brotli is an open-source compression format that has recently gained popularity due to its ability to compress files much better than more established alternatives such as GZIP. 10Web has enabled Brotli compression by default to ensure the best possible compression for enhanced frontend optimization. If you do not use 10Web hosting, make sure your hosting supports Brotli compression.
Using GZIP compression, you can significantly reduce the size of your CSS, HTML and JS files reducing the time to load these resources. GZIP is a lossless compression algorithm based on the deflate algorithm. Using 10Web Booster, you can apply GZIP compression to sites running on Apache. You should confirm whether your host has GZIP compression enabled by default.
3. Optimize CSS delivery and Reduce unused CSS.
The introduction of CSS made a huge contribution to the appearance of websites. However, if not optimized well, CSS can increase your web page load time and make it slow. Optimizing CSS delivery includes compression, minification, and critical CSS generation. Generating critical CSS involves selecting the bare minimum CSS necessary for displaying the initial parts of the page. Generating critical CSS and inlining it with HTML files allows your page to load faster, thus improving the TTI score.
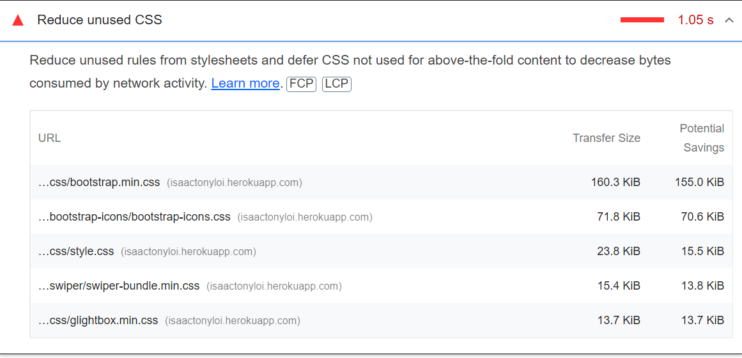
Unused CSS files are just that unused; they do not modify any elements of your web page. The presence of these CSS files or part thereof is of no consequence and can be safely deleted without any effect on your website. Despite having no effect on the appearance of your page, unused CSS files impact the load time of your web page and its performance.
You can use different tools to detect unused CSS files, among other issues. The coverage tab in Chrome tools and PageSpeed insights are some commonly used methods of detecting unused CSS.
Google’s Lighthouse can also detect and report unused CSS under the opportunities section using a red or orange flag.
There are different ways that you can choose to handle unused CSS files. If you have some knowledge of CSS and HTML, you can manually identify and delete all CSS files that you think are unusable. To speed up this process, you can opt to use a tool such as PurifyCSS to identify unused CSS code and delete it.
There is also a list of WordPress plugins that you can use to optimize CSS delivery and remove unused CSS.
10Web Booster plugin generates critical CSS for both mobile and desktop and on five different screen sizes. 10Web Booster’s algorithm interacts with your page and collects all the CSS rules used in the website. It ensures that all stylesheets for critical CSS are present, duplicates are dealt with, and styles are ordered to secure fast website performance.
4. Prefetch DNS requests.
It is common for highly robust websites to depend on resources often hosted on other domains. Third-party resources include framework libraries, custom fonts, advertising content, marketing analytics, and more. These third-party resources are often hosted on external servers you have little or no control over.
The main idea of DNS prefetching is to instruct the browser to make requests to the third-party domains where these resources are hosted before they are needed. This action ensures that by the time the user requests the resource, DNS resolution is already complete.
Although DNS caching can take care of the latency, DNS resolution could add even more latency. There are different solutions to the DNS resolution latency problem. For example, you can manually add the <link> element to the header alongside DNS-prefetch as the value for the rel attribute and the link to the domain we wish to prefetch.
<link rel="dns-prefetch" href="https://fonts.googleapis.com/" />
This allows us to mask the DNS prefetching latency.
5. Preload Fonts.
Preloading is a great tool for optimizing web page performance by giving you more control over how resources on your WordPress site load. By default, browsers load resources according to how they are ordered on your website, which is often not the optimal way. However, using preloading, you can control how these resources are rendered and their effect on the performance of your web page.
By default, browsers have to wait until the font is ready before they can load content for your users to see. Loading fonts at the time when they are needed can cause delayed load time and degrade the user experience. With font preloading, you can load the essential fonts earlier so that they are readily available when the web page displays content.
If you run a Lighthouse test on a website, you’re likely to come across the recommendation to “Preload key requests.” Preloading fonts is one of the ways that you can use to preload key requests.

You can do this manually by adding the rel = “preload” tags between the header elements of your HTML pages.
<link rel="preload" href="https://fonts.googleapis.com/" />
Alternatively, you can also use WordPress plugins to preload your fonts. 10Web booster has an integrated feature that allows you to optimize font delivery.
6. Reduce server response time and time to the first byte (TTFB).
A fast server is a key to reducing the response time of your web pages and, in turn, lowering the TTI score. Other solutions that you can use to reduce server response time include:
- Optimizing your database by removing unnecessary records such as spam comments and scheduling automatic clean-ups. You can also optimize queries sent to the database or migrate to a faster database.
- Minifying and compressing your CSS and JS files using GZIP compression.
- Opting for a reliable and fast host.
- Using caching – Caching is a useful tool for reducing TTI. Caching allows your browser to download and store resources locally such that when the user returns to your website, the browser does not have to ask the server to load up the resources again. There are different caching options available, as described in this article.
- Using the latest version of PHP.
The 10Web plugin can help you accomplish some of the solutions above, as we discussed earlier. For example, you can compress your JS and CSS files using 10Web. You can also optimize your backend and perform advanced caching for your WordPress site.
How 10 Web improves TTI.
With 10Web Booster, you get complete frontend and backend optimization and comprehensive diagnostics on what affects your site speed. 10Web Booster automatically optimizes the frontend speed of any WordPress site, helping pass Core Web Vitals and get 90+ PageSpeed.
Here are solutions by 10Web that can help improve your TTI and the overall PageSpeed of your WordPress site.
-
CSS & HTML minification and compression
The minification and merger of CSS and HTML is the procedure of reducing file size by a couple of bytes. The significance of this stems from the fact that larger files require more resources which may slow down website load time and increase your TTI score. 10Web Booster eliminates all the unnecessary data from HTML and files, such as punctuation, comments, white spaces, and more.
-
JS minification and compression
Compression of lengthy algorithmic JS codes is standard practice. The crunching of JS code, meaning the removal of all the extra spaces and comments, reduces the time of downloading JavaScript, directly improving WordPress Speed.
-
Image optimization
Images can affect the page load responsiveness and, by extension, the TTI score of your website. One way to reduce images or videos’ effect on the Time to Interactive is through lazy loading. Lazy loading prevents the immediate upfront loading of all images.
Image optimization also leans on minimizing file size through image compression while simultaneously preserving image quality. 10Web’s image optimizations achieve that and more.
10Web uses three lazy loading techniques, such as the browser native technique and a JQuery plugin, to ensure that images work perfectly by avoiding conflicts with themes and other plugins and eliminating dependencies on other plugins.
-
Delay JS execution
Having content immediately visible when a user opens your website is only possible with file load optimization through JavaScript delay. 10Web Booster provides an elegant solution to third-party JavaScript files. Understanding that JavaScript files are Rendered-Blocking resources, 10Web removes all JavaScript files from the page, utilizes Web Workers API in the background, downloads the JavaScript files, and integrates them into the page later.
-
Loading only critical CSS first
Downloading complete CSS files hinders the perceived speed of your WordPress website. After the user visits the webpages, the minimum-necessary stylesheets for properly rendering the webpage’s visible content are loaded, while the rest is served per need. Critical CSS doesn’t block page rendering and assists in passing the Core Web Vitals.
-
Font Swap
The reduction and optimization of how web fonts load could help you pass the Core Web Vitals assessment, thus, benefit your TTI score. Since the competition is off the charts, every millisecond counts. For the following purpose, your content will be displayed in a generic font, thus, bridging the time until your original font style is set up.
-
Backend optimization
You can also optimize your backend speed on 10Web hosting using 10Web Booster pro. 10Web uses up-to-date PHP and MySQL versions for faster performance, efficiency, and security. It uses the ultra-fast Google Cloud Premium Tier Network optimized for WordPress database hosted on the highest performance C2 compute-optimized VMs and SSD disks to deliver websites with the best possible speed and functionality. 10Web also provides automated WordPress core and plugin updates and real-time backups and ensures that the Time To First Byte (TTFB) is faster than 200 ms.
Conclusion
TTI is an important user-centric metric that accounts for 10% of the overall PageSpeed score of your website. Therefore, without a doubt, this is a metric that anyone looking to improve the interactivity and user experience of their users should pay close attention to. A page with a good TTI translates to a good user experience and can get users to spend more time on your page, leading to higher conversion rates. There are many causes of a poor TTI score, with unoptimized Javascript code leading the list. However, with the right plugin tools, such as 10Web, you can optimize your web pages with one click.


