What is a Menu in WordPress
A menu in WordPress is a key feature that helps visitors navigate your website. It’s a collection of links, typically found at the top of your site, leading to various pages, categories, and other content. Menus ensure that users can find what they need quickly and easily, enhancing their overall experience on your site.
Creating a menu in WordPress is straightforward. You can customize it by adding links to your pages, posts, and even external websites. This flexibility allows you to highlight important sections of your site and guide visitors to your most valuable content effortlessly.
When you understand what is a menu in WordPress, you unlock a powerful tool for site organization. Efficient navigation menus can make a significant difference in how users interact with your website. By organizing your content logically, you improve user satisfaction and increase the chances of visitors returning to your site.
Understanding WordPress menus
Menus in WordPress are essential for organizing your site’s navigation and ensuring visitors can easily find the content they need. This section explains what WordPress menus are and why they are important.
What is a WordPress menu?
A WordPress menu is a collection of links displayed on your site, usually in the header. It helps visitors navigate through different parts of your website. Menus often include links to pages, posts, categories, and sometimes even custom links.
You can create and manage menus from the Appearance section in your WordPress dashboard. You’ll find options to build a new menu, add items, organize your menu structure, and assign it to locations such as the header, footer, or sidebar. Most WordPress themes support multiple menus, so you can set a primary menu for the top of your site and a secondary menu for other areas.
Why use menus?
Using menus in WordPress makes your website easier to navigate. Clear navigation menus help visitors find what they’re looking for quickly, improving their experience on your site. You can customize your menus to include important pages like the About, Contact, or Blog sections of your site.
Menus can also include submenus to organize content hierarchically. For example, under a Blog menu item, you can nest categories like Tech, Travel, or Food. This hierarchical structure is useful for sites with a lot of content.
Additionally, the drag-and-drop interface in the menu editor makes it simple to rearrange menu items. You can include widgets to add more functionality. Effective menu structures can increase user engagement and ensure that your content is easily accessible to all visitors.
Different types of menus on WordPress
Menus in WordPress are an important part of your website’s navigation. There are different types of menus you can use, depending on your theme and needs.
- Single-level menus: Single-level menus display all the items on the same layer. This type of menu is great for smaller websites with fewer pages.
- Multi-level menus: Multi-level menus have dropdowns, allowing for sub-menu items. This helps organize pages better, especially for sites with many sections.
- Header and footer menus: Header menus are usually at the top of your website and contain the main navigational links. Footer menus are placed at the bottom and often include less critical links like privacy policies or contact information.
- Sidebar menus: Sidebar menus are located on the side of your website. These are often visible on blog pages and can hold categories, recent posts, or archives.
- Navigation block menus: You can use the navigation block to add, edit, and customize your menu directly from your WordPress editor. This offers more flexibility and real-time visual changes.
These types of menus help improve user experience and make it easier for visitors to navigate your site. Choose the menu type that best fits your site’s structure and purpose.
How to create menu on WordPress
Understanding what is a menu in WordPress can help you better organize your website’s structure. Here’s how you can create one:
Using the WordPress dashboard
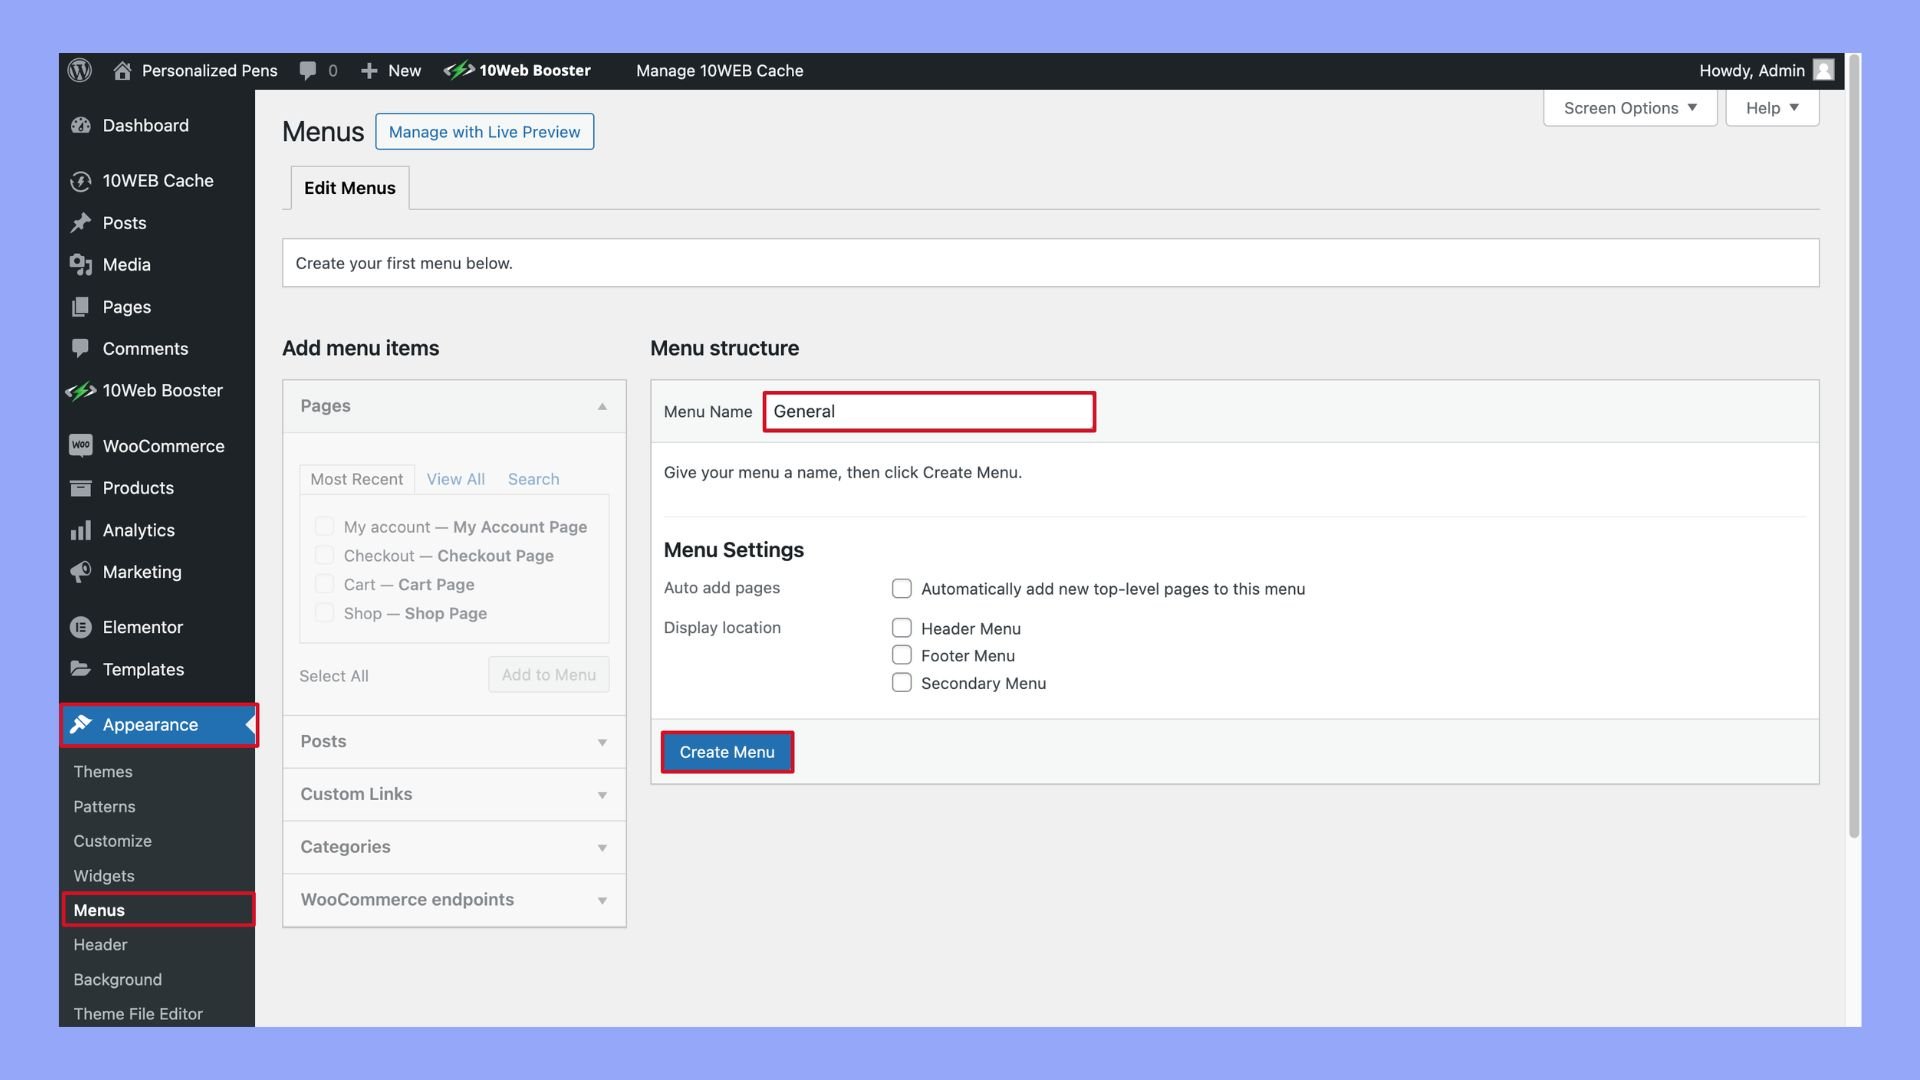
- Log in to your WordPress dashboard.
- Navigate to Appearance > Menus.
- Click on the Create a new menu link.
- Give your menu a name and click Create Menu.

Adding items to your menu
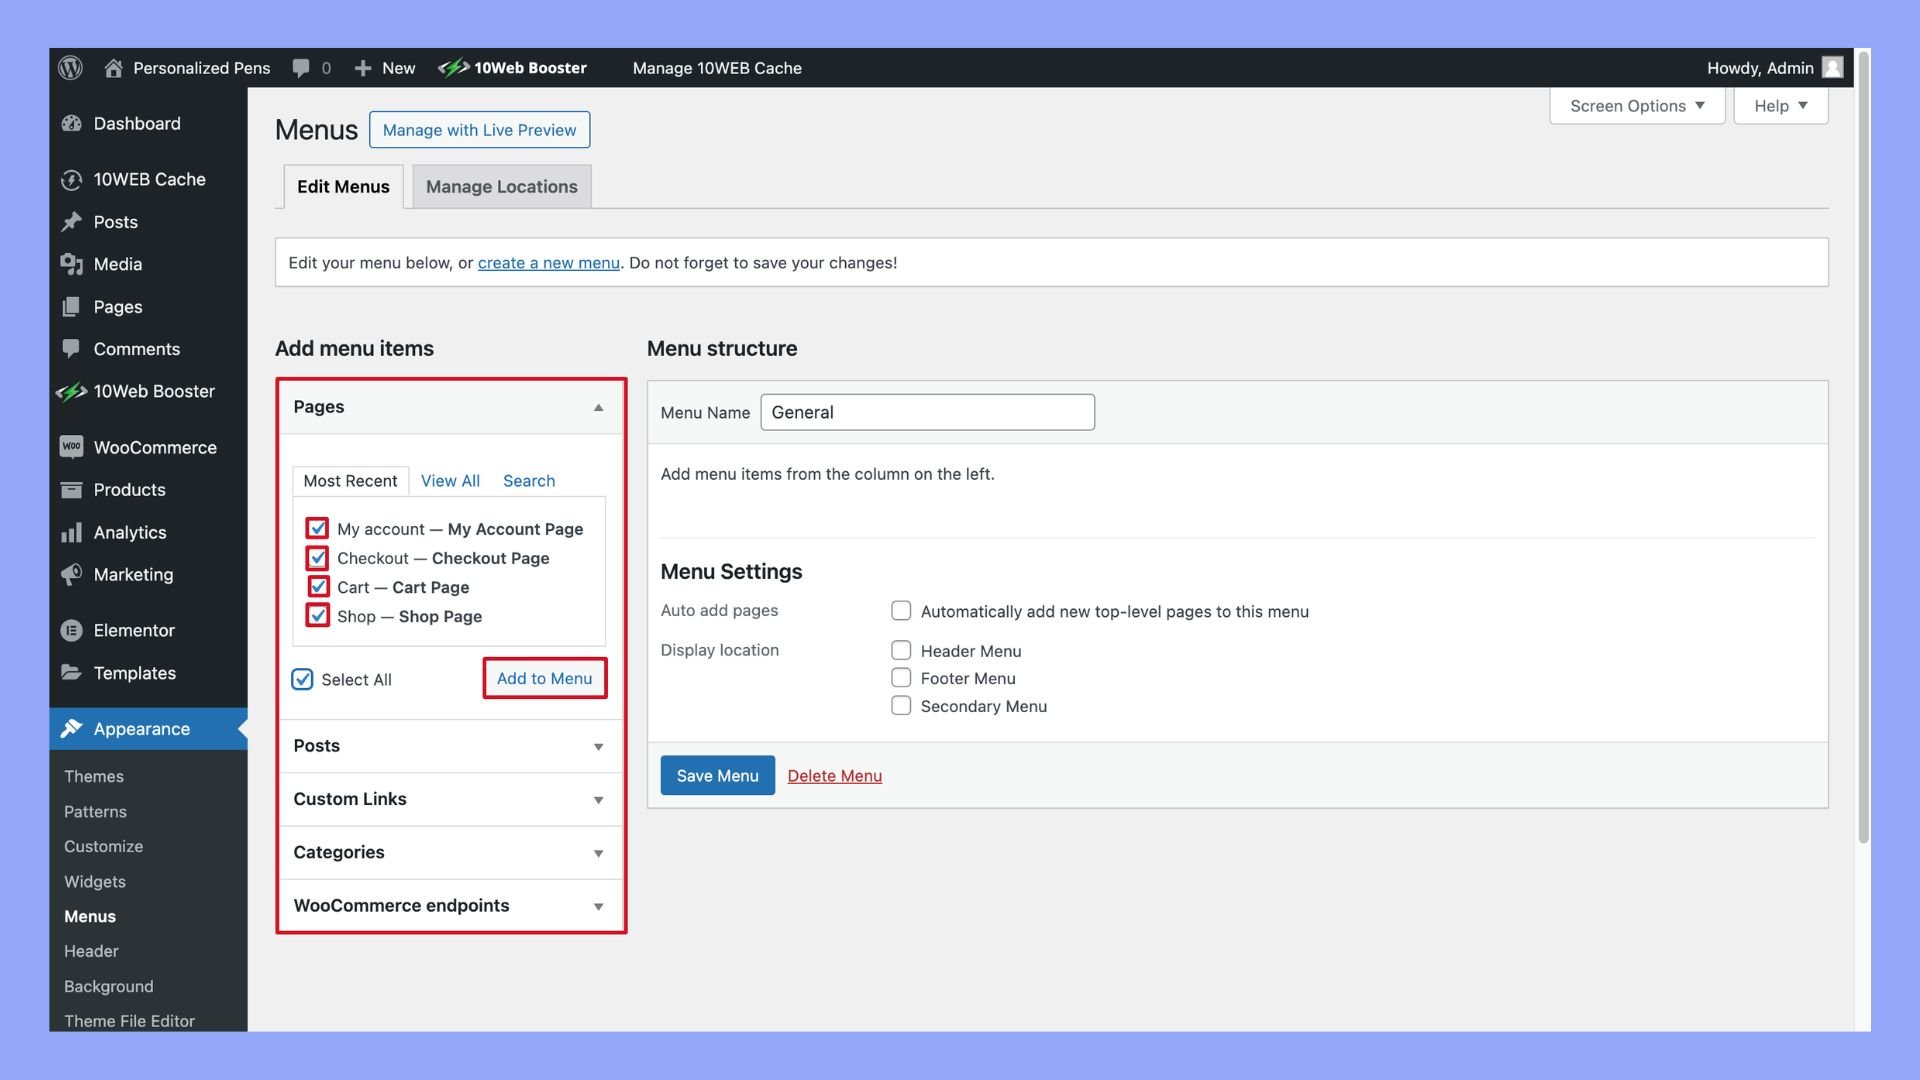
- On the left, you will see sections like Pages, Posts, Custom Links.
- Select items you want to add and click Add to Menu.
- Drag and drop items to organize them.
- Click Save Menu to apply changes.
Creating dropdown menus
- Within the Menus screen, add your top-level items.
- Drag sub-items slightly to the right under their parent items.
- Save your changes to create dropdowns.
Method 4: Using the WordPress Editor
- Go to Appearance > Editor.
- Click on the + button and select the Navigation Block.
- Add menu items and organize them.
- Click Save to publish your menu.
Example menu structure:
| Menu Item | Type |
| Home | Page |
| Blog | Page |
| – Latest Posts | Post |
| Contact Us | Custom Link |
Knowing what is a menu in WordPress ensures you build an intuitive navigation system for your users. Try these methods to create a menu that fits your site’s needs perfectly.
How to create multi-level menus on WordPress
Creating a multi-level menu in WordPress can help you organize your website’s content better. Here’s how you can do it:
- Go to your WordPress dashboard. Select Appearance > Menus.
- Click the Create a new menu link. Enter a name for your menu and click the Create Menu button.
- Use the boxes on the left to add pages, posts, or custom links to your menu. Simply check the items you want and click Add to Menu.
- Drag and drop the menu items to arrange them. To create a sub-menu (or a multi-level menu), drag an item slightly to the right under another item. It should appear indented.
- Once you are satisfied with the structure, click the Save Menu button to apply the changes.
Multi-level menus can make navigation easier for your site visitors, enhancing their overall experience.
How to edit menus on WordPress
Editing menus on WordPress is simple and flexible. You can add new items, edit existing ones, or remove items you no longer need.
Adding items to a menu
To add items to your menu, go to your WordPress dashboard and navigate to Appearance > Menus. Here, you can choose from several options including pages, posts, custom links, and categories.
- In the Pages box, select the pages you want to add, and then click Add to Menu.
- For custom links, enter the URL and link text, then click Add to Menu.
Arrange your menu structure by dragging and dropping items into place. If you want nested items, drag them slightly to the right under the main item.
Editing menu items
To edit existing menu items, go to Appearance > Menus. Select the menu item you want to edit. You will see options like Navigation Label to change the text that appears on your menu and Link Target to open the link in a new tab.
You can also add CSS Classes to menu items for custom styling. Simply check the CSS Classes box under the Screen Options tab to enable this feature.
For more customization, you can use the built-in menu editor or the Customize feature in the dashboard for a more visual editing experience.
Removing menu items
Removing items from your menu is straightforward. In Appearance > Menus, locate the item you want to remove. Click the arrow next to the item to expand its options.
At the bottom of the expanded item, click the red Remove link. This will immediately remove the item from your menu.
You can also delete nested items similarly by expanding their options and clicking Remove. Click Save Menu to apply your changes.
Using these steps, you can easily maintain your WordPress menus and ensure they remain up-to-date for your visitors.
How to customize menu appearance
Customizing the appearance of your WordPress menus can enhance the user experience and align your site with your brand’s aesthetic. You’ll learn how to adjust basic and advanced menu properties for a polished look.
Customizing WordPress menus
To start customizing your menus, navigate to your WordPress dashboard. Click on Appearance, then Menus. Here, you can add, remove, and reorder menu items with a simple drag and drop interface.
To customize the look:
- Change colors: Adjust the text and background colors to match your site’s theme.
- Modify fonts: Use custom fonts to give your menu a unique style.
- Add hover effects: Make your menus interactive by adding hover effects.
These small changes can make a big difference in your site’s appearance.
Advanced menu properties
For more advanced customization, visit the Appearance section and click on Editor. If using a block theme, this allows for more detailed adjustments:
- Navigation block: Customize the navigation block directly from the Full-Site Editor.
- Sticky menus: Make your menu stay at the top of the page as users scroll.
- Multi-level menus: Create complex menus with submenu items that expand upon click or hover.
Implementing these features requires careful planning but greatly enhances your site’s functionality and user experience.
Understanding what is a menu in WordPress and mastering its customization lets you offer a seamless navigation experience to your visitors.
Advancing your menu strategy
To make your WordPress site easier to use and navigate, you need a solid menu strategy.
1. Improve SEO
Menus can boost your site’s SEO. Use descriptive text for your menu items. If you’re unsure how, WordPress experts or sites like 10Web’s Blogs and WPBeginner can help, offering guides and video tutorials.
2. Test your menus
Always test your menus to ensure they work as expected. Check both desktop and mobile views. Make sure every link goes to the right page.
3. Plugins for advanced menus
Consider using plugins to enhance your menu features. For example, plugins can help create mega menus or add icons to your menu items. These features are especially useful for complex sites.
Some plugins to consider:
- Max Mega Menu
- UberMenu
- WP Mega Menu
- QuadMenu
- Mega Main Menu
4. Pre-selected and default menus
When setting up your site, use the theme’s default menu options as a starting point. Most WordPress themes come with pre-selected menu locations like header and footer.
5. Resources and expertise
If you need help, there are many free WordPress resource sites available. Websites like 10Web’s Blogs and WPBeginner are often called Wikipedia for WordPress. They provide tutorials and tips.
Mastering the use of menus in WordPress is key to creating a user-friendly website. Well-organized menus help visitors find what they need quickly, improving their overall experience. Whether you’re new to WordPress or have been using it for a while, understanding how to create and customize menus can make your site more intuitive and engaging.
Effective menus not only enhance navigation but also contribute to better SEO and increased visitor retention. By implementing a thoughtful menu strategy, you can guide visitors to your most important content and make your website easier to use. Start experimenting with your WordPress menus today to see how they can improve your site’s functionality and look.
Subscribe to AI insights
- The latest trending AI news
- How AI boosts efficiency at 10Web
- In-depth reviews of AI tools
- Entrepreneurial wisdom and insights
- Valuable business growth tips
Share article
-
 Copy
Copy
-
-
-