If your website feels like it’s missing something, widgets might be the answer. These powerful tools are perfect for customizing and enhancing your site, making it more interactive and user-friendly.
By incorporating dynamic content into sidebars or enriching the footer, widgets can significantly improve the user experience. Let’s learn various methods of how to add widgets to WordPress and elevate your website’s appeal.
FAQ
What is a widget in WordPress?
A widget in WordPress is a small block that performs a specific function, allowing users to add content and features to their site’s sidebar, footer, and other widget-ready areas.
How do I add a widget to my WordPress page?
To add a widget to your WordPress page, go to Appearance > Widgets in your dashboard. Choose a widget, then drag it to your desired widget area or click it and select where to add it.
Why can't I see widgets option in WordPress?
If you can’t see the widgets option in WordPress, your theme might not support widgets, or you are using a full-site editing theme which uses blocks instead of traditional widgets.
Understanding WordPress widgets
In WordPress, widgets are small, independent components or blocks of content that can be added, arranged, and removed from designated areas of a WordPress theme known as widget-ready areas. These areas are typically found in sidebars, footers, and sometimes headers or other places depending on the theme’s design. Widgets offer a way to enhance your site dynamically, enabling customization of these specific areas without any coding required.
These tools are defined by your theme’s layout and are managed through a user-friendly drag-and-drop interface. They extend your website’s functionality by incorporating essential elements such as search forms, social links, and more.
Widgets on your WordPress website significantly enhance user experience. They streamline navigation and make content more discoverable. As a result, this boosts site usability and visitor satisfaction. Moreover, widgets organize information and guide visitors, ensuring they find what they need swiftly.
Additionally, using widgets also promotes content and special offers effectively. They’re tools to expand your email list and generate more leads. Place email opt-in widgets strategically to capture visitor details. This turns casual browsers into potential customers and loyal subscribers.
Besides, widgets offer a platform for advertising, creating a balance between user experience and ad revenue. They allow targeted ad placements without overwhelming the site. This strategy ensures a steady income stream while maintaining a positive user experience.
Simplify WordPress with 10Web
Automate manual work with 10Web Managed WordPress Hosting and 10Web AI Website Builder. Optimize your WordPress website effortlessly.
Types of widgets available
Regardless of the widget types, the process of how to add widgets to WordPress is the same. However, understanding common widgets is useful for designing your website’s layout. Choosing the right widgets involves understanding your audience’s needs and how each widget can improve their interaction with your site. Whether it’s enhancing navigation, showcasing content, or encouraging engagement, widgets are a potent tool in your WordPress arsenal for creating a more dynamic and interactive website. Let’s look at some widget types:
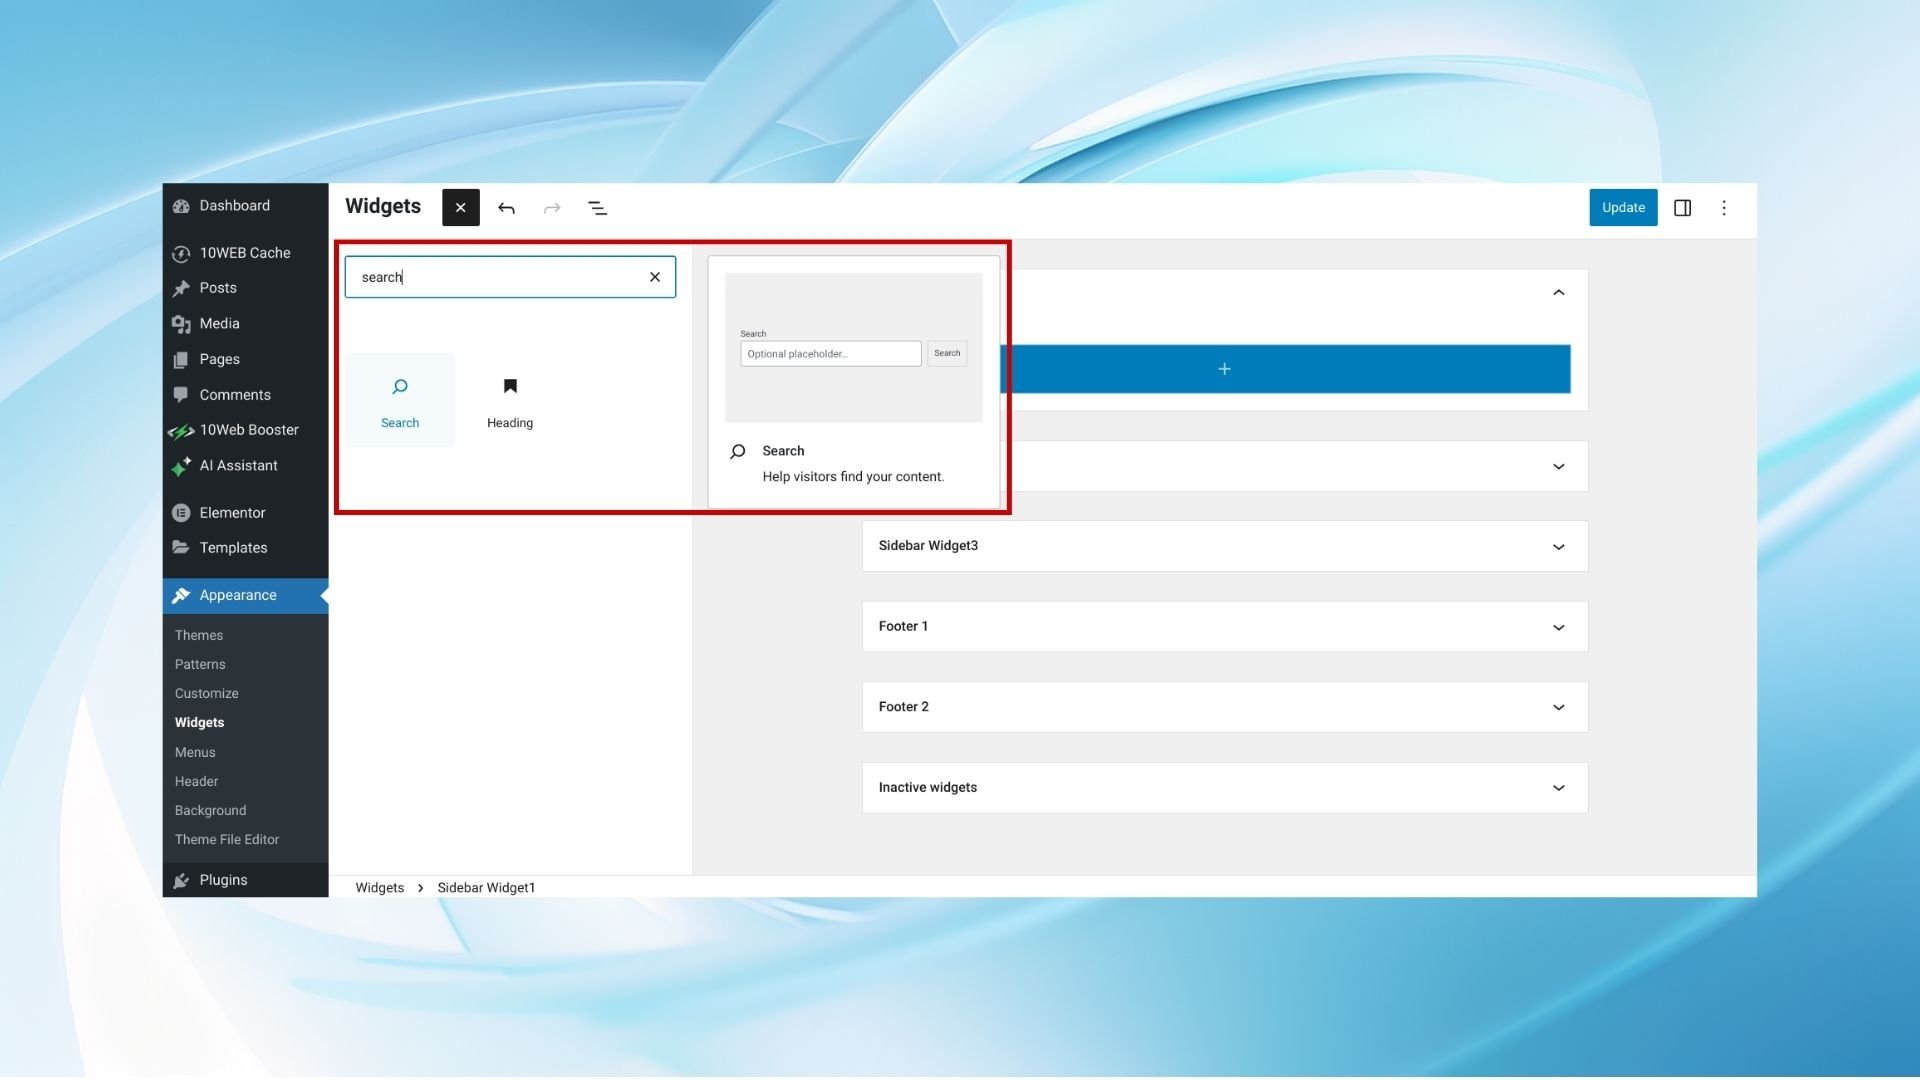
Search
Purpose: Enables visitors to search your website’s content.
Common use: Often found in the header, sidebar, or footer, making it easy for users to find what they’re looking for on your site.
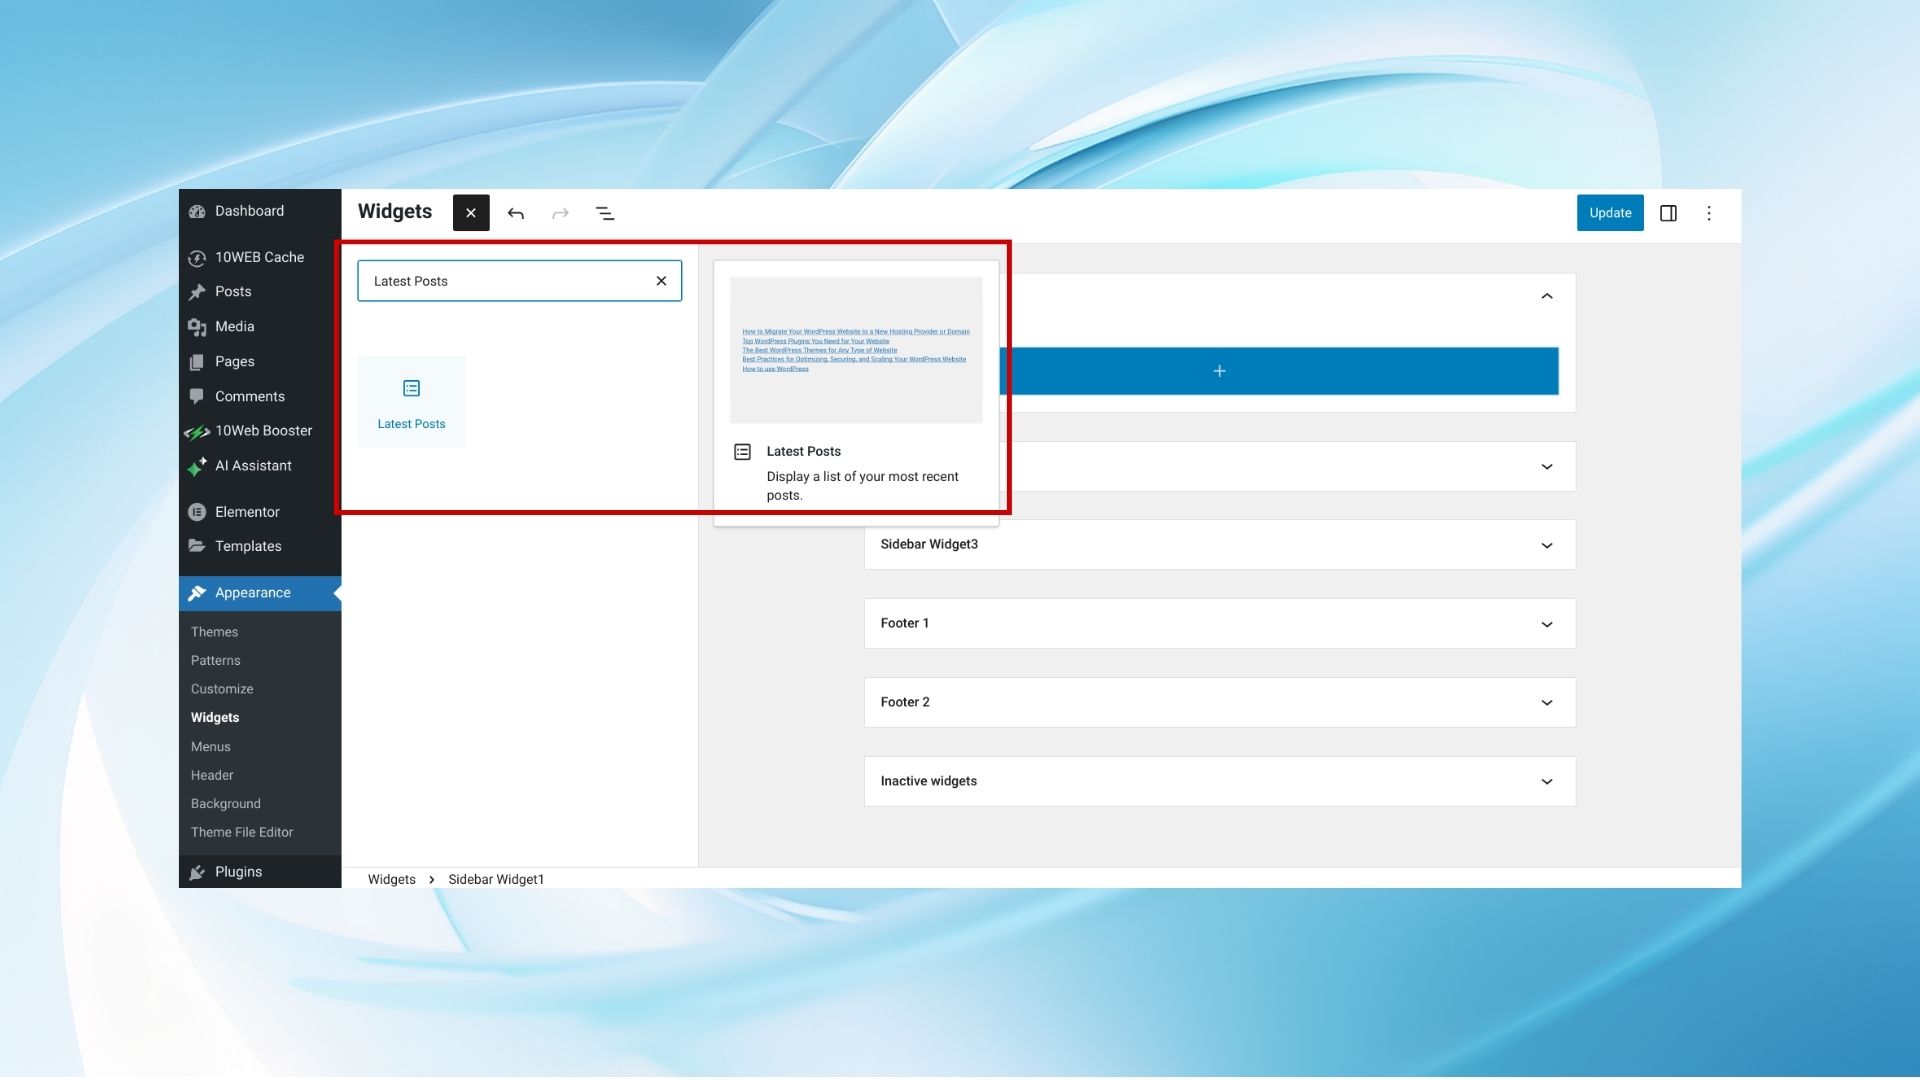
Latest post
Purpose: Shows the latest posts or pages to keep your content fresh for visitors.
Common use: Ideal for sidebars or footers to prompt visitors to discover more of your website.
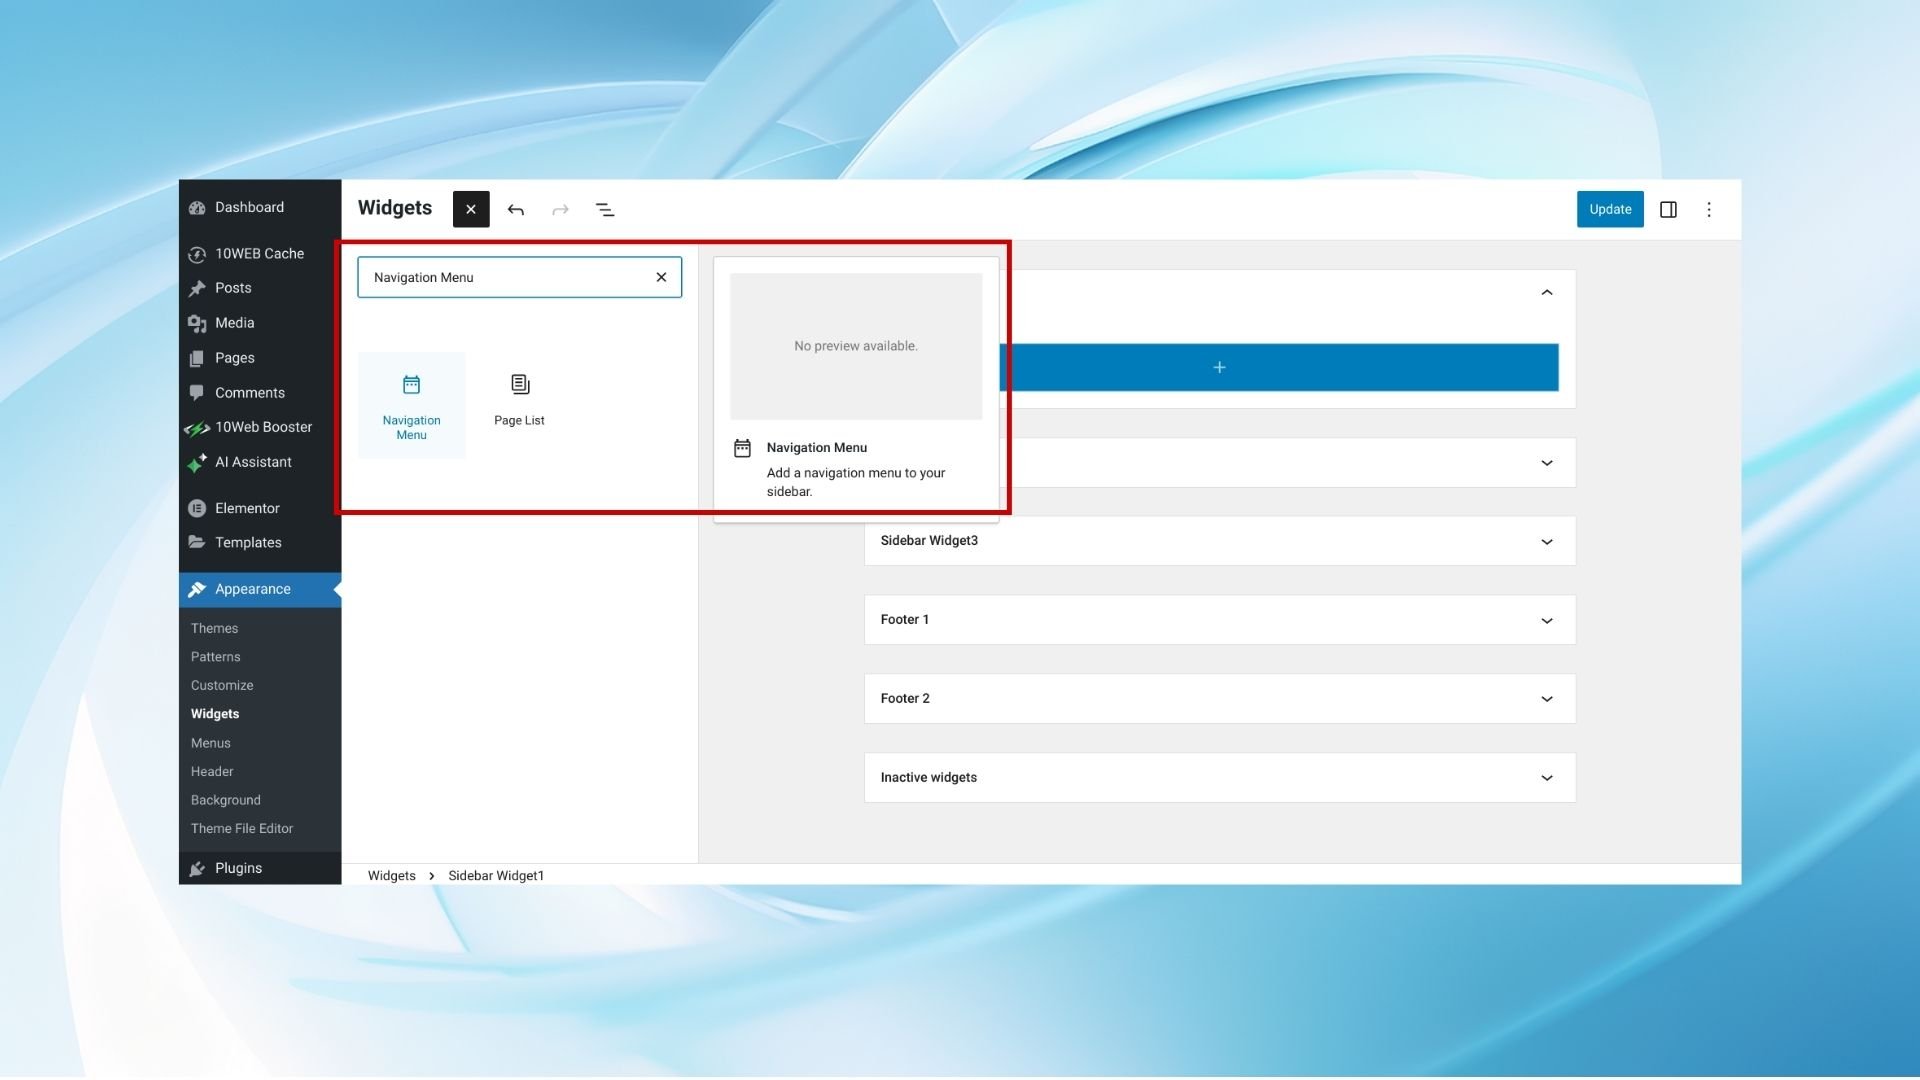
Navigation menu
Purpose: Provides easy access to the main sections of your website, enhancing site navigation.
Common use: Commonly placed in headers, footers, or sidebars to help users navigate the site efficiently.
Social media buttons/feeds
Purpose: Connects visitors to your social media profiles and shows your latest social content.
Common use: Added to areas like the sidebar, footer, or header to boost your social media interaction and followers.
Categories list
Purpose: Lists or provides a dropdown of post categories for easier content navigation.
Common use: Utilized in the sidebar for efficient discovery and access to topics of interest.

Event calendar
Purpose: Displays upcoming events in a calendar view.
Common use: Essential for community sites, businesses, or blogs to announce events, webinars, or product launches.

While WordPress and many themes come with a selection of built-in widgets, others may require additional plugins for specific functionalities, such as email opt-ins through marketing plugins or social media feeds via dedicated social plugins. Product filters often come with ecommerce platforms like WooCommerce.
Simplify WordPress with 10Web
Automate manual work with 10Web Managed WordPress Hosting and 10Web AI Website Builder. Optimize your WordPress website effortlessly.
Classic and block widgets
If you Google guides to using widgets in WordPress, you’ll find guides showcasing two different WordPress widget interfaces. That’s because WordPress currently supports two versions for managing widgets: the classic and block interfaces, reflecting the platform’s evolution and its commitment to accommodating diverse user needs and preferences.
Block widgets
WordPress 5.0 introduced the Gutenberg Block Editor, revolutionizing content creation with a more visual, block-based system. This allowed for intricate layouts and diverse content types within posts and pages, stepping away from the older, more rigid system.

Block Widgets represent a forward-thinking approach in WordPress, extending the Block Editor’s flexibility to widget areas. This upgrade enhances design and layout options, making it easier to create dynamic, engaging sites. The integration of a unified interface for managing content across posts, pages, and widgets simplifies the WordPress experience, ensuring consistency. Moreover, this shift towards a block-based framework is in line with WordPress’s broader goal for full-site editing, allowing for customization and future-proofing websites.
Classic widgets
Prior to WordPress 5.0, content creation was predominantly through the Classic Editor, with widgets managed separately. These widgets were straightforward tools for adding various content and features to site margins.
Classic Widgets continue to play a crucial role in WordPress, offering a lifeline for sites built with older themes or plugins reliant on traditional widgets. WordPress recognizes the importance of user preference and the need for a gradual transition for some users, thereby maintaining the classic widget system. This decision ensures that all users can navigate changes at their own pace, without disrupting site functionality or forcing an immediate switch to the new system.
Classic widgets plugin
To bridge the gap between the two systems, WordPress introduced the Classic Widgets plugin, a solution for users who prefer the traditional widget interface. This plugin easily reverts the widget editor back to its classic form, accommodating those who may find the block-based approach challenging or incompatible with their current site design. Through options like this plugin, WordPress demonstrates a commitment to flexibility and user choice, ensuring that its platform remains accessible and user-friendly for a diverse range of needs and technical preferences.
Simplify WordPress with 10Web
Automate manual work with 10Web Managed WordPress Hosting and 10Web AI Website Builder. Optimize your WordPress website effortlessly.
How to add widgets to WordPress
This section will cover steps of adding widgets to WordPress, focusing on two methods: one for Classic widgets and another for Block widgets. We’ll provide clear steps for both options, making it easy to customize your site.
How to add block widgets
Adding widgets to your WordPress site with block widget interface brings the power and flexibility of the block editor to your widget areas, such as sidebars and footers. Let’s look at how to add widgets to WordPress using the block widgets interface to enhance your site’s functionality and appearance.
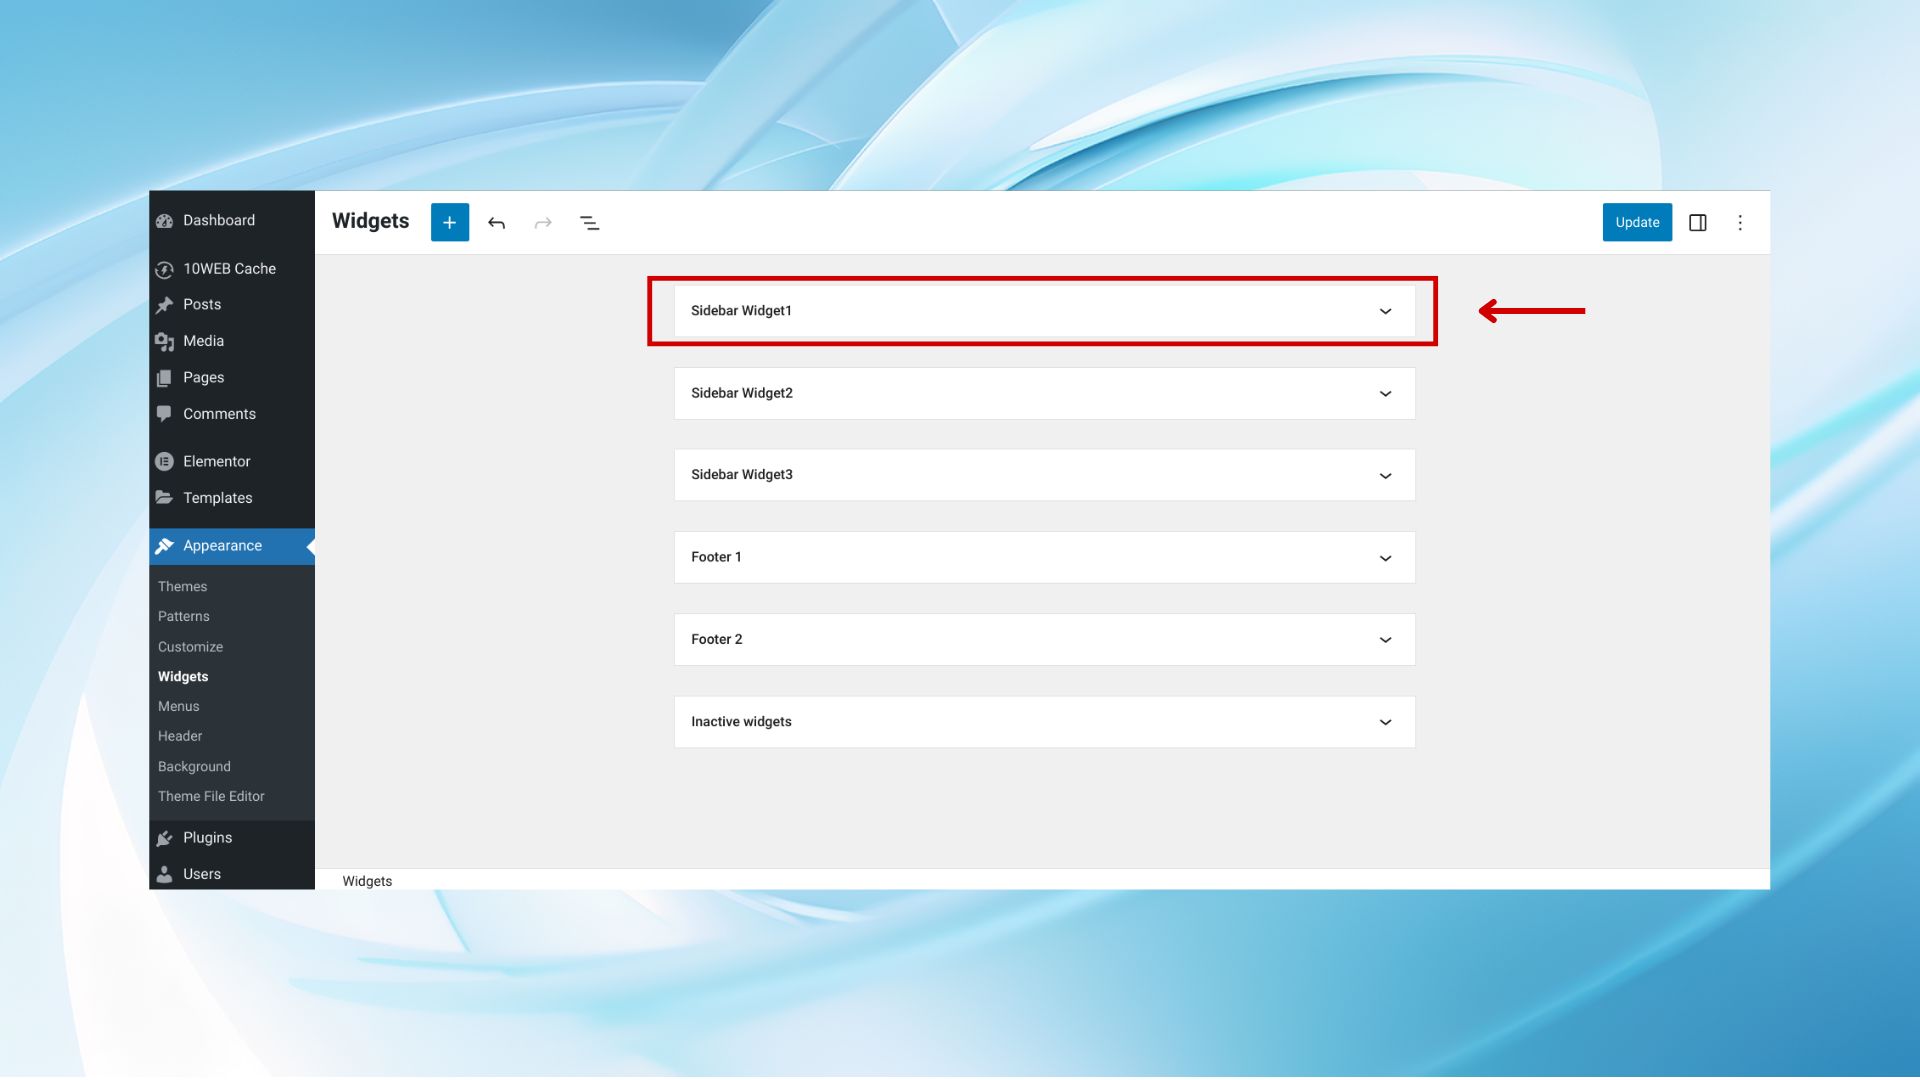
Step 1: Access the widgets editor
- Log in to your WordPress Dashboard.
- Navigate to Appearance > Widgets. This will open the block-based widgets editor, which looks similar to the post and page editor but is designed for widget areas.

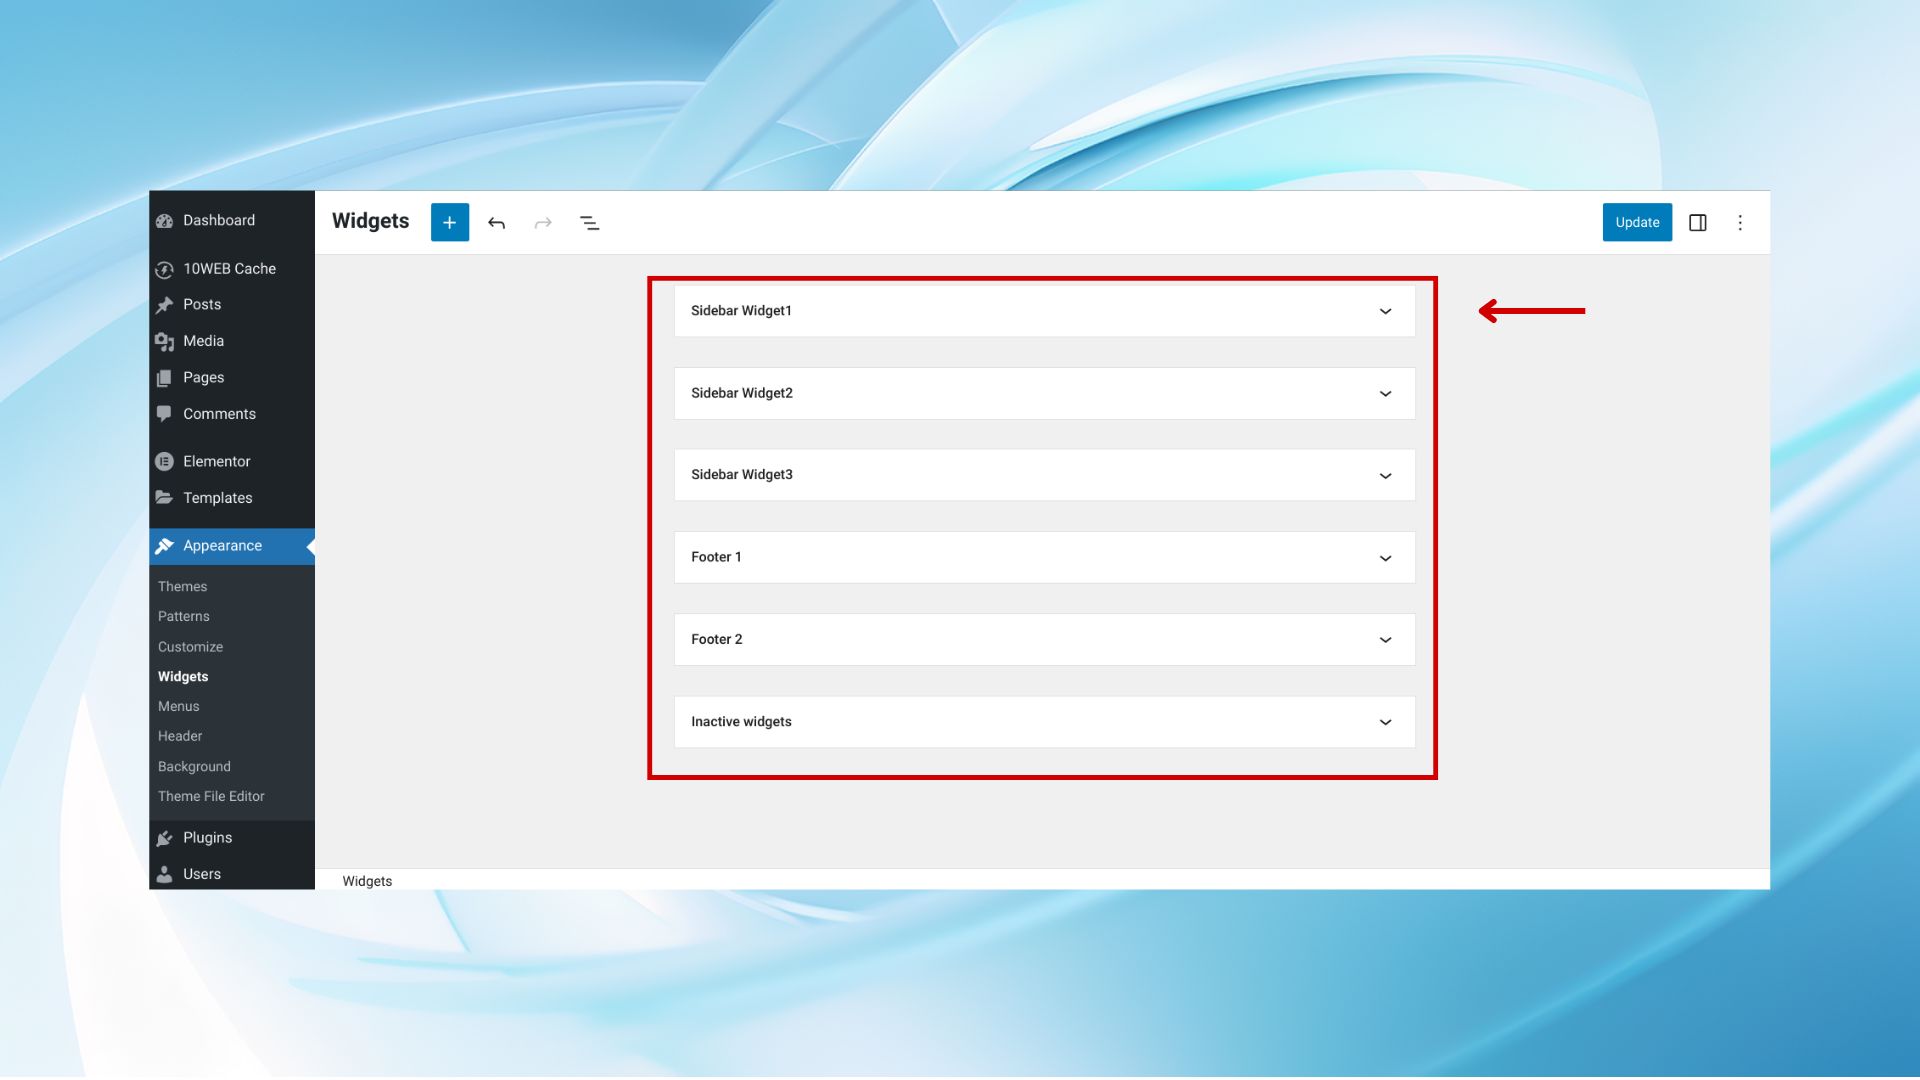
Step 2: Familiarize yourself with the interface
The block widgets editor displays your widget areas on the screen. These areas depend on your theme and might include the sidebar, footer, and others.
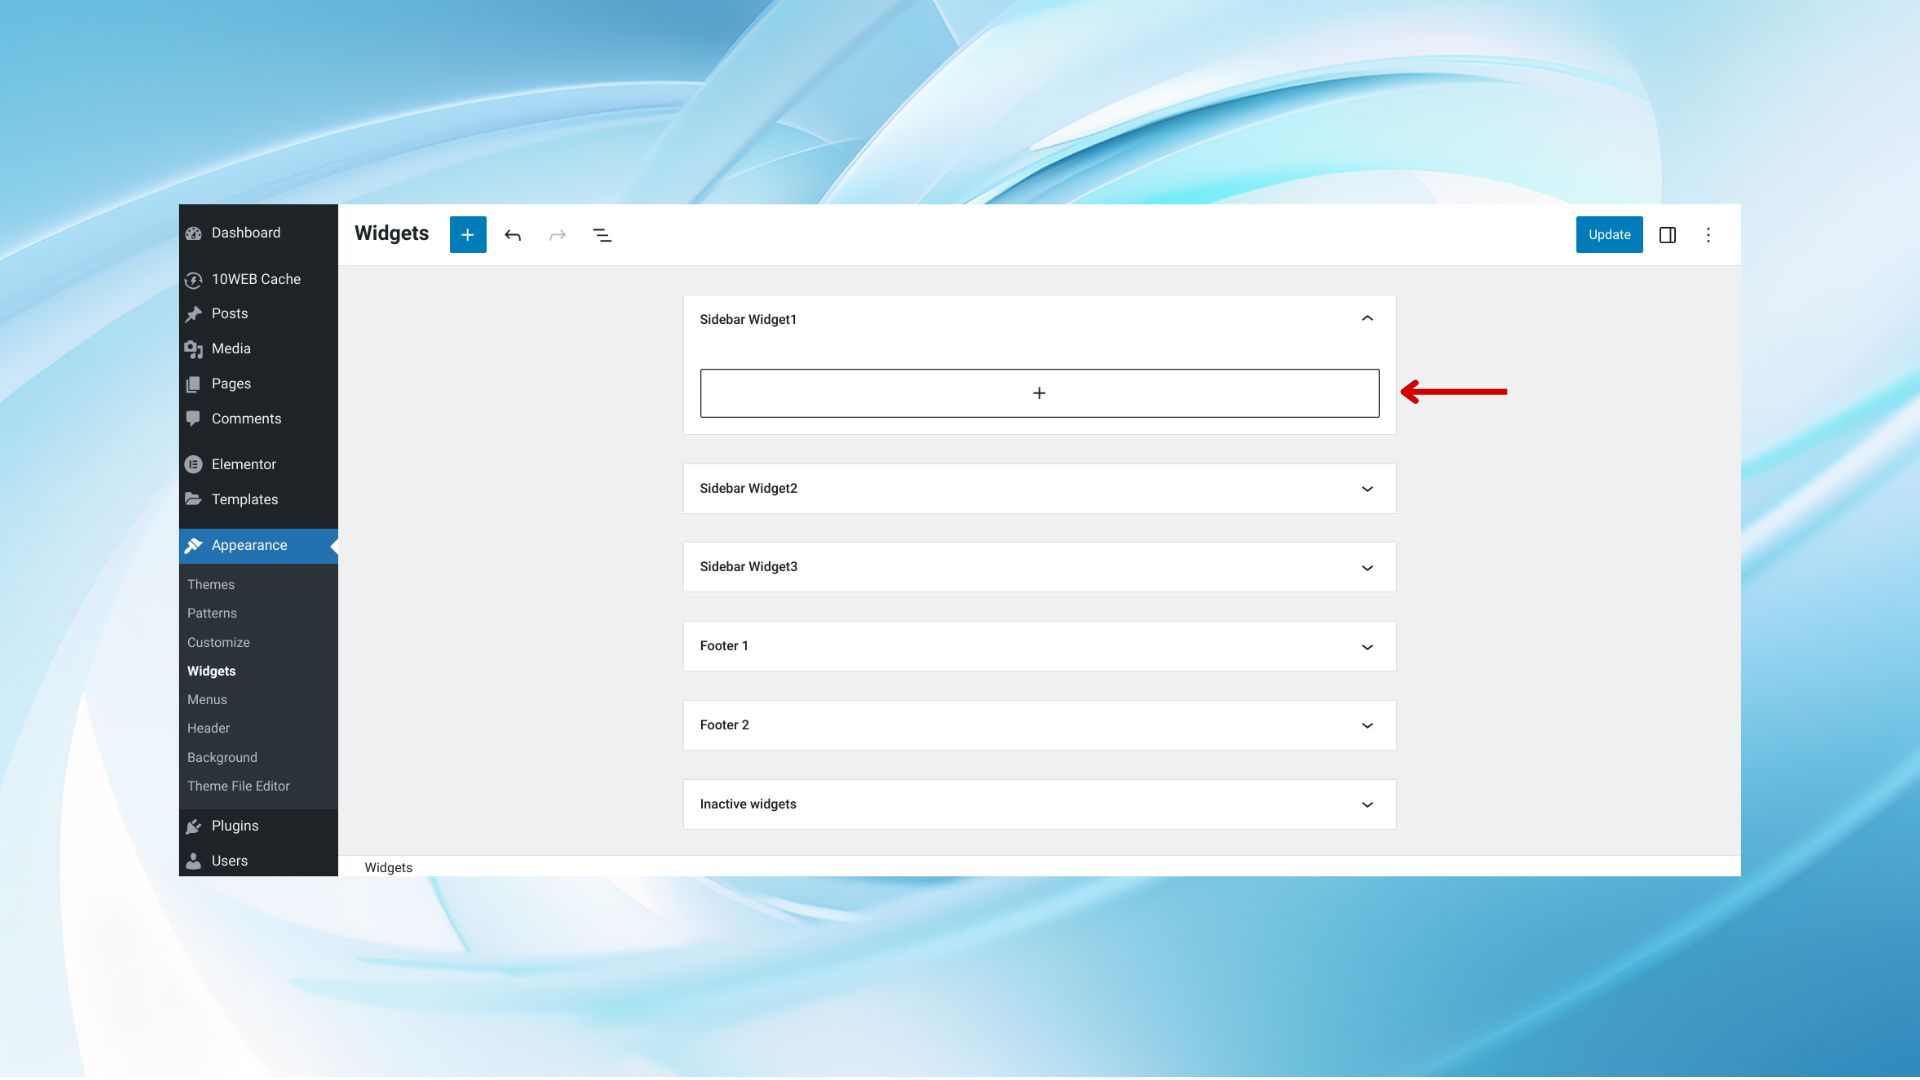
Step 3: Adding blocks to widget areas
- Navigate to the widget area (Sidebar, Footer, etc.) in your theme where you wish to add blocks.
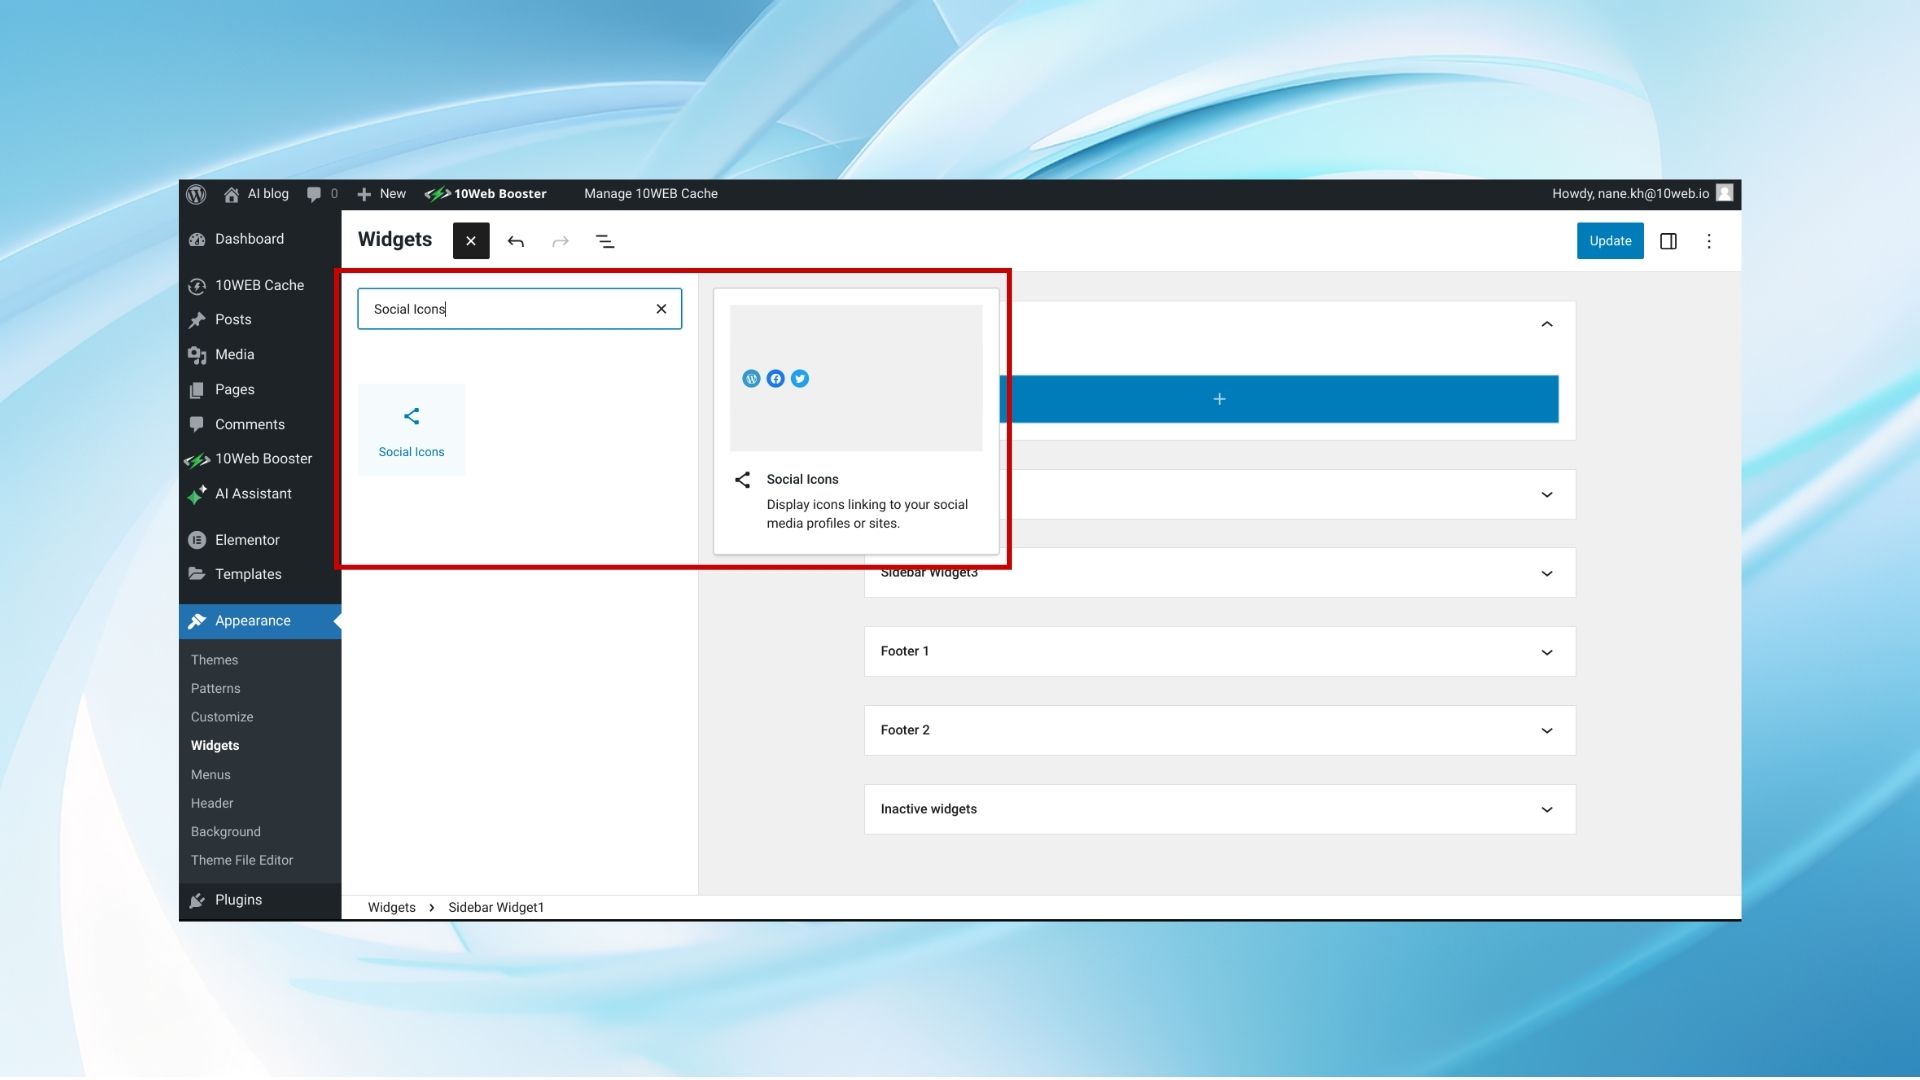
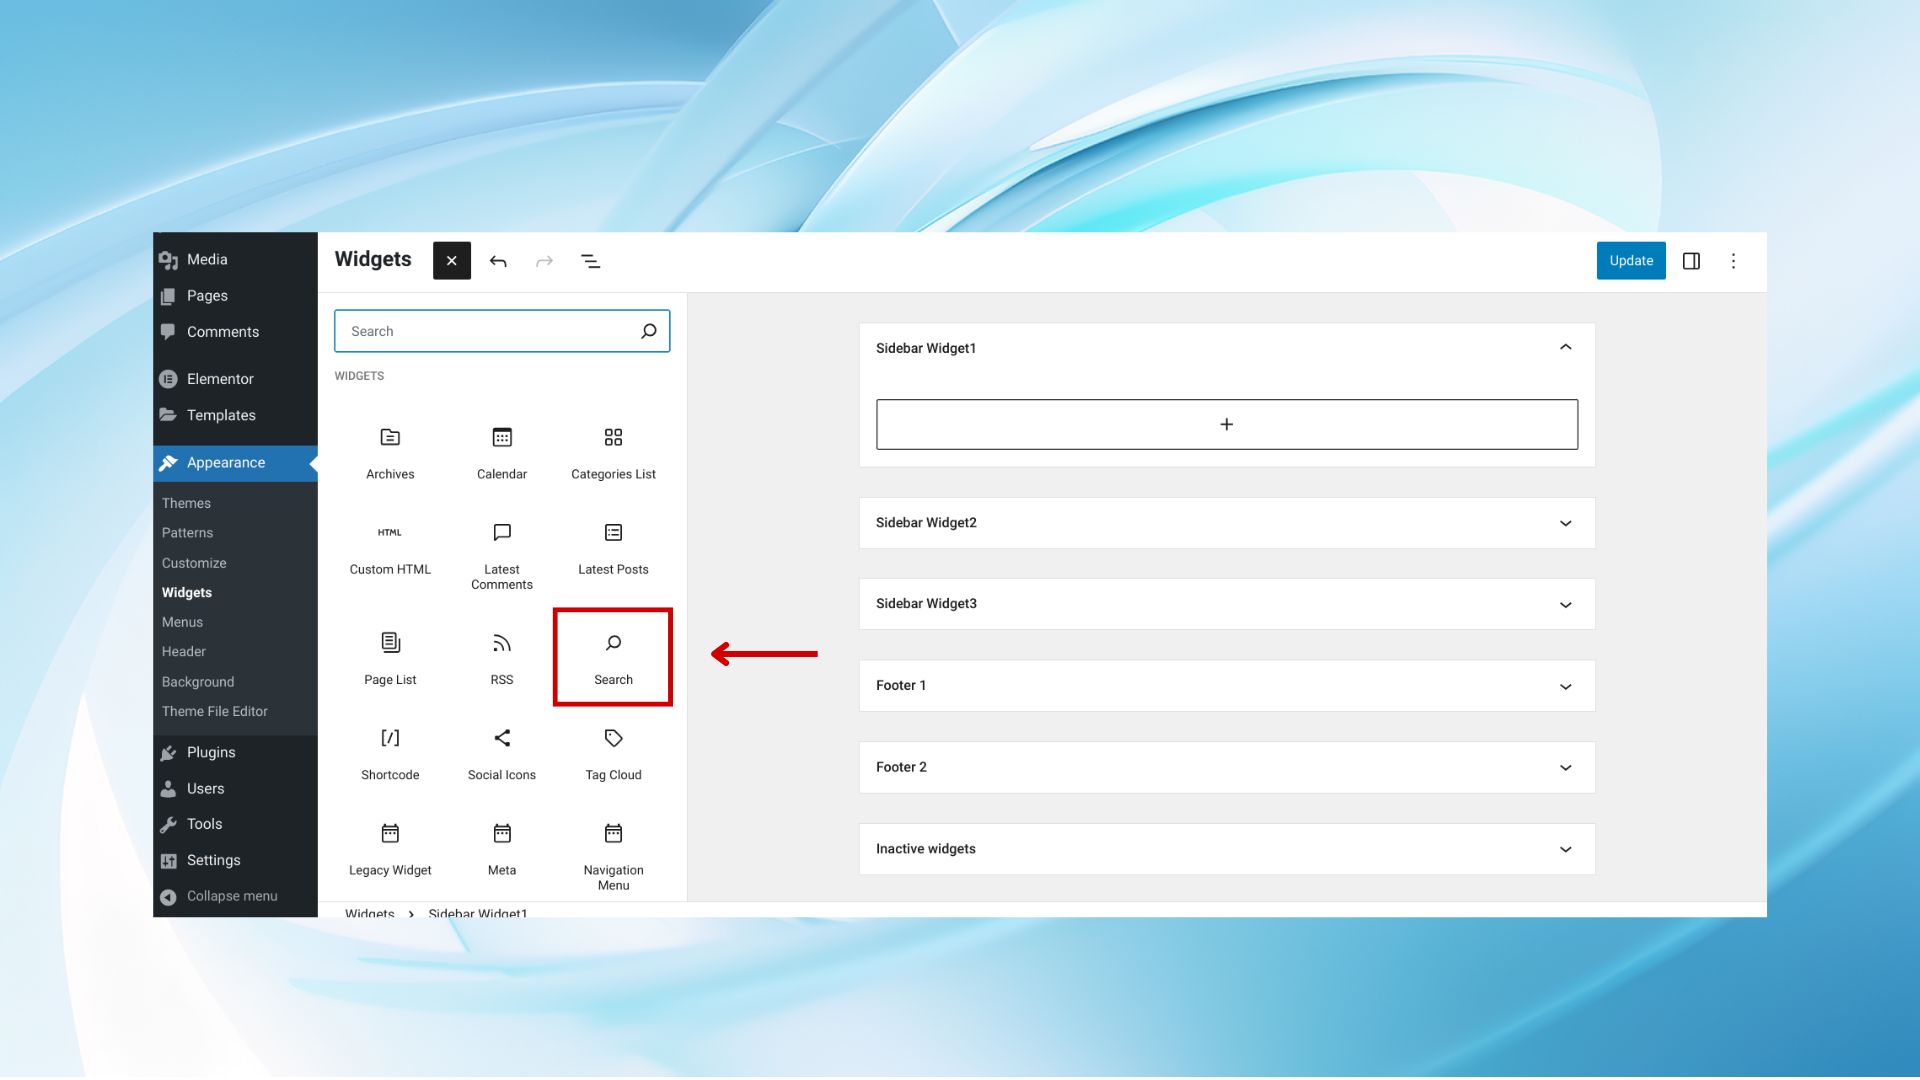
- Click the + button inside the widget area to introduce a new block.
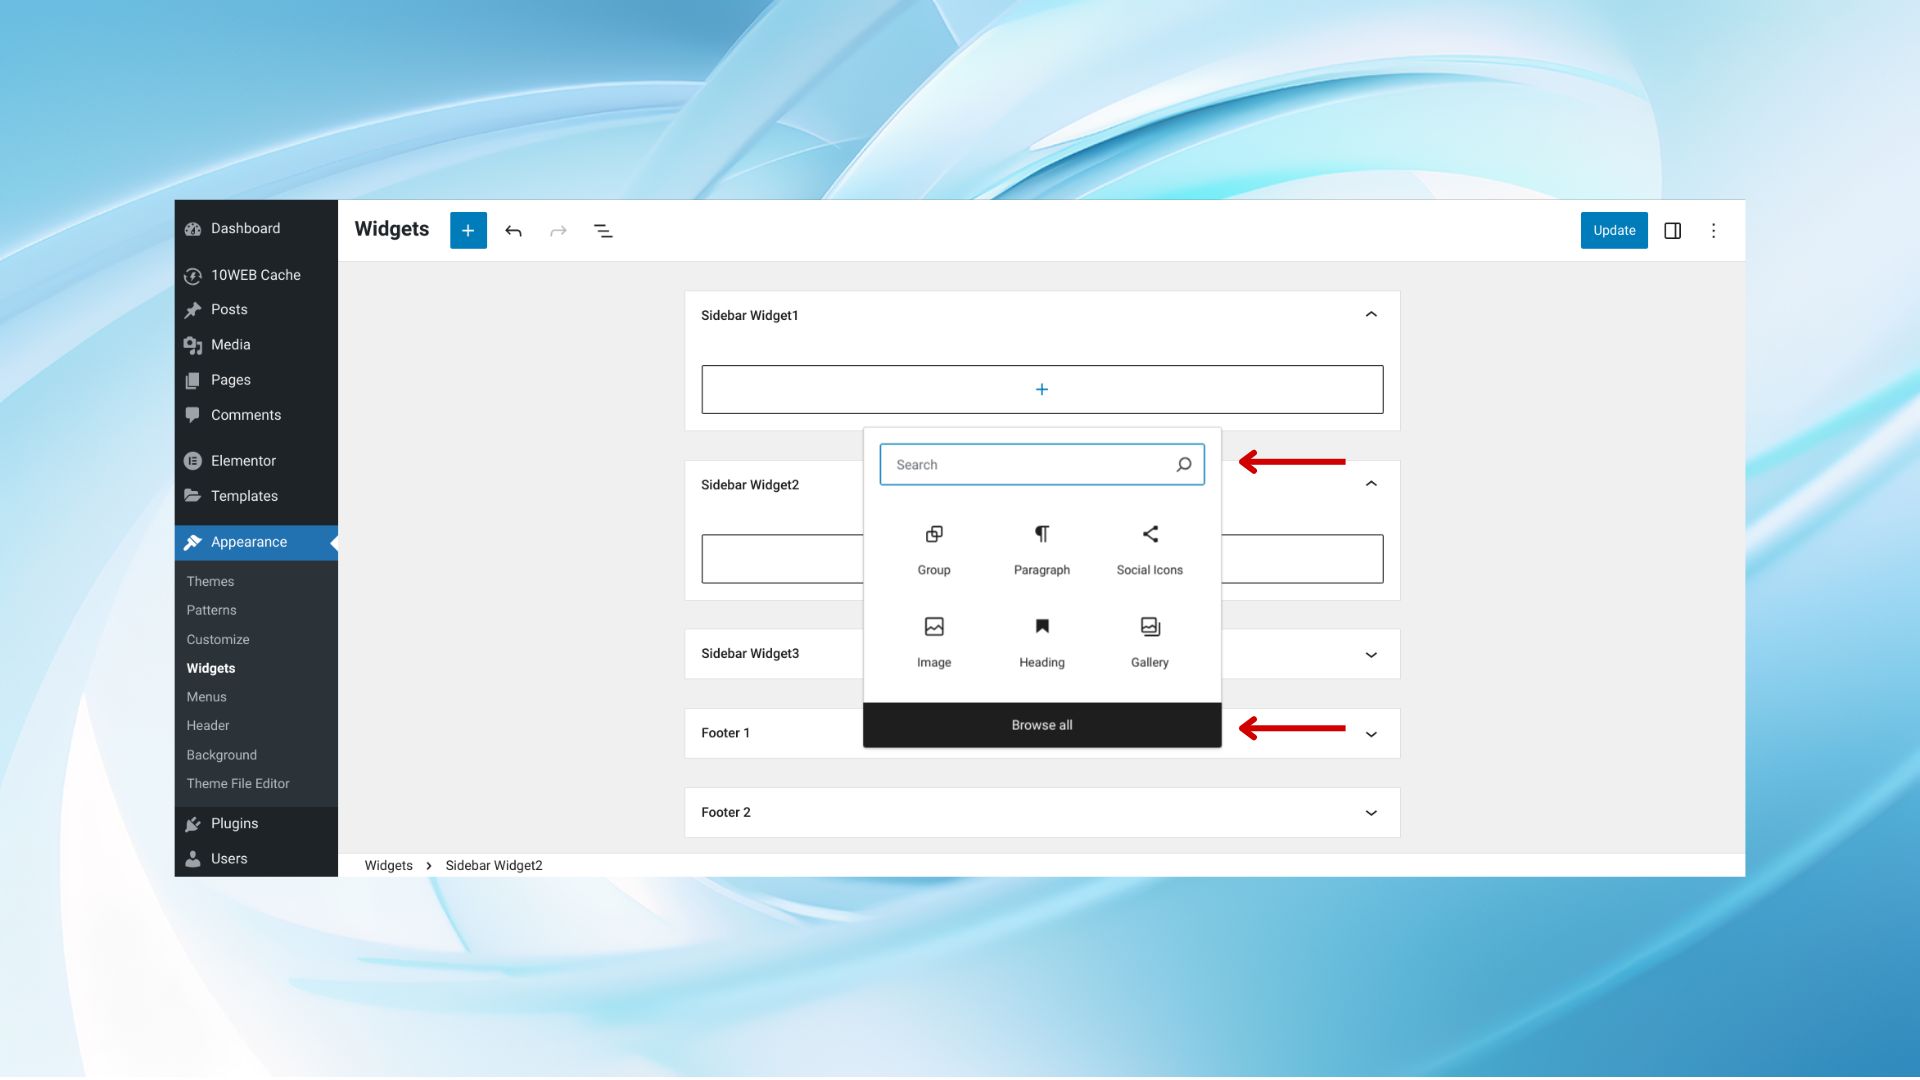
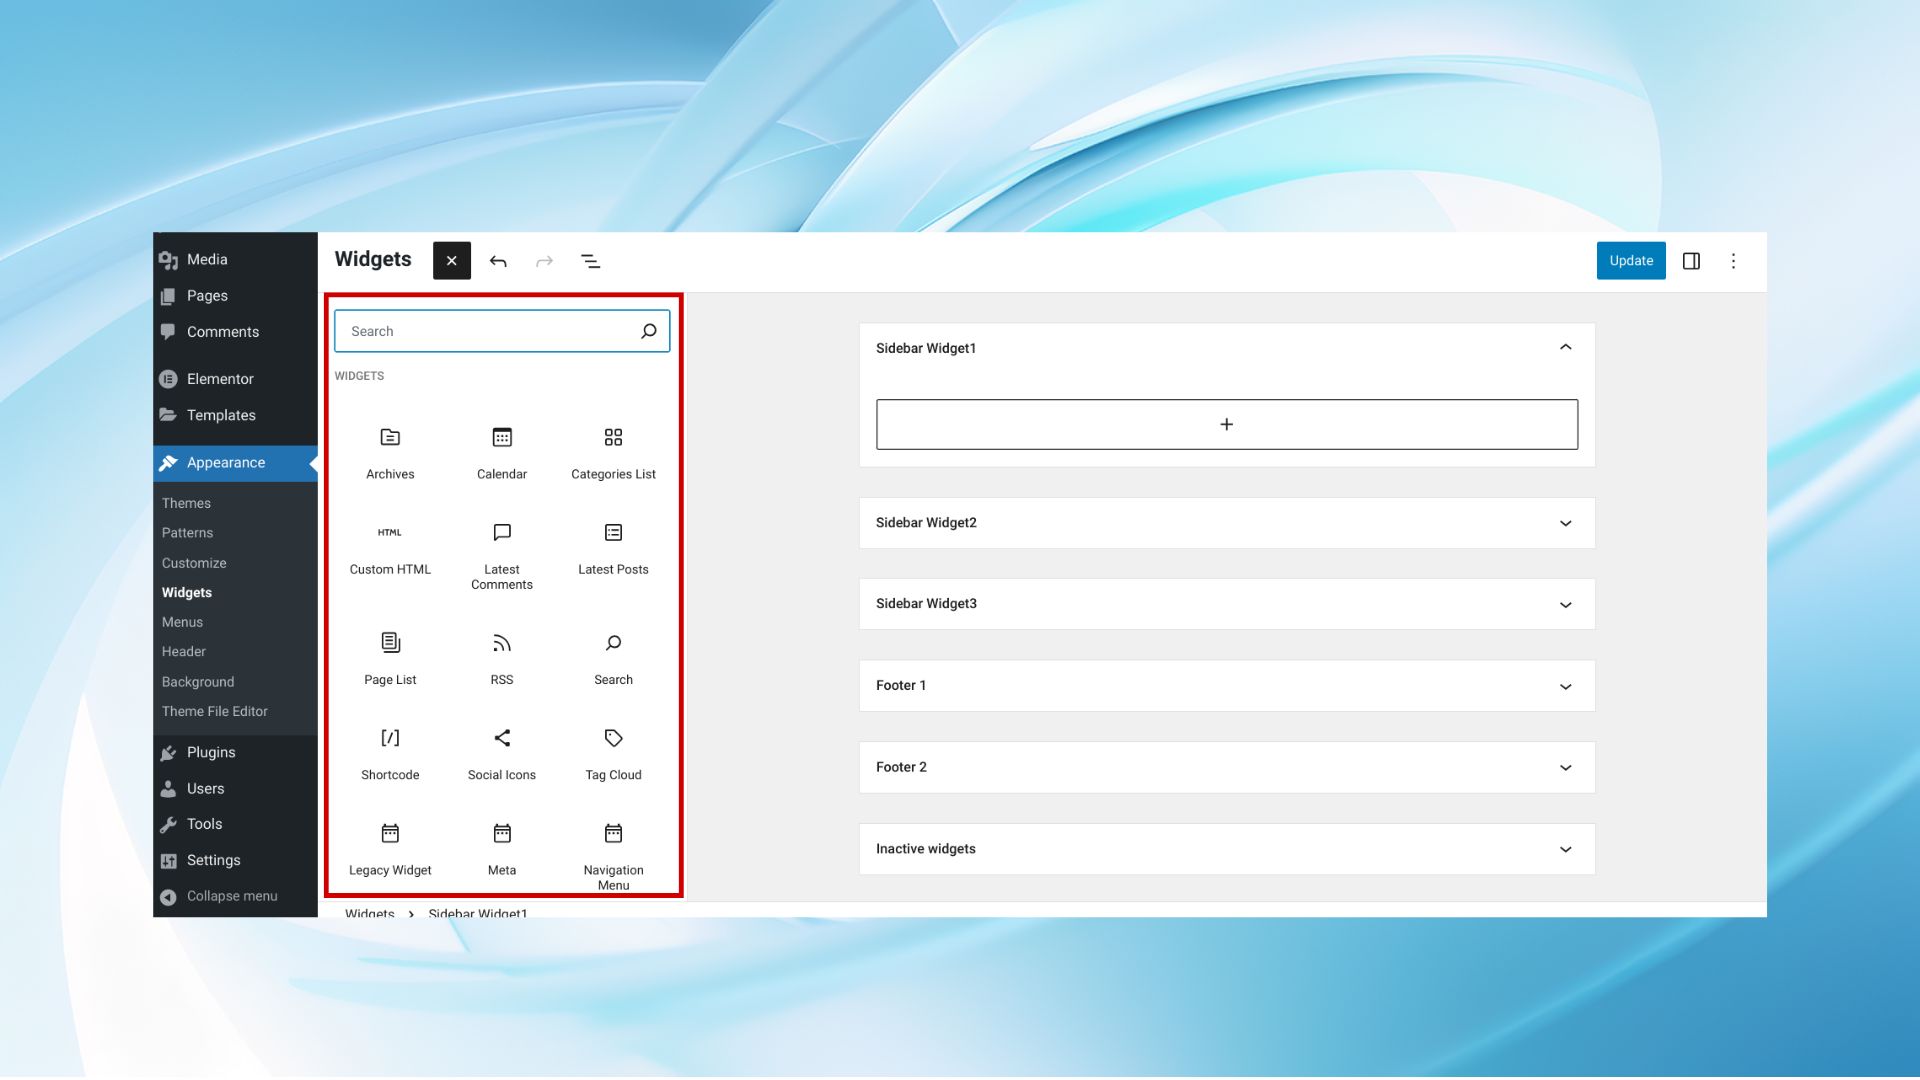
- Press the Browse all button to see all available blocks, including widgets.
- Alternatively you can press the + button the upper left corner to see all available blocks.
- Click on the widgets you would like to use.

Step 4: Manage blocks
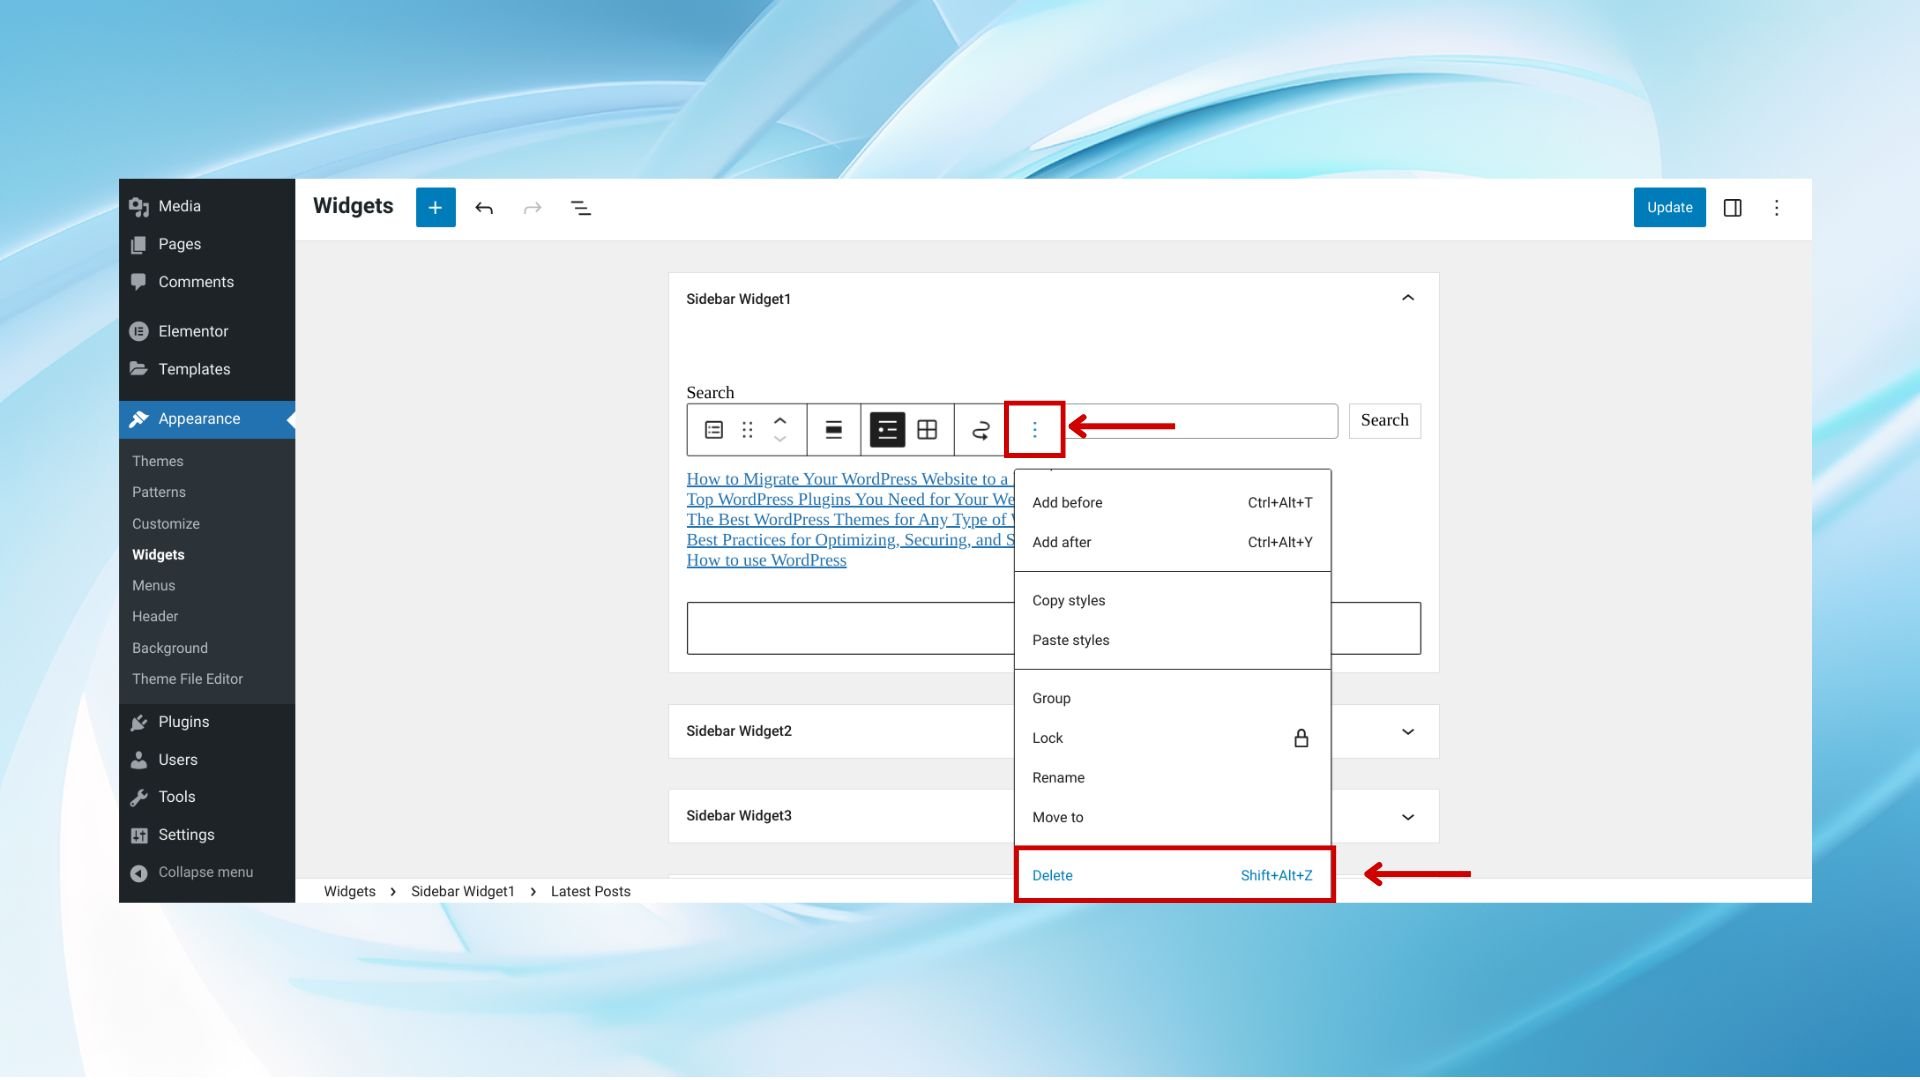
- Press on the block to reveal various editing options.
- Drag and drop blocks to reorder them within the widget area. Use the block’s toolbar to change alignment, size, or style.
- Click the three dots on the block toolbar for more actions like duplicating or removing the block.

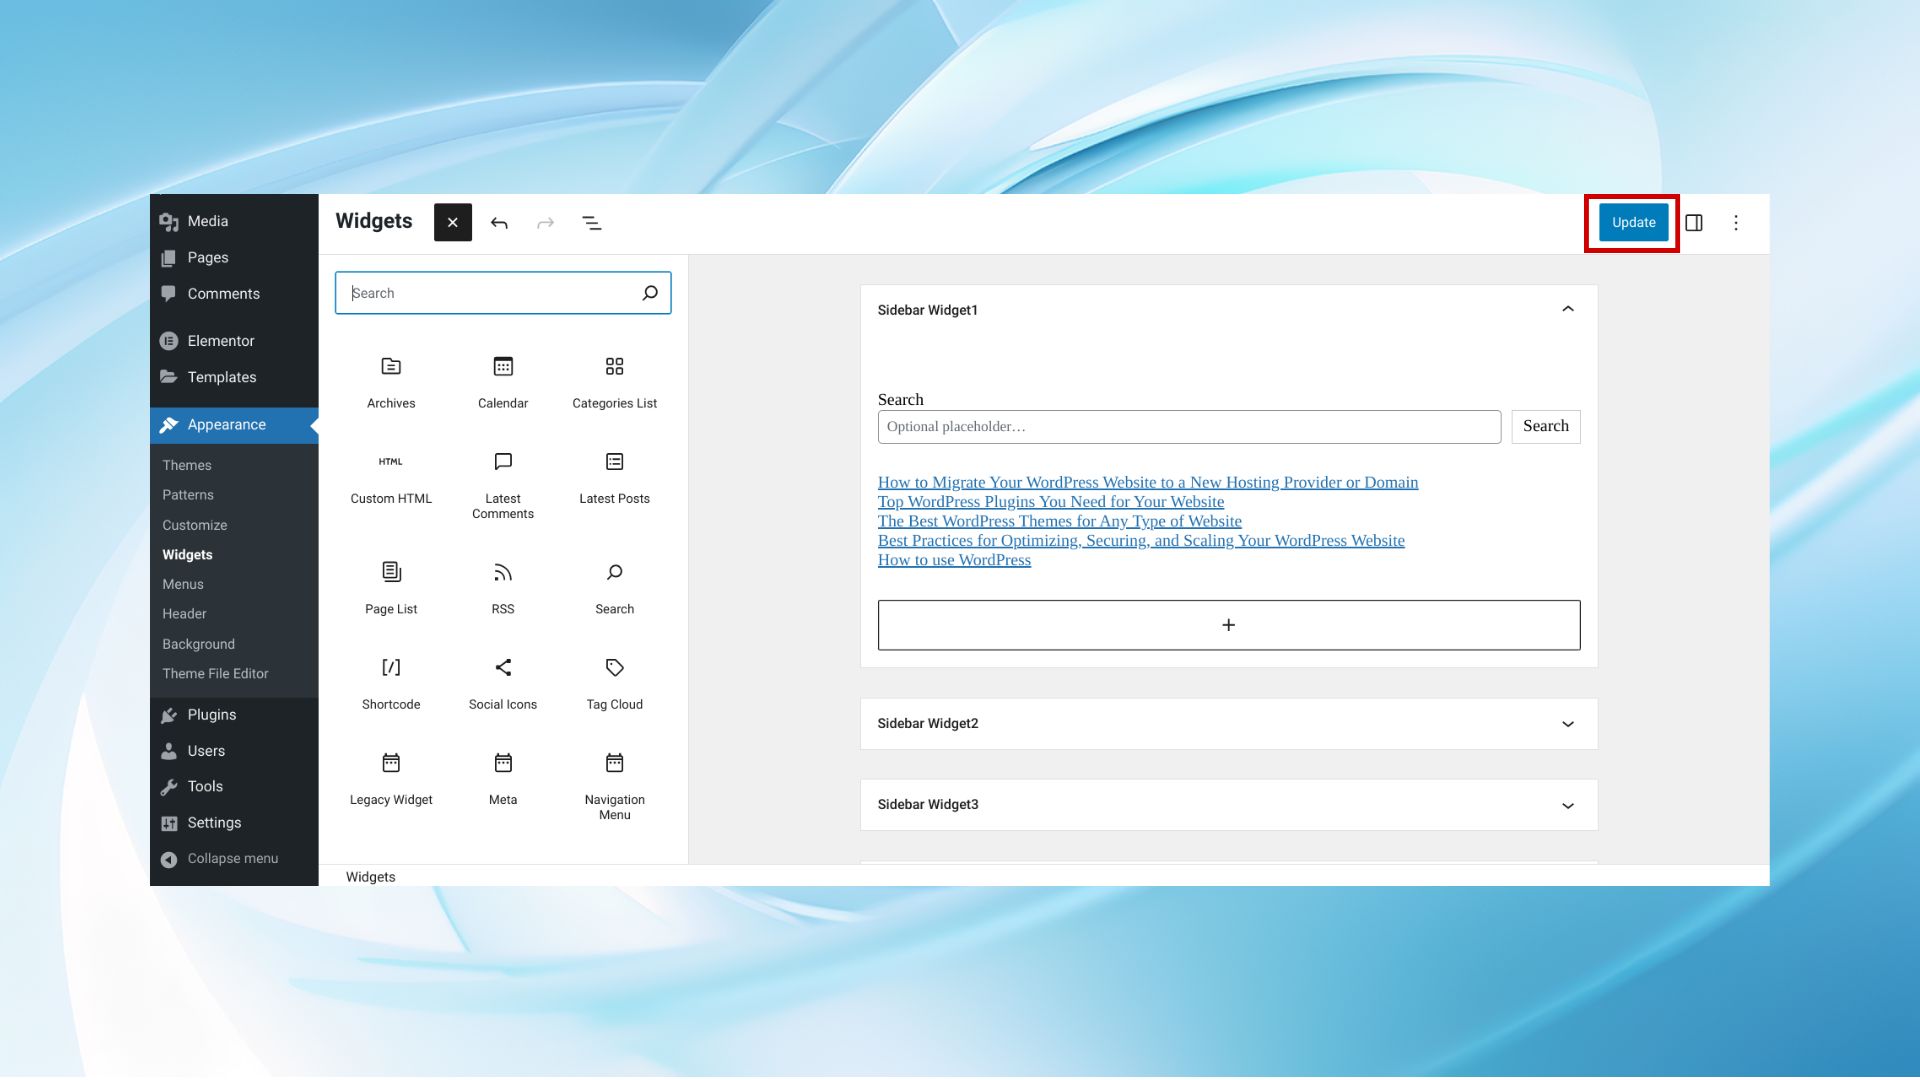
Step 5: Publish
Once you’re satisfied with your changes, click the Update button to save and publish your updated widget areas.
How to add classic widgets
Here’s a step-by-step guide of how to add widgets to WordPress using classic widgets.
Step 1: Access the widgets area
- Log in to your WordPress dashboard.
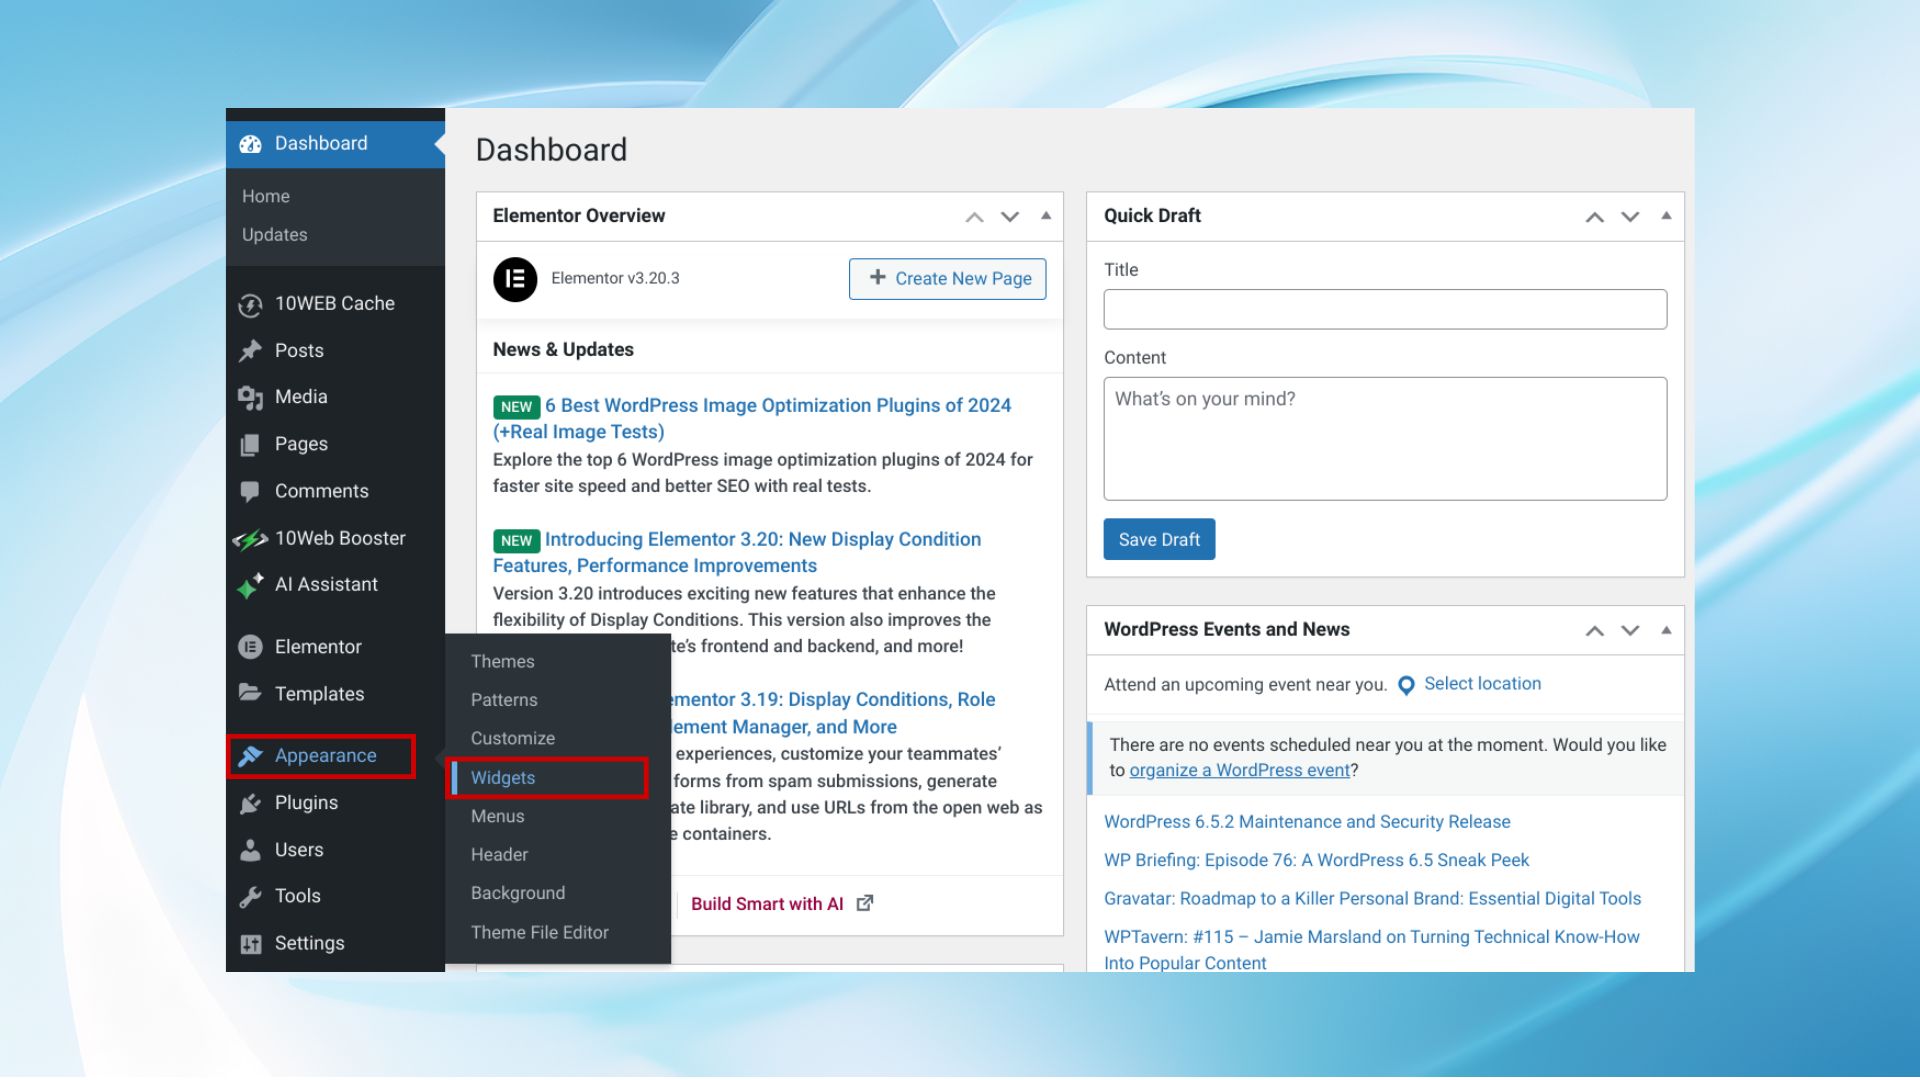
- Navigate to Appearance on the left sidebar.
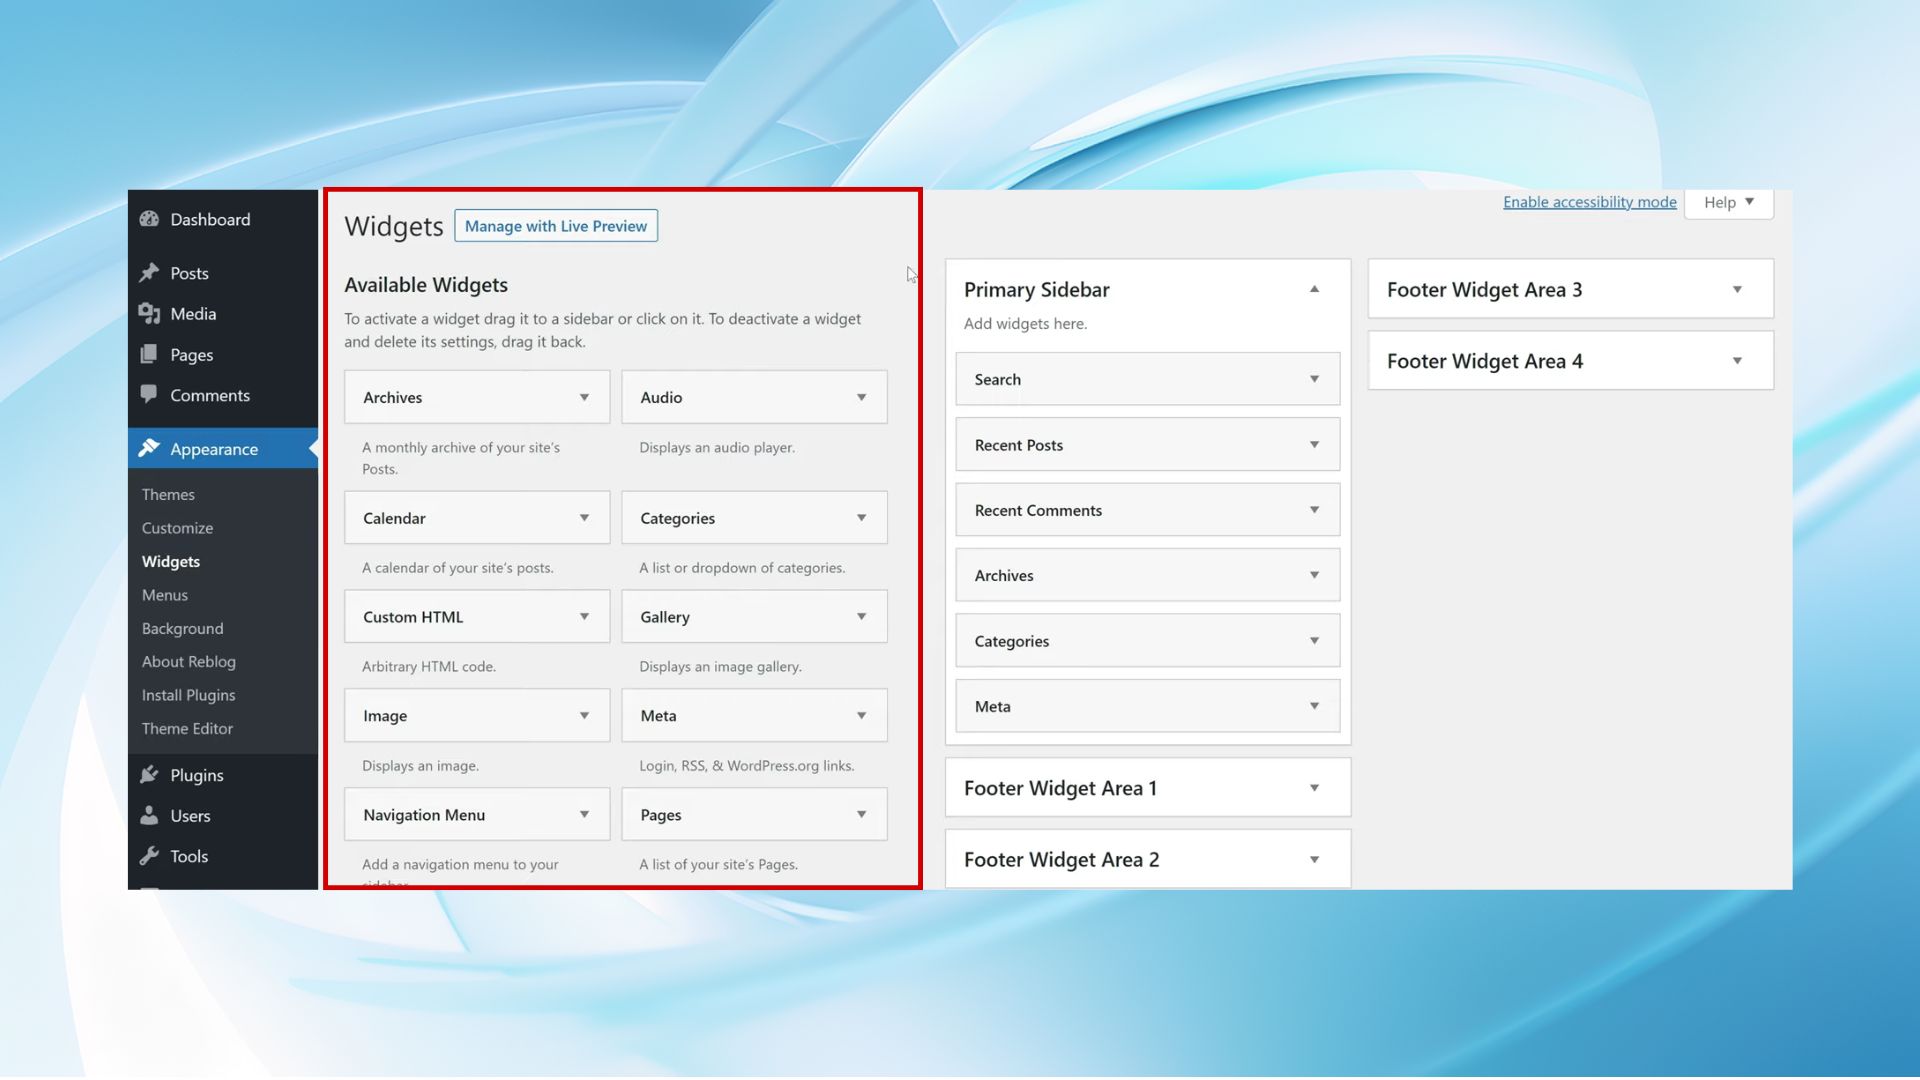
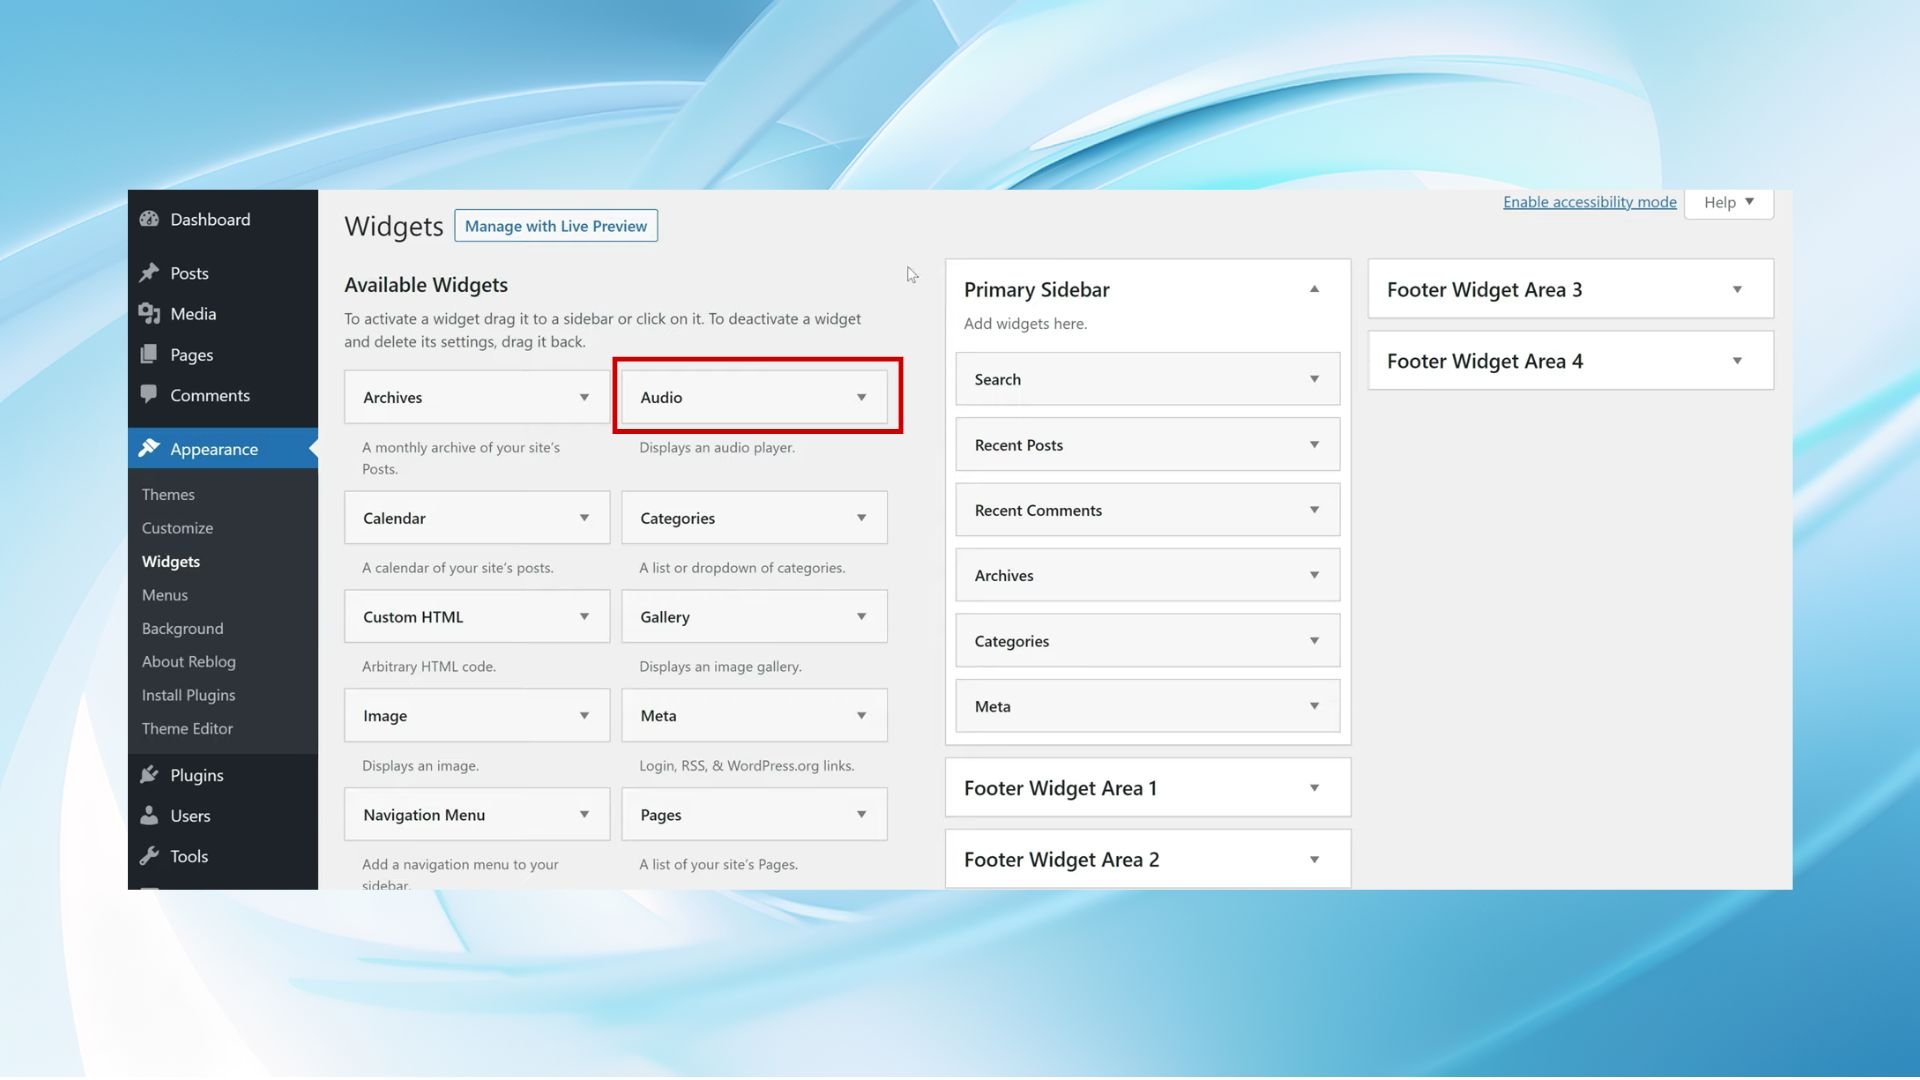
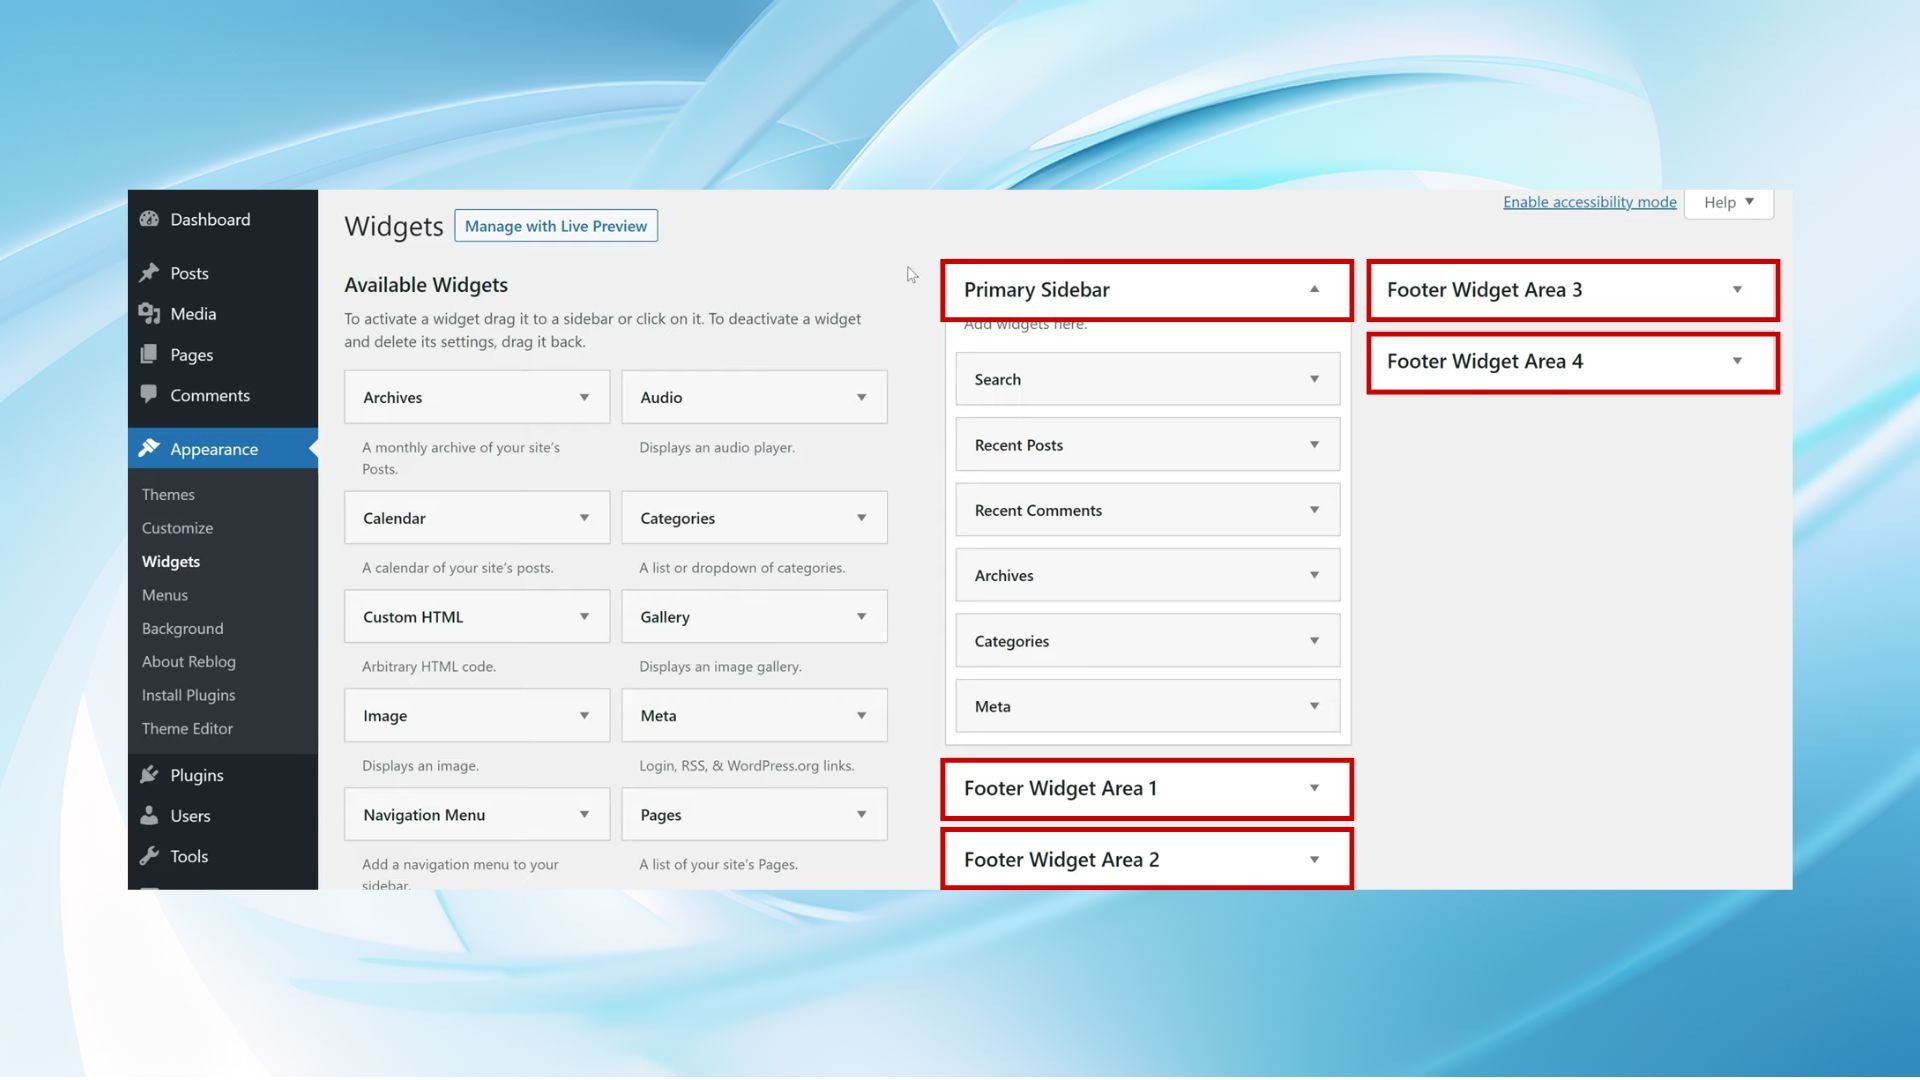
- Click on Widgets to open the widgets area. Here, you’ll see a list of available widgets and widget-ready areas defined by your theme.
Step 2: Choose and add your widget
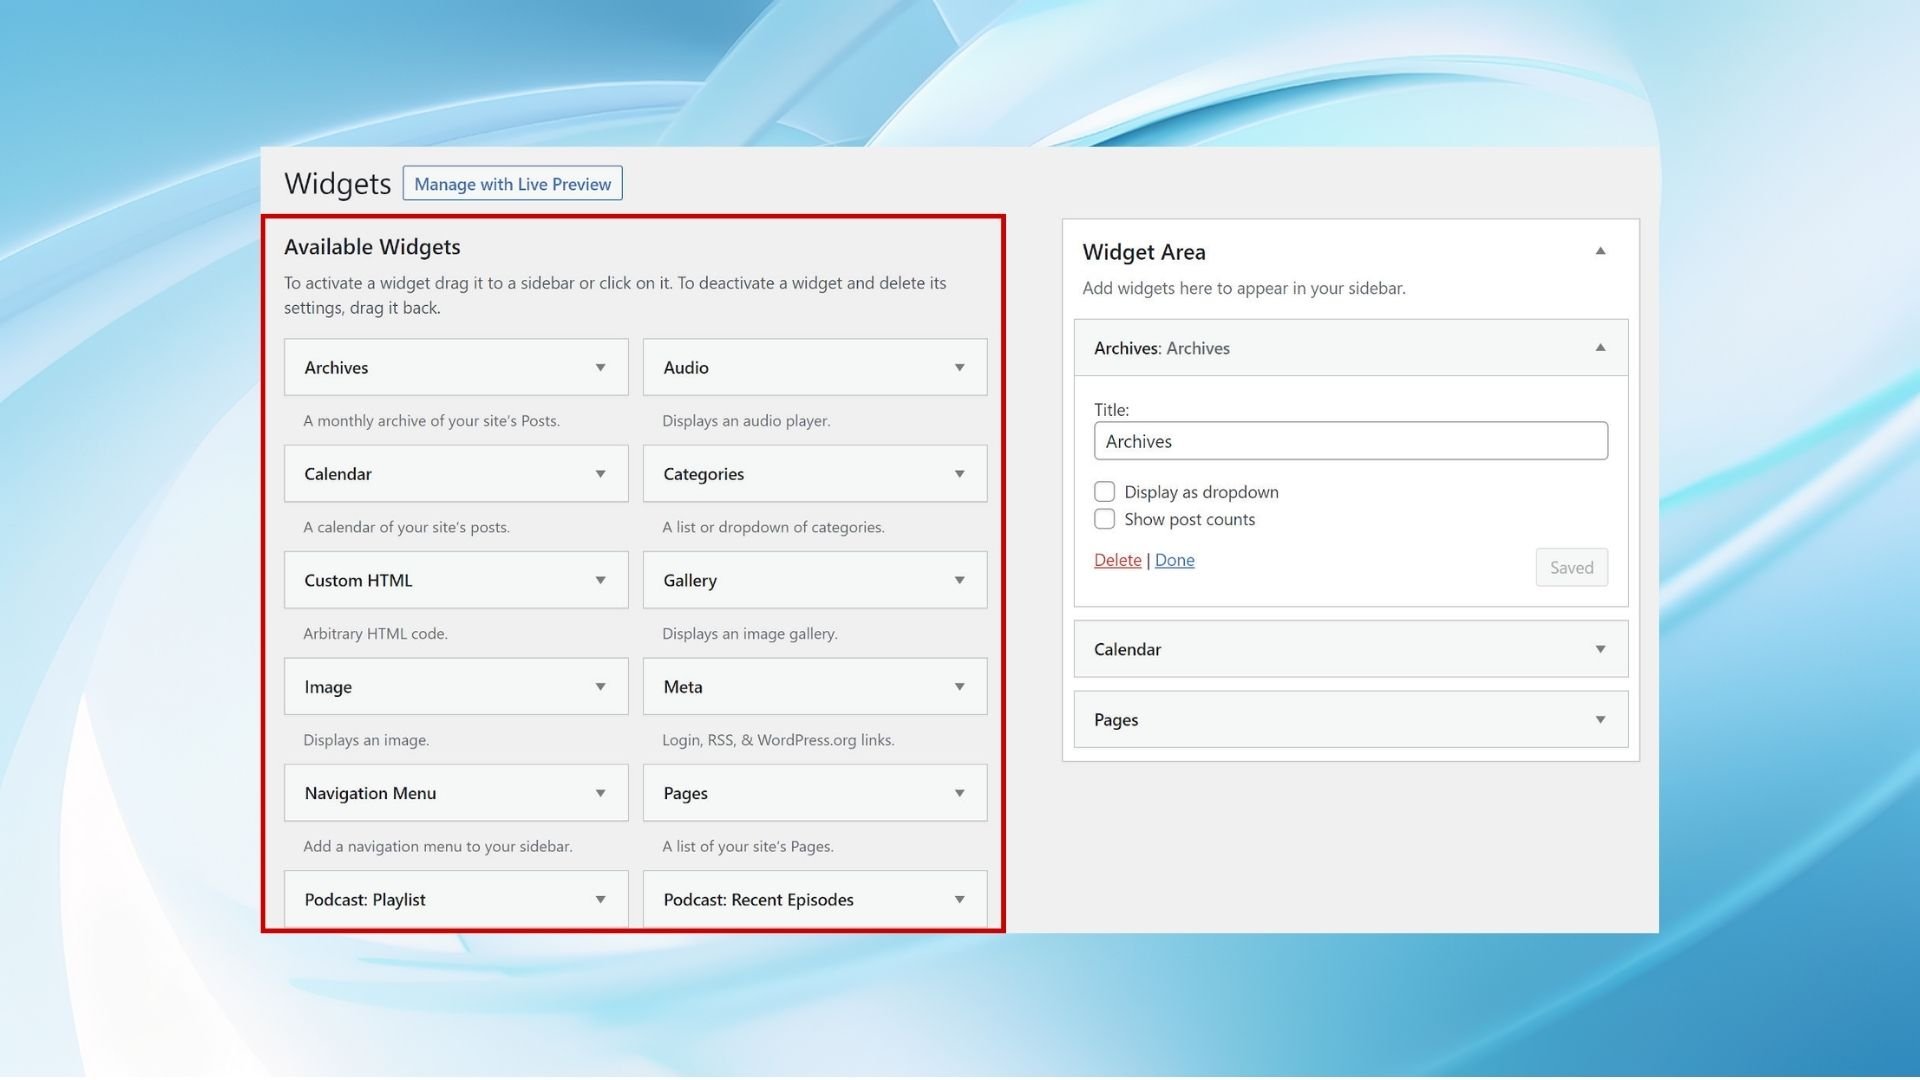
- Explore available widgets (categories, recent posts, custom HTML, etc.).
- Choose a widget for your site.
- Pick a location for it (sidebar, footer, header).
- Drag the widget to the desired area.
Step 3: Configure the widget and save
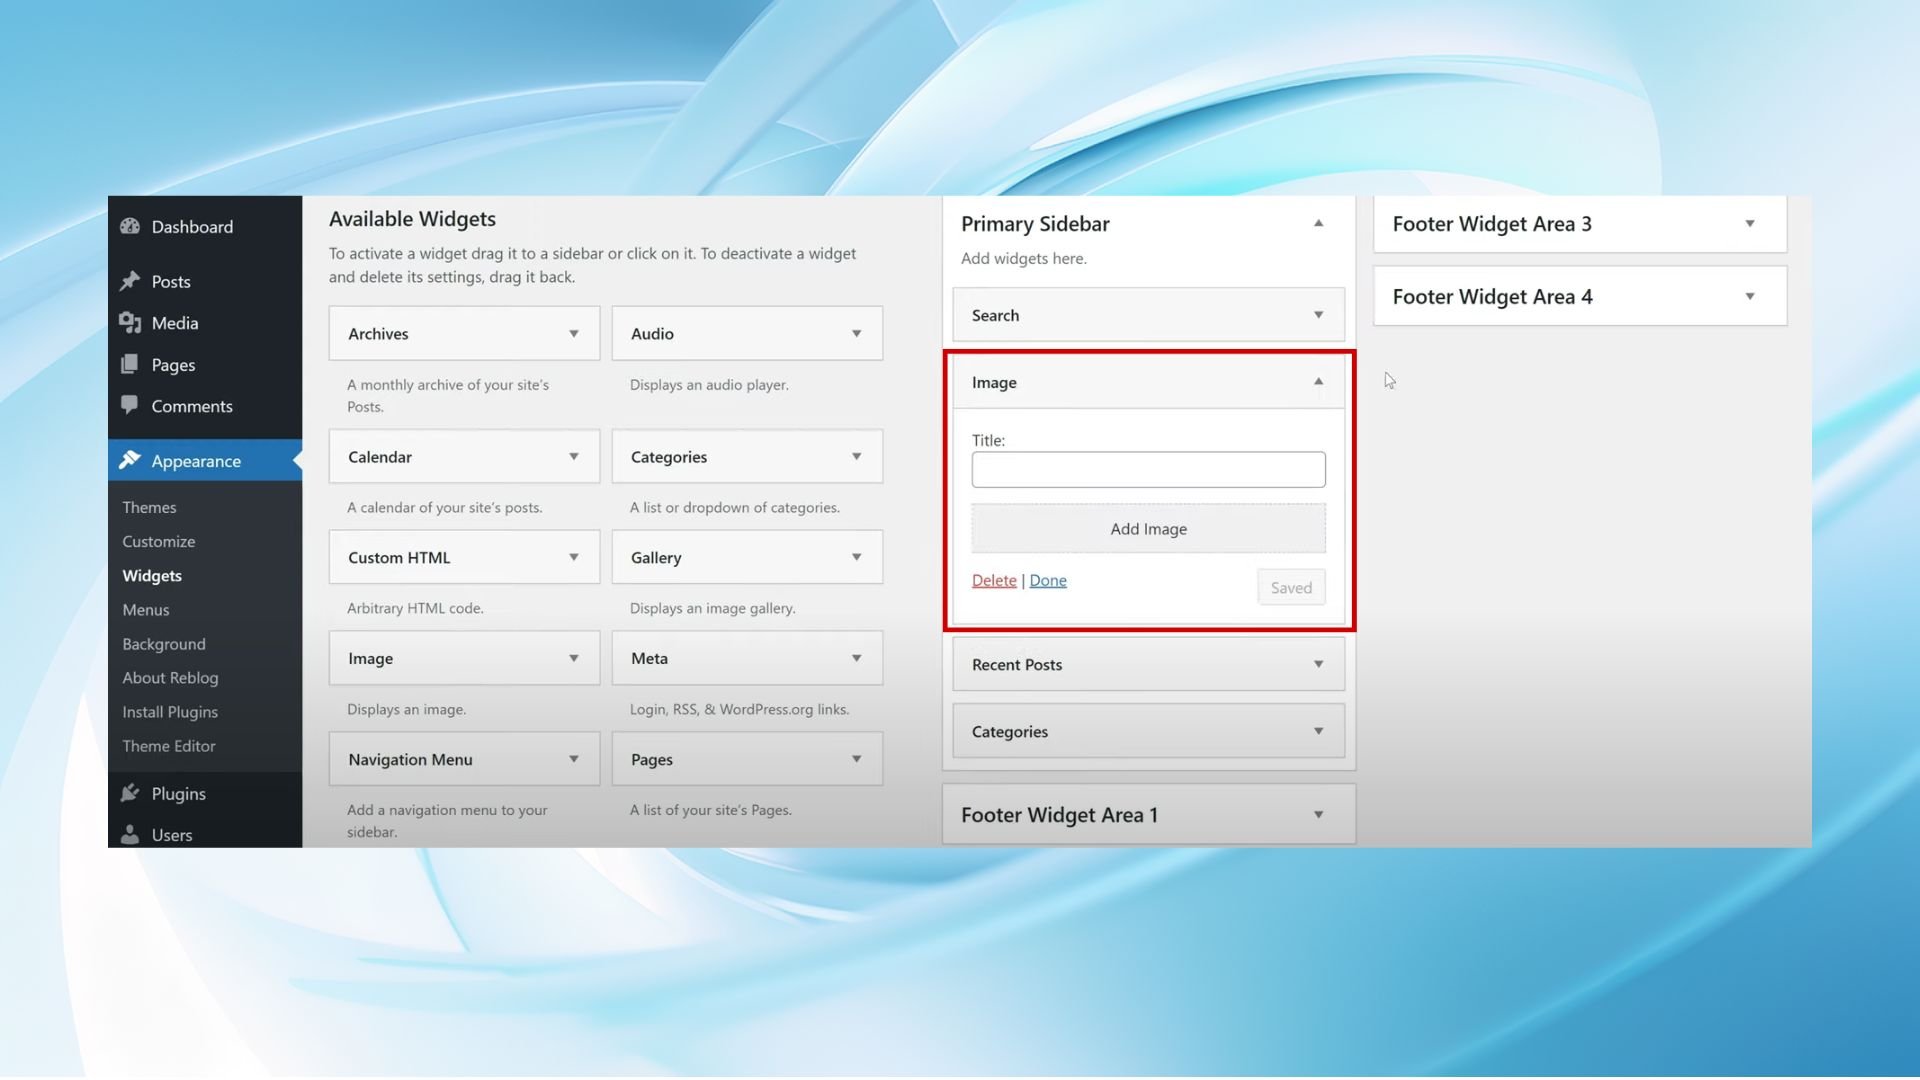
- After adding the widget to your desired area, click on it to expand its options.
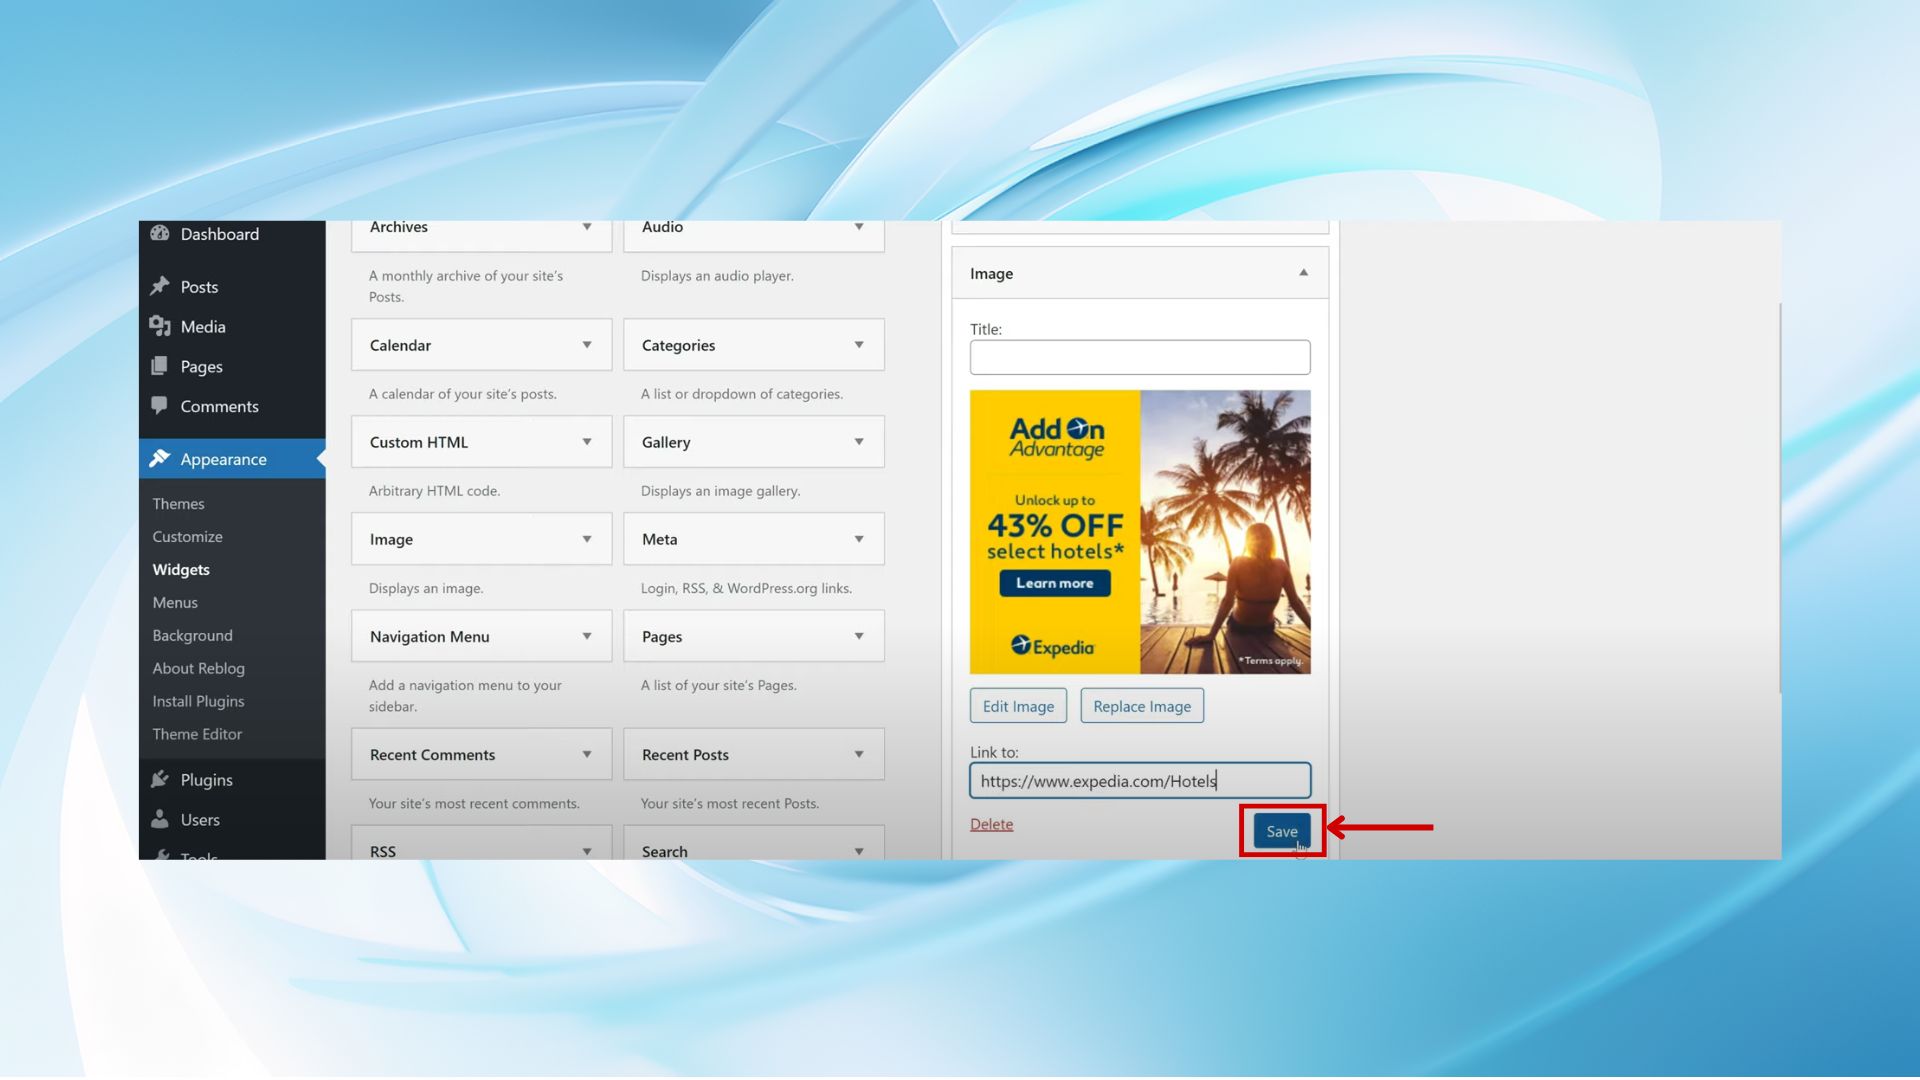
- Customize the widget settings according to your needs. Each widget has different options available, such as title, number of posts to show, and whether to display post dates.
- Once you’re satisfied with the settings, click Save to apply the changes.
Adding widgets to WordPress with the Customizer
Adding widgets to your WordPress site through the Customizer provides a live preview of your changes, making it a user-friendly option for customizing widget areas like sidebars, footers, and other widget-ready areas. Here’s how to add widgets to WordPress with Customizer:
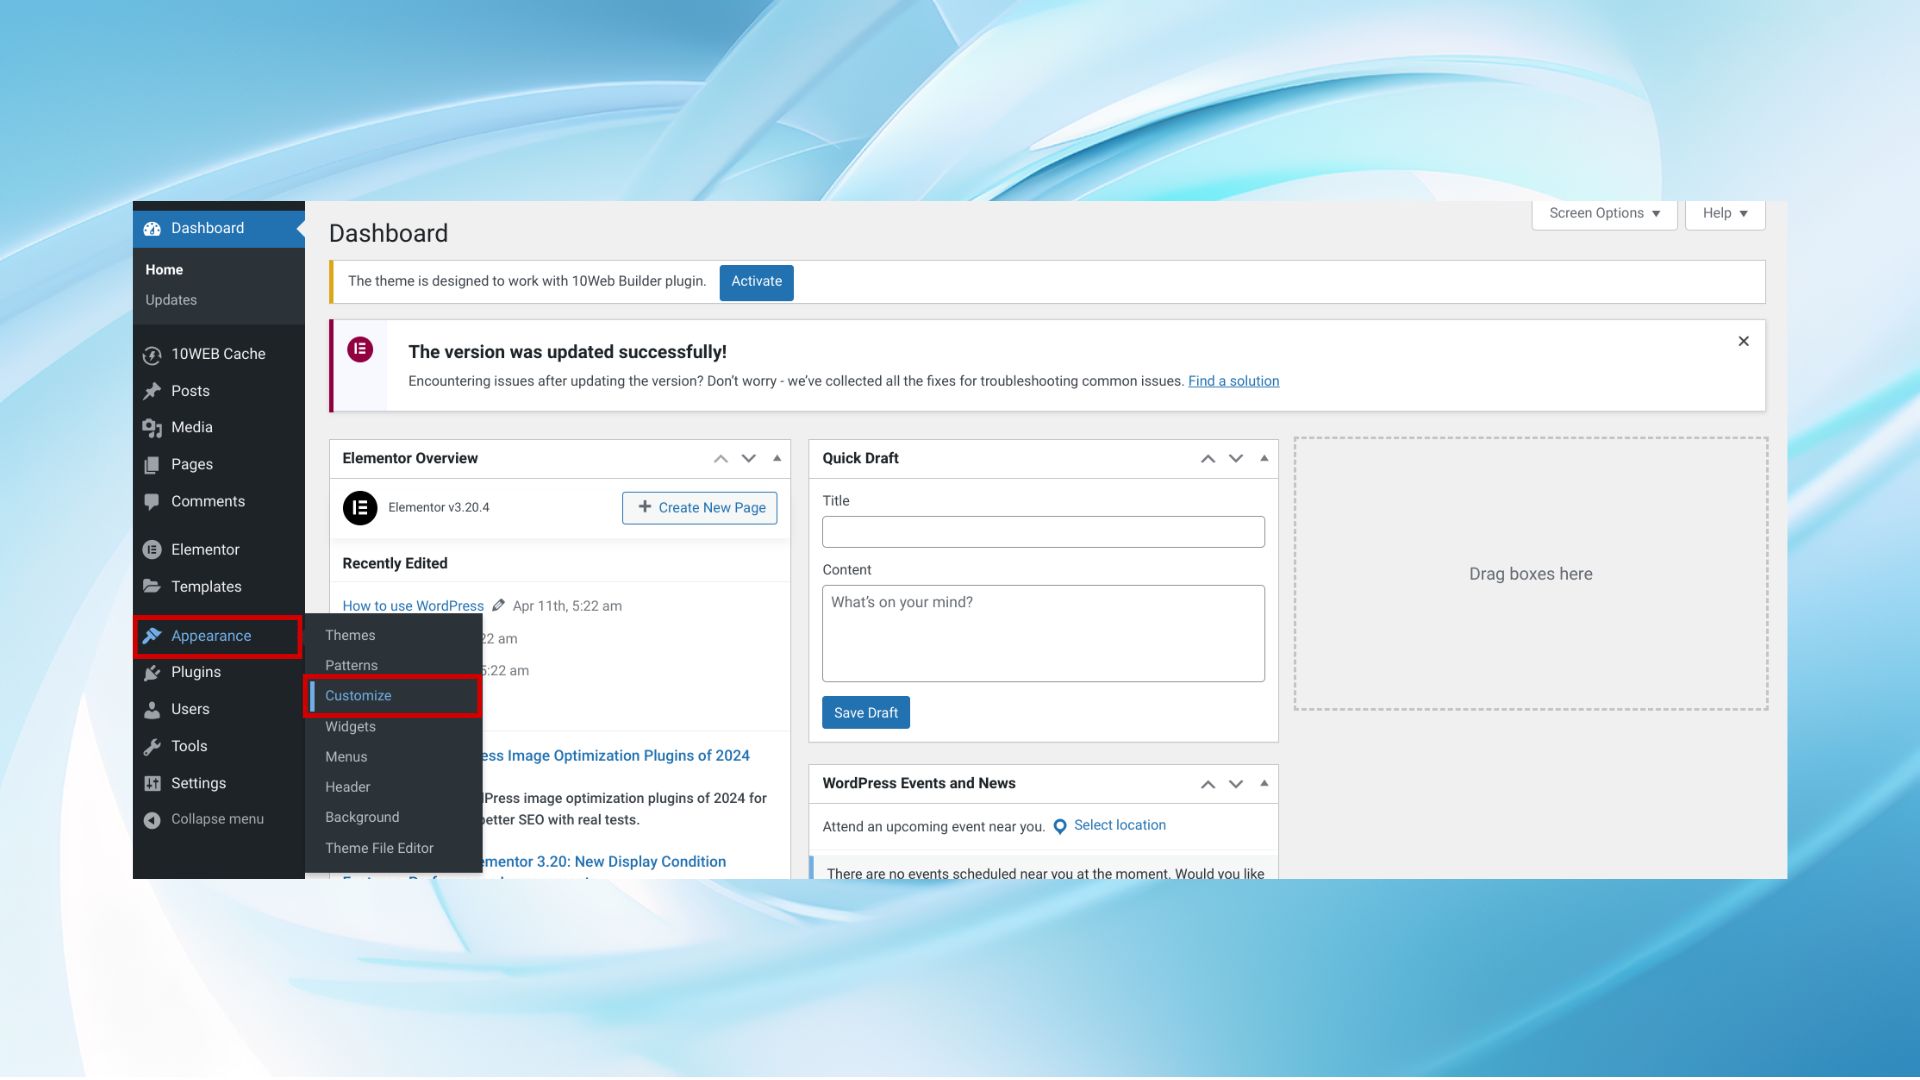
Step 1: Access the Customizer
- Log in to your WordPress Dashboard.
- Navigate to Appearance > Customize. This opens the WordPress Customizer, where you can make live edits to your site.
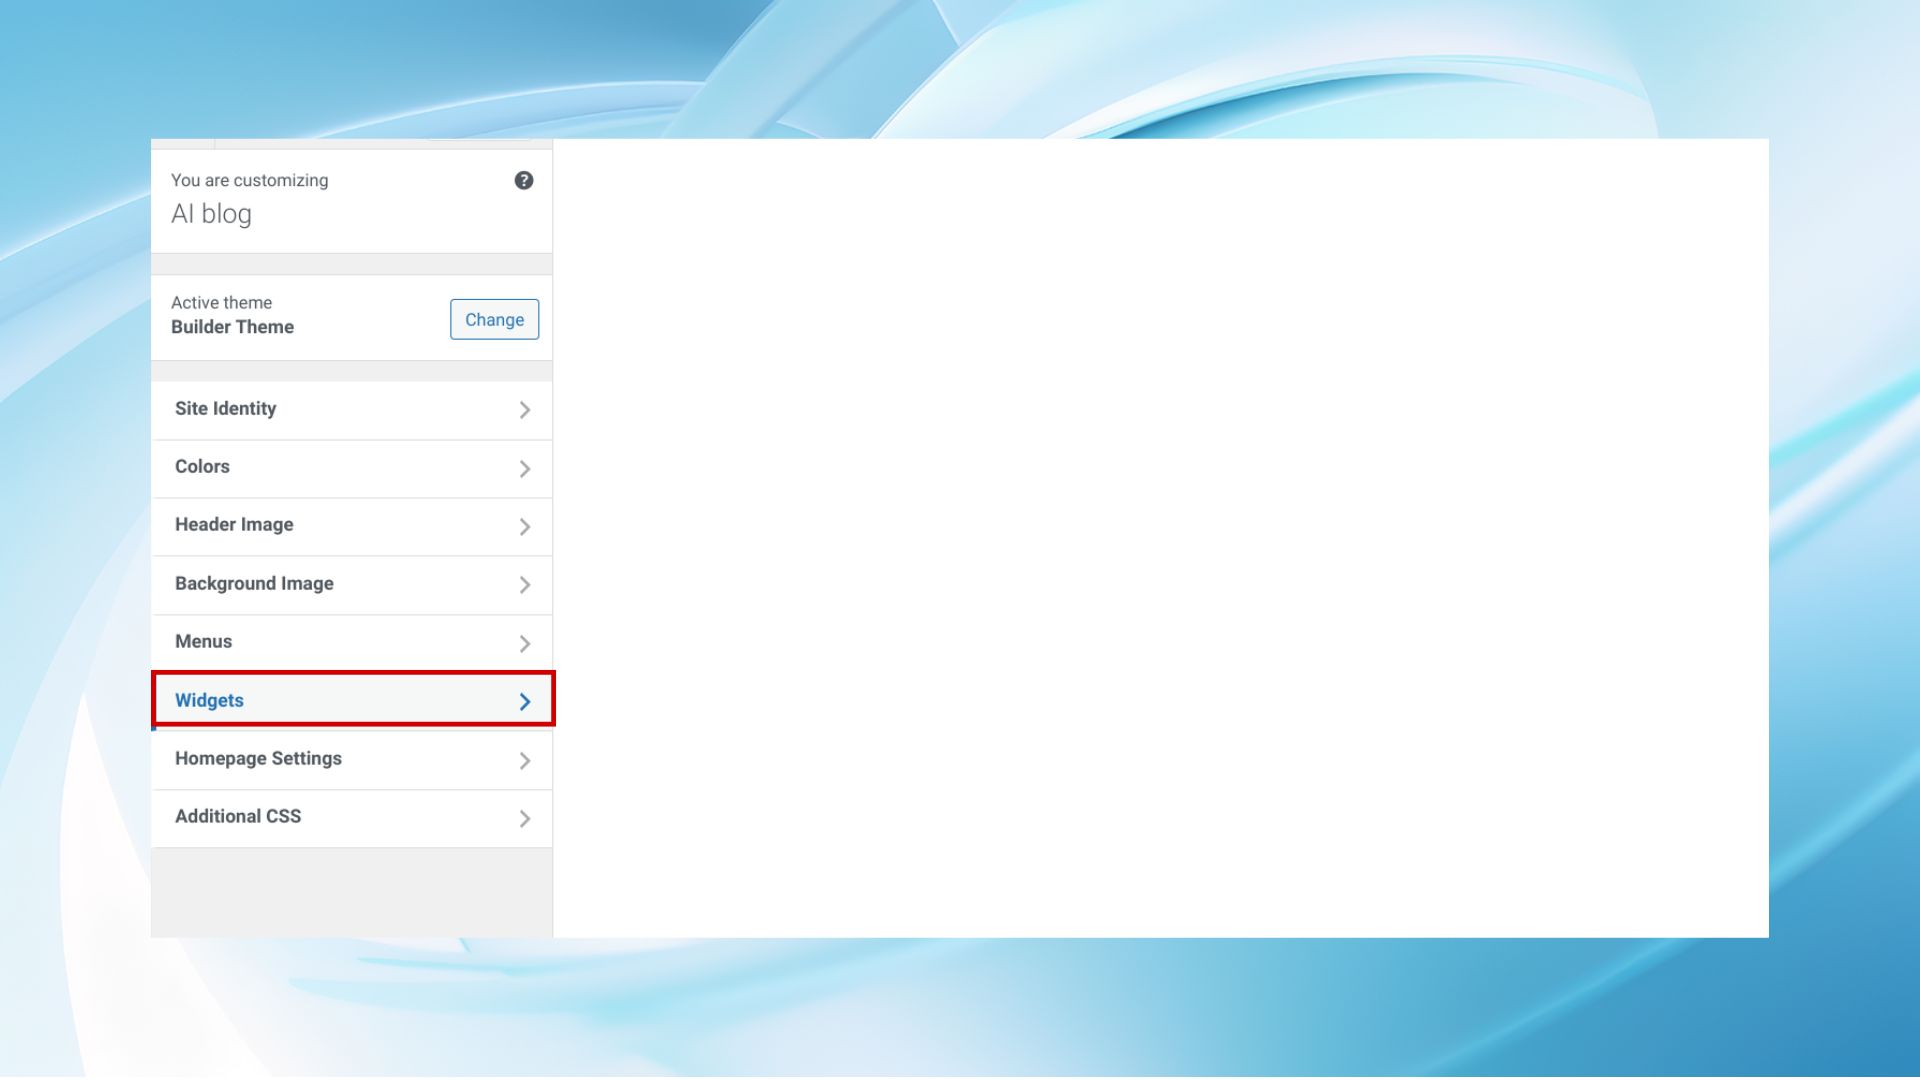
Step 2: Navigate to Widgets
- In the Customizer menu, look for the Widgets section. The name might vary slightly depending on your theme (e.g., “Widgets,” “Sidebar,” “Footer”).
- Click on Widgets to expand the section. You’ll see a list of widget areas defined by your theme.
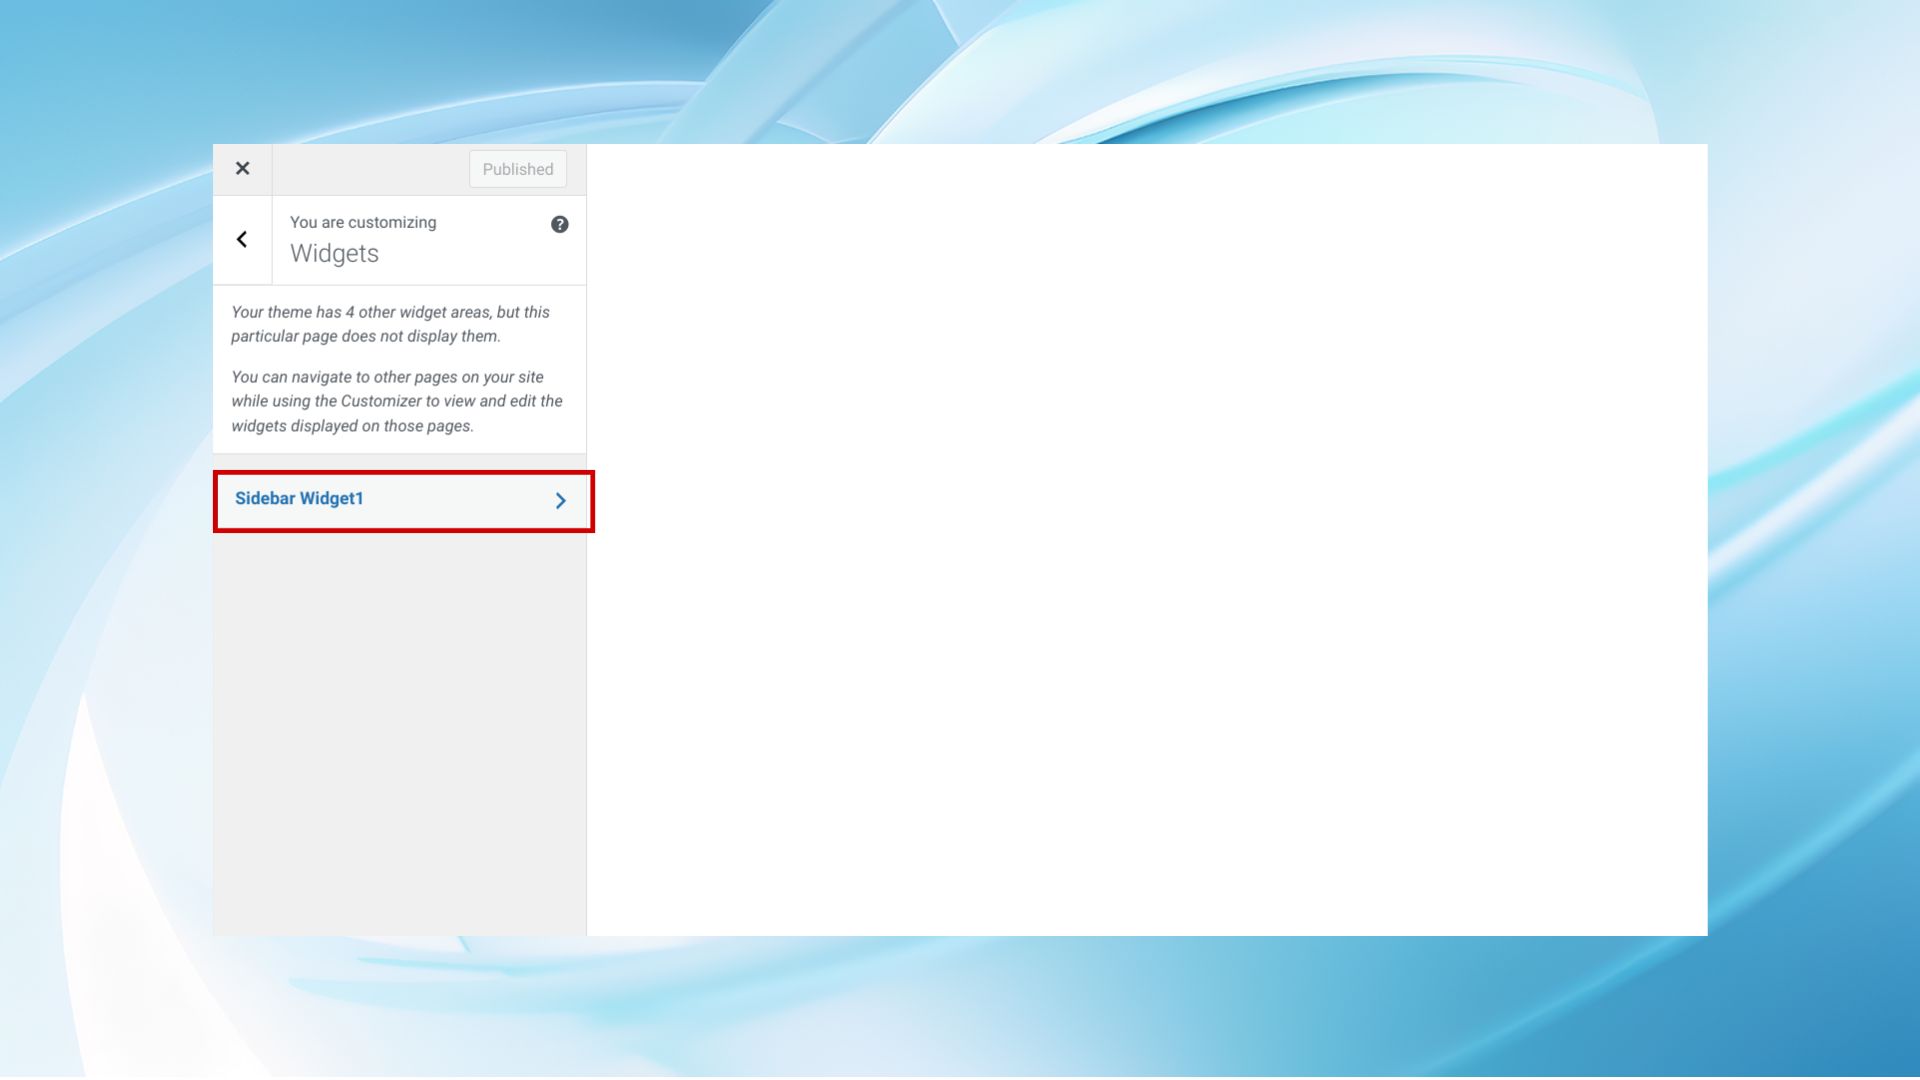
Step 3: Select a widget area
- Choose the widget area you want to add widgets to by clicking on it. This could be your sidebar, footer, or any other widget-ready area your theme provides.
- Once you select a widget area, you’ll see a list of any block widgets already in that area.
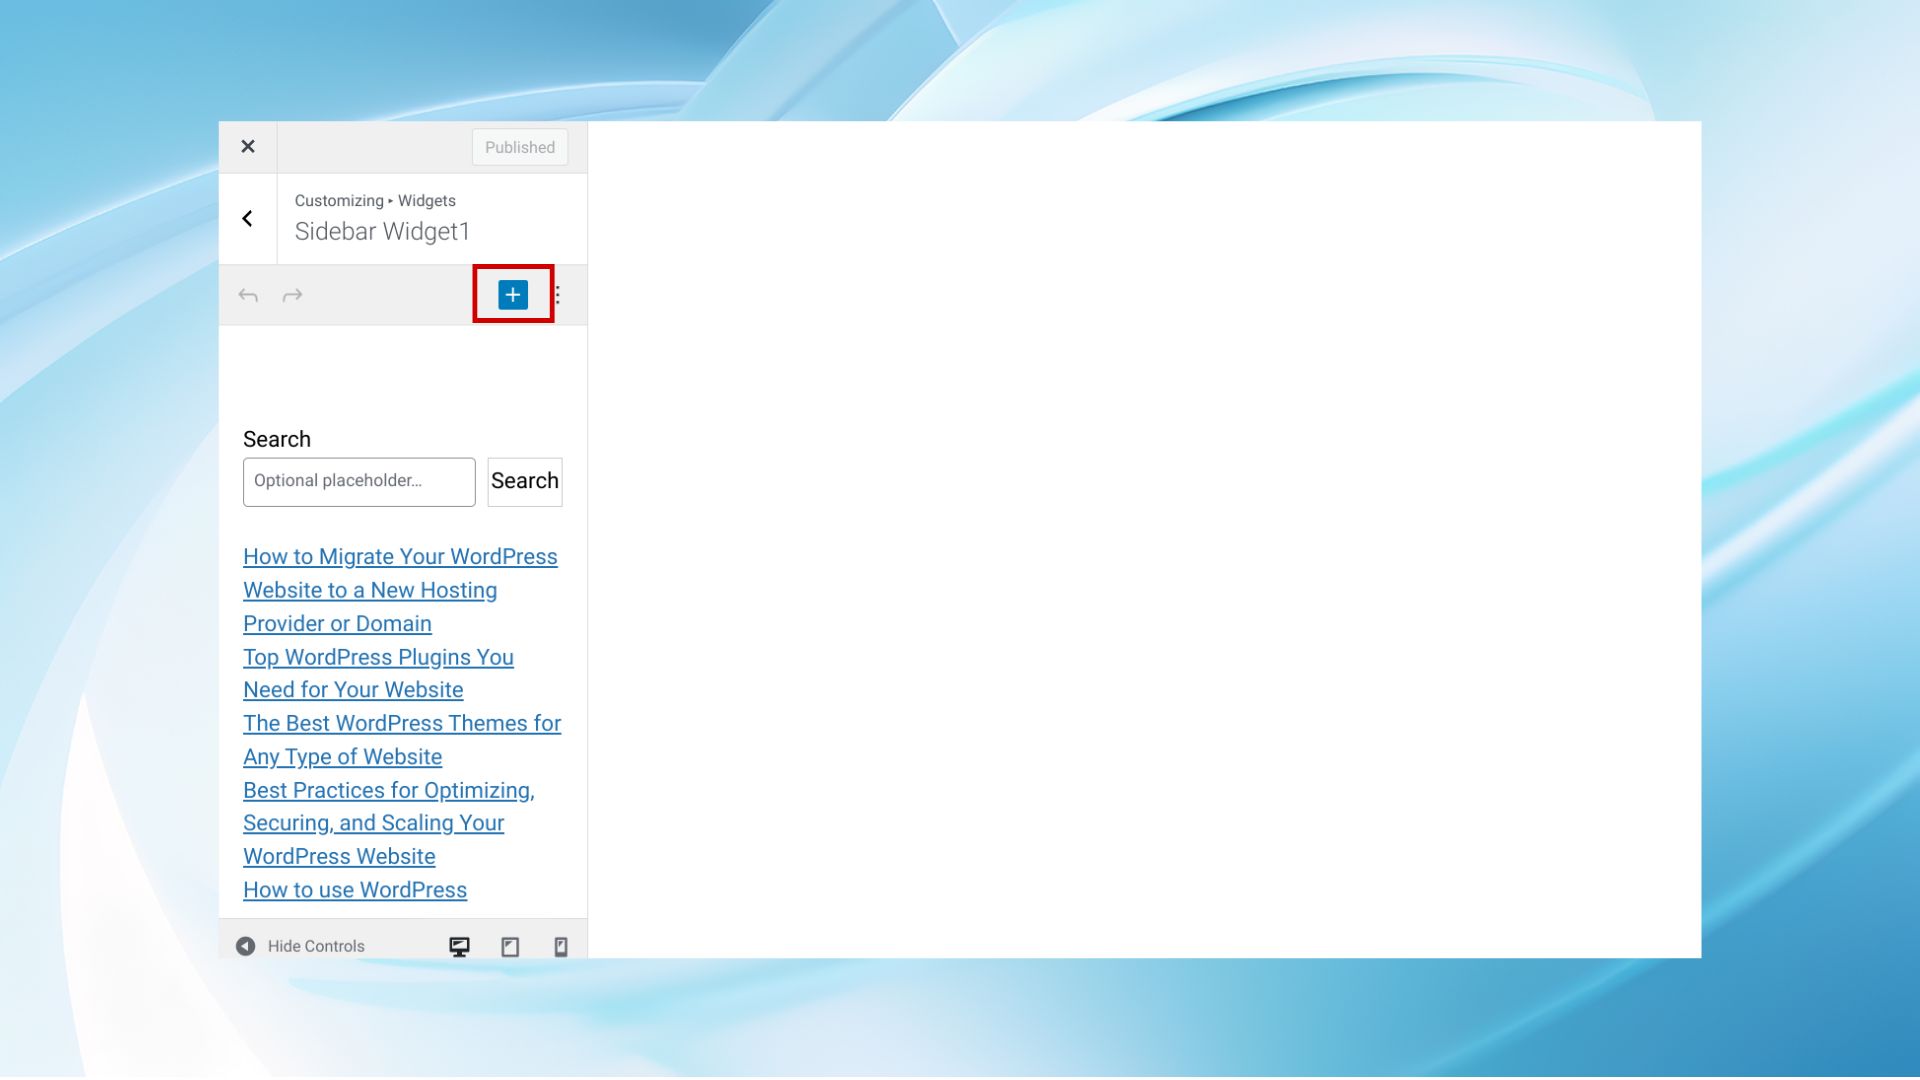
Step 4: Add and configure the widget
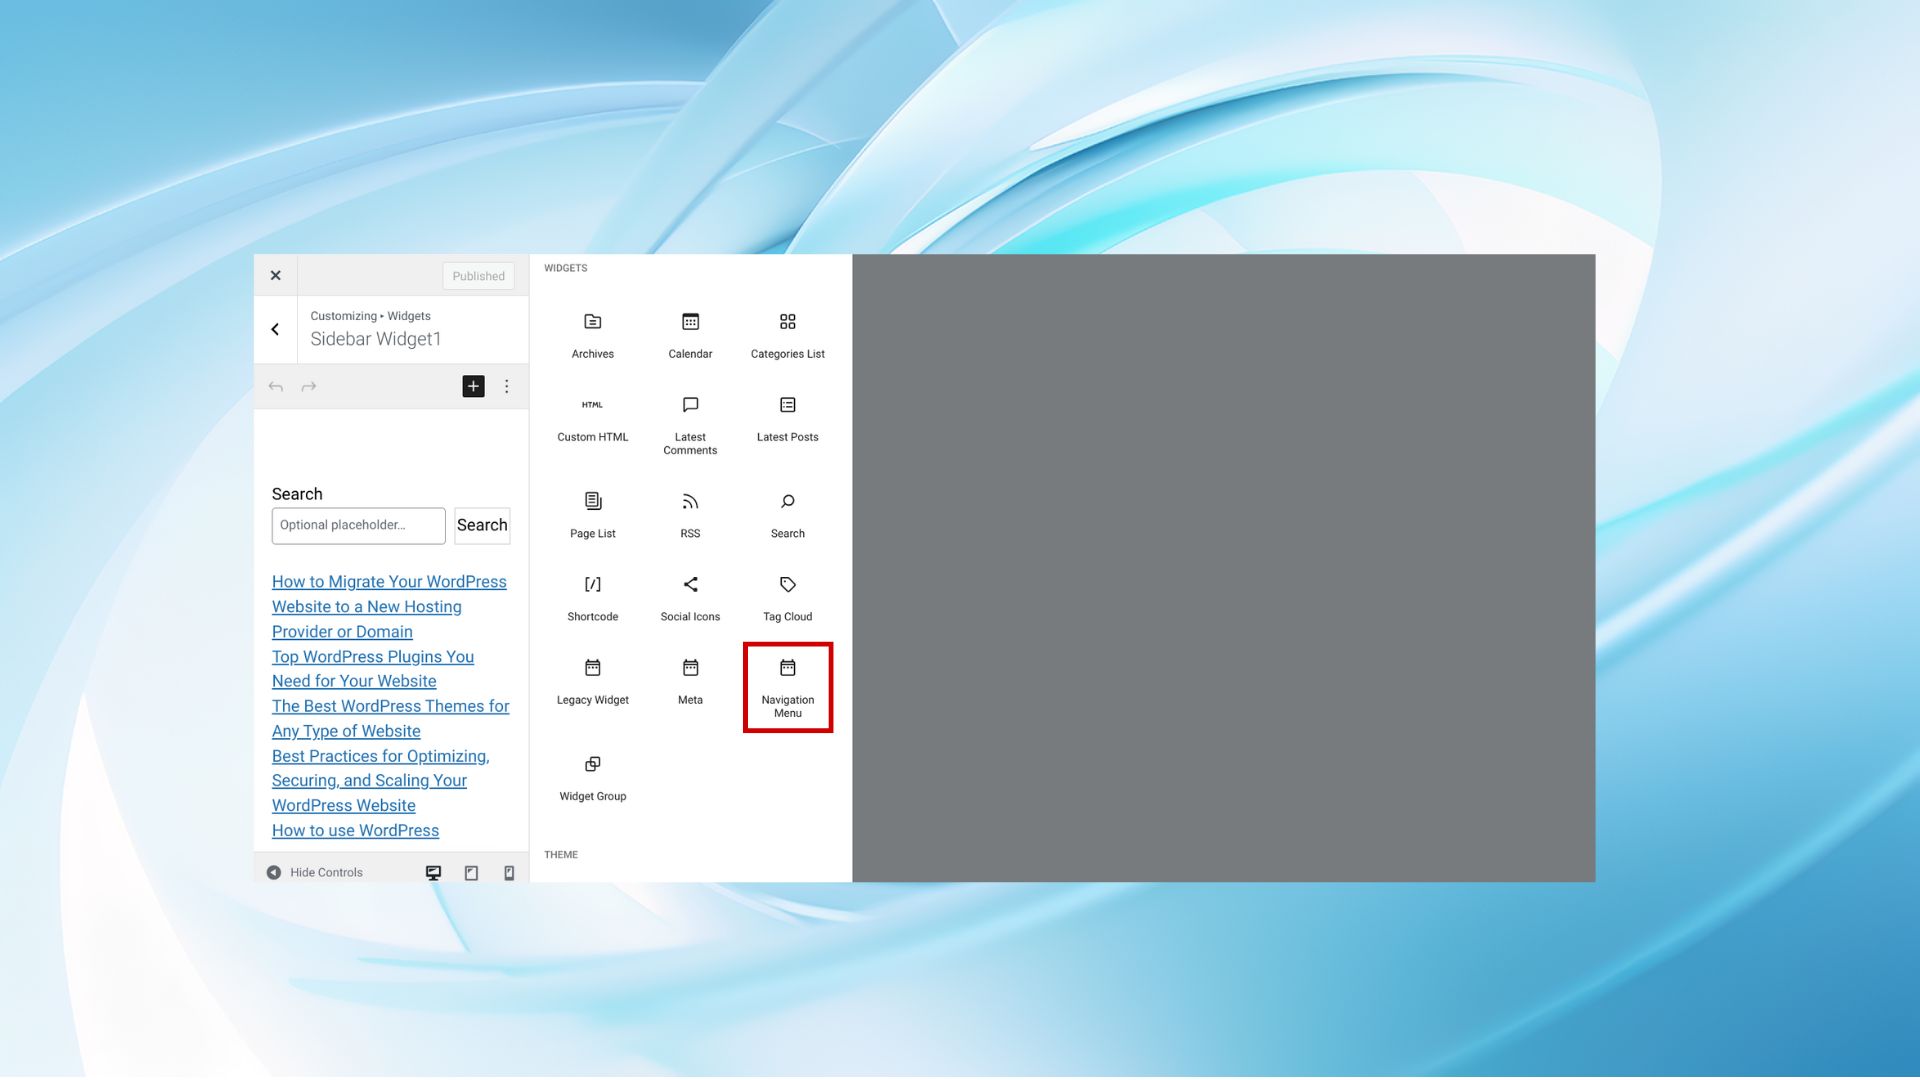
- Click the + button inside the widget area to introduce a new block.
- A list of available widgets will appear. Scroll through or use the search box to find the widget you want to add.
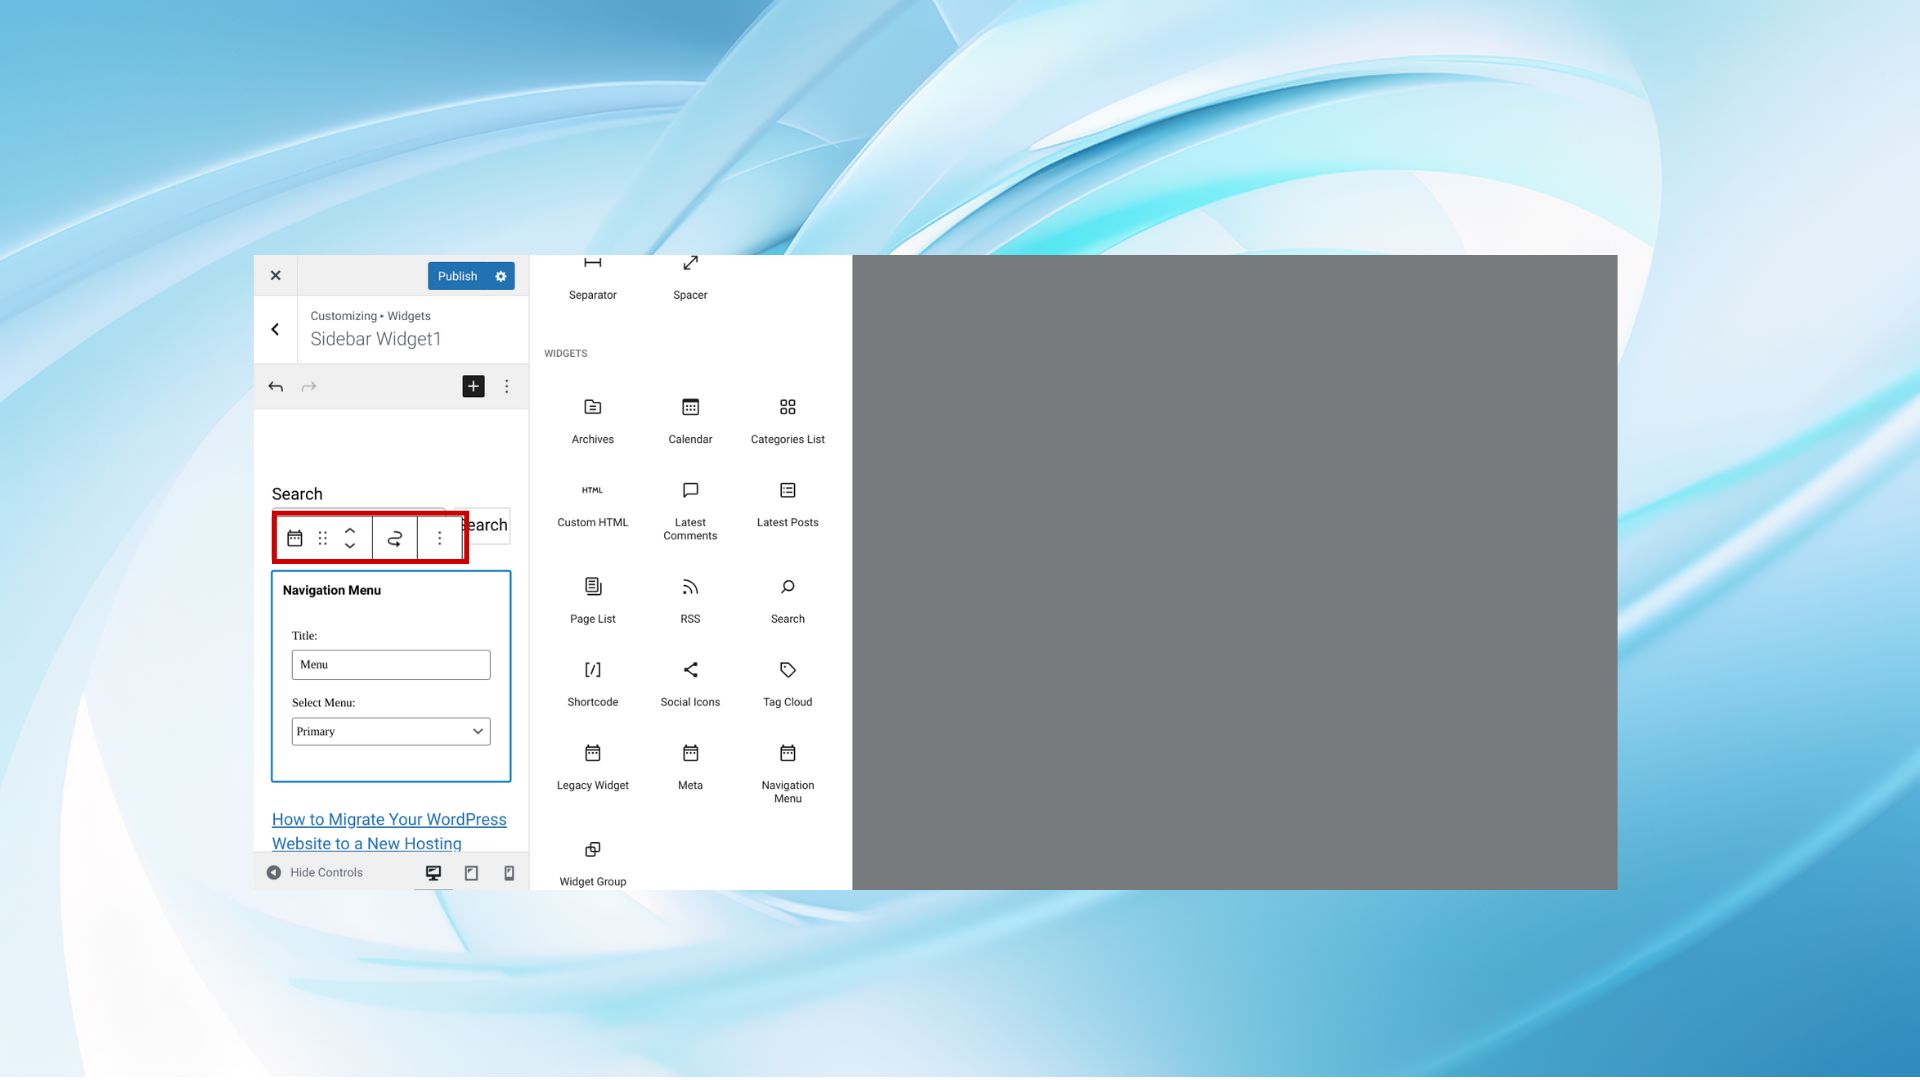
- Drag and drop blocks to reorder them within the widget area.
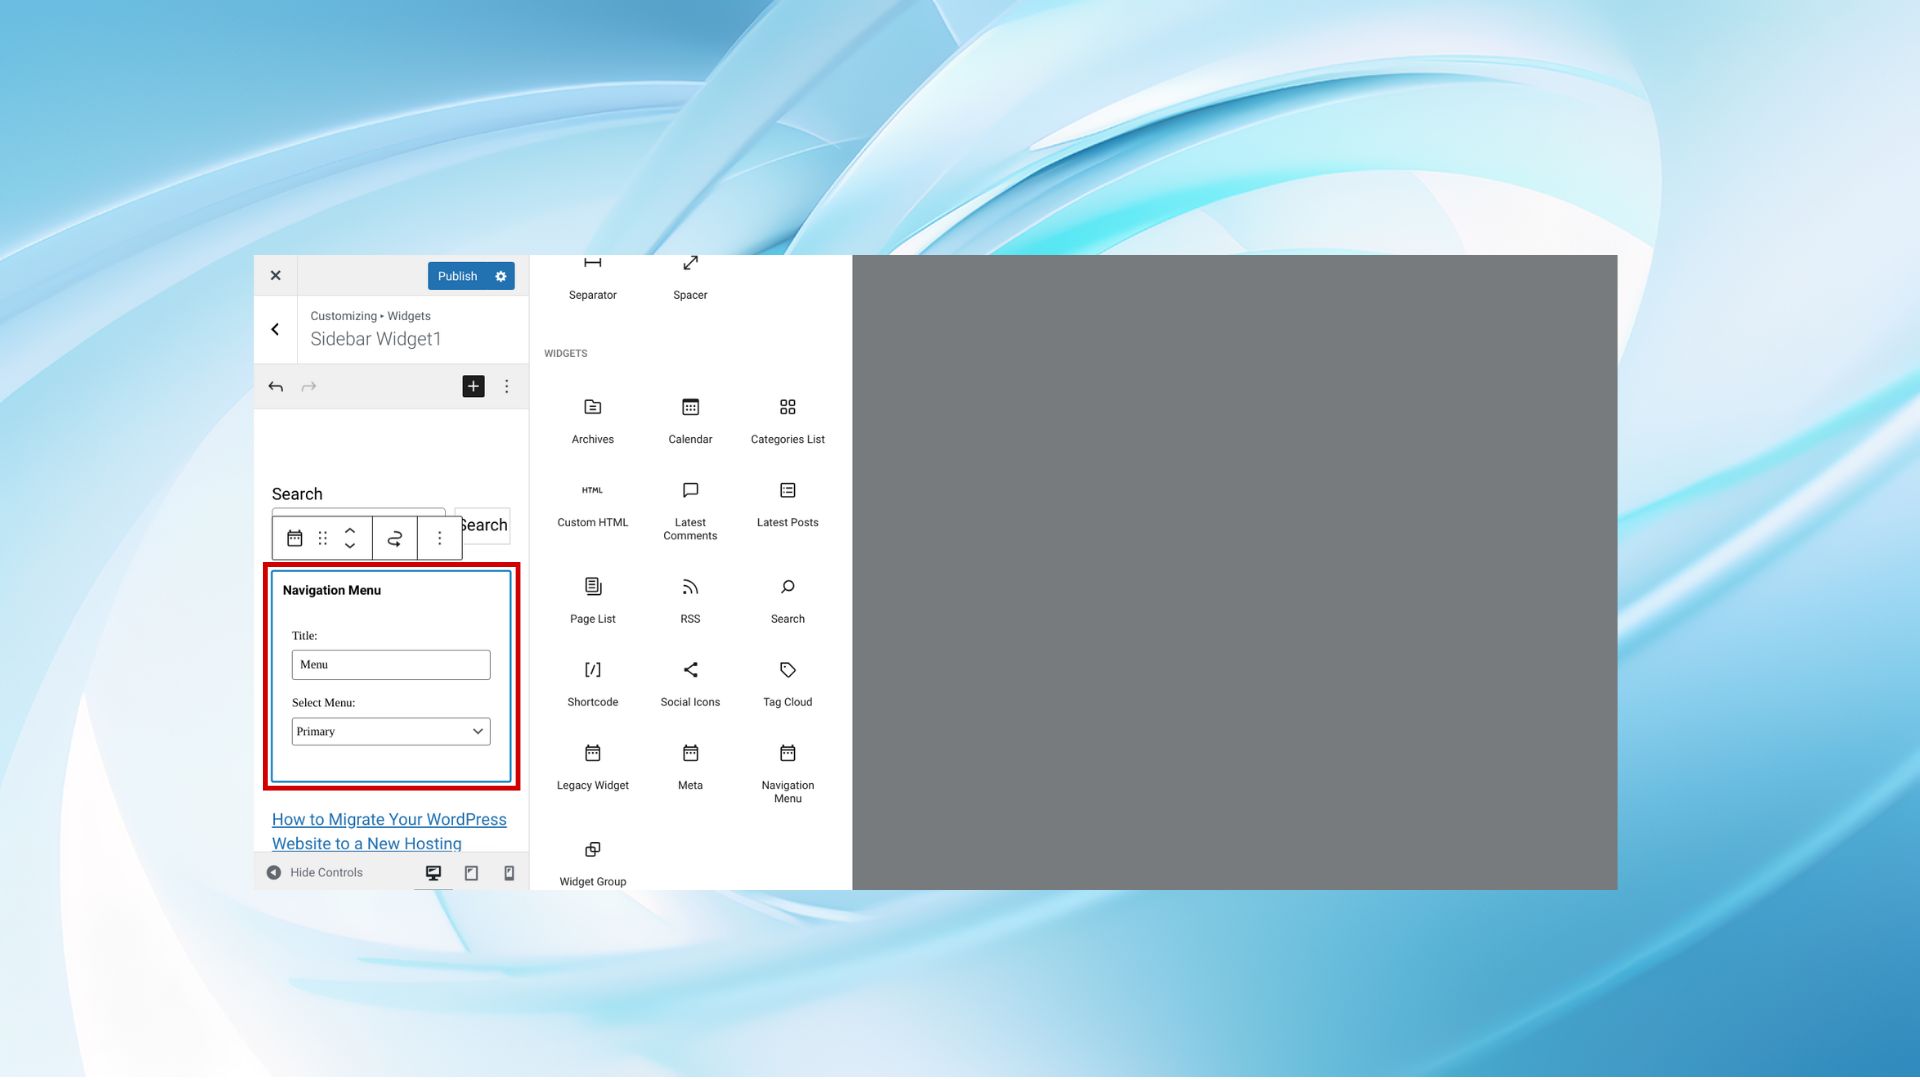
- After adding the widget, you’ll have the option to customize it. Each widget has its own set of options, such as title, number of posts to show (for recent posts widget), etc.
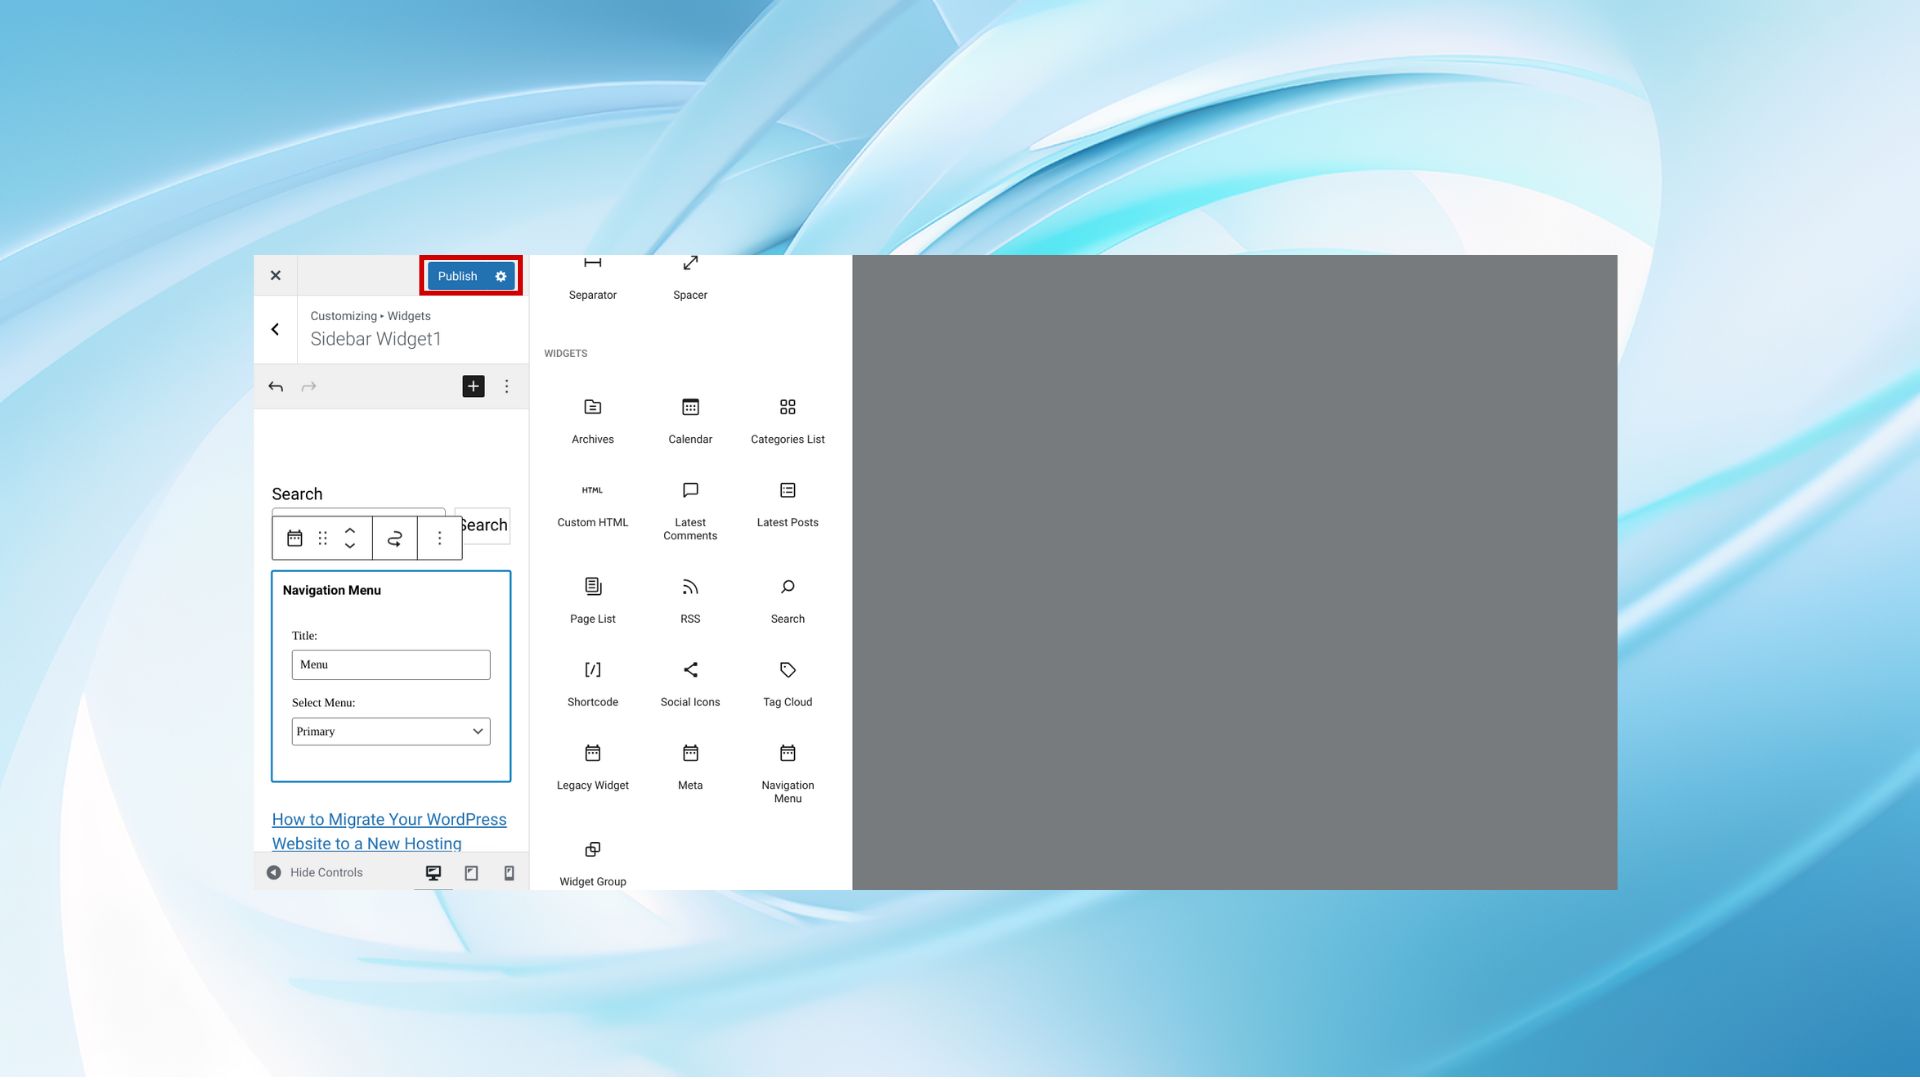
Step 5: Publish your changes
Once you’re satisfied with your widget settings and their placement, click the Publish button at the top of the Customizer to save your changes and make them live on your site.
Additional tips
- Preview on different devices: Use the device preview buttons at the bottom of the Customizer to see how your widgets look on desktop, tablet, and mobile devices.
- Experiment with widgets: Don’t be afraid to experiment with different widgets and settings. The Customizer allows you to try different configurations without affecting what visitors see until you’re ready to publish.
Using the WordPress Customizer to add widgets provides a straightforward and visual way to enhance your site’s functionality and design, with the added benefit of seeing your changes in real-time before making them live.
Customizing widgets with custom CSS
Beyond functionality, the visual harmony between your widgets and the site’s overall design is key to a cohesive user experience. Styling your widgets to match your website’s theme and branding strengthens your online identity. For those who wish to dive deeper into customization, using custom CSS offers the freedom to precisely shape the appearance of your widgets. This level of detail allows for perfect alignment with your site’s aesthetic, from colors and fonts to spacing and borders.
Here’s how you can style your widgets to align with your website’s theme and branding, with an option to use custom CSS for deeper customization:
Step 1: Understand your theme’s styling
Familiarize yourself with your website’s theme and its color scheme, typography, and layout. This will be your baseline for customizing widgets.
Step 2: Apply custom CSS
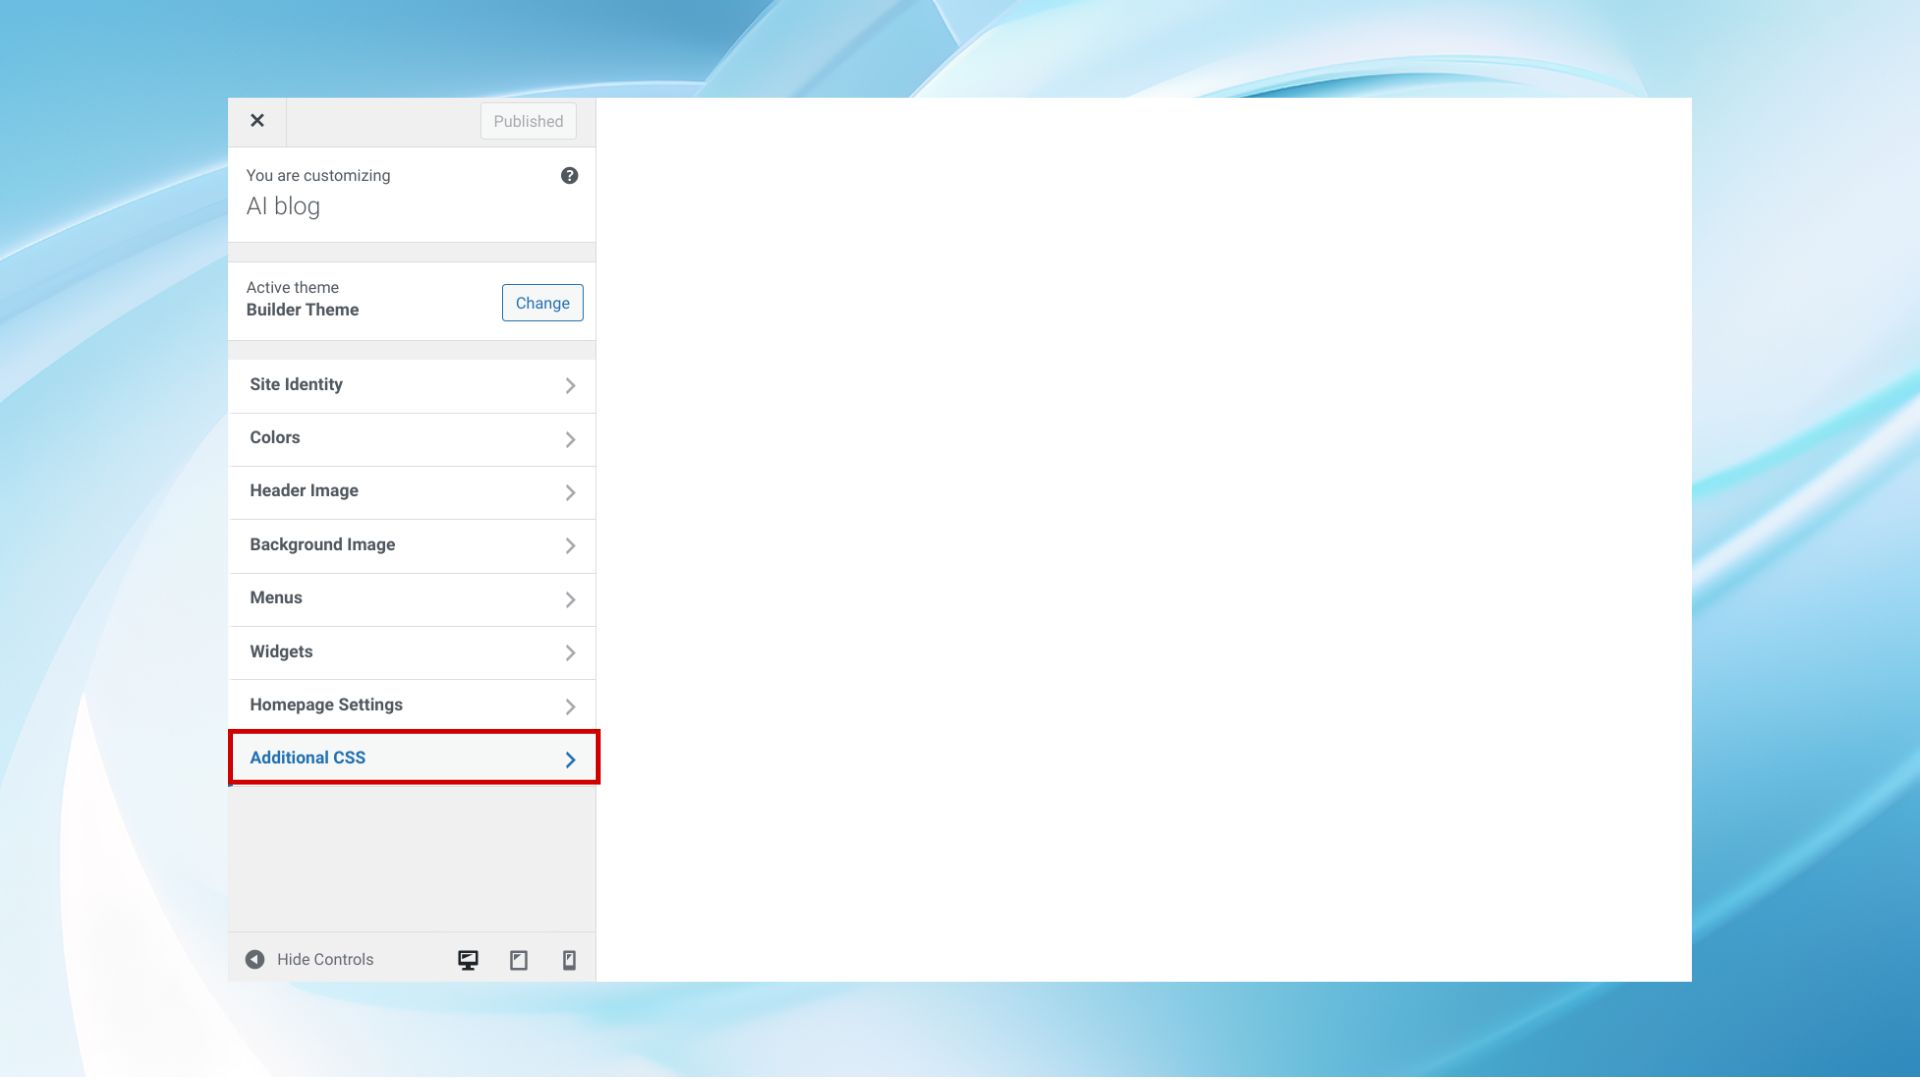
- Navigate to Appearance > Customize in your WordPress dashboard, then go to the Additional CSS section.
- To target specific widgets, you’ll need to identify their CSS classes or IDs. Use the browser’s Developer Tools (right-click on the widget and select Inspect) to find these identifiers.
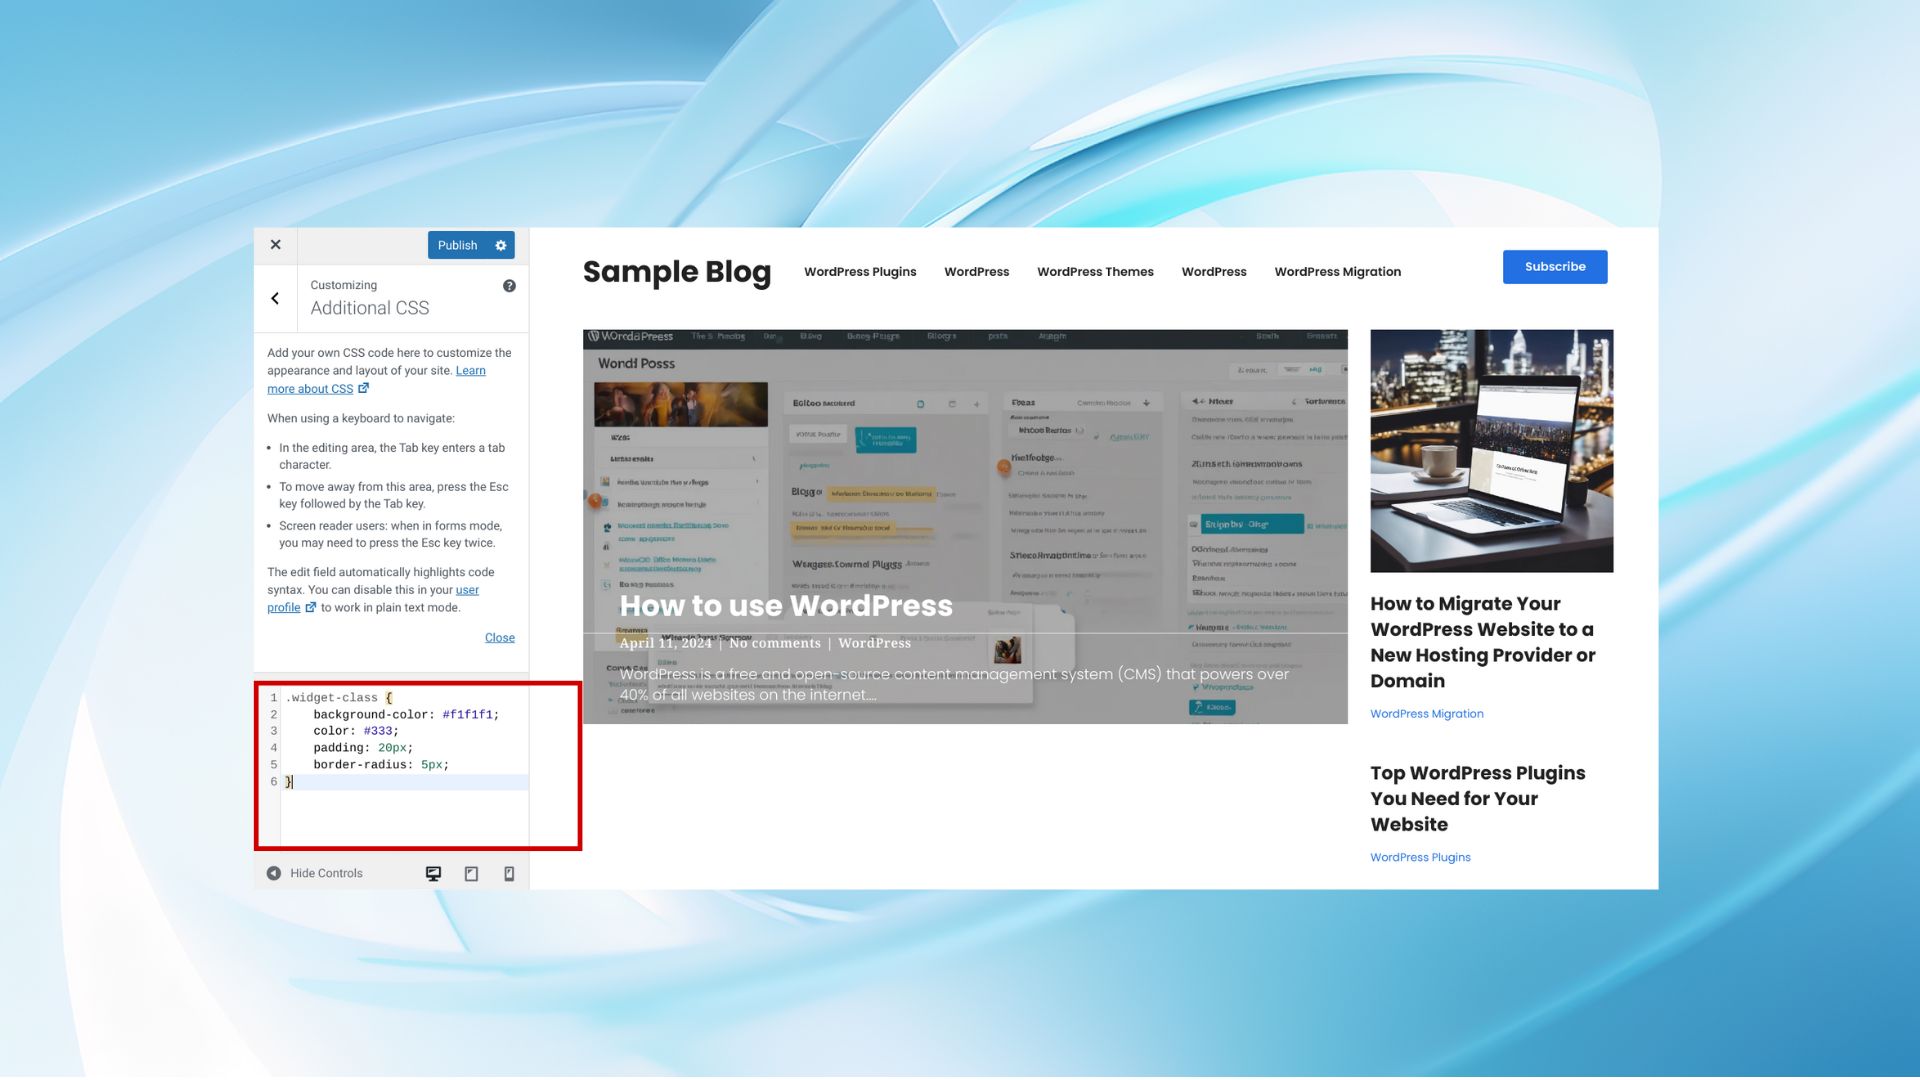
- Write custom CSS rules to adjust the widgets’ appearance, such as `color`, `font-family`, `margin`, or `border`.
.widget-class {
 background-color: #f1f1f1;
color: #333;
padding: 20px;
 border-radius: 5px;
}
Replace .widget-class with the actual class or ID of the widget you wish to customize.
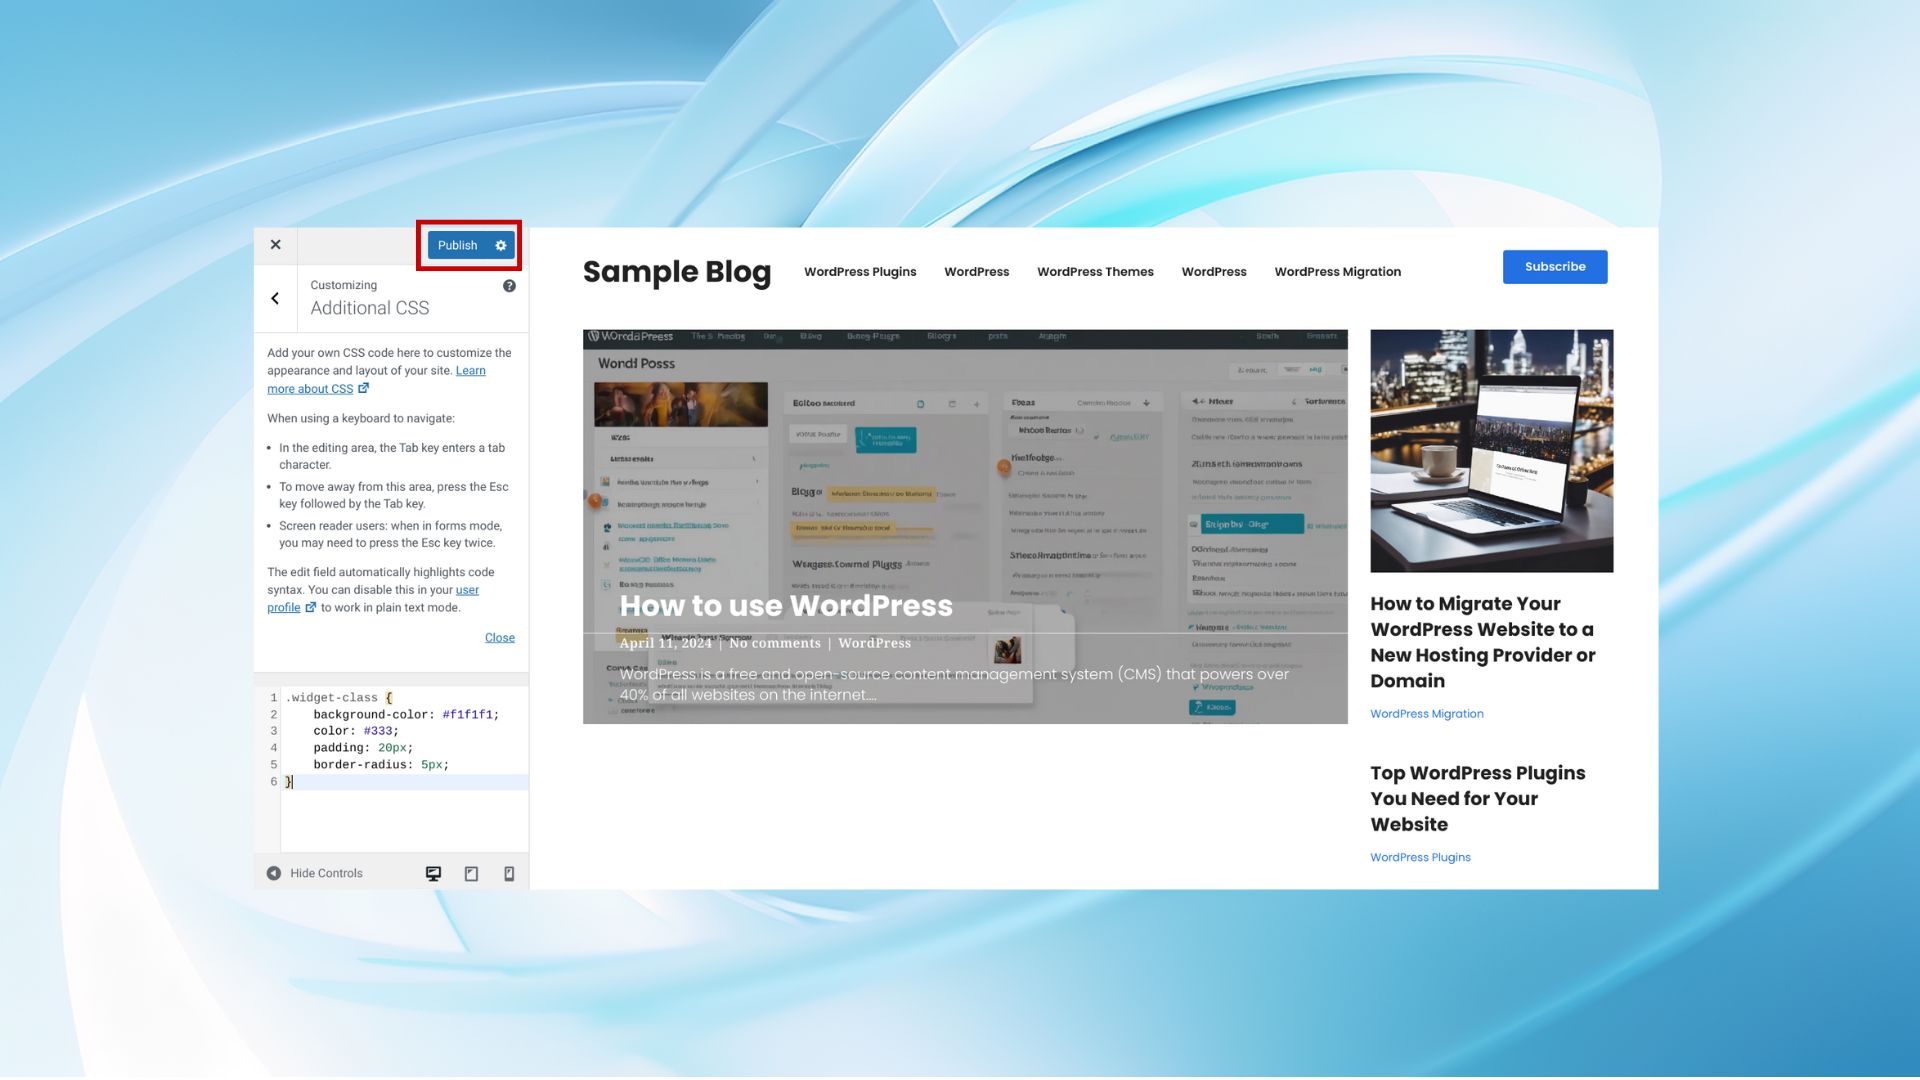
Step 3: Preview, adjust, and publish
After applying your customizations, preview your site to see how the widgets blend with the overall design. Make any necessary adjustments to ensure everything looks cohesive.
Once you’re satisfied with your changes, click the Publish button to save and publish your updated widget areas.
How to show a WordPress widget on selected posts or pages
Sometimes you need to have different widgets on different posts or pages on your WordPress site, ensuring that your content is perfectly tailored to the context of each page. Achieving this level of customization can significantly enhance the user experience by providing relevant information and tools exactly where they’re needed. Whether it’s showcasing a related posts widget on your blog articles or a special offer on product pages, the flexibility to customize widgets per page or post is a powerful feature. Let’s see how to add widgets to WordPress while customizing for each page.
Using widget visibility settings (if available):
- Navigate to Appearance > Widgets in your WordPress dashboard.
- Click on the widget you want to show on specific posts or pages.
- Look for a visibility option or button—this feature may not be available for all widgets or themes.
- Set the visibility conditions based on your requirements (e.g., show if page is x).
Using a plugin for conditional widget display:
- Install a widget management plugin like Widget Options or Display Widgets from the WordPress plugin repository.
- Activate the plugin and go to Appearance > Widgets.
- Click on the widget you wish to display conditionally.
- Use the plugin’s interface to set conditions for displaying the widget on specific posts or pages.
- Save your changes.
Either approach allows you to tailor your site’s widget display, ensuring content relevance and enhancing user experience on specific posts or pages.
Best practices for widget placement and usage
When it comes to widget placement and usage on your WordPress site, adopting best practices can significantly enhance the user experience and your website’s overall performance. Here’s how you can make the most out of widgets:
Analyze user behavior for strategic placement
Understanding how users interact with your site is crucial. Use analytics tools to track user behavior and site engagement. Place widgets in areas where they’re most likely to catch attention, such as near top navigation or at the bottom of popular articles. The goal is to ensure that widgets are both visible and relevant to your audience’s needs and interests.
Balance functionality with aesthetics
Widgets should add value to your site without cluttering it. Maintain a clean and coherent design by choosing widgets that align with your site’s theme. Ensure they don’t disrupt the overall aesthetic or user flow. Also, be mindful of your site’s loading speed; too many widgets, especially those that load external content, can slow down your site. Use performance testing tools to monitor the impact of widgets on loading times and make adjustments as necessary.
Keep widgets updated and test regularly
Widgets, like any other aspect of your website, require maintenance. Regularly check for updates to widgets you’re using, as updates can fix bugs, improve performance, and add new features. Periodically review the widgets on your site to ensure they’re still relevant and functioning as expected. Consider conducting A/B testing to compare different widgets or placement options and gauge what works best in terms of user engagement and conversion rates.
Collect and act on feedback
Feedback from your users is invaluable. Pay attention to comments or feedback related to usability issues or suggestions for your site. Users might provide insights into widgets they find useful or ones that hinder their experience. Use this feedback to iterate on your widget strategy, removing what doesn’t work and enhancing what does.
Optimize for mobile
With the increasing use of mobile devices to access the web, ensuring your widgets look good and function well on smaller screens is essential. Test your site on various devices and screen sizes to ensure widgets are responsive and don’t adversely affect the mobile user experience.
Conclusion
Now we’ve covered essential techniques on how to add widgets to WordPress, catering to both classic and block widget interfaces. Whether you’re working with the traditional method or the newer block-based approach, the steps we’ve outlined will enable you to customize and enhance your website efficiently.
From simple drag-and-drop actions in the classic interface to integrating advanced block features in the block editor, each method supports different user preferences and needs. By understanding these tools, you can better engage your audience, enrich your website’s functionality, and maintain a dynamic and interactive online presence.
Simplify WordPress with 10Web
Simplify WordPress with 10Web
Skip and automate manual work with 10Web Managed WordPress Hosting and the 10Web AI Website Builder.