

Putting your site in maintenance mode is an essential part of managing your WordPress website. When conducting updates, making changes, or fixing issues on your site, it’s important to ensure that your visitors have a smooth experience even when your site is temporarily unavailable. By activating maintenance mode, you create a courteous barrier between your work in progress and your audience. This mode informs visitors that your site is undergoing maintenance, while also preventing them from encountering broken pages or error messages.
To get started with putting your WordPress site in maintenance mode, you can utilize various methods. One of the most straightforward ways is through the use of plugins specifically designed for this purpose.
For those who prefer a more manual approach or wish to implement maintenance mode without the use of additional plugins, you can put your WordPress site in maintenance mode by adding code snippets to the functions.php file of your theme. It’s crucial, however, to ensure that you back up your website before making any direct changes.
FAQ
What steps are involved in activating maintenance mode on WordPress?
How can I create a custom maintenance page in WordPress?
Creating a custom maintenance page can be done by using a maintenance mode plugin that allows you to design and publish a maintenance page. SeedProd is one such plugin offering templates and a drag-and-drop builder to customize your maintenance page from your WordPress dashboard.
Can I put my site in maintenance mode in WordPress using Elementor?
Yes, if you’re using Elementor, there’s a built-in maintenance mode feature. You can design your maintenance page with the Elementor page builder, then choose to put WordPress in maintenance mode by going to the Elementor settings and configuring your preferences under the ‘Maintenance Mode’ tab.
How can maintenance mode be turned on without a plugin in WordPress?
To put your website in maintenance mode without using a plugin, you can add code to your theme’s functions.php file or create a .maintenance file. Both methods require you to manually insert specific code that triggers maintenance mode when visitors access your site.
What are the ways to resolve WordPress being stuck in maintenance mode?
If WordPress is stuck in maintenance mode, you can typically fix it by deleting the .maintenance file from your website’s root directory. This file is automatically generated by WordPress during updates and sometimes doesn’t get deleted after the process is complete.
Understanding maintenance mode
When you put your WordPress site in maintenance mode, it serves as a notification that your website is temporarily down for updates or changes. This feature is crucial for preserving your site’s reputation and search engine ranking while making necessary modifications.
Purpose of maintenance mode
Maintenance mode is used to signal that your website is undergoing temporary changes or updates. It provides you with the peace of mind to perform updates, implement new features, or resolve issues without negatively affecting your site’s user experience. By communicating this status to your visitors, you maintain transparency and preempt confusion or frustration.
Impact on visitors
When maintenance mode is active, visitors are typically greeted with a notification screen that informs them of the ongoing maintenance. This screen can provide useful information, such as the reason for downtime and an estimated time when your site will be back online. It’s essential to craft this message thoughtfully to ensure visitors understand the situation and are encouraged to return.
Search engine considerations
For search engines, maintenance mode can be handled carefully to avoid any negative impact on SEO and your site’s search engine ranking. It’s important to return the correct HTTP status code to ensure that search engines understand that the downtime is temporary. Using the 503 status code tells search engines to check back later without demoting your site for being inaccessible. This strategy helps maintain your reputation in search engine results during the maintenance period.
Simplify WordPress with 10Web
Automate manual work with 10Web Managed WordPress Hosting and 10Web AI Website Builder. Optimize your WordPress website effortlessly.
Preparing for maintenance
Before entering maintenance mode for your WordPress site, it’s crucial to have a clear plan in place. The way you prepare can significantly impact the duration and success of the updates or changes you are implementing.
Assessing the scope of changes
Determine whether you’re updating themes, plugins, or core files. This will affect the complexity and duration of the maintenance.
- Updates: List out each update with its expected impact.
- Fixes: Note any specific bugs you plan to address.
- Changes: Clearly define any content or design changes to be made.
By understanding the extent of the work needed, you can estimate the downtime required and prepare accordingly.
Communication strategies
Communicate upcoming maintenance effectively to minimize inconvenience to your site visitors.
- Coming soon page: Implement a ‘Coming Soon’ or ‘Under Maintenance’ page with details about the maintenance.
- Social media: Utilize social media platforms to inform your audience beforehand.
- Contact details: Keep your contact details visible for users to reach out if needed.
Be transparent about the nature of the updates and offer reassurance that the site will be back with improvements.
Scheduling downtime
Choose a time for maintenance when website traffic is typically low to lessen the impact on visitors.
- Low-traffic window: Identify your site’s off-peak hours through analytics data.
- Time estimate: Communicate how long the site will be under maintenance.
- Monitoring: Be prepared to monitor the site’s return to functionality to address any immediate issues.
Organizing the maintenance for a specific window can help streamline the process and set clear expectations for your users.
How to put your site in maintenance mode
When you’re updating your WordPress site, enabling maintenance mode is essential to prevent visitors from encountering errors or a broken site. It’s a straightforward process that can be accomplished either by using a plugin or by manually editing code. Choose the method that best suits your comfort level with WordPress.
Using a maintenance mode plugin
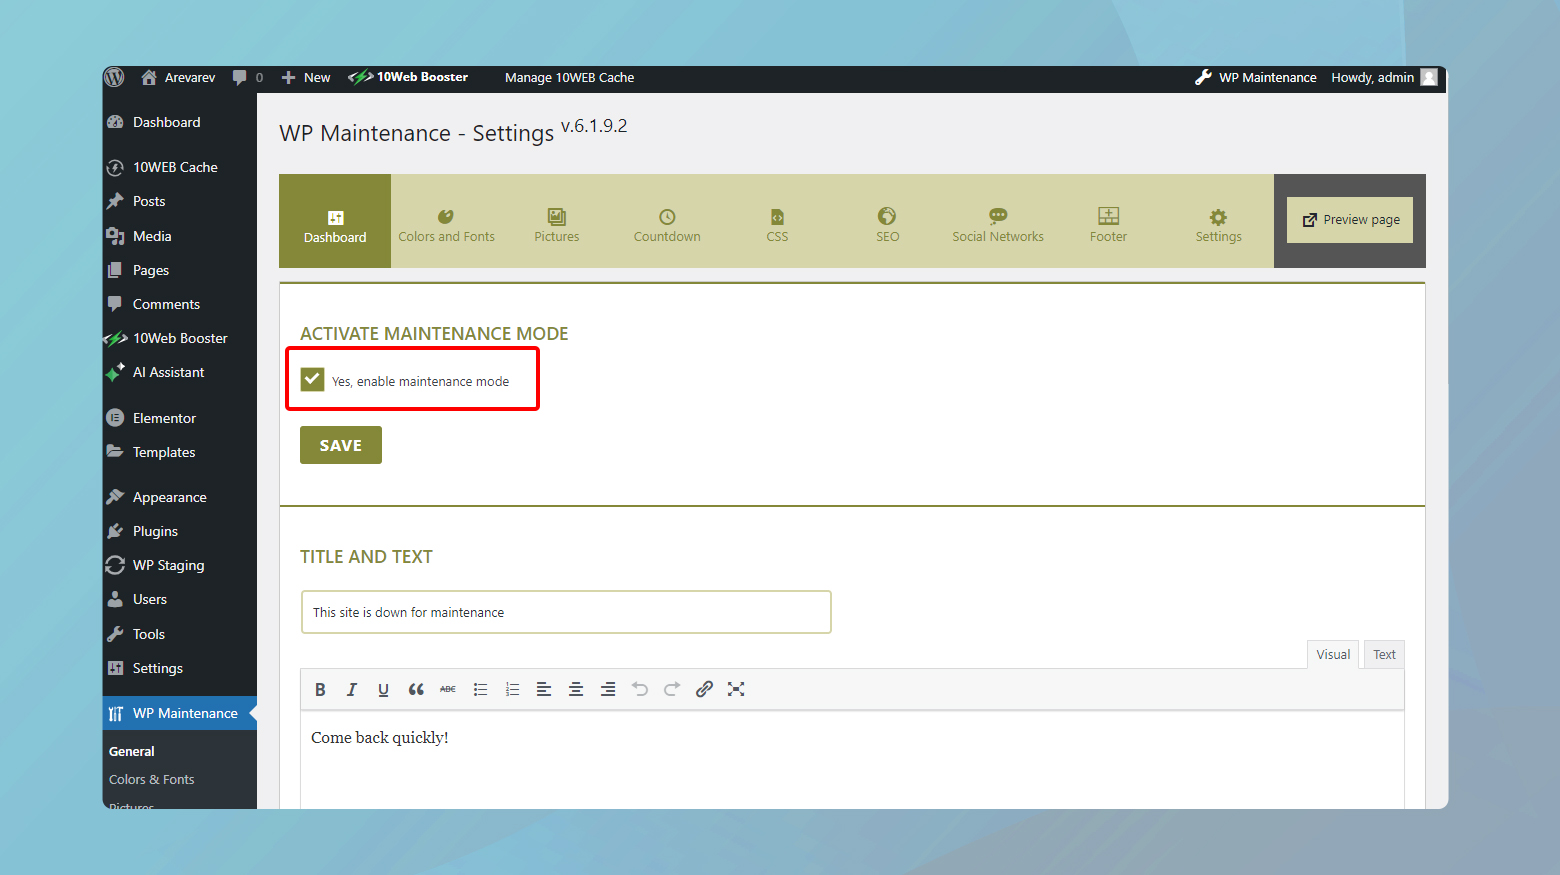
Using a plugin is the most user-friendly way to activate maintenance mode. One popular choice is the WP Maintenance Mode plugin. Here are the steps:
- Install the WP Maintenance Mode plugin from the WordPress plugin repository.
- Activate the plugin through your WordPress dashboard.
- Navigate to Settings > WP Maintenance Mode.
- Set the mode to Activated to put your site in maintenance mode.
Simplify WordPress with 10Web
Automate manual work with 10Web Managed WordPress Hosting and 10Web AI Website Builder. Optimize your WordPress website effortlessly.
Manual activation via code
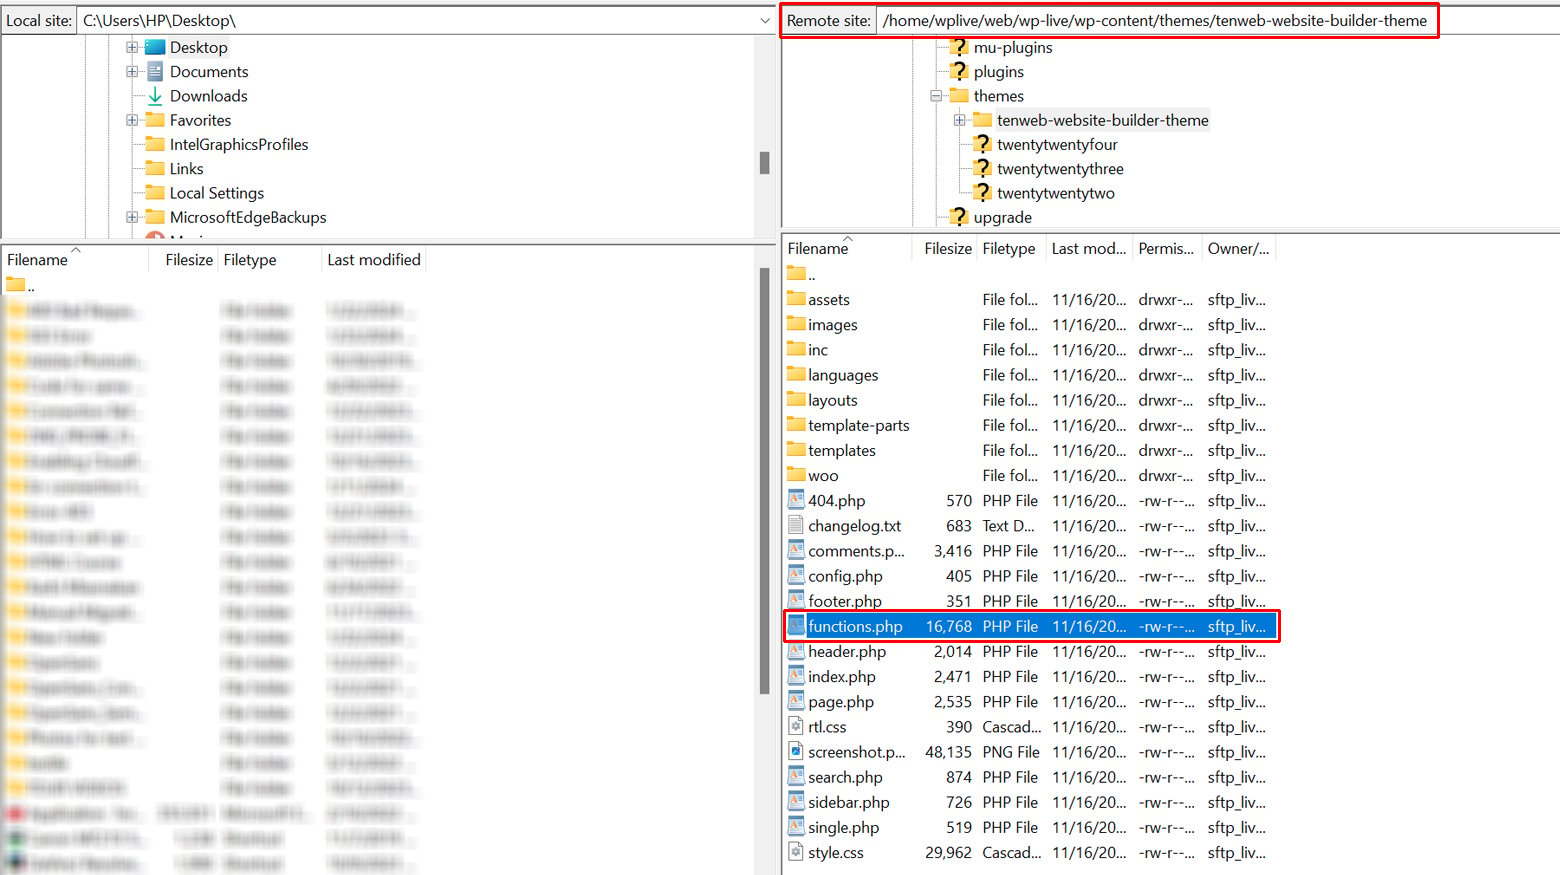
If you are more technically inclined, you can manually put your WordPress website in maintenance mode by editing your site’s functions.php file. Below is how:
-
- Access your WordPress theme’s functions.php file.
- At the end of the file, insert a snippet of code that triggers maintenance mode.
function wp_maintenance_mode() {
if (!current_user_can('edit_themes') || !is_user_logged_in()) {
wp_die('<h1>Under Maintenance</h1><br />Website under planned maintenance. Please check back later.');
}
}
add_action('get_header', 'wp_maintenance_mode');
- Save your changes to activate.
How to put your site in maintenance mode using hPanel dashboard
If your hosting provider offers an hPanel dashboard, you can typically enable maintenance mode through it:
- Locate File Manager within your hPanel dashboard.
- Edit the .htaccess file within your site’s root folder or create a .maintenance file to activate maintenance mode.

Remember, whichever method you choose, always verify that maintenance mode is activated by visiting your site’s front end.
Simplify WordPress with 10Web
Automate manual work with 10Web Managed WordPress Hosting and 10Web AI Website Builder. Optimize your WordPress website effortlessly.
Customizing the maintenance page
When your WordPress site is under maintenance, it’s crucial to present visitors with a clear and aesthetically pleasing maintenance page. Customization allows you to maintain your brand’s look and feel even when updating your site.
Design and layout
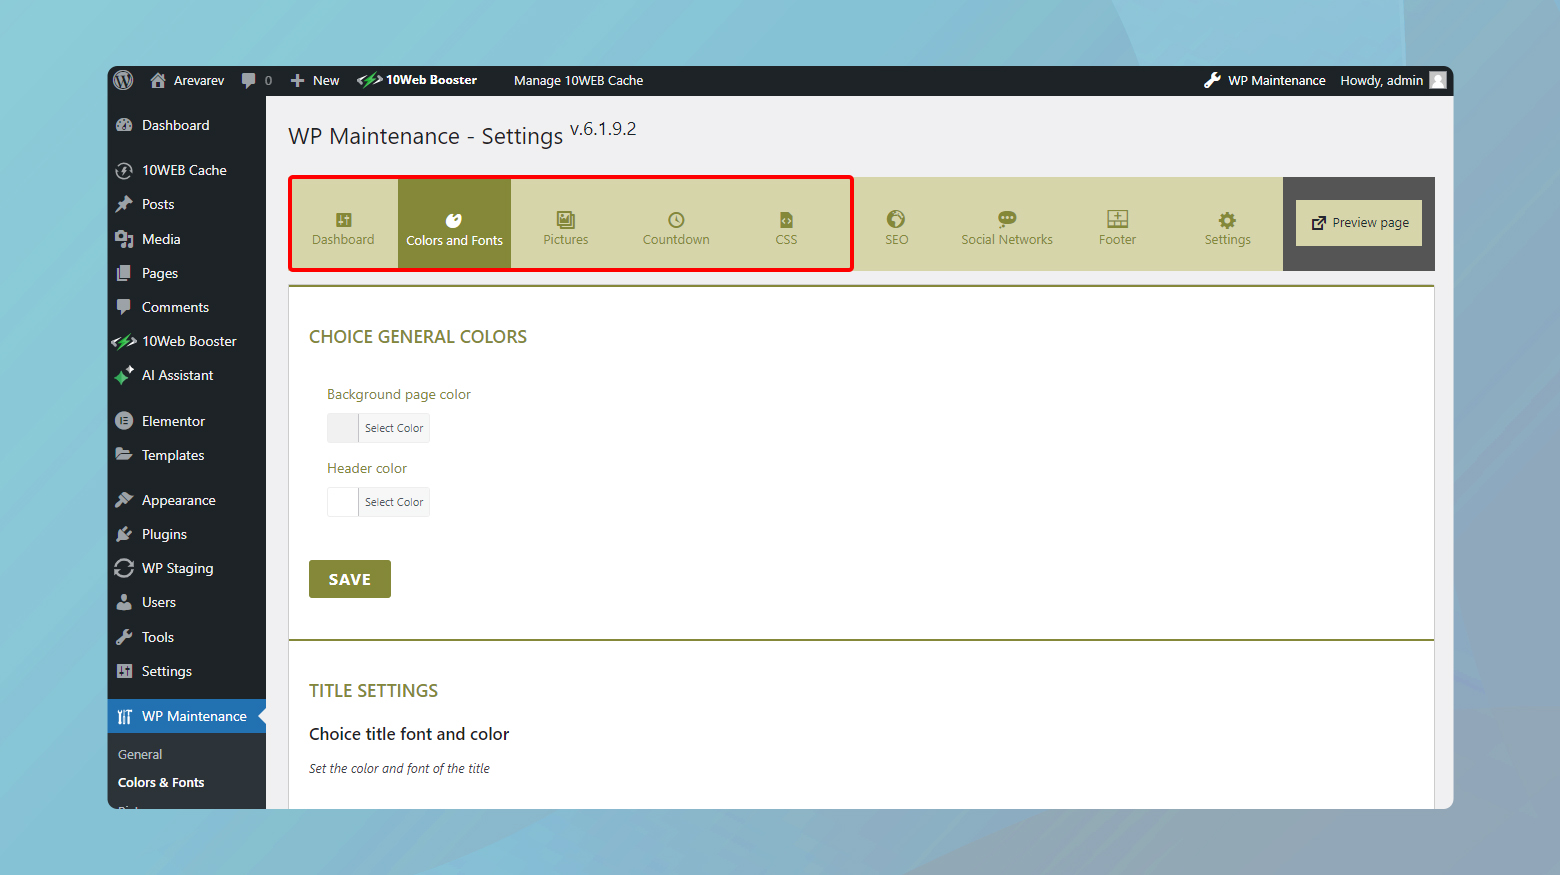
Your maintenance mode page should align with your site’s overall design to ensure brand consistency. Themes and templates serve as the foundation for your maintenance page’s appearance. You can select from a variety of pre-designed templates or create a custom design to match your brand. Consider the following elements for customization:
- Background: Choose a color or image that complements your brand.
- Layout: Position elements like text and buttons in a user-friendly manner.
- Colors and fonts: Ensure your text is readable and the color scheme matches your website.
Remember, your maintenance page is an extension of your website and should reflect the same level of professionalism and style.
Adding custom messages and contact information
A custom message provides clarity to your visitors about why they can’t access your site. Keep your message concise and informative. Here’s how you can add valuable content to your maintenance page:
- Custom message: Explain the maintenance activity in a brief text. Use a friendly tone to reassure your visitors.
- Contact information: Offer a way to reach out. Include an email address or a contact form link.
- Maintenance duration: Give an estimated timeframe for when the site will return online.
- Updates: Optionally, add a sign-up button for updates to keep your visitors informed.
By providing essential information and maintaining open channels for communication, you ensure a positive experience even during downtime.
Advanced features and functionalities
When you put your WordPress site in maintenance mode, you have the opportunity to not only notify visitors of ongoing updates but also to keep them engaged. Advanced features such as subscription options, timers, and social media links can enhance the user experience even when your site is temporarily offline.
Adding subscription options
You can incorporate a subscription form module directly on your maintenance mode landing page. This enables visitors to subscribe to updates and get notified when your website goes live again. Make sure you include a clear contact form with fields for users to enter their email addresses.
How to add a subscription form
- Install a maintenance plugin that supports subscription modules.
- Configure the plugin’s settings to display a subscription form.
- Collect email addresses in a database or integrate with an email service provider.
Countdown timer and progress bar
Adding a countdown timer creates anticipation for your website’s return. A progress bar can be useful for showing the current status of the updates. These features communicate transparency and can reduce visitor frustration.
Steps to include timers and progress bars:
- Select a plugin with timer and progress bar functionalities.
- Customize the design to match your site’s branding.
- Set the timer to count down to the estimated live time.
Social media integration
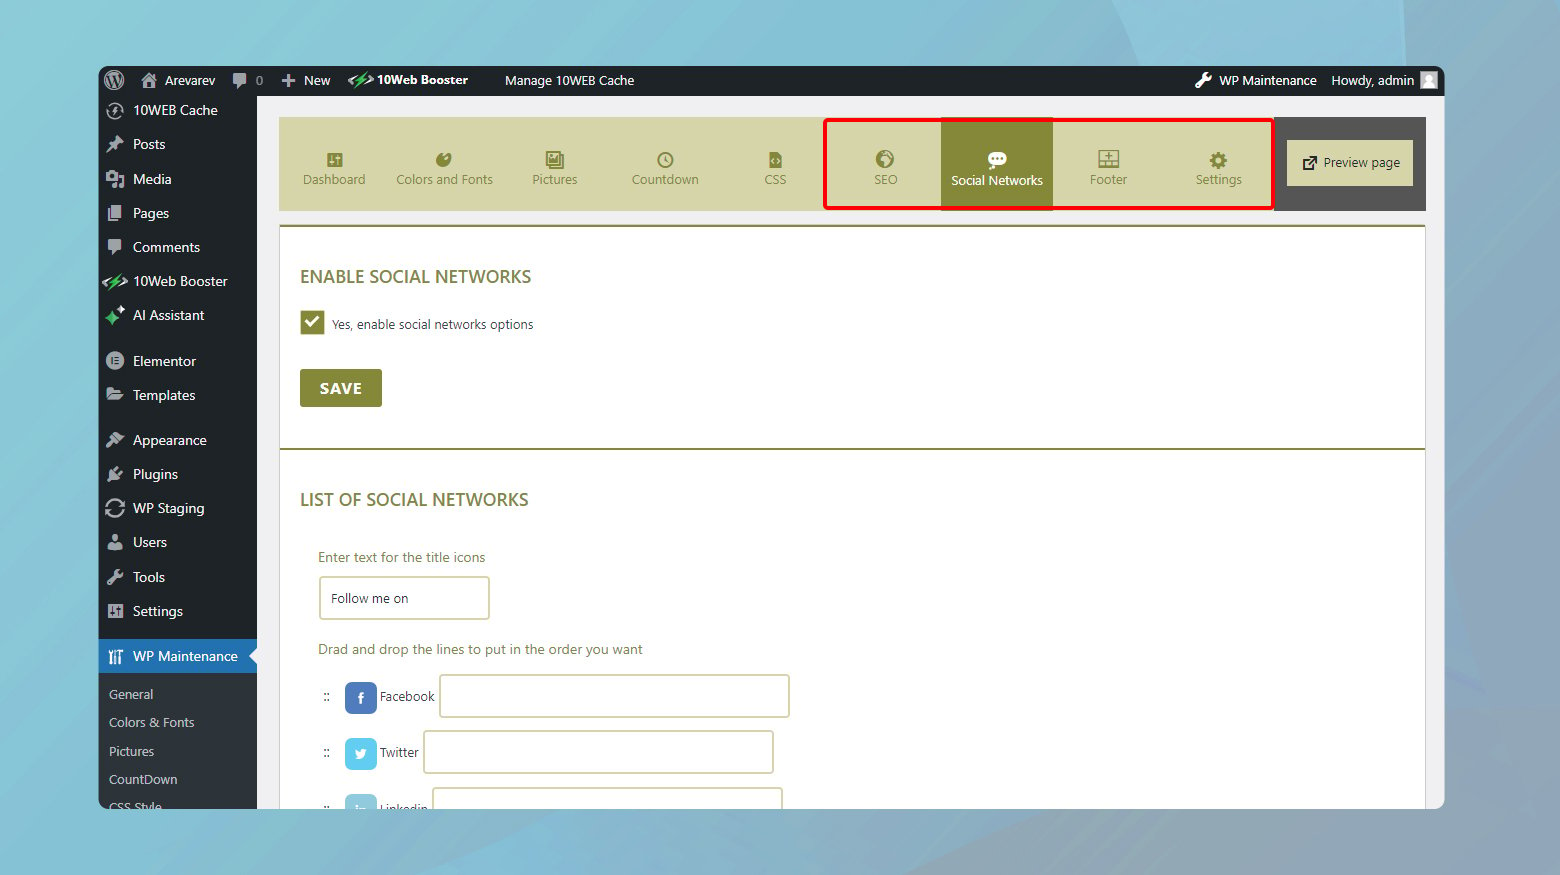
Social media integration allows you to connect with your audience on different platforms while your site is under maintenance. Directing them to your social media accounts keeps the lines of communication open.
How to add social media links:
- Choose a plugin with social media module options.
- Add your social media profile URLs to the appropriate fields.
- Design the icons to align with the overall look of your maintenance page.
Simplify WordPress with 10Web
Automate manual work with 10Web Managed WordPress Hosting and 10Web AI Website Builder. Optimize your WordPress website effortlessly.
Managing site accessibility during maintenance
During website maintenance, it’s crucial to manage who can view your site and what remains accessible. WordPress allows for precise control over these aspects, ensuring that necessary users can still perform their duties while visitors see a maintenance mode page.
Setting up user roles and access
In your WordPress dashboard, under the Settings menu, you have the option to define which user roles can have access to the site during maintenance mode. Typically, you’d want to allow Administrators to have full access. To do so:
- Navigate to the maintenance mode plugin settings.
- Look for the section labeled Access or Permissions.
- Check the roles that should have access, such as Administrator.
- Save your changes.
Remember, users with the selected roles will need to login to see the site.
Excluding URLs from maintenance
Sometimes you may need certain parts of your website to remain accessible to all visitors, like a contact page or a privacy policy. To exclude specific URLs from maintenance mode:
- Look for a setting within your plugin labeled Exclusions or Exclude URLs.
- Enter the URLs you want to exclude from maintenance.
- Use relative paths (e.g., /contact instead of https://yoursite.com/contact).
By carefully managing accessibility and exclusions, you can maintain a functional user experience even while performing site maintenance.
Simplify WordPress with 10Web
Automate manual work with 10Web Managed WordPress Hosting and 10Web AI Website Builder. Optimize your WordPress website effortlessly.
Finalizing and disabling maintenance mode
Before you deactivate maintenance mode, ensuring that your updates function correctly and preparing for a seamless transition back to live status are critical steps.
Testing updates and functionality
After implementing updates, rigorously test your website’s functionality. This includes checking all pages, links, forms, and any other interactive elements to confirm they work as expected. Specifically, you should:
- Verify plugin and theme updates by navigating through your site as both an admin and a user.
- Perform a responsiveness test to ensure your site displays correctly on various devices and browsers.
- Check for 404 errors and resolve any broken links that could impact user experience and search engine rankings.
Smooth transition back online
When you’re confident that your site is ready, moving back online should be swift and trouble-free. Follow these quick steps:
- If you’ve used a plugin to initiate maintenance mode, navigate to the settings of the plugin and click the button to deactivate.
- Should you have manually set maintenance mode by editing the functions.php file, remove or comment out the code snippet you added to disable it.
- After deactivation, clear any caching mechanisms on your site to ensure that users will see the updates immediately.
- Announce the completion of maintenance on your social media or through an email newsletter to inform users that your site is back online.
Remember to test your site’s visibility on search engines post-maintenance to ensure your presence remains uninterrupted.
Troubleshooting common issues
When enabling Maintenance Mode in WordPress, it’s essential to smoothly navigate through occasional stumbling blocks. Confident and clear guidance is here to help you troubleshoot the two most common issues: plugin conflicts and access problems.
Handling plugin conflicts
If you’re encountering errors after activating Maintenance Mode, plugins may conflict with each other. To diagnose and resolve this issue:
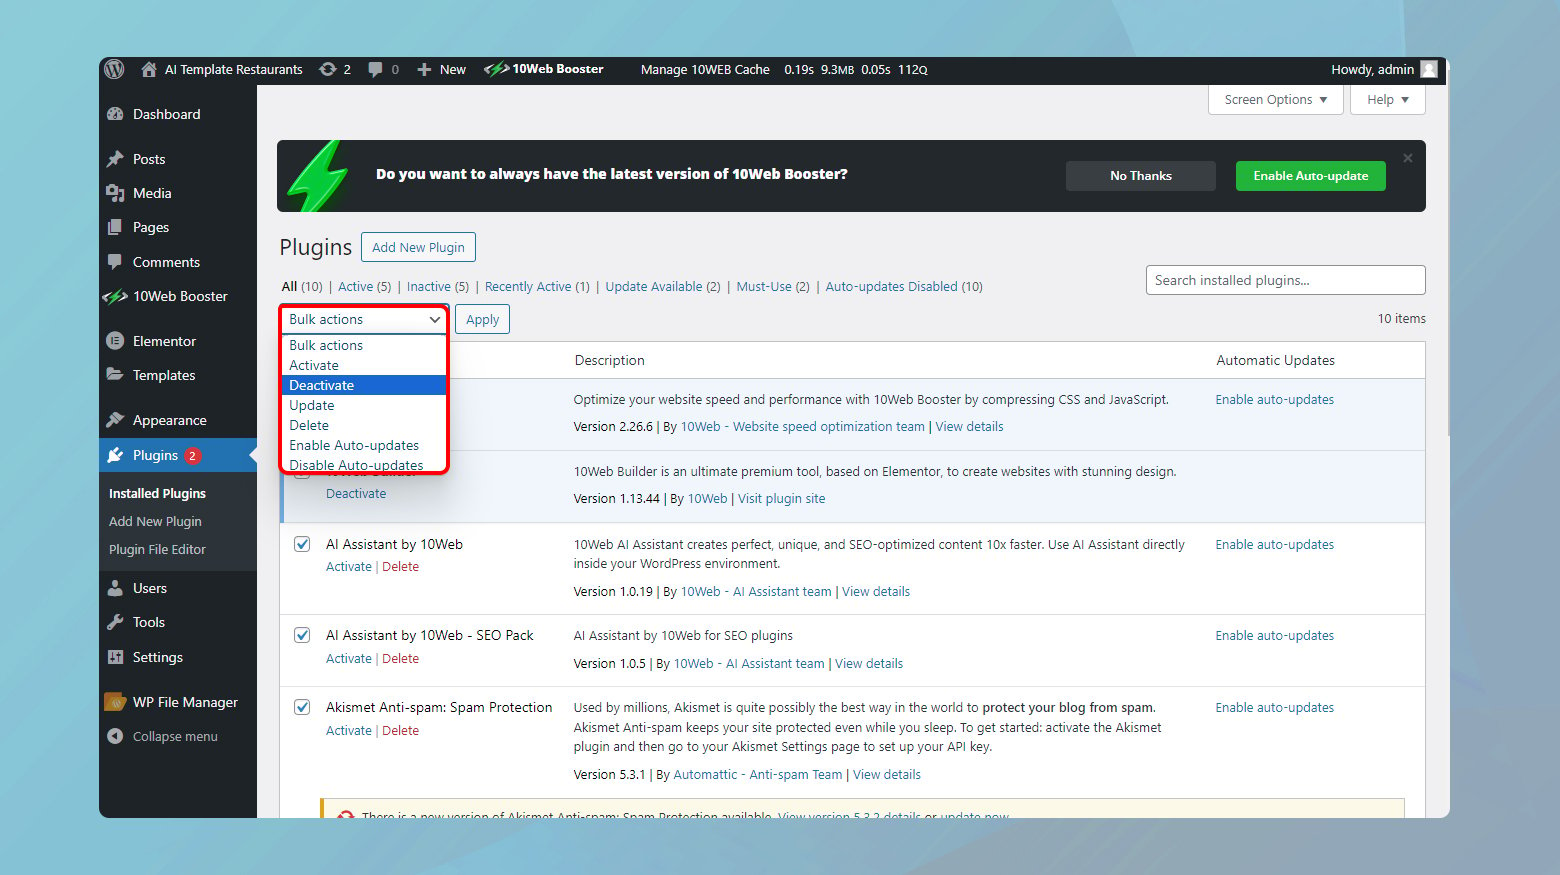
- Deactivate all your plugins from the WordPress dashboard. You do this by navigating to the “Plugins” section and selecting “Deactivate” from the bulk actions menu.
- Reactivate them one by one, each time checking to see if the site returns to maintenance mode properly.
- If you discover a conflict, reaching out to the plugin’s developer or checking the plugin’s support forums may offer a solution. Alternatively, you may choose to replace the troublesome plugin with an alternative.
Remember that it’s crucial to backup your site before making any changes, in case you need to revert to a previous state.
Resolving access problems
Sometimes, after placing WordPress in Maintenance Mode, you might find yourself unable to access your dashboard. In such cases:
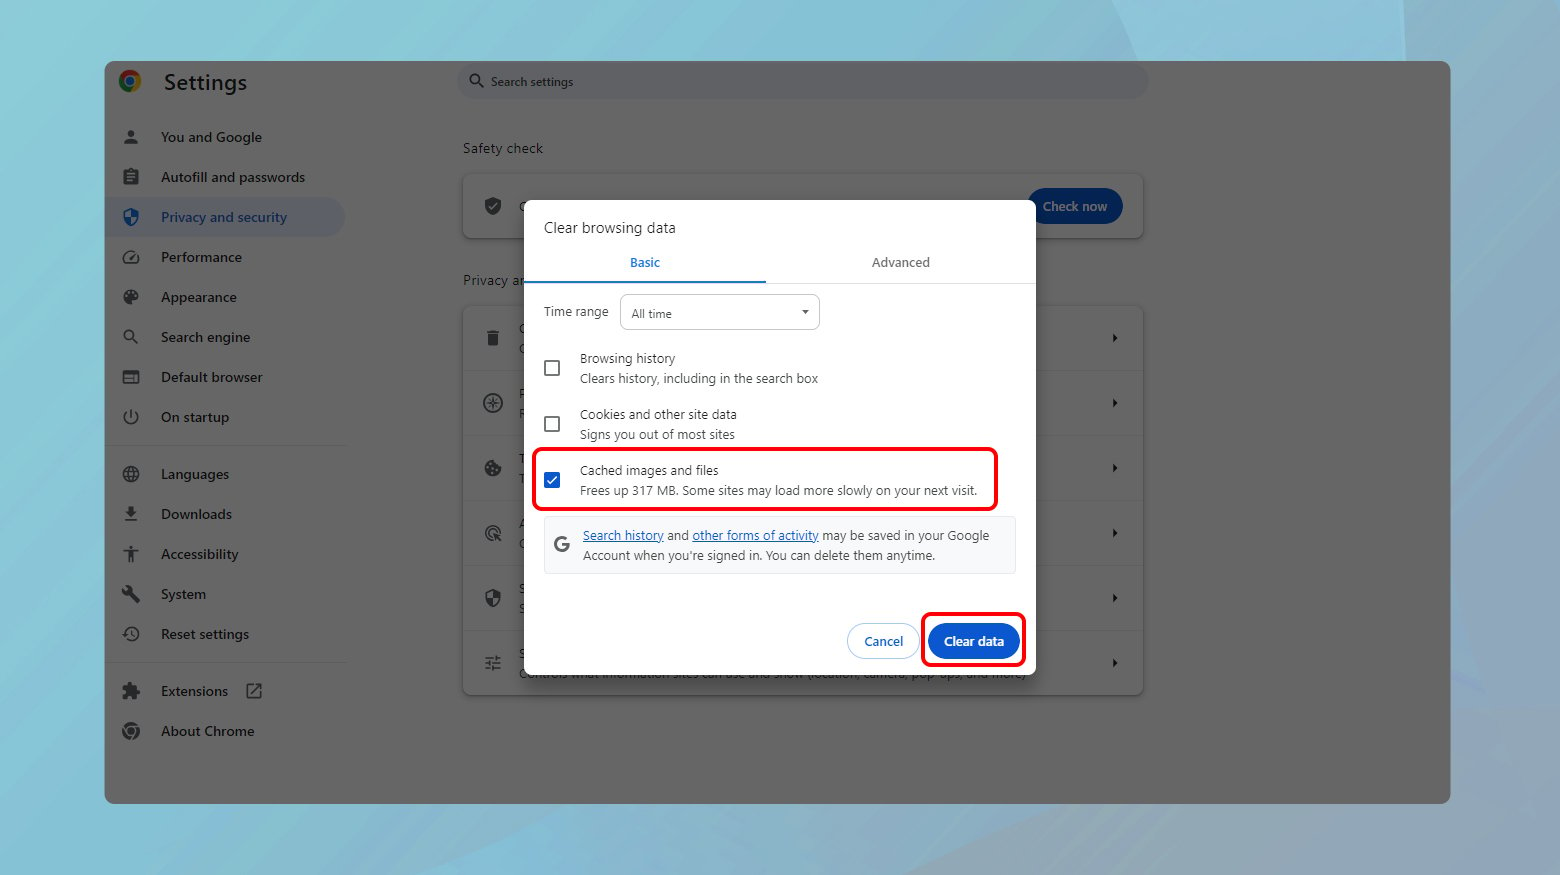
- Clear your browser cache and attempt to log in again; cached versions of your site could be interfering with the login process.
- If the problem persists, access your site using a FTP client or your hosting provider’s File Manager. Navigate to the root directory and delete the .maintenance file.
- Alternatively, if you have access to your hosting account, some providers offer the option to disable maintenance mode directly from their dashboard.
By methodically working through these steps, you can effectively troubleshoot and resolve the common issues experienced with WordPress Maintenance Mode. Always ensure you have a direct line of communication with your hosting provider for additional support when needed.
Conclusion
Implementing maintenance mode on your WordPress website is a crucial step for maintaining a positive user experience during updates, changes, or troubleshooting.
Whether you opt for plugin-based solutions for their ease of use and functionality or prefer manual coding methods for a more customized approach, the end goal remains the same: to provide a seamless transition for your visitors.
Maintenance mode not only safeguards your site’s reputation and search engine ranking but also offers a platform to communicate directly with your audience, minimizing potential frustrations.
Simplify WordPress with 10Web
Simplify WordPress with 10Web
Skip and automate manual work with 10Web Managed WordPress Hosting and the 10Web AI Website Builder.


