
Imagine you’re updating your WordPress site, eagerly waiting for new features or security fixes to be applied. But instead of a successful update message, your site seems to freeze in time, displaying a message that it’s in maintenance mode and leaving your visitors unable to access your content. This scenario is more common than you might think and can cause a bit of a panic. Essentially, WordPress automatically puts your site in maintenance mode during updates. If everything goes as planned, this mode is so brief that you might not even notice. However, if there’s an issue in the update process, your site might get stuck in this temporary state. This can stem from issues with your server, your internet connection during the update, or a problem with the update files themselves.
In this guide, we’ll cover:
- Understanding the mechanics behind WordPress maintenance mode.
- Identifying the common culprits that lead to your site getting stuck.
- Practical steps to fix the issue and prevent it from recurring.
Variations of the issue
The stuck in maintenance mode issue can manifest in several ways, depending on how your WordPress site is set up, the hosting environment, and the specific updates being applied. Some common variations include:
- A plain white screen with a simple message stating your site is under maintenance.
- An error message that explicitly mentions maintenance mode.
- A custom maintenance mode page if you’re using a maintenance mode plugin.
Reasons why this error occurs
Several factors can cause your WordPress site to get stuck in maintenance mode, including but not limited to:
Update interruptions: If the update process is interrupted—perhaps due to a lost internet connection or server timeout—WordPress might not complete the necessary steps to exit maintenance mode.
Permission issues: WordPress needs specific file permissions to update and remove the maintenance file. Incorrect permissions can prevent this process from happening.
Plugin conflicts: Sometimes, a plugin may conflict with the update process, especially if it’s not compatible with the new version of WordPress or other plugins.
Hosting timeouts: On some hosting platforms, long processes like updates can exceed maximum execution times, leaving the job unfinished.
How to fix WordPress stuck in maintenance mode
When your WordPress site stays in maintenance mode, it’s usually during or after an update. During an update, WordPress automatically creates a file called .maintenance in your site’s root folder. This allows WordPress to put your site into maintenance mode, which is usually for a brief moment. However, sometimes WordPress gets stuck in maintenance mode. Let’s dive into how to remove that sign and get your site back up and running.
Removing the .maintenance file
The most straightforward step to fix your site is to delete the .maintenance file. This file acts as a switch for maintenance mode, and removing it brings your site out of maintenance mode, thus fixing the issue.
Here’s how to do it:
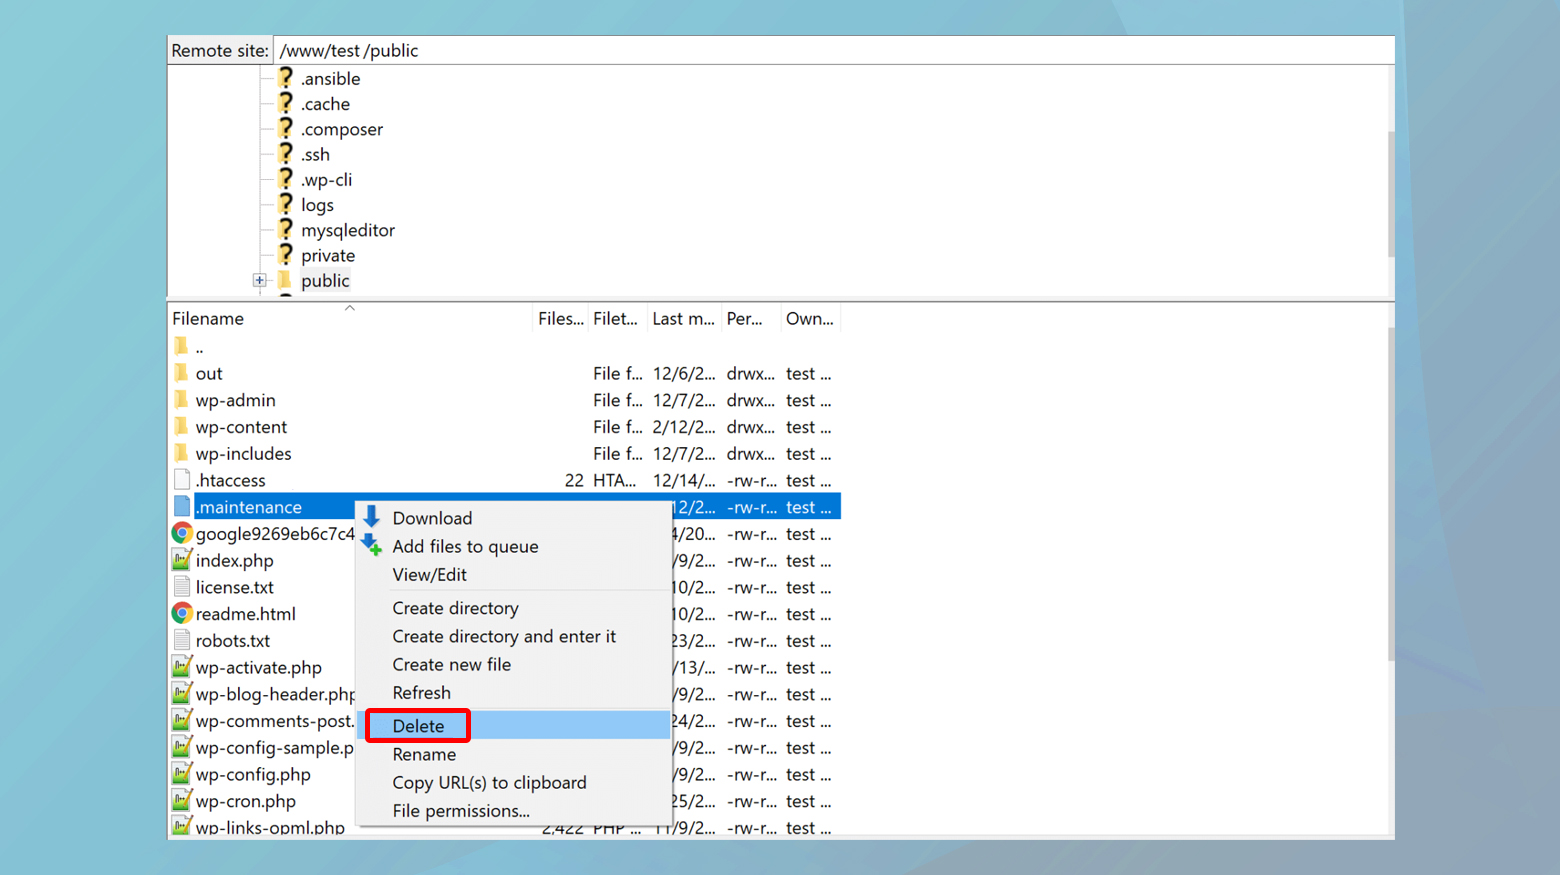
- Connect to your site server through an FTP (File Transfer Protocol) or SFTP (Secure File Transfer Protocol) client.
- If you’re using a web host like 10Web, you can find instructions on how to connect here.
- Once connected, head to the root directory of your WordPress installation. This is typically where you’ll find the wp-admin folder and the wp-config.php file.
- In the root folder, look for a file named .maintenance. Once you find it, delete it. This action should effectively pull your site out of maintenance mode.
Clearing your WordPress cache
After removing the `.maintenance` file, it’s a good practice to clear your site’s cache. This ensures that your visitors won’t see a cached version of the maintenance mode page. Clearing the cache varies by hosting platform, but if you’re a 10Web customer, for example, you can easily do this from your 10Web dashboard or directly from your WordPress admin toolbar.
Here is how:
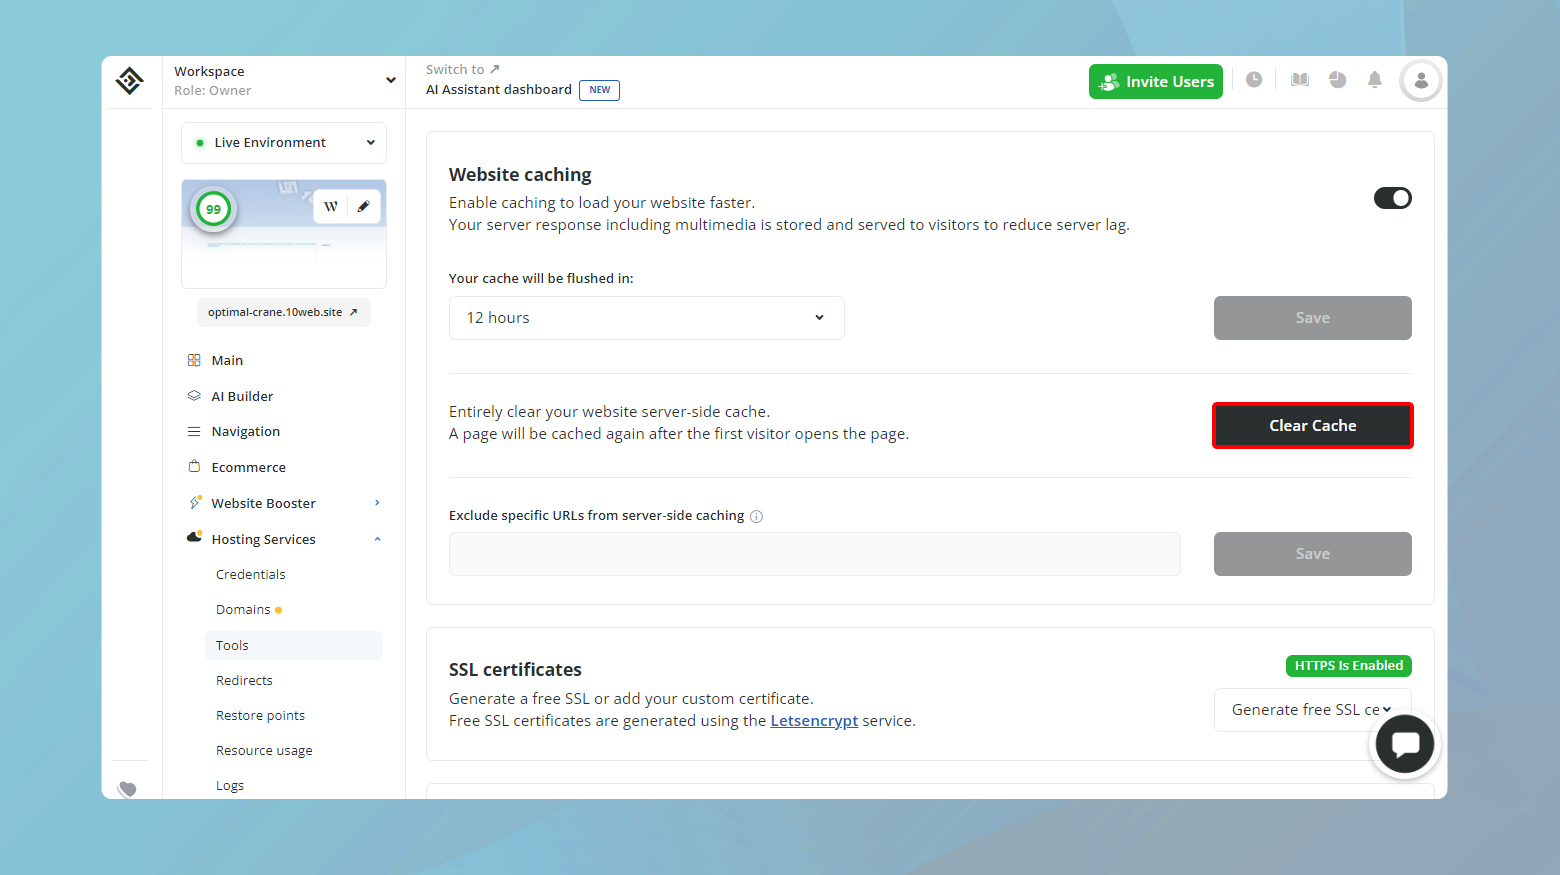
- Log in to your 10Web dashboard.
- Click on the website you have just removed from maintenance mode.
- Navigate to Website Booster > Settings and click on Clear Cache.
You can also clear your website cache from your WordPress dashboard:
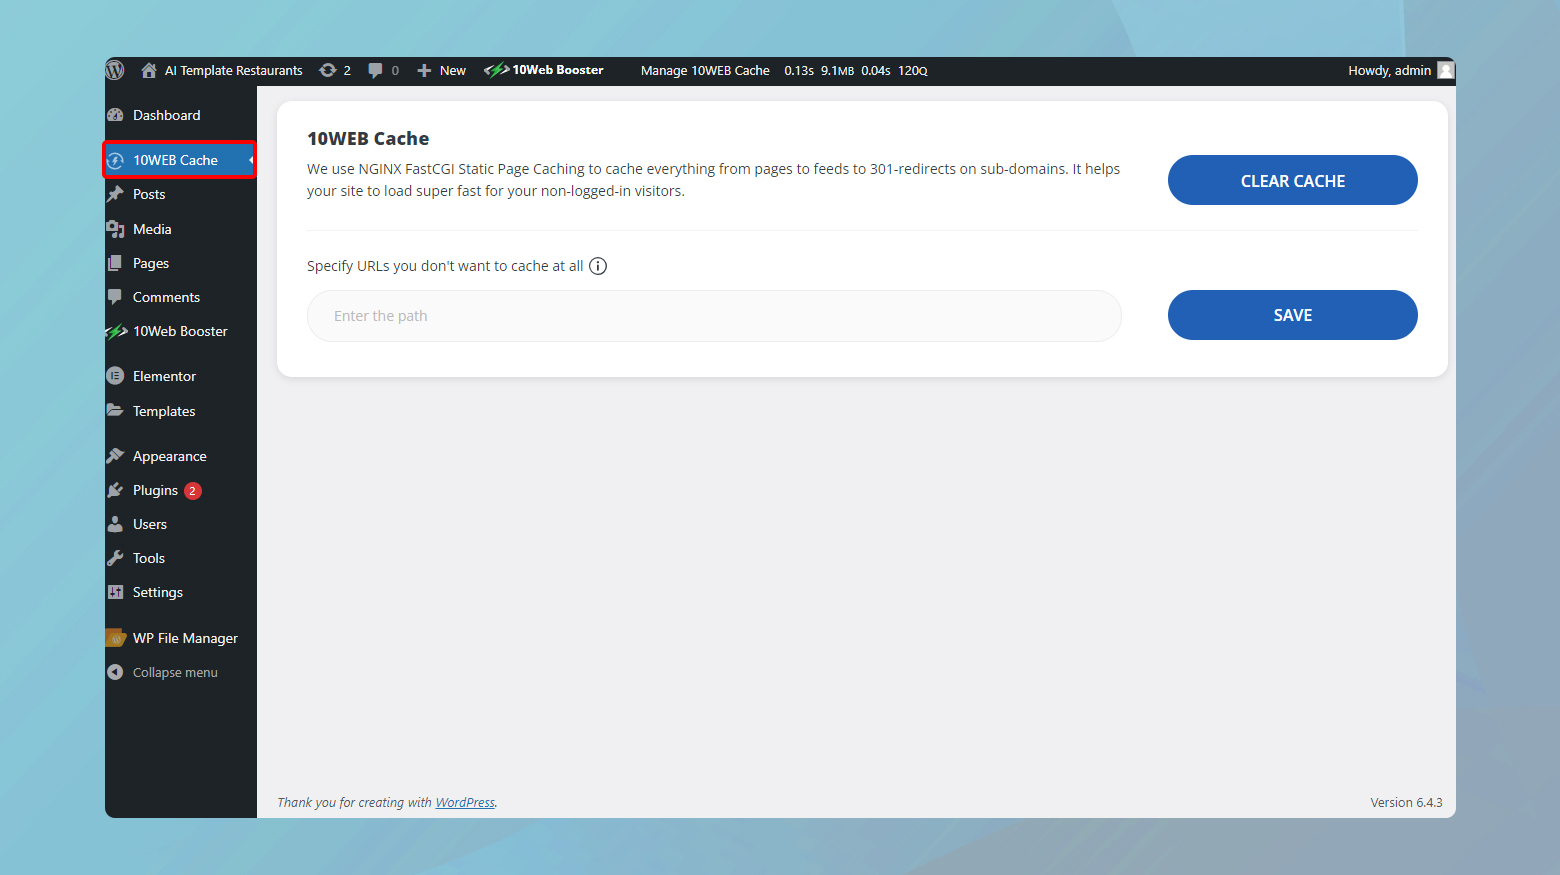
- From your 10Web dashboard, click on the W icon at the top right of your website thumbnail. This will redirect you to your WordPress dashboard.
- To the left of the WordPress dashboard click on 10Web Cache.
- Click Clear Cache to purge all the pages of your website.
- Here you also have the option to specify URLs you don’t want to cache.
Running the upgrade again
If your site went into maintenance mode during an update, there’s a chance the update didn’t complete properly. After ensuring your site is out of maintenance mode and clearing the cache, it’s wise to run the update again. This time, watch for any error messages or compatibility issues that could indicate what went wrong the first time.
Preventative measures
Though this issue is easily resolved, there are some actions you can take to prevent the issue.
Check compatibility before updating
Before you dive into updating WordPress, themes, or plugins, a little compatibility check can save you a lot of headaches. WordPress makes this quite straightforward right from your dashboard. Here’s how to check:
Visit the plugins page: Navigate to the Plugins section in your WordPress dashboard. Here, you’ll find a list of all your installed plugins, complete with details about each.
Check compatibility information: For each plugin and theme, WordPress displays compatibility information with the version of WordPress you’re using. This information is often highlighted when an update is available, indicating whether the update is compatible with your version of WordPress.
Visit theme details: Similarly, for themes, you can go to the Appearance > Themes page, select the theme you’re using or plan to update, and check the details for compatibility information.
Research and review updates: If you’re about to update to a significantly new version of WordPress, take a moment to research the major changes. Plugin and theme developers often publish information about compatibility and any required updates in response to major WordPress releases.
Staging environment: Utilize a staging environment for major updates. A staging site is a clone of your live site where you can test updates without affecting your live site. This is an excellent way to catch and fix any issues before they go live.
Regular backups: Ensure you have a recent backup before making any updates. Backups are your safety net, allowing you to restore your site to a pre-update state if something goes wrong.
Minimal and essential plugins: Keep your site lean by using only necessary plugins. More plugins mean more potential for compatibility issues. Regularly review and remove any plugins you no longer use.
Gradual updates minimize risks
Updating everything all at once can not only be overwhelming but can also increase the chances of your WordPress site getting stuck in maintenance mode. By spreading out updates and tackling them as they become available, you can minimize risks and keep your site running smoothly. Let’s explore why this approach works and how to implement it effectively.
The logic behind updating themes and plugins individually or in smaller batches, rather than in one large sweep, is pretty straightforward:
Easier troubleshooting: If something goes wrong during an update, it’s much easier to pinpoint the culprit when you’ve only updated a few items. This can save you a ton of time in diagnostics and fixes.
Less load on your site: Updates, especially major ones, can be resource-intensive. By spacing them out, you prevent overwhelming your server resources, which can be particularly beneficial for shared hosting environments.
Improved compatibility checks: Updating one plugin or theme at a time allows you to verify compatibility with your current WordPress version and with other plugins or themes more meticulously.
How to implement gradual updates
Implementing a strategy for gradual updates doesn’t have to be complicated. Here are some steps to guide you:
Enable auto-updates for minor releases: WordPress allows you to enable automatic updates for minor core releases, which are mostly security and maintenance releases. For plugins and themes, you can also enable auto-updates, which is a smart move for trusted plugins and themes that regularly release minor updates.
Set a schedule for manual updates: For major updates or for those plugins/themes where you’ve not enabled auto-updates, set a regular schedule. This could be weekly, bi-weekly, or whatever fits your workflow and the update frequency of your site components. The key is consistency and ensuring that updates aren’t left to accumulate.
Prioritize updates: Not all updates are created equal. Security updates should be at the top of your list, followed by functionality improvements and then cosmetic updates. By prioritizing updates in this way, you ensure that the most critical updates are applied first, further reducing the risk of issues.
Use a staging site for major updates: For significant updates, especially those to WordPress core, major theme revisions, or substantial plugin updates, use a staging environment first. This allows you to test updates in a safe space, ensuring they don’t conflict with each other or with your site’s customizations.
Closing thoughts
In wrapping up our dive into freeing your WordPress site from being stuck in maintenance mode and ensuring smoother updates, we’ve covered a range of strategies from dealing with the immediate issue to implementing preventive measures for long-term site health. By methodically addressing updates, ensuring compatibility, and adopting a cautious approach to changes, you can maintain a robust, secure, and efficiently running WordPress site. Remember, consistency in maintenance and updates is key, as is a patient, step-by-step troubleshooting approach when issues arise. Armed with these insights, you’re well-equipped to keep your WordPress site in top form, avoiding unnecessary downtime and optimizing for a seamless user experience.
Accelerate your WordPress website creation with AI
Create a custom WordPress website tailored to your business needs 10X faster with 10Web AI Website Builder.
Say goodbye to website errors
Fix all the website errors in one click
Migrate your website to the world's best Managed WordPress Hosting.