
“The site is experiencing technical difficulties” error generally pops up when there’s a critical issue within your WordPress site that prevents it from loading properly. This isn’t just a minor glitch; it’s a fatal error that brings your site down, locking out both front-end users and back-end administrators. It could stem from a variety of sources—be it a plugin or theme that’s not playing nice, or perhaps some deeper issue within the WordPress core files or your web hosting environment. Essentially, it’s WordPress’s safeguard mechanism kicking in to prevent any potential damage from a faulty script or incompatible piece of code.
Understanding this error involves recognizing that WordPress is a complex ecosystem. Plugins and themes add functionality and style, but they also introduce potential points of failure. Similarly, the hosting environment must meet certain requirements for WordPress to operate smoothly. When these components aren’t in harmony, problems arise.
WordPress may send an email to the site administrator with details about the error. This email might include specifics about what caused the error, such as a problematic plugin or theme. However, it’s equally possible that you’ll encounter this error message without any additional context.
In this article, we’re going to explore what this error means, where it usually stems from, and how to diagnose and resolve the issue so you can get your site back up and running.
Plugin and theme conflicts
At the heart of many of these errors are plugin and theme conflicts. WordPress’s strength is its flexibility and the vast ecosystem of plugins and themes available, thanks to its open-source nature. Developers from all corners of the globe contribute to this ecosystem, bringing their unique coding practices and styles to the table. While this diversity fuels WordPress’s adaptability and customizability, it also sets the stage for potential conflicts.
These conflicts typically arise when two (or more) pieces of code from different sources try to perform similar tasks in incompatible ways. For instance, a plugin designed to modify your site’s SEO settings might conflict with another plugin that tries to do the same thing but uses a different approach. In mild cases, one of the conflicting plugins might simply fail to work as expected. In more severe scenarios, however, such conflicts can trigger a fatal error, rendering your website inaccessible.
Variations of this error
This error might present itself in slightly different ways depending on your hosting environment, the specific cause of the issue, your WordPress version, and wether you’re seeing it in the frontend or backend.
- The site is experiencing technical difficulties. (front)
- There has been a critical error on your website. (front)
- This site is experiencing technical difficulties. Please check your site admin email inbox for instructions. (back)
- There has been a critical error on your website. Please check your site admin email inbox for instructions. (back)
Reasons why this error occurs
Several factors can trigger this daunting message, including:
Plugin conflicts: Often, plugins that are not compatible with each other or with the current version of WordPress can cause critical errors.
Theme issues: A theme that’s not updated or incompatible with the latest WordPress core updates can break your site.
Corrupted files: Core WordPress files or theme/plugin files that have been corrupted could lead to significant errors.
Server limitations: Sometimes, the server hosting your WordPress site might not meet the necessary PHP requirements or memory limits, leading to issues.
Database problems: Issues with the website’s database, such as corruption or connectivity issues, can also trigger this message.
How to fix The Site Is Experiencing Technical Difficulties error
Fixing the “The site is experiencing technical difficulties.” error can be done using a few techniques. Let’s take a look at some of the ways you can fix this error.
Troubleshooting with the email
If you’re lucky, WordPress has sent you an email with specifics about the error, including the plugin or theme at fault and a link to activate recovery mode. Here’s how to use the email for troubleshooting this error.
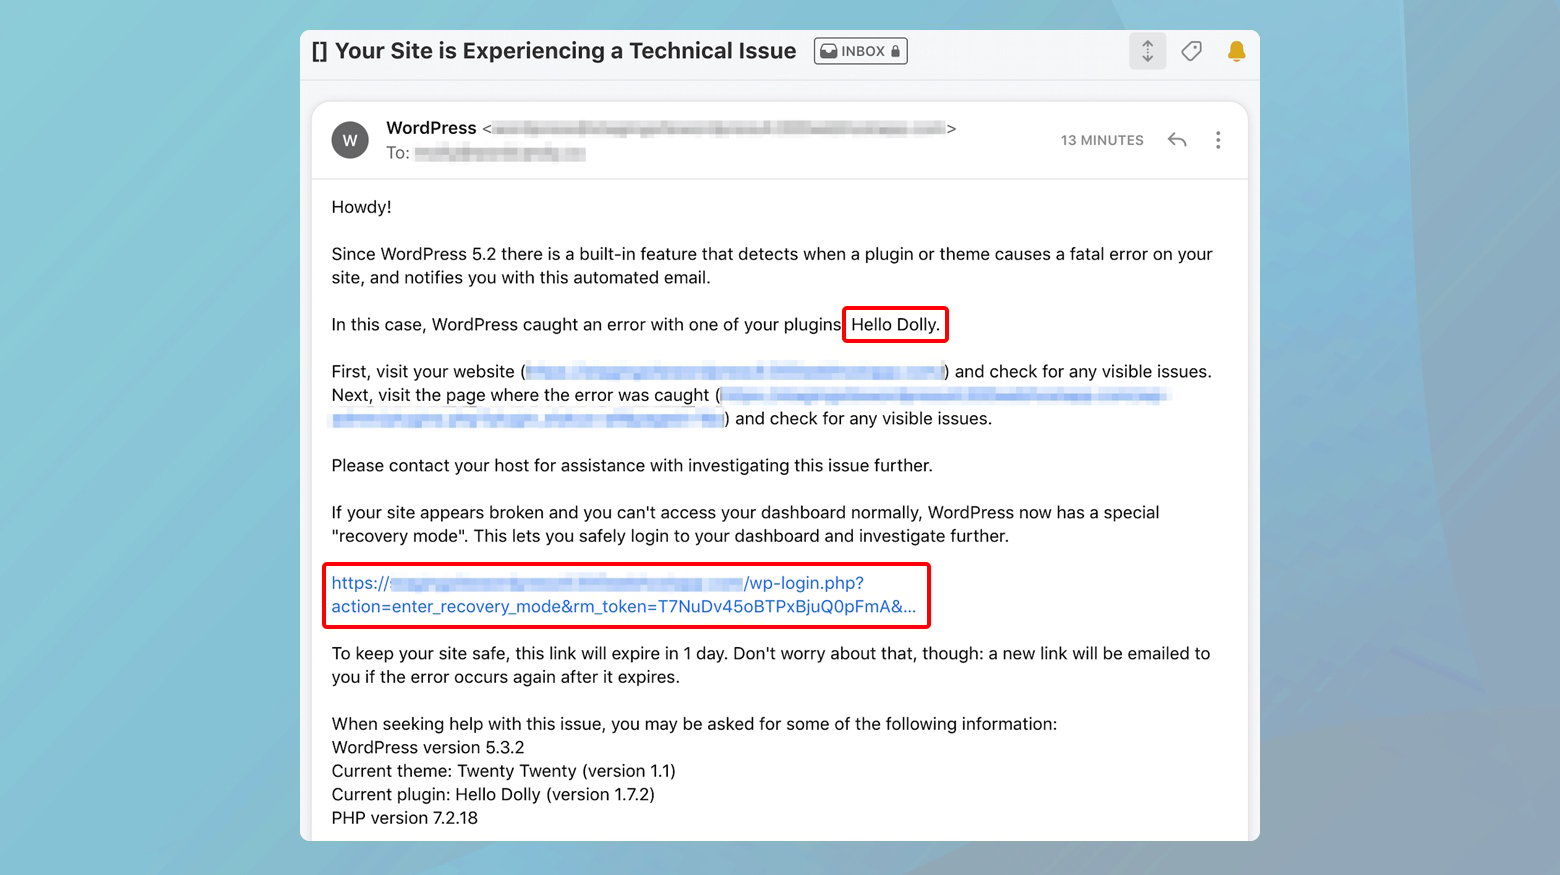
- Check the inbox of the email associated with your WordPress site admin. Don’t forget to peek into the spam folder, just in case.
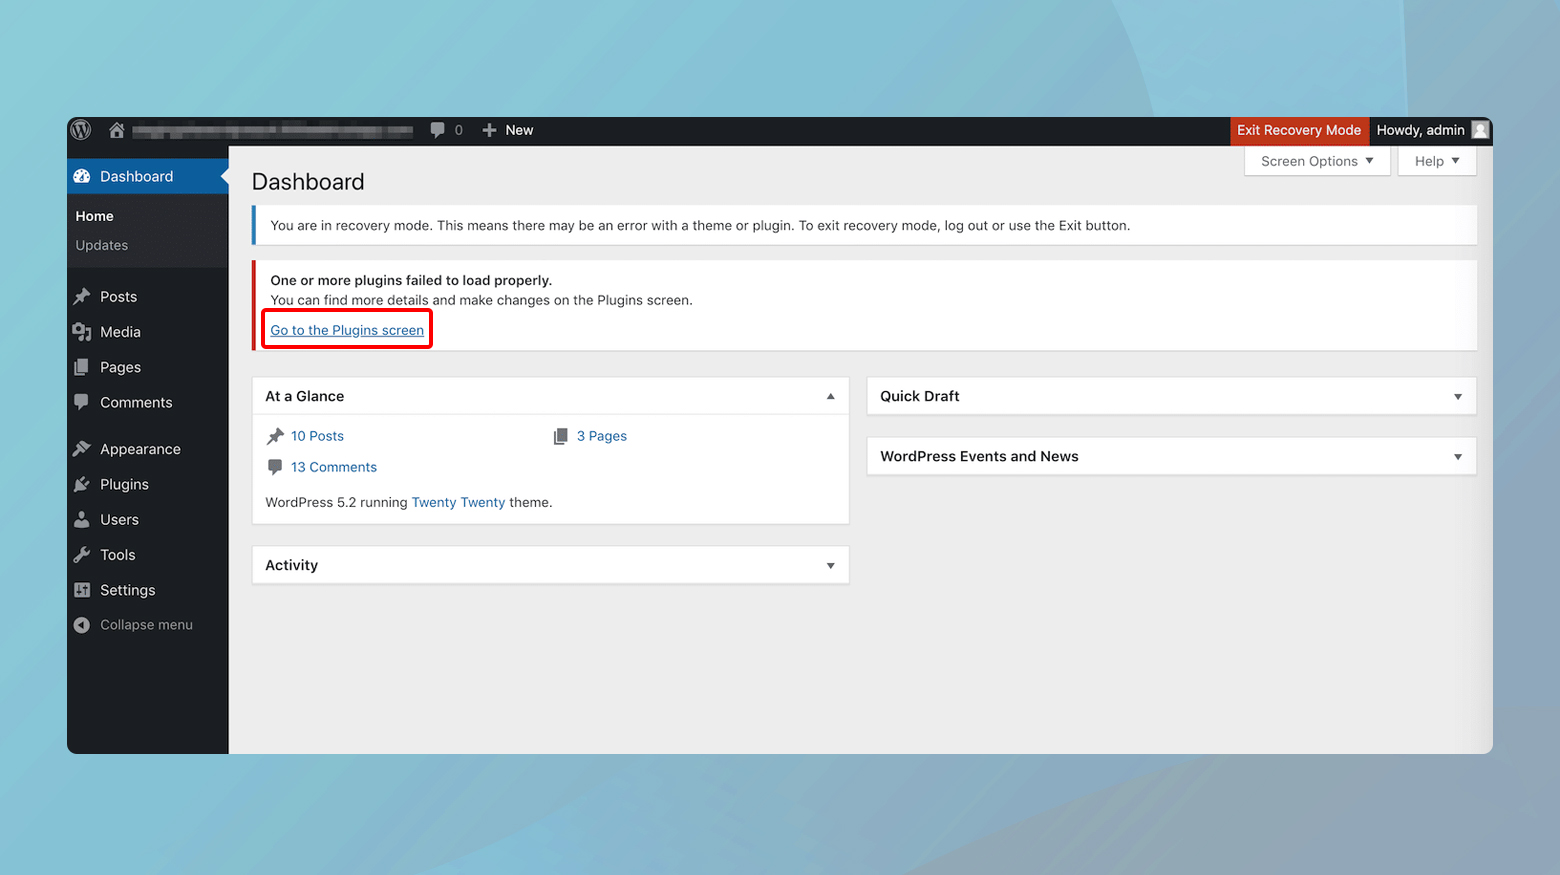
- Click on the link provided in the email to put your site into recovery mode. This mode allows you to access the WordPress admin area even when an error is present.
- The email should specify which plugin or theme is causing the issue. Once in recovery mode, go to the Plugins or Themes page in your dashboard and deactivate the mentioned extension.
After deactivation, visit your site to check if it’s back to normal. If it is, consider finding an alternative to the problematic plugin or theme or reaching out to the developer for support.
Deactivating the conflicting plugin or theme
The recovery mode feature is designed to empower users to regain control over their site in the face of errors that would otherwise render the backend inaccessible. Here’s a closer examination of how to utilize this feature.
If your WordPress site hits a fatal error, you can’t get into the backend to turn off whatever’s causing the trouble. But, if you have a recovery mode link, you’ve got a couple of ways to work around this issue. Clicking on this link will route you to a login page.
Whether you’re the site administrator or a designated troubleshooter with the recovery link, you can use your WordPress credentials to log in. This ensures that the right person can always address the issue, even if the primary admin is unavailable.
Recovery mode environment
The recovery mode environment is specially tailored for troubleshooting, with several key features at your disposal:
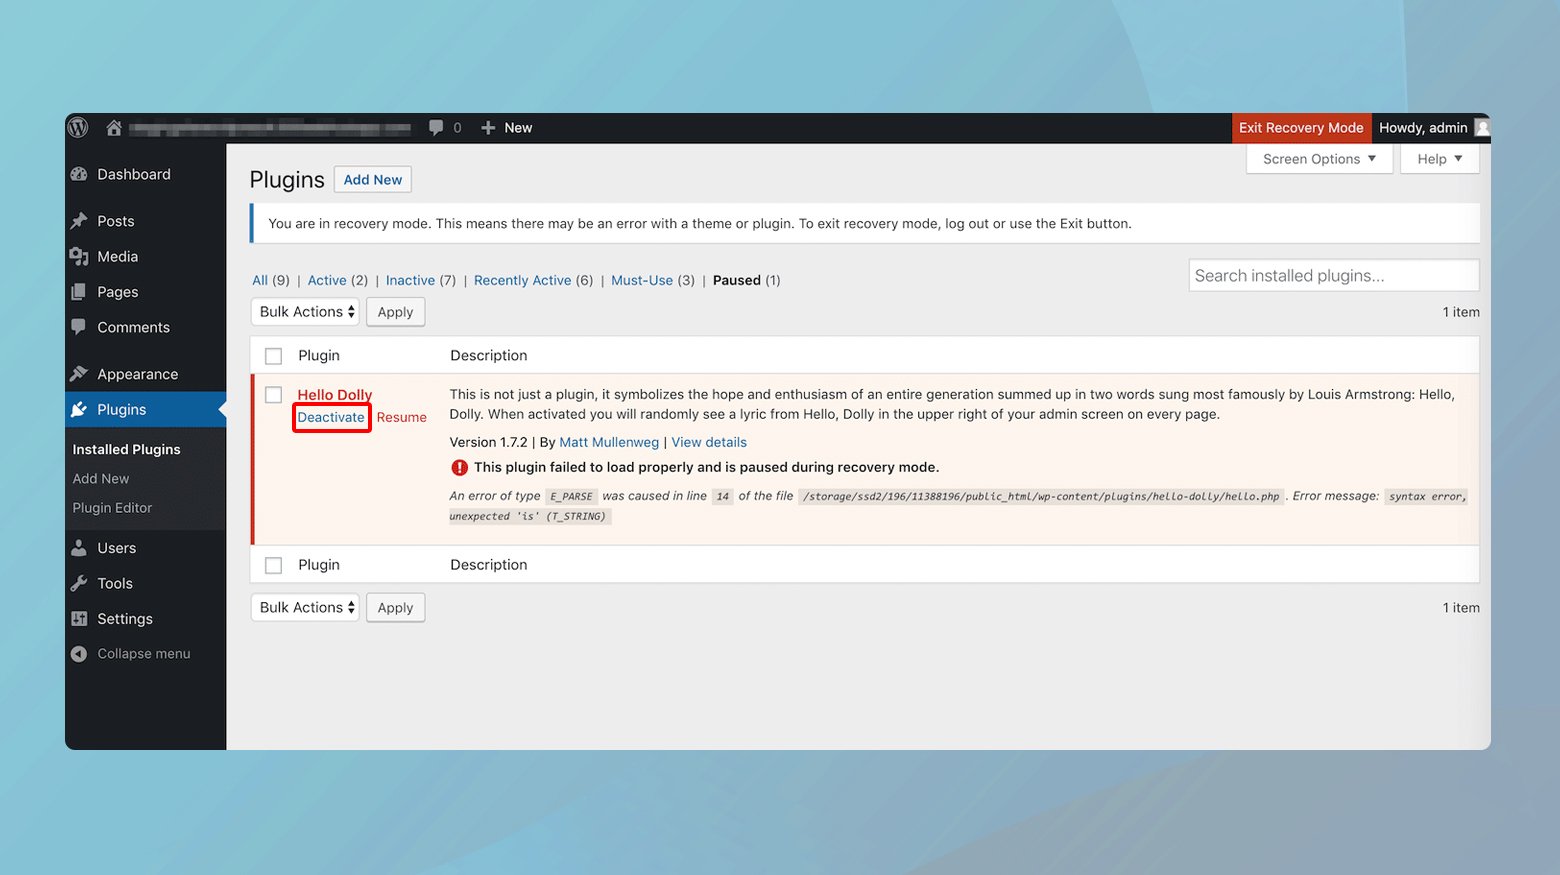
WordPress isolates and pauses the plugins or themes it suspects are the root cause of the error. A banner at the top of your dashboard will alert you to these culprits, making it clear which components require your attention.
While in Recovery Mode, your access to the site is not impaired by the fatal error affecting your visitors. This allows you to navigate and make changes as if the site were functioning normally, a critical advantage when diagnosing and resolving issues.
Navigating the fix
With the problematic elements highlighted, the path to resolving the error is clearer. Follow these steps to safely address the issues:
Access the Plugins or Themes page from your dashboard. Here, WordPress will have marked the extensions causing the conflict, making it easy to identify what needs to be addressed.
For each flagged plugin or theme, you’ll see an option to Deactivate. Selecting this option doesn’t delete the extension but merely suspends its operation. This critical step helps isolate the error’s source without permanent deletion.
Once you’ve deactivated the problematic plugins or themes, you should exit recovery mode by clicking the button located on the top bar of the admin dashboard. Exiting Recovery Mode applies your changes across the site, potentially resolving the error for all users.
Post-recovery actions
With the fatal error averted, your site should now be accessible to all users. However, this is just the beginning of a more comprehensive solution. Consider the following steps to ensure long-term stability:
Assessing extension necessity: Evaluate the importance of the deactivated extensions. If they’re not essential to your site’s functionality, it might be prudent to leave them deactivated or seek alternatives.
Exploring alternatives and updates: Search for other plugins or themes that offer similar functionality without the compatibility issues. Alternatively, check for updates to the problematic extensions that may resolve the conflict.
Engagement with developers: Reaching out to the developers of the problematic plugins or themes can be a fruitful endeavor. Many developers are responsive to feedback and willing to address compatibility issues, especially if the extension is widely used.
Direct intervention: If you possess the technical acumen, consider delving into the extension’s code to implement a fix yourself. Ensure you have a solid understanding of WordPress development practices and always back up your site before making any changes.
The importance of testing
Before reintroducing any changes to your live site, conduct thorough testing in a staging environment. This sandbox allows you to experiment and verify fixes without risking further disruptions to your site’s operation. Comprehensive testing ensures that once you deploy solutions to the live environment, they will not reintroduce the fatal error or new issues.
If you are a 10Web user, you can use the staging environment feature. To learn more, take a look at how to manage staging environments in 10Web.
Resolving plugin conflicts without WordPress recovery mode
There’s a manual approach that can help you regain control over your WordPress site by troubleshooting plugin conflicts directly through an FTP client. Here’s a detailed guide on how to navigate this process, step by step.
To do this, you’ll need two things: an FTP client and your FTP credentials. These credentials—a username, password, and often a server address—are typically found in your hosting account’s dashboard or received via email when you first set up your hosting account.
Accessing your site via FTP
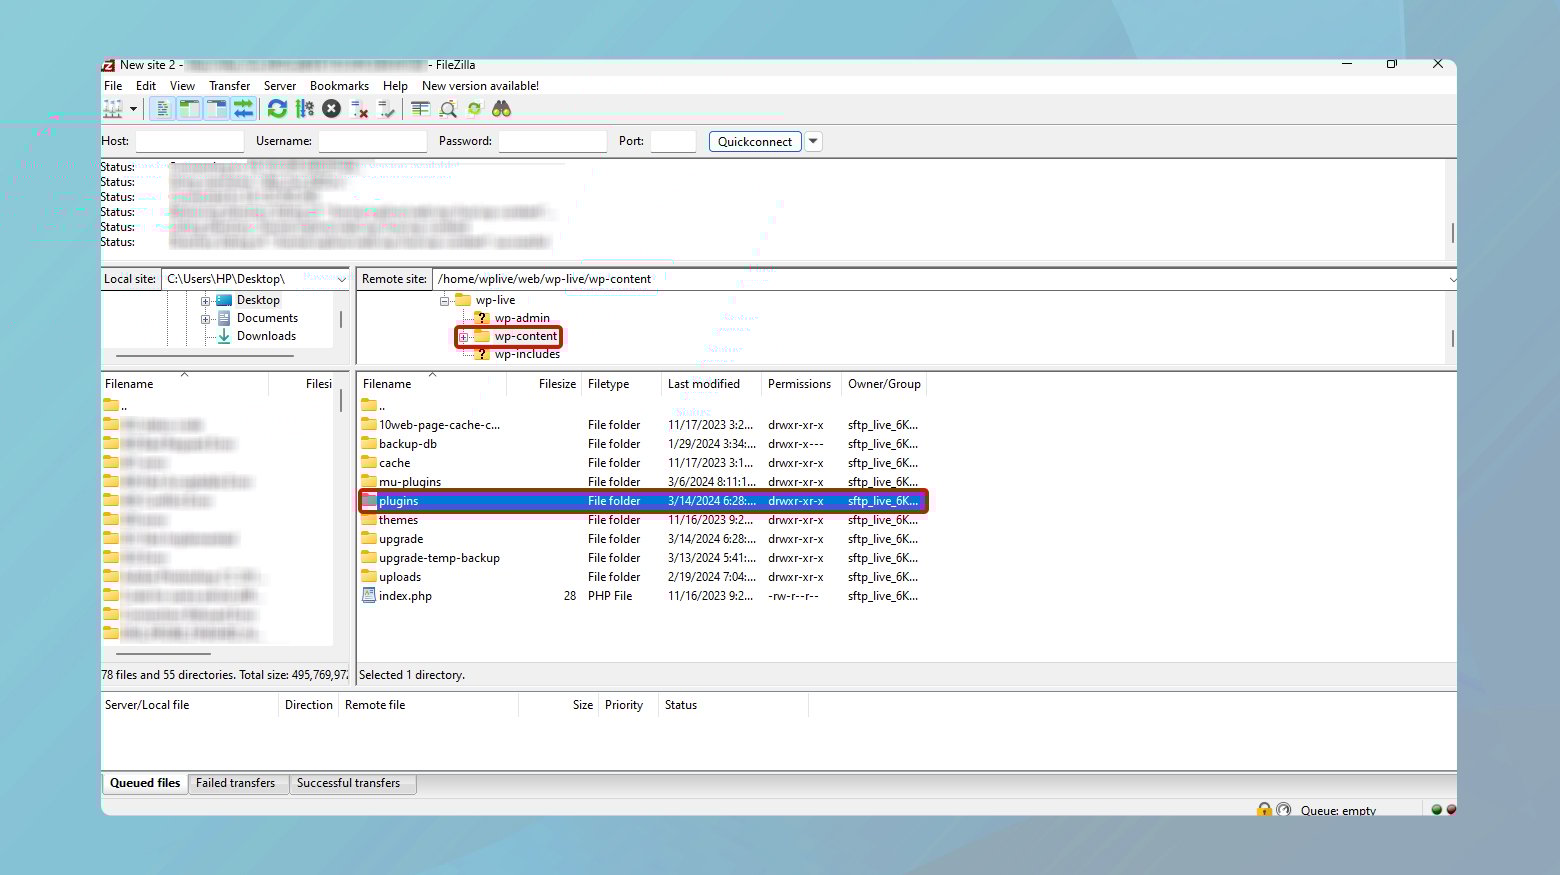
- Launch the FTP client of your choice and enter your FTP credentials to establish a connection between your computer and your website’s server.
- Once connected, look for the wp-content folder, then find and open the plugins directory. This folder houses all your site’s plugins, each in its own subdirectory.
With access to the plugins directory, you can begin the troubleshooting process. If you already suspect a specific plugin is causing issues, you can directly target it. Otherwise, you’ll have to use the process of elimination.
If you know which plugin is causing the error:

- Locate its folder.
- Right-click on it and choose Rename.
- Adjust the folder name to include a suffix like -deactivated.
Renaming the plugin folder will automatically deactivate the plugin.
After renaming the plugin’s folder, visit your WordPress site and refresh the page. If the site loads correctly, you’ve identified the culprit. If not, revert the folder’s name (if this was your suspected plugin) and proceed to the next plugin.
If the problematic plugin isn’t known, you’ll need to methodically work through the list of your plugins. Rename each plugin folder starting at the top of your list. After each rename, check your site by refreshing the browser. Once you find the plugin whose deactivation resolves the issue, you’ve pinpointed the source of the conflict.
With the problematic plugin identified, you have several options. You can delete it (if it’s not essential), replace it with an alternative, contact the plugin’s developer for support, or attempt to resolve the conflict yourself if you have the necessary skills.
Apply the same method to themes
The same troubleshooting technique applies to themes, should you suspect a theme conflict:
In your FTP client, within the wp-content folder, locate the themes directory. Similar to plugins, if you suspect a specific theme, rename its folder by adding –deactivated to the end. If you’re unsure, you might have to temporarily switch to a default WordPress theme by renaming your current theme, prompting WordPress to revert to a default one.
Use an up to date PHP version
PHP, being the backbone scripting language of WordPress, needs to be up-to-date for your site to function optimally. Let’s navigate through the steps to ensure your PHP version isn’t the reason for this error and how to update it if necessary.
PHP and WordPress compatibility
WordPress 5.0 set a new standard for the minimum PHP version, discontinuing support for versions older than 5.6.20. This move was aimed at enhancing security and performance. Furthermore, the PHP development team itself has ceased support for versions below 7.4, which means running on outdated PHP not only poses a security risk but might also be the reason behind technical difficulties on your site.
Checking your PHP version
To pinpoint the version of PHP your site currently operates on, you’ll need access to your hosting account dashboard. This procedure varies among hosting providers, but the essence remains the same.
For 10Web users
10Web users can view and update PHP versions of their website through the 10Web dashboard.
To view the version of your website:
- Log in to your 10Web account.
- Click on the website of which you want to check the PHP version.
- Click on Hosting Services > Tools.
- Scroll down to the PHP version section.
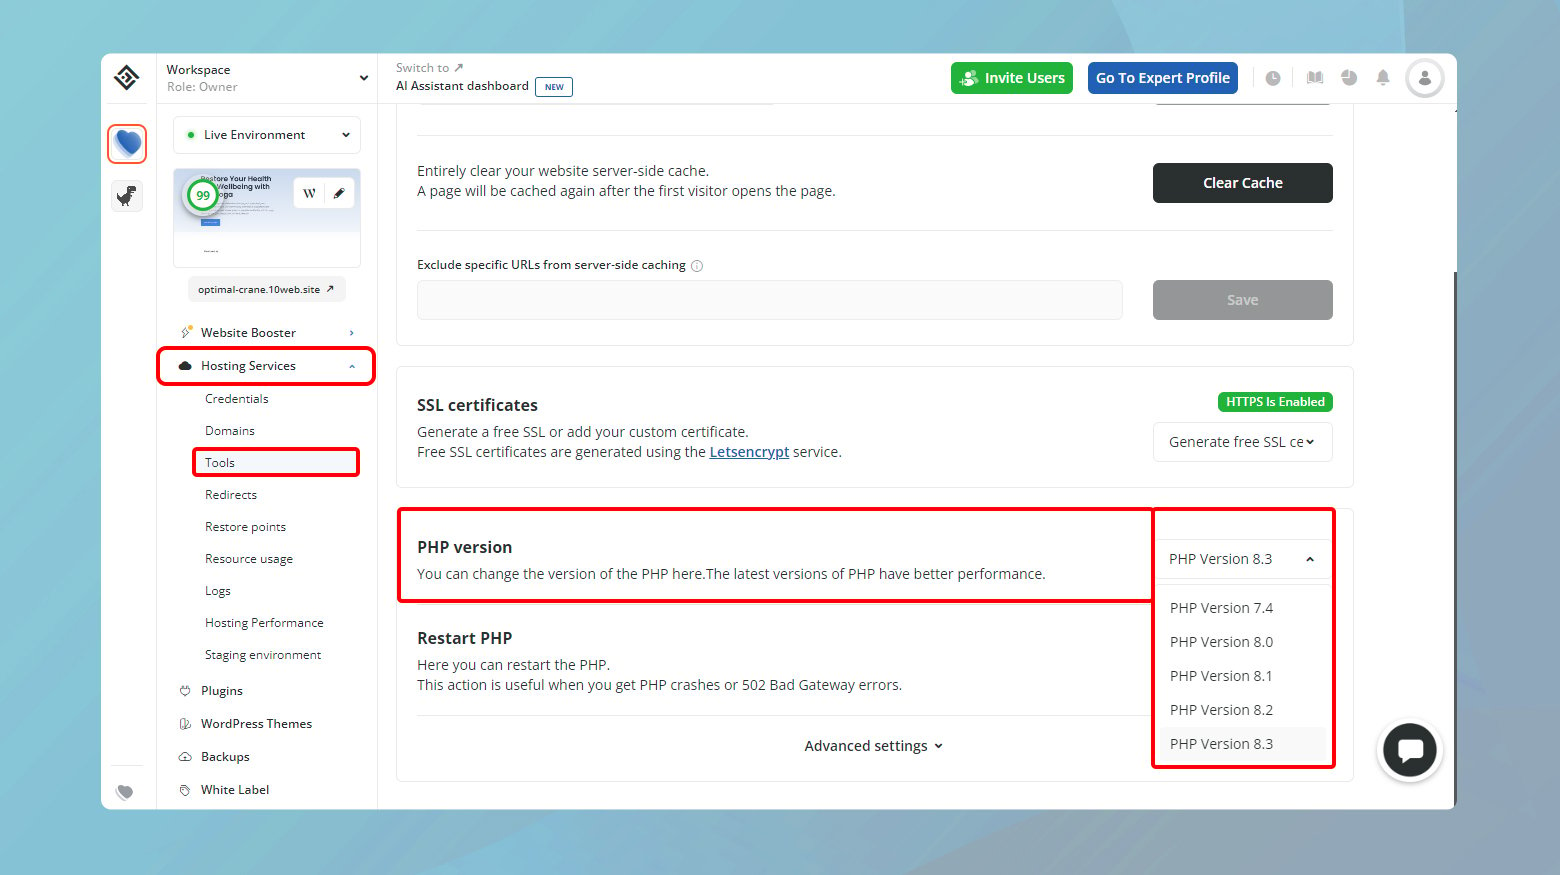
Here you can view your current PHP version. You can also change your PHP version.
- Click on the drop down menu and select the latest version of PHP.
- Confirm the changes to finalize.
Recommendations and precautions
Backup before updating: Always ensure you have a complete backup of your website before making any significant changes like a PHP version update. This provides a safety net in case anything goes awry during the update process.
Compatibility check: Before upgrading, confirm that your site’s themes and plugins are compatible with the new PHP version. This precaution helps avoid potential conflicts post-update.
Consult support if needed: If you’re unsure about the update process or encounter issues, don’t hesitate to reach out to your hosting provider’s support team for assistance.
Activate WordPress debug mode
The WordPress Debug Mode uncovers hidden PHP errors, providing clues to the root cause of your site’s issues. Let’s walk through how to activate Debug Mode, interpret its findings, and ensure your site’s security while using this diagnostic feature.
Debug Mode allows WordPress to display PHP errors, warnings, and notices that are otherwise hidden. These messages can offer valuable insights into what’s causing your site’s issues. Here’s how to turn it on:
- Use your FTP client to log into your site’s server with your FTP credentials.
- Navigate to the root directory where WordPress is installed.
- Look for the wp-config.php file in the root directory. This file contains important WordPress settings.
- Download the file to your local computer and open it with a text editor.
- Scroll through the file until you find the line that says “That’s all, stop editing! Happy publishing.” Just above this line, insert the following code:
- Save your changes and upload the modified wp-config.php file back to your server, replacing the original file. Visit your site and refresh the page.
define( 'WP_DEBUG', true );
With Debug Mode activated, your site will display errors that were previously hidden. These messages can include:
PHP notices: Minor issues that don’t necessarily affect your site’s performance or functionality.
Warnings: Potential issues that should be addressed but are not fatal to site operation.
Fatal errors: Critical problems that prevent a script from running, often the cause of the “technical difficulties” message.
Look for any error messages that mention specific plugins, themes, or files. These clues can guide you toward the source of the problem.
Exiting debug mode
Remember, debug mode is a diagnostic tool, not a permanent state for your site. Leaving it enabled can inadvertently reveal sensitive information to visitors.
Here’s how to safely disable it:
- Open your wp-config.php file again in a text editor.
- Change the debug mode line you added earlier to:
- Save your changes and upload the `wp-config.php` file back to the server, ensuring your site is secure.
define( 'WP_DEBUG', false );
Check error logs
For those who didn’t spot any glaring issues through Debug Mode, the server error log might just have the answers you seek. Server error logs record a variety of issues, from minor notices to critical system errors. Accessing these logs can provide insight into persistent problems that aren’t obvious through front-end diagnostics. Here’s how to access and make sense of these logs.
10Web customers
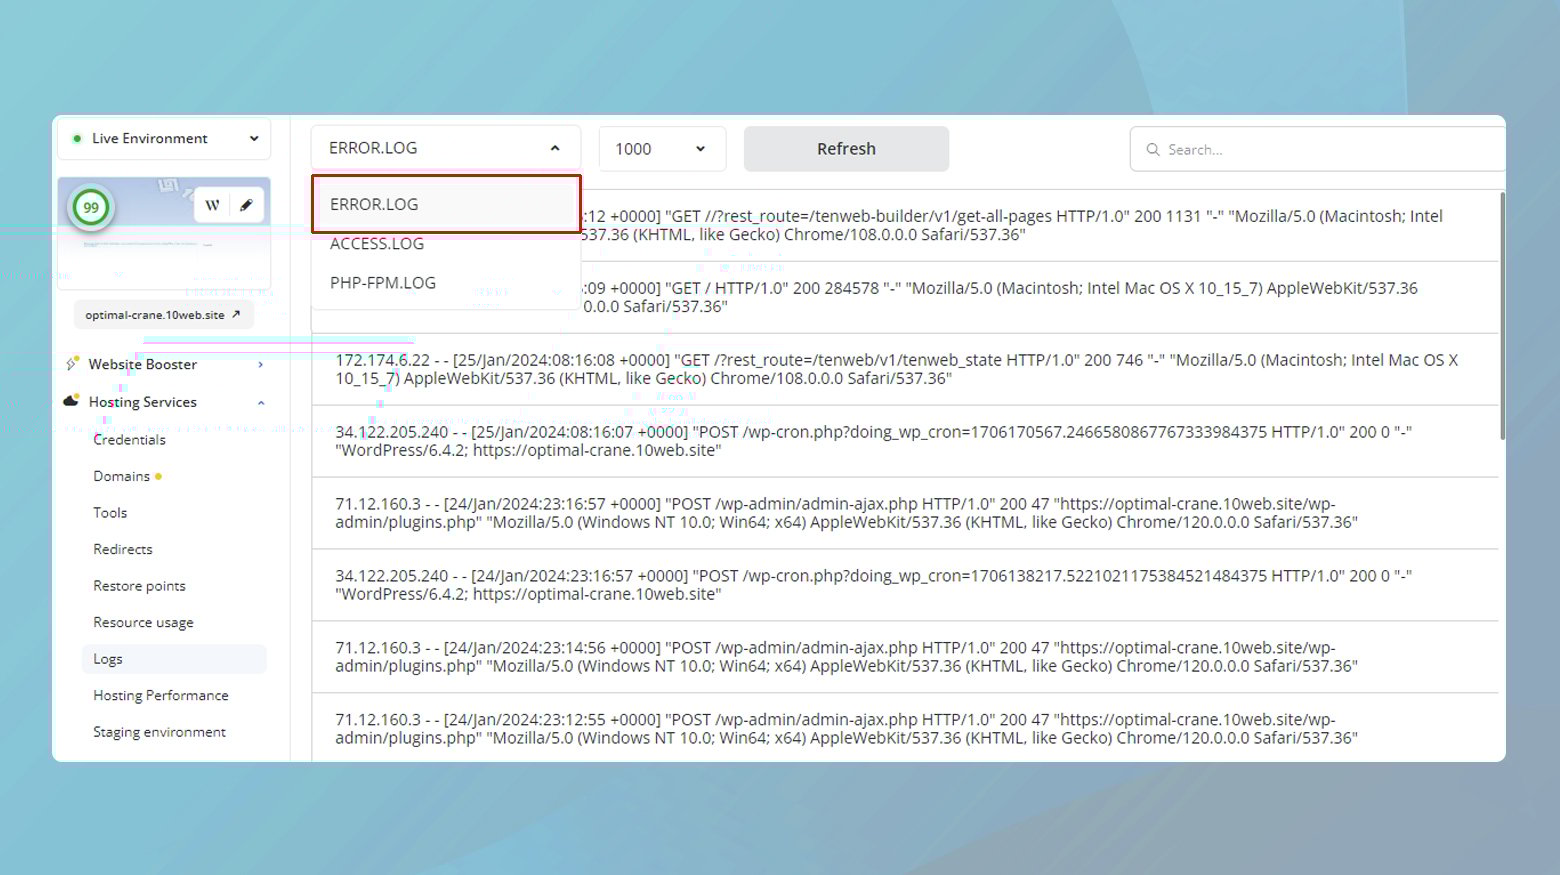
- Log in to your 10Web account.
- Click on the website that’s experiencing the issue.
- Navigate to Hosting Services > Logs.
- Click on the drop down menu and select to view the Error logs.
If you’re not with 10Web, the process to find your error logs will vary slightly depending on your hosting provider. Typically, you’ll find these logs in your hosting control panel, often under sections labeled “Logs,” “Error Logs,” or “Server Logs.” If you’re unsure, consult your hosting provider’s documentation or support team.
Interpreting the error logs
Once you’ve accessed your error.log file, it’s time to put on your detective hat and start looking for clues. Server error logs can be dense and technical, but here’s what to watch for:
Timestamps: Each entry is timestamped, allowing you to correlate errors with specific events or changes on your site.
Error codes: Look for HTTP status codes (like 500 Internal Server Error) or PHP error codes that can indicate specific types of issues.
File paths and line numbers: Errors often point to specific files and line numbers where problems occur, which can be invaluable for pinpointing the source of an issue.
Error descriptions: While sometimes cryptic, the descriptions accompanying each error can offer clues about what went wrong.
Contact your host
If you’ve followed each troubleshooting step without resolution, the issue could well be server-related or something deeply technical that requires administrative access or specific expertise. Server configurations, deeper PHP errors, or database issues are common reasons that are difficult to diagnose and solve without the appropriate tools and knowledge. In this case you should try contacting your hosting provider for assistance.
Most hosting providers offer several channels for support, including chat, email, phone, or a dedicated support section on their website. The method you choose can depend on the urgency of your issue and your personal preference.
Closing thoughts
In this blog, we’ve covered a range of strategies for tackling the “This site is experiencing technical difficulties” error in WordPress. From basic troubleshooting with plugins and themes to engaging deeper diagnostics like PHP updates and Debug Mode, we’ve explored how to identify and resolve common issues. When these steps don’t resolve the problem, the next move is to contact your hosting provider’s support for expert assistance.
Accelerate your WordPress website creation with AI
Create a custom WordPress website tailored to your business needs 10X faster with 10Web AI Website Builder.
Say goodbye to website errors
Fix all the website errors in one click
Migrate your website to the world's best Managed WordPress Hosting.