
When you’re diving into the world of WordPress, encountering a message that reads “Briefly Unavailable for Scheduled Maintenance” can initially seem daunting. This message is not an error per se but a notification that appears when WordPress is undergoing updates. Whether it’s a theme, plugin, or core WordPress update, the system automatically puts your site into maintenance mode to prevent visitors from experiencing broken pages or functionality issues during the update process. Typically, this process is smooth and quick, but if the update is interrupted or fails, your website can get stuck in maintenance mode, leaving visitors facing this message instead of your content.
Reasons why this error occurs
When WordPress updates are in progress, the site enters what’s known as “maintenance mode.” This mode is a safeguard, ensuring updates to the core, plugins, or themes can happen without visitors encountering broken features or content. It’s a built-in feature designed to be temporary and usually invisible to the end user, as the updates typically complete within seconds. However, when something goes wrong, you will continue to see the “Briefly unavailable for scheduled maintenance. Check back in a minute” message.
A few scenarios can lead to your WordPress site getting “stuck” in maintenance mode:
Update interruption: If an update process is interrupted (due to a loss of internet connection, server timeout, or manual interruption), WordPress might not exit maintenance mode automatically.
Bulk updates: Attempting to update several themes or plugins simultaneously can overload the process, potentially stalling it.
Update conflicts: Compatibility issues between the new updates and your current setup might trigger a glitch, preventing the completion of the update process.
How to Fix the “Briefly unavailable for scheduled maintenance. Check back in a minute” error
The fix for this issue is quite simple and straightforward. This message typically pops up when an update is being applied to your WordPress site but gets stuck in maintenance mode. Deleting the maintenance file should solve it!
How to delete the maintenance file
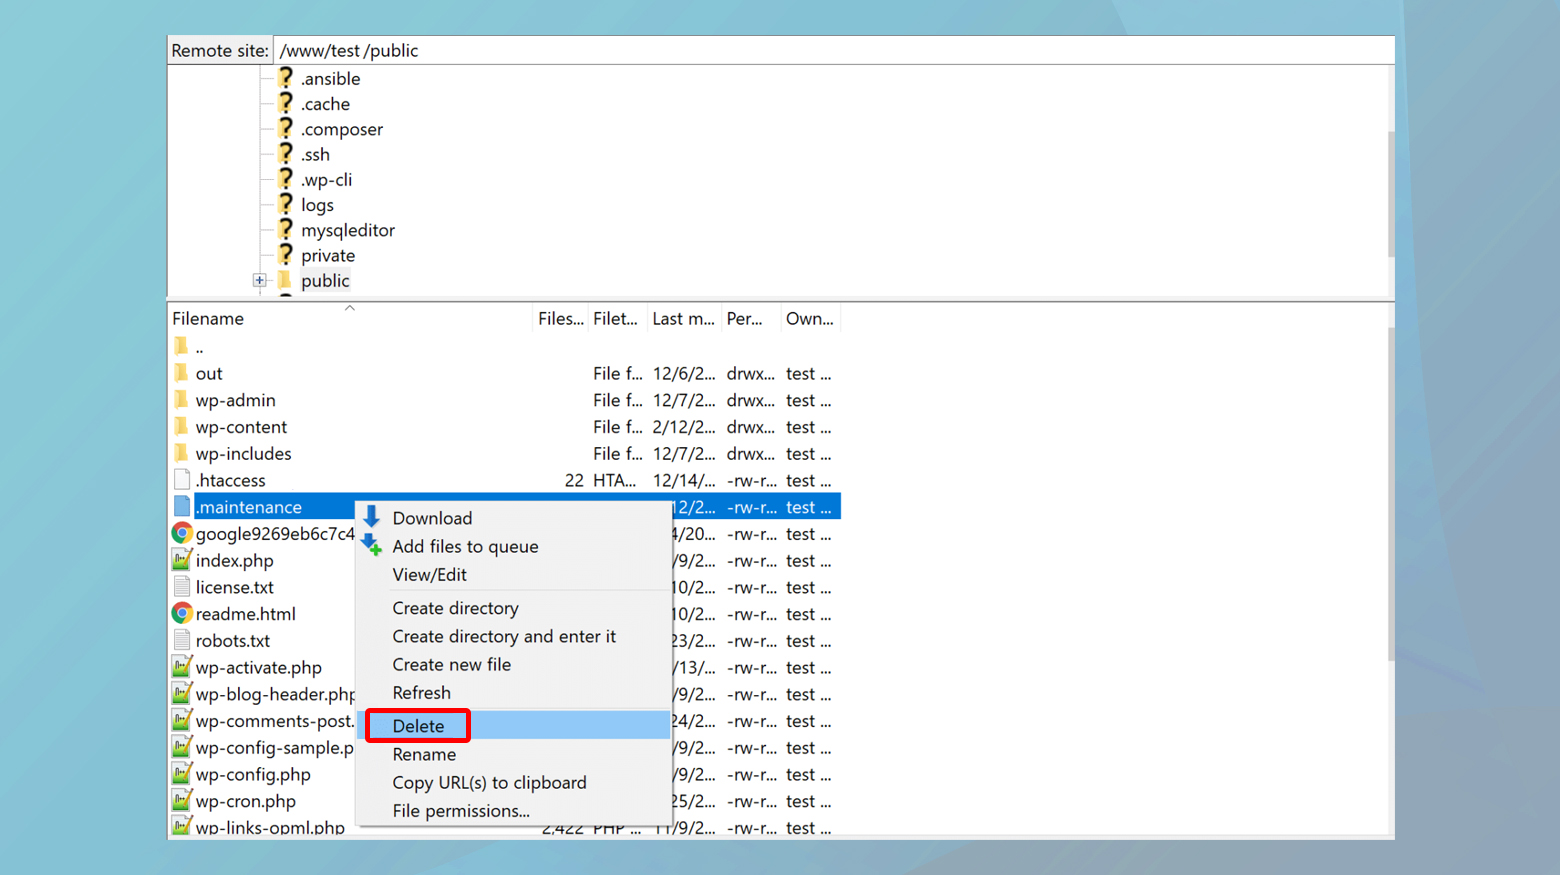
The essence of fixing this issue lies in deleting a particular file that WordPress creates to notify visitors of maintenance mode. This file, aptly named `.maintenance`, is what we need to focus on removing.
Use SFTP to connect to your site
To kick things off, you’ll need to use an FTP program that supports SFTP (Secure File Transfer Protocol) to securely connect to your WordPress site. If your site is hosted at 10Web, you will find your SFTP credentials in your 10Web dashboard under Hosting Services > Credentials. For those who might need a bit of guidance on connecting to SFTP, 10Web provides a comprehensive guide that walks you through the process.
Navigate to the root folder
Once you’ve established an SFTP connection, you’ll find yourself looking at all your site’s files. Look for the public folder, which is essentially the root directory of your WordPress installation. This is where WordPress lives, alongside key files like `wp-config.php`. It’s also where the `.maintenance` file, the source of our current predicament, is located.
Delete the .maintenance file
With the root folder open, look for the file named `.maintenance`. Once you spot it right-click on the file and choose the option to delete it. This action signals WordPress to exit maintenance mode and resume normal operation. This straightforward step will immediately resolve the issue.
Showing hidden files
In some cases, the `.maintenance` file might not be immediately visible because it’s hidden. This is a common setting in many FTP programs to keep certain files out of sight by default. If you’re using FileZilla, for example, you can make hidden files visible by going to the “Server” menu at the top and selecting “Force showing hidden files.” This should reveal the `.maintenance` file if it wasn’t showing up before.
After the deletion, check on your site. Visit your website like you normally would, and if everything went according to plan, the maintenance message should be gone.
Preventing future issues
Keep browser page open during updates
To ensure a smooth update process and a quick return to normalcy for your site, it’s essential to keep the browser tab open through the entire update process. After you start the update, you’ll see various messages indicating the progress, culminating in the all-important “Disabling Maintenance mode…All updates have been completed.” This message is your green light, signaling that the update process is finished and maintenance mode has been lifted.
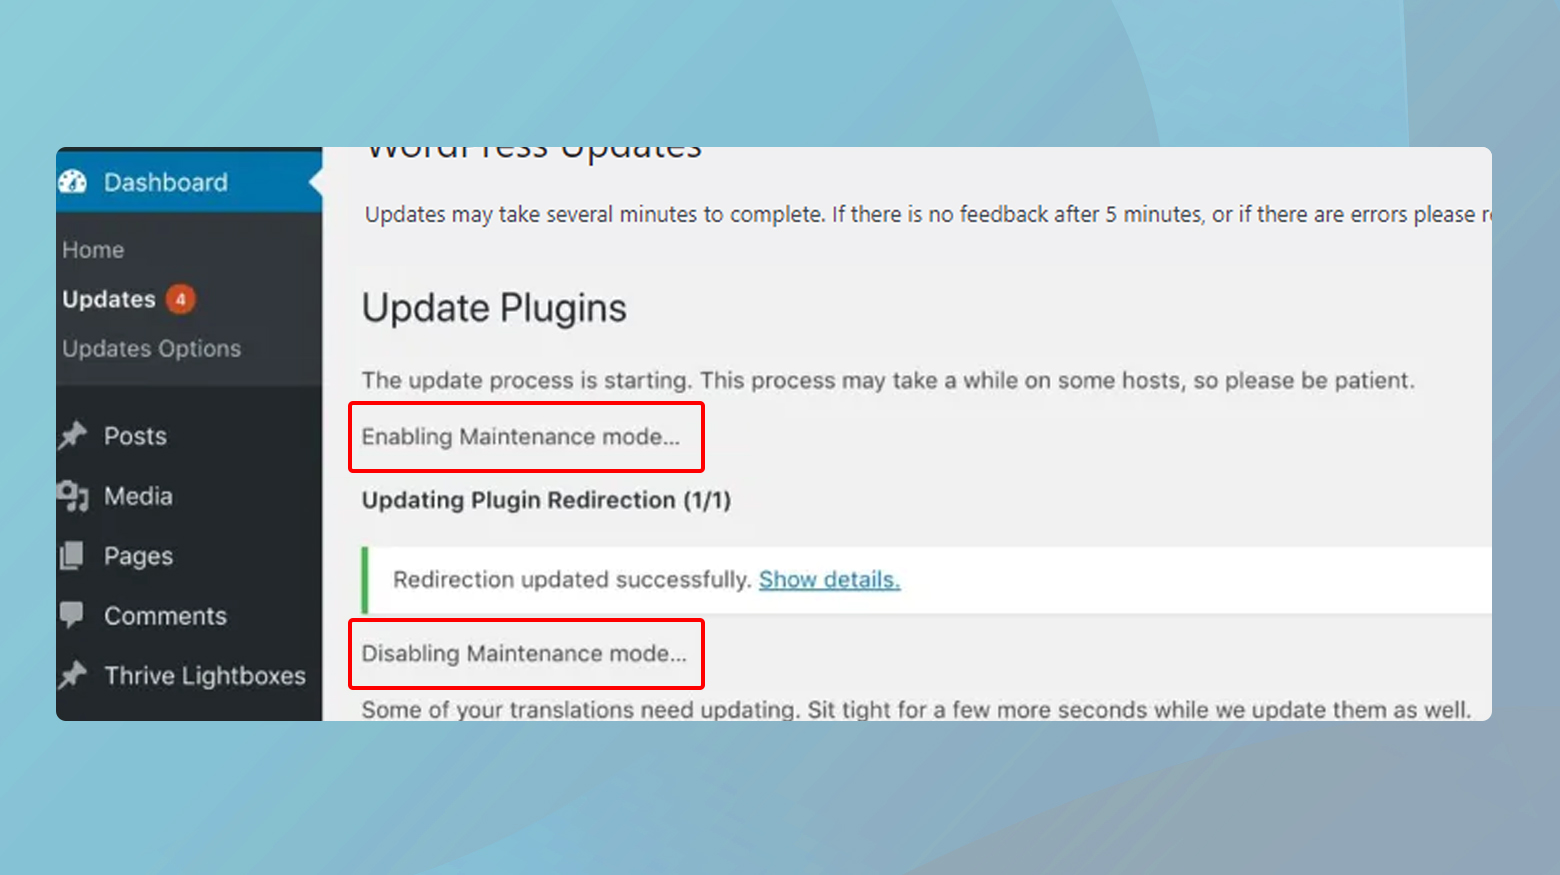
Closing the browser too soon might interrupt the update process, potentially leaving your site in an incomplete state. Prematurely exiting the update process can leave your site stuck in maintenance mode. Updates can include important security patches and performance improvements. Waiting for the confirmation message ensures your site exits maintenance mode correctly and your site benefits from these enhancements.
Avoid bulk updates
Yet, there’s an art to updating your site in a way that minimizes disruptions and avoids the dreaded maintenance mode. The temptation to hit the ‘Update All’ button can be strong, especially if you’ve accumulated a pile of updates for plugins, themes, and the WordPress core. However, restraint here can save you a lot of potential headaches. By limiting the number of updates you run at a single time, you can drastically reduce the risk of conflicts that might send your site into an extended maintenance mode or, worse, break functionality.
Update individually: Instead of updating everything in one fell swoop, prioritize updates based on security patches, bug fixes, and new features. This allows you to address the most critical updates first and spreads out the workload.
Regular check-ins: Make it a habit to check for updates on a weekly or bi-weekly basis. Smaller, more frequent updates are easier to manage than large, infrequent ones.
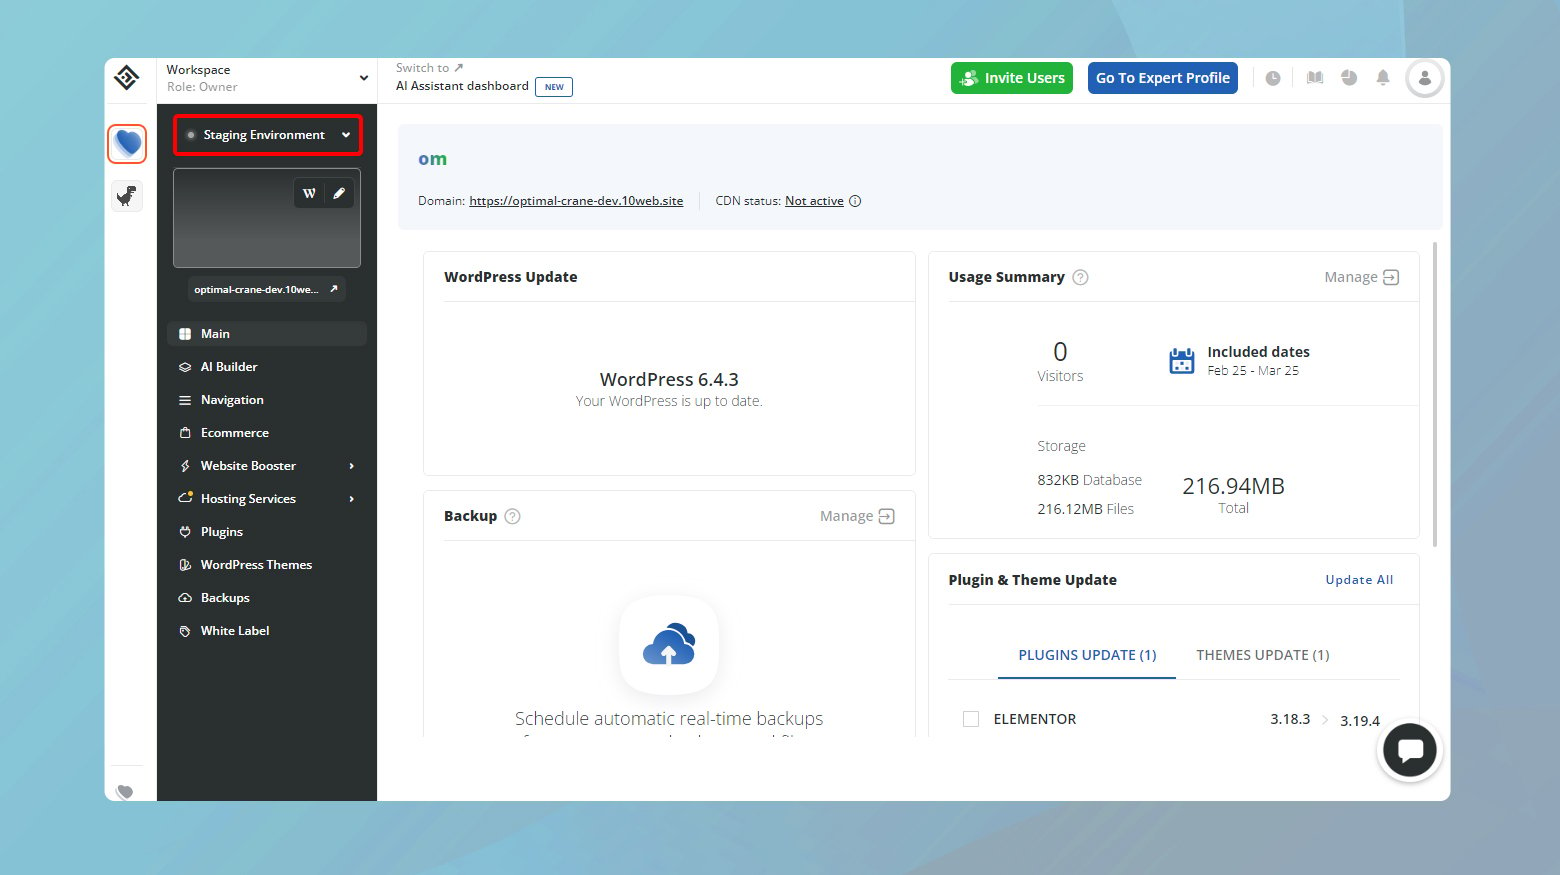
Utilizing 10Web’s staging and backup features
For 10Web users, the platform offers powerful tools like staging environments and automatic backups that are game-changers for managing updates. Staging environments allow you to clone your live site and test updates in a risk-free environment. If anything goes wrong, you can pinpoint the issue without affecting your live site. Likewise, 10Web’s automatic backup functionality allows you to schedule backups for plugins, themes and your entire website. 10Web automatic backups ensure that you can always restore to an earlier state in case something goes wrong.
Leveraging these features
Test on staging: Before applying updates to your live site, replicate them on your staging site. This step is crucial for catching any compatibility issues between new updates and your site’s existing setup.
Regular backups: Ensure your site is backed up regularly, ideally before each update. While 10Web provides automatic backups, it’s good practice to manually trigger a backup before making significant changes.
Check compatibility before updates
Compatibility checks are a preventative to the “Briefly Unavailable for Scheduled Maintenance Error.” You don’t want to update a plugin or theme only to find it breaks your site because it’s not compatible with your WordPress version. This can lead to a range of issues, from minor glitches to significant functionality breakdowns, potentially affecting your site’s user experience and security.
How to check compatibility
WordPress makes it relatively straightforward to check the compatibility of plugins and themes with your current version of WordPress.
- Within your WordPress dashboard, navigate to the section where updates are displayed. This could be under “Dashboard” > “Updates” or directly within the “Plugins” or “Themes” sections, depending on what you’re looking to update.
- Next to each plugin or theme that has an available update, you’ll typically see a “View Details” link. Clicking on this link opens a popup window with more information about the specific update.
- Within the popup, look for the compatibility information, which will tell you whether the plugin or theme is compatible with your version of WordPress. This is often clearly stated, sometimes with a “Tested up to” notation that indicates the latest version of WordPress the author has tested the plugin or theme with.
Closing thoughts
Throughout our blog on maintaining and updating WordPress sites, we’ve navigated through best practices to avoid common pitfalls such as the site being stuck in maintenance mode. Key takeaways include the importance of deleting the `.maintenance` file to resolve update issues, checking theme and plugin compatibility before updates, and utilizing tools like staging environments and backups for a smooth update process. These strategies ensure your WordPress site remains secure, functional, and up-to-date, minimizing downtime and enhancing the user experience.
Accelerate your WordPress website creation with AI
Create a custom WordPress website tailored to your business needs 10X faster with 10Web AI Website Builder.
Say goodbye to website errors
Fix all the website errors in one click
Migrate your website to the world's best Managed WordPress Hosting.