Choosing the right WordPress theme is pivotal as it sets the tone for your website’s design and functionality. The process of how to install a WordPress theme can be simple, but understanding the different methods – whether uploading a custom theme directly through the WordPress admin panel or using FTP – enables you to quickly establish your digital presence. This guide will provide a comprehensive overview of these installation techniques to help you get started with your ideal theme without any hassle.
Simplify WordPress with 10Web
Automate manual work with 10Web Managed WordPress Hosting and 10Web AI Website Builder. Optimize your WordPress website effortlessly.
FAQ
How do I manually install a WordPress theme?
How do I install a WordPress theme from a zip file?
How do I implement a WordPress theme?
What is a WordPress theme?
A WordPress theme is a collection of files that work together to define the design and functionality of a WordPress website. These files include stylesheets, templates, images, and possibly JavaScript files, all of which determine the layout, typography, colors, and other visual elements of the site. Themes can also extend the functionality of a WordPress site with features like custom post types, widgets, and plugins.
Themes provide a way to personalize and style your website without needing to write the code from scratch. They can be easily switched in the WordPress dashboard, allowing site owners to update the look and feel of their site while maintaining the content and functionality intact. WordPress themes can range from simple designs for blogs to complex designs for ecommerce websites, and they are available in both free and premium versions from various sources.
How to choose the best theme for a WordPress site
Choosing the best theme for your WordPress site is crucial because it not only influences the visual appeal and user experience but also affects the functionality and performance of your site. Before understanding how to install a WordPress theme, let’s look at some key factors to consider when selecting one:
Purpose and niche
Ensure the theme suits the specific purpose of your site, whether it’s a blog, business website, portfolio, online store, etc. Look for themes that offer features tailored to your niche, like booking systems for hotels, product galleries for ecommerce, or portfolio displays for artists.
Design quality
Choose a theme that visually aligns with your brand identity. The design should be modern, attractive, and appropriate for your target audience. Ensure the theme looks good and functions well on all devices, including desktops, tablets, and smartphones.
Ease of customization
Check if the theme offers flexible customization options, such as the ability to change colors, layout styles, fonts, and more without needing to code. Some themes are designed to work seamlessly with page builders, making it easier for you to build and customize your site.
Performance and optimization
Choose a theme that is optimized for speed. A lightweight theme helps in faster loading times, improving user experience and SEO.Look for themes that are optimized for search engines, which can help your site rank better in search results.
Plugin compatibility
Ensure the theme supports all the necessary WordPress plugins you might need, such as WooCommerce for ecommerce , Yoast SEO for search engine optimization, or WPML for multilingual sites.
Support and updates
Choose a theme that is regularly updated to keep up with WordPress core updates, bug fixes, and modern web standards. Check if the theme provider offers adequate support through forums, email, or live chat. Good support can be crucial if you encounter issues with the theme.
Reviews and ratings
Read reviews and ratings by other users to gauge their experiences. This can provide insights into potential issues or strengths of the theme.
Compliance and accessibility
If necessary, choose a theme that adheres to web accessibility standards to ensure your site is usable by people with disabilities. Make sure the theme complies with legal standards and the licensing is clear, especially for commercial sites.
Preparing to install a WordPress theme
Before diving into the installation of a new WordPress theme, it’s essential to prepare your website to ensure a smooth transition. This preparation helps in avoiding potential issues that could affect your website’s functionality or cause data loss. Here’s how you can get your site ready for a theme installation:
Ensure WordPress is up to date
First and foremost, make sure your WordPress installation is up to date. Running the latest version of WordPress not only improves security but also ensures compatibility with new themes. To update WordPress, simply go to your dashboard, navigate to the Updates section, and if there’s an update available, click the Update Now button. This step is crucial because themes often use new features and code standards introduced in the latest versions of WordPress.
Backup your website
Backing up your website is a critical step before making any significant changes, like installing a new theme. A backup allows you to restore your website to its previous state if something goes wrong during the installation process. You can use a plugin like UpdraftPlus or VaultPress for automated backups, or you can manually create a backup through your hosting provider’s control panel. Ensure you back up both your website’s database and its files. Once your backup is secure, you can proceed with confidence, knowing that your data is safe.
How to install a WordPress theme
Method 1: Installing free themes from WordPress theme repository
- Access the WordPress Admin Dashboard
- Navigate to Appearance > Themes
- Use the Add New button to browse and install themes

- Utilize the Feature Filter to find specific types of themes

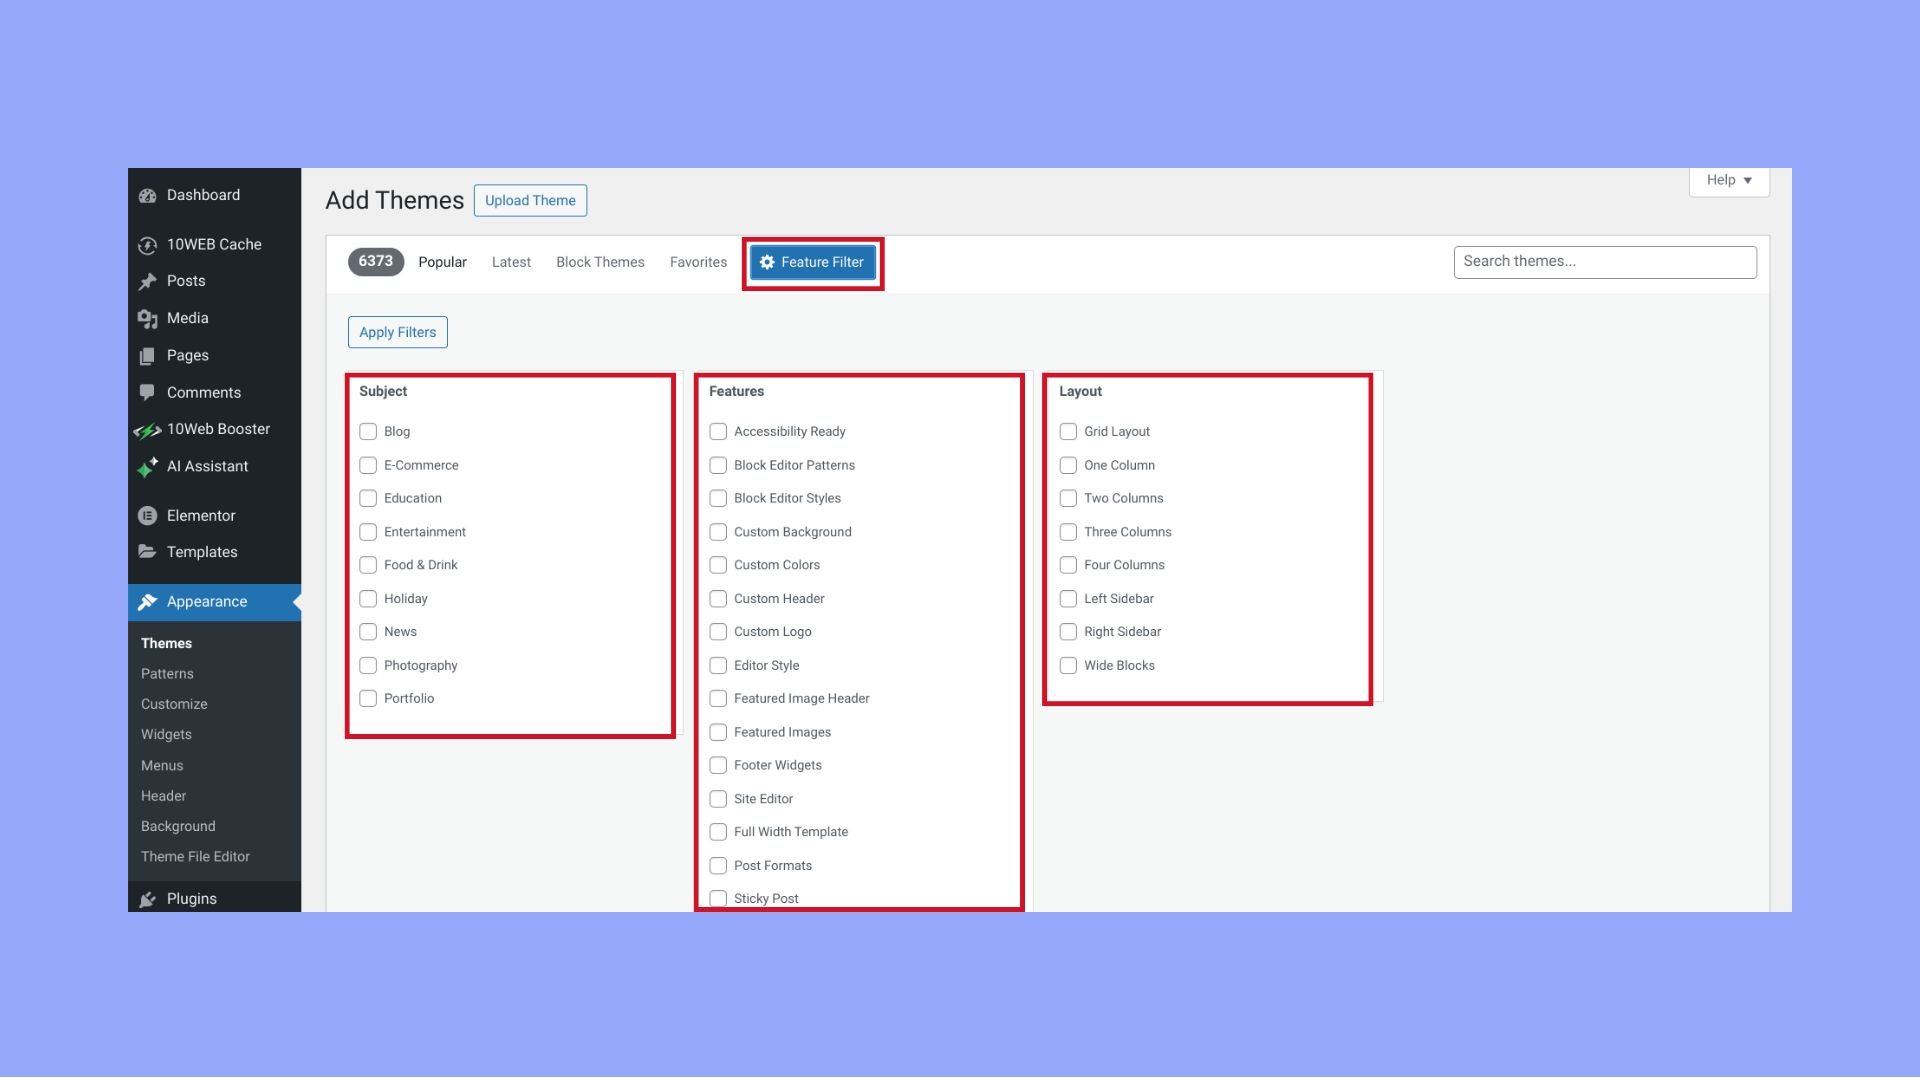
You’ll see categories like Layout, Features, and Subject. Each category contains checkboxes for various features such as responsive layout, accessibility ready, grid layout, one column, custom colors, custom logo, etc.
Check the boxes next to the features you are looking for in a theme. You can select multiple features across different categories to narrow down your search to themes that specifically meet your needs.
Method 2: Uploading a premium or downloaded theme
This method is typically used for themes that are not available in the WordPress theme directory and are often purchased from external vendors or downloaded from other sources. First of all you need to:
- Purchase or select a theme from a reputable third-party source. Ensure the source is trustworthy to avoid issues such as poor coding or security vulnerabilities.
- Once purchased, you will typically have access to a `.zip` file of the theme. Download this file to your computer. Ensure that the file you download remains in the `.zip` format, as this is necessary for the next steps.
After you have downloaded the zip file, it’s time to install it to WordPress:
- Open your web browser and log in to the admin area of your WordPress website. This is typically found at `yourwebsite.com/wp-admin`.
- In your WordPress dashboard, navigate to Appearance > Themes. This section displays all the themes currently installed on your site.
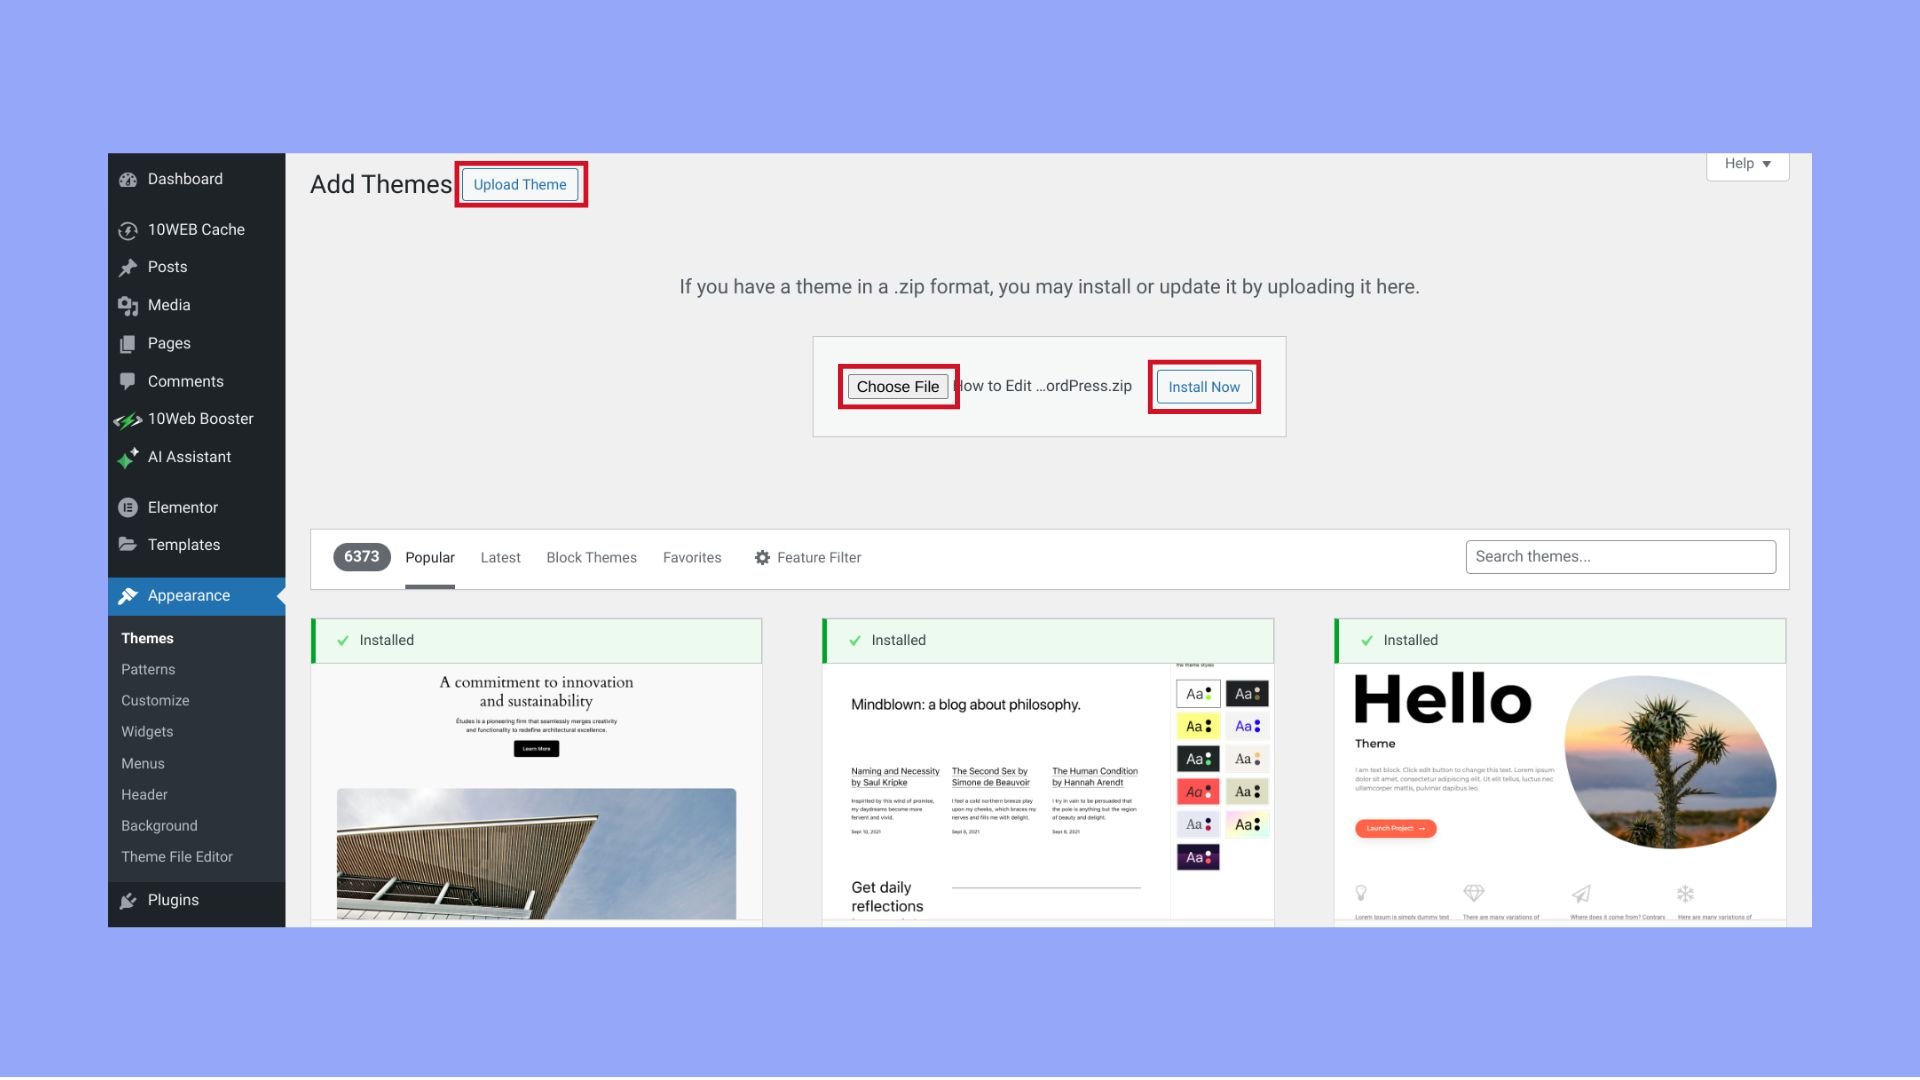
- At the top of the Themes page, you’ll see an Add New button. Click this to go to the Add Themes page.
- On the Add Themes page, you’ll see an Upload Theme button at the top of the screen. Press on this button to reveal the theme upload options.
- Click on Choose File and navigate to where you saved the `.zip` file on your computer. Select the file.
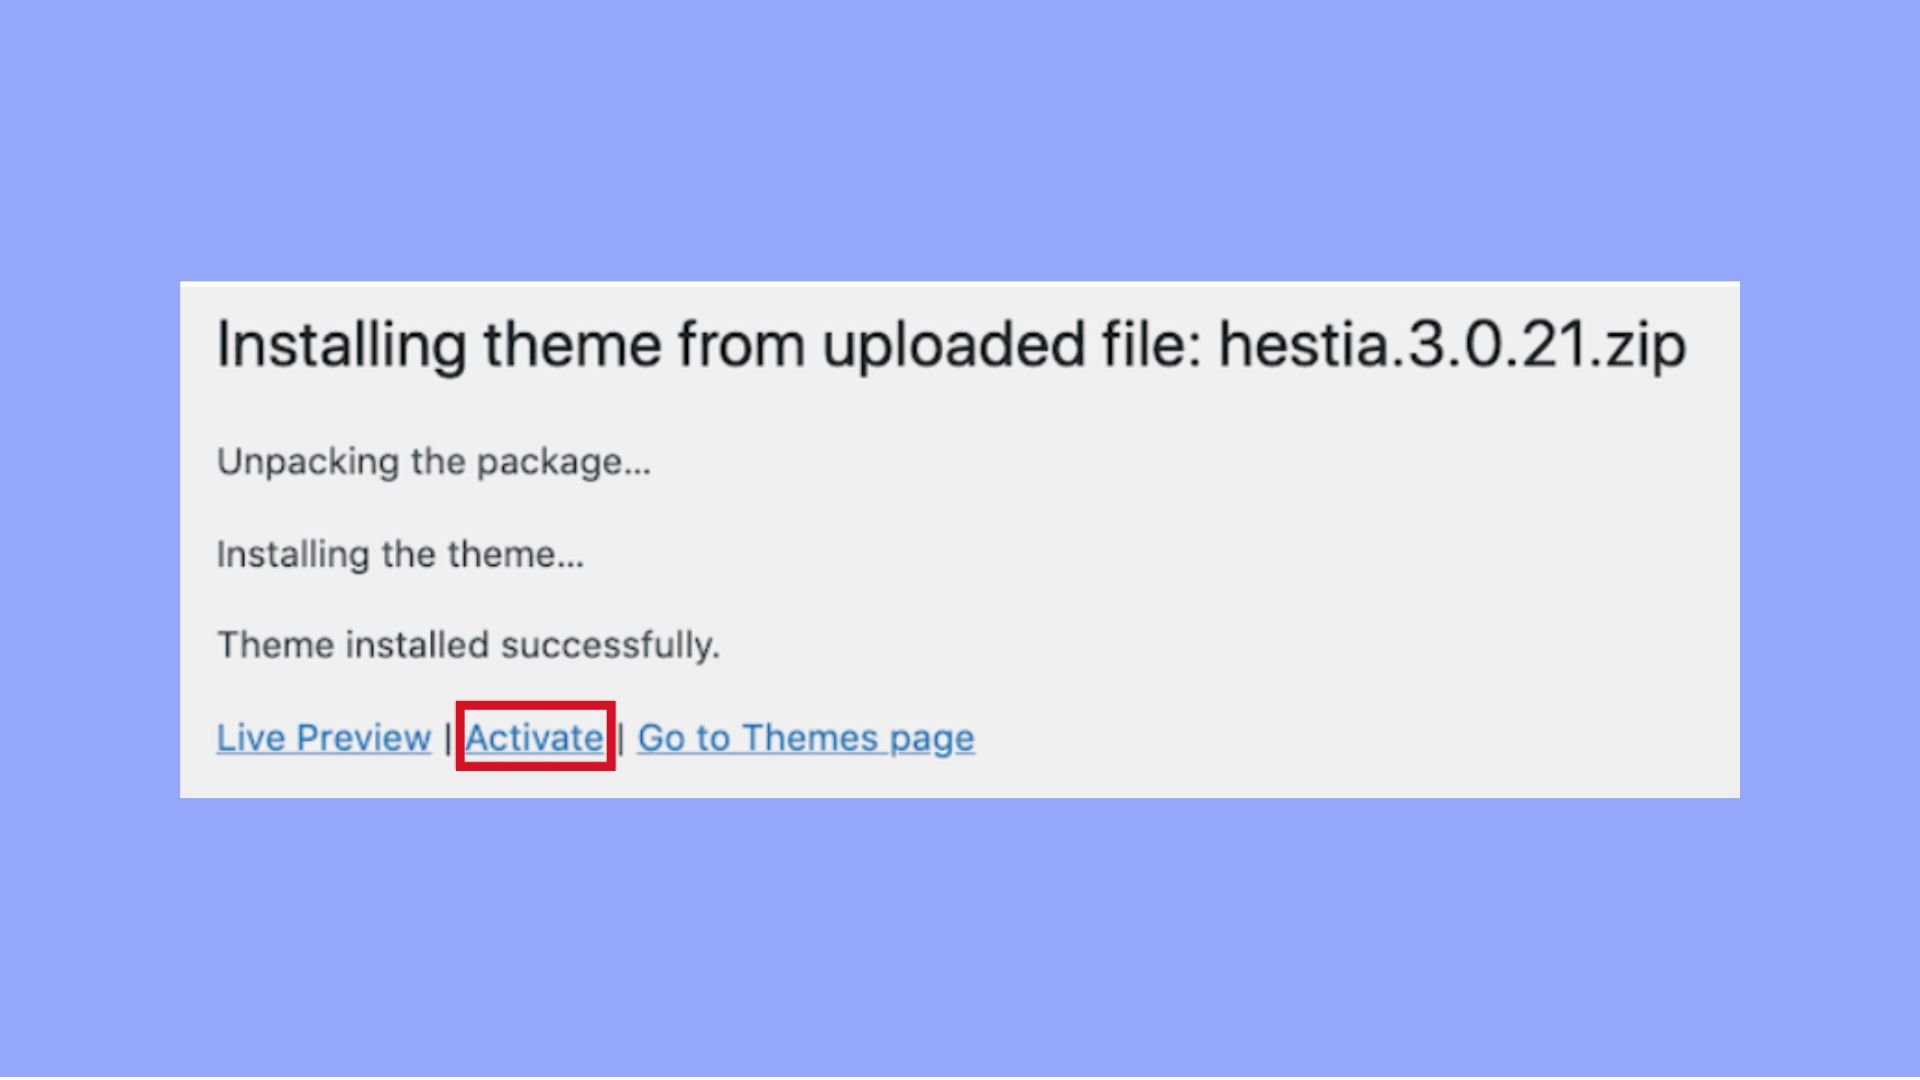
- After selecting the file, click Install Now. WordPress will upload the zip file from your computer and install the theme on your website. This process may take a few moments depending on the size of the theme and the speed of your internet connection.
- Click Activate to apply the new theme to your site immediately.
Method 3: Manual installation via FTP
This method is particularly useful if you have issues with the WordPress admin interface or need to bypass file size limits imposed by your hosting environment. Here’s how to install a WordPress theme using SFTP, with detailed steps to connect using FileZilla and 10Web credentials:
Step 1: Obtain and prepare the theme files
- Acquire the theme’s zip file from a marketplace, a theme developer’s website, or any trusted source.
- Before uploading, unzip the file on your local computer. This creates a new folder containing all the theme’s files and directories.
Step 2: Set up SFTP access
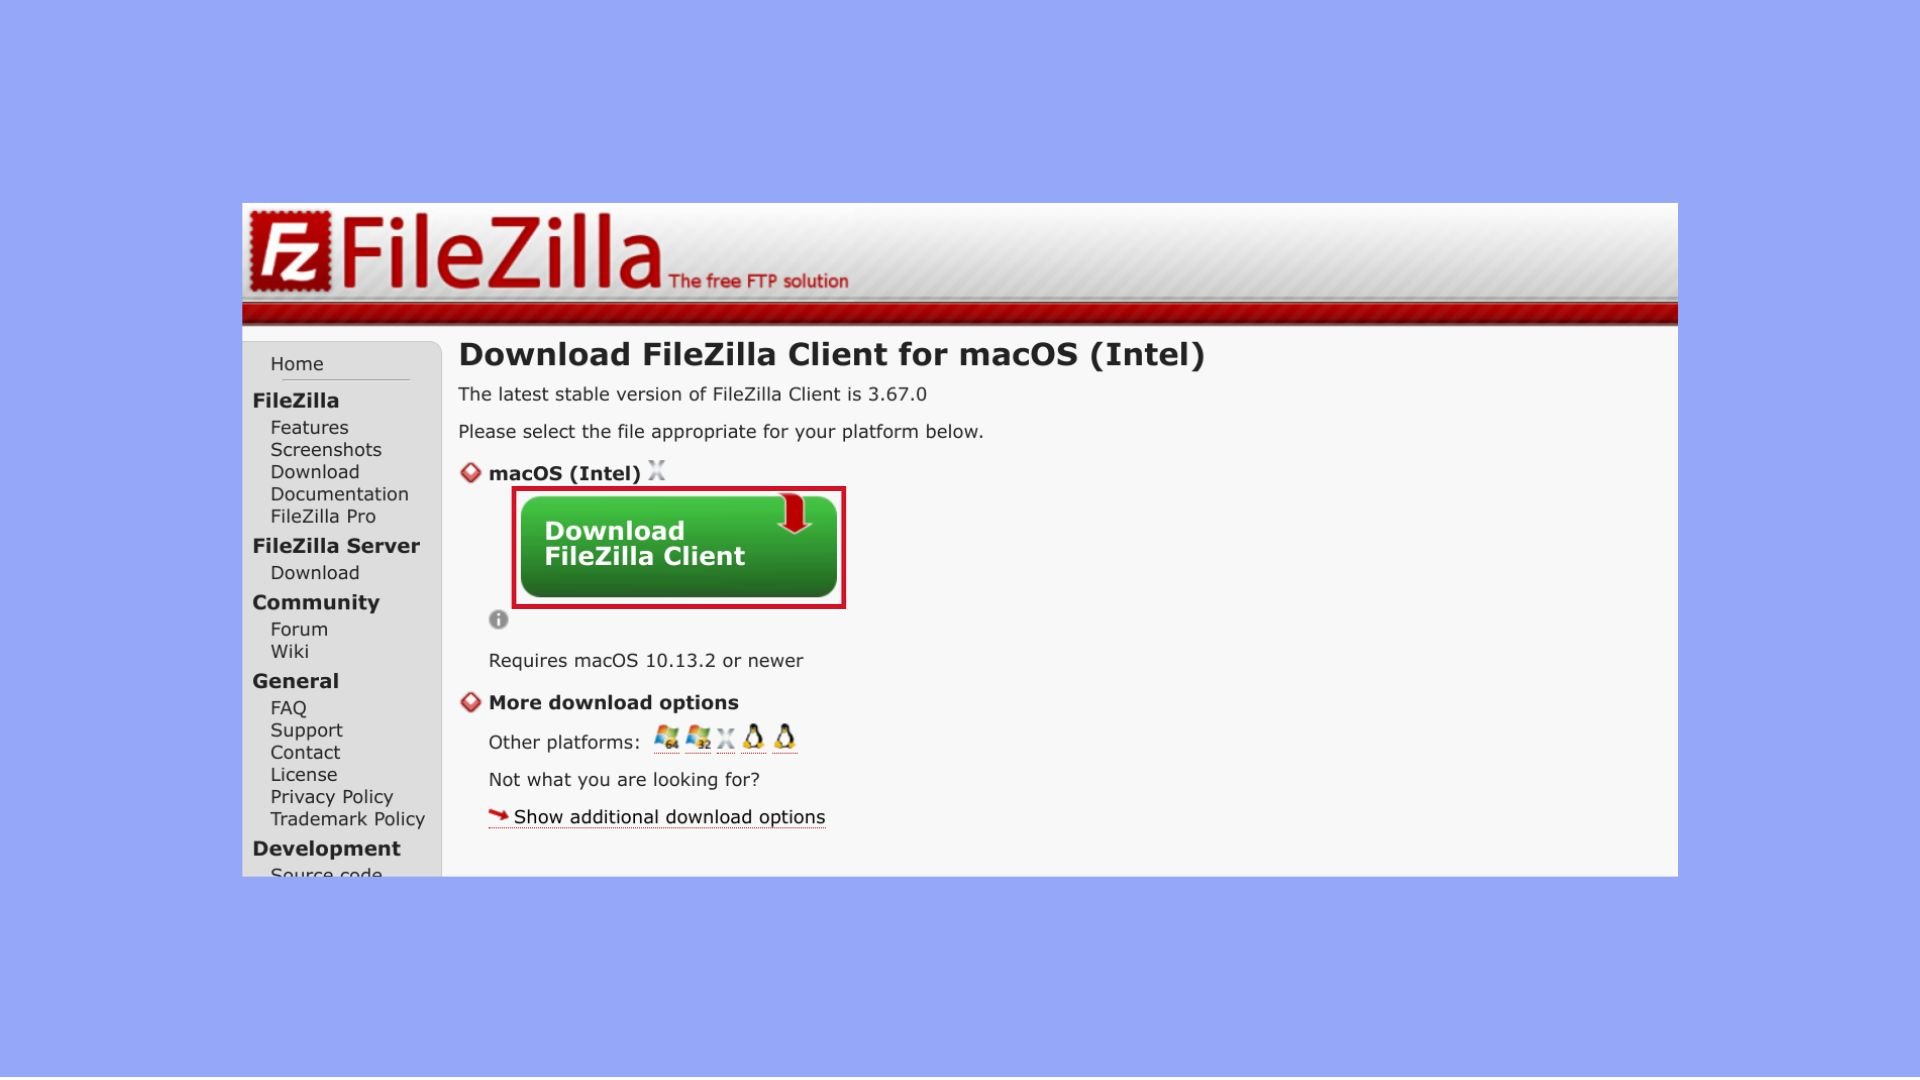
- If you haven’t already, download and install an FTP client. FileZilla is a widely-used option that supports SFTP.
- Obtain SFTP credentials by logging in to your 10Web dashboard.
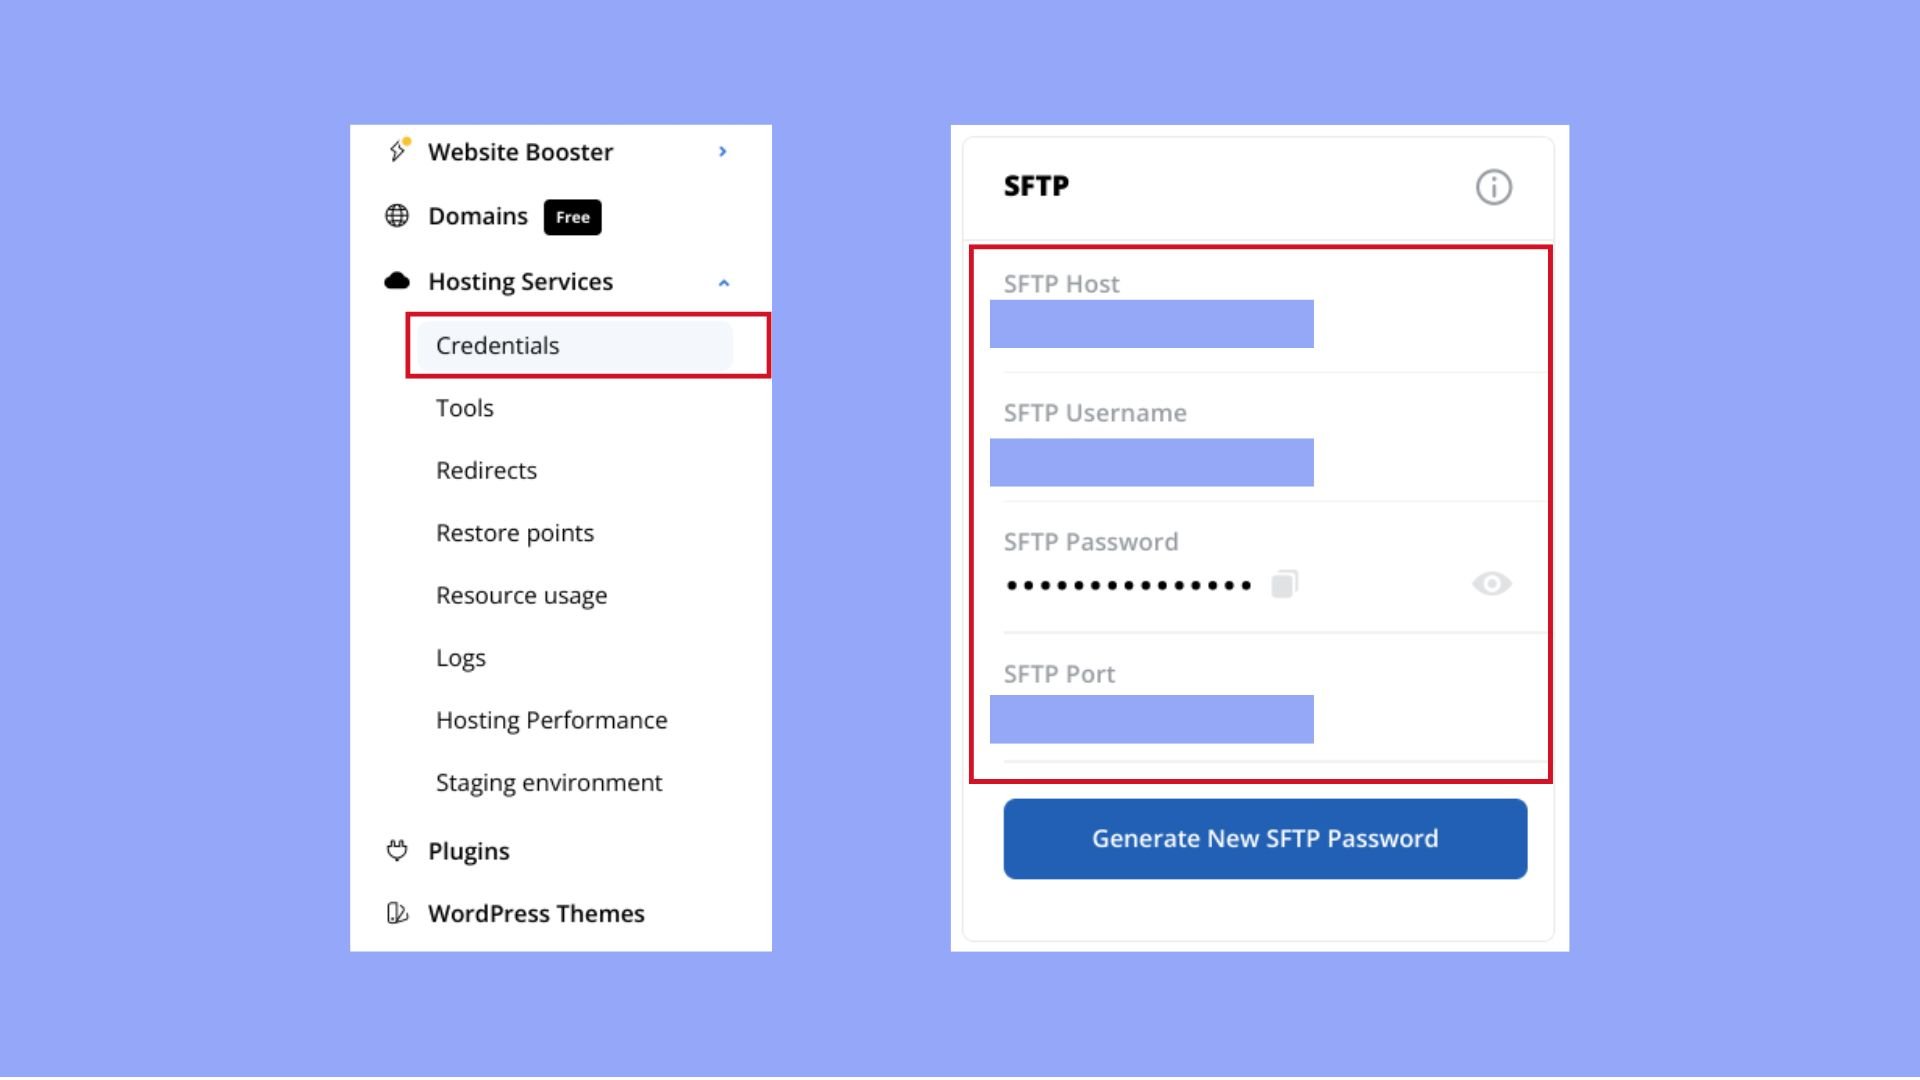
- Select the website you wish to connect to.
- Under Hosting Services, click on Credentials to find your SFTP credentials.

Simplify WordPress with 10Web
Automate manual work with 10Web Managed WordPress Hosting and 10Web AI Website Builder. Optimize your WordPress website effortlessly.
Step 3: Connect using FileZilla
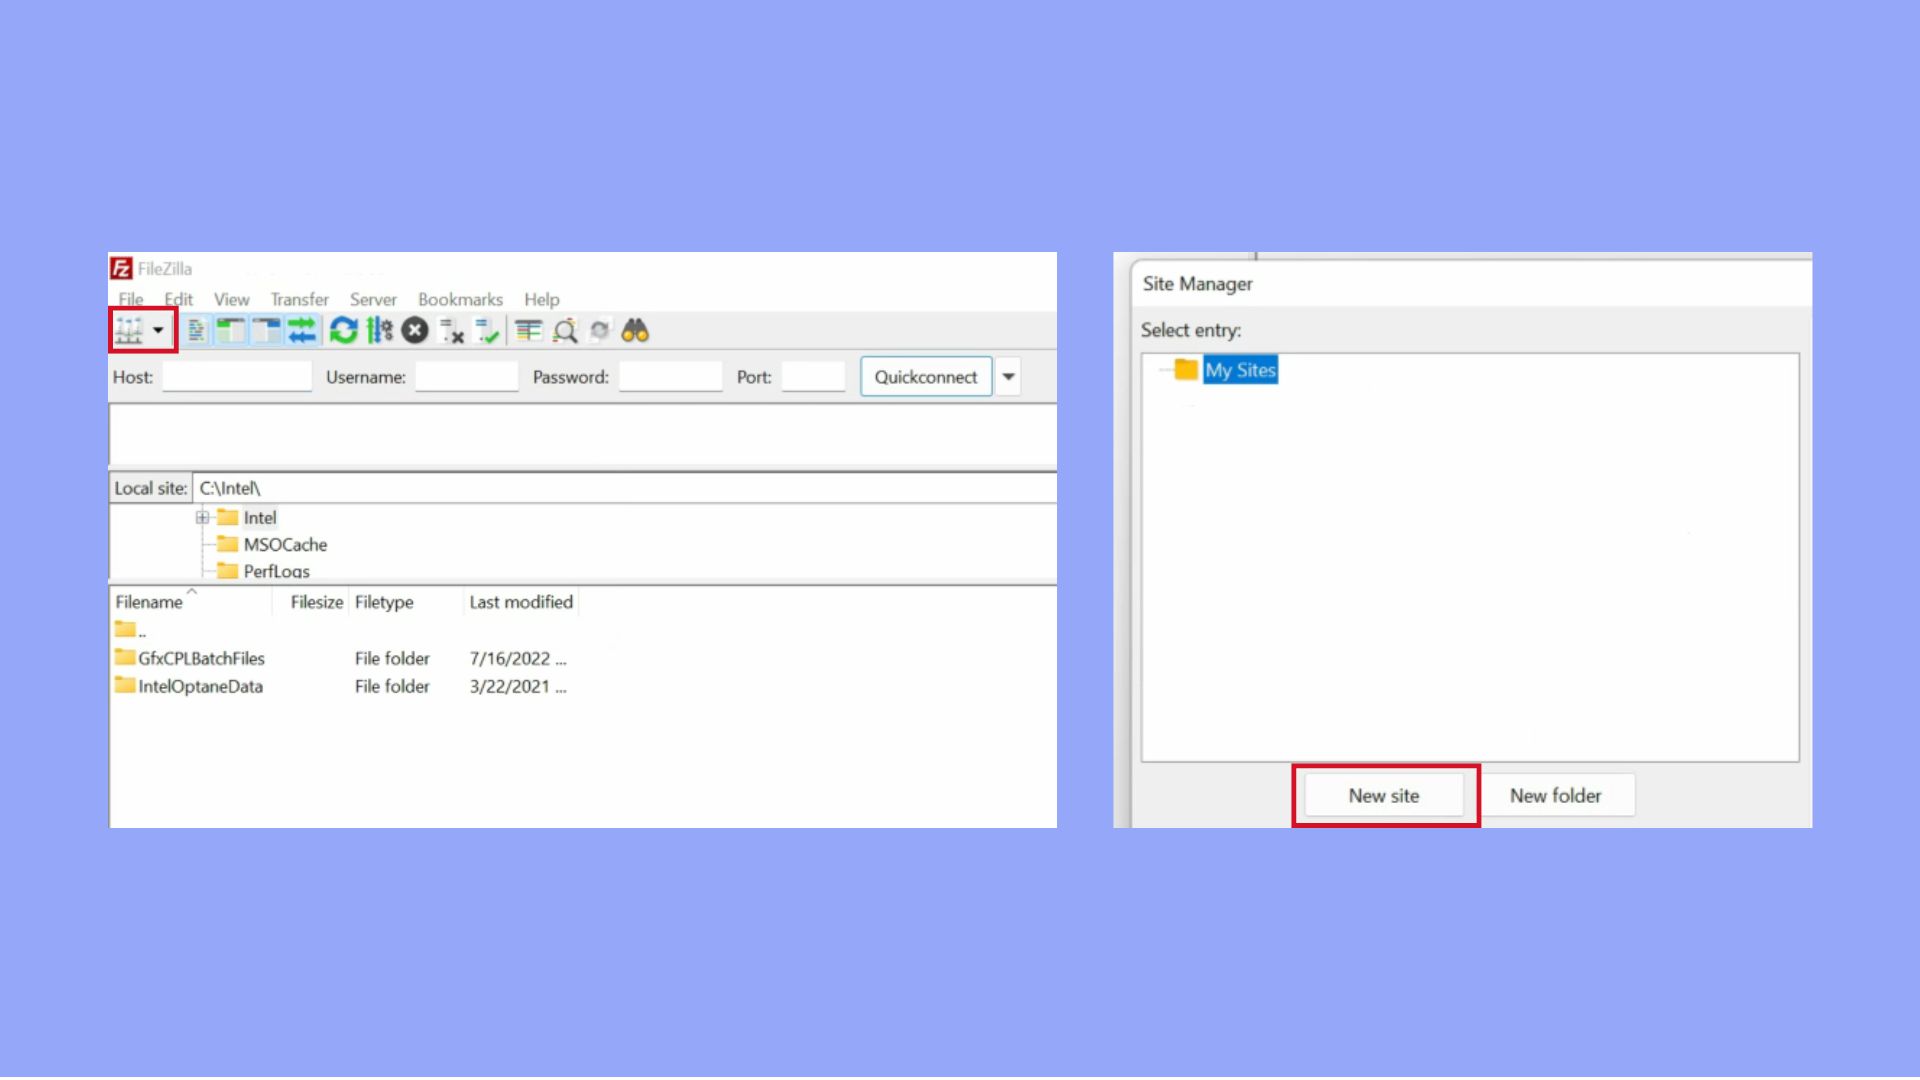
- Launch FileZilla and go to File > Site Manager.
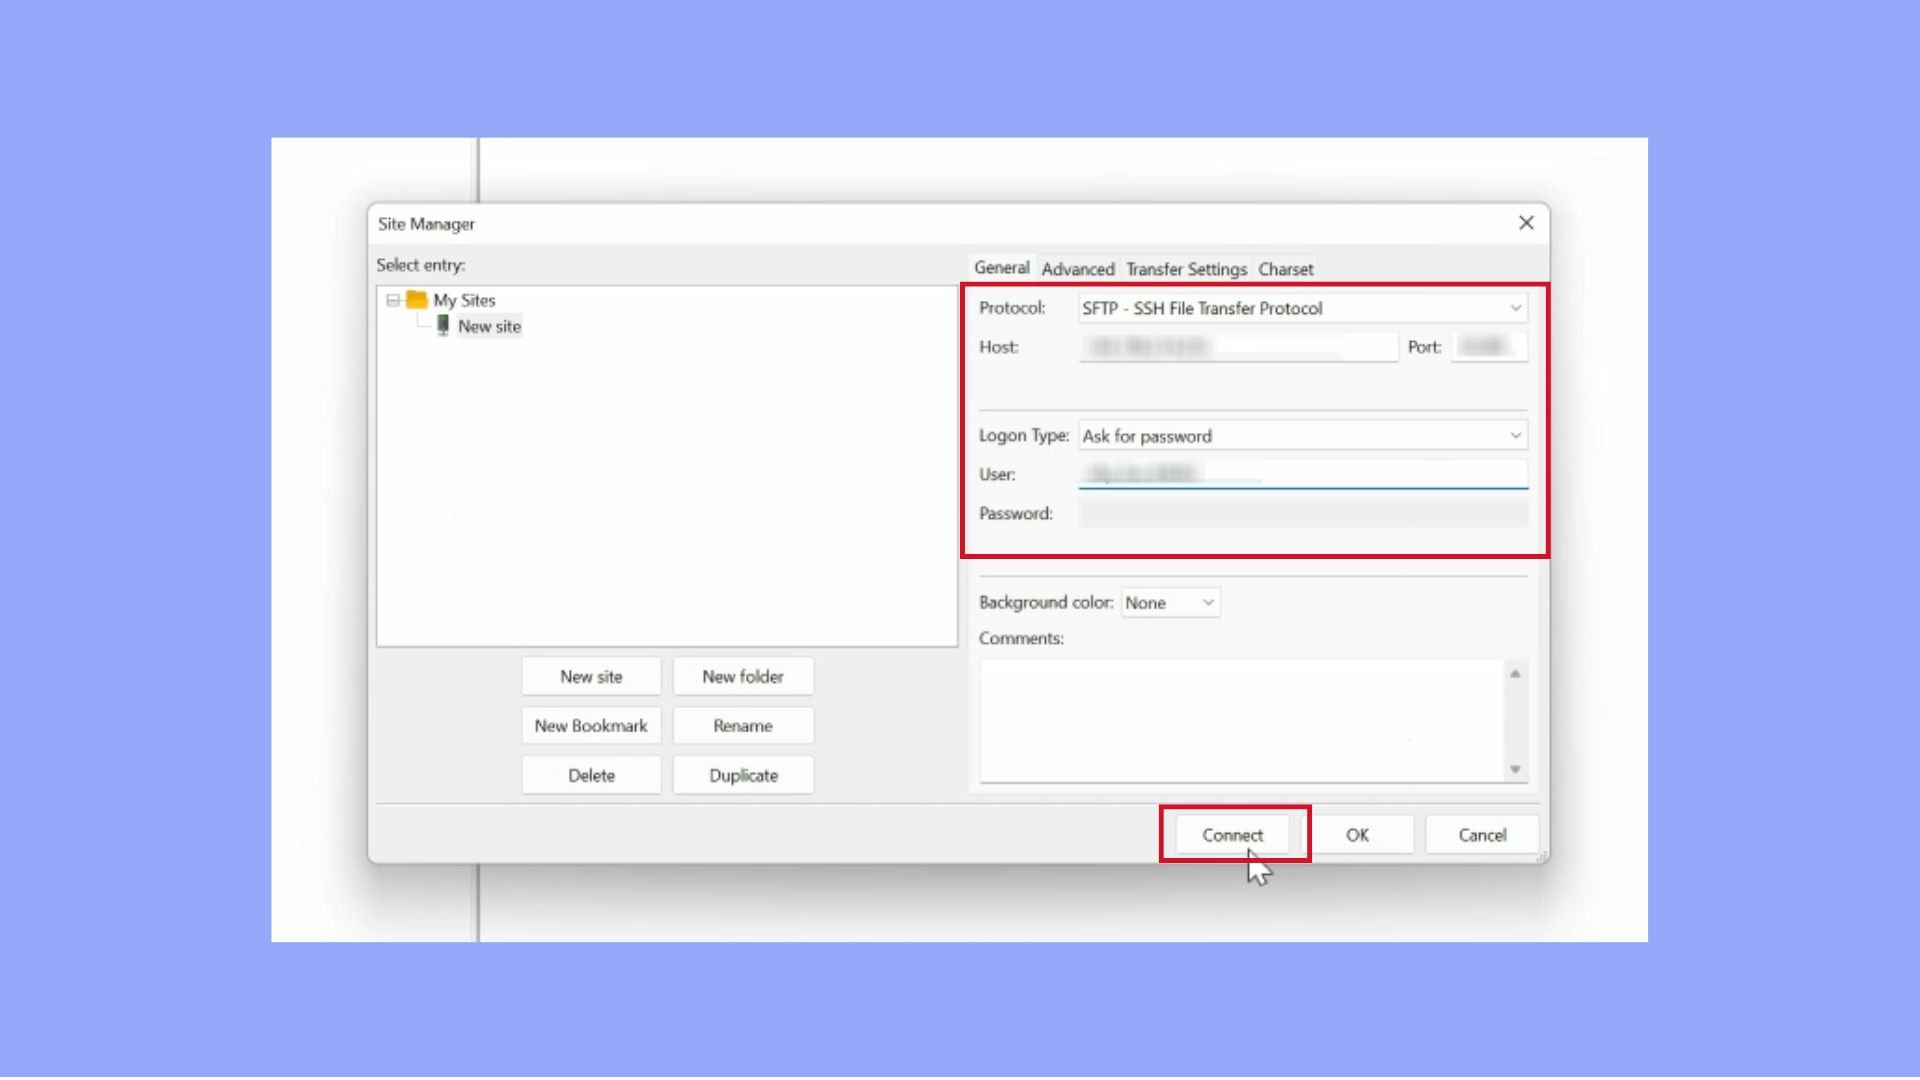
- Press New Site and fill in your SFTP credentials:Host: SFTP host from 10Web credentials.
Port: SFTP port provided.
Protocol: Choose SFTP.
Logon type: Select Normal.
User: SFTP username.
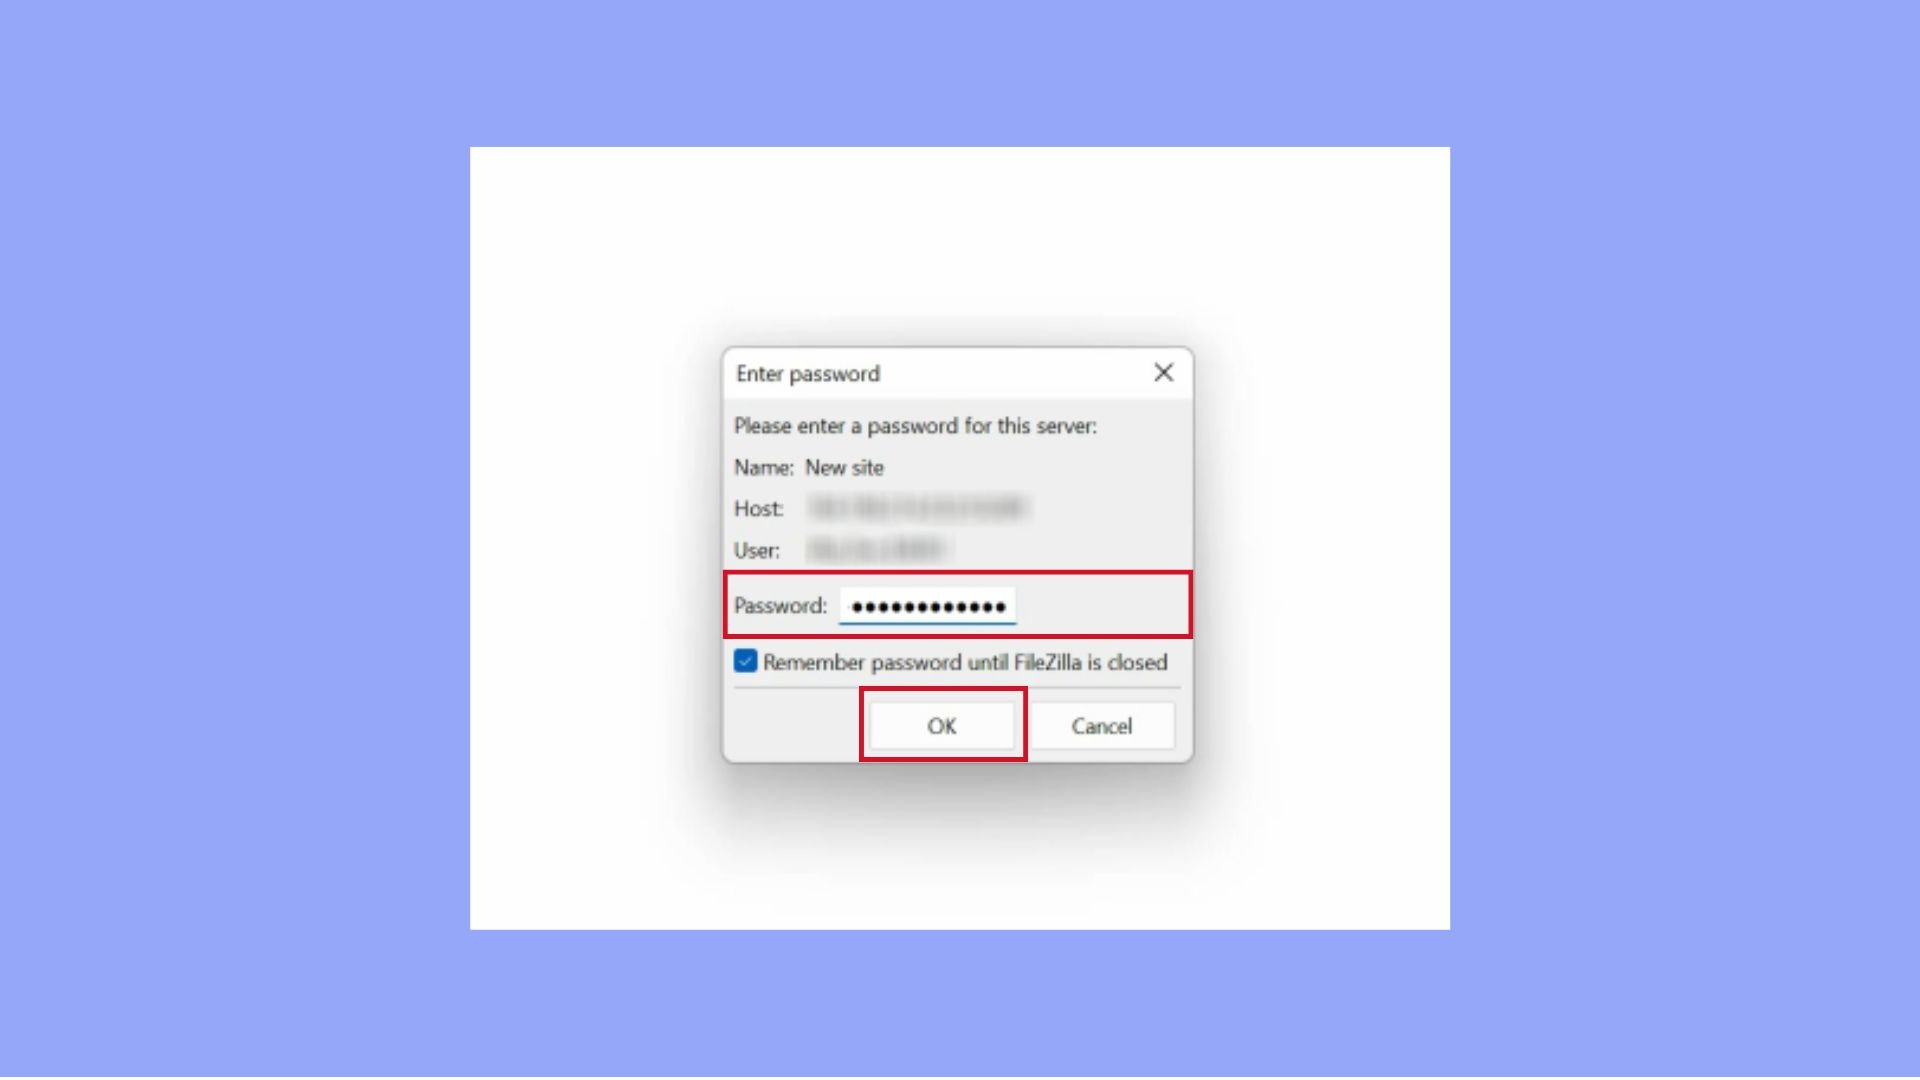
Password: SFTP password (you can enter it later when prompted).
- Click Connect. When prompted for the password, enter it to finalize the connection.
Step 4: Upload the theme
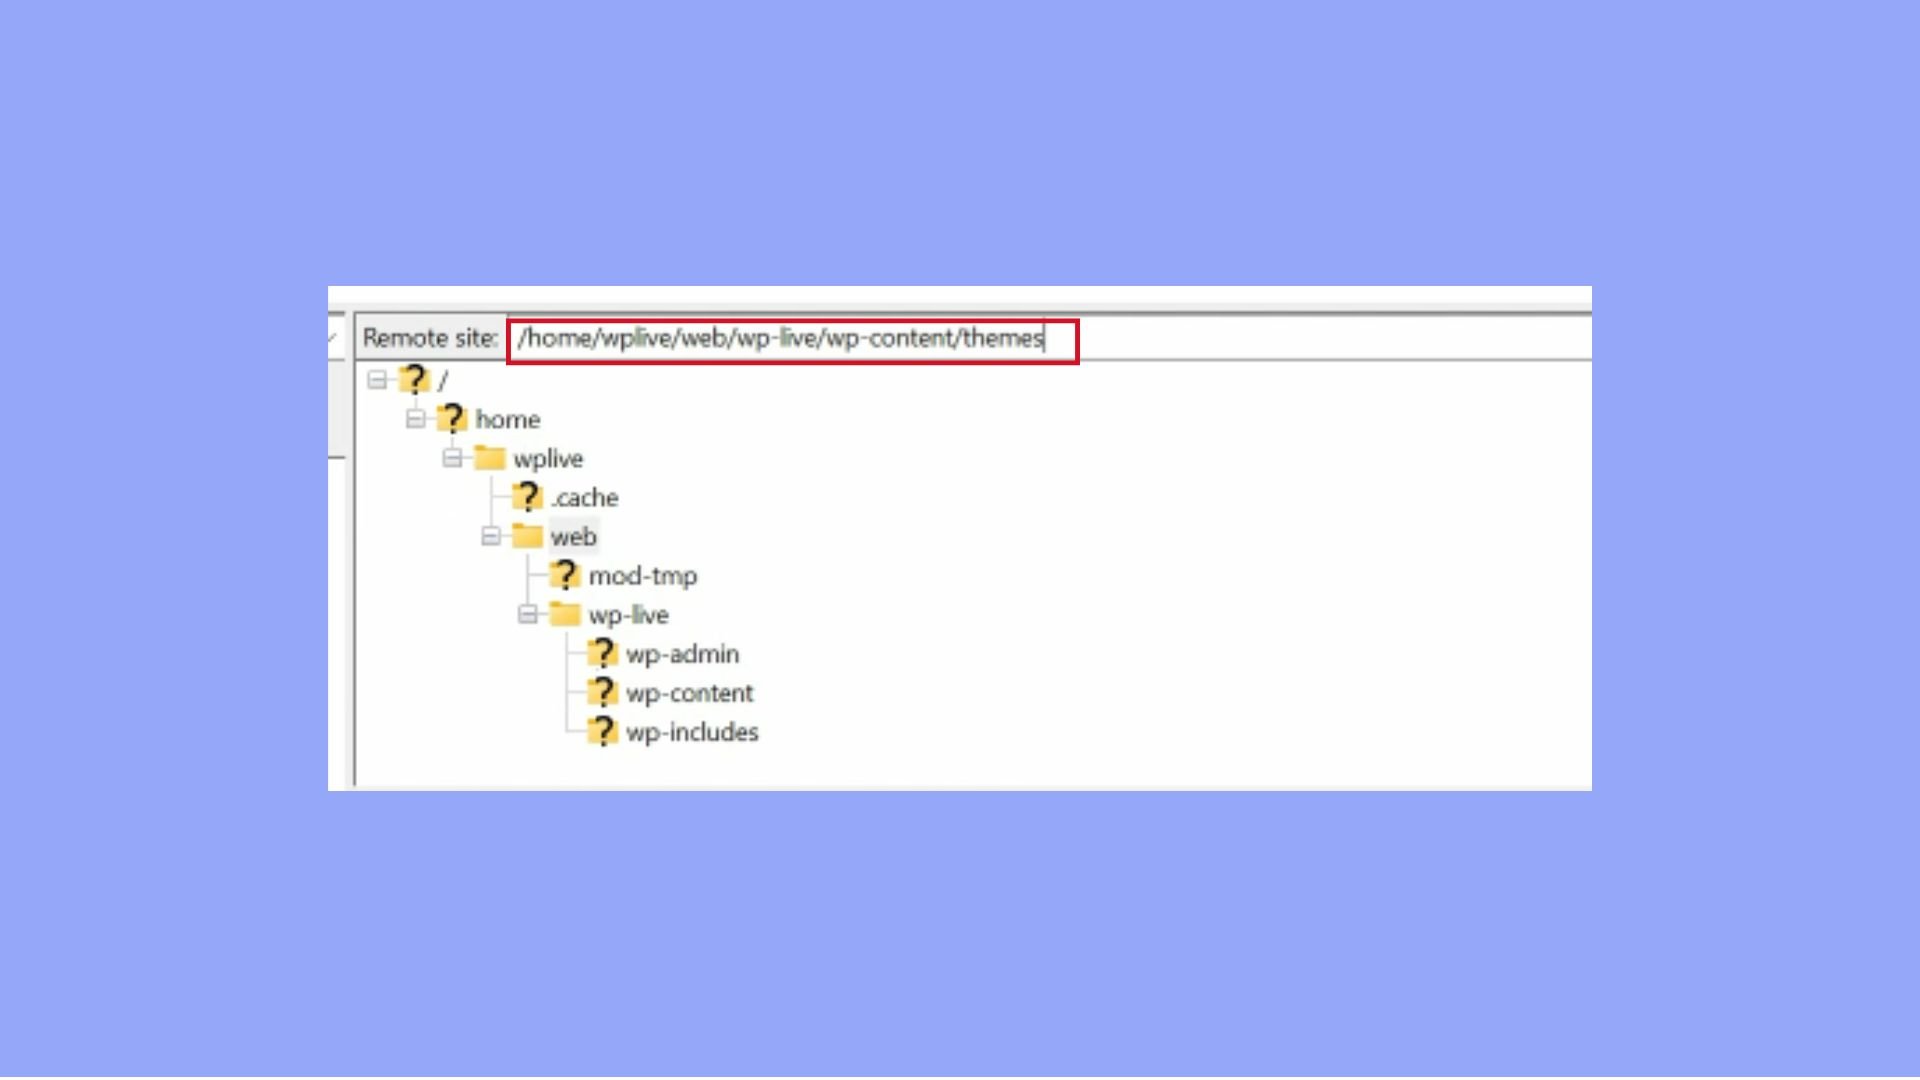
- Once connected, use FileZilla to navigate to the `/wp-content/themes` directory of your WordPress installation.
- Drag and drop the unzipped theme folder from your local machine into the `wp-content/themes` directory on your server. Ensure you upload the entire folder containing the theme files.
Step 5: Activate the theme
- Open a web browser and go to `yourwebsite.com/wp-admin`.
- Navigate to Appearance > Themes.
- Your newly uploaded theme will appear alongside any other installed themes.
- Hover over the theme thumbnail and click Activate to set your new theme live.
Important notes
- Ensure you are connecting via SFTP in FileZilla, not FTP. You may need to prefix your host with `sftp://` if using the quick connect feature to avoid connection errors.
- Always ensure that your site is backed up before making changes like theme installation. Also, keep your themes and WordPress installation updated for security and performance.
Method 4: Using 10Web
If you are a 10Web user, you can install your theme directly from the 10Web dashboard, streamlining your website setup. 10Web allows you to install themes either by uploading from your computer or directly from the WordPress repository, making it incredibly convenient.
To install themes by uploading:
- Log into your 10Web dashboard.
- Navigate to the website where you want to install the theme.
- Go to WordPress Themes > Add WP Themes.
- To upload a theme, click on Choose file, select your theme file and click Open, or simply drag and drop your file into the Upload box.
- To activate the theme, tick the checkbox next to the theme and click Activate.
To install a theme from the WordPress Repository:
- Log into your 10Web dashboard.
- Navigate to the website where you want to install the theme.
- Click on WordPress Themes > Add WP Themes.S
- Switch to the WordPress Repository tab, find the theme you want, and click Install.
- The installed theme will appear in the All themes section of the themes page.
To activate or delete any of the themes, simply tick the checkbox next to the theme and click Activate or Delete as needed. Once the theme has been activated, it will be immediately applied to your website, transforming its appearance and functionality.
With 10Web, it’s easier to manage your WordPress website, providing powerful tools and an intuitive interface to streamline your web management tasks. For more information on managed WordPress hosting by 10Web, visit 10Web Managed WordPress Hosting.
Simplify WordPress with 10Web
Automate manual work with 10Web Managed WordPress Hosting and 10Web AI Website Builder. Optimize your WordPress website effortlessly.
Post-installation steps
Now that you know how to install a WordPress theme, there are several post-installation steps you should take to ensure everything is set up correctly and tailored to your needs:
Previewing the theme using live preview
- Navigate to Appearance > Themes in your WordPress dashboard. Hover over your newly installed theme and click the Live Preview button. This allows you to see how your website will look with the new theme without actually activating it.
- Use the Live Preview to explore different layout options, color schemes, and widget placements that the theme offers. This step is crucial for visualizing the potential adjustments before making the theme live.
Customizing the theme settings
- If you’re satisfied with the preview, click Activate & Publish to apply the theme. Then, go to Appearance > Customize to access the WordPress Customizer.
- In the Customizer, you can modify various settings like the site title, colors, header images, navigation menus, and more. Each theme may offer different customization options based on its capabilities.
- Make sure to save any changes you make during customization. WordPress Customizer allows you to see a live preview of these changes as you make them.
Ensuring all plugins and widgets work with the new theme
After activating the theme, check to ensure that all previously installed plugins and widgets are compatible and functioning correctly with the new theme. Some themes might not support certain plugins or widgets, or they may require additional styling to integrate seamlessly.
- Navigate through your site to test different functionalities, especially those related to active plugins (like contact forms, SEO tools, e-commerce setups, etc.). Ensure everything works as expected without errors or styling issues.
- Visit Appearance > Widgets to see if any widgets need to be re-added or adjusted. The new theme might have different widget areas or not support certain custom widgets from your previous theme.
Conclusion
This guide has comprehensively walked through the steps on how to install a WordPress theme, ensuring a thorough understanding of various methods whether through the admin panel, direct uploads, or manual installation via FTP. The importance of preparatory steps such as updating WordPress and securing a backup has been emphasized to safeguard site functionality during updates.
Now with a new theme installed, take the time to assess various themes and their impacts on site aesthetics and functionality. The appropriate theme enhances not only the visual appeal but also the operational aspects of a site, playing a crucial role in achieving online goals. Each installation offers valuable insights that contribute to optimizing the WordPress experience, refining the digital presence, and ensuring the site remains engaging and effective.
Simplify WordPress with 10Web
Simplify WordPress with 10Web
Skip and automate manual work with 10Web Managed WordPress Hosting and the 10Web AI Website Builder.