

Reinstalling WordPress can be a helpful step when troubleshooting your website or when you want to start fresh without losing your content. It can resolve issues like site errors, security breaches, or just bring a cluttered site back to its default state. Before you begin, always ensure you have a complete backup of your WordPress files and database. This way, you protect your data and can restore your site if needed.
Understanding the different methods available to reinstall WordPress is crucial to choose the approach that’s right for your specific situation. Keep in mind that while some methods are straightforward and suitable for beginners, others may require a bit more technical knowledge.
FAQ
How do I completely uninstall and reinstall WordPress?
To completely uninstall WordPress, delete the WordPress files from your server, drop the associated database, and remove any unnecessary user permissions. To reinstall, download the latest version of WordPress from the official website, upload it to your server, create a new database, and follow the WordPress installation guide.
What happens if you reinstall WordPress?
Reinstalling WordPress will give you a fresh start with the core files. It replaces all the core files but doesn’t automatically alter your database or content. However, manual interventions such as database reset or theme and plugin reconfigurations may be needed depending on the type of reinstallation.
How do I reset my WordPress site without losing data?
To reset your WordPress site without losing data, use a plugin like WP Reset, which allows you to selectively reset elements (such as themes, plugins, and database tables) while preserving posts, pages, and media. Always back up your data before performing any resets.
How do I reinstall WordPress from terminal?
To reinstall WordPress from the terminal, use WP-CLI, the WordPress command line tool. First, navigate to your WordPress root directory. Then, use the command wp core download –skip-content –force to reinstall the latest version of WordPress core files without altering content.
Why reinstall WordPress
When you’re managing your website, you may encounter scenarios where reinstalling WordPress is a practical solution. Here are some common reasons why you might need to consider this:
Troubleshooting: If your site is experiencing persistent issues that you can’t resolve with other methods, a fresh WordPress install can oftentimes rectify those problems.
Performance issues: Over time, your site may become sluggish. Reinstalling WordPress ensures you have a clean slate, which can improve site speed and responsiveness.
Security concerns: After a security breach, it’s imperative to start anew to ensure all malicious code is eradicated from your website.
Software conflicts: Sometimes, plugins or themes may conflict with each other or the core WordPress software. Reinstalling can help identify the source of the conflict.
Latest geatures: To take advantage of the latest features and improvements from WordPress updates, reinstalling can ensure you’re utilizing the most current version in a stable environment.
Preparing for reinstallation
Before you start the process of reinstallation, ensure that you have safeguarded all the important components of your WordPress website. This protects your data and ensures that you can restore your site to its previous state if needed.
Backing up your website
It’s crucial to back up your entire WordPress site, particularly the wp-content folder. This folder contains your themes, plugins, and media files. A WordPress backup plugin can automate this process. Plugins like UpdraftPlus offer options to back up your site directly from the WordPress dashboard. Remember, store your backup files in a safe location, such as cloud storage or an external hard drive.
If you are using 10Web as your hosting provider, you can automate the backup of your WordPress websites. You can also make manual backups at any moment and as needed.
Simplify WordPress with 10Web
Automate manual work with 10Web Managed WordPress Hosting and 10Web AI Website Builder. Optimize your WordPress website effortlessly.
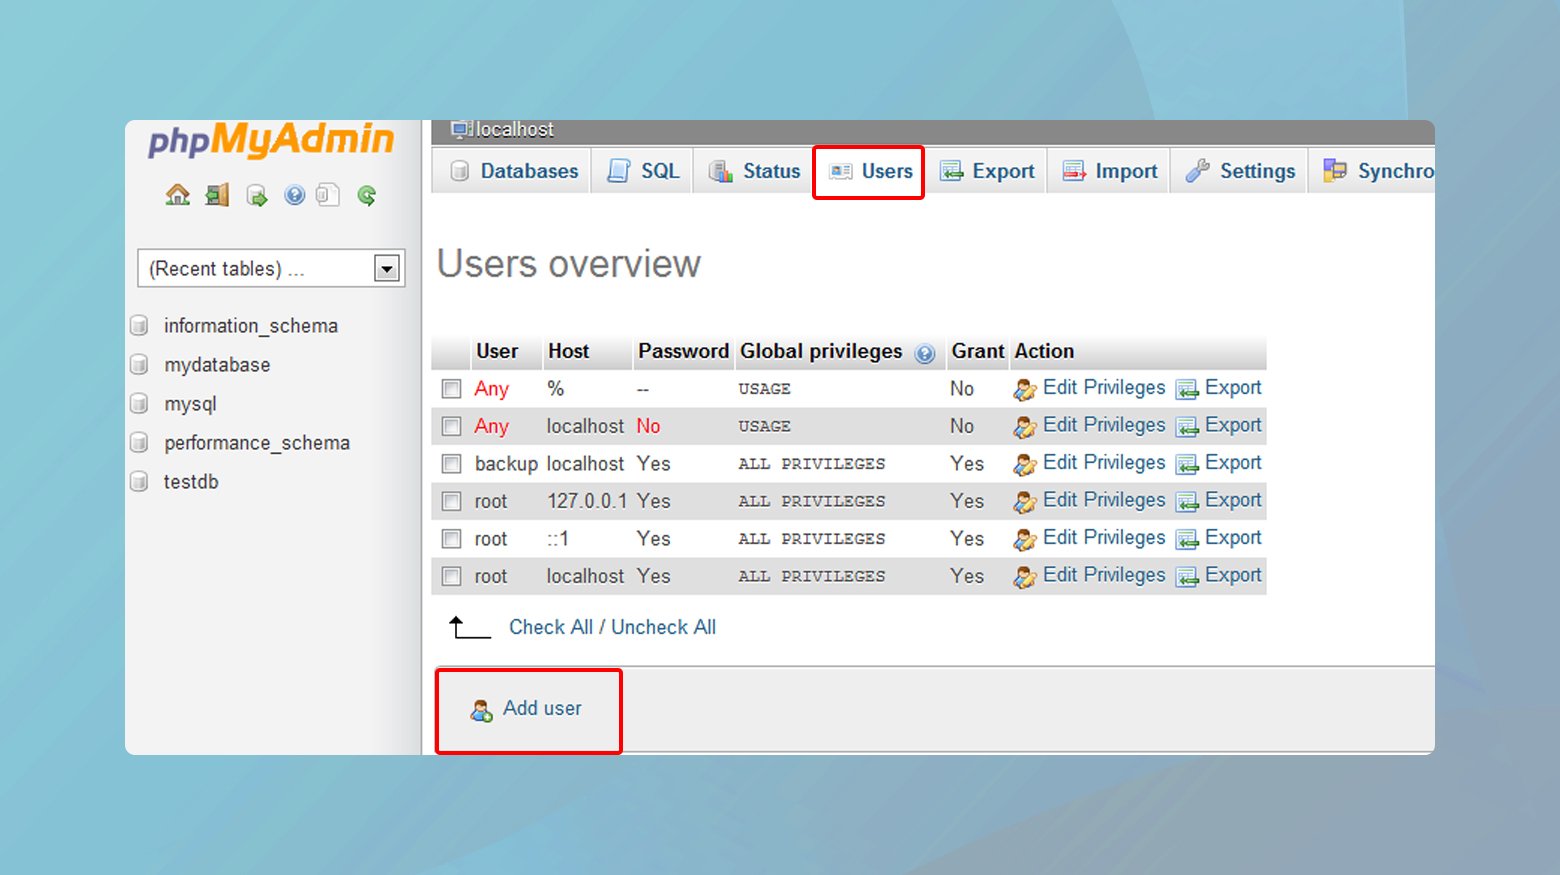
Exporting your database
Your website’s data is stored in a MySQL database. To export this database, you can use phpMyAdmin in your hosting dashboard or cPanel. Follow these steps:
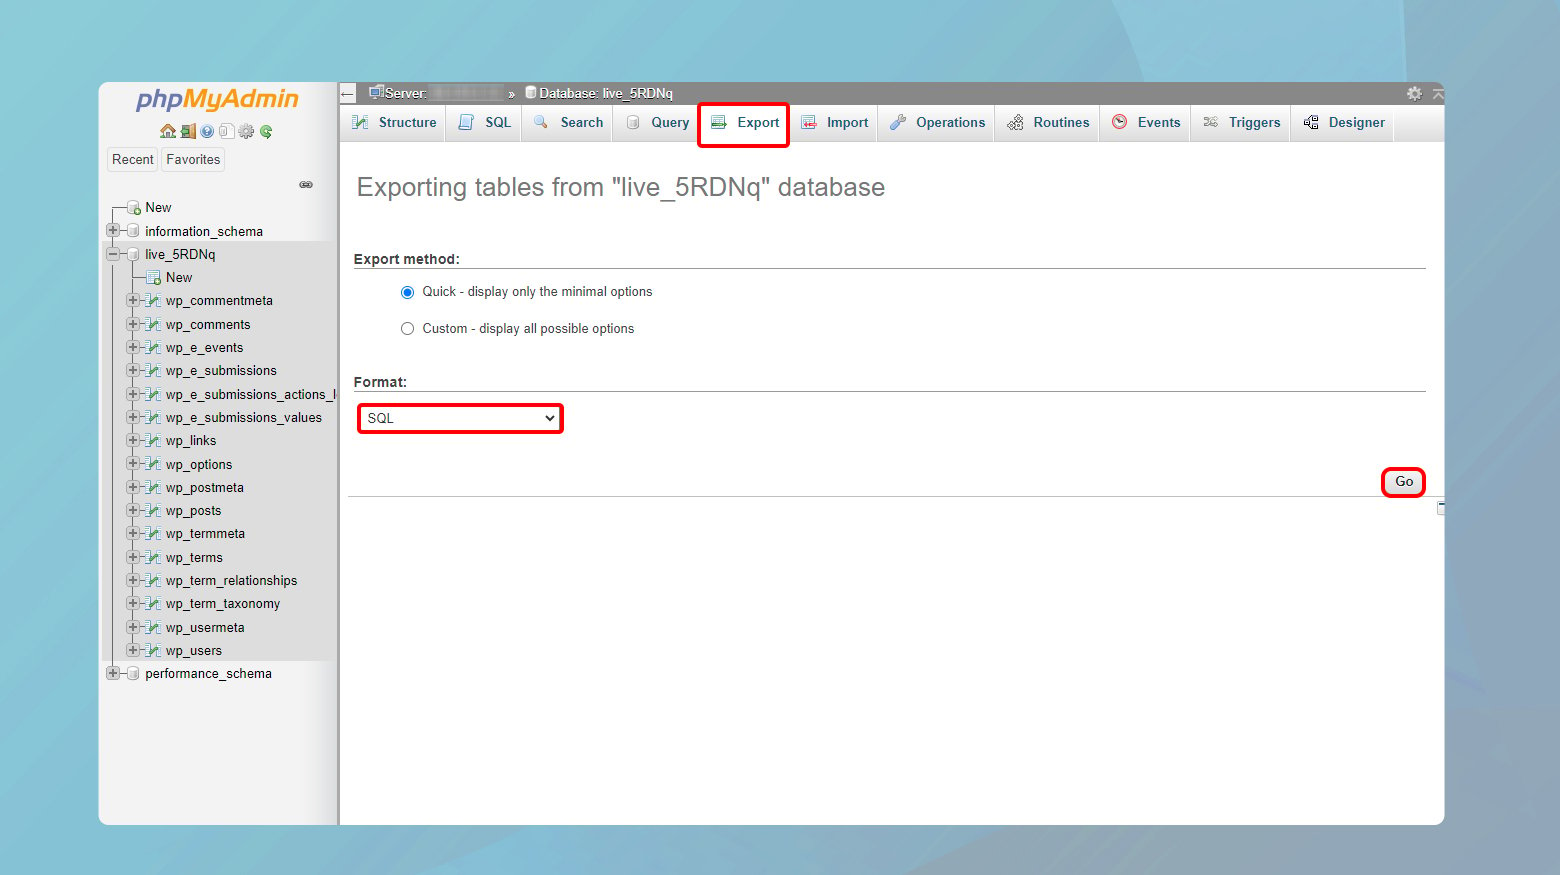
- Log into cPanel and navigate to the Databases section.
- Click on phpMyAdmin and select your WordPress database.
- Click on the Export tab at the top.
- Choose a format (such as SQL) and click on the Go button to download your database.
This will save a .sql file on your computer, which is crucial for retaining all your site’s posts, pages, and comments.
Deactivating plugins
Before reinstallation, you should deactivate all plugins through the WordPress dashboard. This prevents compatibility issues during the reinstall process. To deactivate:
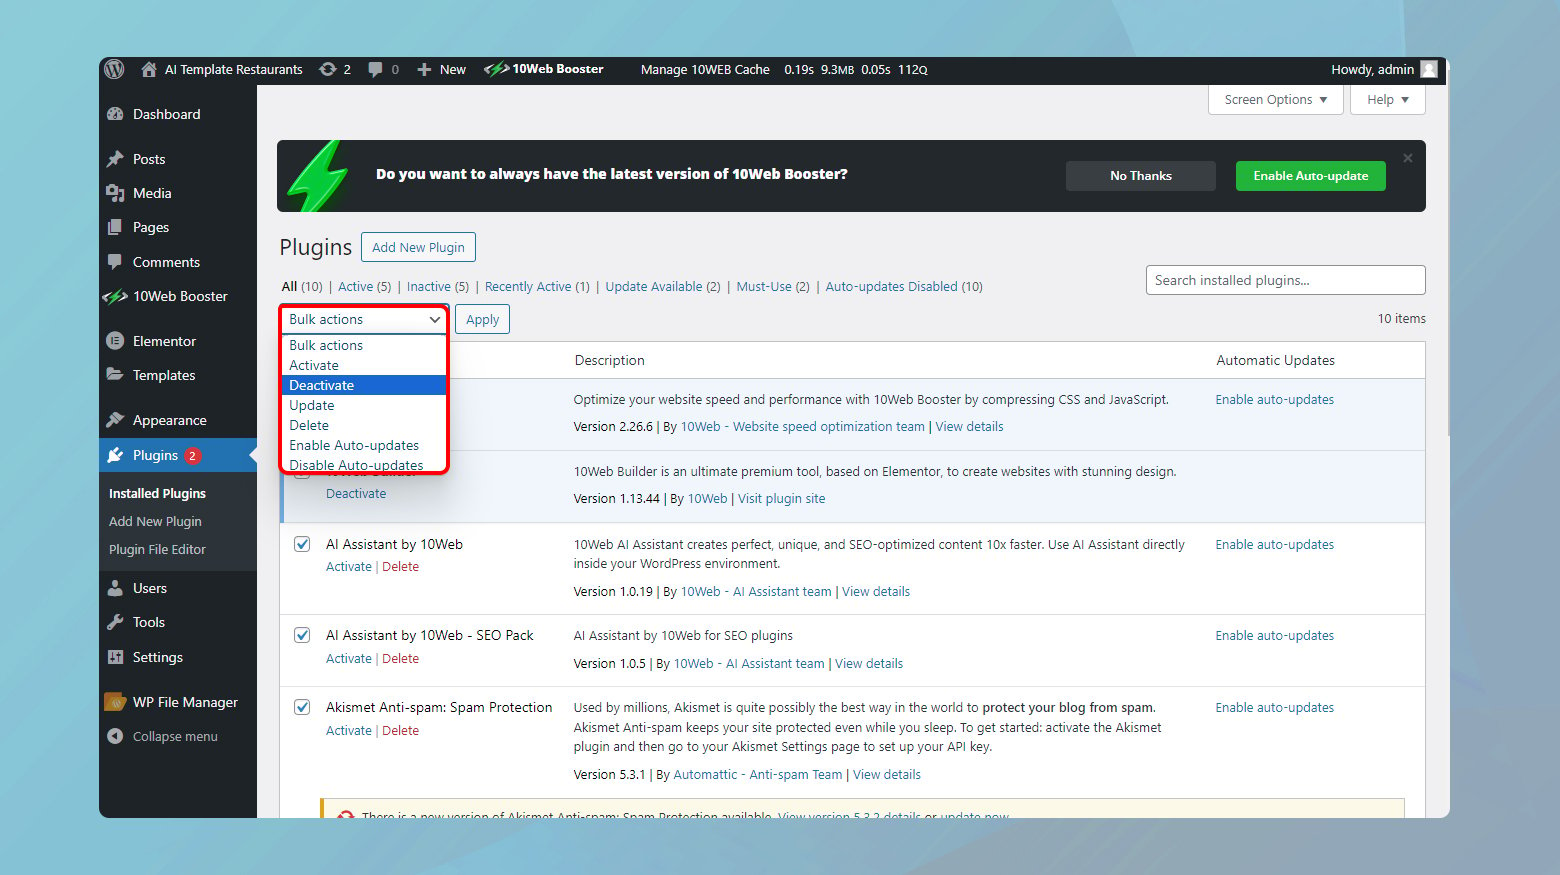
- Log into your WordPress dashboard.
- Click on Plugins.
- Select Installed Plugins.
- Check the box at the top to select all plugins, then from the Bulk Actions drop-down menu, choose Deactivate and apply.
Ensure that all plugins remain deactivated until you’ve completed the reinstallation process.
Uninstalling WordPress
Before you begin uninstalling WordPress, ensure you have backups of essential files, particularly your wp-content folder, and understand that this process will completely remove your site’s current state.
Using cPanel for uninstallation
With cPanel, you can employ the one-click installer that you may have used during the initial installation of WordPress to also uninstall it. This tool simplifies the process, as it typically includes an option to remove the script that powers your WordPress site. To start:
-
- Log in to your cPanel dashboard.
- Navigate to the Software section and click on the one-click installer tool, such as Softaculous.
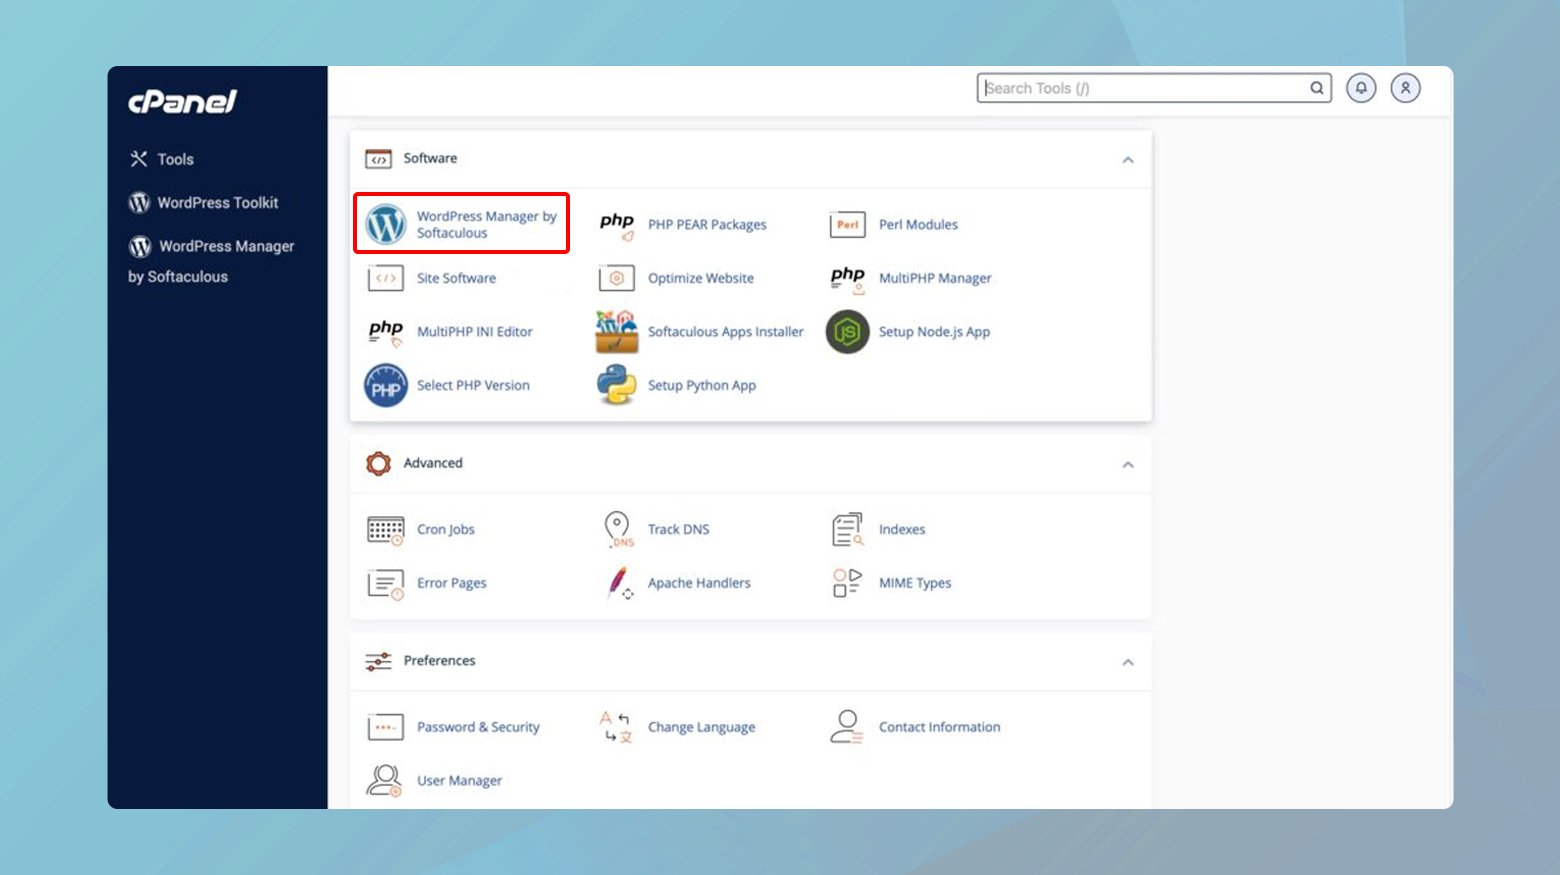
-
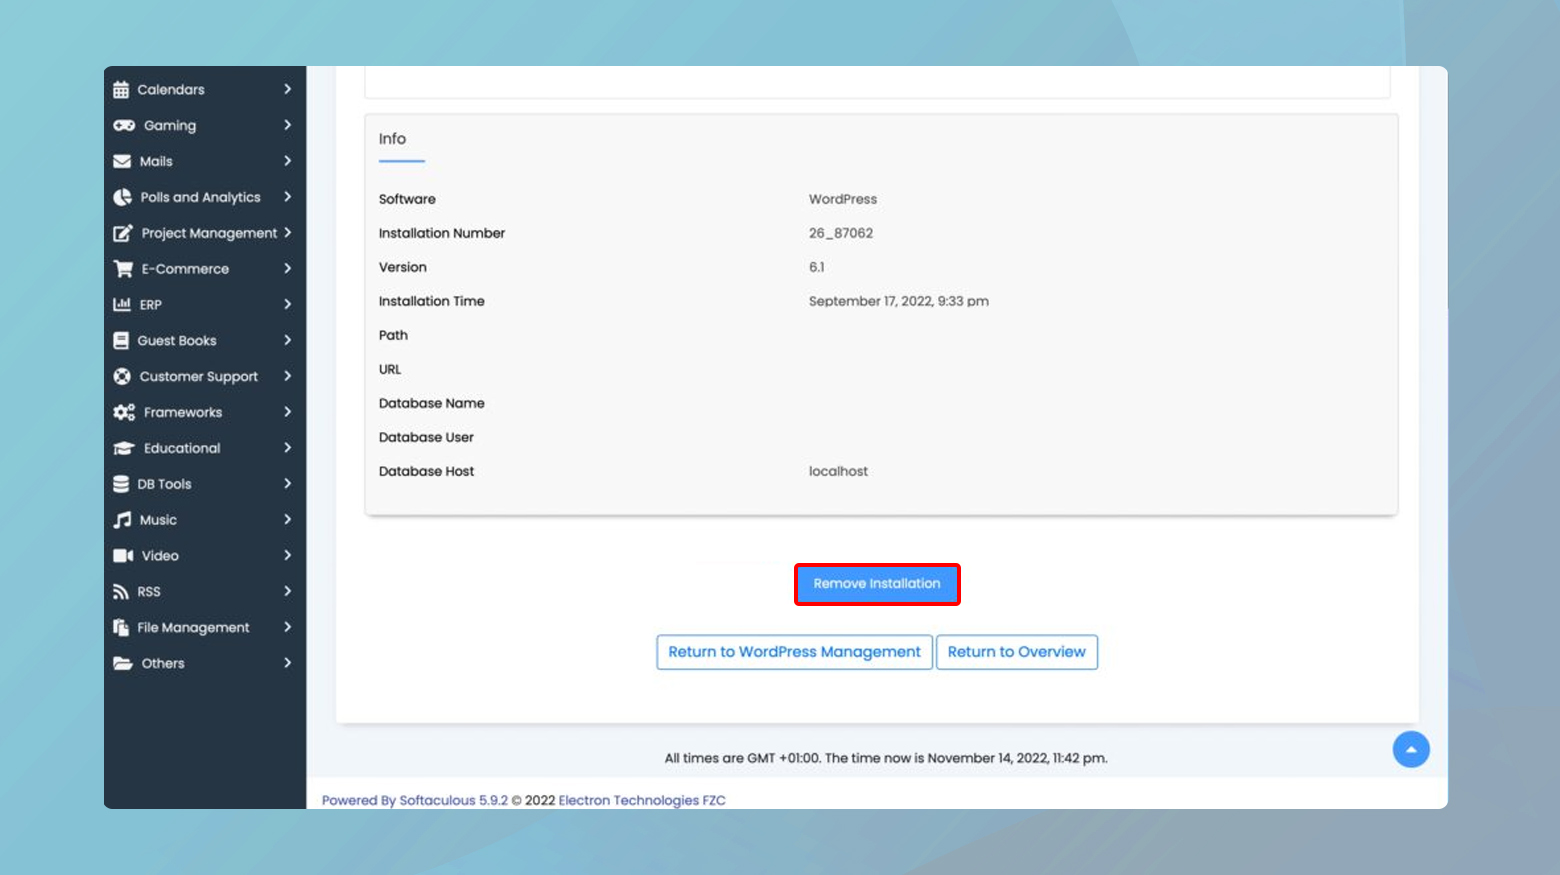
- Find WordPress in the list of installed applications.
- Select it and check to remove Directories, Databases, and Directory Users.
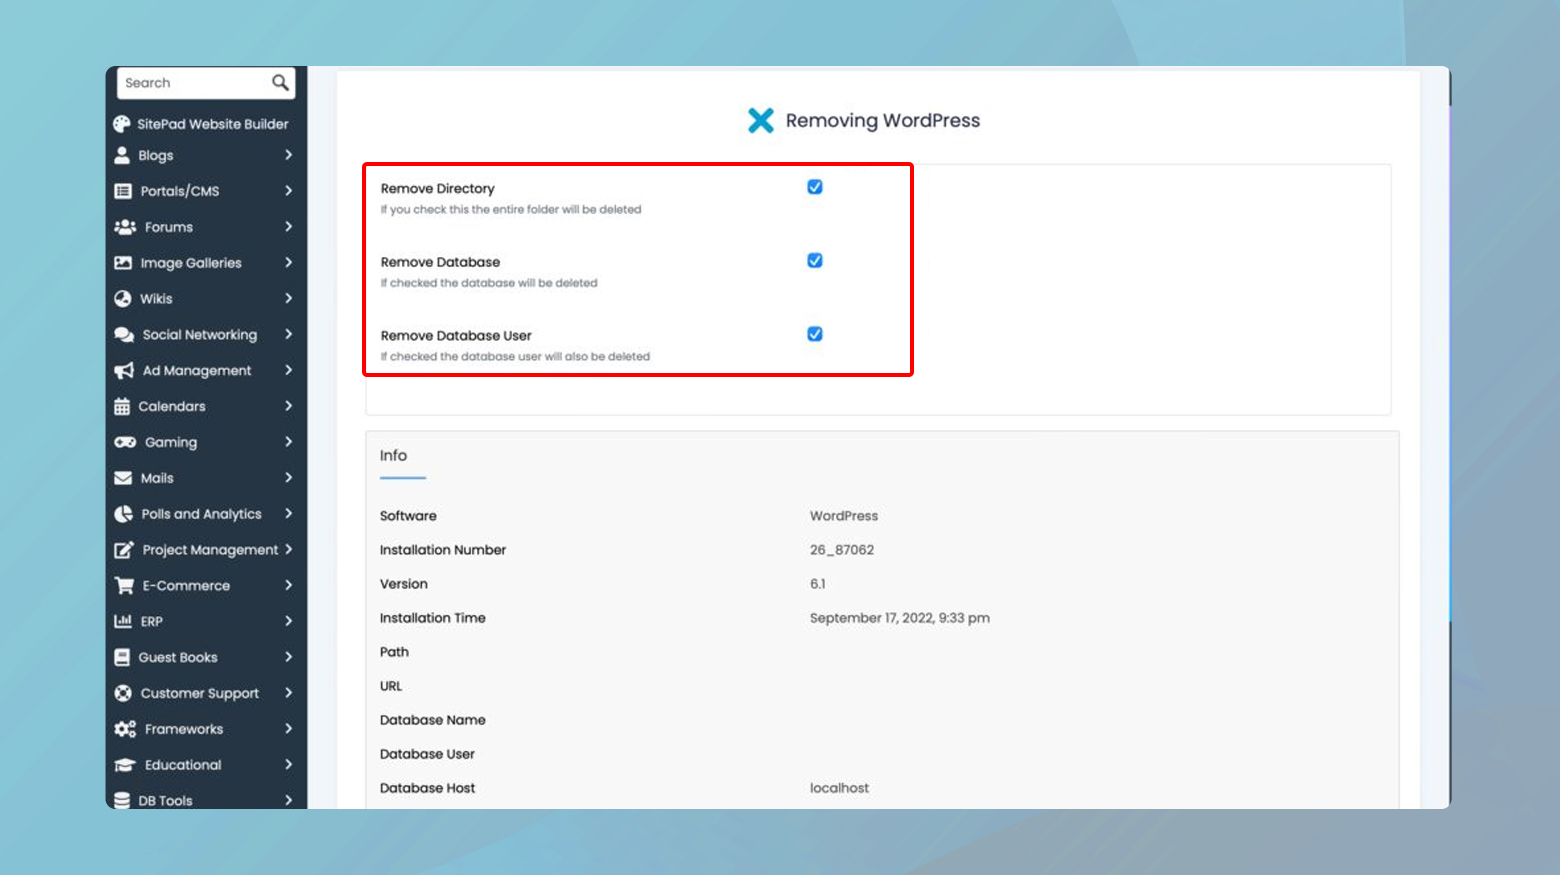
- Click Remove Installation to uninstall WordPress.
Removing WordPress files via FTP
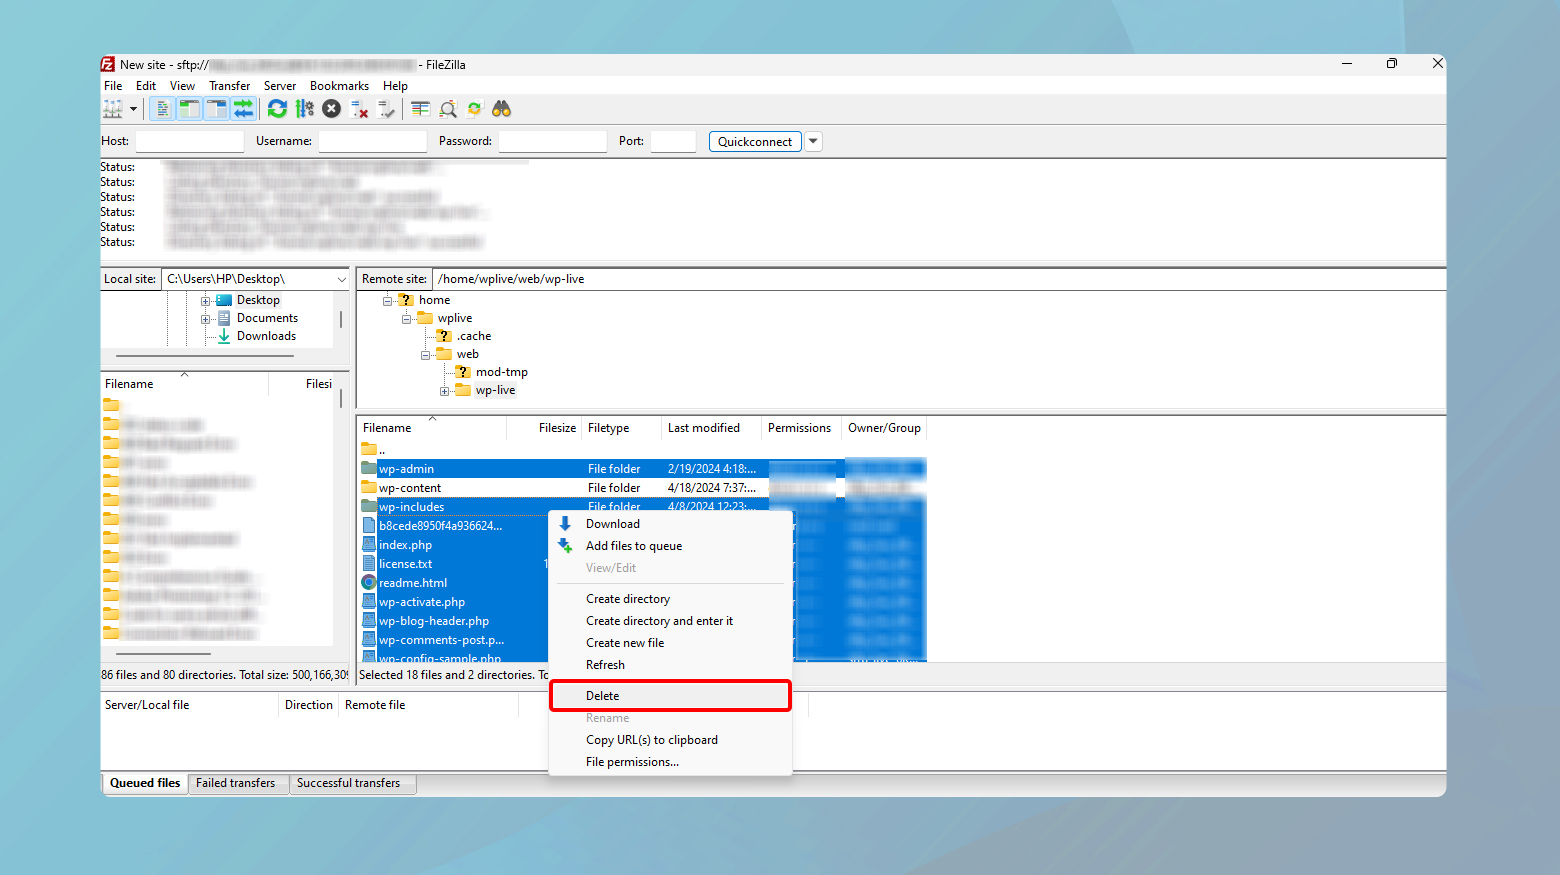
If you prefer to uninstall WordPress manually, you can use an FTP client. This method requires you to remove core WordPress files directly from your server:
- Connect to your server using your preferred FTP client.
- Navigate to the directory where WordPress is installed.
- Select all WordPress files and directories except the wp-content folder if you wish to preserve your themes, plugins, and uploads.
- Right-click and choose the Delete option to remove these files.
Dropping database tables
Lastly, to ensure a complete uninstallation, you need to drop all WordPress database tables:
- Access your hosting account’s MySQL Databases via cPanel.
- Open phpMyAdmin and select the database associated with your WordPress site.
- Check the boxes next to the WordPress tables. These typically start with the wp_ prefix, but your table prefix may vary.
- Look for a drop-down menu or button often labeled with Drop, and select it to delete these tables.
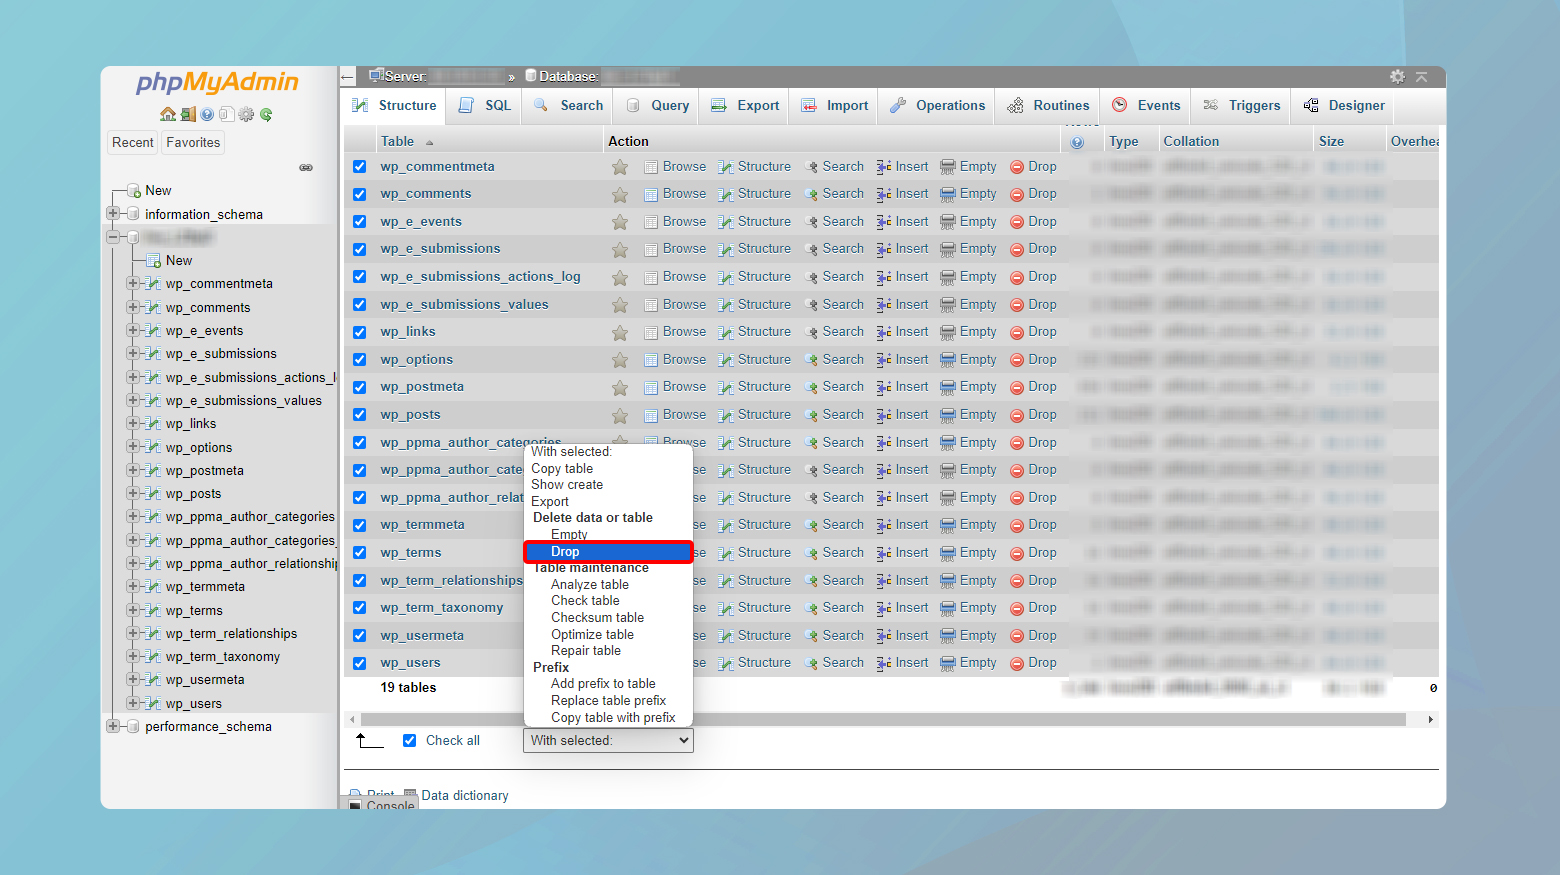
Remember, this step will permanently delete all the content and settings for your site, so it is crucial to have backups before proceeding.
Simplify WordPress with 10Web
Automate manual work with 10Web Managed WordPress Hosting and 10Web AI Website Builder. Optimize your WordPress website effortlessly.
Installing a fresh copy of WordPress
Before you begin reinstalling WordPress, ensure you have backed up your existing site and are familiar with using FTP clients and managing databases. This will help you avoid any data loss and streamline the reinstallation process.
Head over to the official WordPress.org website and download the latest version of the WordPress package. After the download is complete, unzip the package on your local computer.
How to reinstall WordPress via FTP client
After extracting the zip file, locate the wp-content folder and delete it. The wp-content folder contains your themes, plugins, and uploads, which you want to preserve to keep your site’s look and functionality intact.
Deleting the wp-content folder prevents overwriting your existing themes and plugins during the upload process. This step ensures that only the core WordPress files are updated, leaving your custom content untouched.
Uploading files via FTP
- Launch your FTP client .
- Input your host address, username, and password provided by your web hosting service to access your site’s files.
- Navigate to the public_html or www directory.
- Drag and drop all files and folders (except the previously removed wp-content folder) from your local directory to the server directory.
- If asked whether to overwrite files, confirm that you want to overwrite all. This action updates the core files while keeping your existing themes and plugins.
Creating a new database
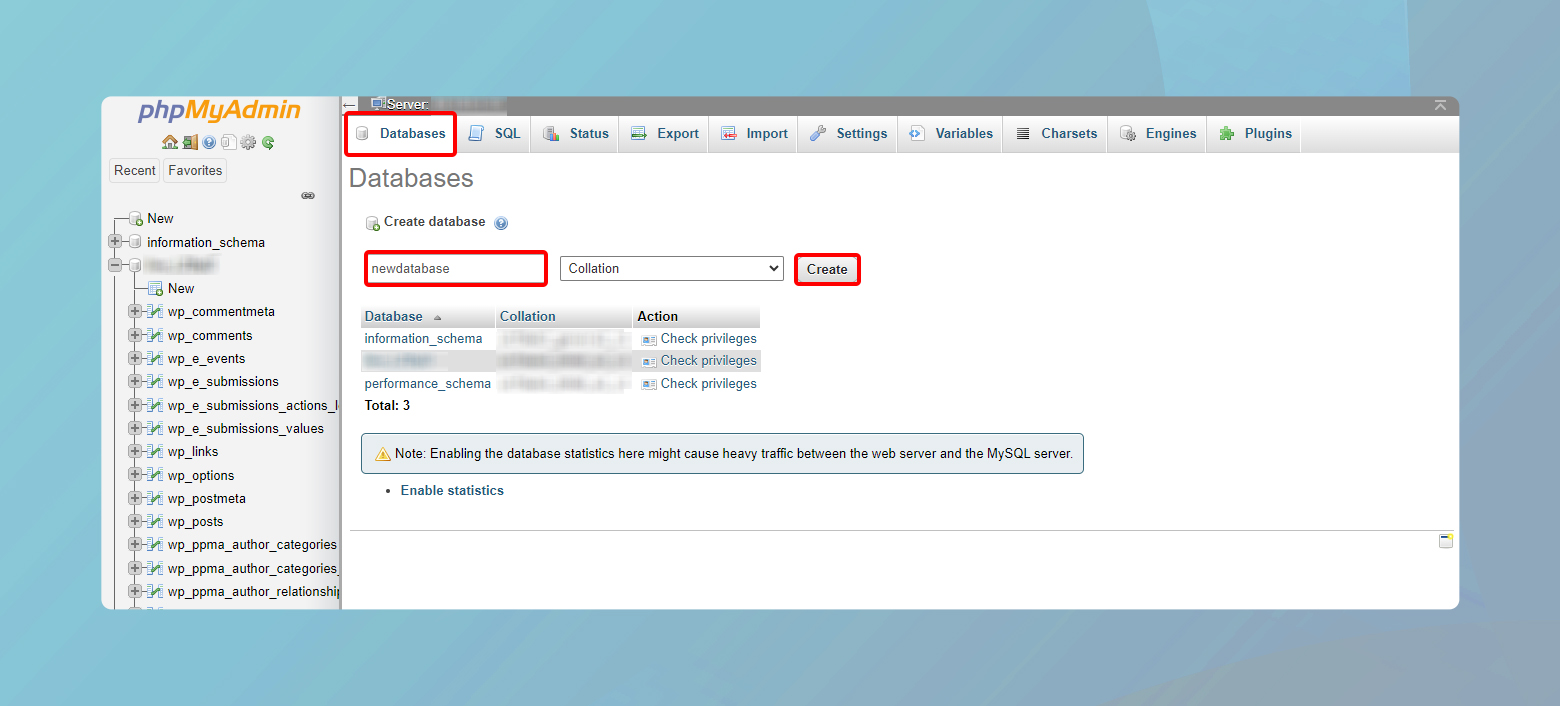
Log in to your hosting control panel, such as cPanel, and navigate to MySQL databases.
To create a new database for WordPress:
-
- Navigate to the Databases section and click on MySQL Databases.
- Under Create New Database, enter a name for your database.
- Click Create Database.
-
- Next, scroll to the MySQL Users section.
- Enter a username and a strong password for the new user.
- Click Create User.
- To grant full access, navigate to Add User to Database.
- Select your new user and the database from the drop-down menus.
- Click Add.
- On the next screen, check ALL PRIVILEGES and click Make Changes.
Running the WordPress installation
Finally, open your web browser and go to your website. The WordPress installation script should automatically start. You’ll need to fill in the database details, including the database name, username, and password you just created. The installation will configure the wp-config.php file for you. Once the installation is complete, you’ll have a fresh copy of WordPress on your site.
Restoring your content
When reinstalling WordPress, ensuring your existing content, plugins, themes, and database are properly restored is crucial for a seamless transition.
Importing database
To restore your existing database, access phpMyAdmin from your hosting control panel. Navigate to the Import tab and choose your previously exported database file. Click Go to start the import process. This step will repopulate your WordPress installation with your existing content and settings.
-
- Access phpMyAdmin from your hosting account.
- Click on the Import tab.
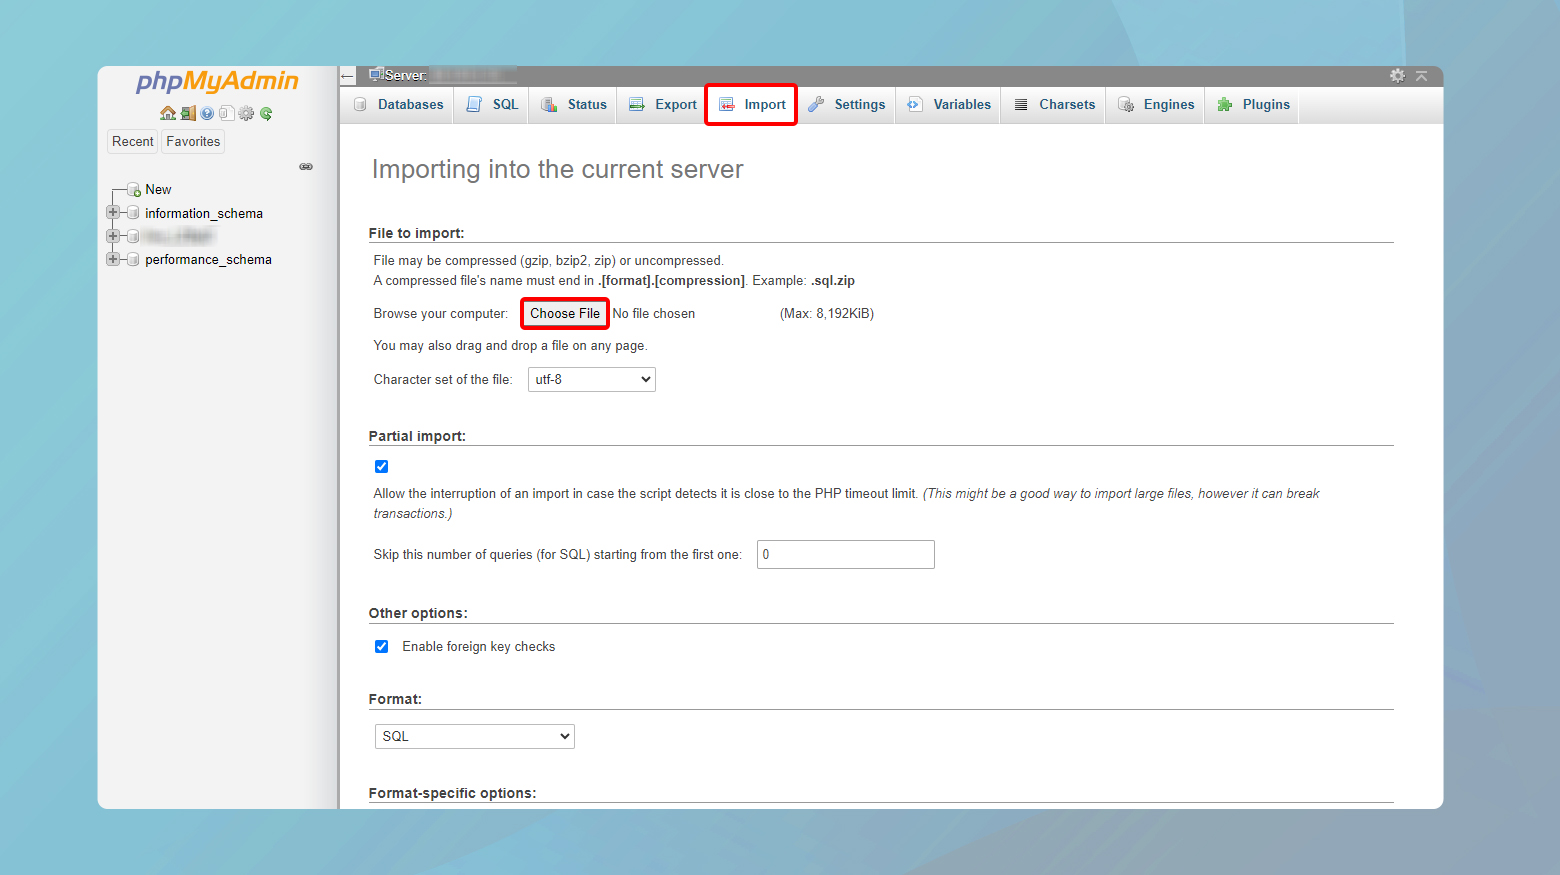
- Choose your database .sql file.
- Press Go to begin the import.
Reinstalling plugins and themes
After securing your content and database, move on to reinstalling plugins and themes. Through the WordPress dashboard, manually reinstall each one to reinstate their functionality.
- Navigate to Plugins > Add New or Appearance > Themes in your WordPress dashboard.
- Use the Upload option to install the plugins and themes from your saved .zip files.
- Activate each one after installation.
Uploading wp-content folder
Finally, restore your wp-content folder using an FTP client. This folder contains all your media, uploads, and the files for your themes and plugins.
- Connect to your site via FTP.
- Navigate to the wp-content directory.
- Upload your saved wp-content folder.
- Ensure you overwrite the existing wp-content folder to update the content.
By following these steps, you maintain the integrity of your site’s media, themes, and plugins throughout the reinstallation process.
Final configurations
After successfully reinstalling WordPress, it’s crucial to fine-tune your website settings to ensure everything is running as expected. This includes setting up permalinks, adjusting site-specific settings, and thoroughly testing your website to catch any potential issues.
Setting up website permalinks
In your WordPress dashboard, navigate to Settings > Permalinks to configure your URL structure. Permalinks affect how your website URLs are structured and are essential for SEO and user experience. Choose a format that best suits your content. For instance, the Post name option is a popular choice because it generates clean URLs with the post title.
Configuring site settings
You’ll want to examine the broader settings of your site to ensure they align with your preferences and requirements. Go to Settings in your WordPress dashboard to review and update site settings such as:
- Site Title & Tagline: Reflect the purpose of your website.
- Time zone: Correct time settings are vital for scheduling posts.
- Reading Settings: If you want to set a static page as your homepage.
- Discussion Settings: Define how you want comments to be managed.
Testing website functionality
Thorough testing is key to ensuring your website is running smoothly. Here are some tips for effective testing:
- Navigational links: Check if all your menu items and buttons are leading to the correct pages.
- Posts and pages: Review your articles and pages for formatting errors.
- Forms and functions: Submit test entries on your contact forms and other interactive elements.
- Troubleshooting errors: In case of any issues, the admin dashboard offers tools for diagnosing and resolving WordPress errors.
By methodically working through these final configurations, you’ll set a solid foundation for a well-structured and functional WordPress site.
Security and maintenance
Maintaining the security and proper functioning of your WordPress site involves a combination of updates and security practices. It’s essential to stay proactive to prevent errors and vulnerabilities that hackers may exploit.
Updating WordPress core and extensions
WordPress Core: Always ensure you’re running the latest version of WordPress. Updates often contain fixes for security issues and bugs.
- WordPress will notify you in the dashboard when updates are available.
- To update, simply click the ‘Update now’ button in the Updates section of your dashboard.
Plugins and Themes: These extensions should also be kept up-to-date to avoid potential security risks.
- For convenience, you can enable automatic updates for plugins and themes.
- To enable, go to the Plugins or Themes section, select the desired plugin or theme, and click on Enable auto-updates.
Implementing security measures
Strong Passwords: Use strong, unique passwords for your WordPress admin, FTP accounts, and database.
- Consider using a password manager to generate and store secure passwords.
Security Plugins: A security plugin can scan your site for vulnerabilities and enforce stronger security measures.
- Plugins like Wordfence or iThemes Security are commonly used and offer a range of features to protect your site.
Scheduling regular backups
Regular Backups: Schedule regular backups to ensure you can restore your site in the event of data loss or being hacked.
- You can use a WordPress backup plugin like UpdraftPlus or a hosting service with built-in backup solutions.
- Make sure to store your backups in a secure location, such as cloud storage or an external hard drive.
Backup Frequency: The frequency of backups should align with how often you update your site. A busy site might need daily backups, while a static site might be fine with weekly backups.
This approach to security and maintenance can significantly reduce the likelihood of your site being compromised and can help ensure that any errors or issues are swiftly dealt with.
Simplify WordPress with 10Web
Automate manual work with 10Web Managed WordPress Hosting and 10Web AI Website Builder. Optimize your WordPress website effortlessly.
Troubleshooting common issues
Before you consider a complete reinstall, addressing specific WordPress issues can often resolve the problems you’re experiencing. Here are fixes for some of the most common ones.
Handling plugin and theme conflicts
When you encounter issues on your WordPress site, start by deactivating all your plugins to rule out a plugin conflict. If the problem resolves, reactivate your plugins one by one until you identify the culprit. For themes, switch to a default WordPress theme, like Twenty Twenty-One, to check if your current theme is causing the issue. Always ensure compatibility with your WordPress version when selecting plugins and themes.
Resolving database connection errors
If you see the “Error establishing a database connection” message, it typically indicates a problem with your MySQL database. Check your wp-config.php file for correct database credentials. Also, verify that your database server is running, as service downtime can lead to this error. Consulting with your hosting provider can clarify whether the issue is on their end.
Dealing with the White Screen of Death
The White Screen of Death manifests as a blank slate on your website and can be quite alarming. It’s often due to exhausted memory limits or a problematic plugin. To troubleshoot, increase your PHP memory limit by editing your wp-config.php file and adding define(‘WP_MEMORY_LIMIT’, ’64M’);. If that doesn’t work, disabling plugins or reverting to a default theme can help you pinpoint the issue. Remember to enable WordPress debugging to gather more information by adding define( ‘WP_DEBUG’, true ); to your wp-config.php file.
Conclusion
Reinstalling WordPress offers you a fresh start to rebuild your website or troubleshoot persistent issues effectively. To ensure a smooth process, here’s a streamlined recap:
- Use the WordPress dashboard to reinstall by clicking the Re-install now button for a quick refresh.
- For a more thorough approach, FTP can be your go-to. Just remember to back up your data and especially the wp-content folder to keep your themes, plugins, and uploads safe.
- Keep your original settings and content by avoiding the deletion of the wp-config.php file and the wp-content directory.
- After reinstalling, verify plugin and theme compatibility and update everything to the latest versions.
Remember, a new beginning can resolve errors or set the stage for a revamped web presence. Ensure you protect your content and settings in the process for a seamless transition.
Simplify WordPress with 10Web
Simplify WordPress with 10Web
Skip and automate manual work with 10Web Managed WordPress Hosting and the 10Web AI Website Builder.


