
The WordPress White Screen of Death (WSOD) is a critical error that manifests as a blank, white screen when attempting to access a WordPress site, and it comes with no error message to hint at what might have gone wrong. This issue can affect your entire website or be isolated to specific sections, such as the WordPress admin dashboard, complicating the diagnostic process. The WSoD is particularly challenging because it offers no clues on the surface; the underlying problems could range from plugin conflicts and theme errors to exhausted PHP memory limits or even corrupted WordPress core files.
Throughout this blog, we’ll cover everything from the basic understanding needed to grasp the nature of the WSOD to the specific triggers that can lead to its appearance. We’ll also dive into both the general and the technical solutions that can help you bring your website back to life.
What is the White Screen of Death
The WordPress White Screen of Death (WSOD) is a critical error that results in a completely blank white screen without any error message, making it a particularly perplexing and challenging issue for website owners and developers. This error can occur on any part of a WordPress site, including both the public-facing pages and the administrative dashboard, effectively locking users out and preventing them from accessing or managing their content.
The WSOD can be triggered by a variety of issues ranging from conflicts between plugins, themes that are either malfunctioning or incompatible with the current version of WordPress, to more systemic problems like PHP memory limit allocation for the website. At its core, the WSOD is a symptom of a PHP error or a database error that WordPress encounters but cannot recover from in a graceful manner, leading to the complete lack of visible content on the screen.
Given its nature, diagnosing the exact cause of the WSOD can be tricky, especially since it provides no direct feedback or error messages to guide the troubleshooting process. To pinpoint where the issue stems from, a methodical approach is needed to identify and resolve the underlying problem, which may involve:
- Deactivating plugins
- Switching themes
- Increasing the PHP memory limit
- Debugging WordPress files.
Variations of the issue
The WSOD can manifest in several ways, depending on the underlying cause and the environment in which your WordPress site is hosted. Variations might include:

- A completely white screen with no error message, making it difficult to identify the issue.
- An intermittent white screen, where the site sometimes loads correctly but fails at other times.
- A white screen affecting only certain areas of your WordPress site, such as the wp-admin area, while the rest of the site functions normally.
- The WSOD appears after installing a new plugin, updating your WordPress version, or updating a theme.
Reasons why this error occurs
Several factors can lead to the WSOD, each with its own set of challenges and solutions:
Plugin conflicts: One of the most common causes of the WSOD is a conflict between plugins. When two or more plugins installed on your site interfere with each other’s operation, it can result in a white screen.
Theme issues: A faulty theme or a conflict between your theme and a plugin can also cause the WSOD. This often happens after installing a new theme or updating an existing one.
Exhausted PHP memory limit: WordPress sites require a certain amount of memory to operate efficiently. If your site exceeds the allocated PHP memory limit, it may result in the WSOD.
Corrupted core files: Core WordPress files can become corrupted due to various reasons, such as incomplete updates or external tampering, leading to the WSOD.
How to fix the WordPress White Screen of Death
When you run into the WordPress White Screen of Death, getting it sorted out fast becomes top priority. So, let’s dive into the top strategies you can employ to tackle this issue head-on.
Deactivate all your plugins
One of the most common culprits behind the WSoD is a misbehaving plugin. Plugins add functionality to your WordPress site, but they can also conflict with each other or with WordPress itself after updates. Deactivating all plugins helps determine if a plugin is the cause of the WSoD. It’s a process of elimination that turns a complex problem into a manageable one. Let’s walk through how to identify and fix the issue.
Via WordPress admin
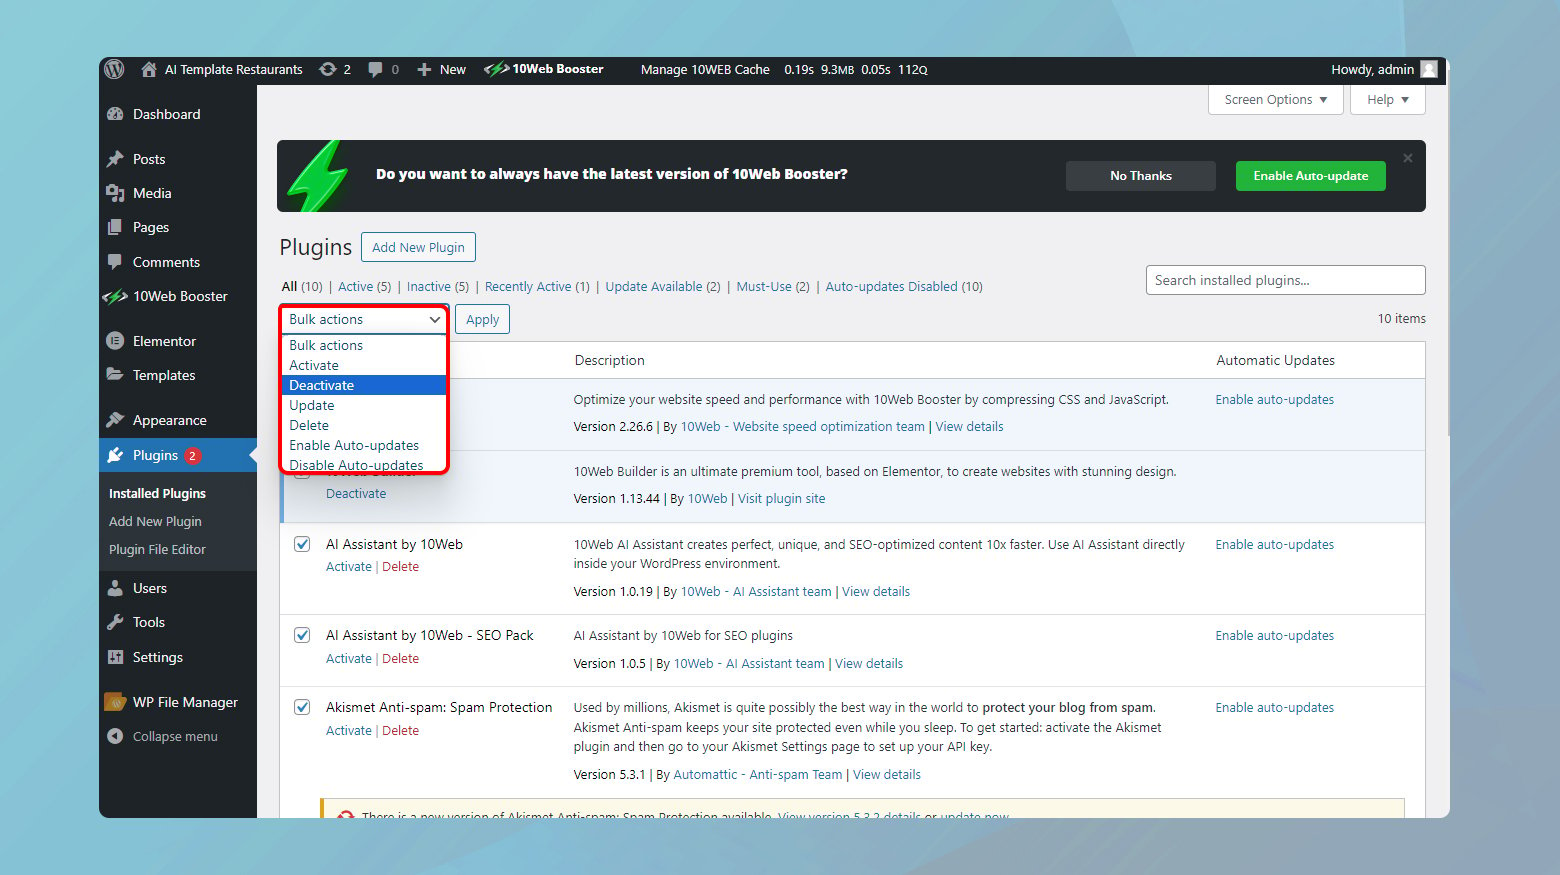
- If you can access your WordPress dashboard, head over to the Plugins section.
- Click on the Installed Plugins menu.
- Select all plugins by checking the box at the top of the list next to Plugin.
- Choose Deactivate from the Bulk Actions dropdown menu.
- Click Apply. This action deactivates all your plugins at once.
Via FTP
If you’re locked out of your admin area, don’t worry. An FTP client can be your backdoor.
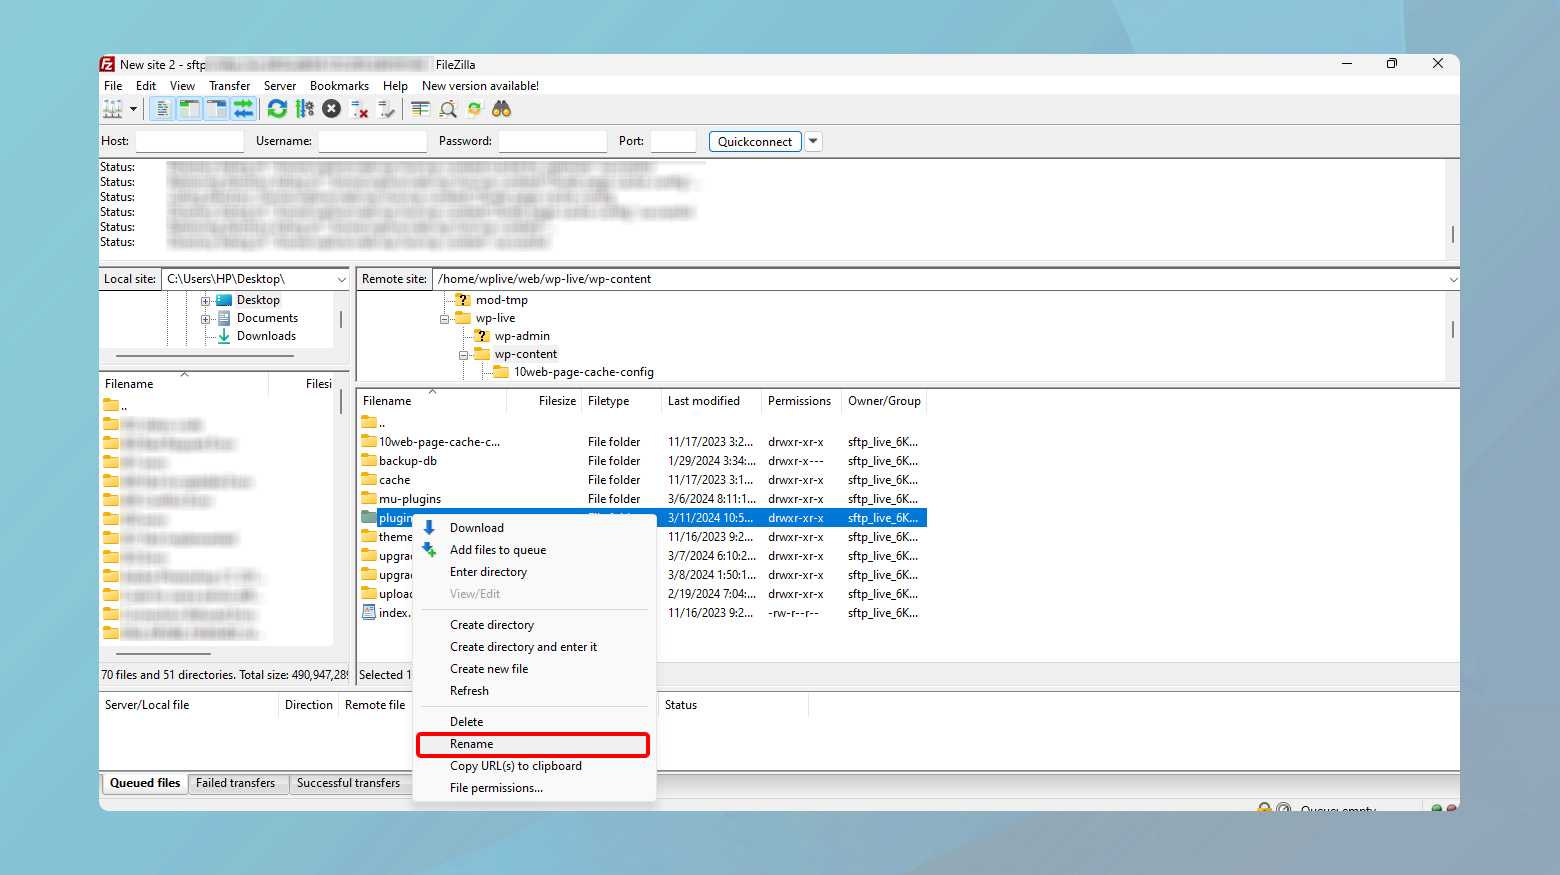
- Open your FTP client and connect to your website.
- Navigate to the wp-content folder.
- Find the plugins folder and rename it. Something like plugins_deactivated works. This deactivates all plugins by making WordPress unable to locate them.
Once all plugins are deactivated, visit your site again. If it springs back to life, congratulations, you’ve isolated the issue to your plugins! The next step is to find the exact plugin that’s causing the issue.
Identify the problematic plugin
To identify which plugin is causing the issue, you will need to reactivate the plugins one at a time.
- If your site is now accessible, reactivate each plugin one at a time. After activating a plugin, refresh your website. If the WSoD reappears, you’ve found the culprit.
- If your site is not available, you will need to do this via FTP. Rename the plugins_deactivated folder back to plugins. Then, rename each plugin folder inside it, one by one, and check your site after each rename. When the WSoD returns, you’ve pinpointed the problematic plugin.
Once you identify the problematic plugin, you can either seek support from the plugin developer or check the WordPress Plugin Directory for updates or similar issues reported by other users.
Switch to default theme
So, you’ve tried the plugin route, but the White Screen of Death (WSoD) is still haunting your WordPress site. WordPress themes control the appearance and layout of your site, but they can also introduce code conflicts or compatibility issues. Switching to a default theme (like Twenty Twenty-One) can help you determine if your current theme is the cause of the WSoD. This step essentially resets the visual design aspect of your site to a stable, conflict-free state, allowing you to diagnose the issue more accurately.
Via WordPress admin
If you’re able to access your WordPress admin dashboard:
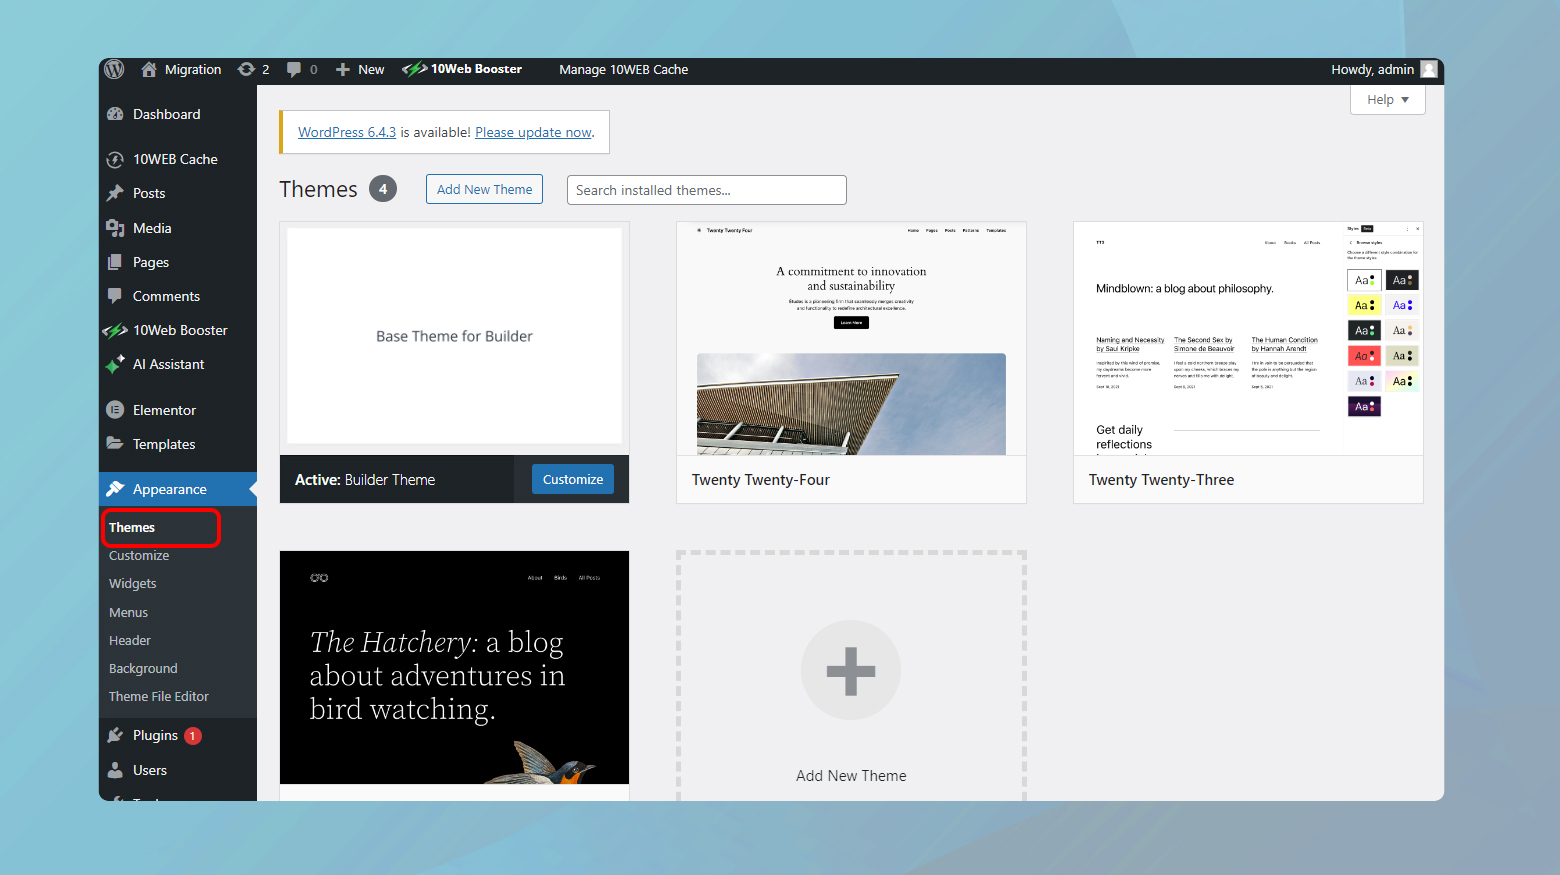
- Navigate to Appearance > Themes.
- Look for one of the default themes provided by WordPress (like Twenty Twenty-One or Twenty Twenty) and click Activate. These themes are known for their stability and compatibility.
- After activating the default theme, visit your site again. If it’s back to normal, your previous theme was likely the issue.
Via FTP
If the admin dashboard is inaccessible, FTP is the route to take.
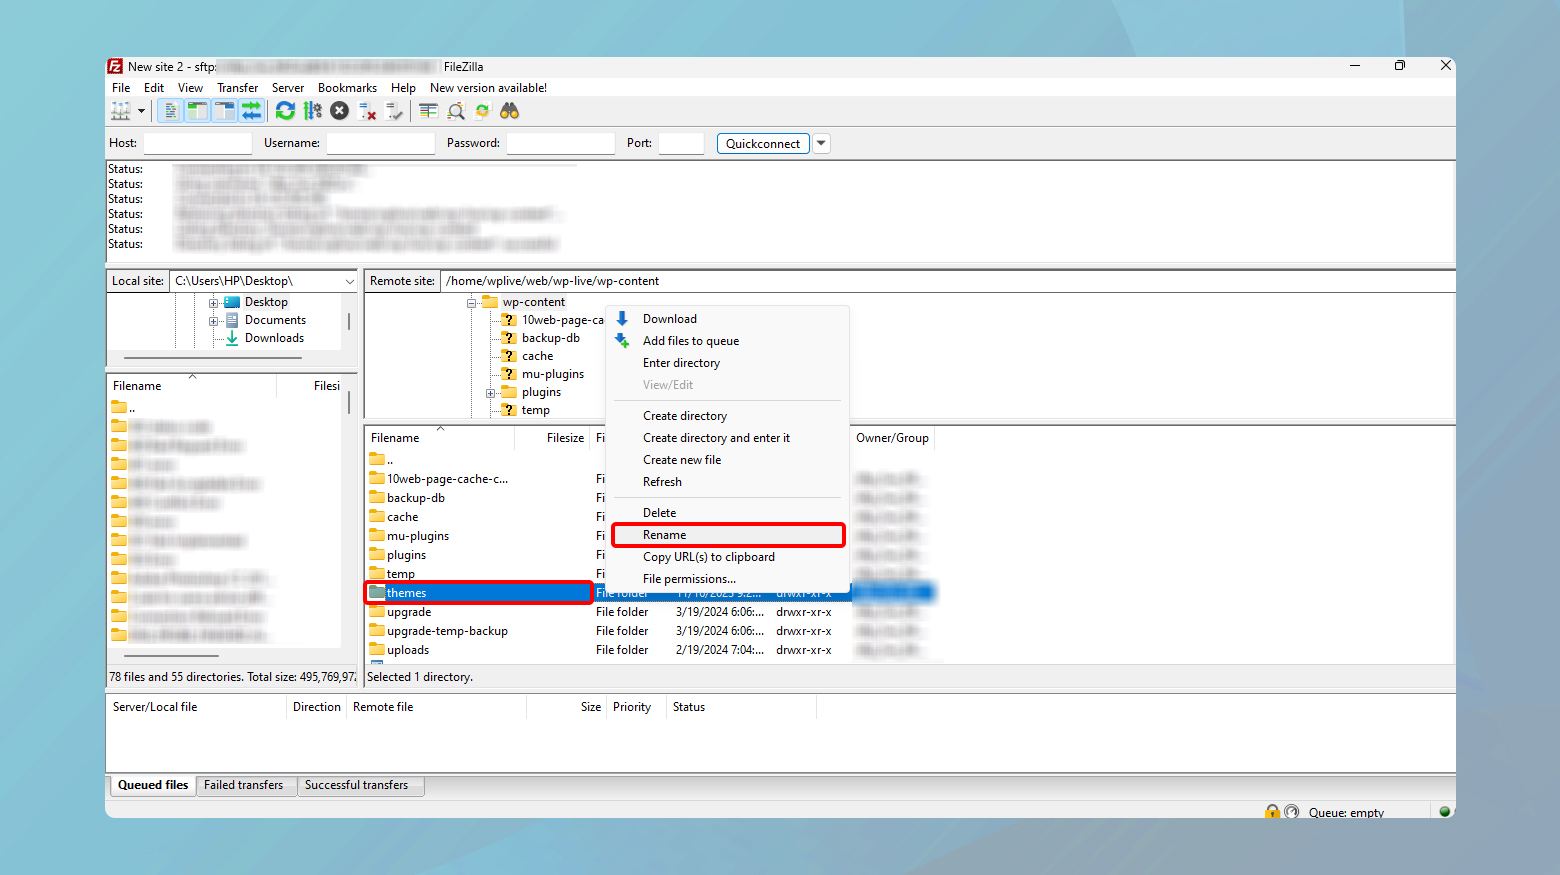
- Connect to your site using an FTP client.
- Go to the wp-content directory and locate the themes folder.
- Rename your current theme’s folder. This action forces WordPress to revert to the latest default theme installed on your site.
- If you don’t have a default theme available, download one from the WordPress Theme Directory, upload it to the themes folder, and WordPress will automatically switch to it.
Once your site is up and running with a default theme, you’ve identified the original theme as the source of your woes. It’s a bittersweet revelation, but one that moves you closer to a solution.
Addressing theme-related issues
If your site is operational with a default theme, consider the following actions:
Update or reinstall the theme: Check if there’s an update available for your theme. An update may fix the issue. If updates don’t solve it, try reinstalling the theme.
Contact theme developer: If the problem persists, reaching out to the theme developer can be a good move. They may offer a fix or guidance on how to resolve the issue.
Consider switching themes: Sometimes, it’s best to part ways. If the theme continues to cause problems and no solution is in sight, exploring other themes might be your best bet for a stable and beautiful website.
Clear cache
Web browsers store cached versions of websites to load them faster on subsequent visits. However, if the cached version is outdated or corrupted, it might result in displaying the WSoD. Clearing cache forces it to fetch the latest version of the web page from the server, potentially resolving any display issues.
Clearing browser cache
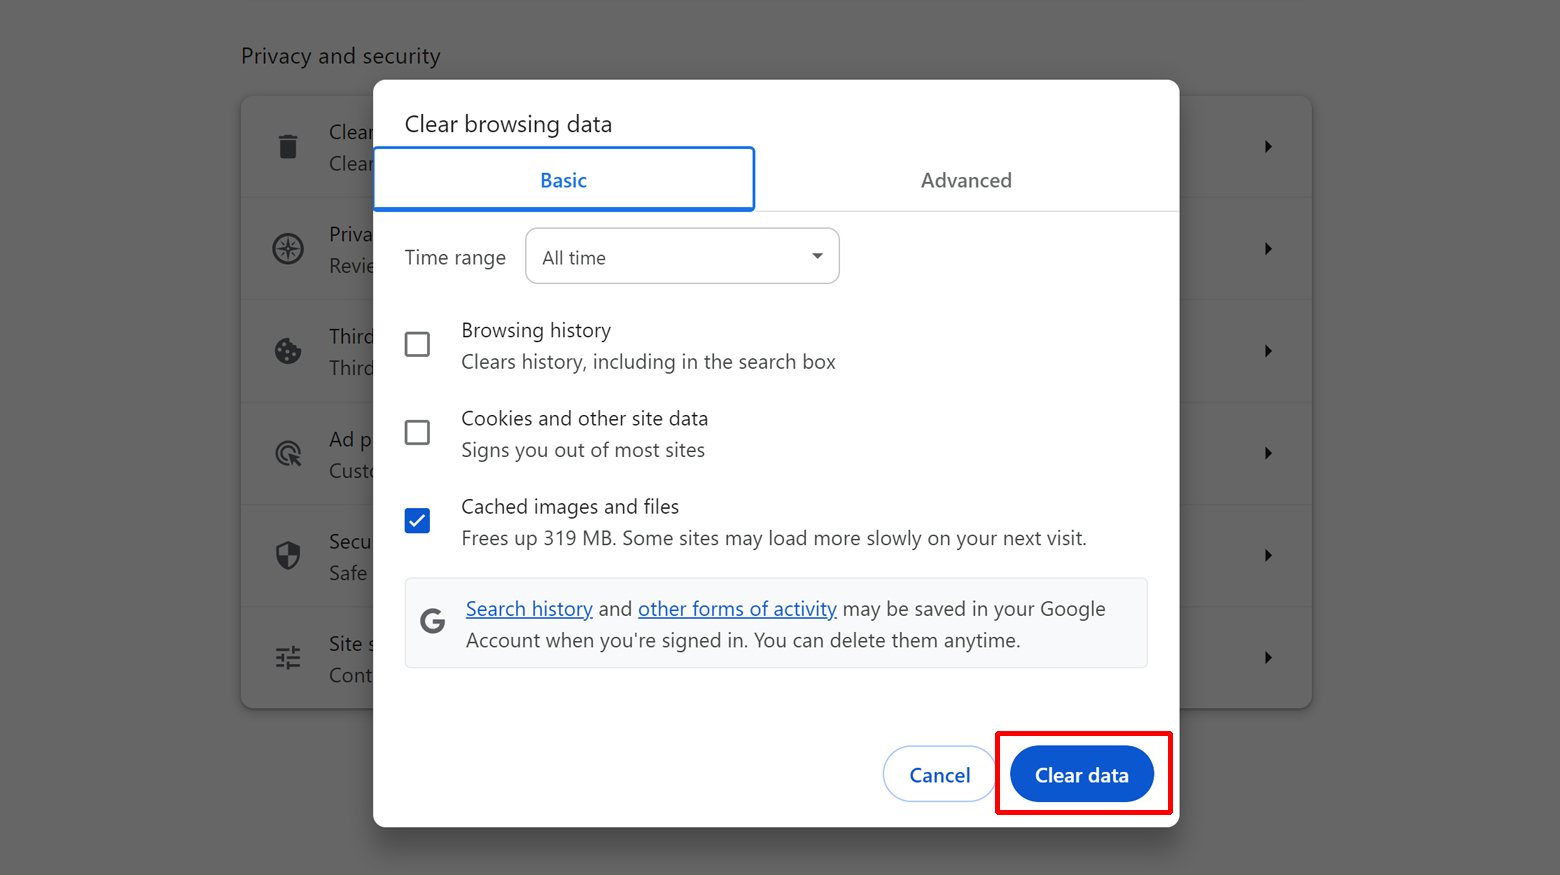
- Open your browser’s settings or preferences menu.
- Look for a section named Privacy and Security or similar.
- Find the option to clear browsing data or cache. This might be under a submenu like History or Data Management.
- Ensure you select to clear cached images and files. You can usually choose a time range; selecting All time is a good way to ensure everything is cleared.
- Confirm the action to clear your browser’s cache.
Clearing cache via a WordPress caching plugin
Caching plugins serve a similar purpose to browser cache but on the server side, storing static versions of your website to reduce server load and improve performance. However, like browser cache, if this data is outdated or corrupted, it might lead to the WSoD. Clearing cache through your caching plugin ensures that your website serves the most current content.
To clear cache:
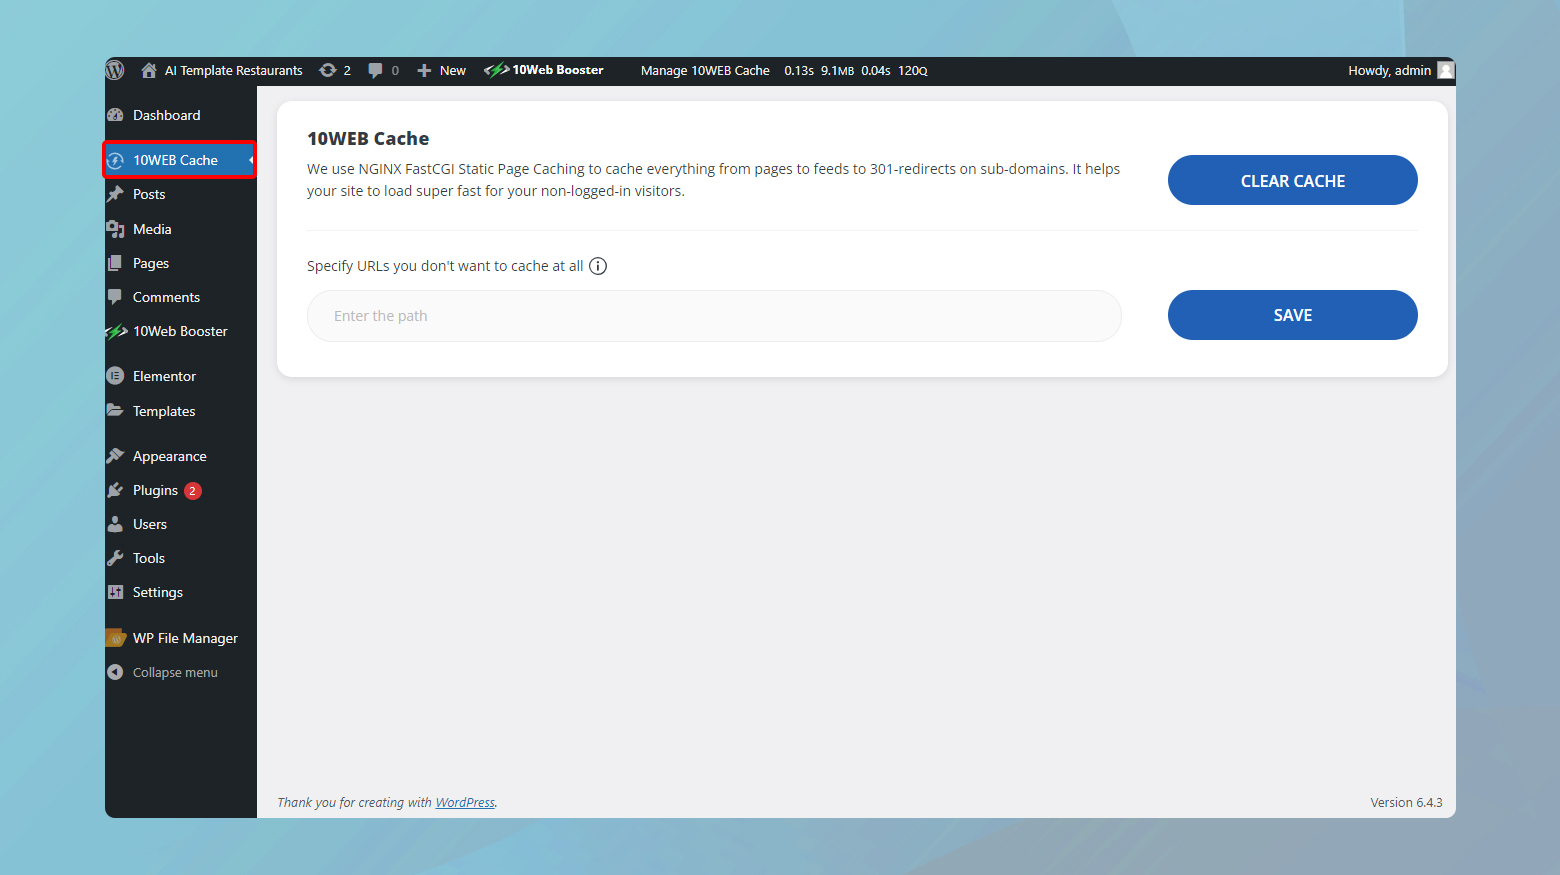
- Navigate to your WordPress dashboard.
- Go to Settings. Here you will have your caching plugin as one of the options. Select it.
- Look for the Delete Cache button or similar option.
- After clearing the cache, visit your site again to check if the issue is resolved.
If you’re using a different caching plugin, the steps will be similar, but the option to clear cache might be located under the plugin’s dedicated tab or menu in the WordPress dashboard. Most caching plugins make it straightforward to clear cache, often with just one or two clicks.
Clearing cache from the 10Web dashboard
If you’re a 10Web user, clearing cache is quick and easy from your dashboard.
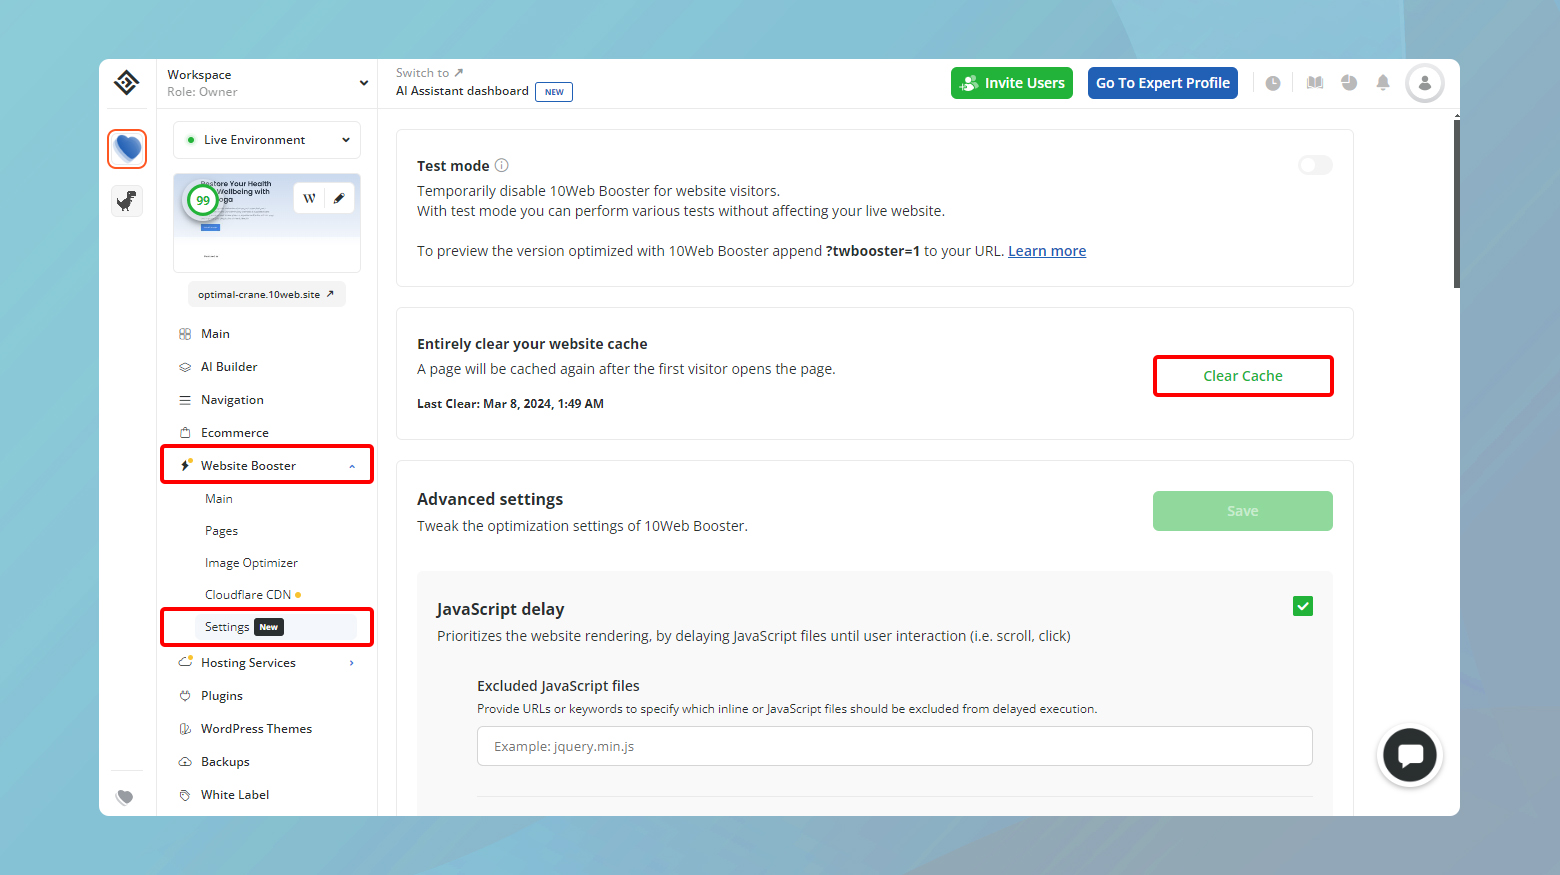
- Click on the website that is displaying the WSoD.
- Navigate to Website Booster > Settings.
- Click Clear Cache to purge your entire website cache.
Enable debugging
Debugging mode in WordPress is designed to display any PHP errors, notices, or warnings that are otherwise hidden. This is invaluable for diagnosing problems on your site, especially when faced with the WSoD. By revealing the specific errors, you can understand whether a plugin, theme, or custom code snippet is at fault.
How to enable debugging
- Use an FTP client or your web hosting control panel’s file manager to access your WordPress site’s files.
- Locate the wp-config.php file in your WordPress root directory. This file contains important WordPress settings.
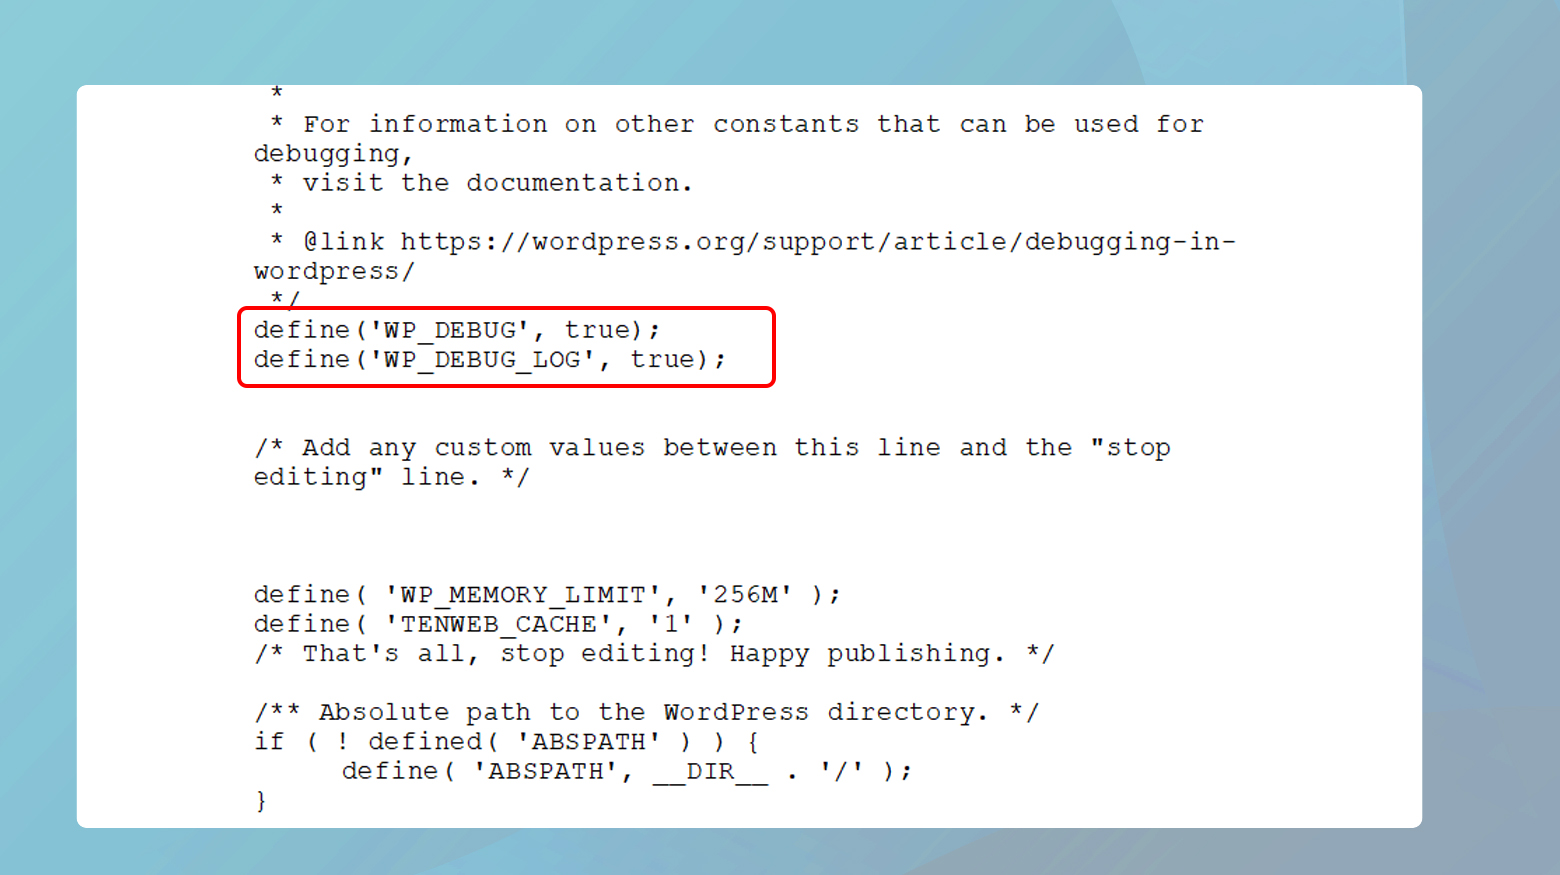
- Look for the line define( ‘WP_DEBUG’, false );. If it exists, change false to true. If it doesn’t exist, add:
- define( ‘WP_DEBUG’, true );
- to the top of the file, just below the <?php tag.
- Save the changes and upload the file back to your server if you edited it locally.
Visit your site again. Instead of a blank white screen, you should now see error messages indicating the source of the problem.
Interpreting the error messages
When you enable debugging, you might see messages pointing directly to the issue, such as a function conflict in a plugin or a theme. These messages typically include the path to the problematic file and the line number, making it easier to pinpoint the exact source of the error.
For example:
- If the error points to a file within a plugin’s folder, deactivating that specific plugin should resolve the issue.
- If it indicates a problem within your theme, switching to a default WordPress theme can help.
Alternatively you can also consult your error logs. If your website is hosted on 10Web, you can access your error logs via your 10Web dashboard. Simply log into your 10Web dashboard, click on the website with the WSoD, navigate to Hosting Services > Logs.
Increase PHP memory limit
WordPress, being written in PHP, requires memory to execute its code. If the PHP memory allocated to your site is insufficient, it may result in the WSoD. Increasing the PHP memory limit allows WordPress to utilize more memory, potentially resolving issues caused by memory exhaustion.
Via FTP
- Use an FTP client or your hosting control panel’s file manager to access your site’s files.
- Find and open the wp-config.php file located in the root directory of your WordPress installation.
- Add the following line of code:
- Save the changes and upload the file back to your server if you edited it locally.
define('WP_MEMORY_LIMIT', '256M');
This line increases WordPress’s maximum amount of memory to be used to 256MB. You can adjust the value based on your needs and the capabilities of your hosting environment.
Via .htaccess file
- Locate and open your .htaccess file in the root directory of your WordPress installation.
- Add the following line:
- Save and re-upload the file if necessary.
php_value memory_limit 256M
Via php.ini file
- Connect to your site via FTP and look for the php.ini file in your root directory. If you don’t see it, you might need to create one.
- Add or modify the following line:
- Save the file and upload it to your server if you’re working locally.
memory_limit = 256M
Via the 10Web dashboard
If your website is hosted on 10Web, you can increase your PHP memory limit right from your website dashboard.
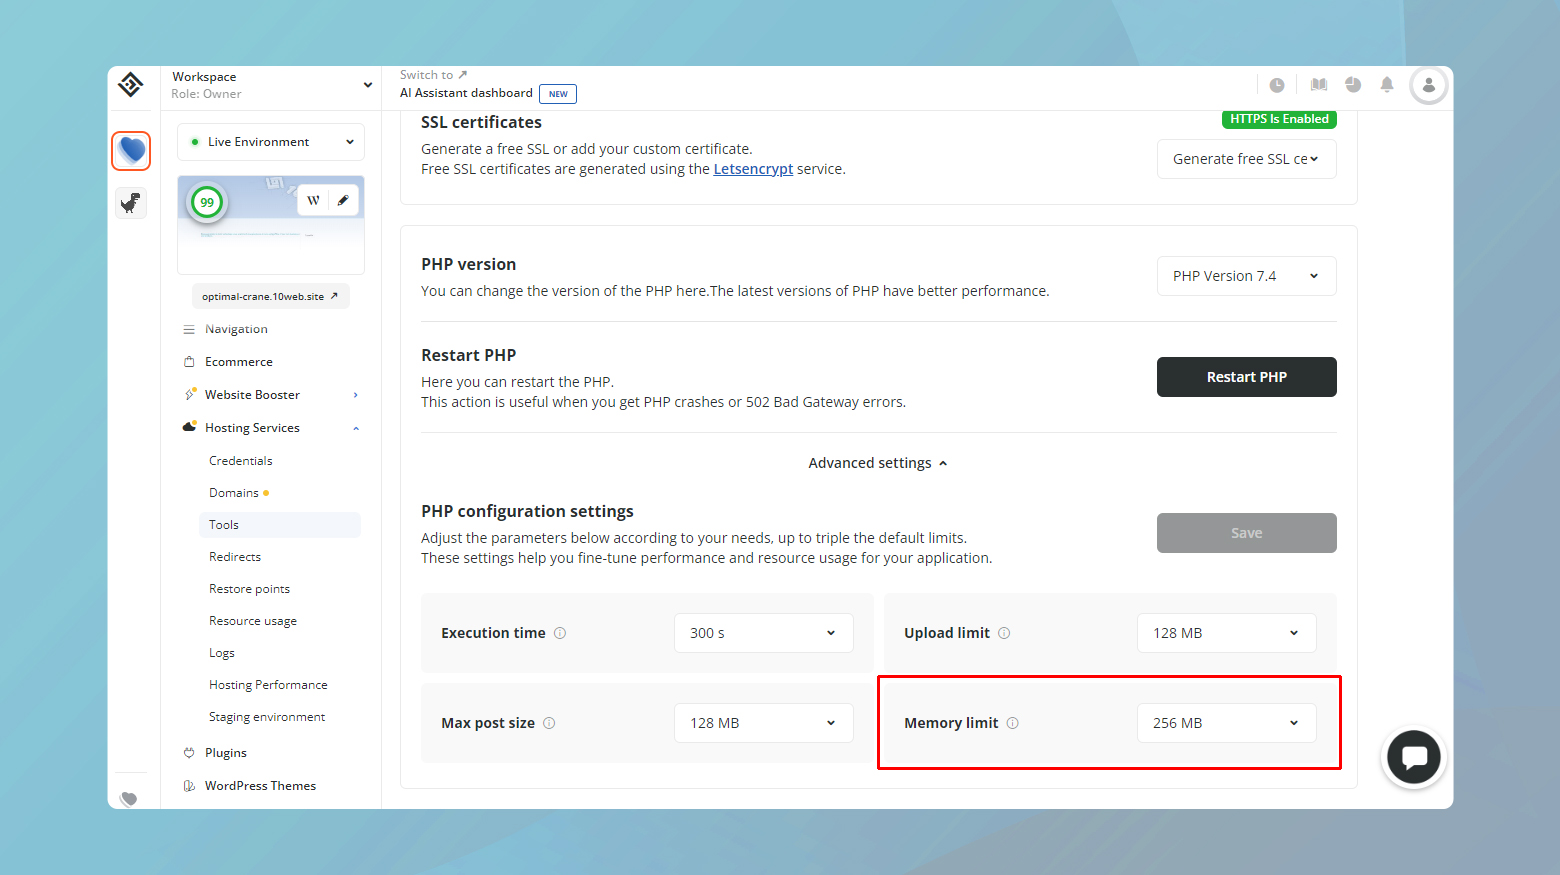
- Log in to your 10Web account.
- Click on the website with the WSoD.
- Navigate to Hosting Services > Tools.
- Scroll down and click on Advanced settings.
- Locate PHP Memory in the PHP configurations, and adjust the limit as needed.
- Click Save to apply the changes.
When to seek further assistance
If you’ve increased the PHP memory limit and the WSoD persists, it might be a sign of deeper issues within your WordPress site, such as a resource-heavy plugin or a theme causing memory leaks. In such cases:
Consult a developer: A professional can delve deeper into the code, identifying and fixing the root cause of the memory issue.
Contact your hosting provider: Some hosts offer insights into your site’s resource usage. They can provide logs and metrics that highlight what’s consuming so much memory, offering clues on how to proceed.
File permissions
Incorrect permissions can prevent WordPress from reading or executing the necessary files, leading to the WSoD. However, tread carefully; setting permissions too loosely could open the door to security vulnerabilities. Permissions are a set of rules that dictate who can read, write, or execute files and directories on your server. For WordPress, setting these permissions correctly ensures that your website functions properly without compromising security.
- Files should generally be set to 664 or 644, allowing the file owner and group to read and write, while others can only read.
- Folders should be set to 775 or 755, enabling the owner and group to read, write, and execute, while others can only read and execute.
- The wp-config.php file, crucial for your WordPress configuration, should be even more restricted, set to 660, 600, or 644. This ensures that sensitive information is not exposed.
How to correct permissions
Adjusting file permissions involves significant risk if done incorrectly. If you’re not confident in your technical skills, it’s best to request assistance from your web host.
To change permissions, you’ll need SSH access to your server. This provides a secure way to connect and execute commands directly on the server where your WordPress site is hosted.
Via SSH
To connect via SSH you will need a specific command line and password to your server. The command line should contain your server address, user name, and port.
- Open command prompt.
- Copy and and paste your address, user name, and port into the command line then hit Enter.
- Type in your password when prompted and hit Enter.
To set the correct permissions for files, use the command:
sudo find . -type f -exec chmod 664 {} +
For directories, use:
sudo find . -type d -exec chmod 775 {} +
And for the wp-config.php file specifically:
sudo chmod 660 wp-config.php
These commands systematically find and apply the appropriate permissions to all files and directories within your WordPress installation, as well as tighten the security on your wp-config.php file.
If you’re uncomfortable making these changes yourself, or if you encounter any issues during the process, it’s important to contact your web hosting provider. They can ensure that permissions are set correctly and safely, without introducing security risks.
Unsuccessful updates
When an update doesn’t go as planned, possibly due to a server timeout, it can leave WordPress in a sort of limbo state, represented by that blank screen.
When WordPress updates, it temporarily places your site in maintenance mode, which is indicated by the presence of a .maintenance file in your WordPress root directory. If the update process is interrupted or doesn’t conclude properly, this file can get left behind, locking your site in maintenance mode indefinitely.
Check for and delete the .maintenance file
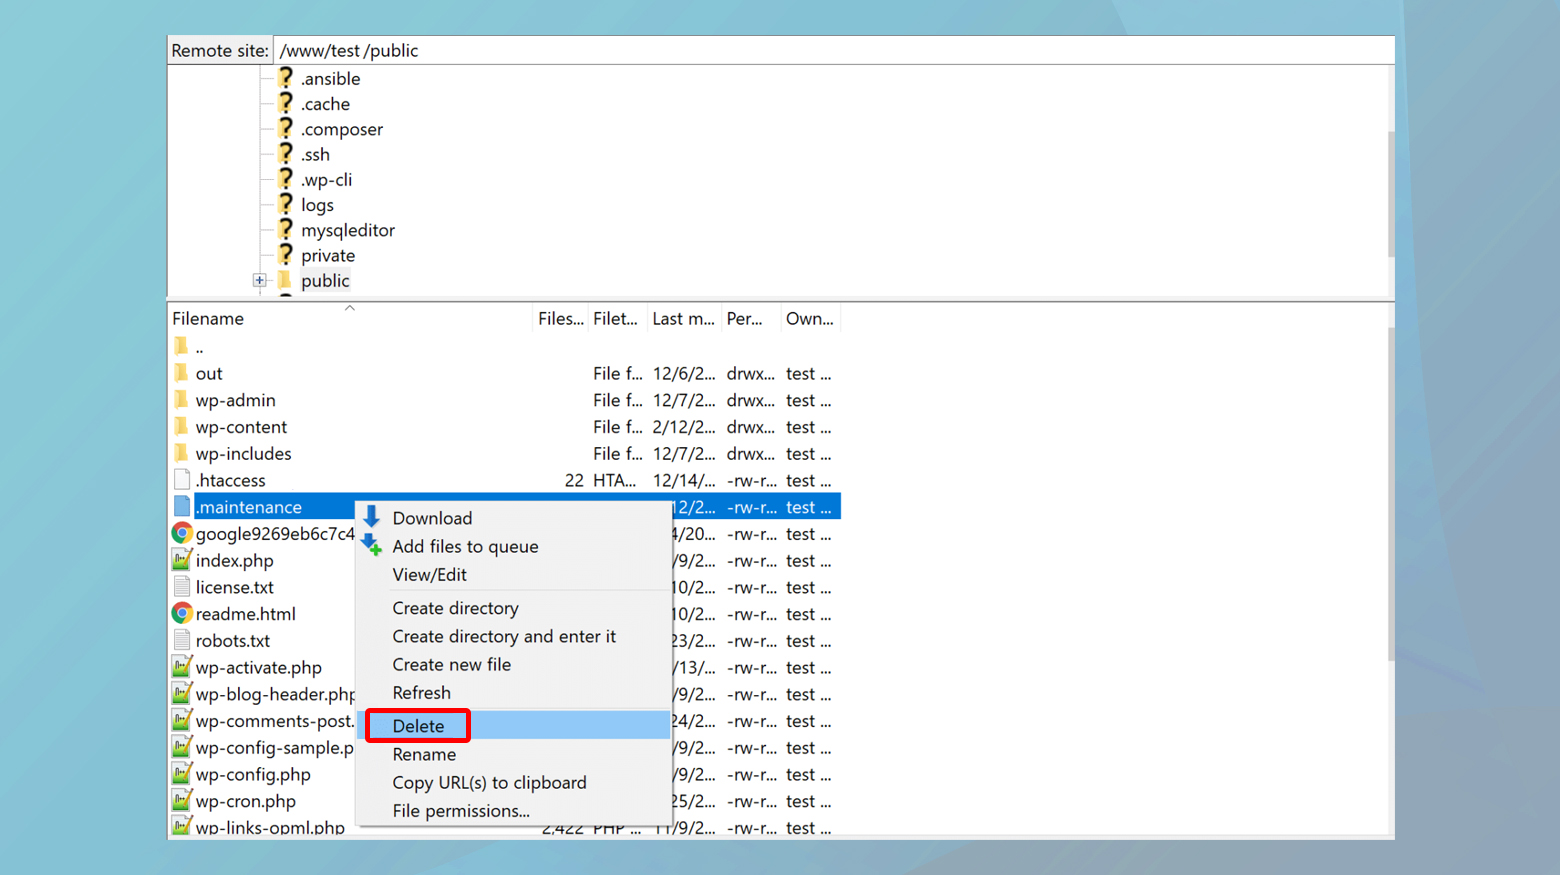
- Use an FTP client or the file manager provided by your hosting control panel to navigate to the root directory of your WordPress installation. This is where you’ll find files like wp-config.php and folders like wp-content.
- Look for a file named .maintenance. It’s usually visible near the top of your root directory because files starting with a dot (.) come first in alphabetical sorting. Note that some FTP clients or file managers may hide these dotfiles by default, so you might need to adjust your settings to make them visible.
- Once you’ve found the file, delete it. This action should take your site out of maintenance mode.
If the only issue was the lingering .maintenance file, your site should now load normally. This typically happens when the update actually completed successfully, but WordPress just failed to remove the file.
If the update was interrupted and not completed, WordPress might attempt to restart the update process automatically once the .maintenance file is removed. Keep an eye on your site and the admin dashboard for any update notifications or prompts.
Manual update
If removing the .maintenance file doesn’t resolve the issue, you might need to perform a manual update of WordPress.
Always start with a full backup of your WordPress files and database. This step ensures you can restore your site to its current state if needed.
- Go to the WordPress.org website and download the latest version of WordPress.
- Using an FTP client, upload the new WordPress files to your server, replacing the old files. Be careful not to overwrite your wp-config.php file or the wp-content directory to avoid losing configurations or content.
- After uploading the new files, visit your WordPress admin area. You may be prompted to update your database. If so, follow the instructions provided.
Fixing code errors
While editing code directly on a live site carries its risks, the situation is far from hopeless if you’ve accidentally introduced an error.
Reverting code changes via FTP
If you recall the specific change that triggered the WSoD, reverting it is your quickest path to recovery.
- Use an FTP client to access your website’s files. FTP (File Transfer Protocol) allows you to upload, download, and manage files on your server.
- Once connected, go to the file or files where you made your changes. This might be a theme or plugin file, or perhaps the wp-config.php file if you were tweaking WordPress settings.
- If you remember the exact change, edit the file to undo it. Be cautious and double-check your corrections to avoid introducing new errors.
After saving your changes, refresh your website to see if it’s back to normal. If it is, you’ve successfully fixed the error.
Using backups to restore your site
If you’re unsure which change caused the problem, or if reverting the changes doesn’t solve the issue, restoring from a backup is a reliable fallback.
10Web users
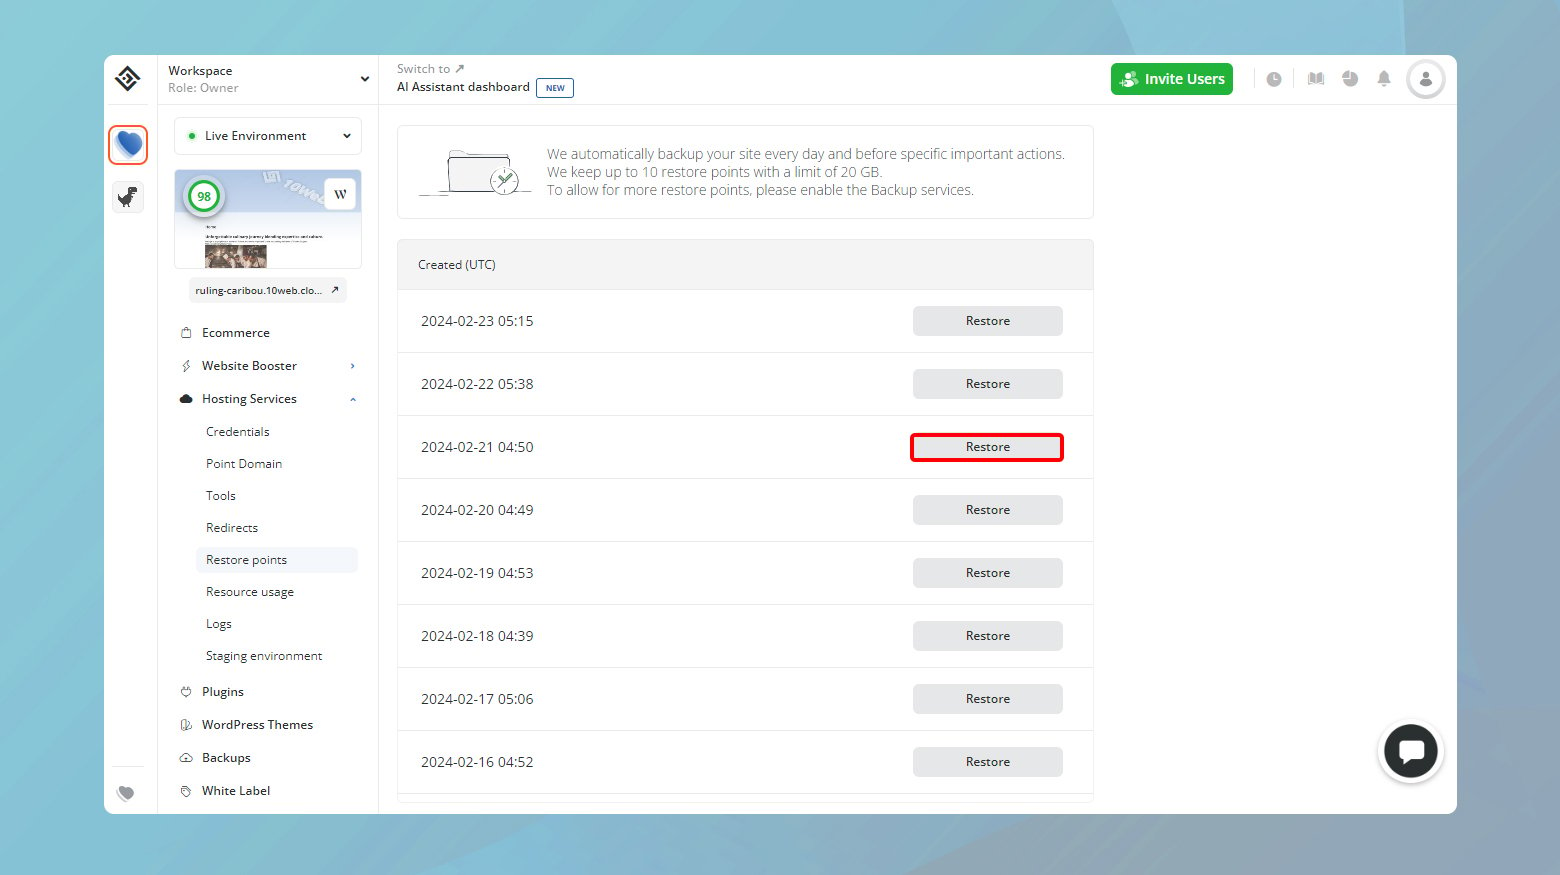
As a 10Web user, you have two ways to restore your website to a previous version. If you have scheduled custom backups of your website, you can restore from the backups you have made. You can also restore your website from the Restore points. These are automatic backups that 10Web makes of your website every day.
- Log in to your 10Web account.
- Click on the website with the WSoD.
- To restore your website from Restore Points, navigate to Hosting Services > Restore points.
- Find the date you want to restore to and click Restore.
- Then click Restore again to confirm.
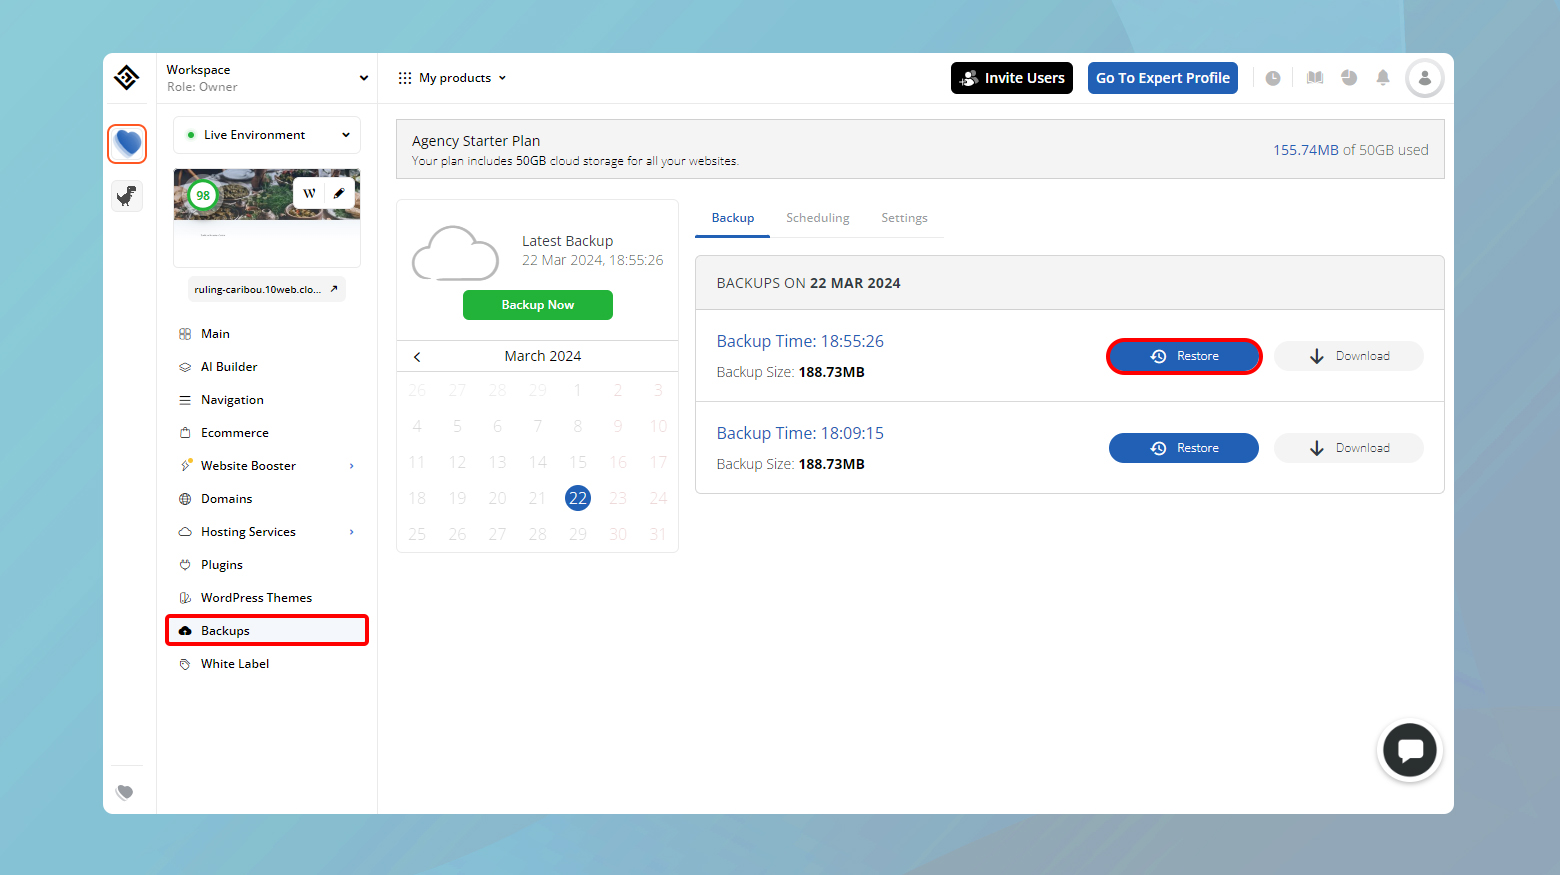
- To restore your website from Backups, navigate to Backups.
- From the list, choose the date you want to restore your website to and click Restore.
- Confirm by clicking Restore again.
Leveraging debug mode for syntax errors
If you enabled WordPress debug mode to troubleshoot the WSoD, it might pinpoint exactly where your syntax error lies.
- Look for an error message mentioning a “parse syntax error” along with a specific file path and line number. This information tells you where to find and correct the problematic code.
- Armed with the debug mode’s insights, connect via FTP, navigate to the specified file, and go to the line number mentioned. Correct the syntax error, ensuring that your code aligns with proper PHP syntax or the specific programming language you’re working with.
Adjusting PHP text processing limits
PHP uses the PCRE library (Perl Compatible Regular Expressions) for pattern matching in text. The pcre.backtrack_limit and pcre.recursion_limit settings define how complex the text patterns PHP can process are before giving up. By increasing these limits, you allow PHP to handle longer and more complex posts that might otherwise trigger the WSoD.
- To increase the limits:Access your wp-config.php file using an FTP client.
- Open the wp-config.php file for editing. You can usually edit files directly through the file manager in your hosting control panel, or you can download the file, edit it with a text editor, and then upload it back to the server.
- Scroll to the bottom of the file, just before the line that says /* That’s all, stop editing! Happy publishing.*/. Here, paste the following code:
- After adding the code, save the wp-config.php file and make sure it’s uploaded back to your server if you edited it locally.
 /* Trick for long posts */
 ini_set('pcre.recursion_limit', '20000000');
 ini_set('pcre.backtrack_limit', '10000000');
This code adjusts the PHP settings to increase the text processing capability.
Refresh your website to see if the adjustment resolves the WSoD. If your site returns to normal operation, it’s likely that the issue was related to PHP’s handling of long posts.
Closing thoughts
Throughout our exploration of the WordPress White Screen of Death (WSoD), we’ve navigated a variety of potential causes and solutions, from plugin and theme conflicts to PHP memory limits, permission settings, update issues, coding errors, and even PHP text processing limits for long posts. Each solution offers a pathway to diagnosing and resolving the WSoD, highlighting the importance of systematic troubleshooting, regular backups, and cautious editing. Whether you’re a seasoned developer or a WordPress beginner, understanding these aspects can significantly enhance your ability to maintain a healthy, vibrant site.
Accelerate your WordPress website creation with AI
Create a custom WordPress website tailored to your business needs 10X faster with 10Web AI Website Builder.
Say goodbye to website errors
Fix all the website errors in one click
Migrate your website to the world's best Managed WordPress Hosting.