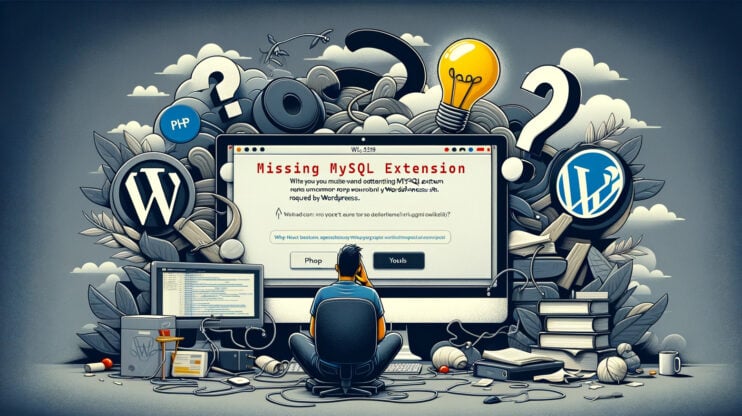
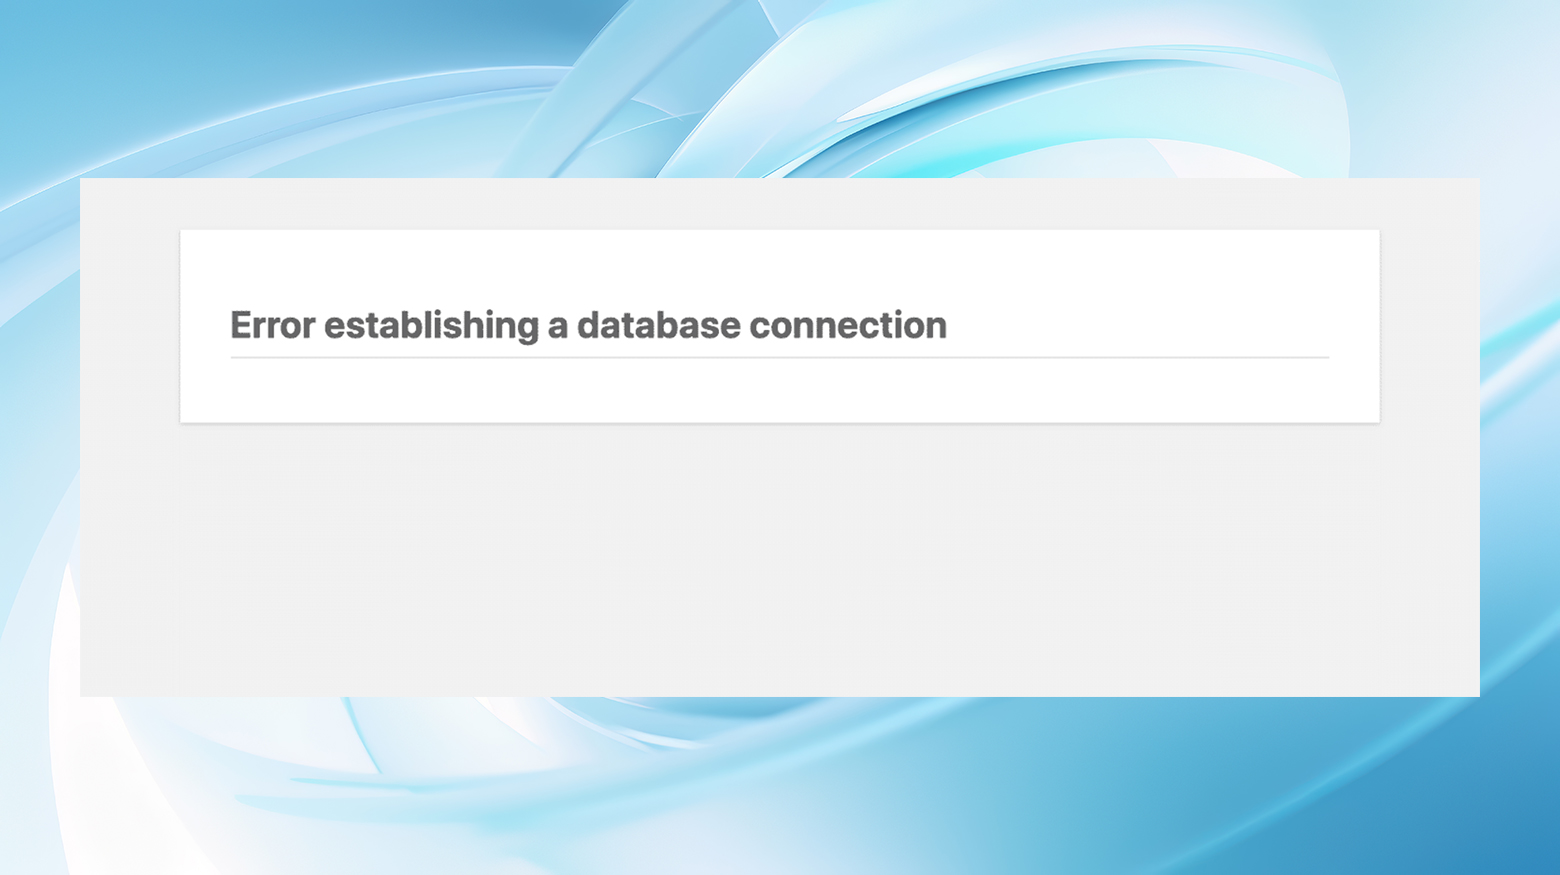
Facing the dreaded “Error Establishing a Database Connection” message on your WordPress site can feel like hitting a brick wall. Suddenly, your entire website is inaccessible, and the urgency to fix it becomes paramount, not just for your peace of mind but also to ensure your site’s visitors continue to have a seamless experience.
Let’s break this down into digestible chunks and get to the bottom of why this happens and how you can fix it, ensuring your site is back up and running swiftly.
Say goodbye to website errors
Achieve peace of mind with 99.99% uptime on 10Web Managed
WordPress Hosting, powered by Google Cloud.
Understanding the error
This error arises when your website’s PHP code can’t fetch data from the WordPress database. It appears as a 500 error in your website’s error logs.
The database connection is vital because your database stores all your website’s content, from user data to posts and pages.
Several factors can contribute to this issue, including incorrect database information in your WordPress settings, a corrupt database, or an unresponsive database server. It’s crucial to understand that your WordPress database stores all your site’s content and data, making its accessibility pivotal for your website’s operation.
Root causes of the “error establishing a database connection” message
There are a few common causes of database connection errors.
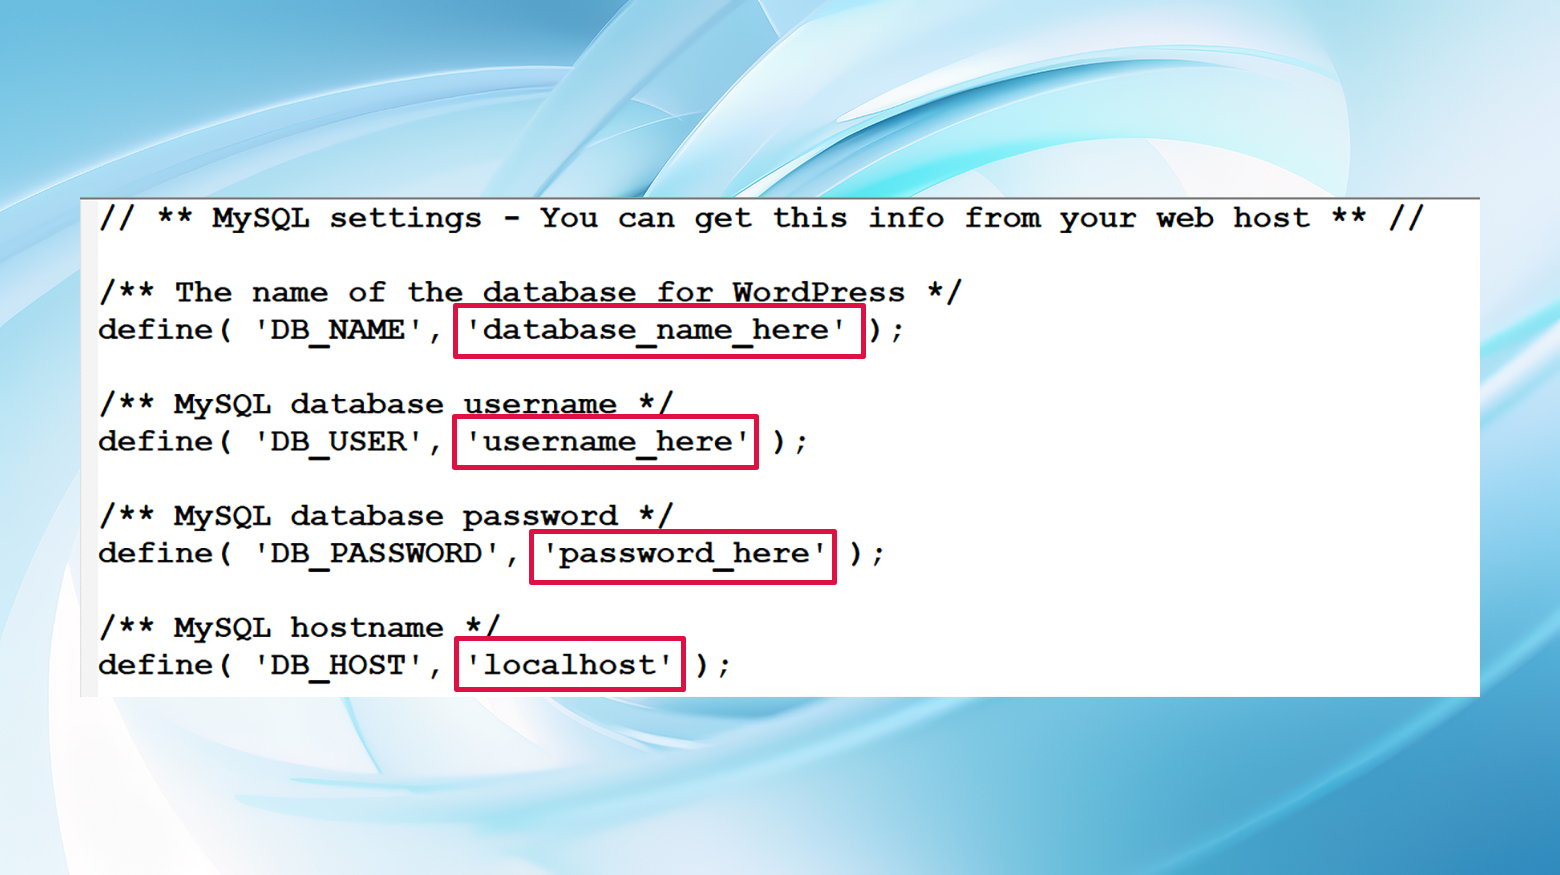
Incorrect database credentials: The most common culprit is incorrect database information in your wp-config.php file. This file contains critical information like the database name, username, password, and server, which must be accurate for WordPress to connect and load content successfully.
Corrupted database: Databases can become corrupt due to plugin or theme conflicts or even manual mistakes.
Database server issues: If your database server is down or overwhelmed by traffic, especially on shared hosting, it might fail to respond to connection requests.
Corrupted WordPress files: Though less common, corruption in WordPress core files can also lead to this error.
Fixing the error establishing a database connection issue
Let’s dive into a structured guide to tackle the “Error Establishing a Database Connection” in WordPress, ensuring you’re well-equipped to address this issue confidently.
Before you begin, back up your WordPress site
Before tweaking your site’s files, ensure you have a safety net. Backing up your site is crucial to avoid losing your data during the troubleshooting process.
Also, be sure you have a complete backup of your WordPress database in addition to your site files.
Here are some methods of creating a whole site backup:
Using a WordPress backup plugin: Tools like VaultPress or WP Time Capsule are invaluable for creating quick, automated backups of your files and database.
10Web users: Take advantage of the built-in backup feature. Navigate to your WordPress site in your 10Web dashboard, Click “Backups,” and then click the “Back up now.” button.
Manual backup via phpMyAdmin and FTP: For those preferring a hands-on approach, access your MySQL database through phpMyAdmin in your hosting control panel and export your database for a manual backup.
Even though the database contains all your post and page data, login credentials, meta information, and so forth, it’s a good idea to grab your website files too. This way, you have a copy of your media and the site’s theme, plugin, and core files.
With your backup securely in place, you’re ready to proceed with fixing your database connection issues confidently.
1. Reboot your web server
For those on dedicated, VPS, or local servers, a server reboot can sometimes fix temporary glitches affecting database connectivity. If you’re on shared hosting, a managed platform, or a similar hosting solution, you can skip this step.
2. Check the database credentials
Incorrect database login credentials are a frequent trigger for this error, especially post-migration to a new host.
Verify the database name, username, password, and server details in your wp-config.php file against those provided by your hosting service. A simple typo in the wp-config.php file could be the reason your site is down.
Verifying database credentials:
- Use SFTP to access your site’s root directory or use the “File Manager” in cPanel to locate the wp-config.php file.
- Open `wp-config.php` and compare the `DB_NAME`, `DB_USER`, `DB_PASSWORD`, and `DB_HOST` values with those provided by your hosting service. Double-check that you’re using the correct database host information. While ‘localhost’ is common, some managed hosting services use different settings.
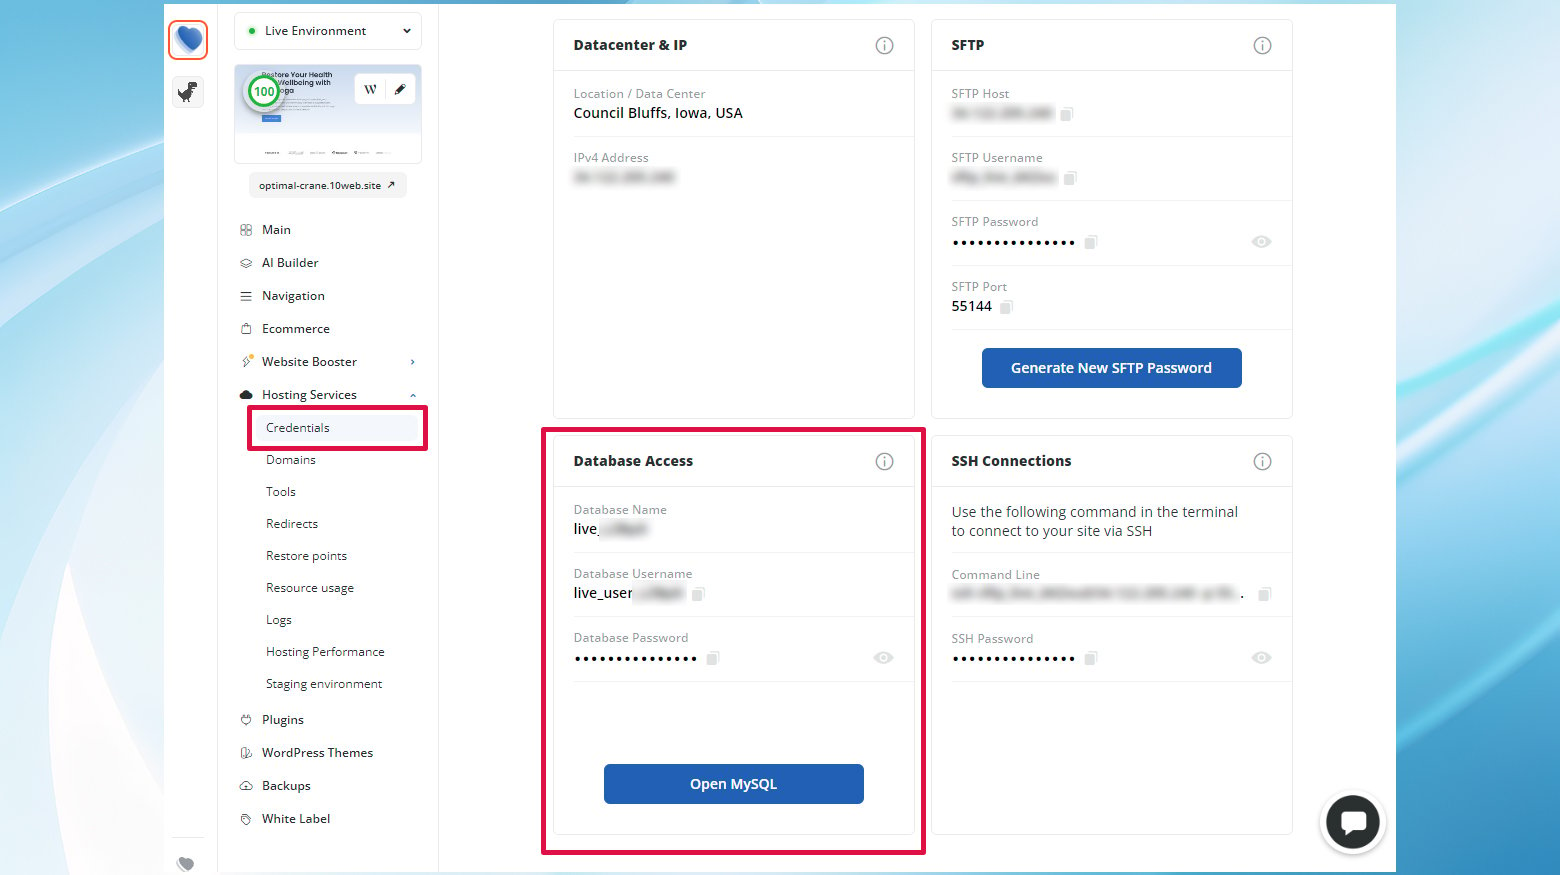
Viewing database credentials in 10Web:
- Navigate to the site’s 10Web dashboard.
- Go to Hosting Services > Credentials.
- Check the Database Access section for the username and password.
Verifying database credentials through cPanel:
Viewing your database password without easy access through your hosting dashboard is a little more tricky.
First, head over to phpMyAdmin and make sure the database name is the same as listed in the wp-config.php file.
Then, instead of trying to check to make sure your wp-config.php file contains the correct credentials, you may consider making a new user and updating your wp-config.php file accordingly.
Find Your Website’s Database Name via phpMyAdmin:
- Start by logging into your web hosting account and accessing the cPanel dashboard.
- Scroll down to the Databases section and click on the phpMyAdmin icon.
- Once in phpMyAdmin, you’ll see the database listed on the left-hand side. Compare the database name listed here with the `DB_NAME` in wp-config.php to make sure they match.
Create a New Database User and Add It to the Database:
- Go back to the main cPanel dashboard, scroll to the Databases section, and click on MySQL® Databases.
- Scroll down to the MySQL Users section. Fill in the Username, Password (use the “Password Generator” for a strong password), and click Create User.
- Scroll to the Add User to Database section. Select the newly created user from the dropdown menu, then select your WordPress database. Click Add.
- On the next screen, check the box for ALL PRIVILEGES and click Make Changes. This action grants the new user full access to your WordPress database.
Edit wp-config.php to Update the Username and Password:
- Return to the wp-config.php file.
- In the `wp-config.php` file, locate the lines that define `DB_USER` and `DB_PASSWORD`. Replace the values with the username and password of the new database user you created. It should look something like this:
php

 define('DB_USER', 'newusername');

 define('DB_PASSWORD', 'newpassword');
- After updating the credentials, save the changes to `wp-config.php` and close the editor.
Open your web browser and navigate to your WordPress site to ensure it’s functioning correctly. If the website still doesn’t load, you’ll have to explore other possible causes.
3. Update the WordPress site URL
In some cases, updating the WordPress site URL directly in the database via phpMyAdmin can resolve the issue.
- Log into your hosting account and navigate to the control panel.
- Look for the Databases section and click on phpMyAdmin to access your WordPress site’s database.
- In phpMyAdmin, you’ll see a list of databases on the left side. Click on the database corresponding to your WordPress site. If you’re unsure which one it is, you can check the wp-config.php file for the database name.
- After selecting your database, a list of tables will appear. Look for the wp_options table. The prefix (wp_) might be different if you or your site’s installer used a custom database prefix for security reasons.
- Inside the wp_options table, search for two specific rows: siteurl and home. These are typically found on the first page of the wp_options table, but you can use the Search feature if you don’t see them.
- Click the Edit button (sometimes represented by a pencil icon) next to the siteurl row. In the option_value field, enter the new URL of your WordPress site. Click Go or Save to apply the changes.
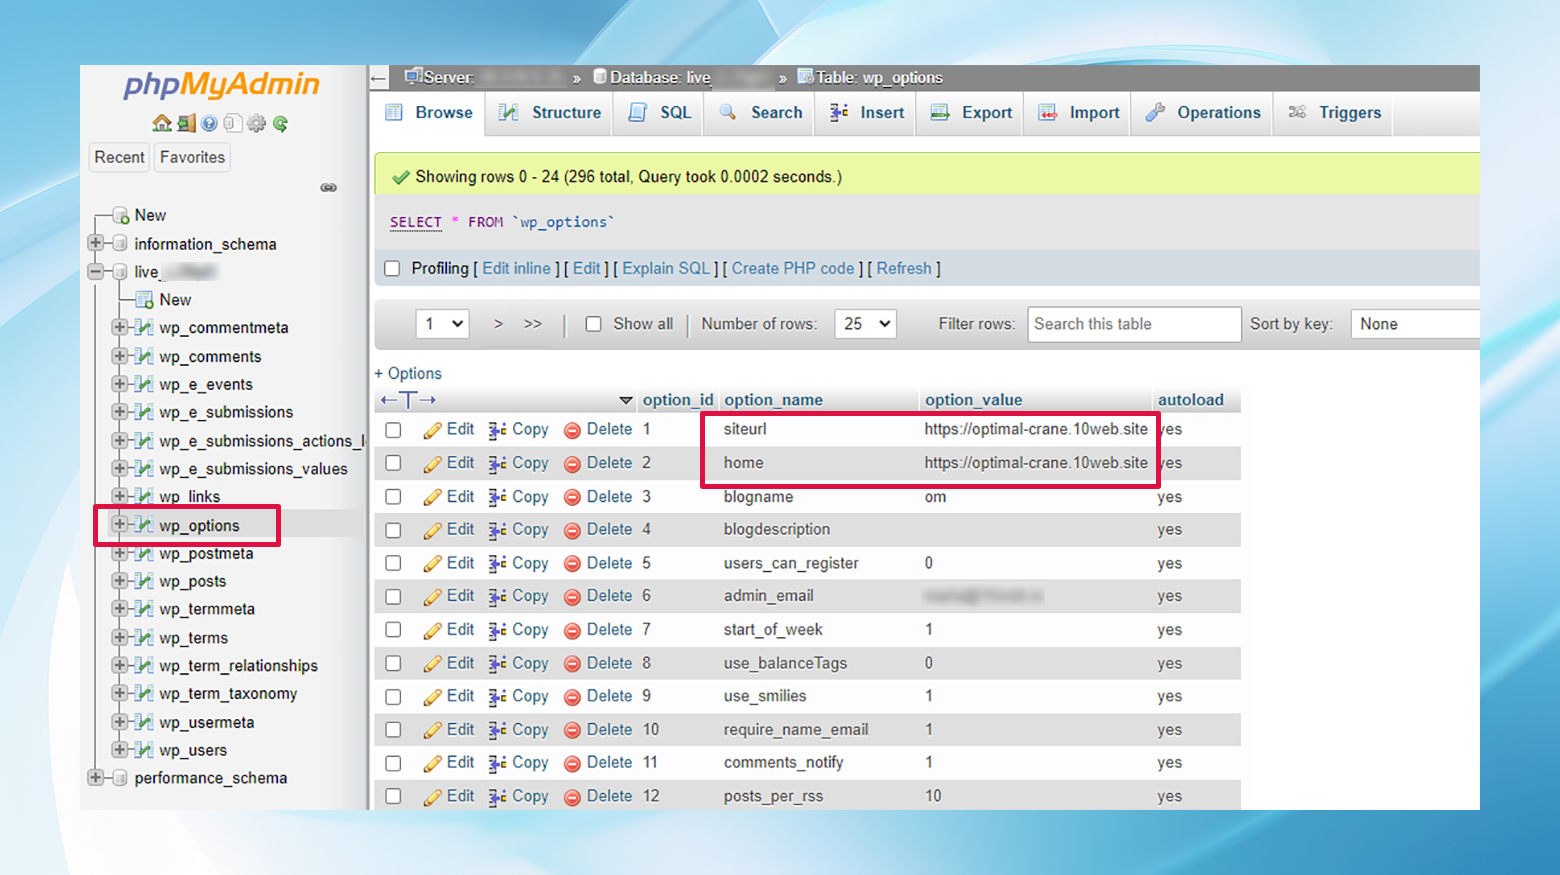
- Repeat the process for the home row, ensuring the option_value matches the URL you entered for siteurl.
- After updating the site URL, it’s a good idea to clear your site’s cache if you’re using a caching plugin, as well as your browser cache. This ensures you’re viewing the site with the updated URL.
Additional Considerations:
- If your site is large and uses many URLs hard-coded into posts, pages, or options, you might also need to update these URLs. This can be done with a search and replace operation in phpMyAdmin or with plugins like Better Search Replace when you regain access to your WordPress dashboard.
- Be very cautious when performing search and replace operations directly in the database, as incorrect changes can break your site. Always back up your database before making any changes.
4. Repair corrupt WordPress database
Database corruption can occur for various reasons, from plugin conflicts to unexpected shutdowns.
Enabling WordPress database repair:
- Add `define(‘WP_ALLOW_REPAIR’, true);` to `wp-config.php`.
- Visit `https://yourdomain.com/wp-admin/maint/repair.php` to initiate the repair and optimize options.
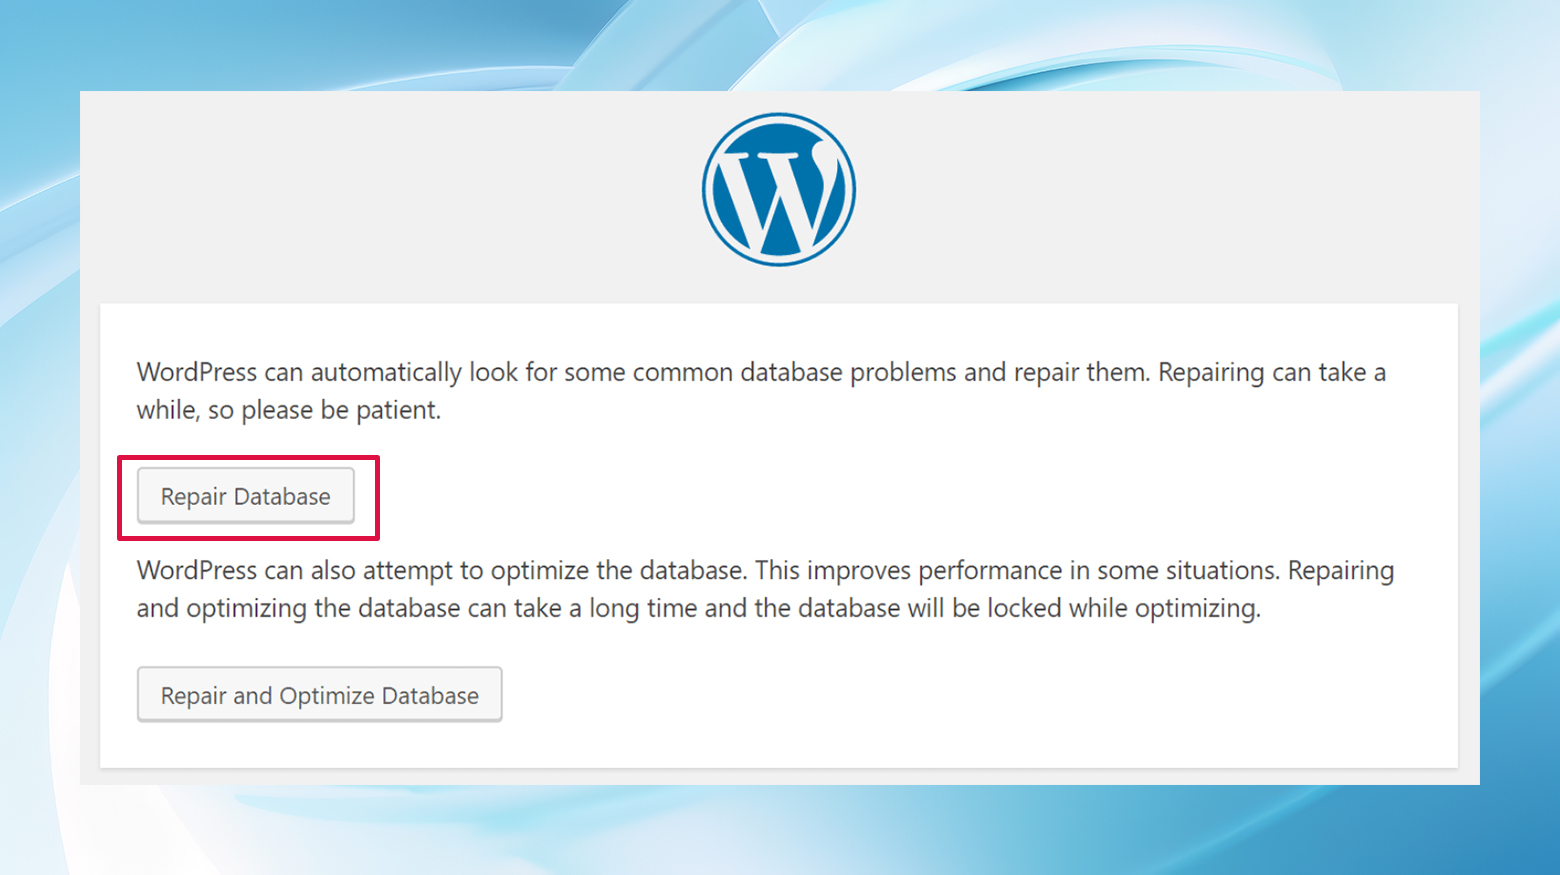
- Remember to remove the `WP_ALLOW_REPAIR` line after completing the repair to prevent unauthorized access.
Alternatively:
- If using cPanel, head over to MySQL databases for the option to repair the database.
- Using phpMyAdmin, select all your database tables then use the drop down menu to select Repair Table.
- Use WP-CLI to run
wp db repair
5. Replace corrupt WordPress files
Corrupted WordPress core files can also lead to database connection errors. If you suspect corrupted WordPress files, download a fresh copy of WordPress from the official site and replace the wp-admin and wp-includes folders.
Keep in mind that you’ll leave your plugins, themes, and media untouched while you’re replacing these core WordPress files. Even though you already have a copy in your website backup, it’s a good idea to grab a copy of your wp-confg.php and .htaccess files before replacing them.
Replacing WordPress core files:
- Download a fresh WordPress installation from WordPress.org and unzip the file.
- Delete the `wp-content` folder and `wp-config-sample.php` file from the new download to avoid overwriting your content and settings.
- Upload the remaining files via SFTP, overwriting your site’s existing files to ensure clean, uncorrupted versions are in place.
If you have to go this route, it’s worth clearing your browser cache and restarting your browser before you check if that fixed the “error establishing a database connection” issue.
6. Check for issues with your database server
High traffic can overwhelm servers, leading to downtime. Contact your hosting provider to check on the server’s status and ensure it’s responsive.
7. Restore the latest backup
If all else fails, restoring your site from a backup can be a quick way to get things back to normal. Most hosting providers offer easy-to-use backup and restore options.
Restoring a backup on 10Web:
- Navigate to the site’s 10Web dashboard.
- Click Backups
- Choose the latest backup from the list, and click restore.
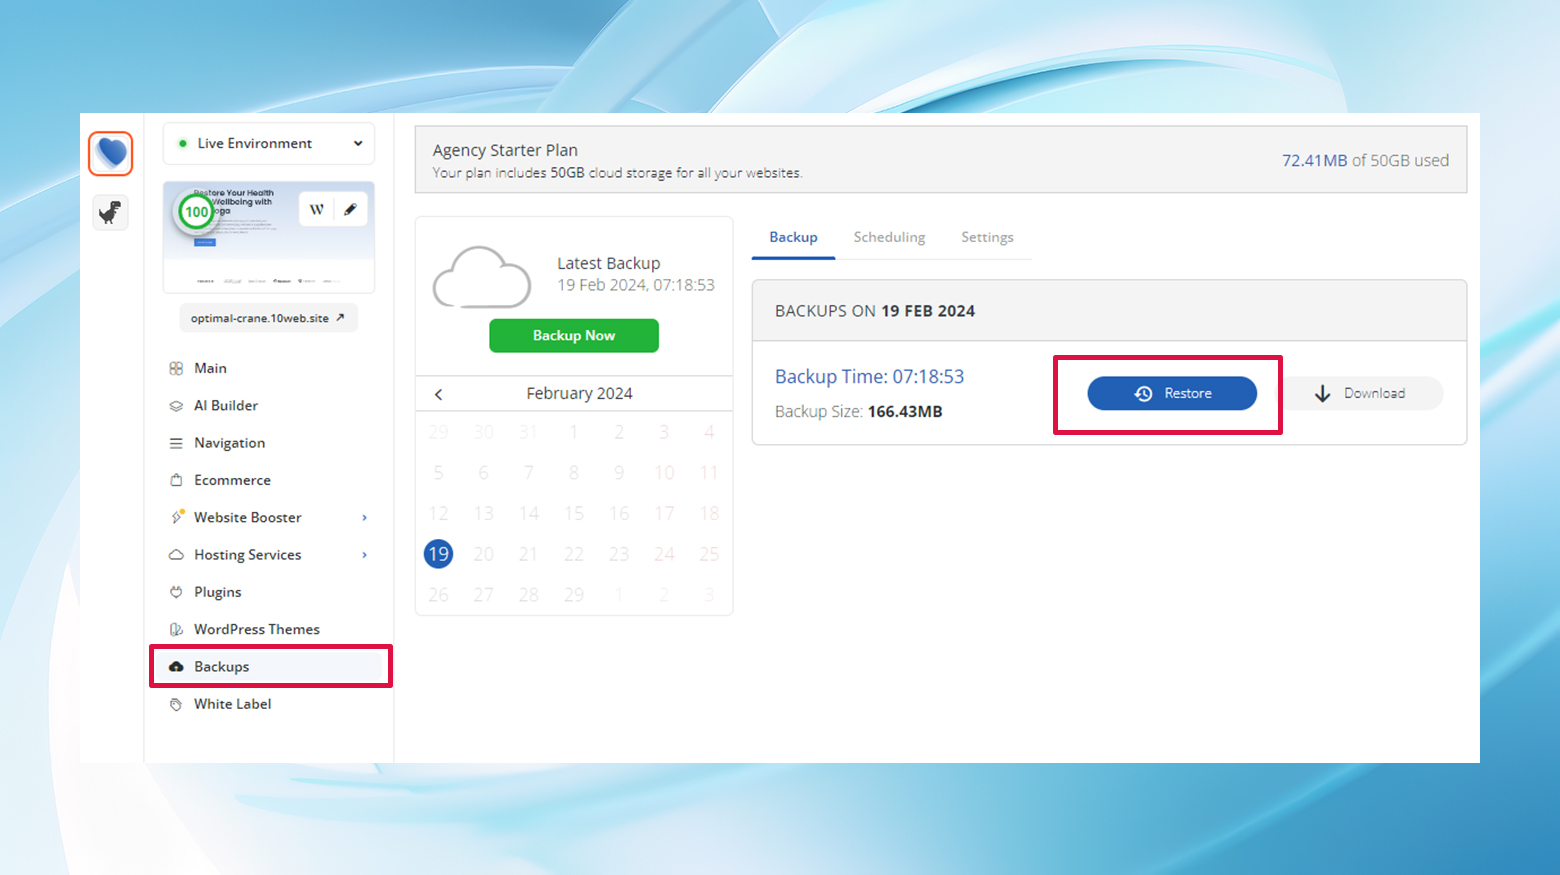
- Follow the prompts to restore your site.
8. Seek professional help
If you’re stuck, reaching out to your hosting provider or bringing in a WordPress pro can provide the necessary assistance to tackle more complex issues head-on.
Prevention and next steps
Going forward, regular backups and keeping your WordPress environment (themes, plugins, core) updated can help mitigate the risk of encountering this error again. Additionally, choosing a reliable hosting provider that offers excellent uptime and support can make a world of difference in managing and preventing such issues.
Addressing the “Error Establishing a Database Connection” promptly and effectively ensures minimal downtime, safeguarding your site’s user experience and your peace of mind. By following these steps and understanding the common causes, you can resolve the database connection error and prevent future occurrences, keeping your WordPress site running smoothly.
Say goodbye to website errors
Achieve peace of mind with 99.99% uptime on 10Web Managed
WordPress Hosting, powered by Google Cloud.
Say goodbye to website errors
Fix all the website errors in one click
Migrate your website to the world's best Managed WordPress Hosting.