The “409 Conflict” error is an HTTP status code that indicates a disagreement between your request and the server’s current state, essentially preventing you from accessing or modifying a webpage as intended. This error is not as cryptic as it seems and often has straightforward fixes, whether you’re a casual browser or a website administrator. Here’s how you can identify and resolve these conflicts, ensuring a smoother internet experience.
Say goodbye to website errors
Achieve peace of mind with 99.99% uptime on 10Web Managed
WordPress Hosting, powered by Google Cloud.
Understanding the 409 conflict error
A 409 error arises when there’s a clash between the intended action of an HTTP request and the resource’s current state on the server. This could be due to a range of factors, such as version control issues, conflicting updates, or even typos in data fields during a PUT request, which aims to update or replace the resource in question.
Identifying the 409 conflict error
Spotting a 409 error requires observing your website’s server requests and responses.
Accessing Server Logs: The first step in identifying a 409 error is to review the server logs. These logs record all interactions with the server, including the details of each HTTP request and response. By examining these logs, you can find instances where the server returned a 409 status code. These entries will typically include the date and time of the request, the specific request method (e.g., PUT), the requested URI, and additional details such as the referring URL and the user agent of the client making the request.
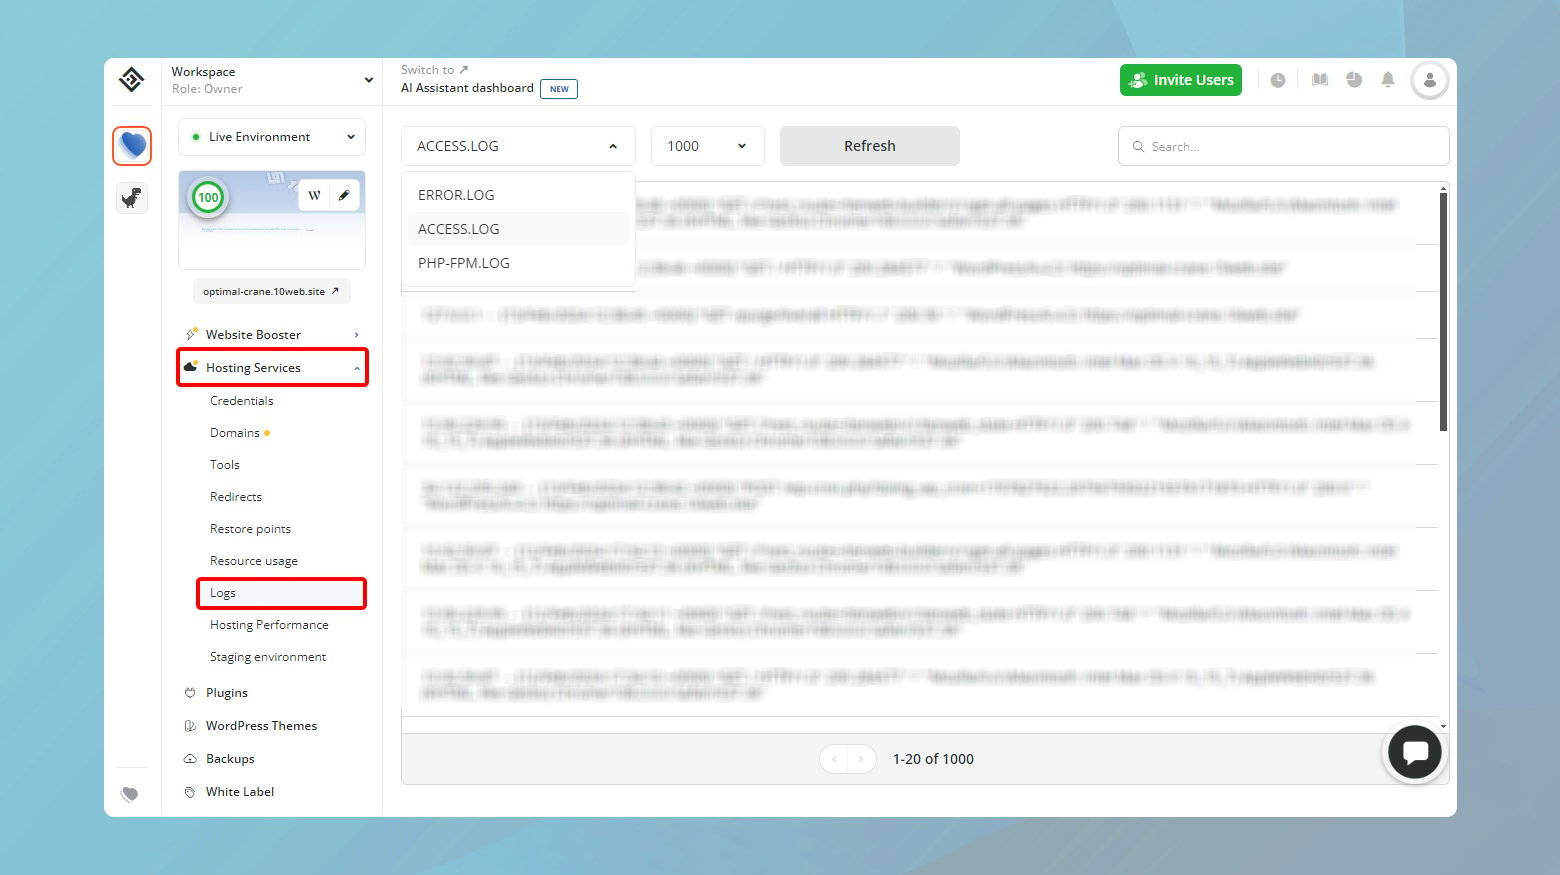
If your website is hosted on 10Web, you can delve into your site logs through the hosting dashboard.
To access your logs:
- Log in to your 10Web dashboard
- Click on the website where you want to check the logs
- Click on Hosting Services > Logs
For more detailed information take a look at our Help Center article.
Analyzing the Nature of Requests: Since 409 errors are often associated with PUT requests, attention should be focused on these types of operations. However, conflicts can also arise from POST requests or any action that attempts to modify the state of a resource. In the server logs, look for requests that resulted in a 409 status code, and examine the context of these requests. Understanding the specific actions attempted—whether updating a resource, deleting an item that has dependencies, or creating a resource that conflicts with existing data—is crucial for diagnosing the root cause of the conflict.
Utilizing Developer Tools and Network Analysis: Modern web browsers are equipped with developer tools that allow users and developers to inspect the network traffic between the client and server. By using these tools, one can observe the HTTP requests sent and the responses received in real-time. When a 409 error occurs, the network tab in the developer tools will display the failed request, providing insights into the request headers, payload, and the specific error response from the server. This real-time analysis can be invaluable for identifying and understanding the circumstances that lead to a conflict error.
Let’s dive deeper into each strategy for resolving the “409 Conflict” Error, providing a more thorough understanding of why these methods work and offering detailed, step-by-step instructions for implementation.
Say goodbye to website errors
Achieve peace of mind with 99.99% uptime on 10Web Managed
WordPress Hosting, powered by Google Cloud.
How to resolve the 409 conflict error
Verify URL Accuracy
URLs are the navigational addresses that guide the flow of information on the internet, directing requests from clients (like your web browser) to specific resources hosted on servers. A URL must be precisely correct to reach the intended destination. Errors in a URL can misdirect these requests, causing the server to either not recognize the request or to identify it as conflicting with the intended operation, particularly in environments where resources are dynamically generated or managed. This precision is crucial in web operations that rely on specific URL paths to access or modify resources, including RESTful APIs and content management systems. Correcting the URL ensures the request accurately aligns with the server’s expected endpoints, thus eliminating the basis for a 409 conflict.
- Begin by examining the URL you’ve entered. Pay attention to common areas where mistakes happen, such as in the domain name (e.g., `.com` instead of `.org`) or in specific paths and parameters within the URL.
- Clear the address bar, then type in the URL again, ensuring accuracy. This step eliminates any errors introduced by copying and pasting or overlooked typos.
- After verifying and correcting the URL, hit Enter to load the page again. Observe if the error has been resolved. If not, proceed to the next troubleshooting step.
Clear Browser Cache
Web browsers use caching as a strategy to reduce load times and internet data usage by storing copies of web pages and resources locally. When a resource is updated on the server but an outdated copy remains in your cache, subsequent requests may attempt to interact with the server based on the outdated state. This discrepancy can lead to a “409 Conflict” when the server recognizes the request is based on or attempts to modify resources in a state that no longer exists. Clearing the cache removes these outdated references, forcing the browser to request the current version of the resource directly from the server. This process aligns the state of the client-side cache with the actual server-side state, mitigating the conditions that lead to the conflict.
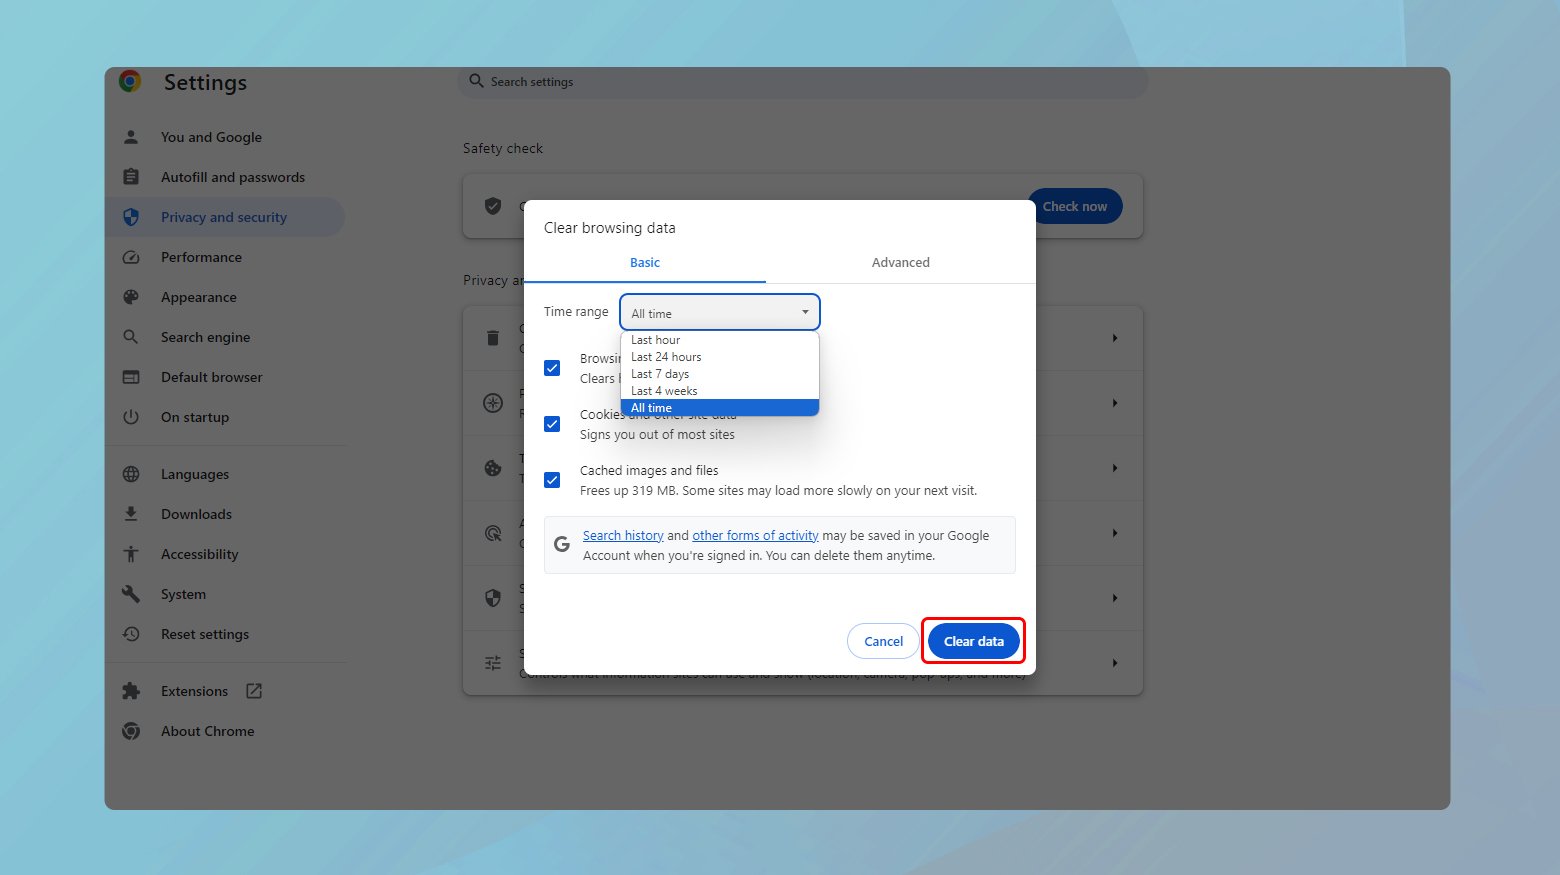
Chrome
- Click the three dots in the top right corner and select “Settings.”
- Go to “Privacy and security” > “Clear browsing data.” Choose “All time” as the time range and check “Cached images and files.”
- Click “Clear data” and restart Chrome.
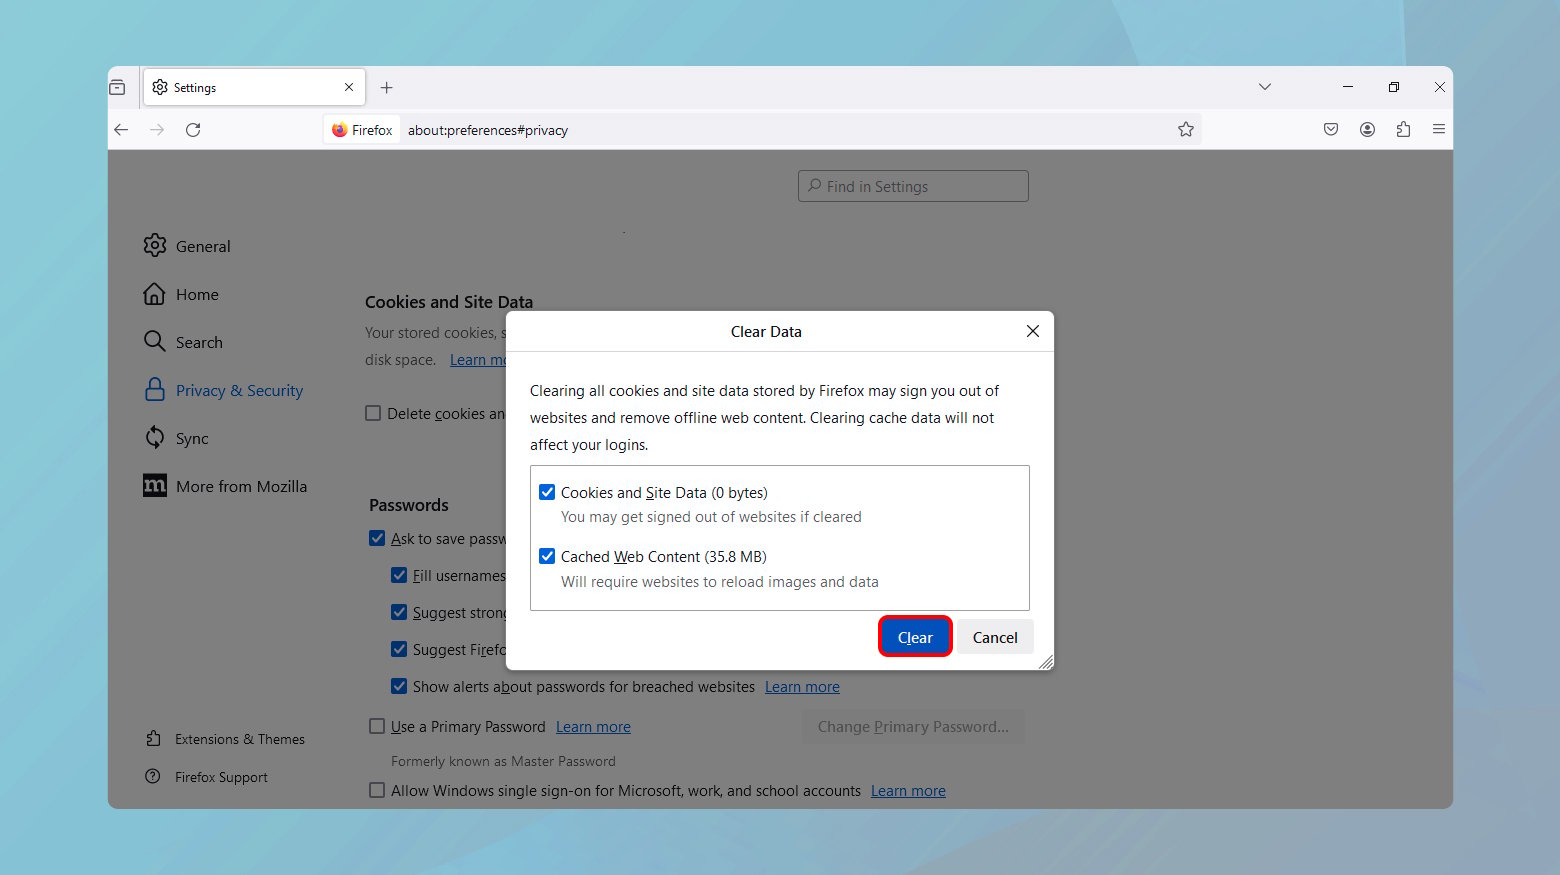
Firefox
- Click the three horizontal lines in the top right corner and select “Options.”
- Navigate to “Privacy & Security” and under “Cookies and Site Data,” click “Clear Data.” Ensure “Cached Web Content” is selected.
- Hit “Clear,” then restart Firefox.
Safari
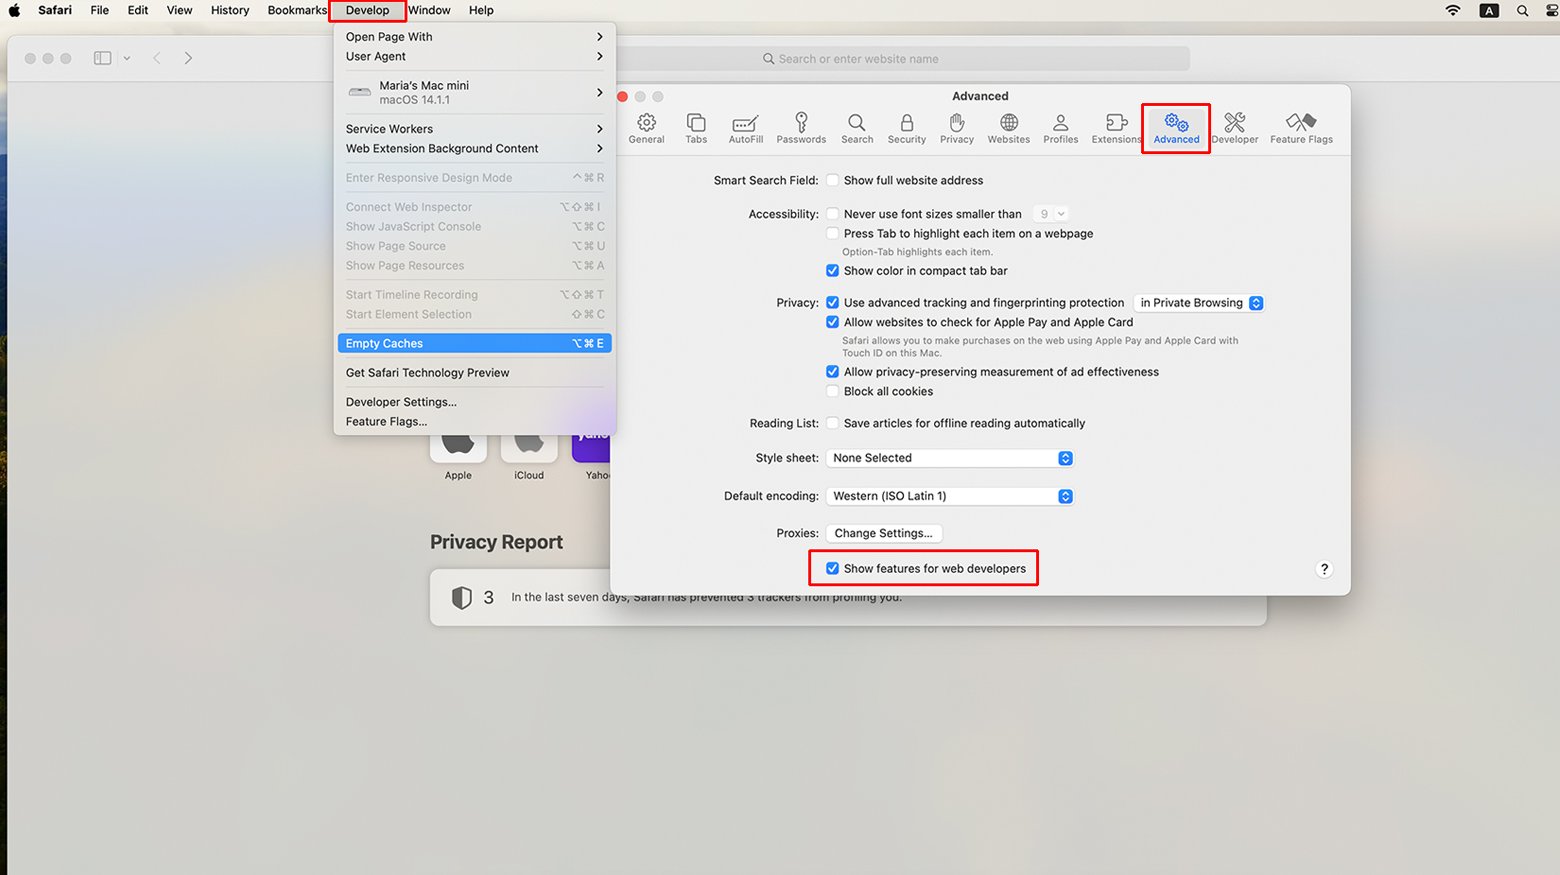
- In Safari, click “Safari” in the menu bar, then “Preferences.”
- Go to the “Advanced” tab and check “Show Develop menu in menu bar.”
- From the “Develop” menu, select “Empty Caches.”
- Close and reopen Safari.
Uninstall Problematic Plugins and Extensions
Within the WordPress ecosystem, plugins extend the functionality of your site, offering new features and capabilities. However, just as browser plugins and extensions can introduce conflicts in web requests, WordPress plugins can similarly affect the operation of your WordPress site. They can interfere with the core functions of WordPress, other plugins, or themes through conflicting code, database queries, or by introducing incompatible settings.
This interference can manifest in various ways, from altering the expected behavior of your site to causing “409 Conflict” errors when plugin operations clash with the current state of your WordPress installation or with the server’s rules for managing and processing data. For example, a plugin that modifies post metadata in a way that conflicts with another plugin or theme could trigger such an error, especially in scenarios involving data synchronization or real-time updates.
Disabling or uninstalling problematic plugins removes these potential points of conflict. This lowers the risk of encountering 409 errors, ensuring smoother operation and better compatibility across your site’s ecosystem.
To disable plugins and extensions:
- Log in to your WordPress admin area. This is usually accessed by appending /wp-admin to your site’s base URL.
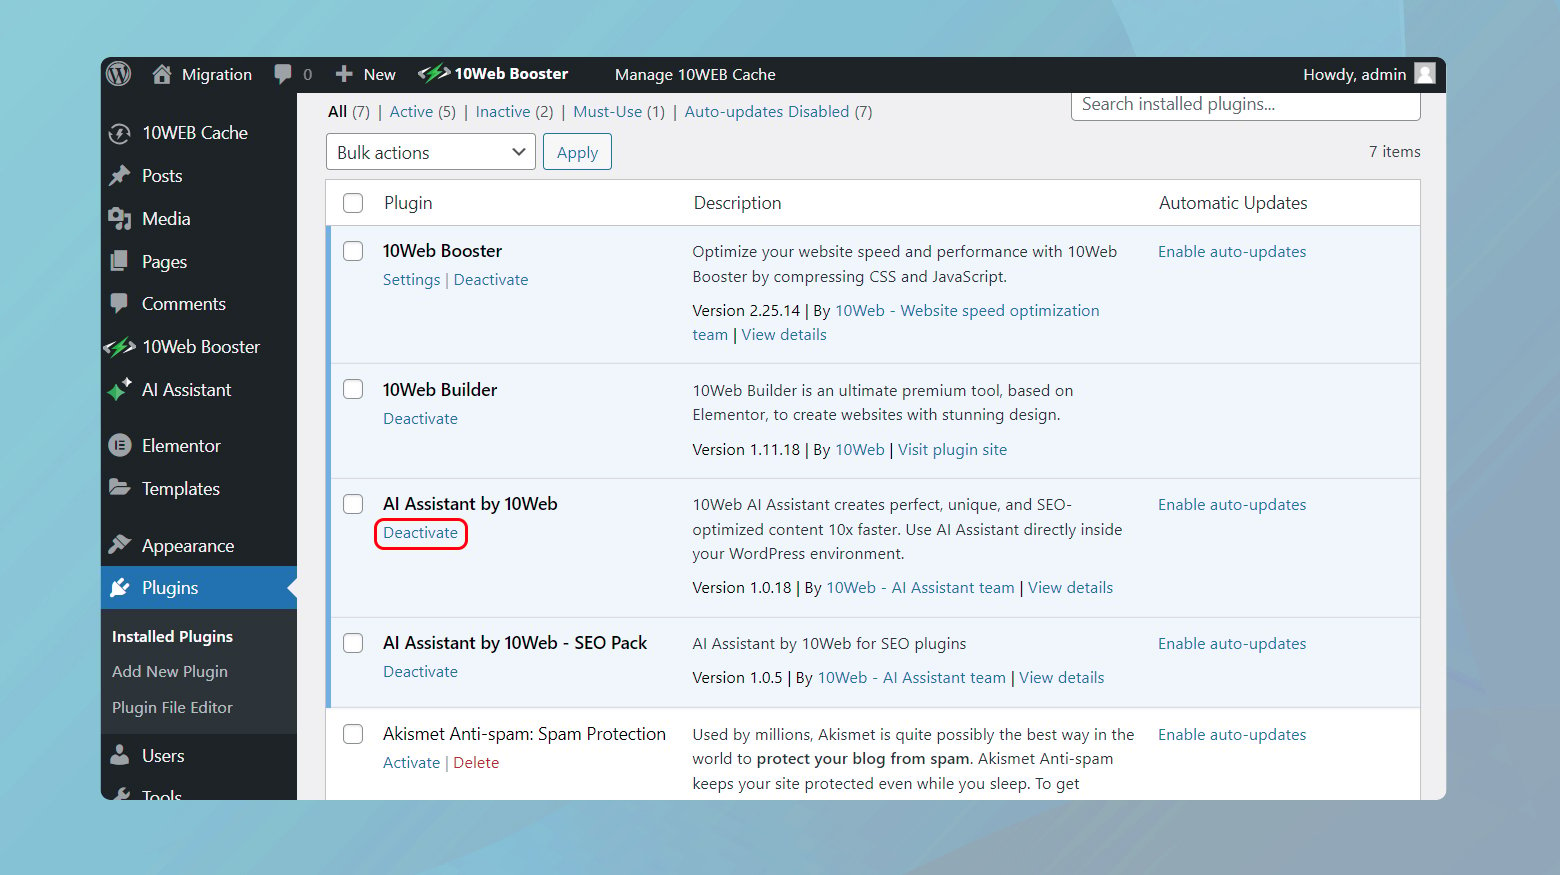
- In the dashboard sidebar, click on “Plugins” to view the list of installed plugins.
- To isolate the issue, you can start by deactivating plugins one at a time. Click “Deactivate” beneath the name of each plugin you suspect might be causing the conflict. After deactivating each plugin, check if the issue persists.
- Once you find the plugin that’s causing the conflict, you can choose to uninstall it by clicking “Delete”.
Note: Ensure you have backups of your site before deleting any plugins, as this action cannot be undone.
If the plugin was essential to your site’s functionality, look for alternative plugins that offer similar features without causing conflicts. Alternatively, check if there’s an update available for the problematic plugin that might resolve the issue.
After uninstalling the problematic plugin, thoroughly test your site’s functionality to ensure that the 409 error has been resolved and that there are no unforeseen issues resulting from the plugin’s removal.
Downgrade to an older version
Updates to web applications, whether they are software plugins, themes, or the core application itself such as WordPress core updates, can introduce changes that are not fully compatible with existing data or configurations. Rolling back these updates reverts the system to a previous state where the configurations, data, and codebase were known to be in harmony, thereby eliminating the newly introduced conflict.
To troubleshoot the 409 conflict error, consider downgrading the version of your WordPress. This will help you understand if the WordPress core was in conflict with other tools on your website.
Before you begin, it is important that you make a complete backup of your website.
The WP Downgrade plugin offers a straightforward solution to revert to a previous version. This can help troubleshoot or bypass new version conflicts. Here’s how to do it:
-
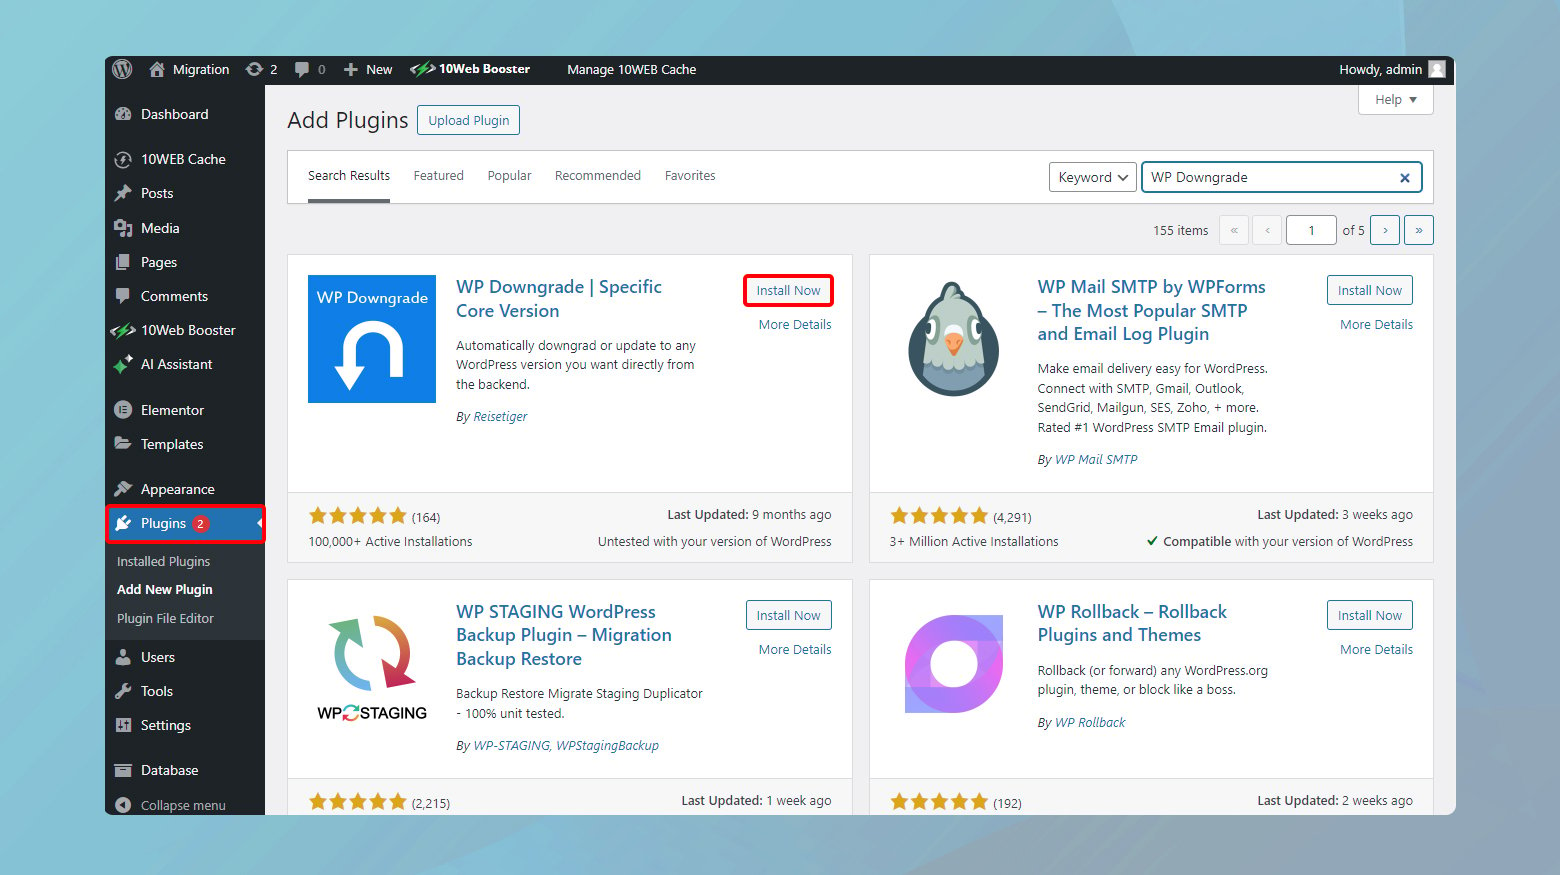
- Navigate to “Plugins” > “Add New.” Search for “WP Downgrade,” install, and then activate the plugin.
-
- Go to “Settings” > “WP Downgrade.” Here, you’ll find a field to input the version number of WordPress you wish to revert to. Make sure to enter the exact version number.
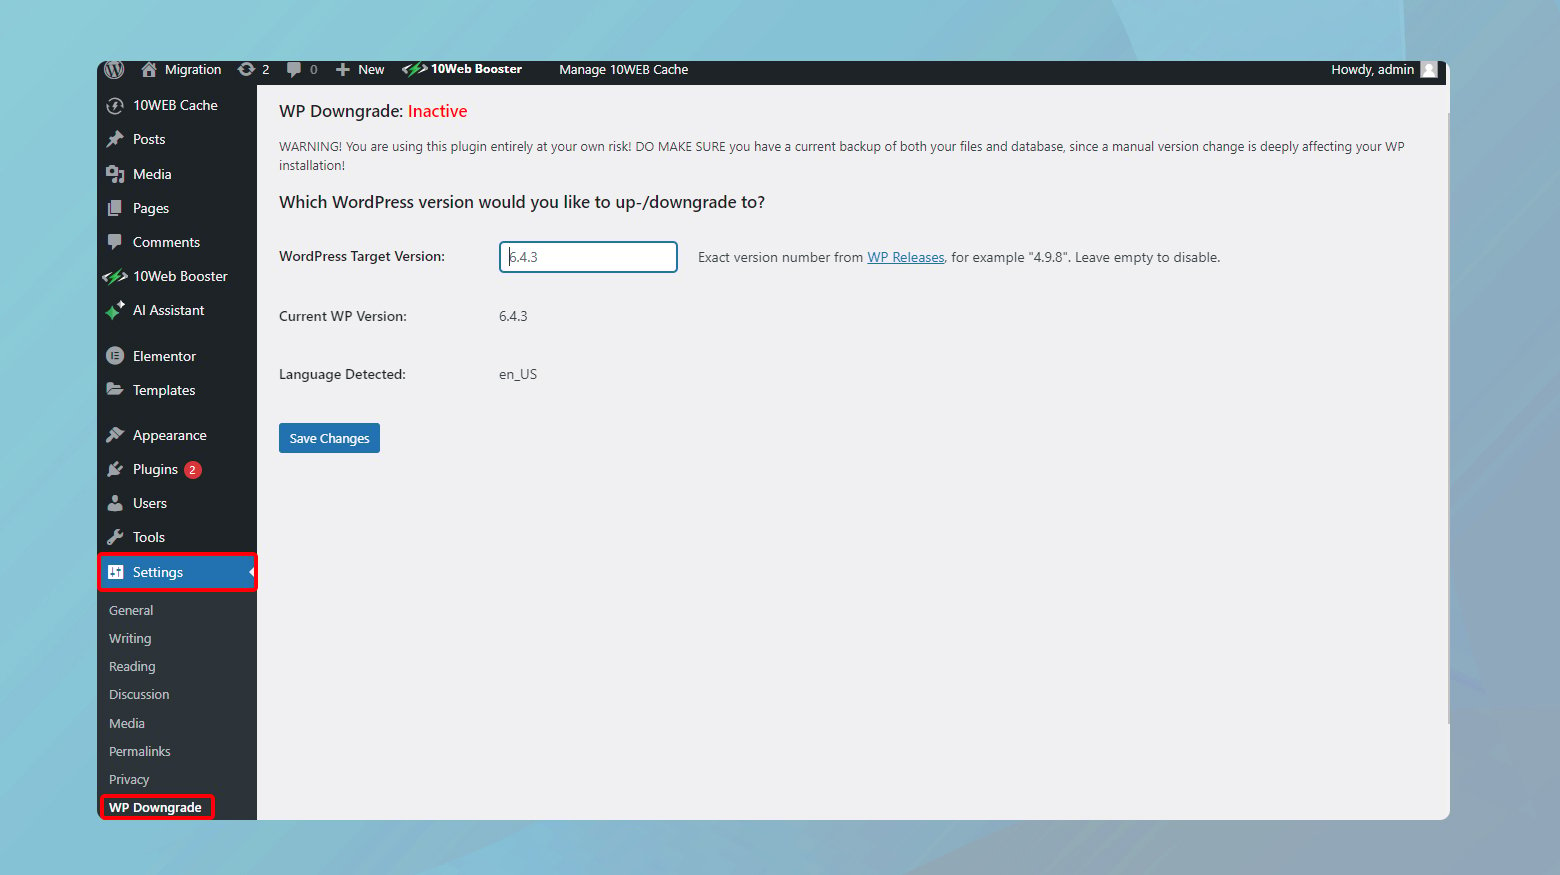
- After entering the desired version number, save your changes. The plugin will prompt you to update WordPress, effectively rolling back to the specified version.
After rolling back, check to see if the conflict has been resolved. If the site is working as expected, consider investigating the updates more closely to identify the specific cause of the conflict.
Examine server configuration
Server configurations determine how incoming requests are handled, how resources are managed, and how responses are generated. Misconfigurations can lead to a variety of issues, including “409 Conflict” errors, especially in complex web applications where resources are tightly controlled and where specific request handling rules are in place. For instance, incorrect settings in version control systems, content management frameworks, or custom application logic can cause the server to reject requests that would otherwise lead to inconsistent states. By reviewing and correcting server configurations, you ensure that the server processes requests in accordance with the intended logic and resource management protocols, thereby reducing the potential for conflicts.
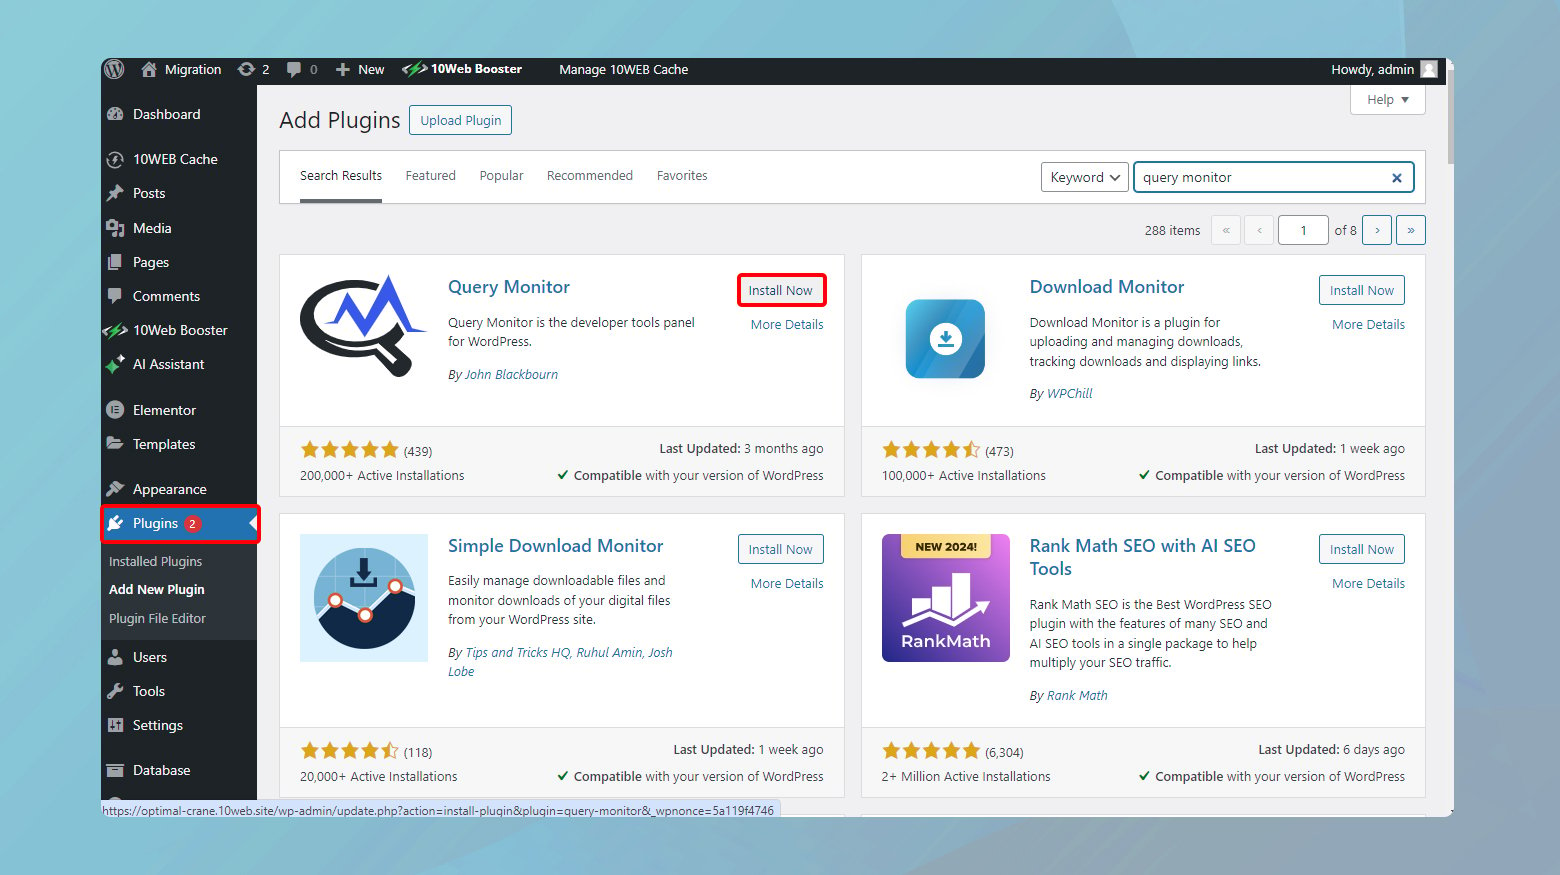
To monitor your site, you can use a tool such as Query Monitor. Query Monitor is a powerful tool for diagnosing and optimizing the performance of your WordPress site. It provides insights into database queries, scripts, hooks and actions, block editor blocks, and more, helping you identify and troubleshoot potential issues.
Here’s how to get started:
-
- Navigate to your WordPress dashboard, go to “Plugins” > “Add New.”
- Search for “Query Monitor,” then click “Install Now.”
- After installation, activate the plugin by clicking “Activate.”
Once activated, Query Monitor adds a new tab to the admin bar at the top of your WordPress dashboard. This tab is visible only to administrators.
- Click on this tab to open the Query Monitor interface.
- Use the information provided by Query Monitor to identify slow or problematic queries, scripts, or hooks.
- Look for patterns or specific plugins/themes that may be contributing to performance issues.
- Address HTTP API call errors by investigating the source of the failed requests, which could be plugins or external services.
Tips
Performance baseline: Use Query Monitor to establish a performance baseline for your site. This way, you can compare before and after results when making changes or updates.
Plugin conflicts: When troubleshooting performance issues or conflicts, deactivate other plugins temporarily and check Query Monitor for changes in performance metrics.
Theme impact: Switch to a default WordPress theme temporarily to assess its impact on your site’s performance compared to your current theme.
Conclusion
In this article we’ve navigated through various approaches to diagnose and fix the “409 Conflict” error, emphasizing practical solutions such as ensuring URL accuracy, clearing browser caches, and managing problematic WordPress plugins. By leveraging these strategies, you can effectively address and prevent the recurrence of this error, ensuring smoother operation and enhanced reliability of their websites. This guidance aims to equip users with the necessary tools and knowledge to maintain optimal website performance and user experience.
Say goodbye to website errors
Achieve peace of mind with 99.99% uptime on 10Web Managed
WordPress Hosting, powered by Google Cloud.
Say goodbye to website errors
Fix all the website errors in one click
Migrate your website to the world's best Managed WordPress Hosting.