What is the ERR_CONNECTION_TIMED_OUT error
The ERR_CONNECTION_TIMED_OUT error is a common error message that you might encounter when trying to access a website. It typically indicates that your browser was unable to establish a connection to the website’s server within a certain time frame – typically around 30 seconds – resulting in a timeout. In the world of WordPress, this error can be likened to a server with limited processing power trying to run a complex application. It’s like trying to run a high-end game on a basic computer – the system struggles to keep up. This is especially true in shared hosting environments where the server’s resources are split among multiple websites.
Say goodbye to website errors
Achieve peace of mind with 99.99% uptime on 10Web Managed
WordPress Hosting, powered by Google Cloud.
Same error different message
Here is the messaging of the same error on different browsers.
Safari – Safari Can’t Open the Page. Safari can’t open the page domainname.com because the server where this page is located isn’t responding.
Firefox – The connection has timed out. The server at domainname.com is taking too long to respond.
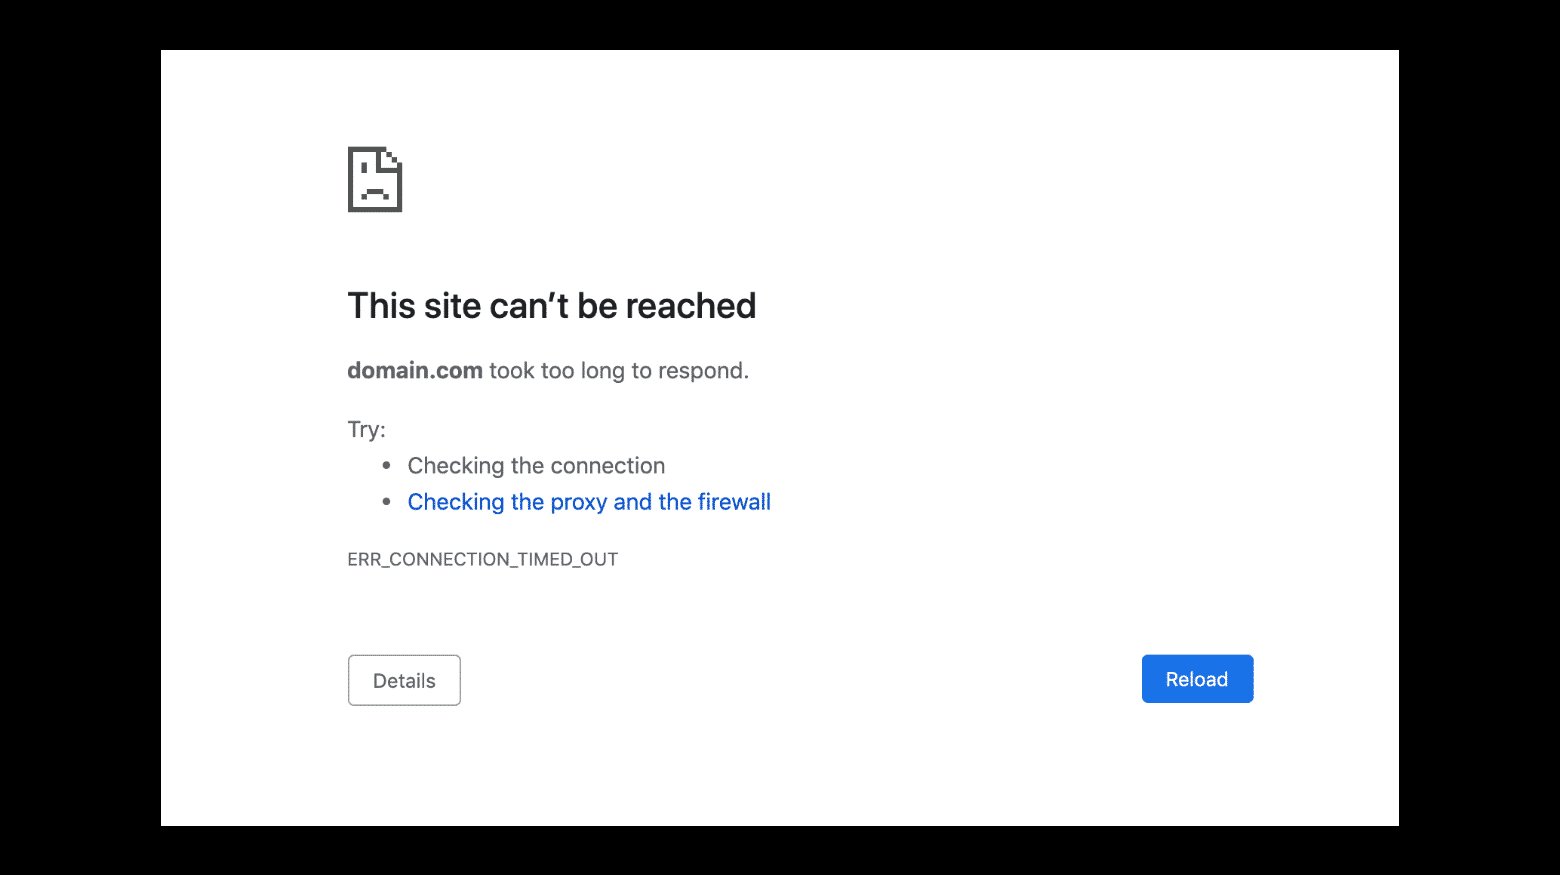
Microsoft Edge – Hmmm… can’t reach this page. Domainname.com took too long to respond.
Why the error occurs
There are several potential reasons why this error might occur:
Server unavailability – The most common reason for this error is that the server hosting the website is not responding or is temporarily down. This could be due to server maintenance, high traffic, or server issues.
Network issues – Problems with your internet connection or local network can also lead to this error. It could be caused by a slow or unstable internet connection, a misconfigured router or firewall, or issues with your ISP.
Firewall or security software – Sometimes, firewall or security software on your computer may block the connection to the website, resulting in a timeout error.
DNS issues – Domain Name System (DNS) is responsible for translating human-readable domain names (e.g., www.example.com) into IP addresses that computers can understand. If there are DNS issues, your browser may not be able to resolve the website’s IP address, causing a timeout error.
Browser extensions or plugins – Certain browser extensions or plugins can interfere with your connection to websites. Disabling or removing these extensions may resolve the issue.
Proxy settings – If you’re using a proxy server, misconfigured proxy settings can cause connection timeouts. Ensure your proxy settings are correctly configured.
WordPress website and server configuration – Website configurations such as execution time and PHP memory can cause connection timeouts. Server misconfigurations can cause timeout issues. Changing the website configurations and ensuring correct server configurations may resolve the connection issues.
How to troubleshoot and resolve the ERR_CONNECTION_TIMED_OUT error
If you come across the ERR_CONNECTION_TIMED_OUT error on your WordPress site, figuring out where to start fixing it can be a bit daunting, especially if you’re not sure what’s causing it. Generally, the problem lies in one of two areas: either it’s a client-side issue, like your network connection or firewall settings, or it’s a server-side problem. On the server end, the issues could be related to memory limitations, how long scripts are allowed to run, and similar factors. So, when this error pops up, you’ll want to check both your own network setup and the server where your site is hosted.
Check your internet connection
Make sure your internet connection is stable and working correctly. Try accessing other websites to verify if the issue is specific to the website you’re trying to reach. While this may seem like a basic step, it’s often the root cause of the issue. Here’s what you can do:
Restart your router
It’s a simple fix but surprisingly effective. Turn off your router, unplug it from the power source, wait about 30 seconds, and then plug it back in and turn it on. This process, known as power cycling, can resolve a surprising number of connection issues.
Assess the quality of your Wi-Fi connection
Slow or unstable Wi-Fi is a frequent issue, especially in crowded areas where many people are sharing the same network. If you’re in such a spot, the problem might just be the overloaded Wi-Fi.
Refresh the page and try a different browser
Sometimes, the error is temporary, and a simple page refresh (F5 key or the browser’s refresh button) can solve the problem. At other times, the issue may be browser-specific. Try accessing the website using a different web browser to see if the error persists.
Test in incognito
When facing issues with your browser, a good first step is to try accessing the webpage in an Incognito window. You can open a new incognito page by simultaneously pressing Ctrl + Shift + N on Windows and Cmd + Shift + N on Mac. If the webpage opens successfully in Incognito mode, it indicates the problem lies with your browser settings or data and you can focus on browser specific solutions to resolve the issue.
Clear browser cache and cookies
Cached data or corrupted cookies may interfere with the connection. Managing your browser data like cache files, saved logins, and cookies is important. While they make your browsing smoother, they can also slow things down and lead to timeout errors. Here’s a guide to clearing browsing data based on your browser:
Google Chrome
- Click the three-dot menu in the top right corner.
- Select Clear browsing data.
- In the Advanced tab, select all the options.
- Choose All time as the time range.
- Click Clear data to remove all browsing data.
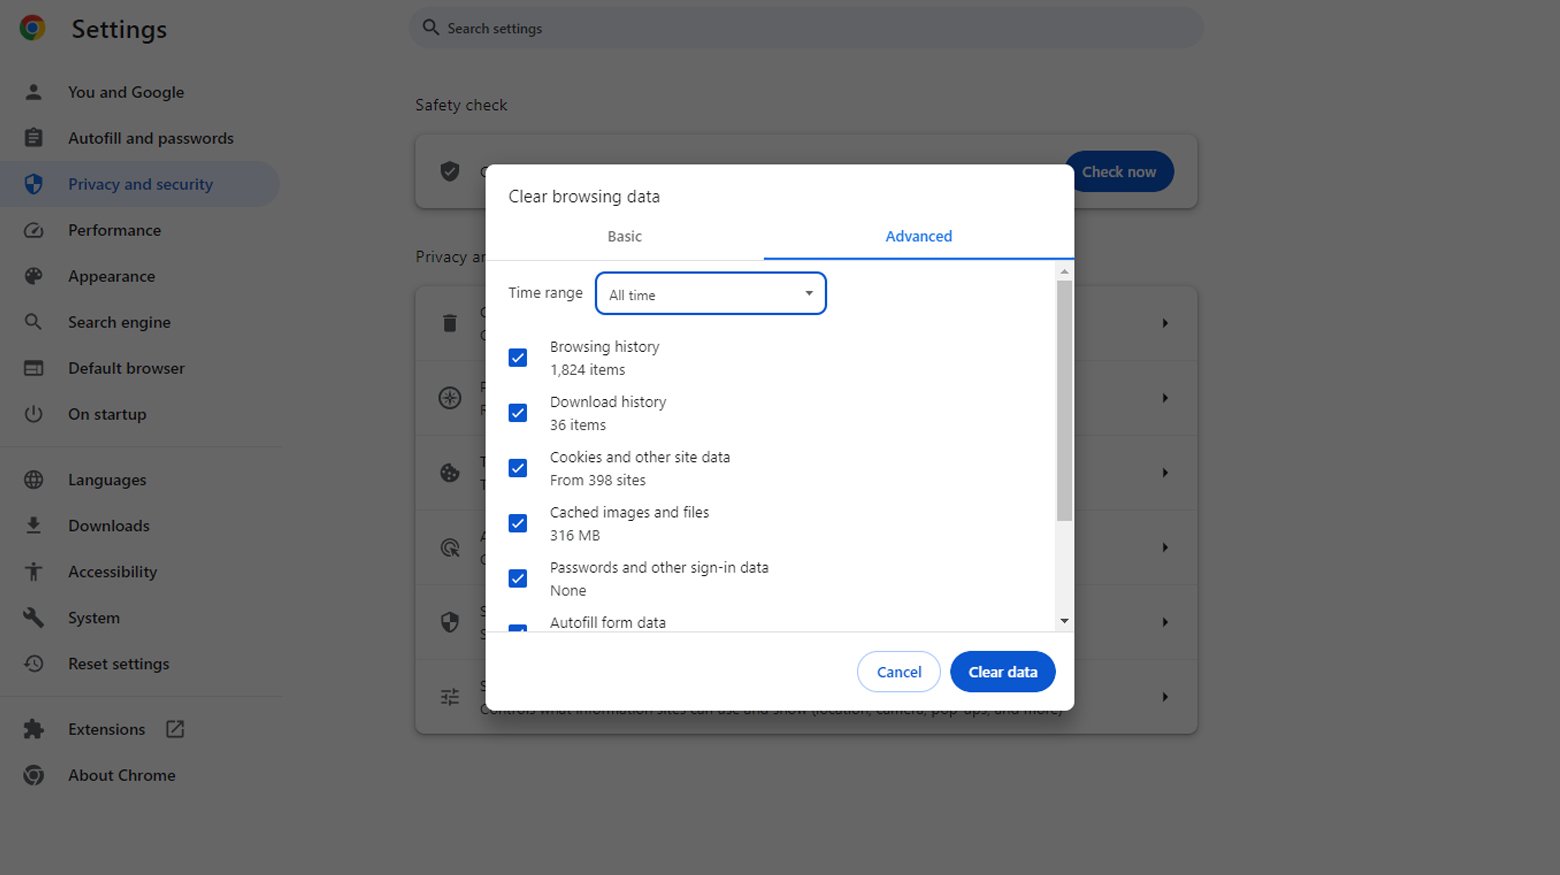
To go straight to the Clear Browsing data page enter: chrome://settings/clearBrowserData in the URL. To clear your browsing history without taking the above steps: Press Ctrl + Shift + Del.
Mozilla Firefox
- Click the hamburger icon.
- Go to History > Clear Recent History.
- Set the time range to Everything.
- Click Clear Now.
Internet Explorer
- Click the Settings button (gear icon).
- Select Safety > Delete browsing history.
- Check Temporary Internet files and Website files.
- Click the Delete button.
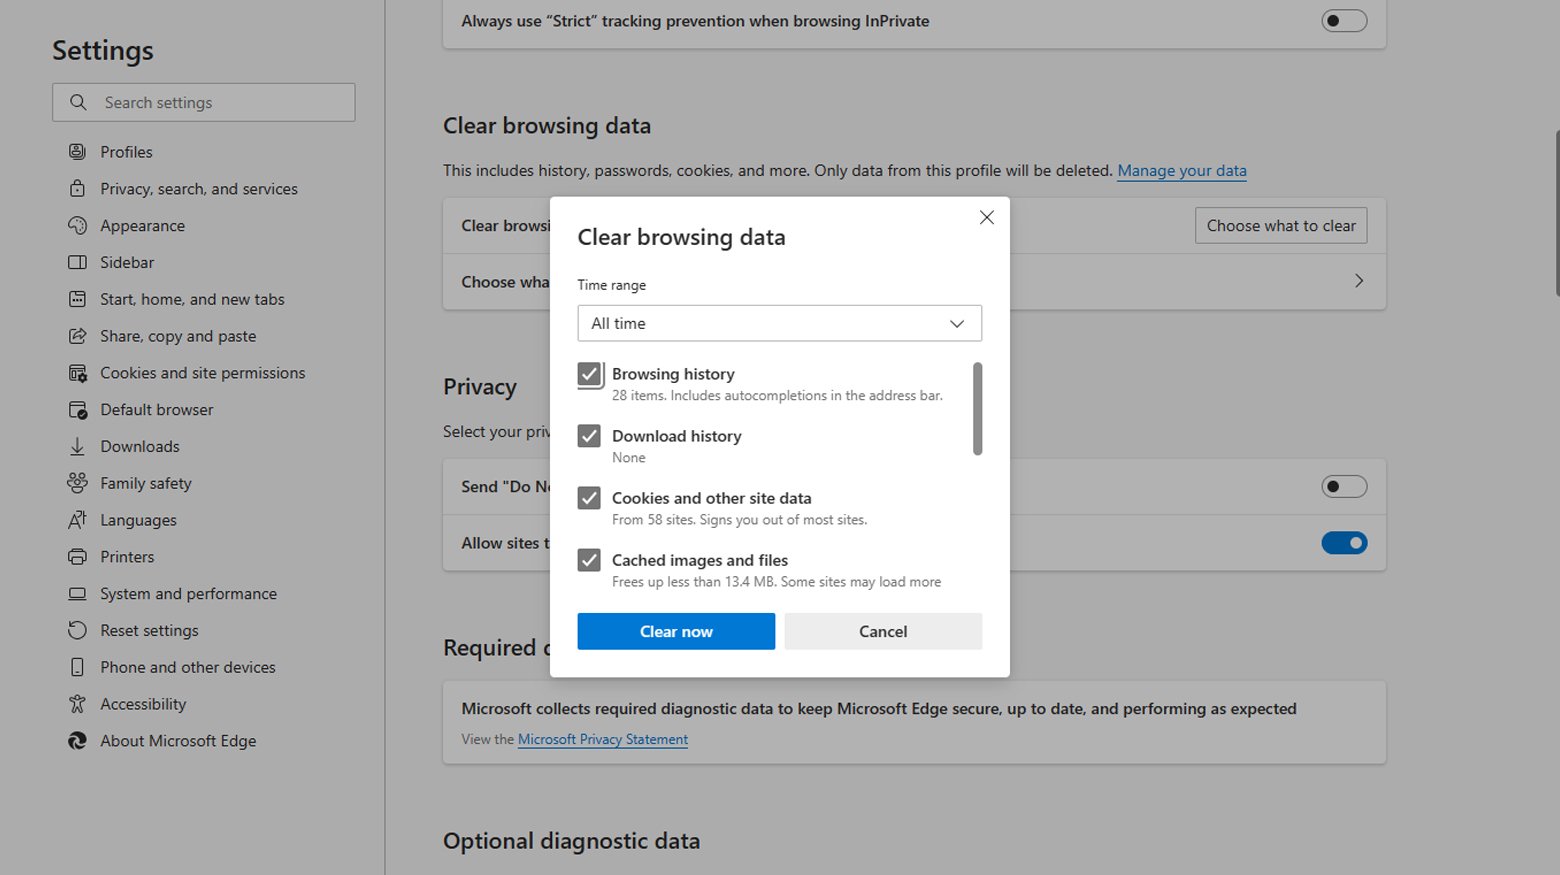
Microsoft Edge
- Click the three dots icon for more options.
- Go to Settings > Privacy, search, and services.
- Under Clear browsing data, choose Choose what to clear.
- Check Cached images and files.
- Hit the Clear button.
Temporarily disable firewall or security software
If you’re facing the ERR_CONNECTION_TIMED_OUT error, it could be due to your firewall or antivirus software mistakenly blocking a safe website. Here is how to temporarily disable any firewall or security software on your computer to see if they are causing the issue. Make sure to re-enable them afterward.
Windows users
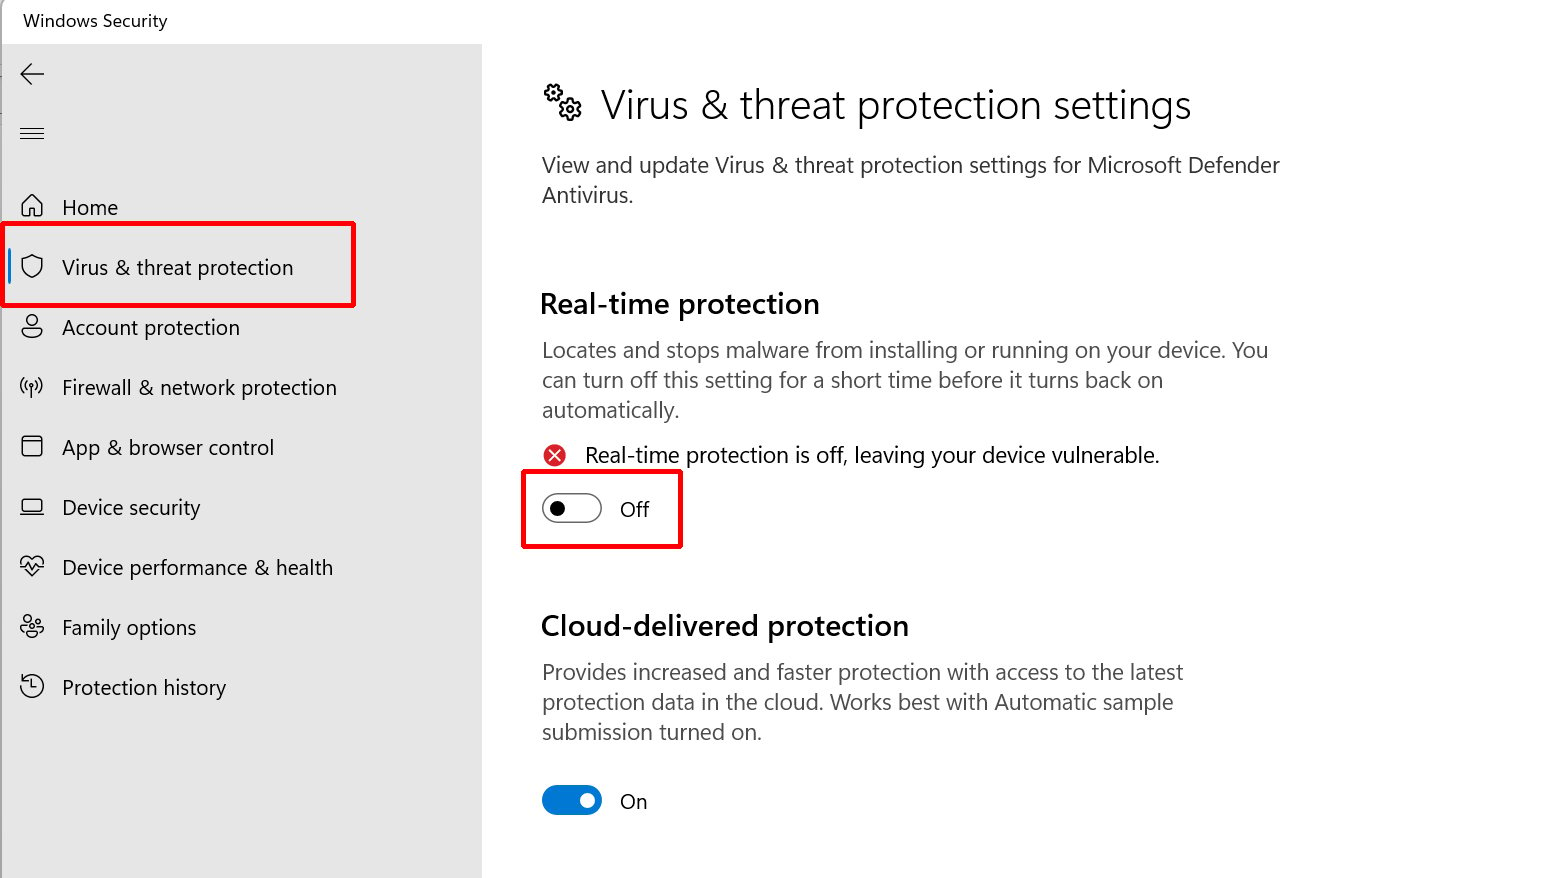
To disable your security software:
- Click the Windows key on your keyboard.
- Go to Settings > Privacy & Security > Windows Security.
- Select Virus & threat protection
- Click on Virus & threat protection settings > Manage settings
- Turn off antivirus protection by toggling to the left.
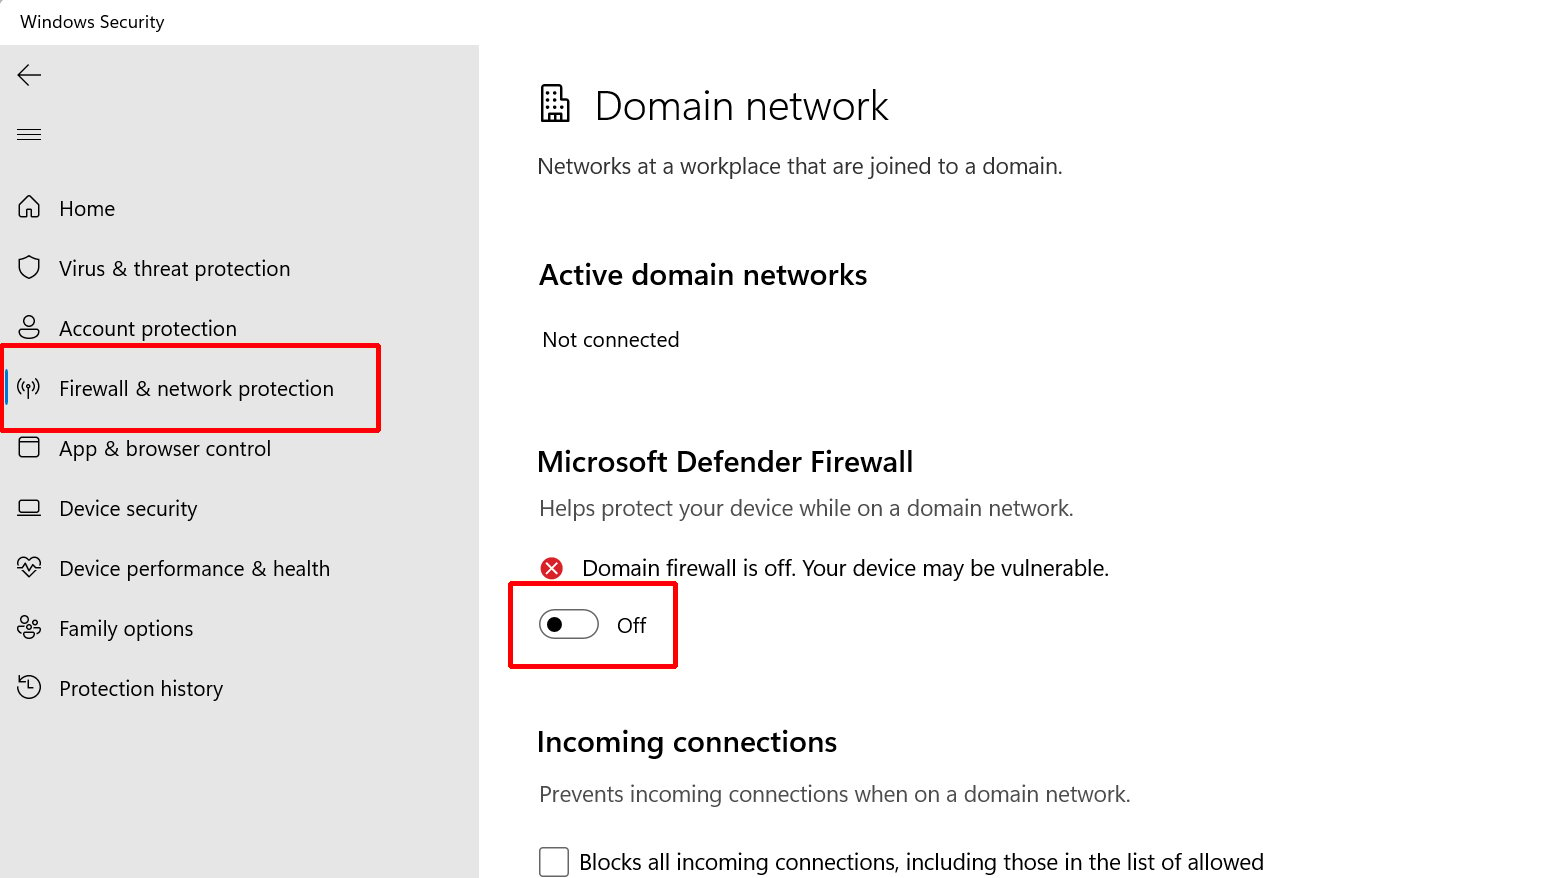
To disable your firewall:
- Click the Windows key on your keyboard.
- Go to Settings > Privacy & Security > Windows Security.
- Go to Firewall & network protection.
- Choose Domain network and slide the toggle to turn off the firewall.
- Repeat for all other networks.
Mac users
- Click the Apple logo at the top left of your screen and select System Settings.
- Choose Security & Privacy.
- Go to the Firewall tab.
- Click Turn Off Firewall.
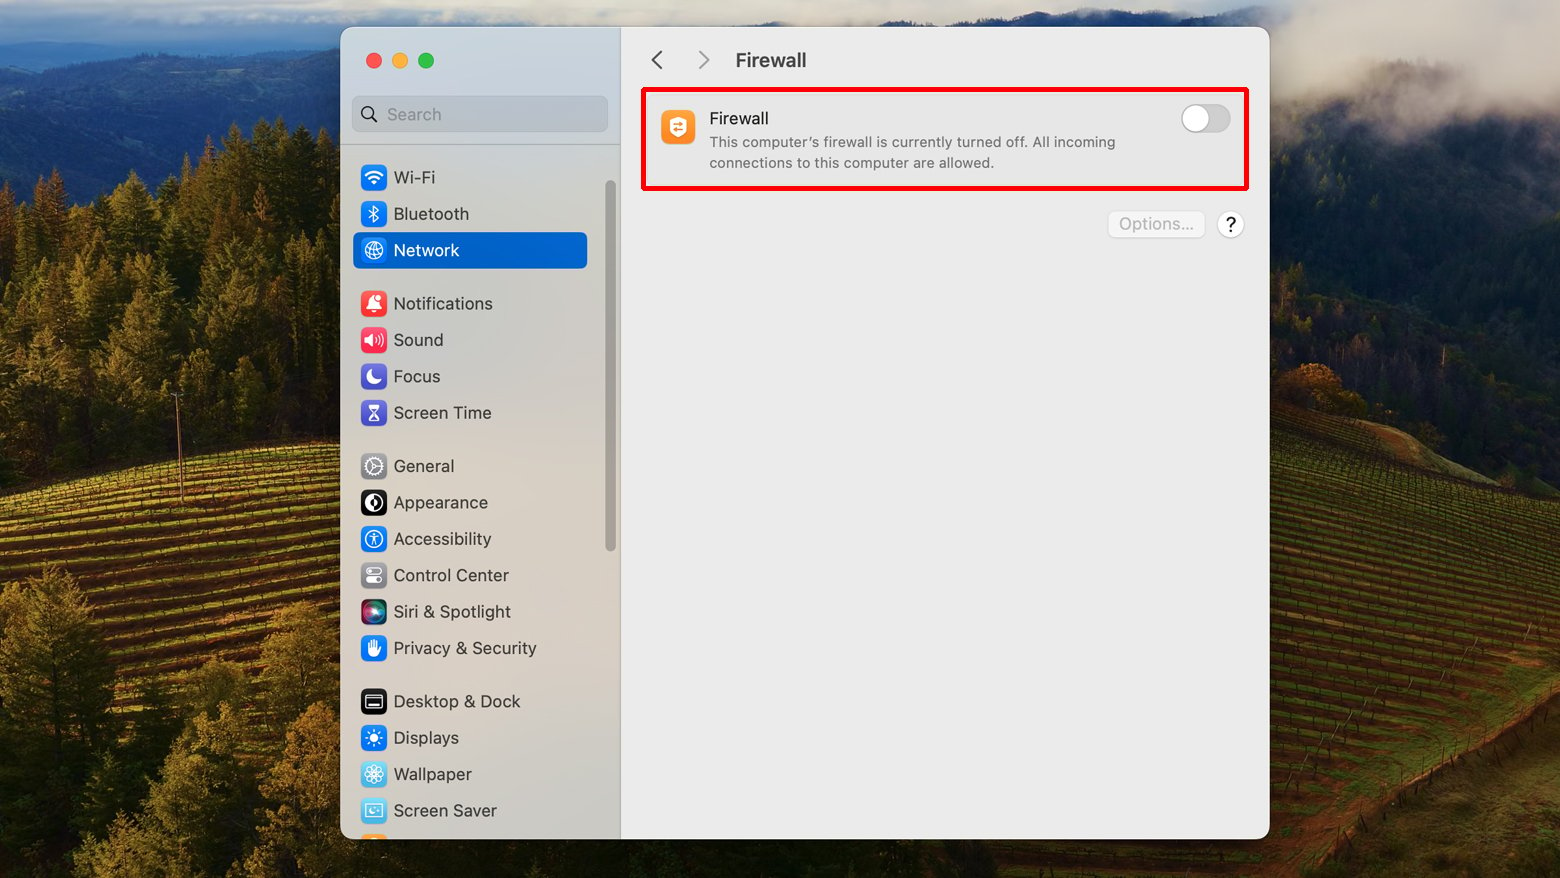
After doing this, check if website access has been restored. Remember, this is a temporary measure. Always turn your firewall and antivirus back on after testing to keep your system safe. If you frequently encounter issues due to these programs, consider switching to different software.
Disable proxy
Encountering the ERR_CONNECTION_TIMED_OUT error can sometimes be linked to proxy server usage. Proxy servers are like middlemen between your computer and the websites you visit, providing additional security and sometimes speeding up your browsing. But, they can also mistakenly block access to websites, causing this error. Here’s how you can check and disable proxy settings:
Chrome users
To access the proxy settings using a Chrome browser:
- Click on the three dots at the top right corner
- Select Settings > System
- Click on Open your computer’s proxy settings
- Toggle the proxy to off
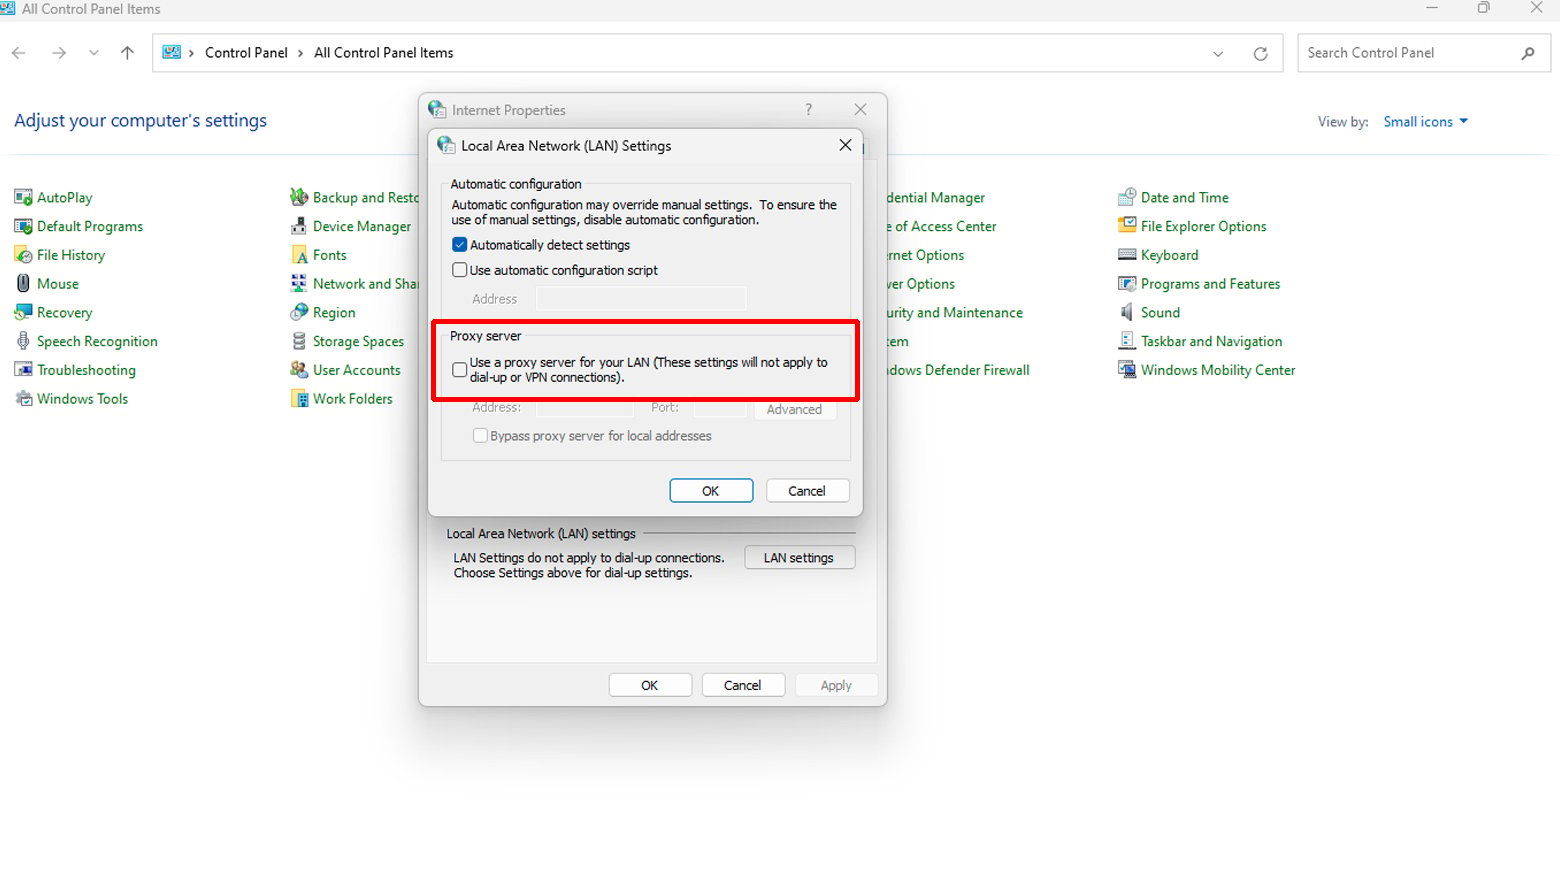
Windows users
- Click on the Windows key and type Control Panel.
- In the Control Panel, click on Internet Options.
- In the Internet Properties window, open the Connections tab and click on LAN settings.
- Uncheck all proxy settings and click Ok.
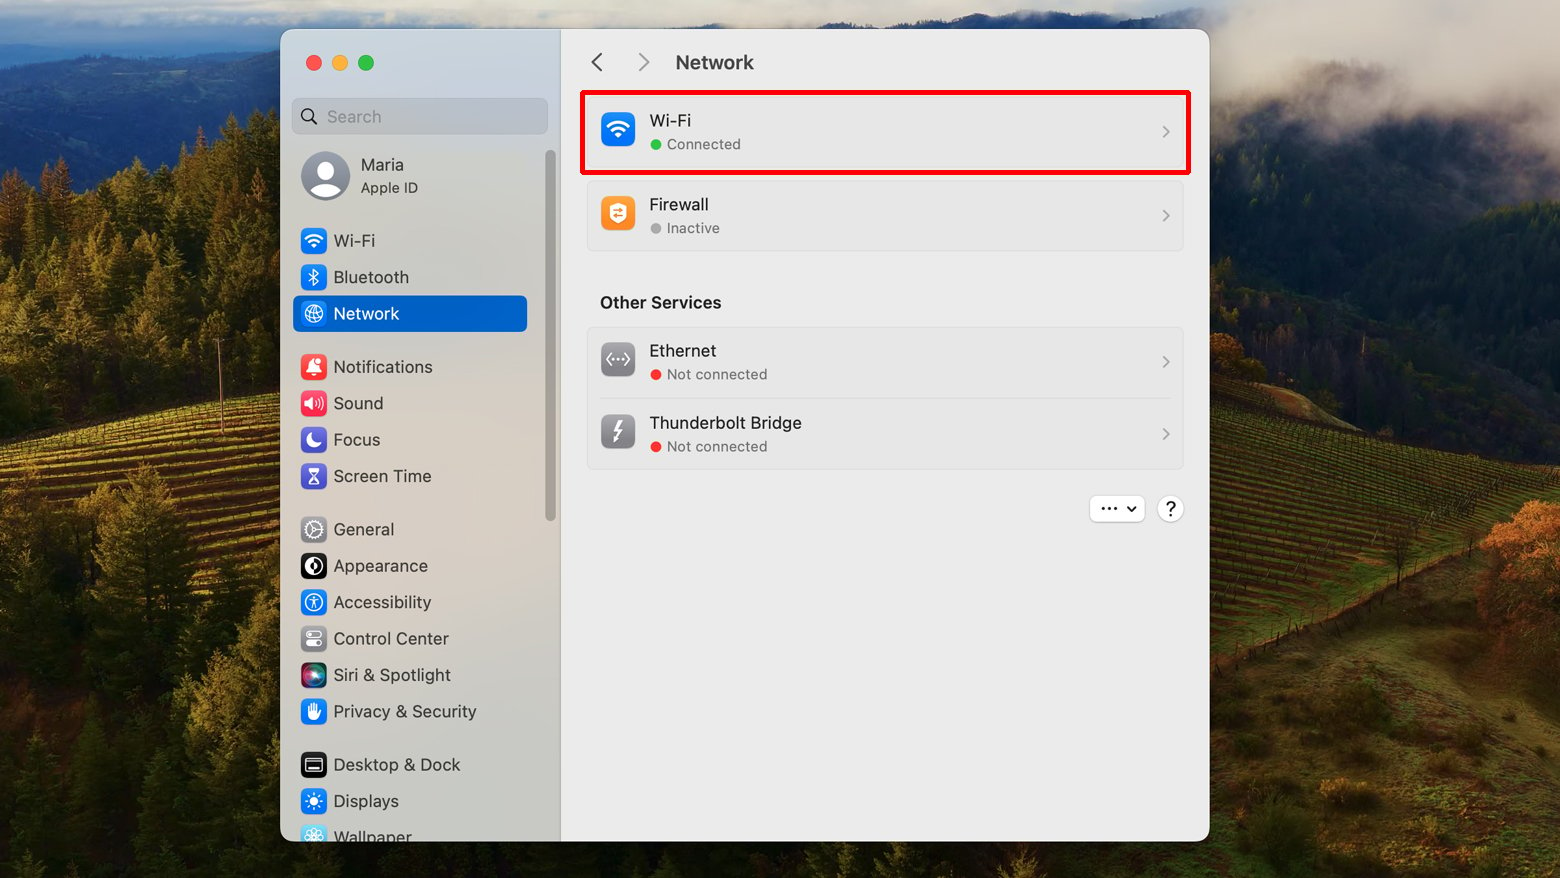
Mac users
- Go to System Settings and select Network.
- Select the active network connection you’re using (like Wi-Fi or Ethernet).

- After selecting your network, click on Details .
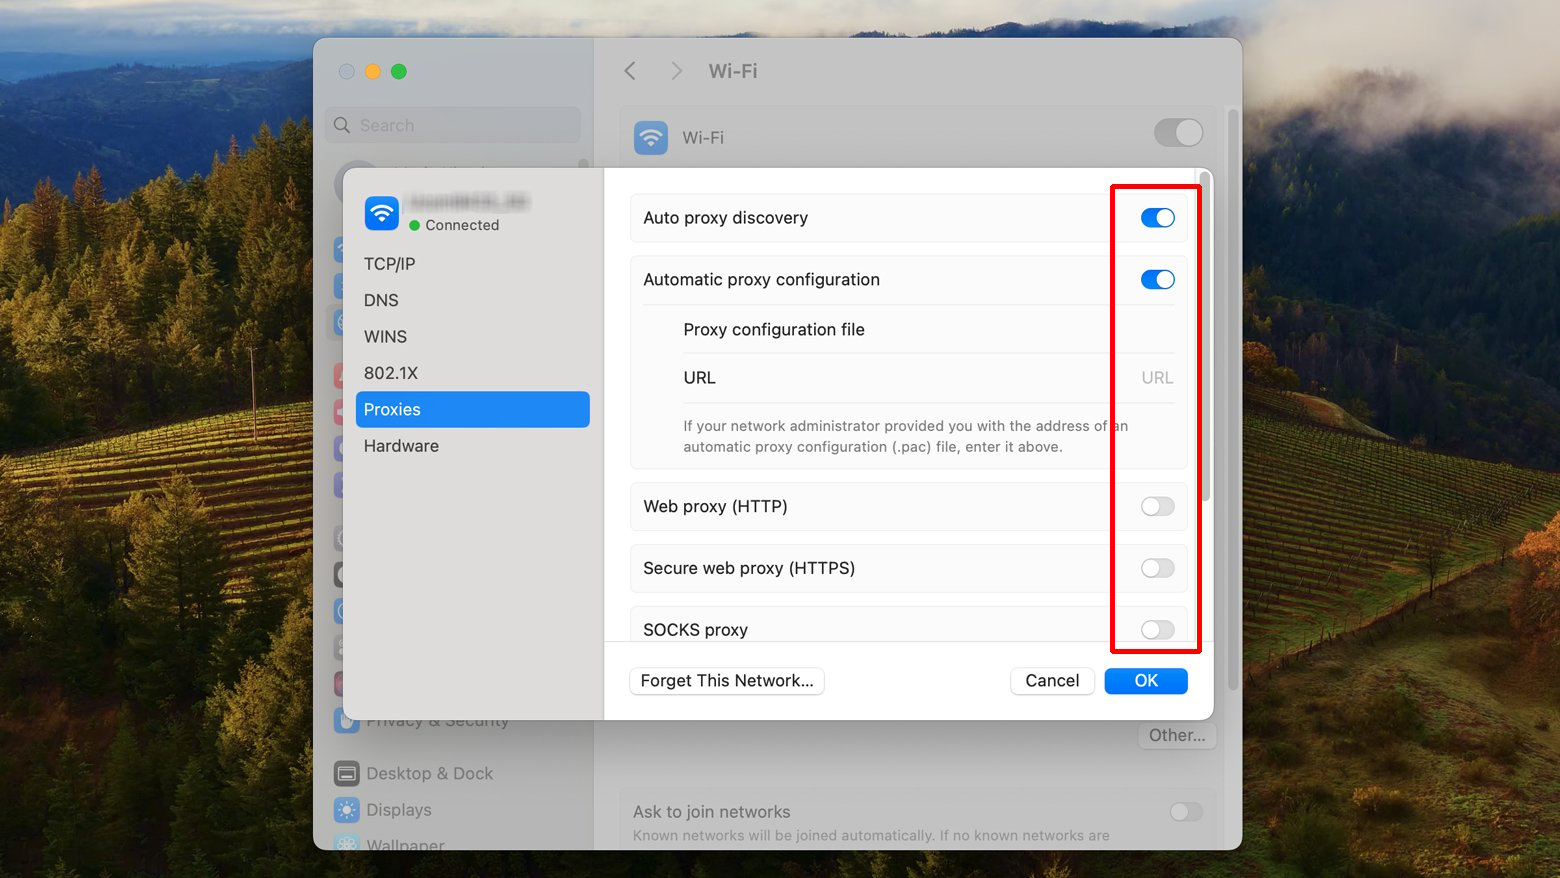
- Go to the Proxies tab.
- Toggle off all the listed proxy protocols and click Ok.
Remember to refresh the page afterwards to check if the error persists. If you’re using a VPN, ensure it’s not connected by mistake. If the issue continues, try changing VPN protocols or temporarily disabling the VPN, as it might be blocked by your ISP or firewall. If you need to use a proxy server, you might have to reconfigure its settings or consider a different hosting provider.
Flush DNS and renew IP
Flushing DNS is like hitting the refresh button on your computer’s memory of website IP addresses. Over time, this DNS cache can get outdated, leading to website access issues. Clearing it can help avoid these timeout errors.
Windows users
-
- Press Windows logo key + R to open the Run command.
- Type cmd and hit Enter to open Command Prompt.
- Type ipconfig /flushdns and press Enter.
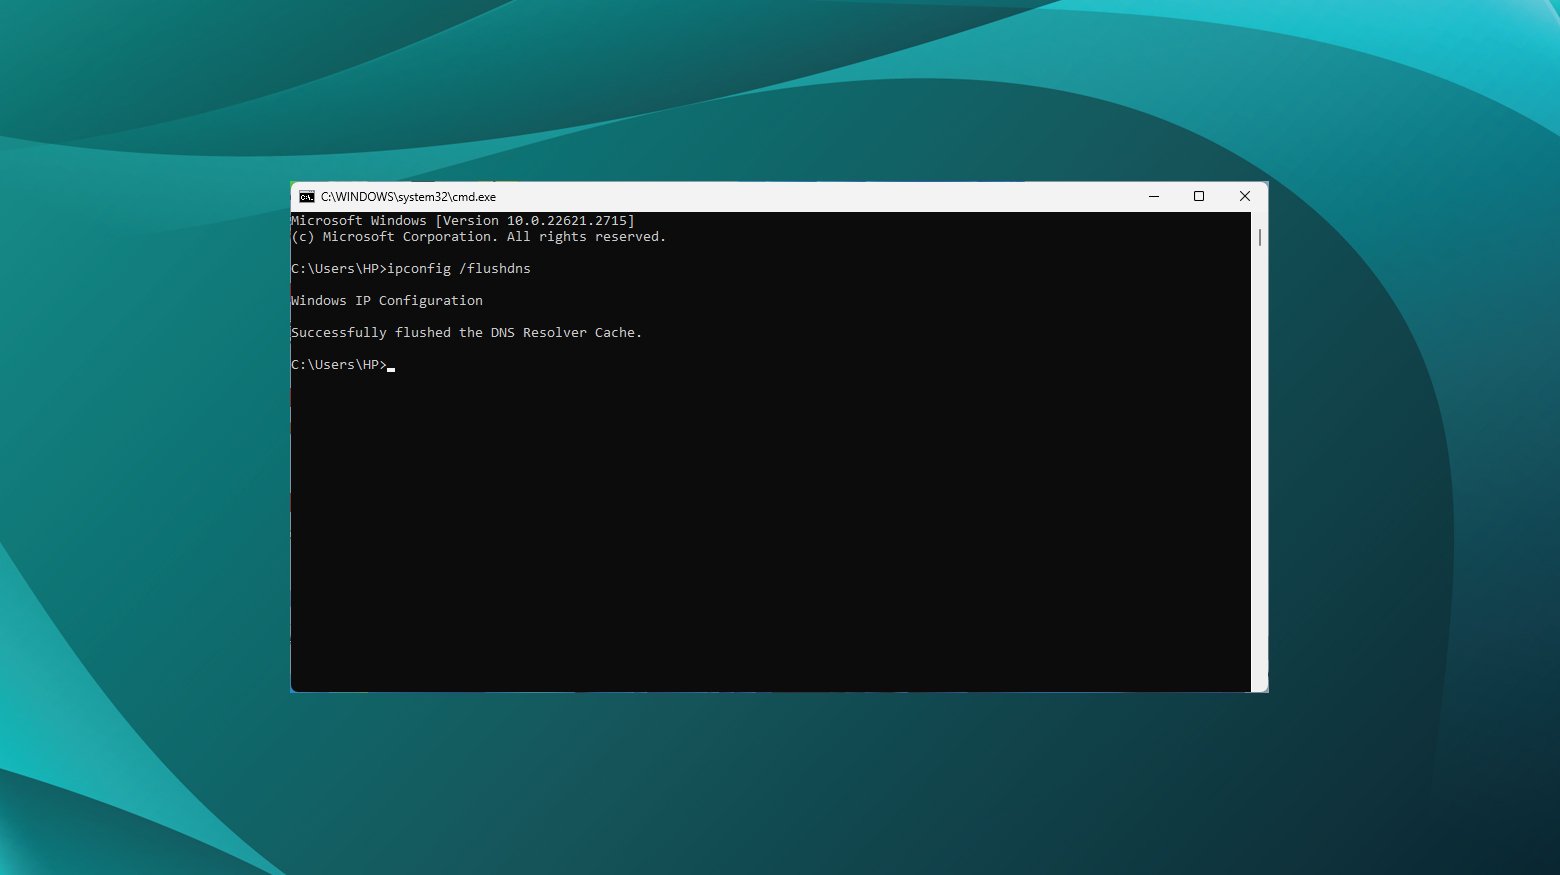
This resets the DNS cache.
- Next, type these commands one at a time, pressing Enter after each:
- ipconfig /registerdns
- ipconfig /release
- ipconfig /renew
- netsh winsock reset
Restart your computer and check if the issue is resolved.
Mac users
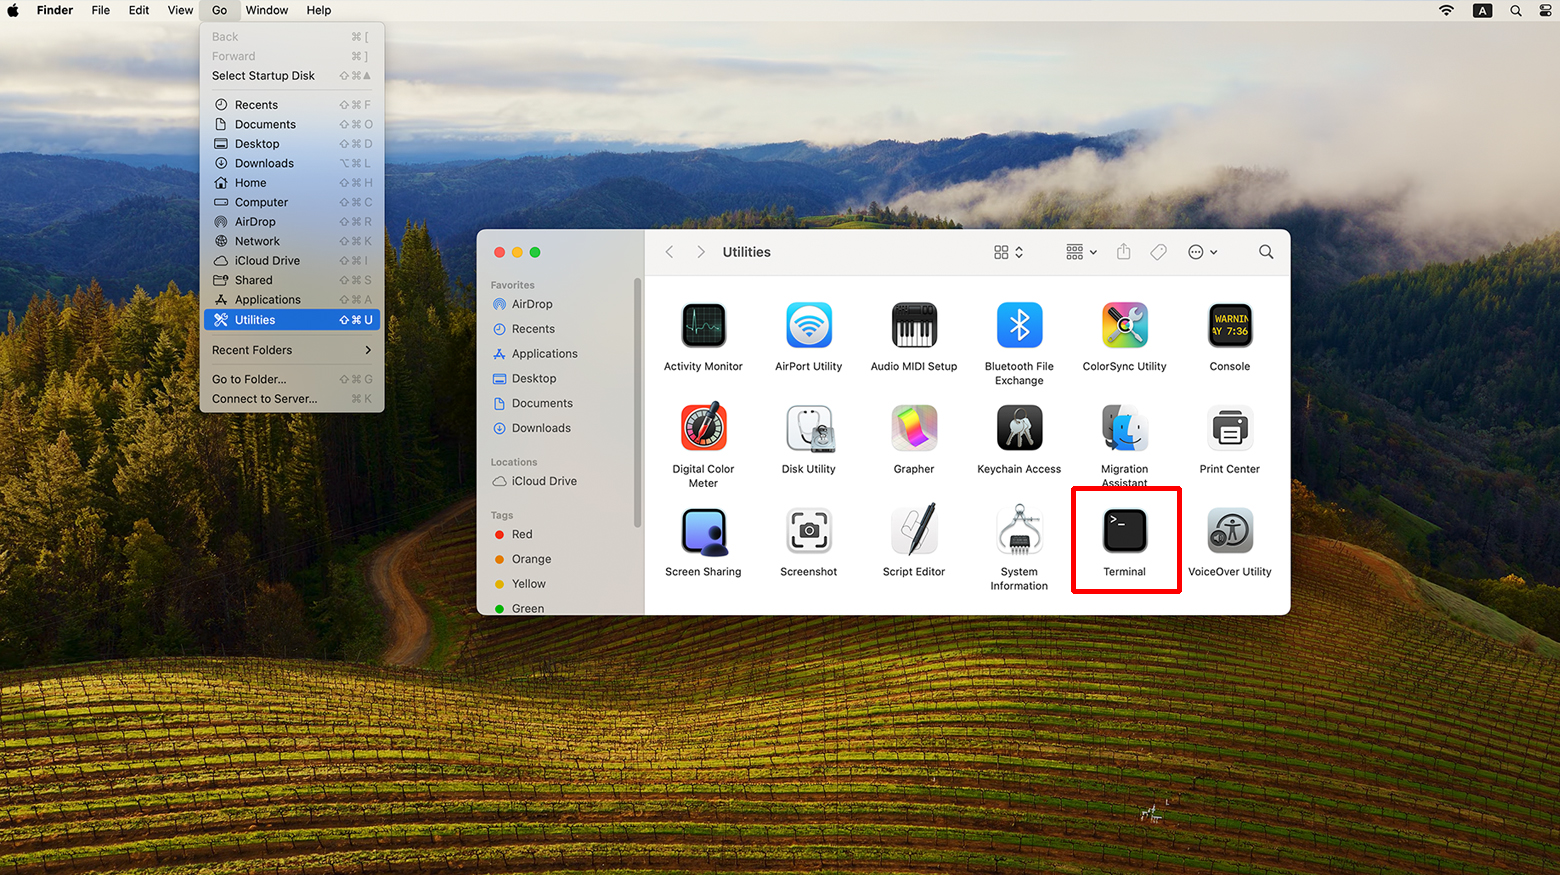
- Click on Go > Utilities.
- Click on Terminal.
- In the Terminal, type in the following command and hit enter: sudo dscacheutil -flushcache; sudo killall -HUP mDNSResponder.
After doing this, reopen your browser to see if the timeout error has been resolved.
Change DNS server
Switching your DNS servers can be another effective way to resolve the ERR_CONNECTION_TIMED_OUT error. While your Internet Service Provider (ISP) usually assigns a default DNS server, switching to a public DNS server like Google or Cloudflare can sometimes offer more reliability.
Windows users
- Open the Control Panel
- Navigate to Network and Sharing Center.
- Click Change adapter settings on the left side.
- Right-click your current network connection and select Properties.
- Find and click on IPV 4 or IPv6 and click Properties.
- Note down your existing settings (for possible future use).
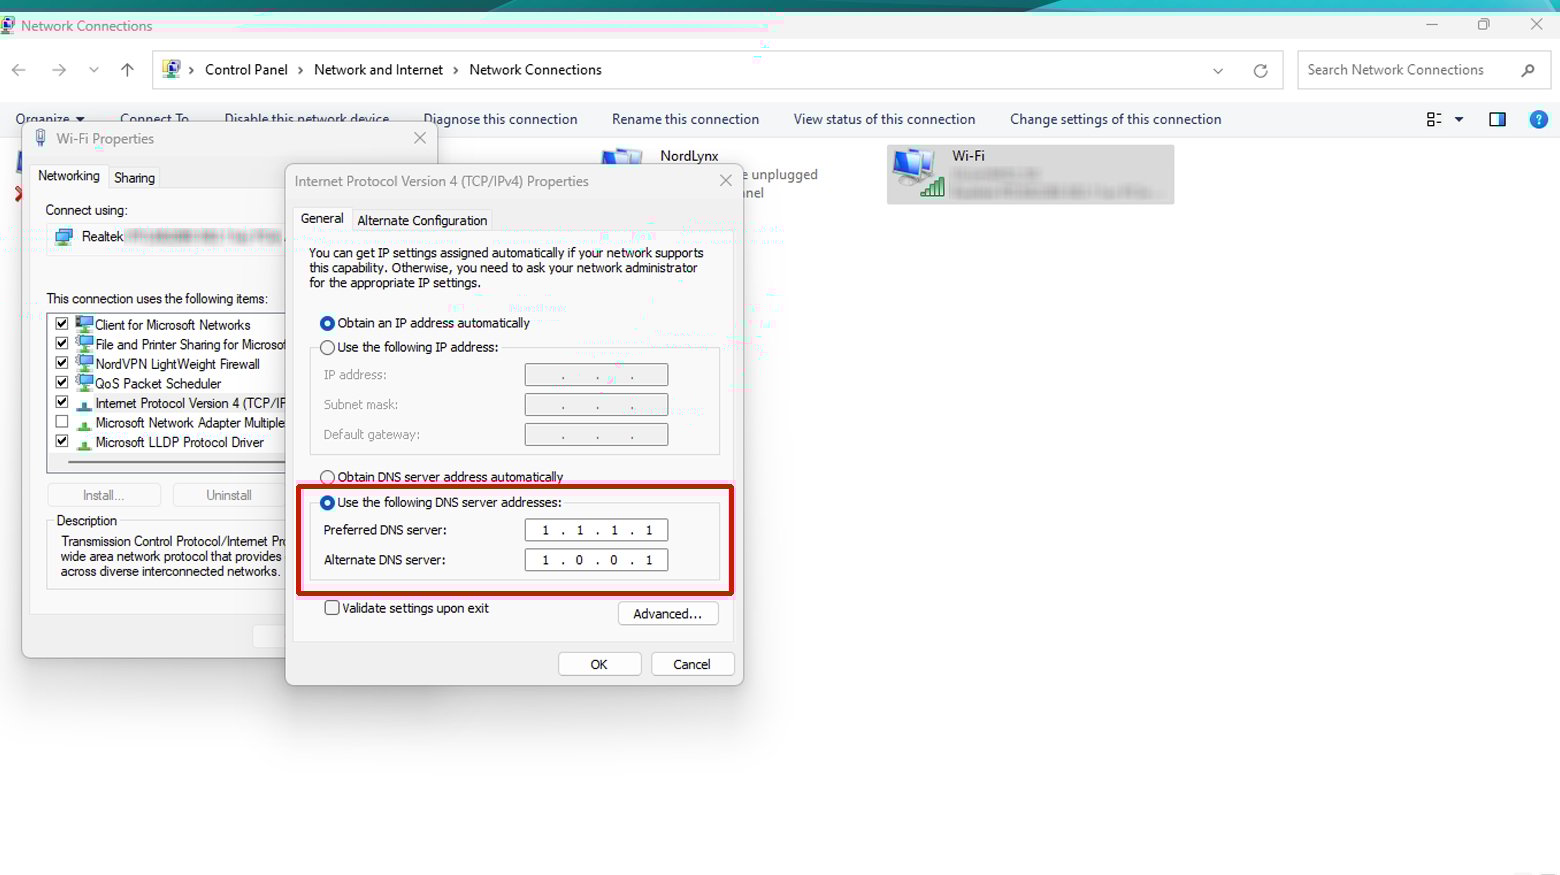
- Select Use the following DNS server addresses and input:
- IPv4 Preferred DNS Server: 1.1.1.1
- IPv4 Alternate DNS Server: 1.0.0.1
- IPv6 Preferred DNS Server: 2606:4700:4700::1111
- IPv6 Alternate DNS Server: 2606:4700:4700::1001
- Click OK, then Close.
Restart your web browser to apply the changes.
Mac users
-
- Click on the Apple and go to System Settings.
- Click on the network icon, then your active network.
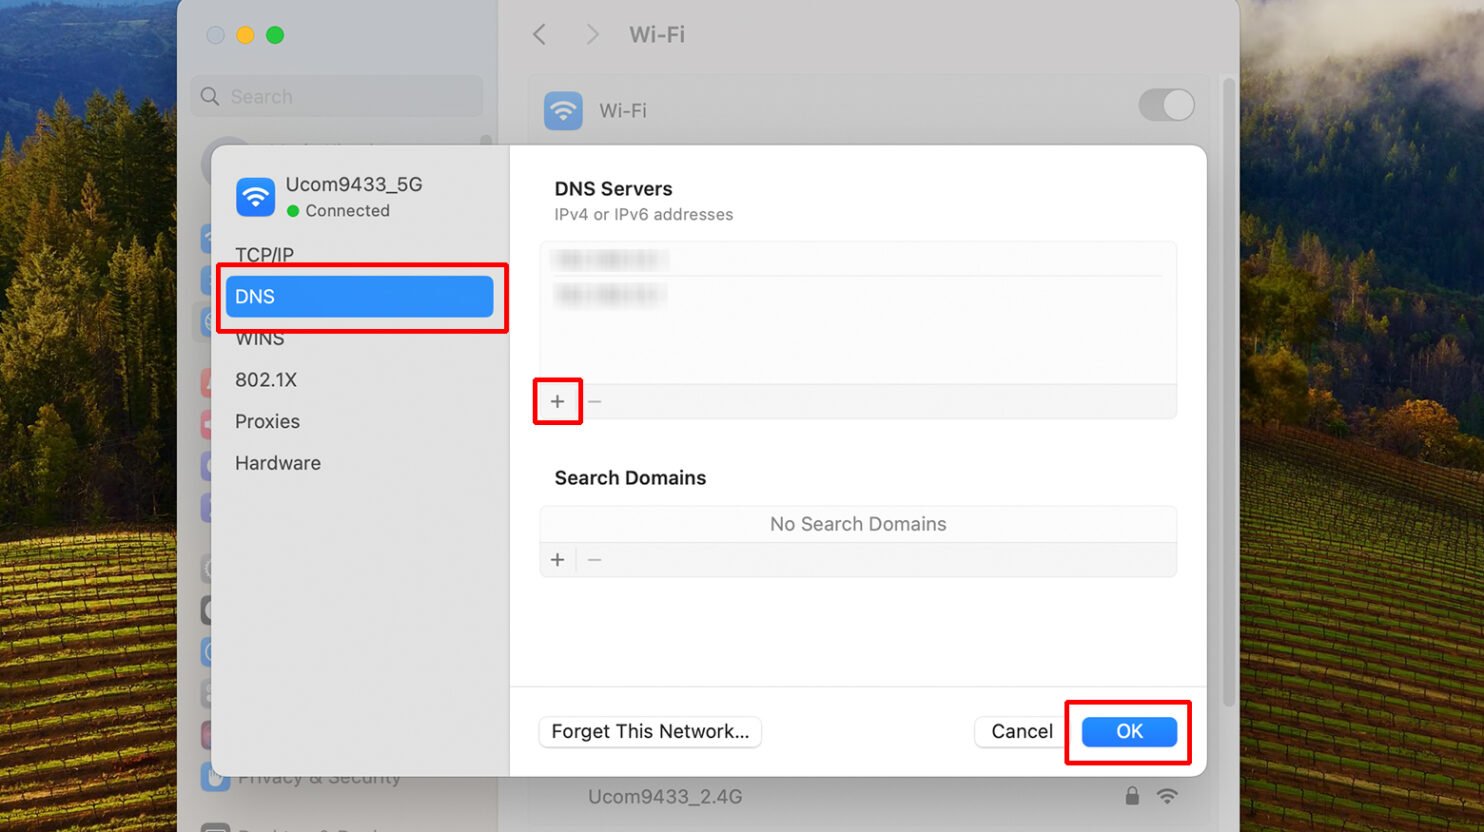
- Click on Details and then the DNS tab.
- Add Cloudflare’s DNS server addresses:
- For IPv4: Type 1.1.1.1
- For IPv4 Alternate: Type 1.0.0.1
- For IPv6: Type 2606:4700:4700::1111
- For IPv6 Alternate: Type 2606:4700:4700::1001
- Click OK to save the changes and then open your browser.
Google Chrome
- Type chrome://settings/security in the address bar to access Chrome’s DNS settings.
- In the Advanced section, select With Custom
- From the dropdown menu choose: Cloudflare, OpenDNS, CleanBrowsing, Google, or NextDNS.
- Restart Chrome to apply the new settings.
Remember, if you’re already using a public DNS and facing issues, sometimes switching back to your ISP’s default servers can fix the problem. Also, if you’re in a public Wi-Fi hotspot, changing DNS servers can sometimes resolve connection issues.
Network adapter drivers
Upgrading your network adapter drivers is key in ensuring your computer can connect to the internet without issues like the ERR_CONNECTION_TIMED_OUT error. Outdated or wrongly installed drivers can often be the culprit behind such problems.
Windows users
To update your network adapter drivers:
- Click the Windows logo key and search and open Device Manager.
- In Device Manager, find and expand the Network adapters section.
- Right-click on your network adapter and select Update Driver Software.
- In the dialog box, choose Search Automatically for Updated Driver Software.
- Follow the on-screen instructions to complete the update.
- Restart your computer to implement the changes.
Mac users
- Click the Apple logo (top left corner).
- Select System Settings from the drop-down menu.
- Go to Software Updates.
- Click Update Now to start updating.
Keeping your macOS up to date is usually enough to ensure your network adapter drivers are current, potentially resolving any ERR_CONNECTION_TIMED_OUT errors.
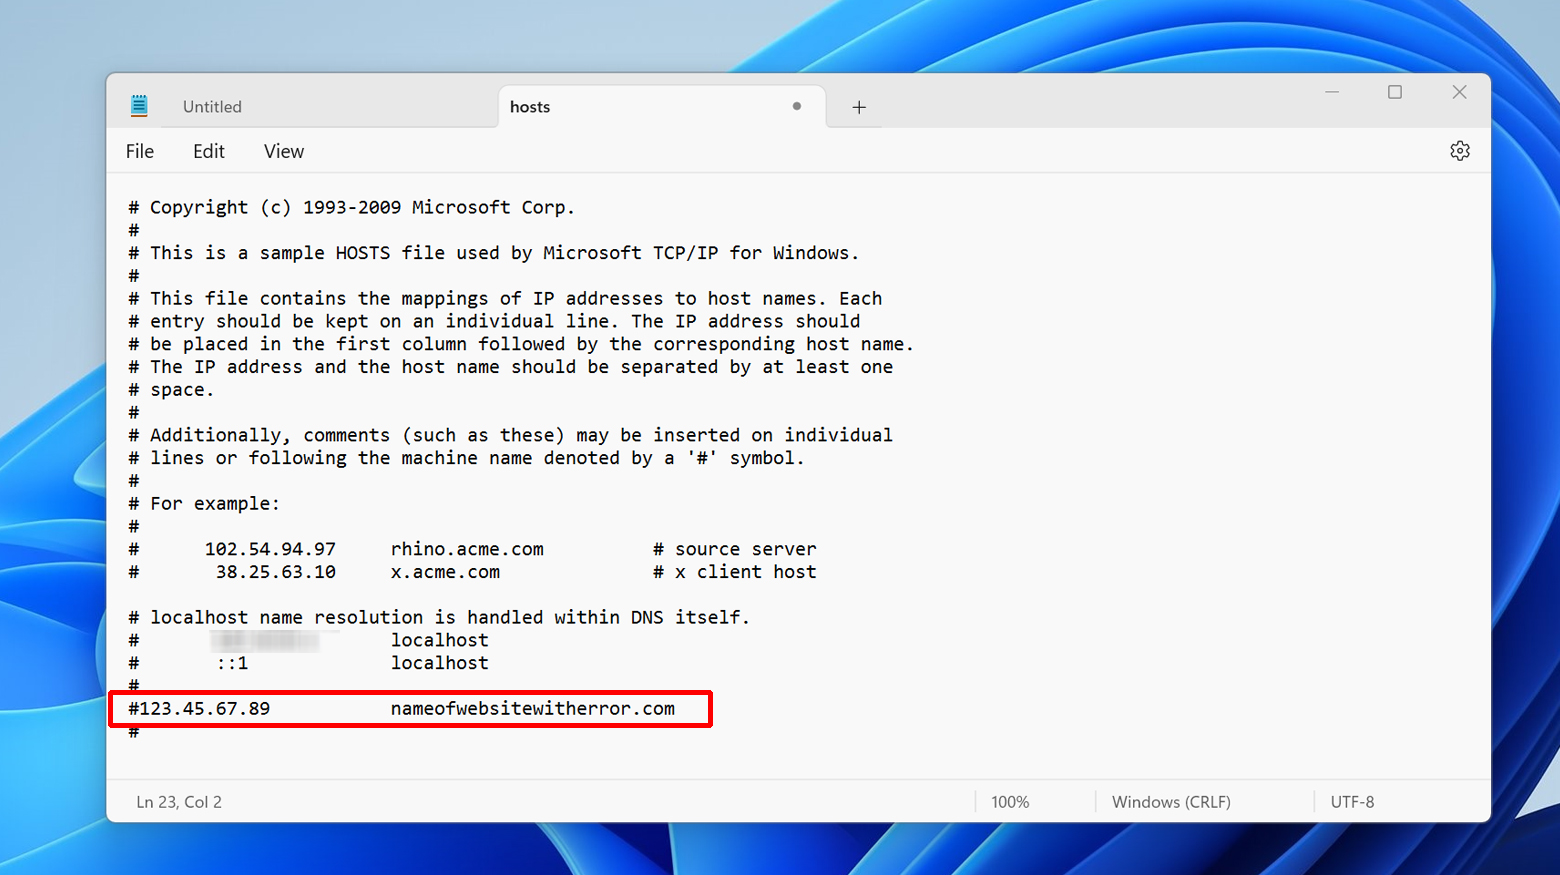
Audit your host file
Every computer has a file known as the host file, which is used to associate website domain names with their corresponding IP addresses. Occasionally, this file might mistakenly block a particular IP address or URL, resulting in the inability to access certain websites. If you’re facing issues like the ERR_CONNECTION_TIMED_OUT error, it’s a good idea to check this file. Here’s how to do it for both Windows and Mac.
Windows users
-
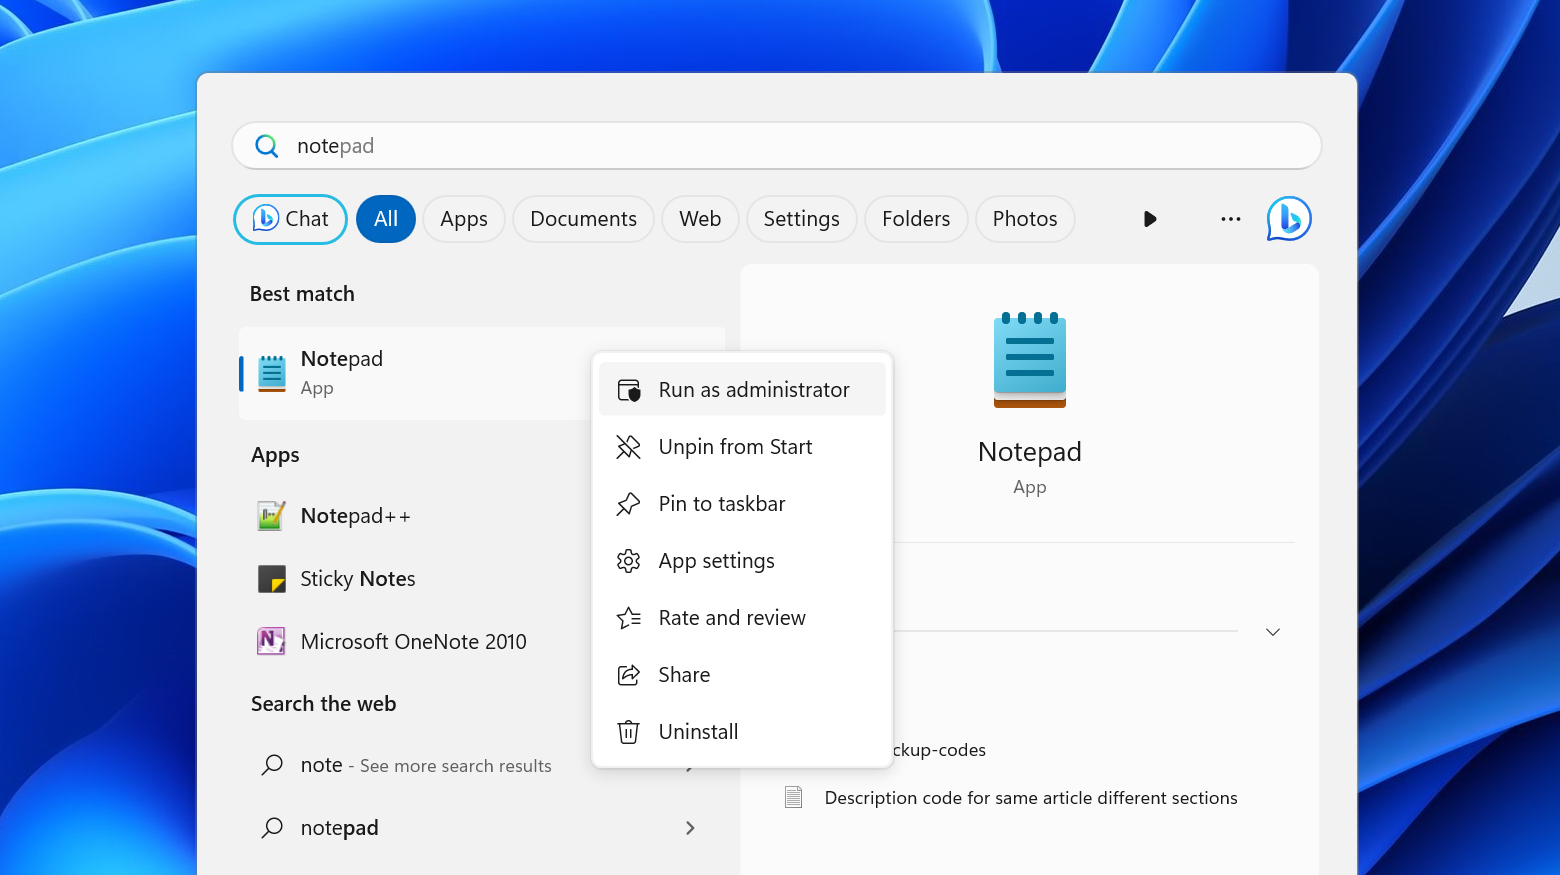
- Open the Start menu.
- Search for a text editor (like Notepad, Notepad++, or Atom).
- Right-click on the editor and select Run as administrator (Admin is necessary to access the hosts file).
- In the text editor, go to File > Open.
- Enter C:\Windows\System32\drivers\etc\hosts in the File Name field and click Open.
- Check if the website you’re trying to visit is listed. If it is, remove the domain name and IP address entries found below the ::1 localhost line.
- Save the changes and revisit the websites to see if the error is resolved.
Mac users
- In the top bar, click on Go > Utilities > Terminal.

- Enter sudo nano /private/etc/hosts and press enter.
- Input your password when prompted.
- Once in the hosts file, look for any entries of the problematic domain and IP address.
- Delete any such entries.
- To save your changes, press Command + O, then hit Return to confirm.
- Exit the file by pressing Command + X.
Try accessing the previously inaccessible websites to check if the NXDOMAIN error is fixed. By ensuring your Host file doesn’t erroneously contain entries for the website you’re trying to access, you can often resolve connectivity issues.
Say goodbye to website errors
Achieve peace of mind with 99.99% uptime on 10Web Managed
WordPress Hosting, powered by Google Cloud.
Website and server configuration
When website owners encounter an ERR_CONNECTION_TIMED_OUT error, it’s crucial to follow a systematic approach to identify and resolve the underlying issue. Here are some reasons that the error can occur and some steps to consider for fixing the error.
Increase Execution time limits – The default execution time on many servers is set to 30 seconds. You may need to increase this limit, especially for resource-intensive tasks. This can often be done in the php.ini file, .htaccess file, or directly from your hosting control panel.
Web server configuration: Verify your web server’s configuration (Apache, Nginx, IIS, etc.) for any incorrect settings that might lead to a timeout. This includes checking for proper port configurations and virtual host settings.
PHP configuration – Review the php.ini file for settings that might affect execution time, memory limits, and file upload sizes. Adjusting these settings can sometimes resolve timeout issues.
Check for faulty plugins/themes – Deactivate plugins and switch to a default WordPress theme temporarily to see if the issue resolves. If it does, reactivate them one by one to identify the culprit.
Check server response time – Verify if your server is taking too long to respond. Tools like Pingdom or Google PageSpeed Insights can provide insights into your server’s response time.
Review server resources – If you’re on shared hosting, check if your site is exhausting the allocated resources (like memory and processing power). High traffic or resource-intensive plugins/themes can cause such issues.
Optimize website performance – Look for ways to optimize your site. Compressing images, using a content delivery network (CDN), caching pages, and optimizing databases can significantly improve load times.
Examine DNS settings – Ensure that your DNS settings are correctly configured. Incorrect DNS can lead to connection timeouts.
Content delivery network (CDN) settings – If you’re using a CDN, ensure that it’s correctly configured and not causing connectivity issues.
SSL/TLS configuration – Incorrect SSL settings or expired certificates can lead to connection errors. Verify that your SSL certificates are up to date and properly installed.
Server logs – Check server logs for any error messages that might indicate what’s causing the timeout. These logs can provide valuable insights into server performance and potential configuration issues.
Bandwidth and traffic limits – Ensure your server isn’t hitting its bandwidth or traffic limits, which can often be a hidden cause of timeouts.
Review the Maximum Execution time
The maximum execution time is a setting that determines how long PHP scripts are allowed to run on your website. The default is often set to 30 seconds by hosting providers. If this time is exceeded, it can lead to ERR_CONNECTION_TIMED_OUT errors. Many hosting providers allow you to adjust this setting through the control panel or by request. If you have access and prefer to modify the execution time yourself, there are two ways you can do this.
1. Modify in php.ini File
If you have access to a php.ini file in your home directory, look for the max_execution_time parameter and modify it. For instance, change it from 30 to 240 seconds. max_execution_time =240
2. Modify in .htaccess File
If the first option isn’t viable, you might be able to make the change in your .htaccess file. This file is usually in your home directory. Add the following at the top of your .htaccess file: php_value max_execution_time 240.

If your website is hosted on 10Web, you have dashboard access where you can easily modify PHP limitations such as: Execution time, Memory limit, Upload limit, and Max post size. Here is a simple guide on how to modify your PHP configurations.
Raise your PHP memory limit
In some instances, PHP scripts might use more memory than what’s allocated, leading to slow response times or errors on your website. Increasing the memory limit can be a solution, but it’s important to keep within the maximum memory provided by your hosting service. For WordPress sites, the WP_MEMORY_LIMIT parameter in the wp-config.php file sets the maximum memory PHP can use. On shared hosting, this is often around 64M If your website is not hosted on 10Web, you will need to increase your PHP memory limit through the .htaccess file or the wp-config.php file.
Increase the PHP memory limit on .htaccess file
- Use File Manager or an FTP client to access your website’s root directory.
- Locate and open the .htaccess file.
- Add the line php_value memory_limit 128M to the file, adjusting 128M to a suitable value that aligns with your hosting plan’s available memory.
- Save and re-upload the .htaccess file to your server, replacing the existing one if necessary.
Increase the PHP memory limit on wp-cnfig.php
To increase your WordPress memory limit:
-
- Use File Manager or an FTP client to access your website’s root directory.
- Locate and open your wp-config.php file
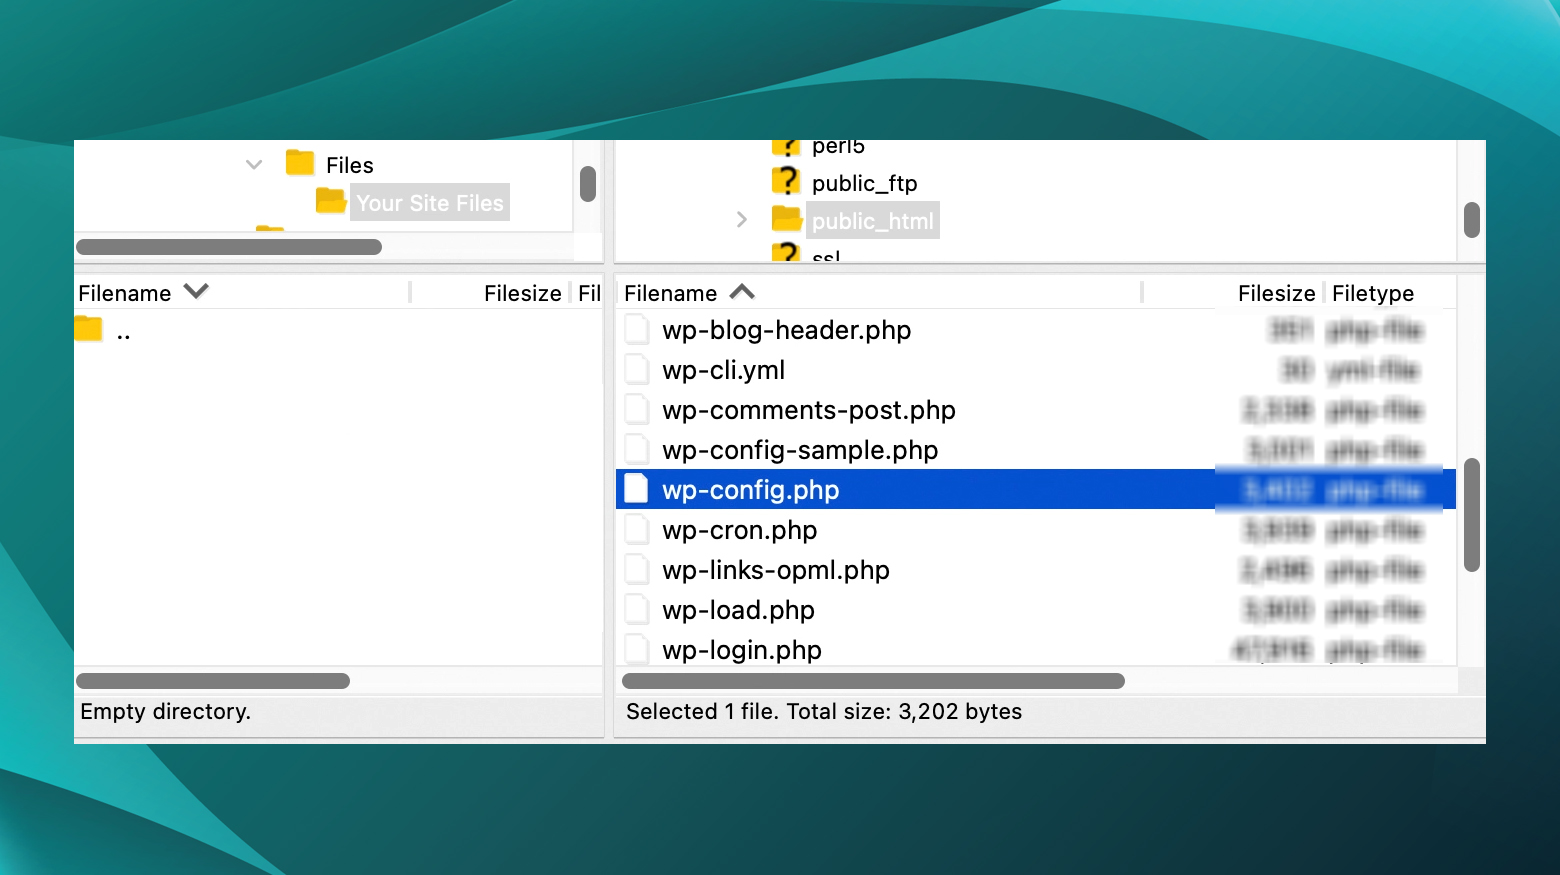
- Add the following line to your wp-config.php file:
- define(‘WP_MEMORY_LIMIT’, ‘256M’);
- Save the changes and upload the new file to your directory
It is important to note that the above code should be inserted above the wp-settings.php; inclusion. You can modify the number for the memory limit as needed or allowed.
Server configuration
If you’re running into connection timeout issues, it’s a good idea to take a peek at your server’s configuration files such as Apache’s httpd.conf or Nginx’s nginx.conf. Sometimes, these files can get a bit mixed up, with settings that aren’t quite right or even conflicting with each other, and that could be what’s causing your timeout issues.
Remove new code
If you’ve recently tinkered with your website’s script and then bumped into the ERR_CONNECTION_TIMED_OUT error, chances are your new code might be stirring up trouble. It could be a little misconfiguration or maybe some heavy-duty features that are weighing down your site’s performance. Here’s what to do in a situation like this:
Back it up – First things first, make a backup of your website and its code. It’s like saving a game before you enter a tough level – you’ll have a fallback if things go sideways. Platforms like Cloudways offer nifty automated backup systems that store everything offsite, so you can breathe easy knowing you can roll back if needed.
Undo recent changes – Next, take out or turn off the code or features you just added. Think of it as retracing your steps to see if one of them was a misstep causing the timeout.
Check if the site’s back up – After yanking out the new stuff, give your site a whirl. Can you get in without the timeout error now? If yes, it looks like your new code was the party crasher.
Fix up the code – If pulling the plug on the new code did the trick, it’s time to put on your detective hat. Go through the code you added for any slip-ups, things out of place, or stuff that might be hogging resources. Tidy it up and make sure it’s running lean and mean.
Bring back changes bit by bit – Need those changes back? Introduce them slowly, like adding spices to a recipe. Keep an eye on how your site’s handling it. This way, if the timeout error sneaks back in, you’ll know exactly which part of the code is the culprit.
Temporarily disable plugins
If you’re running into an error and suspect a rogue plugin is to blame – maybe due to a bug or a clash between plugins – here’s a quick way to find out which one is causing the trouble. First, we’re going to put all your plugins on hold. If you can get into your WordPress dashboard, you can disable them from the Plugins section. But if WordPress isn’t letting you in, you’ll need to use FTP/SFTP to sort things out.
-
- Use an FTP client like FileZilla to connect to your website’s server.
- Navigate to the wp-content folder and look for the plugins subfolder.
- Right-click on the plugins folder, and pick Rename.
You can call it something like plugins-deactivated. This move effectively switches off all your plugins.
Now, go check your website. If it’s working, a plugin was the issue.
Find the problematic plugin
Head back to your WordPress dashboard. You may see some error messages – that’s just because all your plugins are now deactivated. Go back to your files in the FTP client and rename the folder back to plugins. This will remove the errors and let you see a list of your plugins on the WordPress dashboard. However, all of your plugins will be inactive. Start activating your plugins one at a time. After each one, check your site. When the error pops back up, you’ll know you’ve just reactivated the problematic plugin.
Switch to default theme
If you’re stuck with a timeout issue and can’t get into your WordPress admin panel, switching to the default theme might help you troubleshoot. Here’s how you can do that without needing to access your dashboard:
- Use an FTP client (like FileZilla) or your hosting control panel’s file manager to connect to your website’s server.
- Next, head to the root directory of your WordPress site. This is where you’ll find files like wp-config.php and wp-admin.
- In the root directory, look for and enter the wp-content folder.
- Inside wp-content, you’ll find the themes directory.
- In the themes directory, find the folder for your current theme and rename it.
With your active theme renamed, WordPress will automatically switch to the default theme. Now, go visit your website. It should be up and running with the default theme.
Closing thoughts
In this article, we delved into understanding and troubleshooting the ERR_CONNECTION_TIMED_OUT error, a common issue in web browsing that usually points to network or server communication problems. This error can arise from various factors, such as overloaded servers, unstable network connections, or DNS configuration issues. To address this, we explored a range of troubleshooting steps. These included refreshing DNS settings and renewing IP addresses, as well as temporarily disabling firewall and antivirus software to check for any conflicts with security measures. Additionally, we discussed how to increase the maximum execution time and memory limit for PHP scripts. This comprehensive approach aims to pinpoint and resolve the underlying causes of the ERR_CONNECTION_TIMED_OUT error, ensuring smoother and more reliable website access.
Say goodbye to website errors
Achieve peace of mind with 99.99% uptime on 10Web Managed
WordPress Hosting, powered by Google Cloud.
Say goodbye to website errors
Fix all the website errors in one click
Migrate your website to the world's best Managed WordPress Hosting.