When browsing the web, encountering an HTTP error isn’t uncommon. One such error is the HTTP Error 503, known as ‘Service Unavailable.’ This error pops up when you’re trying to access a website, but the server is, for some reason, unable to handle your request at that moment. Unlike errors that indicate a problem with your own internet connection or device, a 503 error points to an issue on the website’s end.
Say goodbye to website errors
Achieve peace of mind with 99.99% uptime on 10Web Managed
WordPress Hosting, powered by Google Cloud.
Same error different message
How you notice a 503 error can vary based on the browser or device you’re using. Generally, you’ll see a webpage displaying a message like “503 Service Unavailable,” “HTTP 503,” or simply “Service Unavailable.” Sometimes, the page may include additional details or a more specific message, like “503 Backend Fetch Failed” or “HTTP Server Error 503.” The design of this error page can differ from one website to another. In some cases, there might be no message at all, just a blank page or a browser-specific error display.
Root Causes of HTTP Error 503
Several factors can lead to a 503 error:
Server Overload – The most common cause is server overload. This happens when the website’s server receives more requests than it can handle, possibly due to high traffic or resource-intensive operations.
Maintenance Work – Websites often undergo routine maintenance, during which the server may become temporarily unavailable.
Faulty Server Scripts or Applications – Misconfigured or buggy scripts and applications running on the server can cause disruptions in service.
Network Errors – Sometimes, issues in the network between your device and the server, like DNS failures, can trigger a 503 error.
DDoS Attacks – A Distributed Denial of Service (DDoS) attack, intended to overwhelm a server with excessive traffic, can also result in this error.
Simple troubleshooting
If you’re just a visitor to the website, your options to fix the issue are limited. Here are some things you can try to fix the issue.
Refresh the Page – Sometimes, the issue is temporary, and a simple refresh (F5 or Ctrl+R on most browsers) can resolve it.
Check Later – If the server is down for maintenance or due to high traffic, waiting a while before revisiting the site can be effective.
Internet Connection Check – Ensure your internet connection is stable, as intermittent connectivity can sometimes cause this error.
Resolving HTTP Error 503
WordPress website administrators encountering the HTTP Error 503 Service Unavailable have a variety of specific strategies and steps they can take to resolve the issue. This error in WordPress often indicates that the website’s server is overloaded, undergoing maintenance, or facing a problem with a plugin, theme, or custom code.
Deactivate plugins
Plugins and themes can introduce new code that may conflict with WordPress’s core functionality or with other plugins/themes. This conflict can overload the server or interrupt the execution of critical operations, leading to a 503 error. By deactivating these elements, you eliminate potential sources of conflict, allowing you to isolate the problem. If the site returns to normal after deactivating a specific plugin or theme, it indicates that this element was the source of the conflict. Here’s what to do:
- Connect to your website using an FTP client like FileZilla.
- Go to your website’s main folder (like public_html or something named after your site).
- Find the wp-content folder and look for the plugins folder inside it.
- Rename the plugins folder to something like plugins.old.
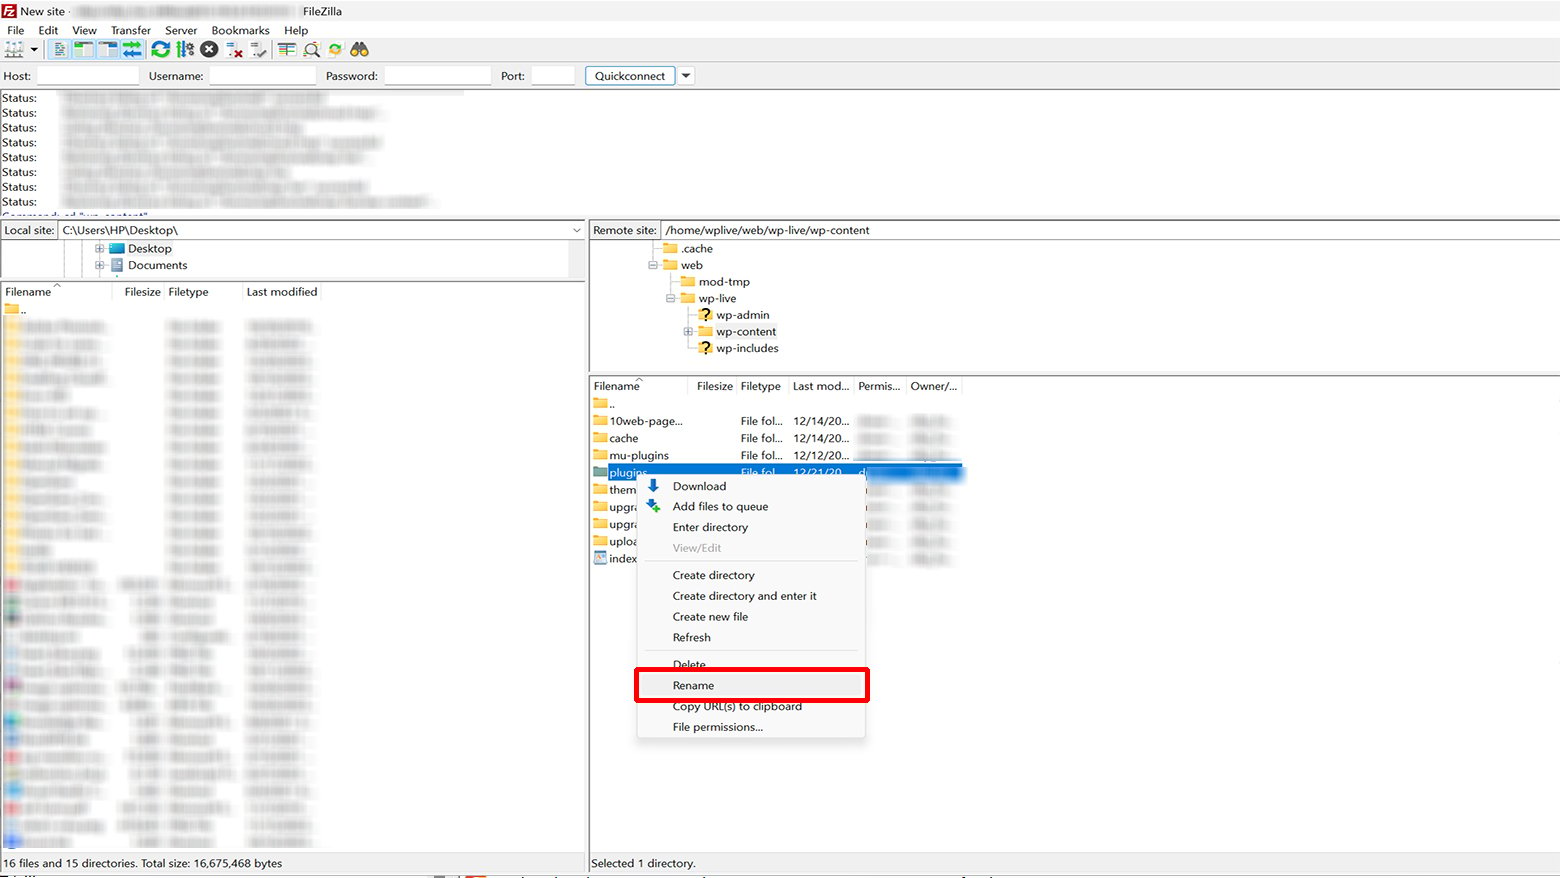 This makes WordPress think the plugins are gone, so it automatically deactivates them. Next, try opening your WordPress dashboard. If the error’s gone, a plugin was causing the trouble. To find the problematic plugin:
- Go back to wp-content and change the plugins folder back to its original name.
- Inside the plugins folder, you’ll see separate folders for each plugin.
- Change the name of the first plugin’s folder.
- Check your site. If it’s still showing the error, put the folder’s name back.
- Repeat the above step until you find the plugin causing the issue.
If you’ve tried all the plugins and still have the issue, it’s time to try something else.
Deactivate themes
Time to check if your website’s theme is the problem. Themes can sometimes cause issues too. But, fixing this isn’t the same as with plugins. If you just rename your theme’s folder, WordPress gets confused. It’ll give you errors like “The theme directory ‘theme name’ does not exist.” Rename the whole themes folder, and you’ll see something like “ERROR: The themes directory is either empty or doesn’t exist. Please check your installation.” What you need to do is dive into your WordPress database. You can do this through phpMyAdmin. If you’re using 10Web, you can change your theme from the 10Web dashboard or find your phpMyAdmin login information in the Credentials section of the 10Web dashboard. To change the theme:
- Log in to phpMyAdmin
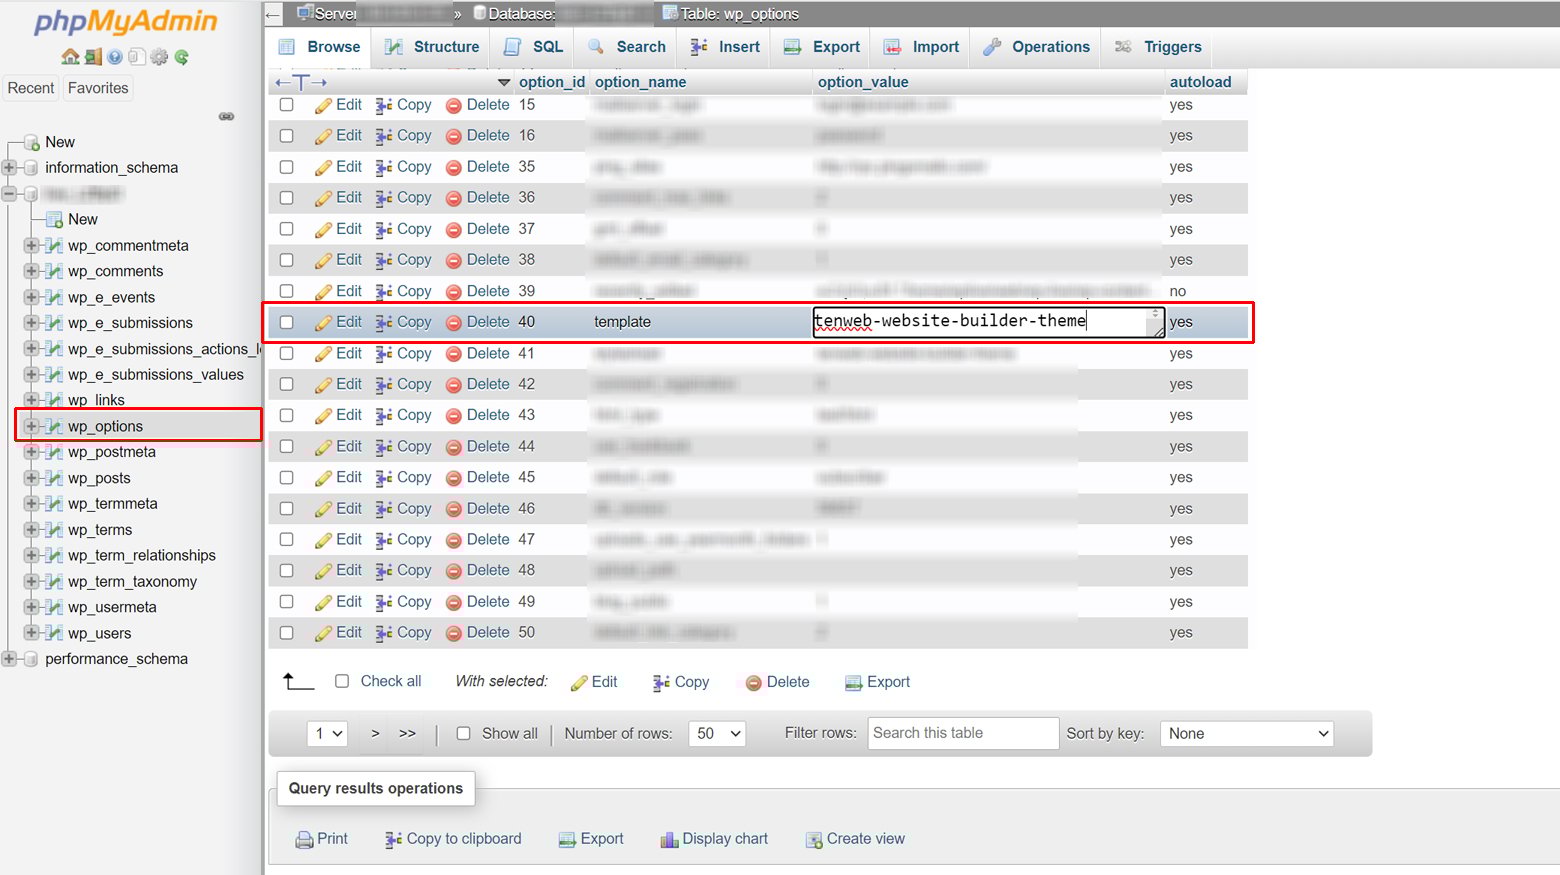
- Once you’re in phpMyAdmin, look for the “wp_options” table.
- Click on the “Search” tab in the “wp_options” table.
- In the “option_name” column, search for “template”. You’ll see your current theme’s name in the “option_value” column.
- Replace your theme’s name with a default WordPress theme, like “twentynineteen.”
- After changing the theme, go back to your website and see if the error has been resolved.
 If this fixes the error, it means the issue was with your theme. You might want to consider reinstalling your theme or using your most recent backup.
Check the .htaccess File
The .htaccess file is crucial for managing the server’s behavior, particularly URL redirections and rewrites. A misconfiguration or corruption in this file can disrupt the server’s ability to handle requests, leading to a 503 error. Resetting the .htaccess file to its default configuration can eliminate any incorrect settings that might be causing the issue. To reset the .htaccess file:
-
- Connect to your website’s server using an FTP client like FileZilla, or use the File Manager in your hosting control panel.
- Navigate to the root directory of your WordPress installation.
- Locate the .htaccess file.
Note that the .htaccess file is a hidden file, so ensure that your FTP client or File Manager is configured to show hidden files.
-
- Rename the .htaccess file (e.g., to .htaccess_old) to disable it.

- Visit your website. If it’s working, the issue was with the .htaccess file.
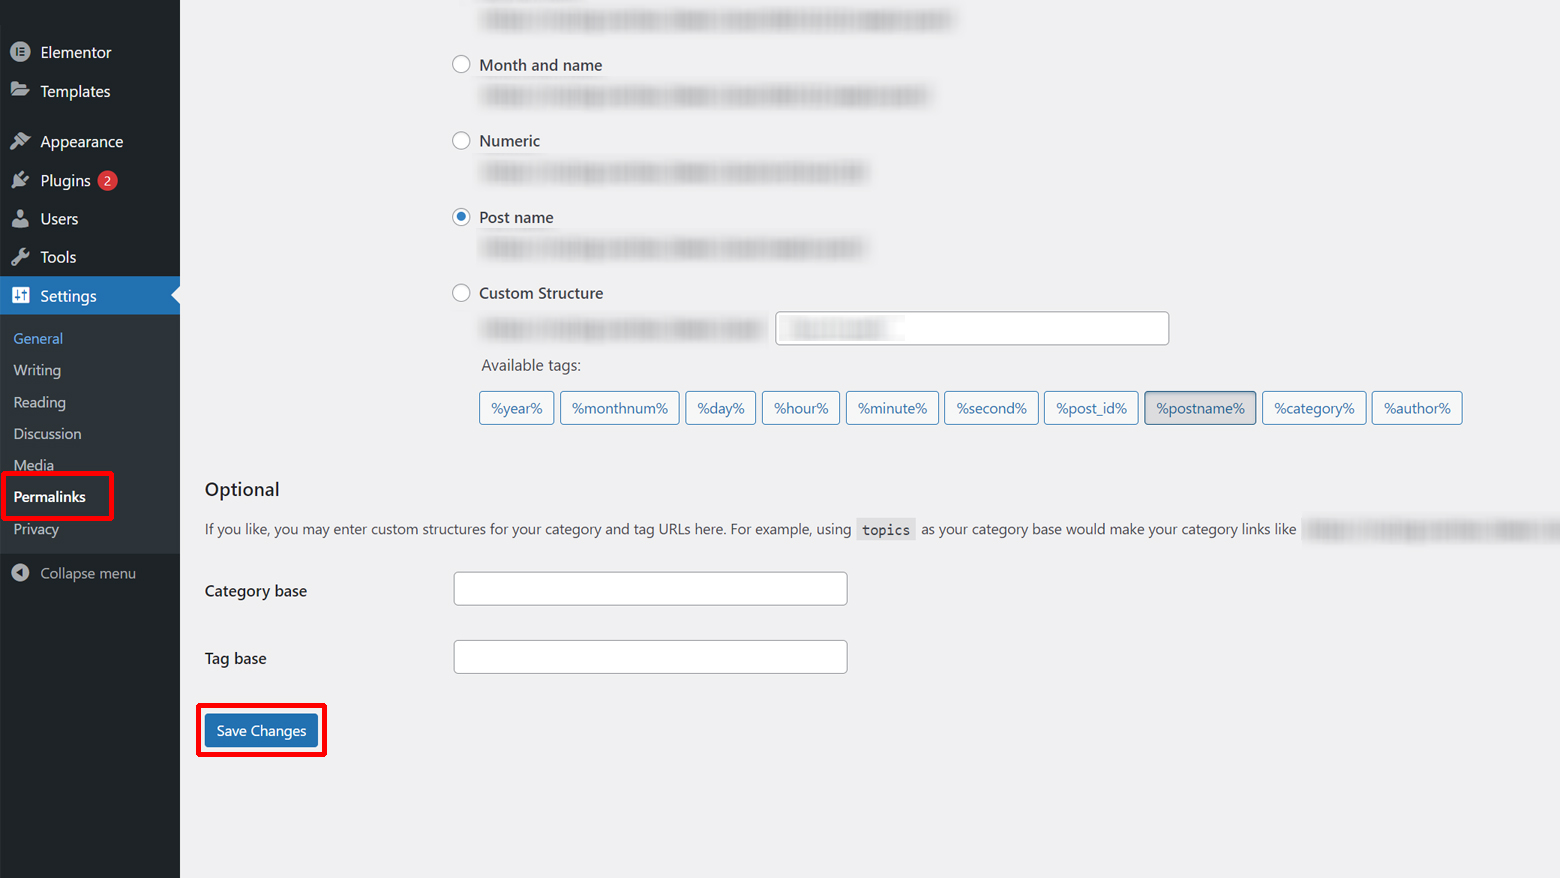
- To create a new .htaccess file, go to your WordPress dashboard, navigate to Settings > Permalinks, and click ‘Save Changes’. WordPress will generate a new .htaccess file with default settings.
Increase Server Resources
When your website exceeds the allocated server resources (like memory and processing power), it can lead to a 503 error, as the server is unable to process all requests efficiently. This is common on shared hosting plans where resources are limited. Upgrading your hosting plan or optimizing resource usage ensures that your website has sufficient resources to operate smoothly, reducing the likelihood of service interruptions.
PHP Version Check
PHP is the scripting language WordPress is built on. Using an outdated PHP version can lead to compatibility issues and performance bottlenecks. Newer versions of PHP include improvements in speed and security, which can significantly reduce the risk of errors like 503. Ensuring that your WordPress site is running on a supported, up-to-date version of PHP is crucial for optimal performance and stability. If your website is hosted on 10Web, you can update and change your PHP versions from the dashboard. To check your PHP version:
- Access your hosting control panel (cPanel, Plesk, etc.).
- Locate the section for PHP versions. This might be under “Software,” “Services,” or a similar category.
- Check the current PHP version running on your site. Compare it with the latest PHP version recommended by WordPress.
- If an update is needed, select the latest PHP version and apply it. Note that you should backup your website before doing this, as some older themes or plugins might not be compatible with newer PHP versions.
- After updating, check your website for any functionality issues or errors.
Check Server Logs
Server logs record all server activities, including errors and malfunctions. By examining these logs, you can uncover patterns or specific events that correlate with the occurrence of the 503 error. This can provide clues about whether the issue is due to server overload, a faulty script, or other server-related problems. If your website is hosted on 10Web, here is a guide on accessing your server logs. To check server logs:
- Log into your hosting control panel.
- Navigate to the section where server logs are available. This is often found under sections labeled “Logs,” “Statistics,” or “Metrics.”
- Look for error logs and access them. You might find logs named as ‘error_log’, ‘access_log’, etc.
- Review the logs for entries that correspond to the times when the 503 errors were observed. Look for repeated error messages or patterns.
- Use the information found in the logs to guide further troubleshooting or to discuss the issue with your hosting provider.
Debugging
Debugging mode in WordPress provides detailed error messages that can help identify specific problems causing the 503 error. These messages can point to problematic plugins, themes, or custom code, allowing for more targeted troubleshooting. To debug your website:
-
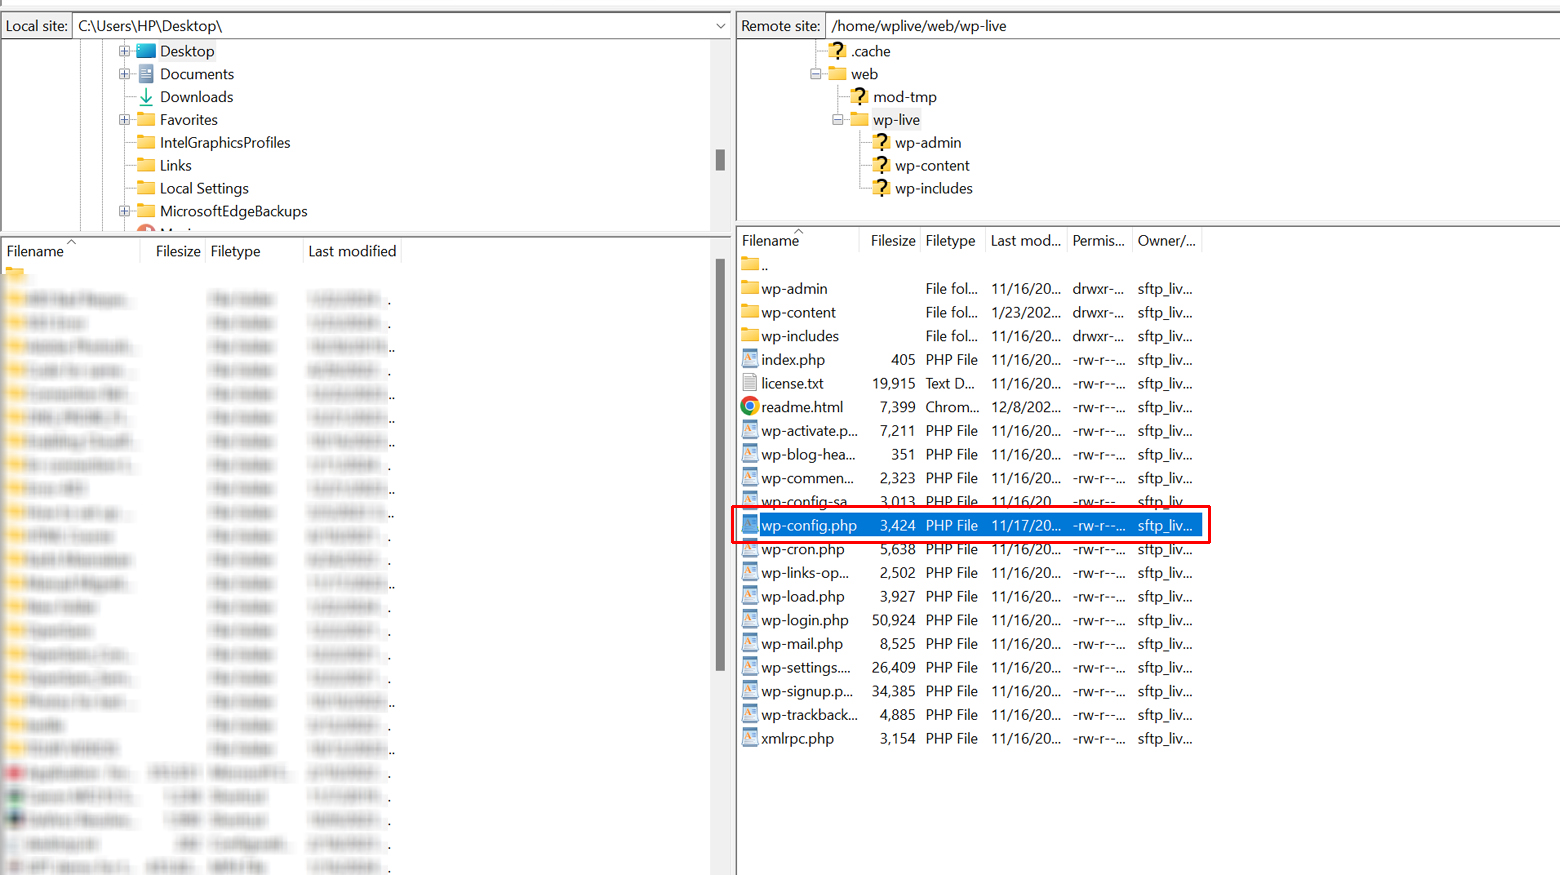
- Connect to your website using FTP or through the File Manager in your hosting control panel.
- Locate and open the `wp-config.php` file, which is in the root directory of your WordPress installation.
-
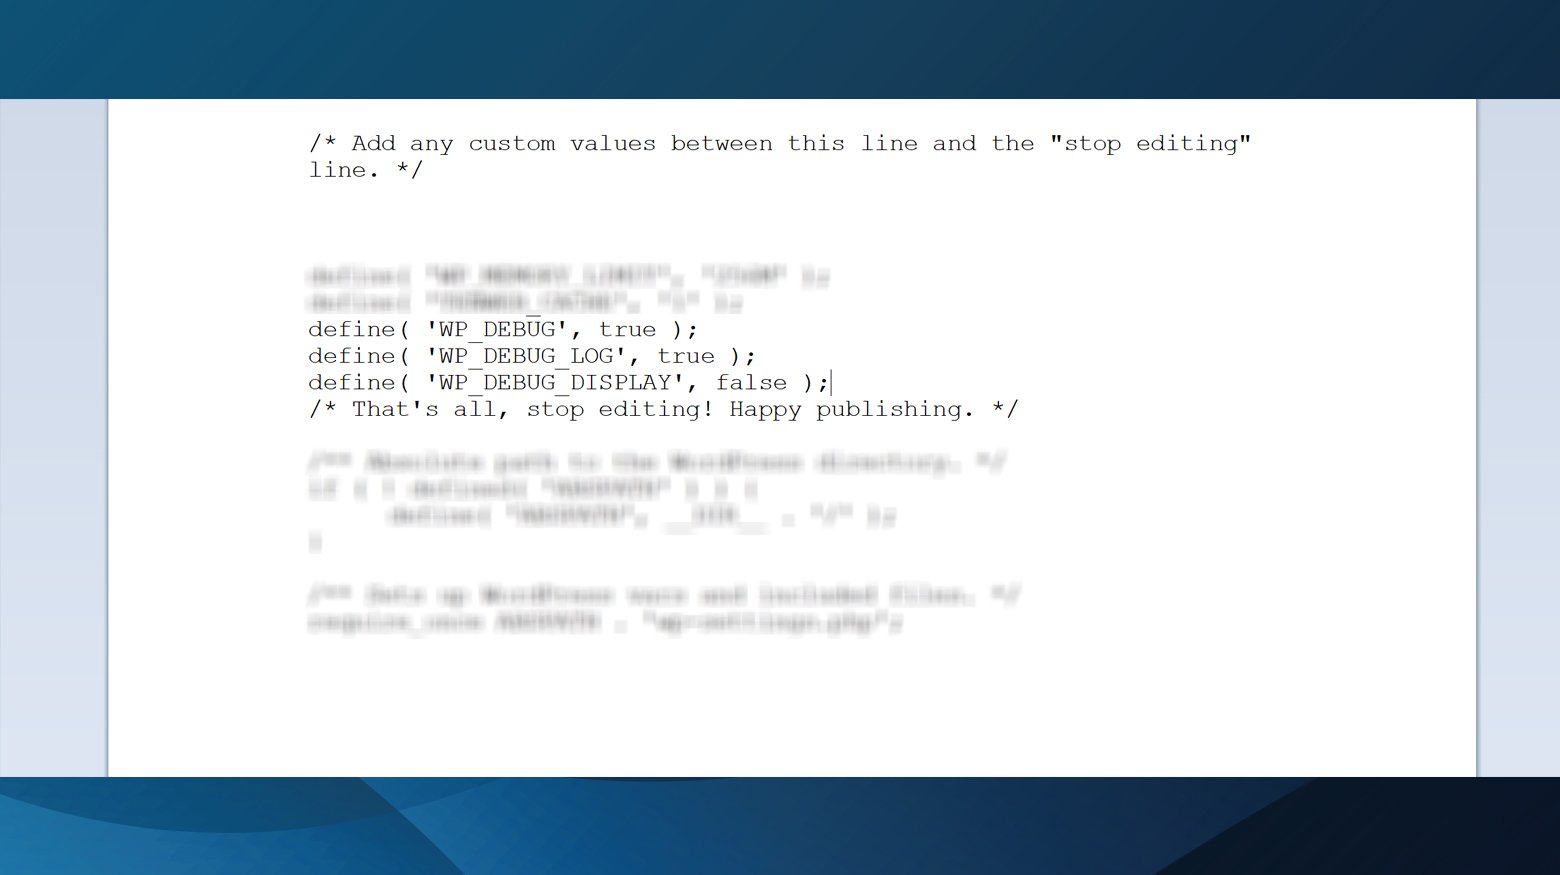
- Find the line that says `/* That’s all, stop editing! Happy blogging. */` and just above it, insert the lines:
- define( ‘WP_DEBUG’, true );
- define( ‘WP_DEBUG_LOG’, true );
- define( ‘WP_DEBUG_DISPLAY’, false );
- Find the line that says `/* That’s all, stop editing! Happy blogging. */` and just above it, insert the lines:
- Save the changes and re-upload the file if using FTP.
- Reload your website to see if any error messages are displayed. These messages can guide you to the specific issue causing the error.
Check if heartbeat API is the problem
The WordPress Heartbeat API is used for auto-saving, notifications, and more, but it can cause a 503 service unavailable error if it’s overloading your server. To check if the heartbeat API is causing the issue:
-
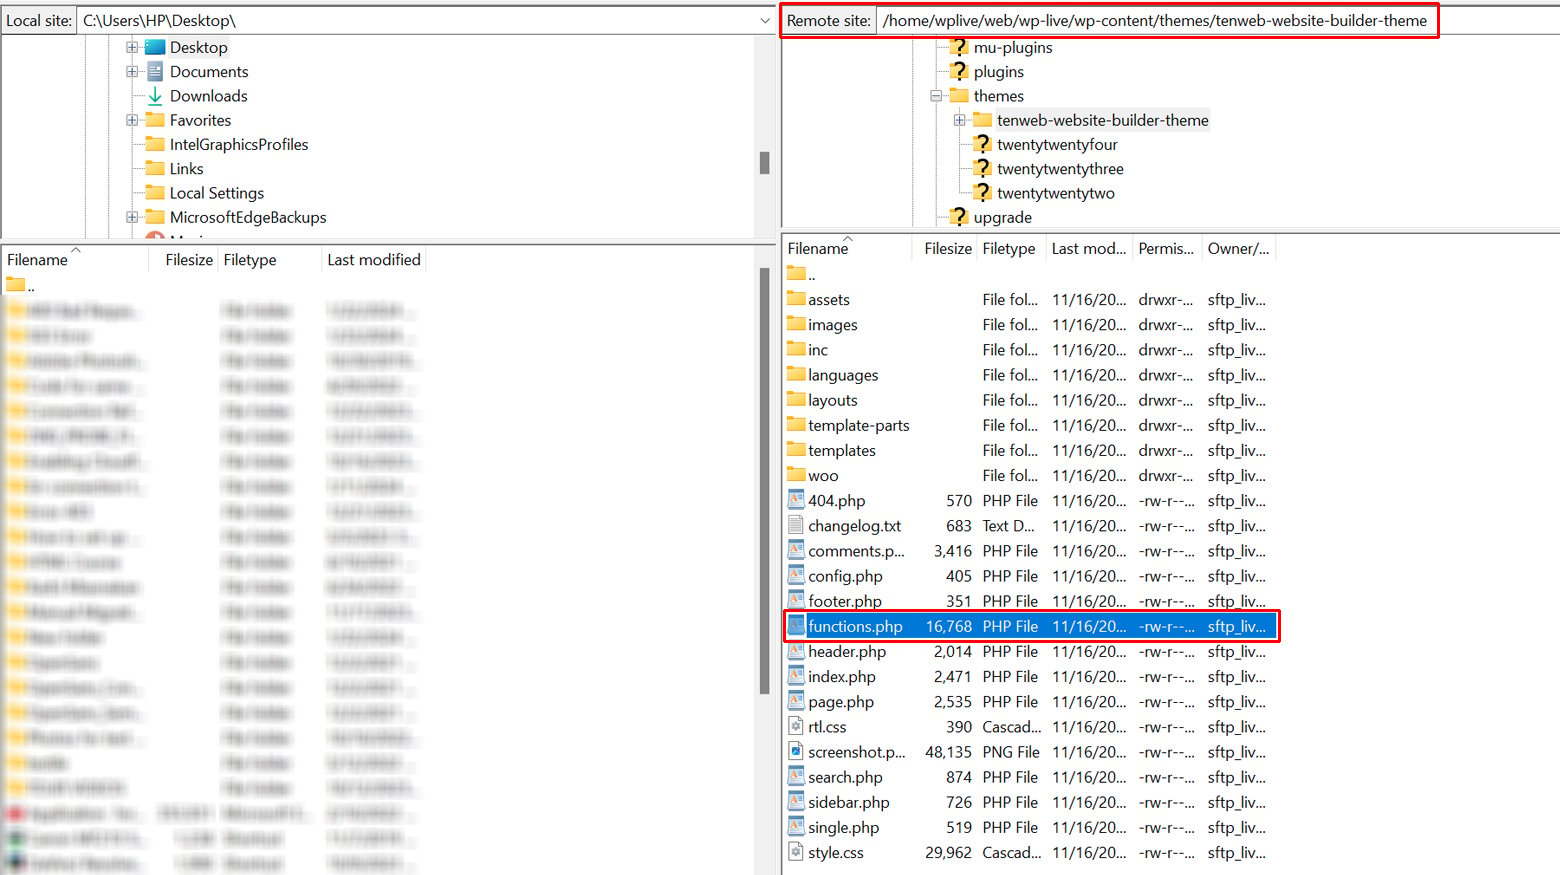
- Connect to your WordPress site using FTP.
- Go to your current theme’s folder and find the `functions.php` file.
-
- Right-click on `functions.php` and choose to View/Edit in your text editor.
- Add this code
- add_action( ‘init’, ‘stop_heartbeat’, 1 );function stop_heartbeat() {wp_deregister_script(‘heartbeat’);}
- Save the changes, close the file, and then see if your website works without the 503 error.
If the error is gone, the Heartbeat API was your issue. But you don’t want to keep it disabled because it’s useful. However, you can keep it under control using a plugin.
- Install the Heartbeat Control plugin on your WordPress site.
- Go to Settings > Heartbeat Control, and set the Heartbeat frequency to the lowest possible number.
- Go back to your `functions.php` file.
- Remove the code snippet you added earlier and save the file.
Content Delivery Network (CDN)
A CDN works by caching and distributing your site’s content across multiple servers around the world. This not only speeds up the loading time for your visitors (as they access content from a server closer to their location) but also reduces the load on your primary server. By distributing the traffic across multiple servers, a CDN can prevent your main server from becoming overwhelmed, which is a common cause of 503 errors. Alternatively, if you are using a CDN, sometimes the 503 Service unavailable error is caused by the CDN. In this case, disable the CDN temporarily to determine if it is the cause of the error.
Say goodbye to website errors
Achieve peace of mind with 99.99% uptime on 10Web Managed
WordPress Hosting, powered by Google Cloud.
Measures to prevent the 503 Service Unavailable error
Regular updates
Regularly updating WordPress core, themes, and plugins ensures you have the latest features, bug fixes, and security patches. Updates often address known issues that can cause errors like the 503. Outdated software can have vulnerabilities or compatibility issues, leading to performance problems and increased risk of errors. Staying updated is a key preventive measure against many common WordPress issues. To update your WordPress core:
- Log into your WordPress admin panel.
- To update WordPress core, if an update is available, you’ll see a notification at the top of the dashboard. Follow the on-screen instructions to complete the update.
- For plugins, go to ‘Plugins’ > ‘Installed Plugins’. Here, you’ll see a list of plugins with an option to update if updates are available.
- Similarly, for themes, navigate to ‘Appearance’ > ‘Themes’. If updates are available for your active or installed themes, you’ll have the option to update them.
- Before updating, it’s wise to back up your website to prevent data loss in case of an update-related issue.
Maintenance mode during updates
Activating maintenance mode during updates prevents users from accessing the site while changes are being made. This is important because accessing the site during an update can lead to corrupted data or incomplete updates, which can cause errors like 503. Maintenance mode lets you safely perform updates, troubleshoot, or make changes without additional stress on the server. To activate maintenance mode:
- Install a maintenance mode plugin from the WordPress plugin repository. Plugins like ‘WP Maintenance Mode’ or ‘Coming Soon Page & Maintenance Mode by SeedProd’ are popular choices.
- Activate the plugin and configure the settings. You can usually set a message to display to visitors, indicating that the site is undergoing maintenance.
- Enable maintenance mode when you start performing updates or making significant changes.
- Once you’ve completed your updates or changes, disable maintenance mode so that your site becomes accessible to visitors again.
Optimize the website
Website optimization involves reducing the load your site places on the server. This can be achieved through various means like caching, image optimization, and minimizing the number of active plugins. Caching reduces server load by storing static versions of your content, reducing the need for WordPress to generate a page each time it’s requested. Image optimization reduces file sizes, which speeds up load times and decreases bandwidth usage. Minimizing plugins reduces the amount of processing the server needs to do, as each plugin can introduce additional server requests.
Database optimization
Over time, WordPress databases can accumulate unnecessary data such as post revisions, spam comments, and transient options, which can bloat the database and slow down your website. This can put additional strain on your server, contributing to a 503 error. Regular database optimization helps clean up this unwanted data, keeping your database efficient and reducing server load.
Contact hosting provider
Sometimes, the cause of a 503 error is outside the scope of WordPress and lies within the server or hosting environment itself. This can include server misconfigurations, hardware failures, or network issues. Your hosting provider can check for these issues and resolve them. They have access to server resources, configuration settings, and logs that you might not have, enabling them to diagnose and fix server-related problems more effectively.
Closing thoughts
Resolving the HTTP Error 503 in WordPress involves a combination of deactivating recent plugins and themes, checking and resetting the .htaccess file, optimizing website performance, ensuring updated PHP versions, and utilizing debugging tools. Regular maintenance, including updates and database optimization, is key to preventing such issues. These steps, along with understanding their underlying principles, equip WordPress administrators with the tools to not only fix current errors but also to mitigate future occurrences, ensuring a stable and efficient website experience.
Say goodbye to website errors
Achieve peace of mind with 99.99% uptime on 10Web Managed
WordPress Hosting, powered by Google Cloud.
Say goodbye to website errors
Fix all the website errors in one click
Migrate your website to the world's best Managed WordPress Hosting.