What does DNS Server Not Responding mean?
When you encounter the message “DNS Server Not Responding,” it means that your computer or phone cannot connect to the system that translates website names to their respective IP addresses. You can think of the Domain Name System (DNS) as a translator between you and the internet. When you type in a website name, DNS translates it into a numerical IP address so your device can locate the website.
However, if DNS isn’t functioning correctly, your browser cannot connect to websites because it does not know where to go. Most of the time, this error is not a significant issue, and you can resolve it with some basic troubleshooting.
What causes DNS Server Not Responding errors?
If you’re getting a DNS Server Not Responding message, it’s often because your internet connection is down or there’s an issue with DNS at some level in your network. Here’s a quick rundown of what else could be causing the problem:
Dropped internet connection
The most common culprit. No internet means no DNS.
Your DNS provider is experiencing issues
Sometimes, the service you use for DNS stops working. This could be because there’s too much traffic, or a server may be temporarily unavailable. Either your internet service provider’s DNS or the one in your router needs to be fixed.
Your router or modem needs restarting
If they’re acting up, it can interfere with the DNS. Power cycling one or both of these devices sometimes corrects DNS Server Not Responding errors.
Network issues
Problems with hardware or a network, such as even just one server not communicating with the next one correctly, are enough to cause this error.
Antivirus software is being overprotective
Antivirus software and firewalls can potentially block access to the internet for different software and services. This could show up as a DNS error.
Say goodbye to website errors
Achieve peace of mind with 99.99% uptime on 10Web Managed
WordPress Hosting, powered by Google Cloud.
15 methods to fix the DNS Server Not Responding error in Windows and macOS
Try a different browser
First, give another browser a go to see if that fixes the DNS issue. It could be as easy as switching browsers or updating the one you’re using.
How do you switch browsers?
Open up a different one and try visiting some websites. For example, if you usually use Chrome or Safari, try Firefox or Edge instead. If using a different browser solves the problem, your usual browser might need an update, or you might have to uninstall and reinstall it. But if you’re still getting that DNS Server Not Responding message, the browser’s not the problem.
Connect with a different device
If changing browsers doesn’t do the trick, the issue might be with your device. Rule this out by trying to visit some websites using a different device.
How do you try connecting from a different device?
Just grab another device, like your phone, laptop, or tablet, and try to open a few different websites using the same Wi-Fi or wired network. If you’re still seeing that DNS Server Not Responding error, it’s a hint that your router might be the problem. If you’re unsure, try it with your phone. Turn off your phone’s Wi-Fi and try connecting to some sites with your mobile data. If it works, it’s a good sign that the issue is on your end, not the website.
Restart your router, modem, and computer
Restarting your router might do the trick if the problem is on your end. This step clears out the router’s memory (cache) and can often fix connection issues. Also, don’t forget to power cycle your modem if it’s separate from your router.
Here’s how to restart your router or modem
- Most routers and modems have a power button. Press it to turn off the device.
- Wait for about a minute, then turn it back on. Wait for it to reconnect to the internet.
- Once it’s back online, see if you can access the internet from your browser.
Sometimes, just turning it off and on isn’t enough. To do a complete power cycle:
- Unplug your router and modem from the power outlet.
- Wait at least 30 seconds (this is important).
- Plug it back in and wait a couple of minutes for everything to boot up.
While you’re at it, restart your computer or the device where you’re seeing the DNS error. Restarting these devices gives you a fresh start that can resolve a lot of potential problems. If restarting doesn’t help, troubleshooting the router can get more complicated. Further options include updating the router’s firmware or resetting the router to factory settings. This is a bit more involved, so check your router’s manual for instructions on how to do it. Since resetting will wipe all your settings, and you’ll need to set up your network from scratch afterward, you’ll probably want to try some of the other troubleshooting methods before you take such drastic steps.
Check your ethernet cable connection
If you’re using a wired connection, check the ethernet cable for any loose connections or damage.
How to check your ethernet connection
This is much easier if you’re seeing this error on a wired device and you have a laptop to troubleshoot with. You can carry the laptop over to the router and try a different ethernet cable. If that wired connection works, it may point to a faulty connection or bad cable on the first device. If you don’t have a second device to troubleshoot a wired connection with, you can try visually inspecting the cable you’re using for damage and plugging it into a different port on the access point.
Run network troubleshooter
If you can access the internet or the website showing the error on a different device, an excellent way to continue troubleshooting is by running network diagnostics. It’s a straightforward process that can help fix network issues on a specific device without too much fuss.
Here’s how to do it for both Windows and Mac
For Windows:
- Press the Windows key, type Settings, and press Enter.
- Click Update & Security > Troubleshoot.
- Click the Additional troubleshooters link.
- Click Internet Connections, and click Run the troubleshooter.
Let the troubleshooting process do its thing. If it finds any problems, follow the on-screen steps to fix the DNS issues. For Mac
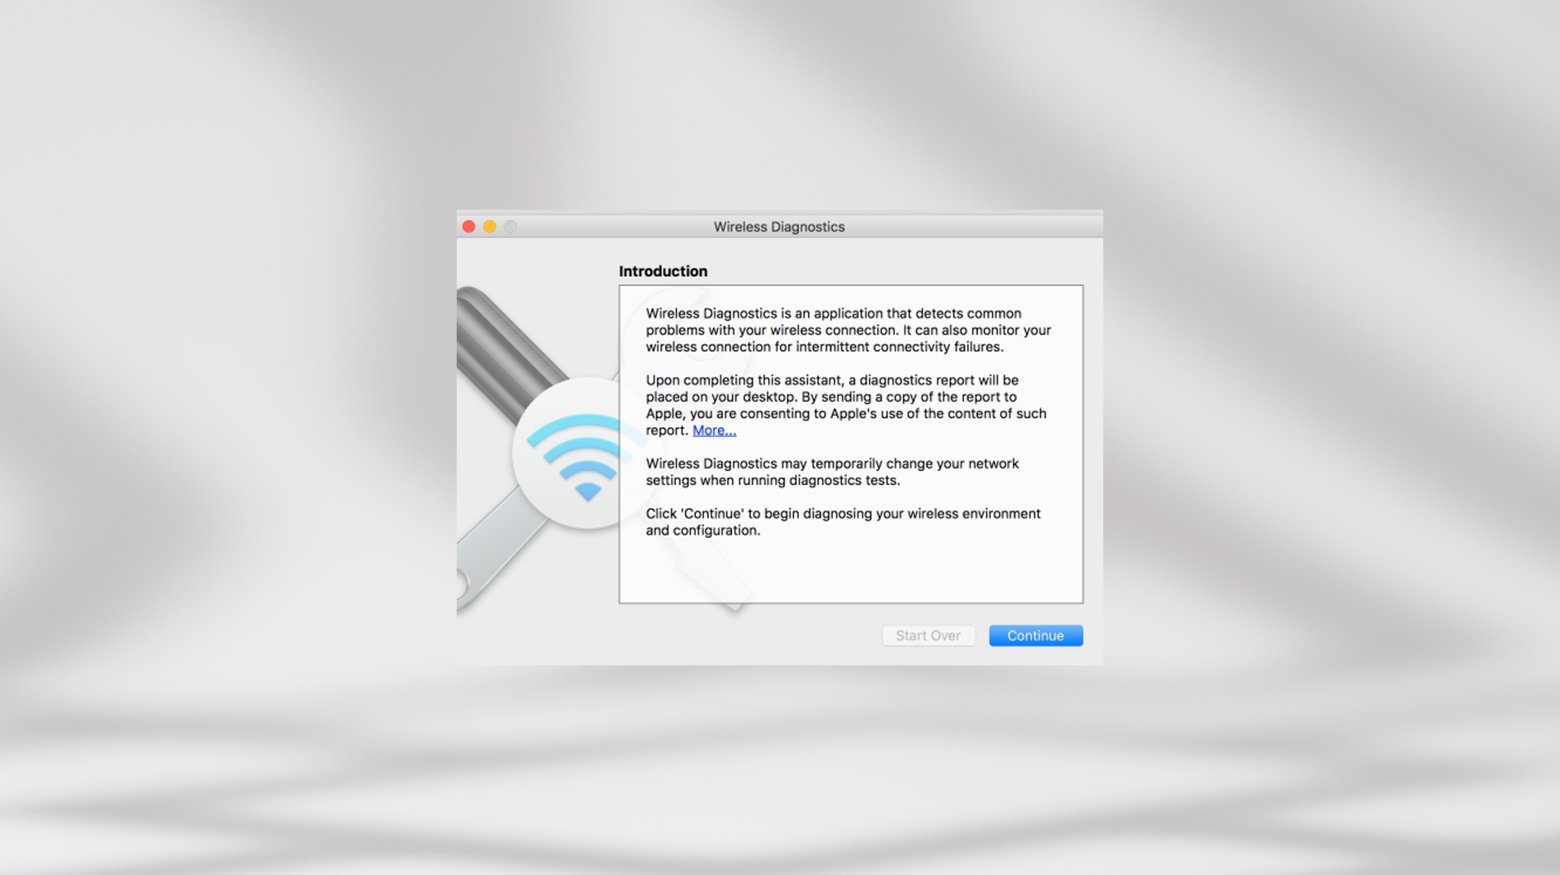
- Close any open apps and connect to the same Wi-Fi you’re having issues with.
- Hold down the Option key, click the Wi-Fi icon in the menu bar, and select Open Wireless Diagnostics.

- Follow the on-screen instructions to check out your network connection.
- After the scan, click the Info icon in the Summary pane for more details about your network and possible solutions to any issues detected.
Flush DNS
If you are still stuck with the DNS Server Not Responding error, it’s time to look at your DNS settings and IP address. Clearing your DNS cache and resetting your IP might be the solution.
Here’s how to clear your computer’s DNS cache
For Windows:
- Type cmd into the search bar and open Command Prompt.
- Type ipconfig/flushdns and hit Enter. This clears the DNS cache.
- Run these commands one after the other: ipconfig /registerdns ipconfig /release ipconfig /renew
- Restart your computer and try connecting again.
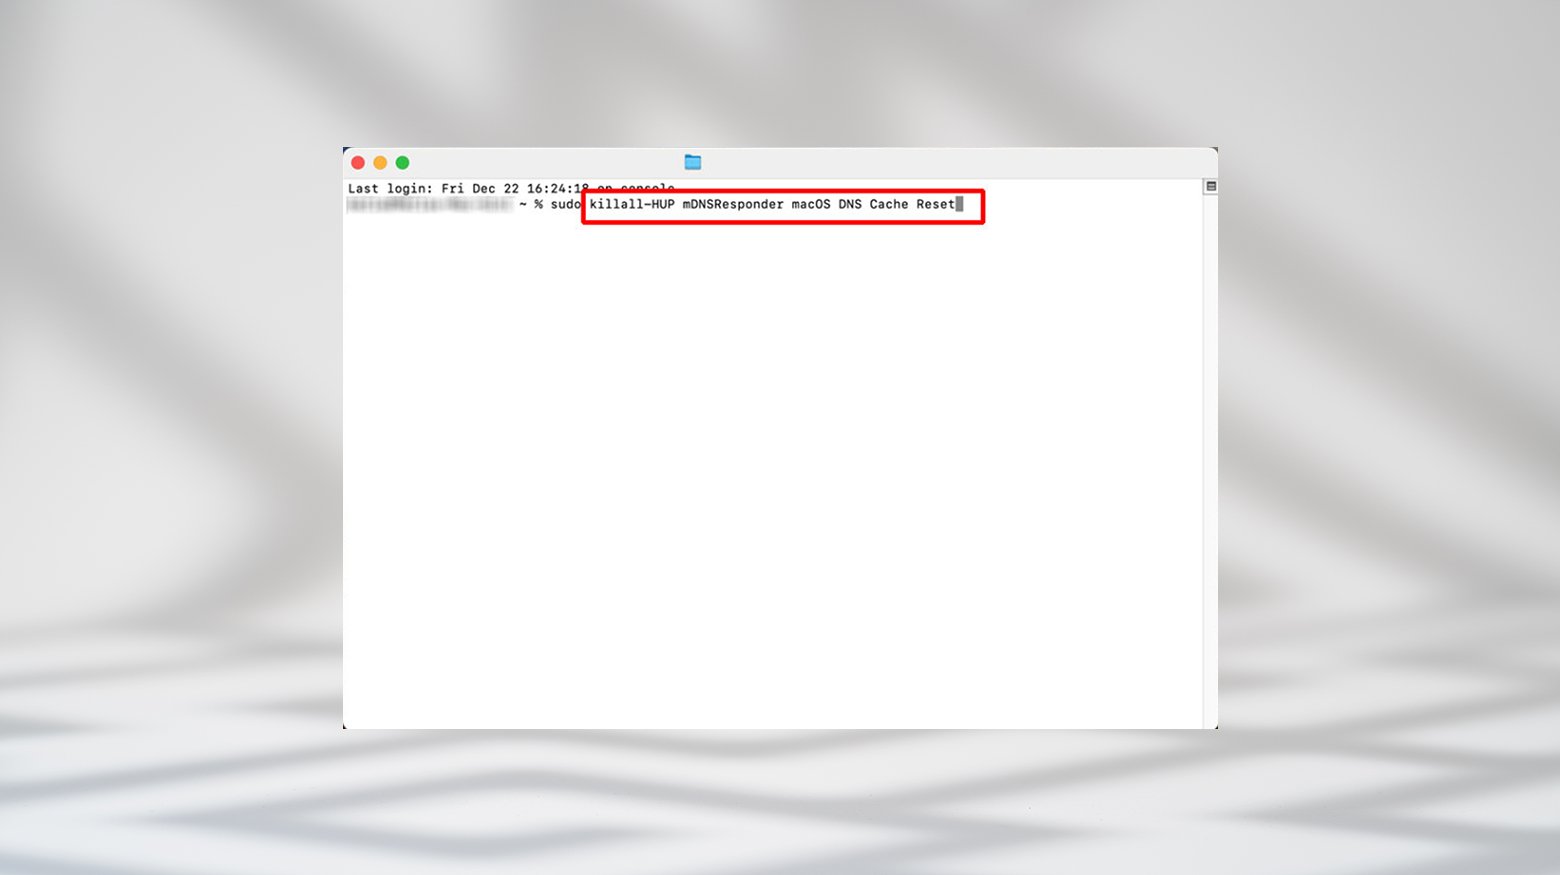
For Mac:
- Click on Go in the toolbar, then go to Utilities.
- Open the Terminal.
- In the Terminal, type: sudo killall -HUP mDNSResponder && echo macOS DNS Cache Reset and hit Enter.
- Enter your admin password at the prompt.
After running these commands, your network adapter will refresh its DNS settings. Hopefully, this will fix your connection problem. If not, it’s possible that the issue is with your DNS provider.
Change your computer’s DNS servers
Changing your default DNS server could eliminate a DNS Server Not Responding error. Since the problem could lie with your internet service provider’s DNS, you can try switching to a different DNS server. Here are some publicly available DNS server addresses you can try:
- Google Public DNS: 8.8.8.8 or 8.8.4.4
- Cloudflare DNS: 1.1.1.1 or 1.0.0.1
- OpenDNS Home: 208.67.222.222 or 208.67.220.220
- AdGuard DNS: 94.140.14.14 or 94.140.15.15
- Quad9: 9.9.9.9 or 149.112.112.112
How to switch to a different DNS
On Windows
- Press the Windows key and type Network connections.
- Select View network connections.
- Right-click on your internet adapter (WLAN for Wi-Fi, LAN for Ethernet) and click Properties.
- Choose Internet Protocol Version 4 (TCP/IPv4) and click Properties.
- Select Use the following DNS server addresses and enter a new DNS server address from the list of alternatives above.
- Click OK and restart your browser.
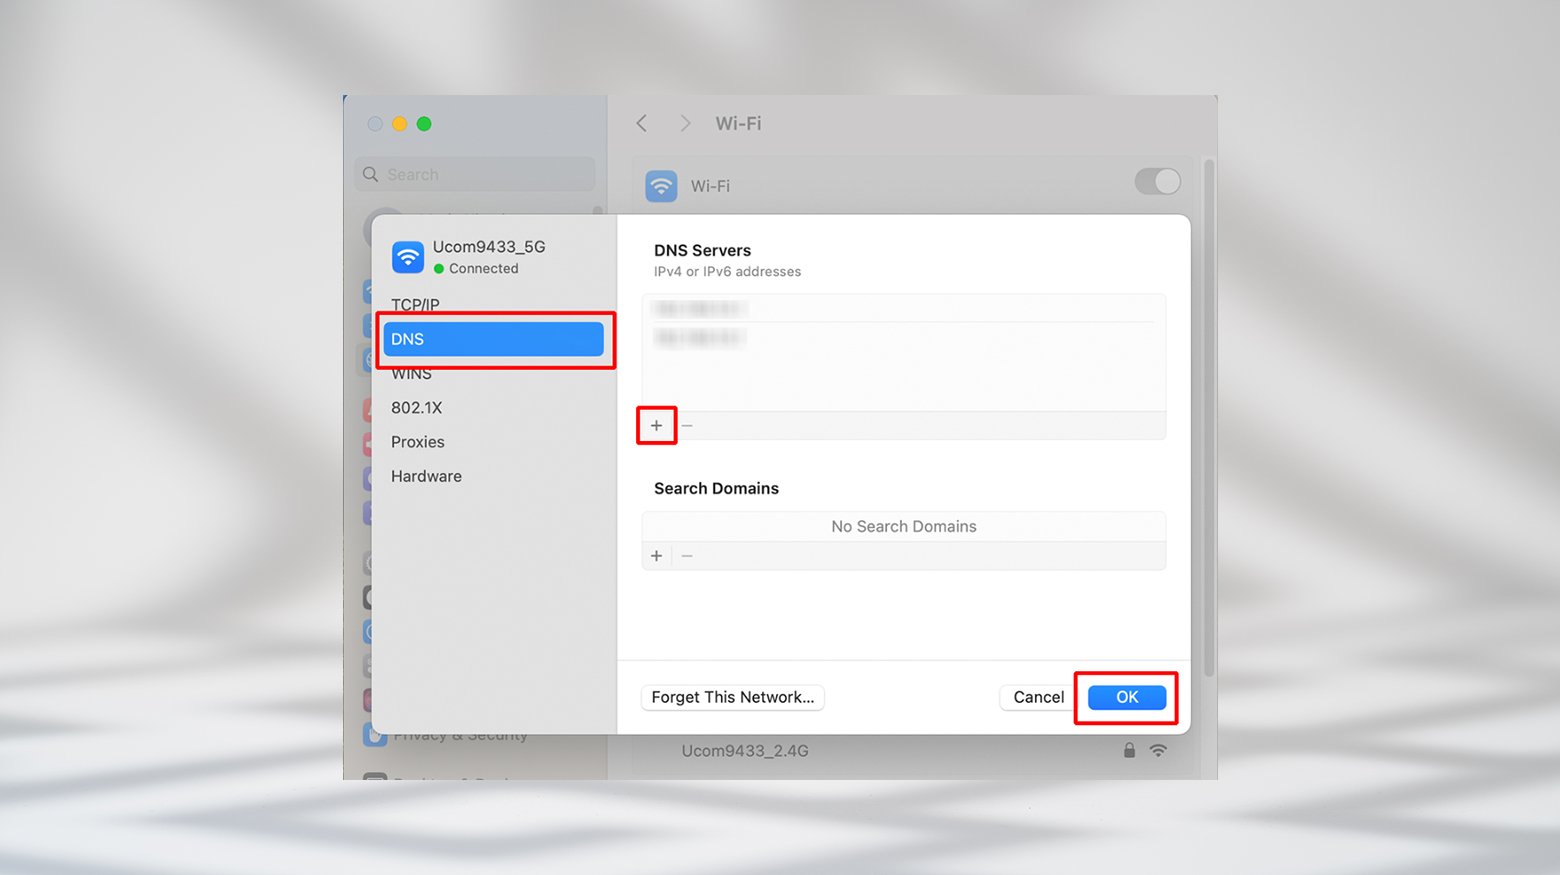
On Mac
- Click the Apple icon and go to System Preferences > Network.
- Select your network and click Details.
- Select the DNS tab in the pop-up window.
- Delete the existing DNS address (make note of this address to revert back later if you wish)
- Click the (+) button to add a new DNS server address.
- Enter the new DNS information, and click OK.
- Restart your browser.
Changing your DNS server lets your browser load websites even if your ISP’s DNS isn’t working. If you don’t see the error after switching to a new DNS server, it’s probably an issue on your original DNS provider’s end.
Reset your network adapter
Depending on what steps the network troubleshooter took, it may have already restarted your network adapter. If not, restarting it can help get you back up and running.
How to reset the network adapter
For Windows
- Press the Windows key, type Settings, and press Enter.
- Click Network & Internet.
- Click Network troubleshooter under Advanced network settings on the Status tab.
- Select your current network type from the list and click Next.
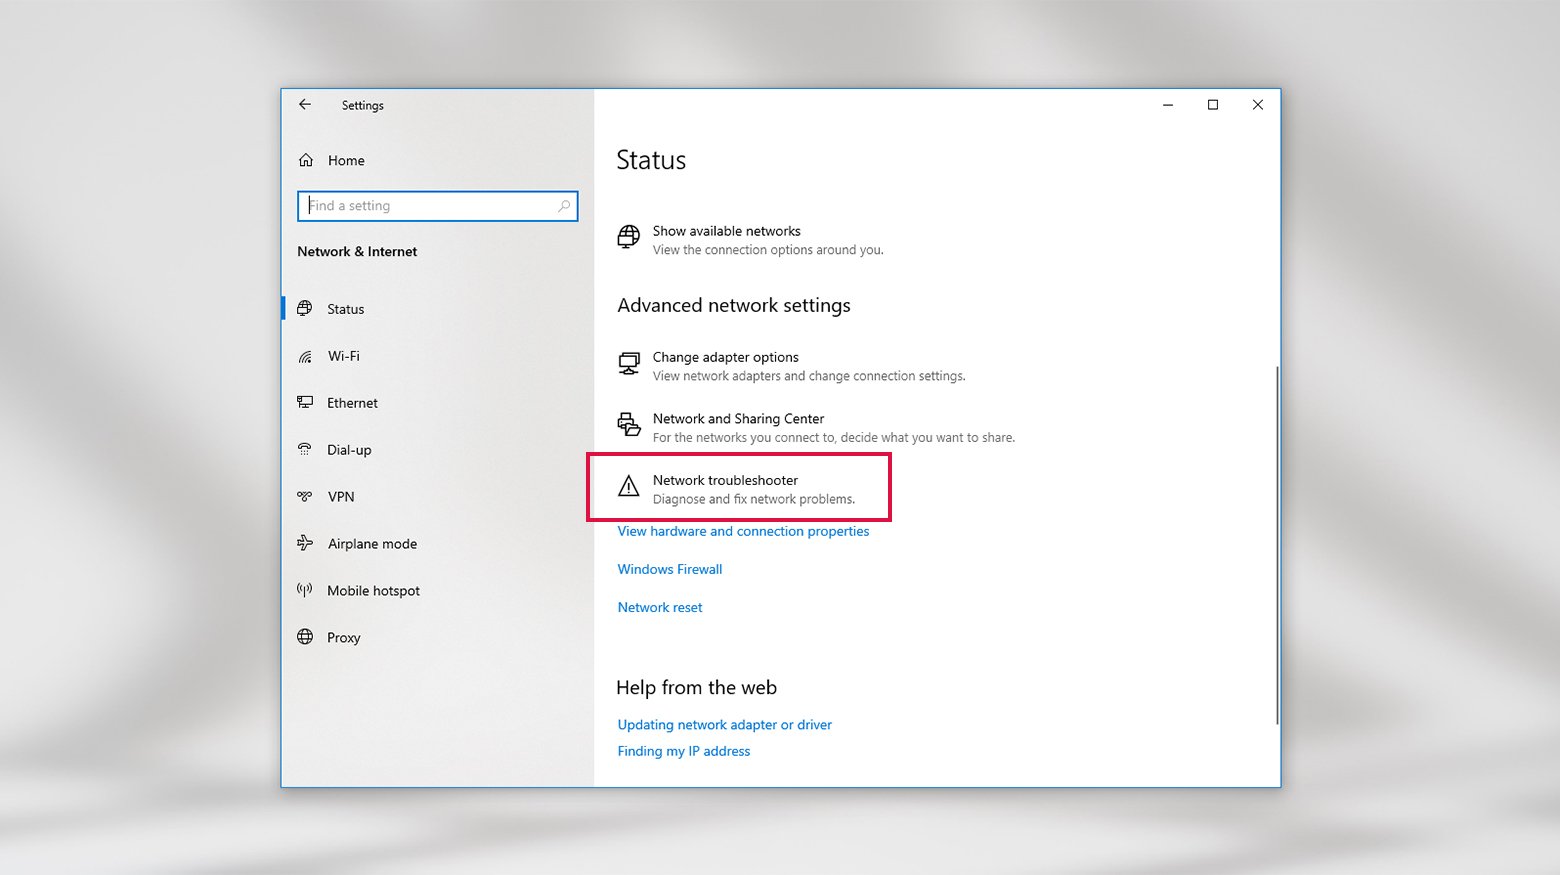
Follow the troubleshooter’s prompts; if it finds any issues, it will reset the network adapter. For Mac: There’s no specific way to restart or reset your network settings on Mac, but you can remove your network settings and start over fresh. Make sure you know your Wi-Fi credentials and any custom settings in your current setup before removing anything.
- Click the Apple icon and go to System Preferences > Network.
- Select your current connection in the list.
- Click the minus icon (-) below the list of connections. (Make sure you know your Wi-Fi password first.)
- Click the plus icon (+) and enter your Wi-Fi details.
- Click Connect.
Try rechecking the DNS error. If resetting your network doesn’t solve the DNS Server Not Responding issue, there are still other steps you can try next.
Update your Windows network adapter driver
An outdated network adapter driver can cause DNS errors. Updating or getting a new driver could be the fix you need.
How to update your network adapter driver in Windows
- Press the Windows key to open the Start menu.
- Click the gear icon to open Settings.
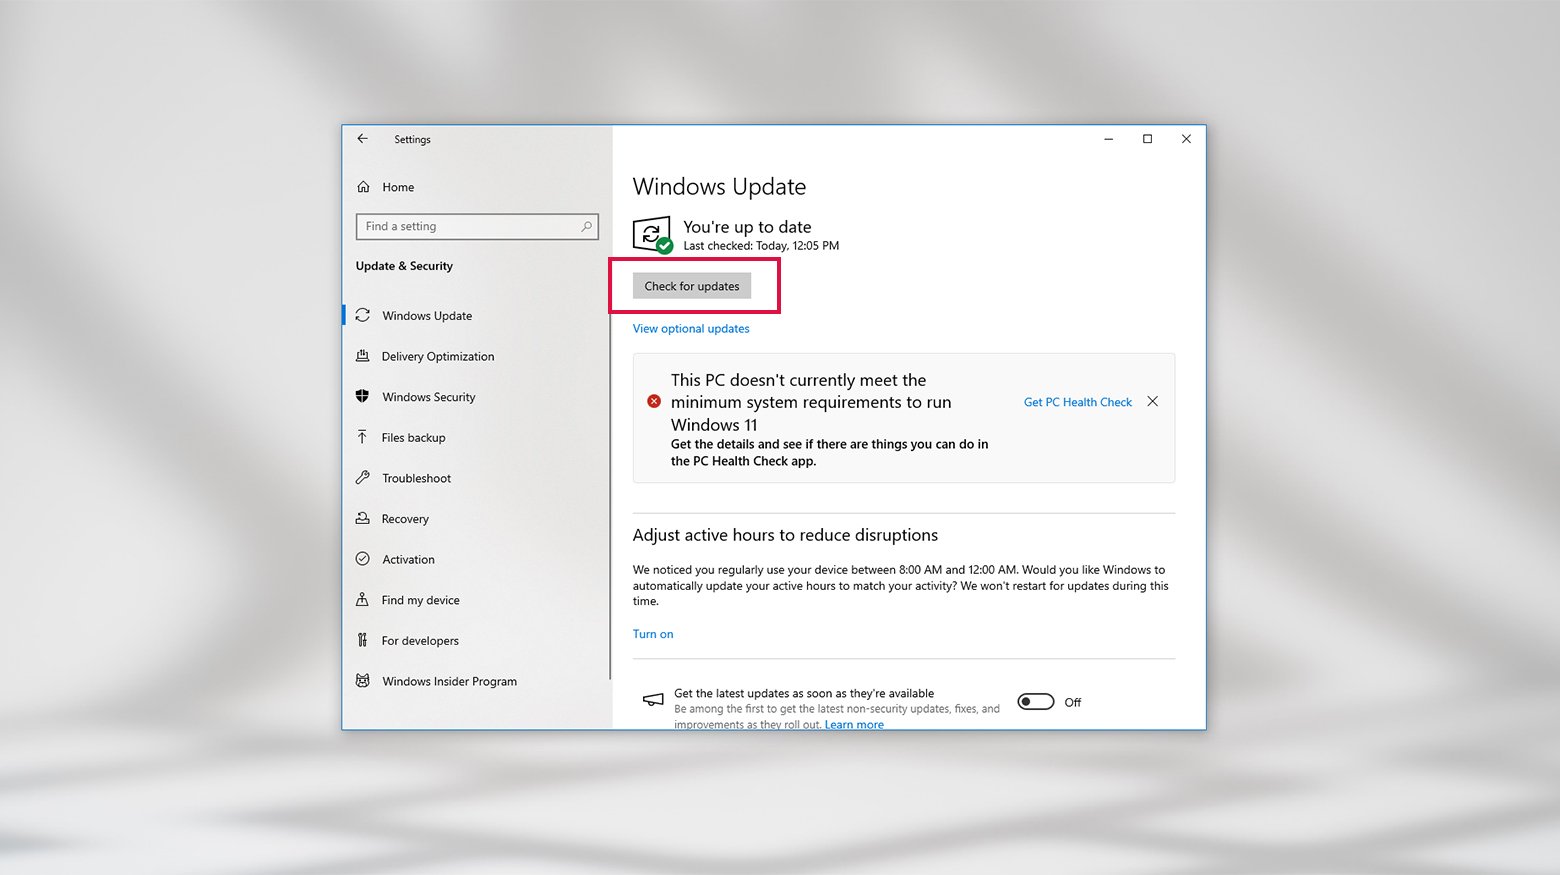
- Select Update & Security > Windows Update.
- Click Check for updates.
- Click View optional updates.
- Select any available drivers that you want to update.
- Click Download and install.
You can also update your network adapter driver manually.
- Press the Windows key, type Device Manager, and press Enter.
- Click the dropdown arrow next to Network Adapters to expand this section.
- Right-click the adapter you want to update, usually the Wireless Network adapter.
- Select Update driver.
- Select Search automatically for updated driver software and follow the prompts.
If the automatic search didn’t turn up a new driver update, you may already be using the most up to date version. Alternatively, you can try looking for the newest driver on the adapter manufacturer’s website. You may want to restart your computer before rechecking the error to see if this resolved the issue.
Temporarily disable antivirus software and firewalls
If you’re still having trouble with the DNS Server Not Responding error, try temporarily turning off your antivirus and firewall. These are important for keeping your device safe, so you’ll want to make sure to re-enable them if you turn either of them off. However, they can have strict rules that wind up blocking your internet connection.
Here’s how to turn them off:
Turning off antivirus protection on Windows
- Press the Windows key and click the gear icon to open Settings.
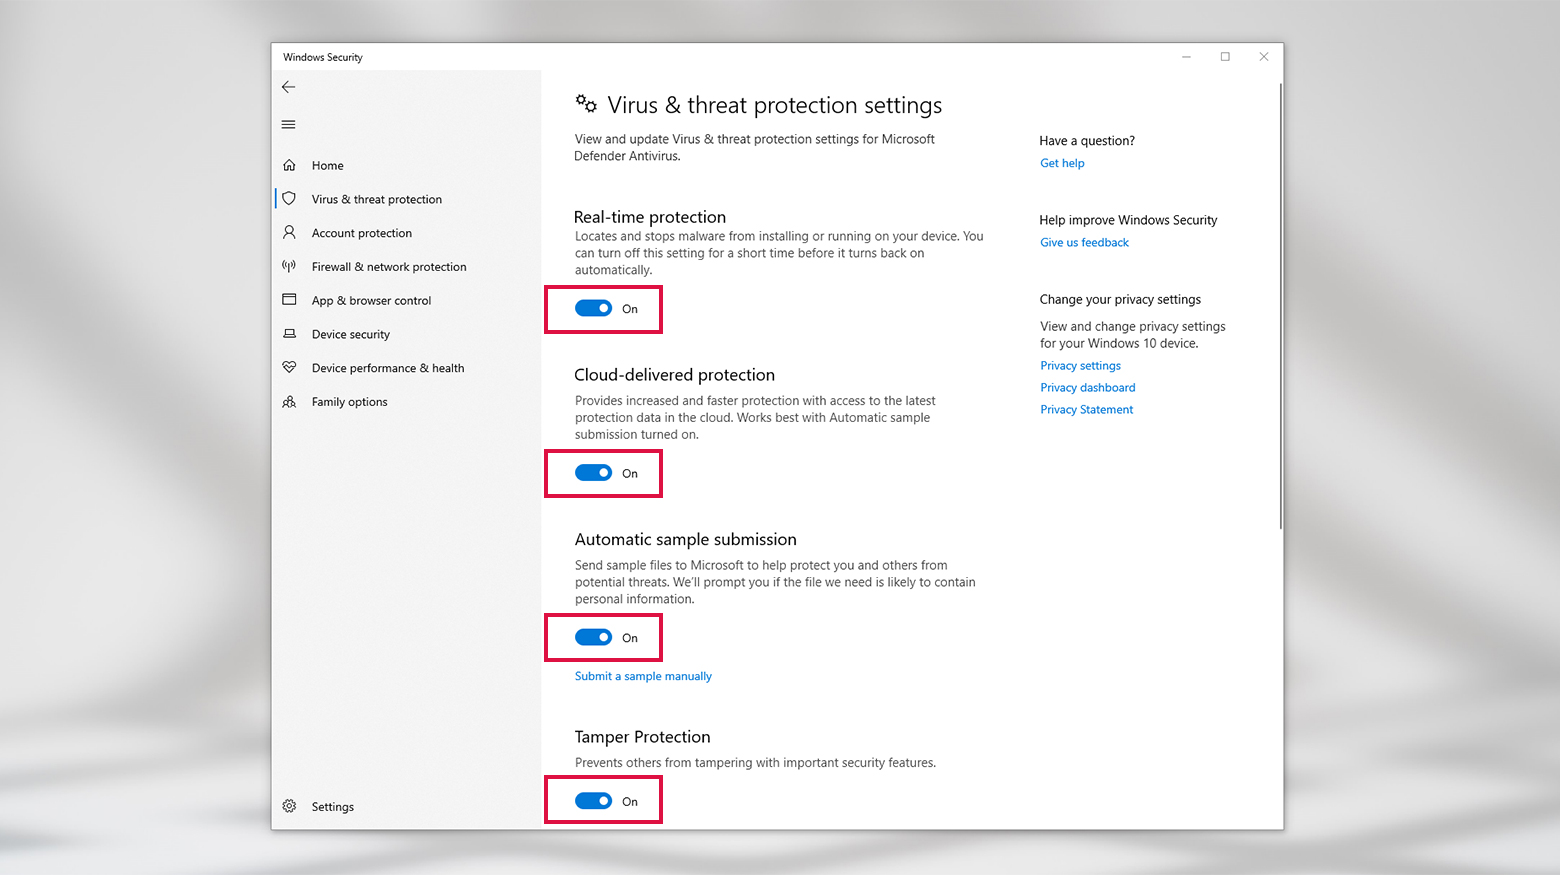
- Click Update & Security > Windows Security > Virus & Threat Protection.
- Click Manage Settings in the Virus & threat protection settings section.
- Turn off protection by switching each toggle off. Turn them on again when you’re finished troubleshooting.
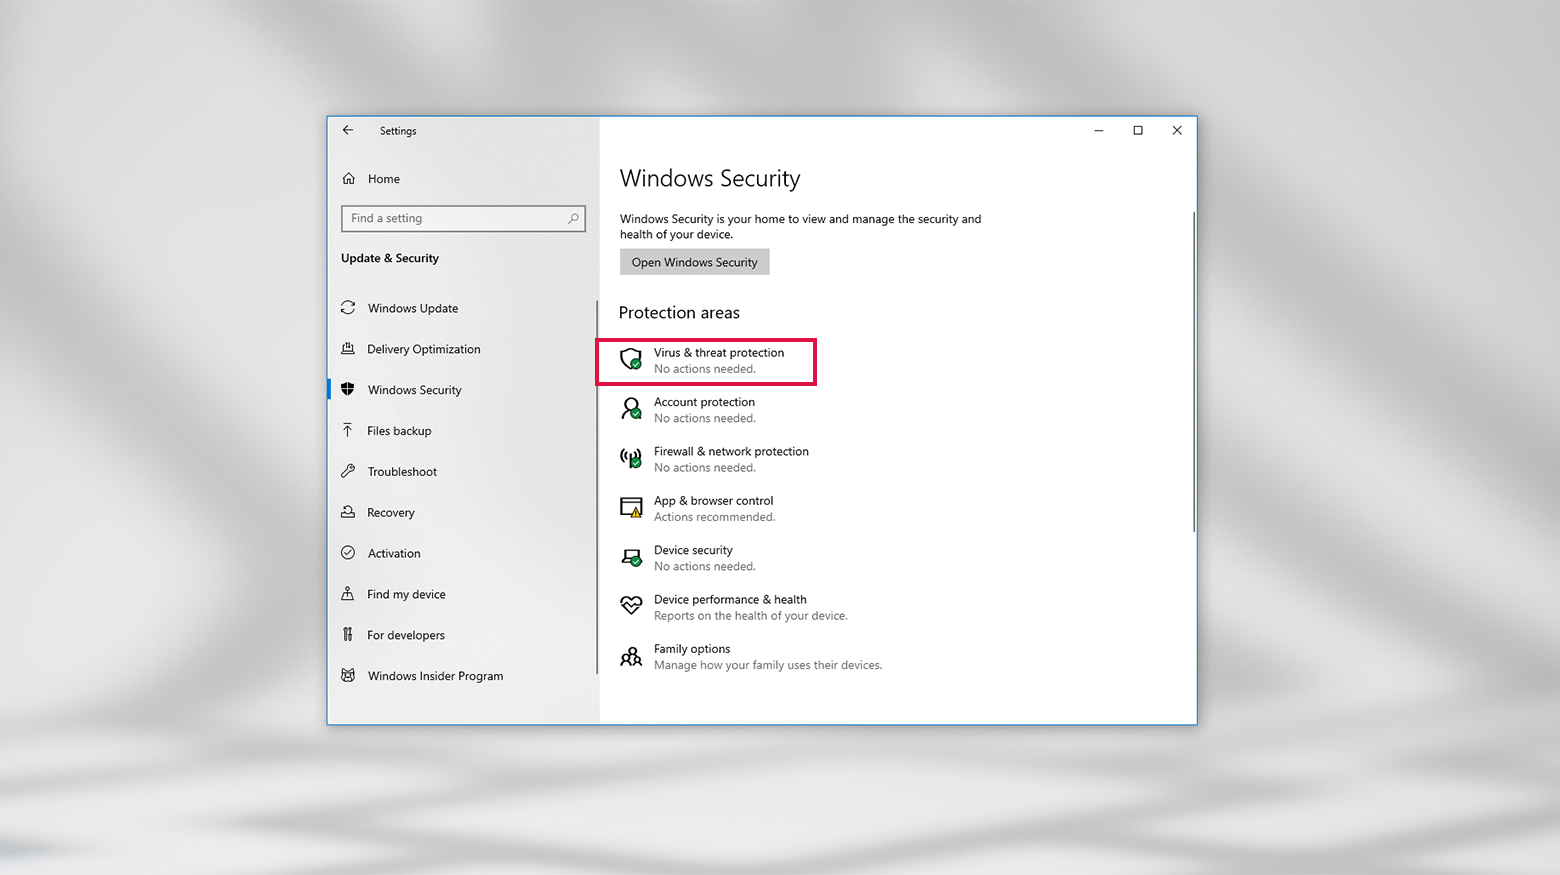
This is also where you can add or remove exclusions if you need to adjust access settings for a certain application or service. Click the Add or remove exclusions link in the Exclusions sections for options. Turning off firewall protection on Windows
- In the same Windows Security screen from step 2 above, click Firewall & network protection.
- Choose the network type you’re currently using: Domain, Private, or Public.
- Click the toggle in the Microsoft Defender Firewall section to turn it off.
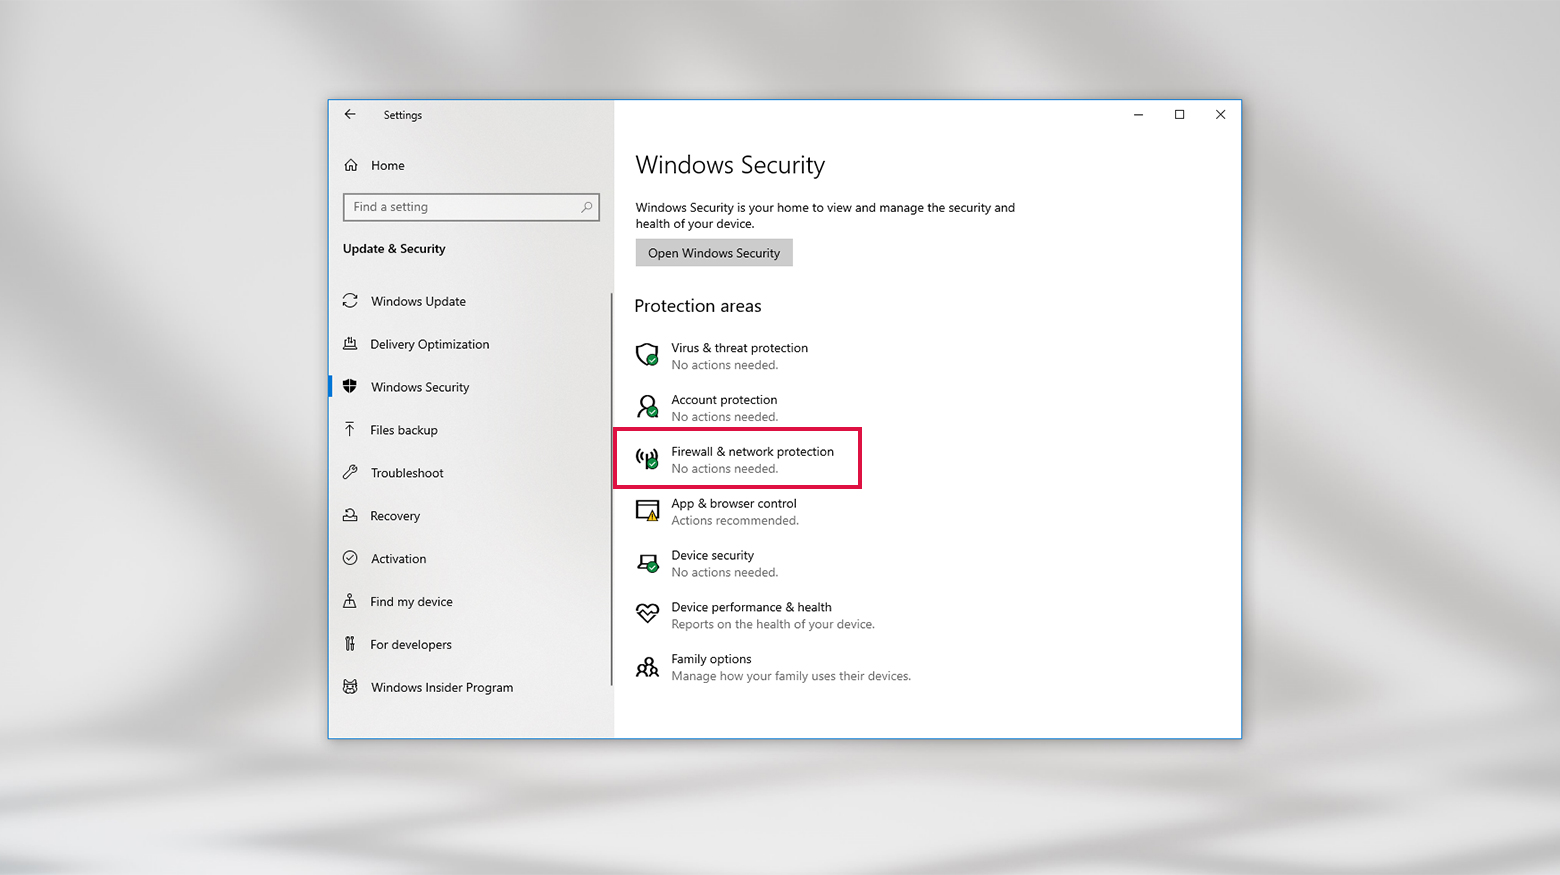
Here, you can also control which apps have access through the firewall via the Allow an app through firewall link. On a Mac
- Head to System Settings
- Click Network, and then the Firewall tab.
- Use the toggle to turn off the firewall.
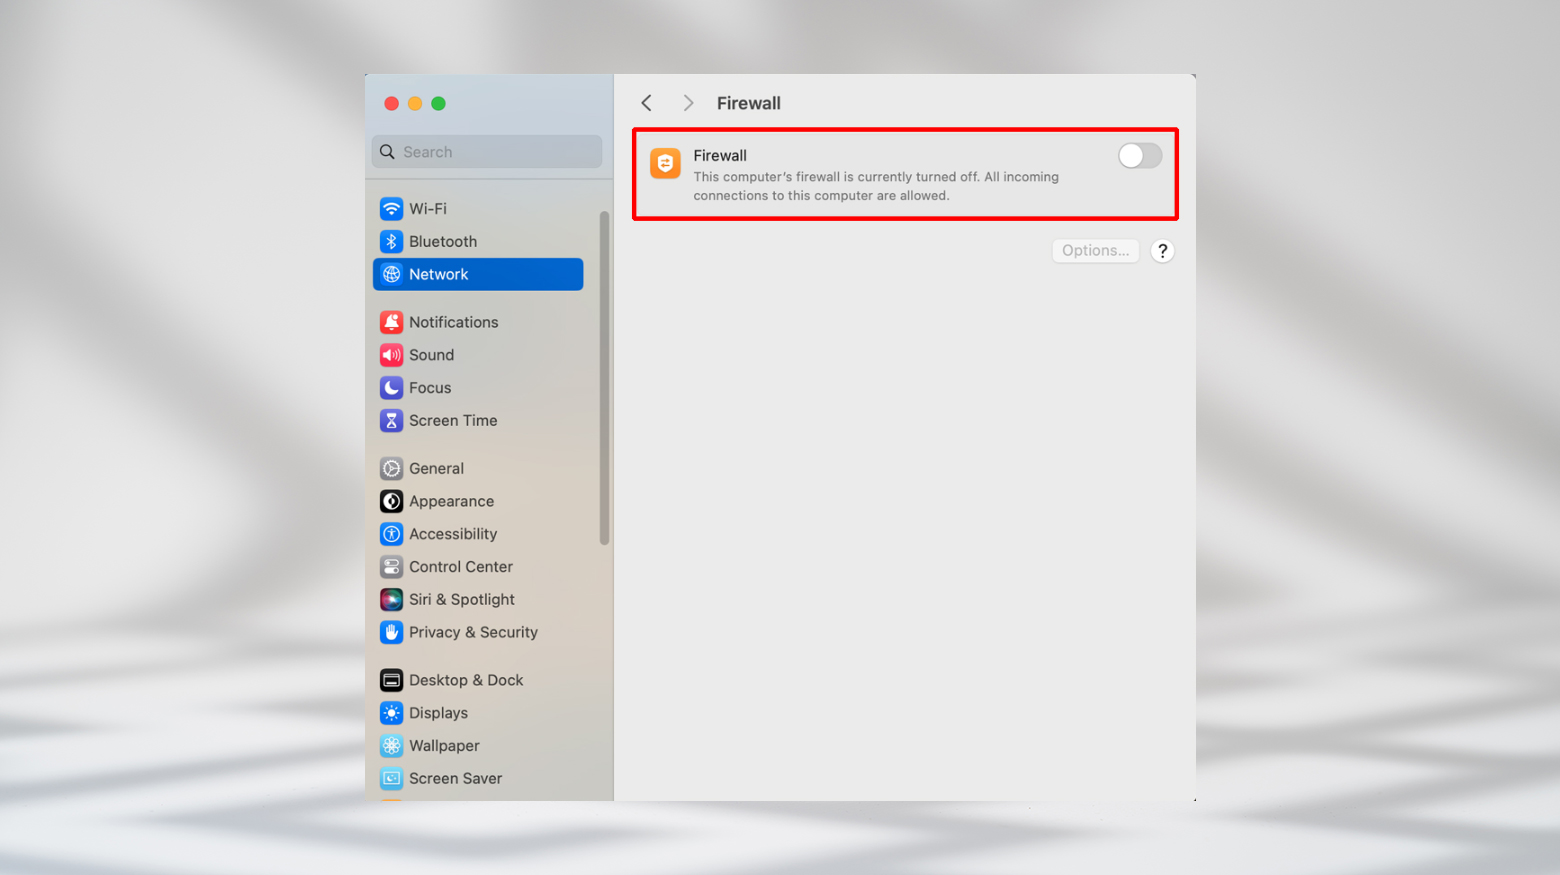
Here, you can also use the Options button to block or allow access for different services and software. After you’ve turned these off, recheck the DNS error. If everything works, the issue might have been with your antivirus or firewall. Update or adjust their rules or configuration so they don’t block your internet in the future. Just remember to turn the firewall and any antivirus back on when you’re done!
Disable secondary connections
If turning off your antivirus or firewall didn’t help with the DNS Server Not Responding error, another troubleshooting step is turning off any extra network connections on your device. You want to ensure that only the network you’re using is active.
How to check for and disable unused connections
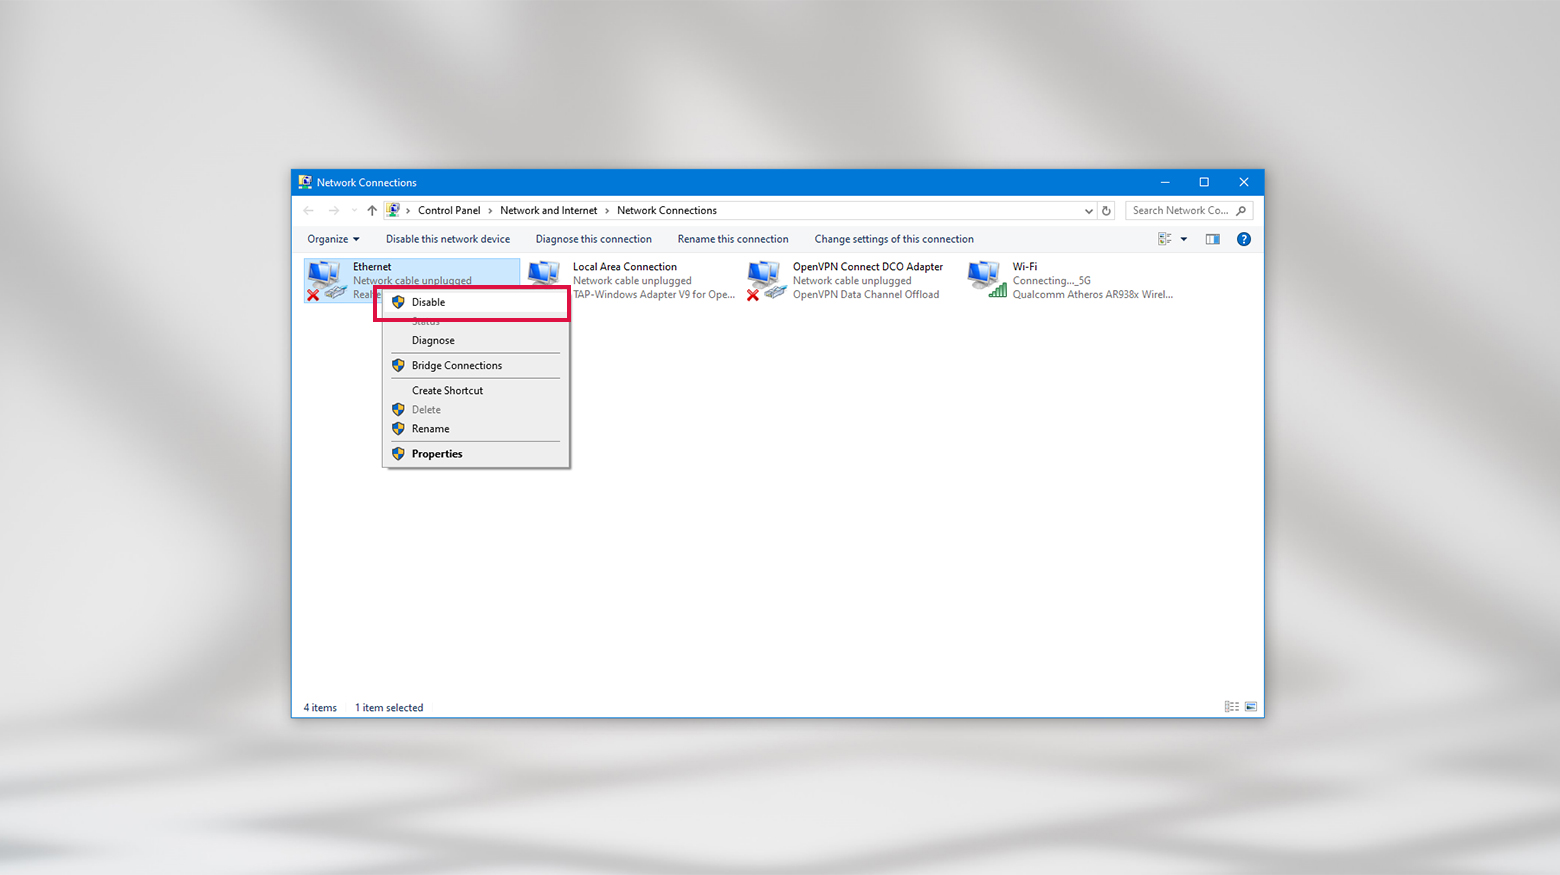
On Windows
- Press the Windows key, type Network connections, and select View network connections.
- You’ll see a list of your connections. Anything you’re not using will have a red (X) next to it.
- Right-click on these unused connections and select Disable.
- Do this for all the connections you’re not using.
- After that, restart your browser and try the website again.
On a Mac (Ventura and later)
- Click the Apple icon and go to System Settings > Network.
- You’ll see your connections on the right side.
- To disable one, Control+click it and select Make Service Inactive.
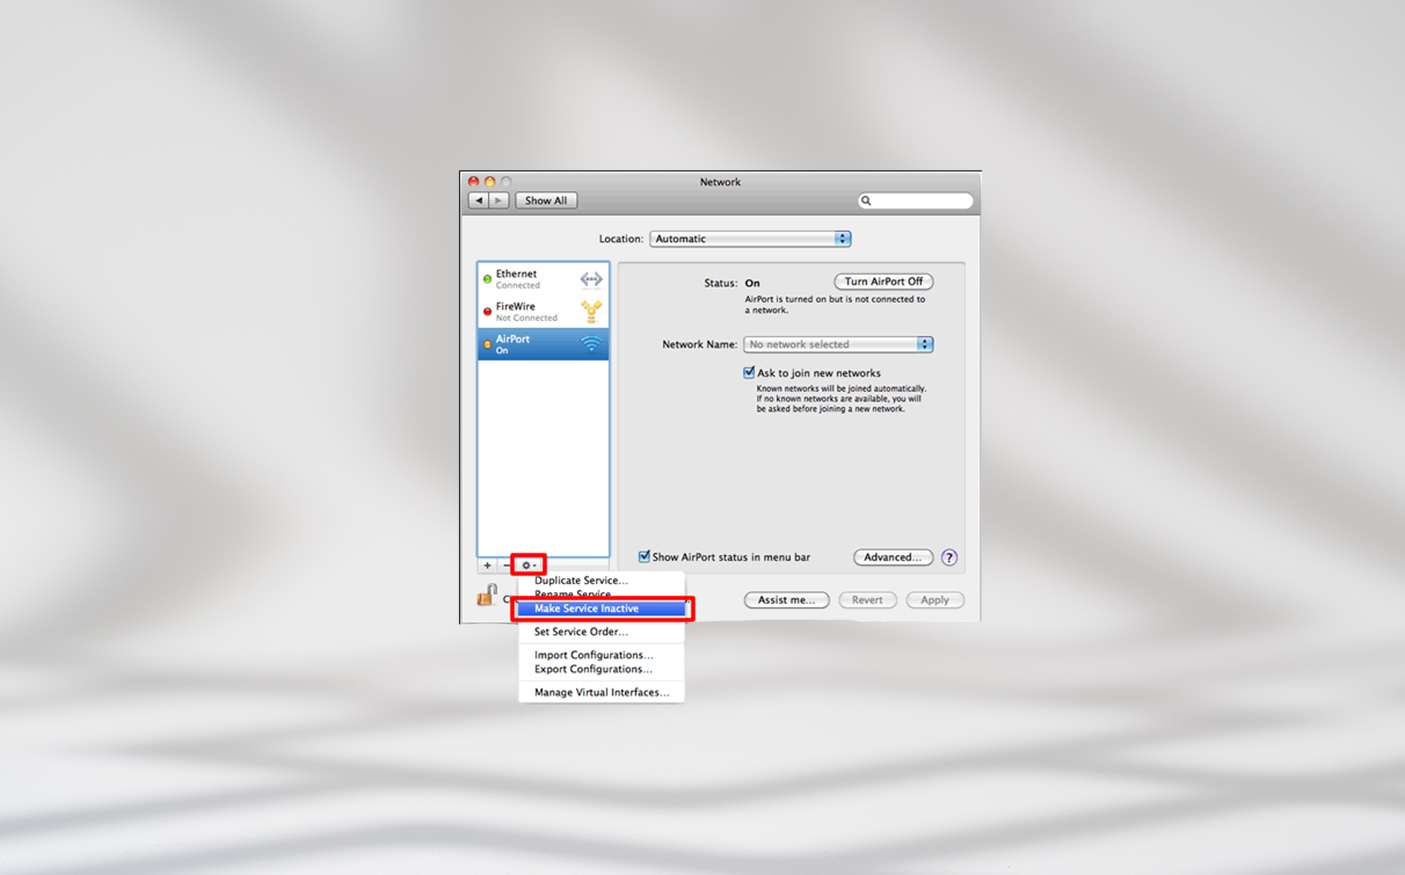
On earlier Mac versions
- Click the Apple icon and go to System Preferences > Network.
- Select the network you want to disable and click the ellipsis icon to open the Action menu.
- Select Make Service Inactive.

Once you’ve disabled all the connections you’re not using, give your browser a fresh start and try reaccessing the internet or website experiencing the DNS error.
Try switching off Peer-to-Peer
If you’re using Windows 10 and still get the DNS Server Not Responding message even after all the other troubleshooting, there’s something else you can try: disabling the Peer-to-Peer (P2P) feature. This feature is all about saving your download bandwidth. It lets you download a Windows update once and share it with other computers on your local network. But it can potentially mess with your DNS settings.
Here’s how to this update feature off
- Click the Windows icon, then the Settings (gear icon), and go to Update & Security.
- On the left side, find and select Delivery Optimization.
- You’ll see an option called ‘Allow downloads from other PCs‘. Turn off the toggle next to it.
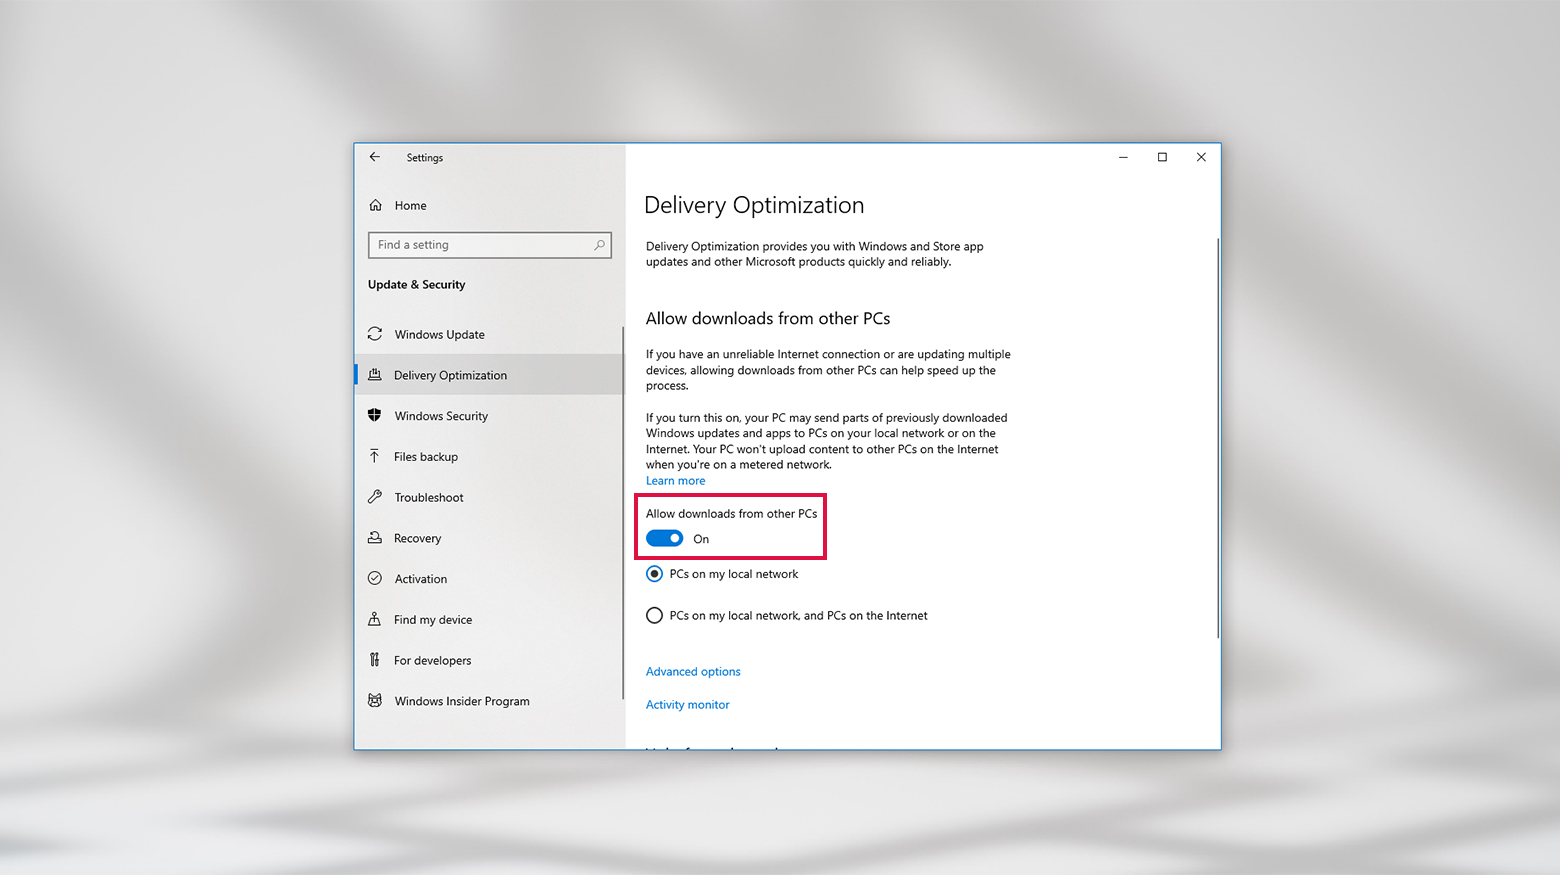
After you’ve done that, restart your computer and recheck to see if you’re still getting the error. If it’s still not working, don’t worry; there are more things to try.
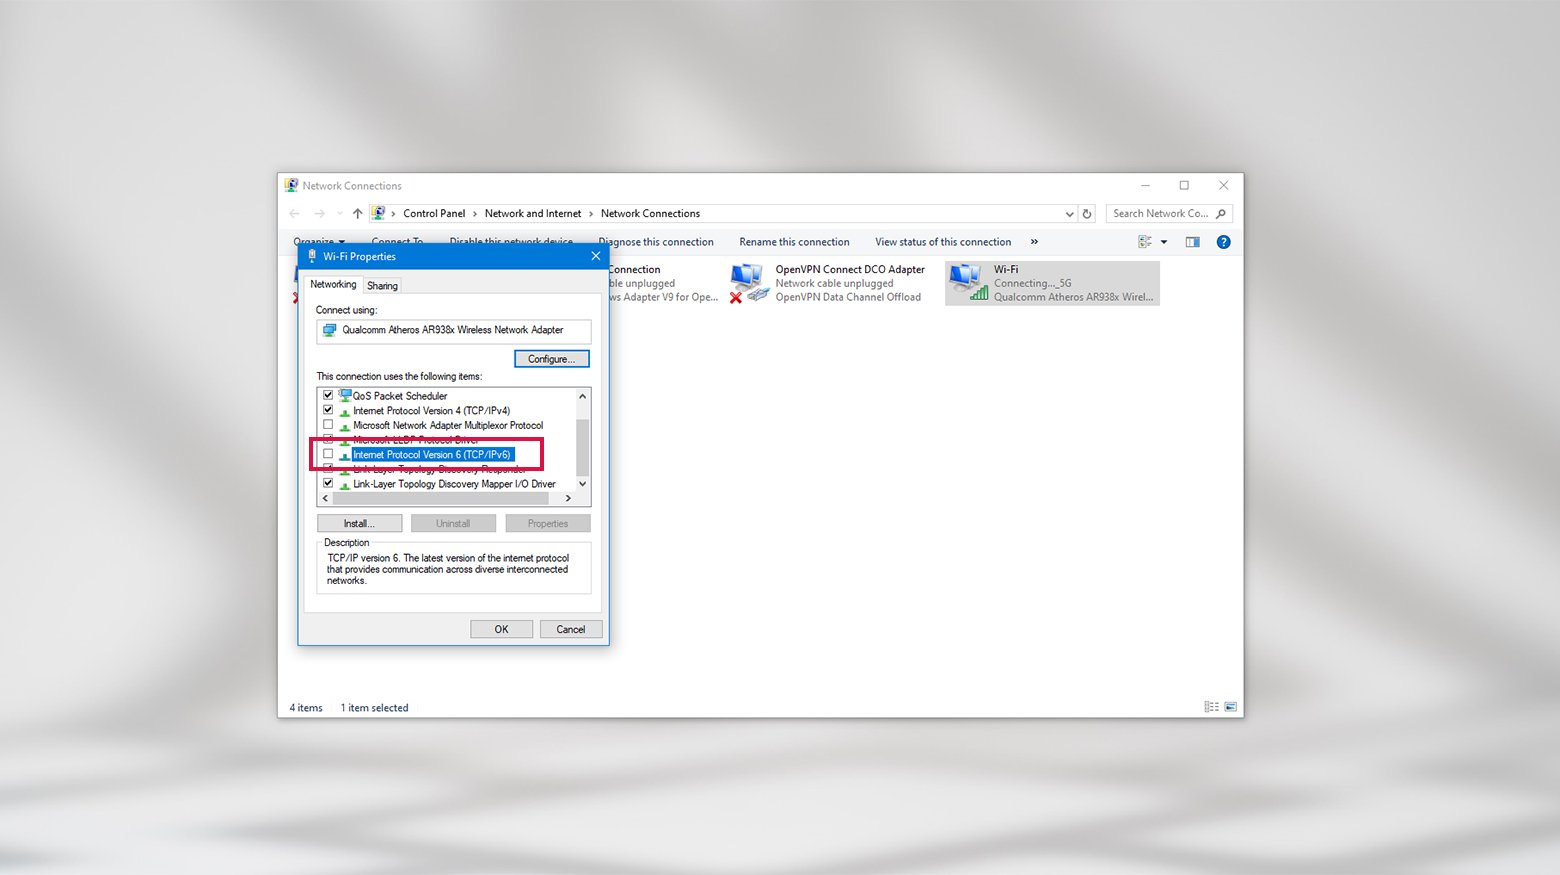
Disable IPv6
If you’re still facing the DNS Server Not Responding issue, another thing to try is turning off IPv6. This is a newer internet protocol that helps with network traffic, but sometimes, it can be the cause of DNS problems.
How to disable IPv6
On Windows
- Press the Windows key, type Network Connections, and press Enter.
- Go to Network Connections, right-click on your active connection, and select Properties.
- Under the Networking tab, find Internet Protocol Version 6 (TCP/IPv6) and uncheck the box.
- Click OK, then restart your browser and see if you can connect to the internet.
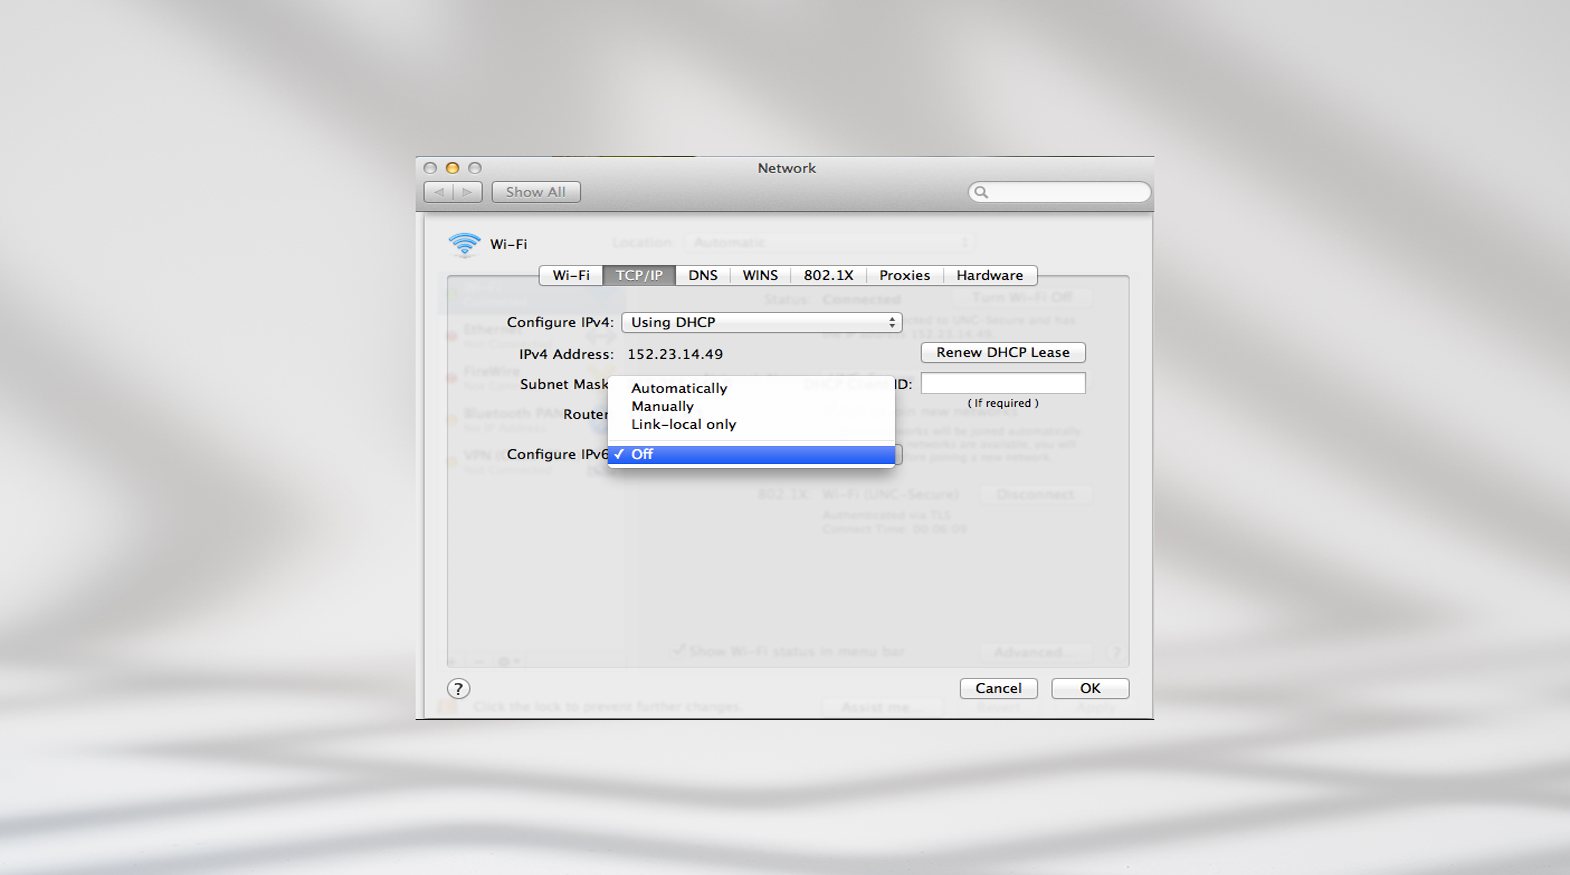
On Mac
- Click the Apple icon and select System Settings > Network.
- Choose your current network connection, click Advanced, and then go to the TCP/IP tab.
- In the Configure IPv6 dropdown menu, set it to Off and click OK. If you can’t turn it off from here, you’ll need to use the Terminal.

Turning off IPv6 via Terminal
- Open Finder, click on Applications > Utilities folder > Terminal.
- Run the following command to see a list of your network interfaces.sudo networksetup -listallnetworkservices
- Find your current connection in the list and note the name (usually Wi-Fi or Ethernet).
- Use the setv6off command to turn off the IPv6 on the network interface you’re using. sudo networksetup -setv6off Wi-Fi If that doesn’t work, try putting the network interface name in quotes: sudo networksetup -setv6off “Wi-Fi”
- To turn off IPv6 on both Wi-Fi and Ethernet, use: networksetup -setv6off Ethernet && networksetup -setv6off Wi-Fi
Enter your password when prompted to turn off IPv6. If you want to turn it back on later, run the following command in Terminal: networksetup -setv6automatic Ethernet && networksetup -setv6automatic Wi-Fi After turning off IPv6, restart your device and try connecting to the internet again to see if the DNS issue is resolved.
Start your PC in safe mode
If you’ve gotten this far, the DNS Server Not Responding error might be because something’s up with your operating system. One method to help rule out various potential issues is to start your computer in Safe Mode. This special start-up mode is like a minimalist version of your operating system. It uses fewer files and resources, which helps in pinpointing problems.
Here’s how to boot in safe mode
For Windows
- Click the Start button, then the Power icon.
- Press and hold the Shift key and click Restart.
- After restarting, choose Troubleshoot > Advanced options > Start-Up Settings, then Restart again.
- When it restarts, press 4 or 5 to start in Safe Mode or Safe Mode with Networking.
- If you’re using Windows 7 or older, restart your PC and hold down F8 while booting up.
For Mac The process for starting a Mac in safe mode differs depending on whether you have a Mac with Apple Silicon or an Intel-based Mac. You can check which you have in About This Mac.
- Click the Apple icon and select About This Mac.
- Check the details for a mention of Chip or Processor. Apple Silicon Macs display Chip and the chip’s name. Intel-based Macs display Processor and the Intel processor’s name.
Now that you know which kind of Mac you have, follow these steps to boot up in safe mode: For Apple Silicon Macs:
- Click the Apple menu > Shut Down
- After it shuts down completely, press and hold the power button until you see Loading startup options.
- Select a volume.
- Press and hold the Shift key, and click Continue in Safe Mode.
For Intel-based Macs:
- With your Mac shut down, turn it on while pressing and holding the Shift key.
- Log in as normal. If successful, Safe Boot displays in the menu bar..
Once you’re in Safe Mode, try rechecking the error. If it works fine now, it could be that some third-party software is messing with your DNS. In that case, you might need to find and remove that software to solve the problem.
Contact your internet service provider
If all else fails, consider contacting your ISP. It’s possible that a wider network outage or DNS server problems on their end are causing the error. If that’s the case, you’ll have to wait for the provider to correct the problem.
Conclusion
We’ve tackled the DNS Server Not Responding issue head-on. Here’s a quick recap of the key points we covered:
- Use network diagnostics to find and fix internet connection troubles.
- Reset your modem or router by turning it off and unplugging it, then plugging it back in.
- Temporarily disable your antivirus or firewall.
- Flush out your DNS cache to update DNS configurations.
- Switch to a different DNS provider, like Google DNS or OpenDNS, instead of your ISP’s default.
If you’re still scratching your head, consider trying the troubleshooting suggestions for nxdomain errors. Now, we’d love to hear from you! Did any of these steps solve your problem? Or do you have other tips to share? Your experiences and insights can greatly help others in the community. Keep the knowledge flowing by adding your thoughts in the comments below!
Say goodbye to website errors
Achieve peace of mind with 99.99% uptime on 10Web Managed
WordPress Hosting, powered by Google Cloud.
Say goodbye to website errors
Fix all the website errors in one click
Migrate your website to the world's best Managed WordPress Hosting.