

Chrome says this site can’t be reached. What does that mean?
When you encounter a “This site can’t be reached” message in Chrome, it indicates a failure in establishing a connection to the requested website. Essentially, Chrome is attempting to reach the server hosting the website, but something is preventing a successful connection.
One common issue is a disruption in your internet connection, either somewhere in your local network or with your Internet Service Provider (ISP). Alternatively, the problem might lie with the website, which could be temporarily down or undergoing maintenance.

While this error message is unique to Chrome, other browsers have similar messages, though the wording may differ. Though Chrome provides some basic troubleshooting suggestions and an error code, a “This site can’t be reached” message is intentionally generic as it appears for various reasons.
Say goodbye to website errors
Achieve peace of mind with 99.99% uptime on 10Web Managed
WordPress Hosting, powered by Google Cloud.
Chrome’s error codes
The “This site can’t be reached” error in Chrome always includes a specific error code that changes depending on the cause of the error. The most common error codes include:
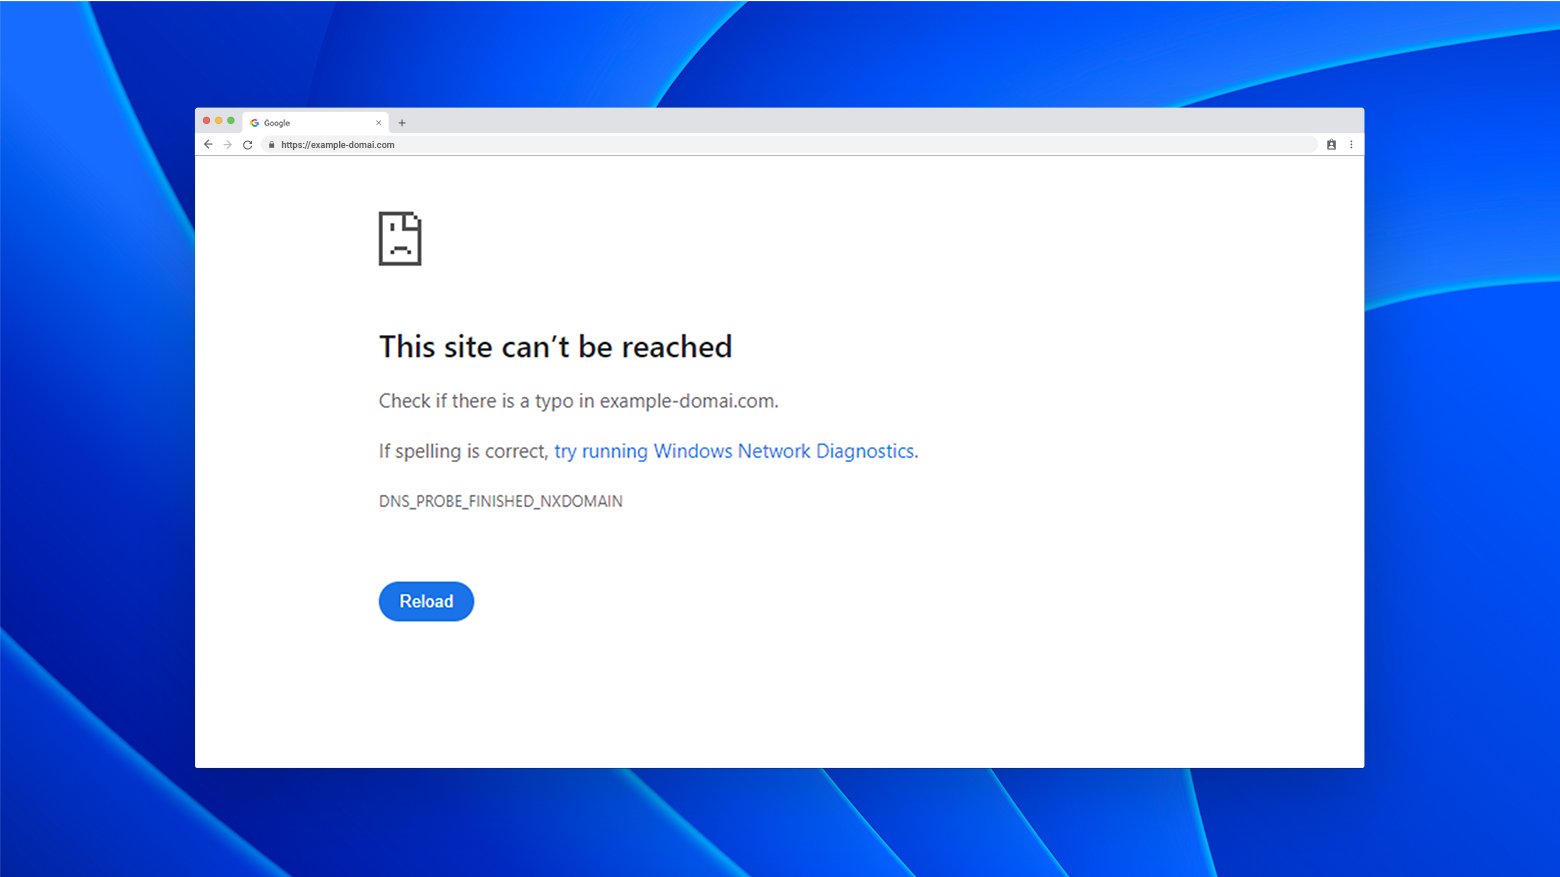
DNS_PROBE_FINISHED_NXDOMAIN
This happens when your browser can’t find the DNS settings for the website you’re trying to visit. It means the browser is having trouble locating which server hosts the site. Common causes could be issues with the website’s domain name or problems with your DNS server.
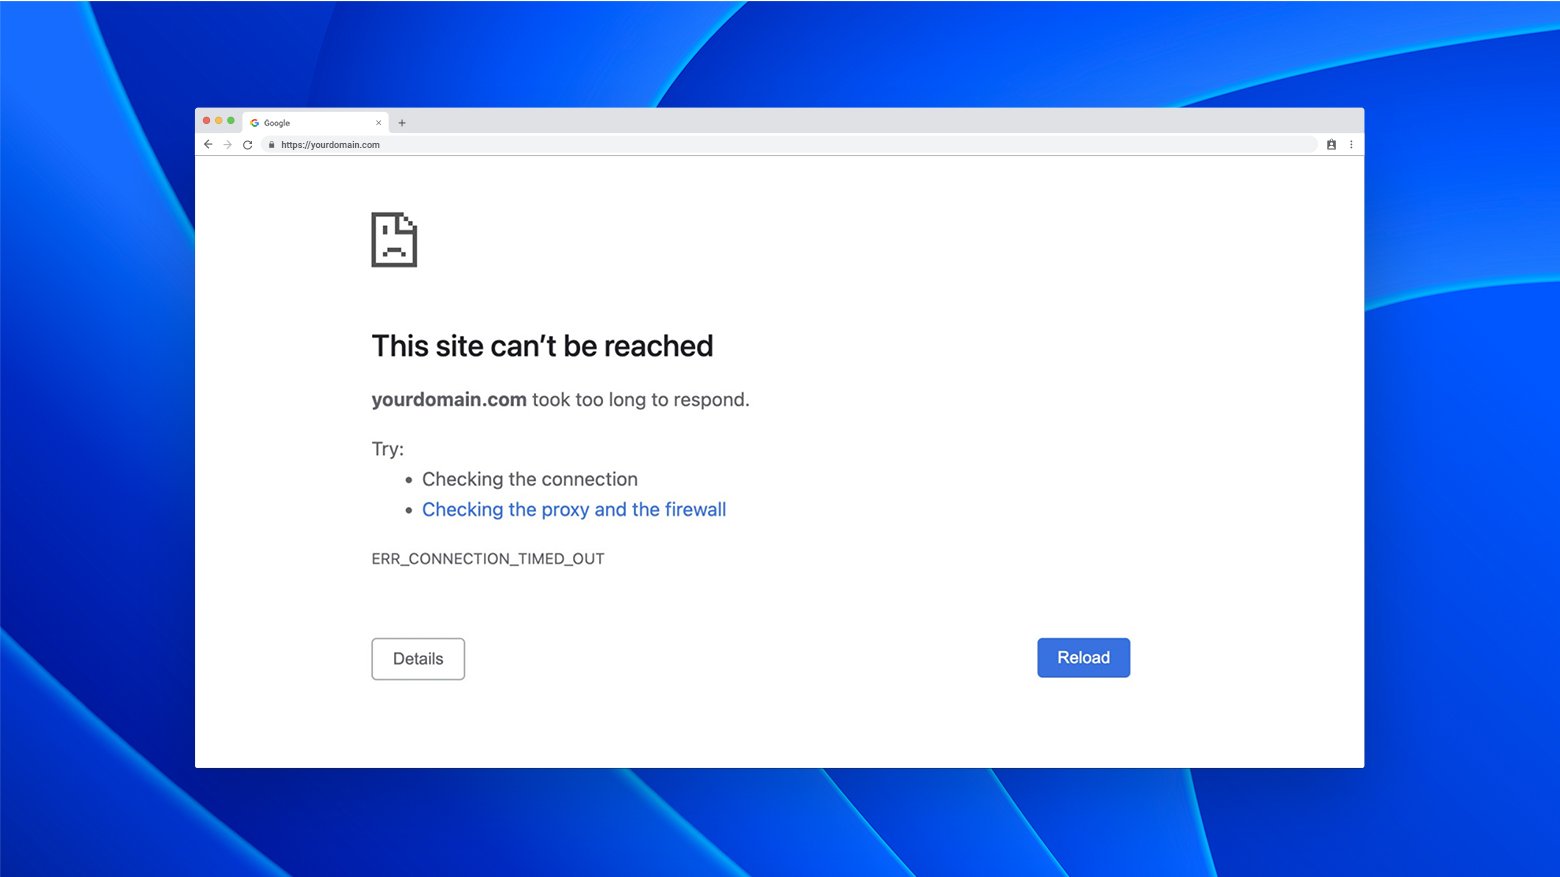
ERR_CONNECTION_TIMED_OUT
This code pops up when the browser waits too long for a response from the website’s server. The server takes too long to reply, and the browser gives up waiting.
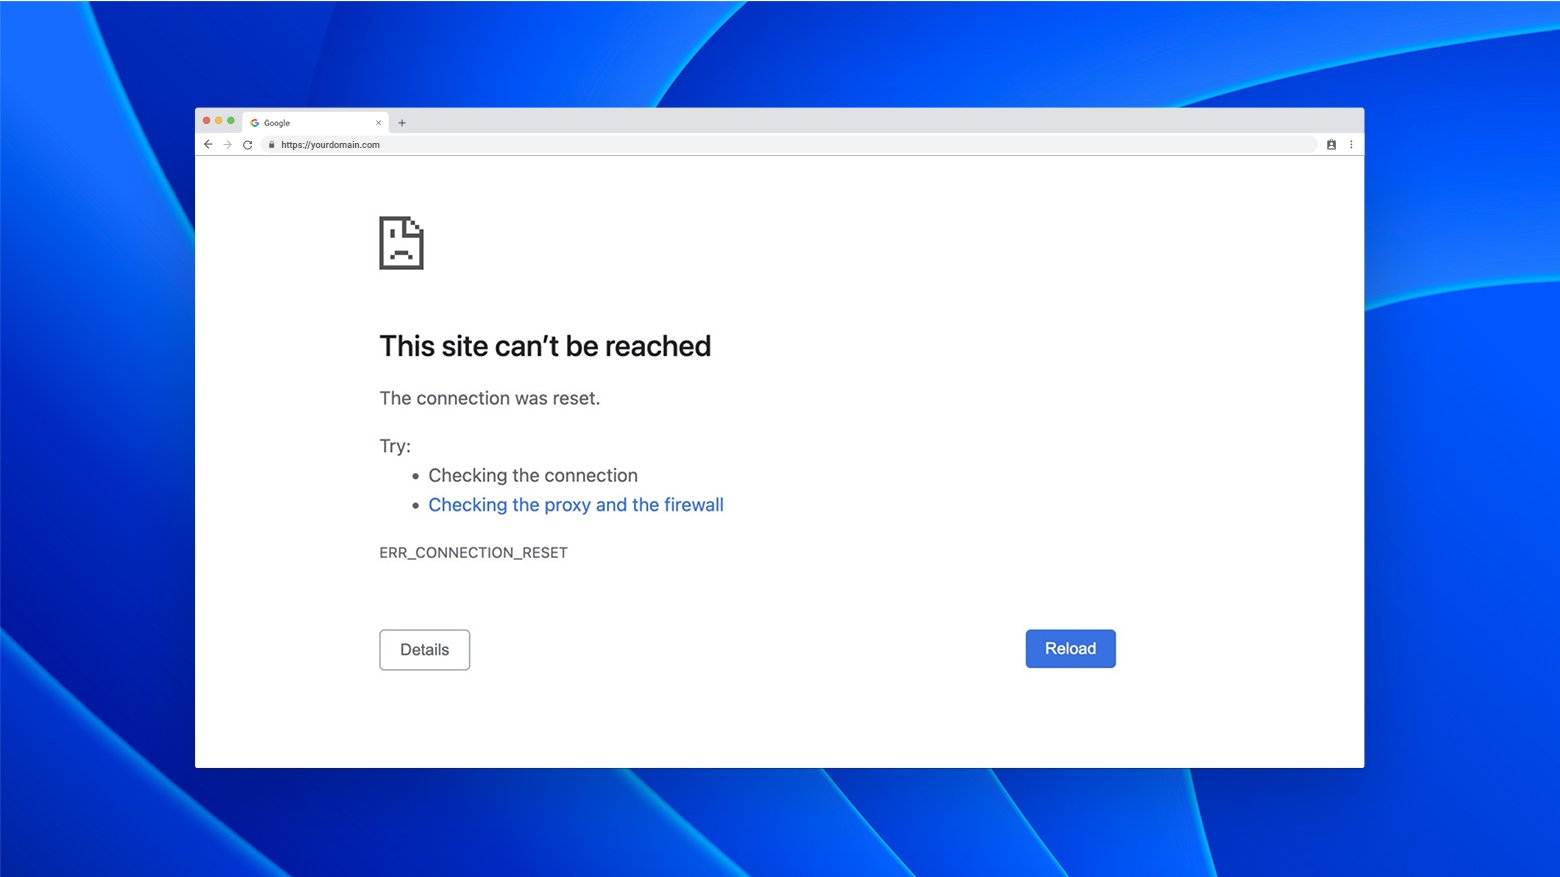
ERR_CONNECTION_RESET
Like ERR_CONNECTION_TIMED_OUT, this error means the browser tried to connect to the website, but the connection was reset. In other words, it was interrupted and couldn’t be completed.
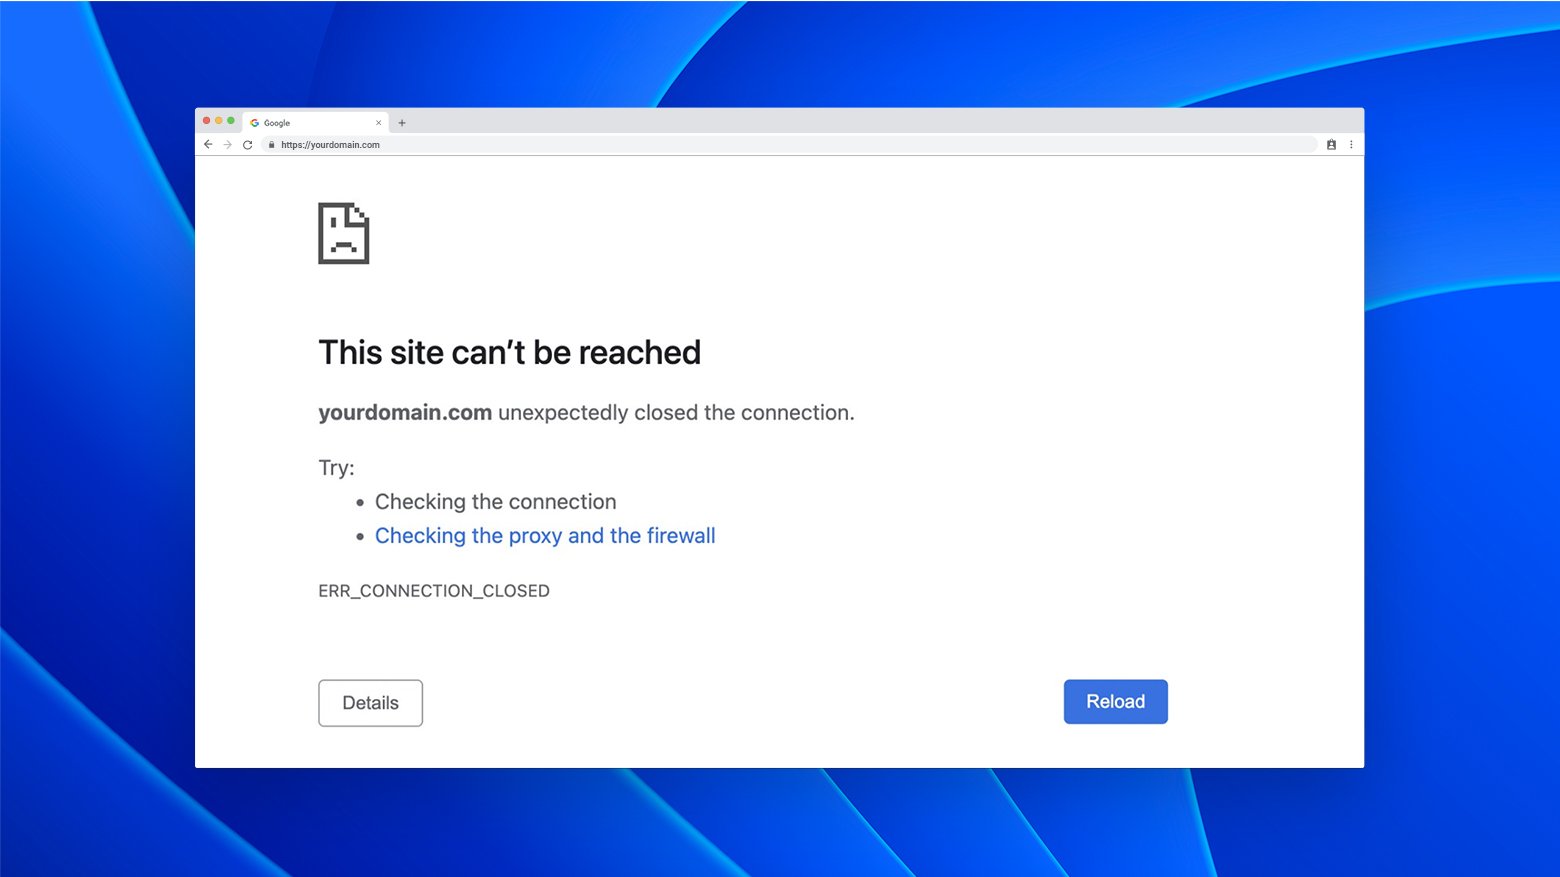
ERR_CONNECTION_CLOSED
This is like ERR_CONNECTION_RESET, but the connection was never fully established before it was closed.
ERR_CONNECTION_REFUSED
This error indicates that the connection to the website was outright refused. This could be due to a misconfiguration or a restriction on either your side or the website’s server.
How this error appears in Firefox and Safari
In Mozilla Firefox and Apple’s Safari, a situation leading to a “This site can’t be reached” error in Chrome results in a more specific message. Because these browsers use distinct messages for different problems, users can more easily identify and troubleshoot the specific problem they are encountering.
Many other browsers use a similar approach to help users determine whether the problem is related to DNS resolution, server connectivity, or other network-related issues.
Firefox
For instance, when Firefox encounters a DNS issue similar to Chrome’s DNS_PROBE_FINISHED_NXDOMAIN, it displays the message “Hmm. We’re having trouble finding that site.” This indicates that Firefox is unable to resolve the website’s address.

On the other hand, if the issue is related to connectivity, Firefox will show a different message entirely. This differentiation helps users understand whether the problem is finding the website’s address or connecting to the website’s server.
Safari
Safari, the default browser on Apple devices, also opts for specific messages for various errors rather than a single catch-all message.
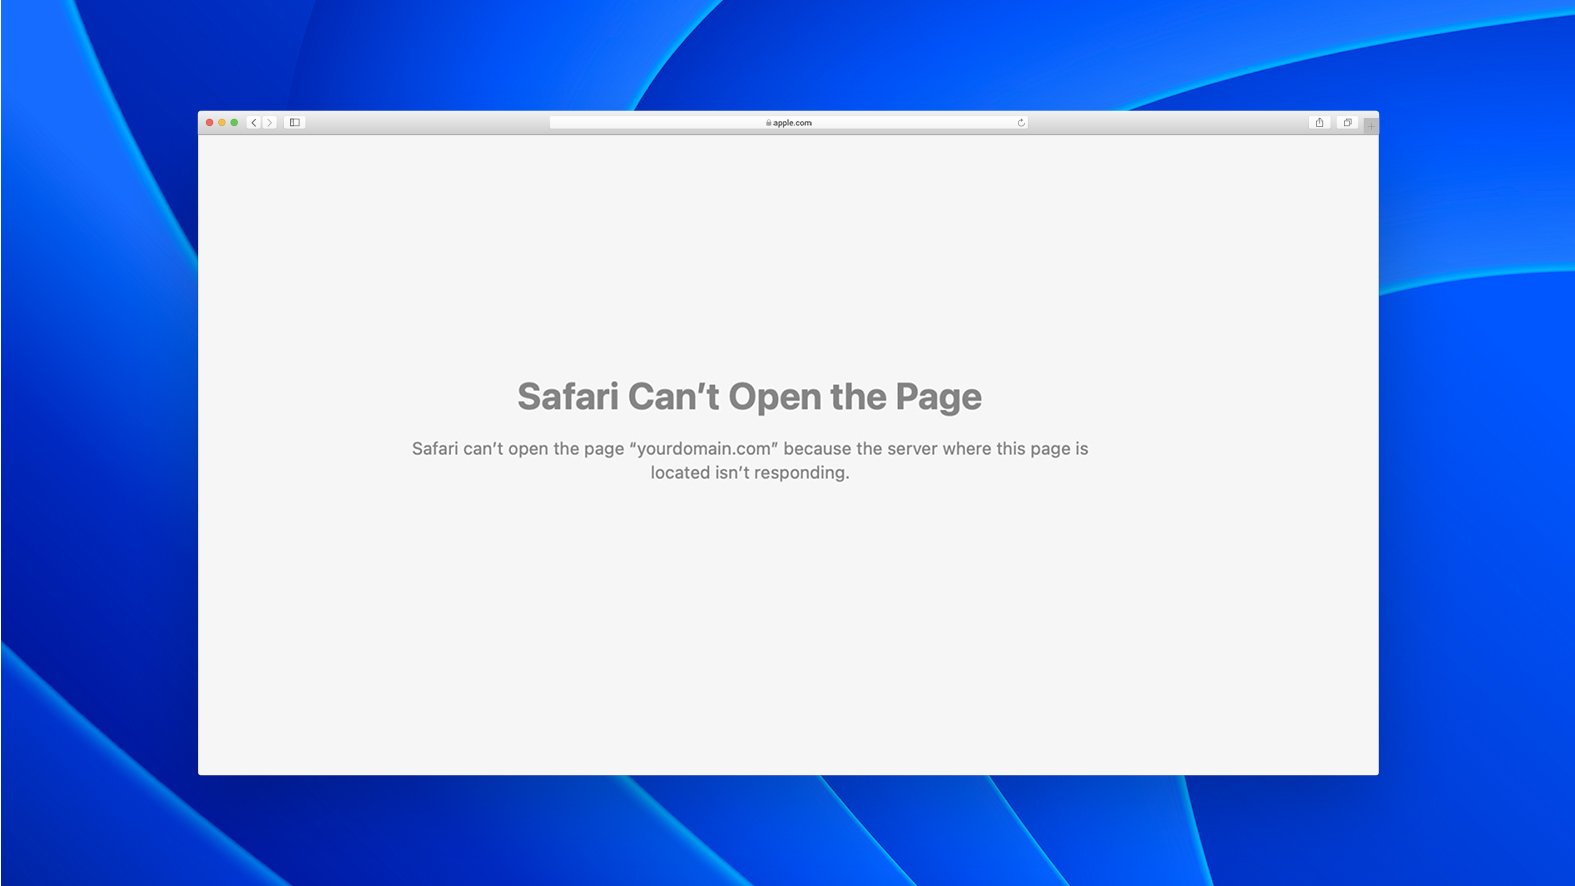
For example, when Safari encounters a timeout due to connectivity issues, it displays the message “Safari Can’t Open the Page.” This message is mainly used to indicate problems with the connection to the server, such as delays in response or interruptions in the network connection.
Common causes of this site can’t be reached messages
The “This site can’t be reached” error in browsers like Chrome is a blanket term covering various issues. These issues can vary widely in nature and origin. One common cause is DNS-related problems. DNS, or Domain Name System, is like the internet’s phonebook; it links website names to their IP addresses.
When there’s a DNS issue, your browser can’t translate the website’s name into its IP address. This is often indicated by the DNS_PROBE_FINISHED_NXDOMAIN error. Common DNS issues include:
- The website’s domain name doesn’t exist or is misspelled in the address bar.
- The domain name has expired.
- The domain’s DNS records are incomplete or misconfigured.
- Your computer’s DNS server is having problems.
- Issues with your local network or Internet Service Provider (ISP).
Connectivity and device issues are other big causes, often indicated by error codes like ERR_CONNECTION_REFUSED, ERR_CONNECTION_CLOSED, ERR_CONNECTION_TIMED_OUT, and ERR_CONNECTION_RESET. These can arise from:
- Internet connection problems.
- Issues with your device or router.
- Outdated cache and cookies in your browser.
- Firewall or network restrictions blocking access to certain websites.
- Browser extensions interfering with website connections.
- An outdated DNS cache in your computer.
- In WordPress websites, plugins that disrupt connectivity.
These issues can prevent your browser from reaching the website you’re trying to access, resulting in the frustratingly vague “This site can’t be reached” message.
Say goodbye to website errors
Achieve peace of mind with 99.99% uptime on 10Web Managed
WordPress Hosting, powered by Google Cloud.
Troubleshooting a “this site can’t be reached” error on your own website
If you’ve encountered the “This site can’t be reached” error on your own website, you’ll need to figure out if the problem stems from an issue on your end or an issue with the website itself. First, try some basic internet troubleshooting steps to see if there’s an issue for everyone or just for you.
You can try accessing the website on a mobile device connection or check it with a service like Down for Everyone or Just for Me. If it’s just you, the problem’s probably related to your internet connection or local network devices. In that case, you can skip to the section below on troubleshooting this error locally.
If the site’s down for everyone, here’s a breakdown of common issues to check out:
Check server status
First, make sure your web server is up and running as usual. Log in to your hosting account and check the server status in your control panel or dashboard. While you’re at it, check for notifications about server failures or other known issues.
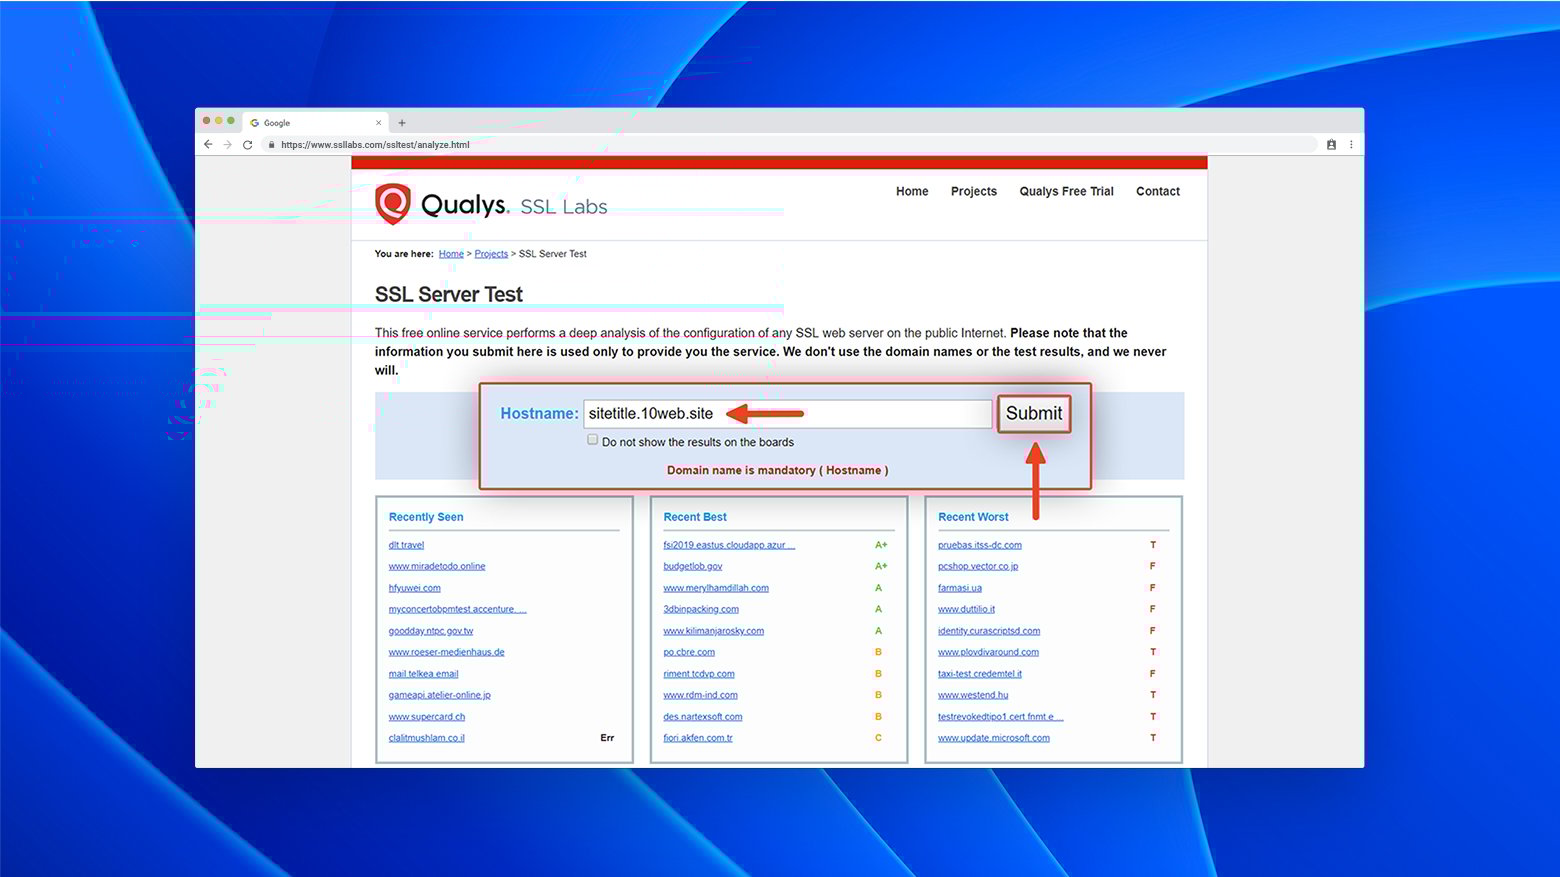
SSL certificate
If your site uses HTTPS, make sure the SSL certificate is valid and properly installed. An expired or misconfigured SSL certificate can block access to your site. You can use an SSL verification tool like Qualys to ensure everything works correctly or track down issues that lead to errors.
Domain registration
New websites might face this issue if the domain name hasn’t been purchased yet. Ensure your domain is registered, and give it some time to start resolving to your hosting if you’ve just bought it or updated the DNS records.
Renew expired domains
If your website suddenly starts showing this error, check if the domain has expired. You can use a WHOIS checker to confirm whether the domain is active, then renew it with the domain registrar if necessary.
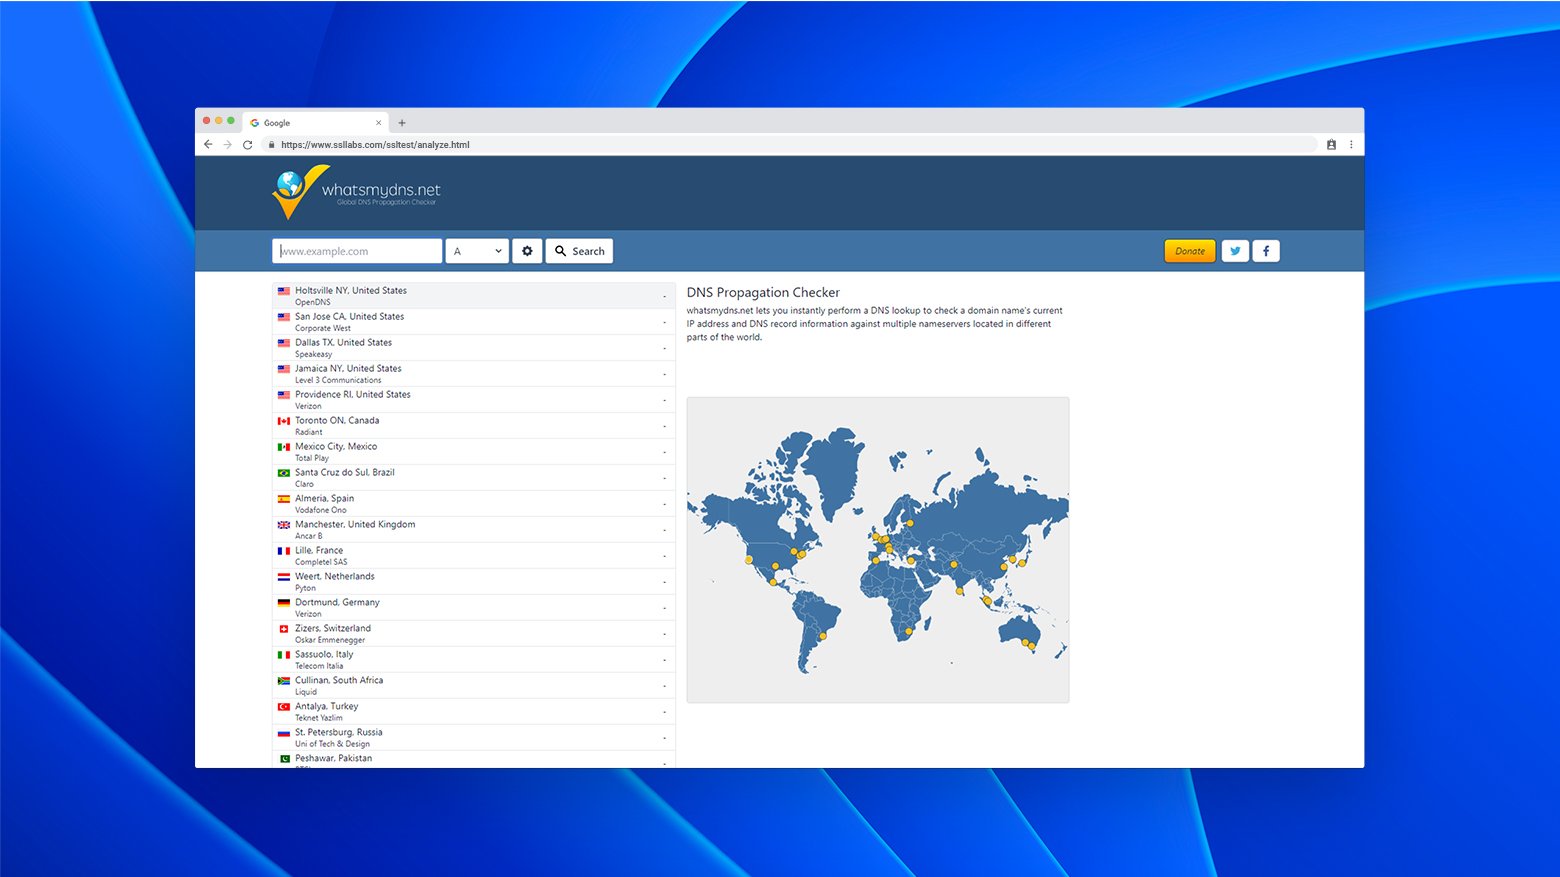
Verify domain’s DNS records
A missing DNS A record can cause this error. Verify your domain’s DNS settings, particularly the nameservers and A record, using tools like DNSChecker, and update any misconfigured or incomplete DNS records.
Turn off DNSSEC
If DNSSEC (a security feature) is enabled on your domain but your nameservers don’t support it, this can lead to errors. Disable DNSSEC through your registrar or domain control panel if necessary.
Deactivate WordPress plugins
Faulty or misconfigured WordPress plugins can cause timeouts. Disable plugins one by one to identify the problematic one, or disable all plugins and reactivate them individually if you can’t access your dashboard.
Testing plugins when you can access the WordPress admin
If you can access yoursite.com/wp-admin, you can try deactivating the plugin or theme found in the error log. If your error log search didn’t turn up anything useful, you can deactivate all the plugins in bulk from the Plugins page.
- Log in to your WordPress admin account
- Go to Plugins
- Tick the box to select all plugins
- Select Deactivate from the Bulk Actions drop-down menu
- Click Apply.
Test the site, and if it works, start reactivating the plugins one by one, checking the site each time for the error. After you activate the problem plugin and see the error again, you’ll know which one is causing the error. You can then contact the plugin’s developer for help or ask for assistance in the plugin or theme’s WordPress support forum.
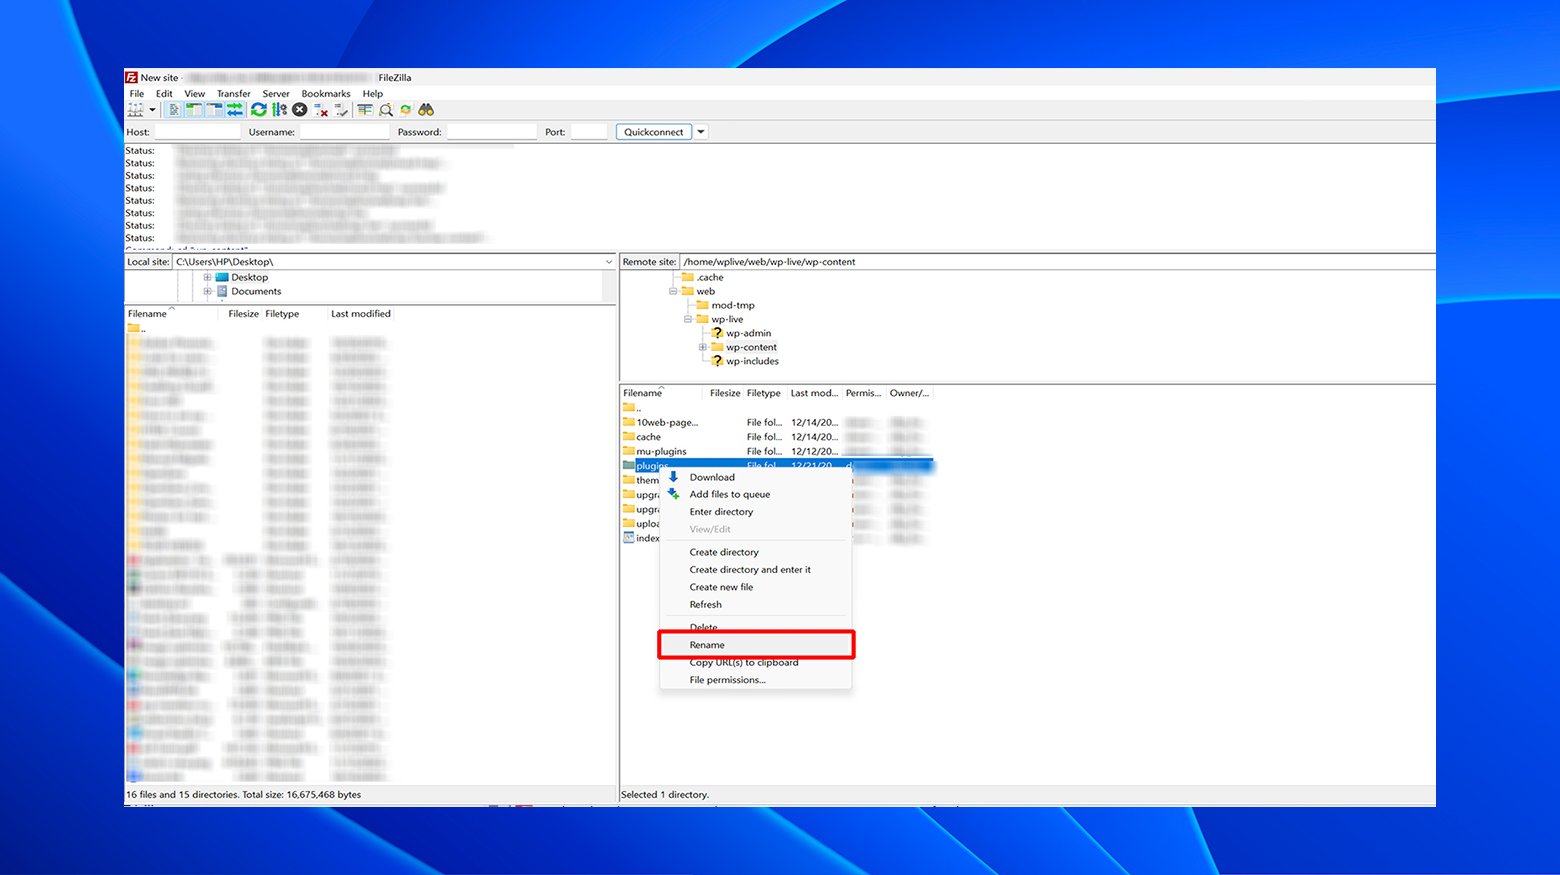
Testing plugins without accessing the WordPress admin
If you can’t access the WordPress admin, you’ll need to use FTP to access your website’s files on the server. You can use an FTP client like FileZilla to do that.
- Find your FTP credentials from your web host.
- Use an FTP client like FileZilla to access your website files.
- Rename your wp-content/plugins folder to disable all plugins, or if you found a particular plugin or theme in the error log, you can rename that specific folder instead of renaming the plugins folder.

- Test the site with the 502 error.
- If the site works, reactivate the plugins by changing the folder’s name back to plugins.
- Repeat the process of deactivating plugins or themes by renaming the respective folder and testing the site for the error until you find the problematic plugin.
Once you’ve found the plugin or theme causing the error, you can contact the developer or ask for help in the plugin’s or theme’s WordPress forum.
Contact Your Hosting Provider
Finally, don’t hesitate to contact your hosting provider if everything else checks out. They can help get to the bottom of issues specific to your hosting or server. Remember, as a website owner, promptly resolving these issues is crucial to avoid losing traffic and ensure a smooth experience for your visitors.
Say goodbye to website errors
Achieve peace of mind with 99.99% uptime on 10Web Managed
WordPress Hosting, powered by Google Cloud.
Troubleshooting a “this site can’t be reached” error while visiting a website
When you’re simply a visitor encountering the “This site can’t be reached” error, it’s important to note that while the issue may sometimes be on the website’s end, there are various steps you can take to troubleshoot potential local device or network issues.
Check other websites
Start by visiting other websites like google.com or bing.com to verify your internet connection. If you can’t access any site, your internet might be down.
Check website availability
Use online tools like Down for Everyone or Just Me to see if the problem is specific to you or affecting all users. If it’s just you, it’s a good indicator that there’s an issue somewhere with your internet connection, network devices, or computer.
Check the URL for errors
Ensure you haven’t mistyped the website address. A typo or misspelling in the domain name or web address can lead to DNS errors like DNS_PROBE_FINISHED_NXDOMAIN.
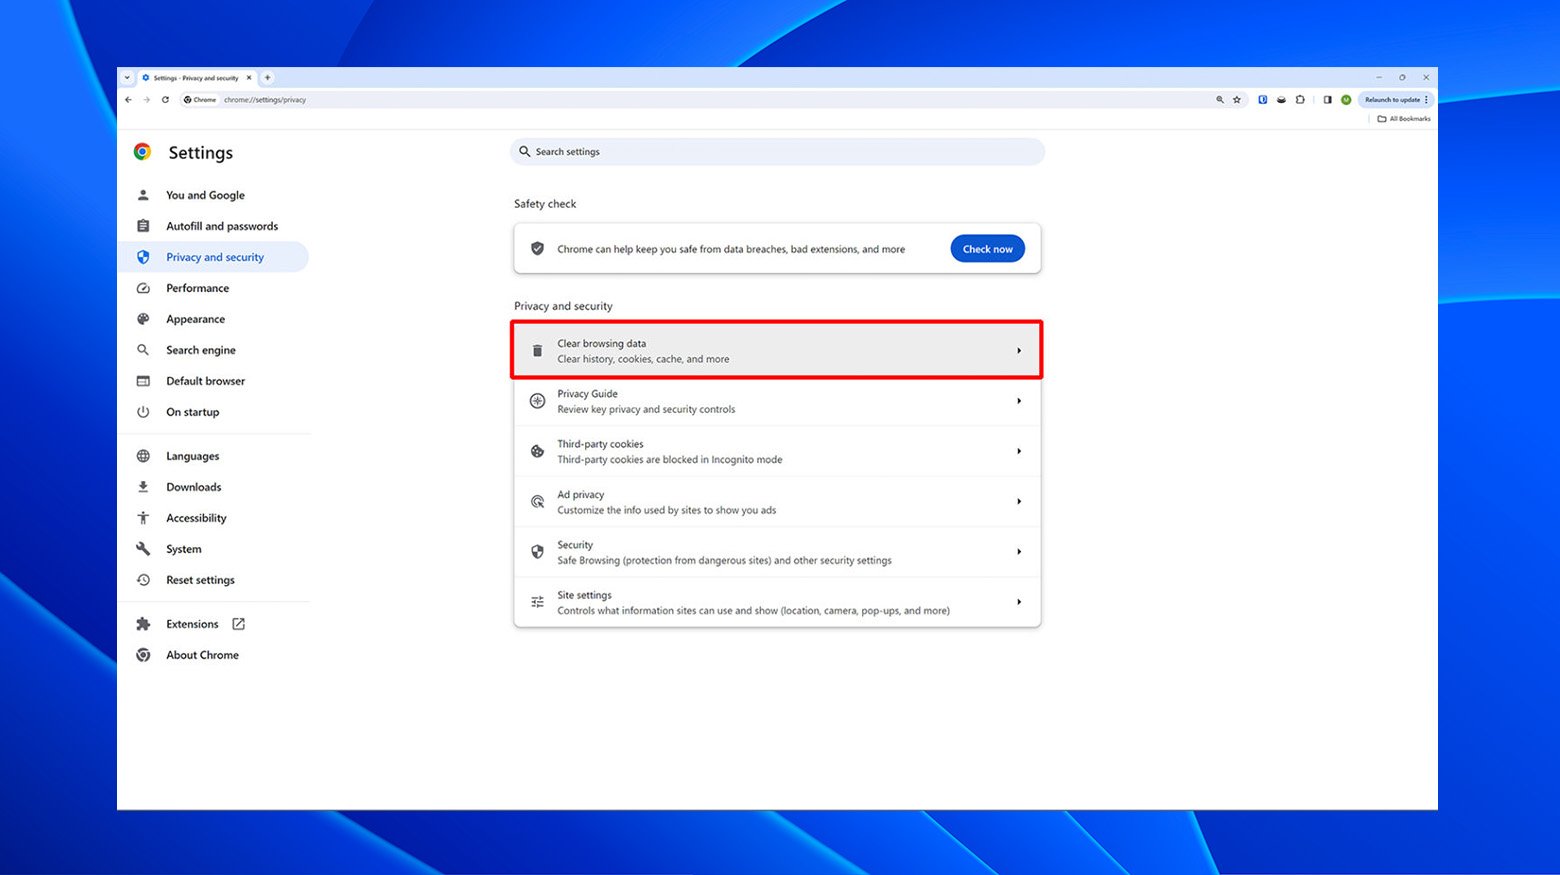
Clear browsing data
Browsers store temporary data to speed up connections, but corrupted or outdated cache and cookies might prevent sites from loading. Clearing your browser data can clear up this issue. Clearing Chrome’s cache:
- Enter chrome://settings/clearBrowserData in the address bar or
- Click on the 3 vertical dots in Chrome’s upper right corner and choose History
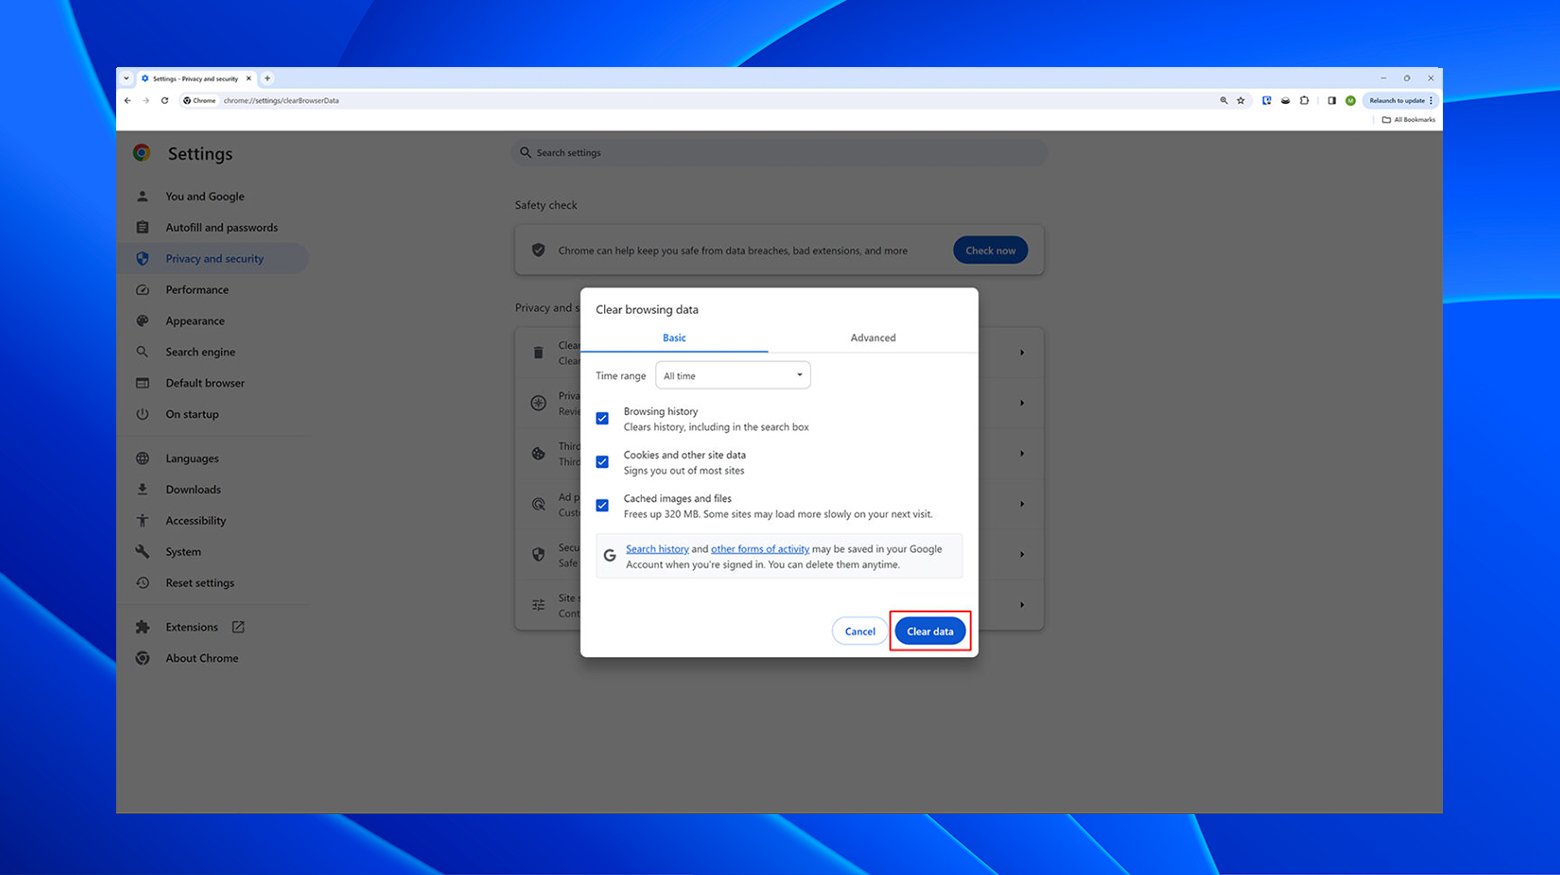
- Click on Clear browsing data
- Tick all the boxes to ensure the cache is totally cleared
- Select the Time Range from the drop-down menu
- Click Clear data
This will clear out any stored data preventing you from accessing the website.
Try another device
Test the website on a different device to determine if the problem is with your computer or internet connection. Try to access the website using your mobile device’s data connection. If it works, it’s a good sign the problem lies with your network connection or computer.
Restart your router and modem
Often, restarting your internet hardware can resolve connectivity issues. This step gives your router or modem a fresh start.
- Most routers and modems have a power button. Press it to turn off the device.
- Wait about a minute, then turn it back on. Give the devices one or two minutes to reconnect to the internet.
- Once everything’s back online, check if you can access the internet from your browser.
Sometimes, more than just using the power button is needed. To do a more thorough power cycle:
- Unplug your router and modem from the power outlet.
- Wait at least 30 seconds (this is important).
- Plug it back in and wait a few minutes for everything to boot up.
For a completely fresh start, restart your computer or the device where you see the DNS error. Restarting these devices often eliminates issues that can resolve many potential problems.
Run network troubleshooting
If you can reach the website on a different device, utilize network troubleshooting tools available on your OS to diagnose and solve network-related problems. For Windows:
- Press the Windows key, type Settings, and press Enter.
- Click Update & Security > Troubleshoot.
- Click the Additional troubleshooters link.
- Click Internet Connections, and click Run the troubleshooter.
The troubleshooter will attempt to detect any problems that are causing connection issues. If it finds anything, follow the prompts to try and resolve it. For Mac
- Close any open apps and connect to the same Wi-Fi you’re having issues with.
- Hold the Option key, click the Wi-Fi icon in the menu bar, and select Open Wireless Diagnostics.
- Follow the on-screen instructions to check out your network connection.
- After the scan, click the Info icon in the Summary pane for more details about your network and possible solutions to any issues detected.
Change your network
Try switching to a different network, like using mobile data instead of Wi-Fi, to see if network restrictions are causing the issue. If you’re using a wireless connection, try switching to a wired connection if possible.
Flush your DNS cache and renew your IP
Clearing your DNS cache can resolve issues related to outdated website data stored by your computer.
Clearing the DNS cache in Windows:
- Type cmd into the search bar and open Command Prompt.
- Type ipconfig/flushdns and hit Enter. This clears the DNS cache.
- Run these commands one after the other:
- ipconfig /registerdns
- ipconfig /release
- ipconfig /renew
- Restart your computer and try connecting again.
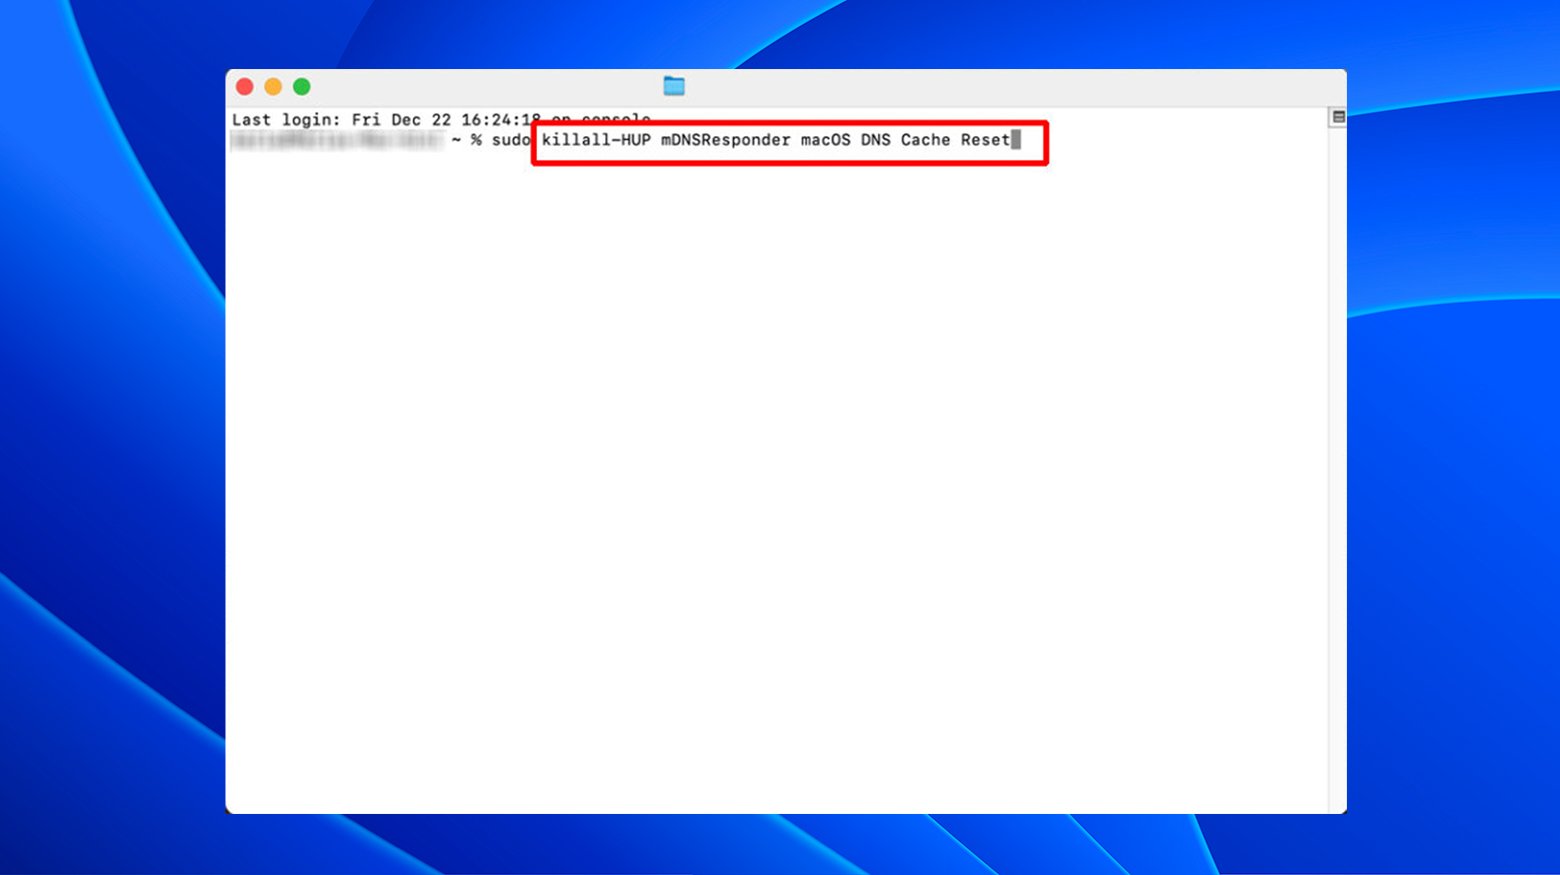
Clearing the cache on Mac:
- Click on Go in the toolbar, then go to Utilities.
- Open the Terminal.
- In the Terminal, type: sudo killall -HUP mDNSResponder && echo macOS DNS Cache Reset and hit Enter.
- Enter your admin password at the prompt.
Running these commands should cause your network adapter to refresh its DNS settings. If this doesn’t fix the issue, you may be experiencing trouble with your DNS settings.
Change your DNS server
Switching to public DNS servers like Google’s (8.8.8.8 or 8.8.4.4) or Cloudflare’s (1.1.1.1 or 1.0.0.1) can help if there’s an issue with your default DNS server. Here are some other DNS servers you can try:
- OpenDNS Home: 208.67.222.222 or 208.67.220.220
- AdGuard DNS: 94.140.14.14 or 94.140.15.15
- Quad9: 9.9.9.9 or 149.112.112.112
Switching to a different DNS server
Windows:
- Press the Windows key and type Network connections.
- Select View network connections.
- Right-click on your internet adapter (WLAN for Wi-Fi, LAN for Ethernet) and click Properties.
- Choose Internet Protocol Version 4 (TCP/IPv4) and click Properties.
- Select Use the following DNS server addresses and enter a new DNS server address from the list of alternatives above.
- Click OK and restart your browser.
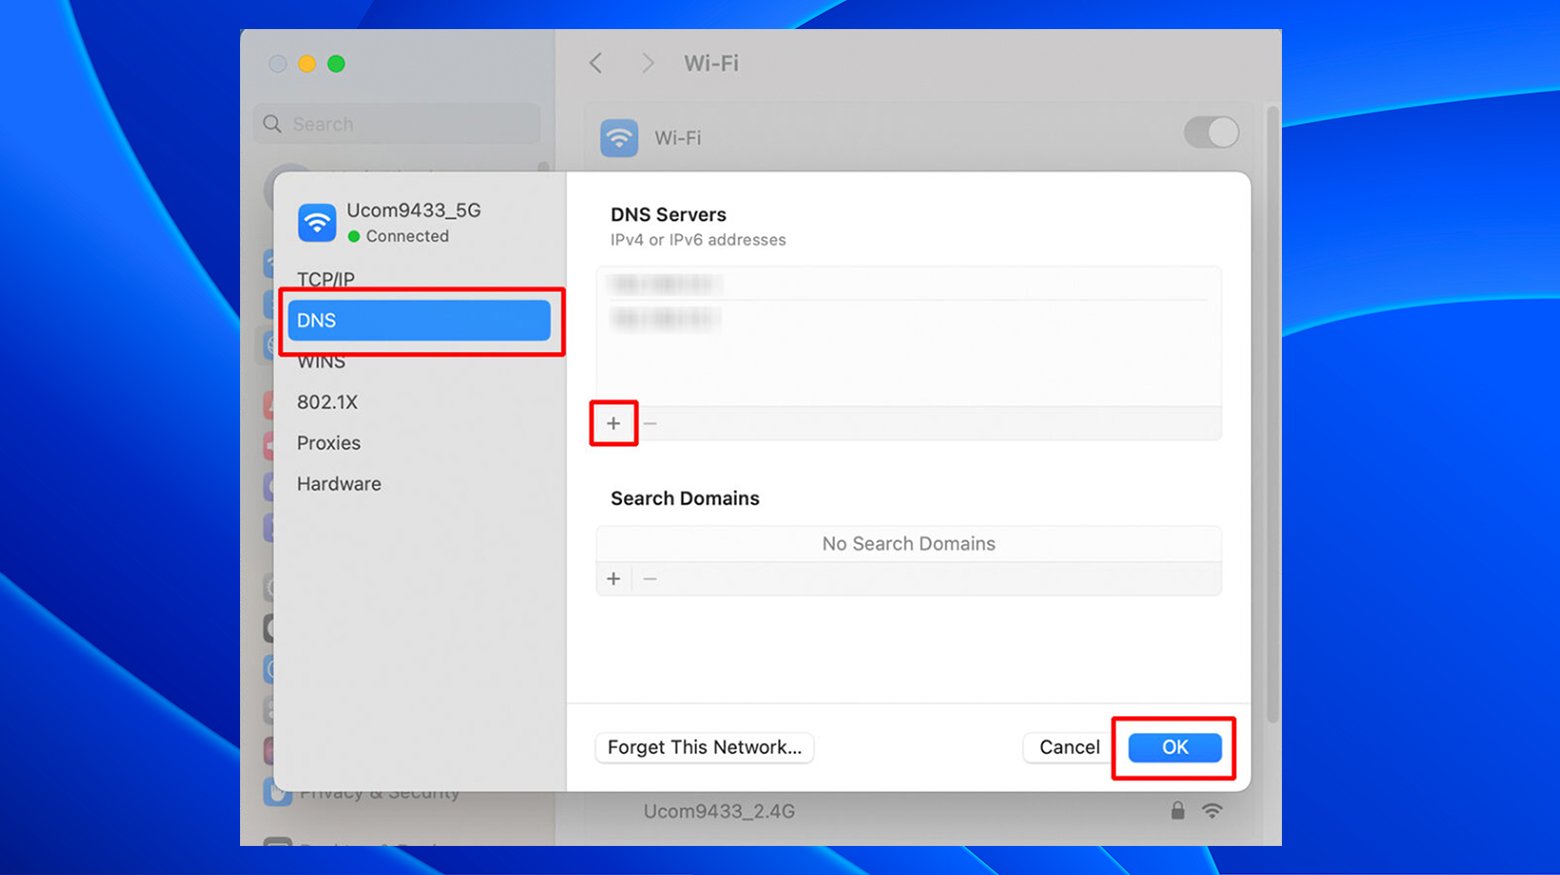
Mac:
- Click the Apple icon and go to System Preferences > Network.
- Select your network and click Details.
- Select the DNS tab in the pop-up window.
- Delete the existing DNS address (make a note of this address to revert back later if you wish)
- Click the (+) button to add a new DNS server address.
- Enter the new DNS information, and click OK.
- Restart your browser.
If changing the DNS server solves the “This site can’t be reached” error, the root cause most likely lies with your Internet Service Provider (ISP).
Reset TCP/IP
Resetting the TCP/IP protocol can help by rebuilding the protocol and removing any accumulated errors. To reset TCP/IP in Windows, you need to open a Command Prompt window with administrator privileges.
Here’s how to do that:
- Click the Start button and type cmd
- Right-click on Command Prompt and select Run as administrator
- A Command prompt window appears. Enter the following commands one by one, pressing Enter after each:
- netsh winsock reset
- netsh int ip reset
- ipconfig /release
- ipconfig /renew
- ipconfig /flushdns
These steps help reset your internet connection, with the final command, “ipconfig /flushdns,” clearing your local DNS cache, which can solve certain connection problems. Once completed, revisit the website displaying the “This site can’t be reached” error to see if the issue is resolved.
For resetting TCP/IP in macOS, the process is straightforward:
- Open System Preferences and select Network.
- Choose your current internet connection and navigate to Advanced settings.
- Go to the TCP/IP tab and click Renew DHCP Lease.
After this, try reaccessing the website that caused the “This site can’t be reached” error.
Disable browser extensions
Browser extensions can sometimes interfere with website connections. Disable them one by one to identify the culprit.
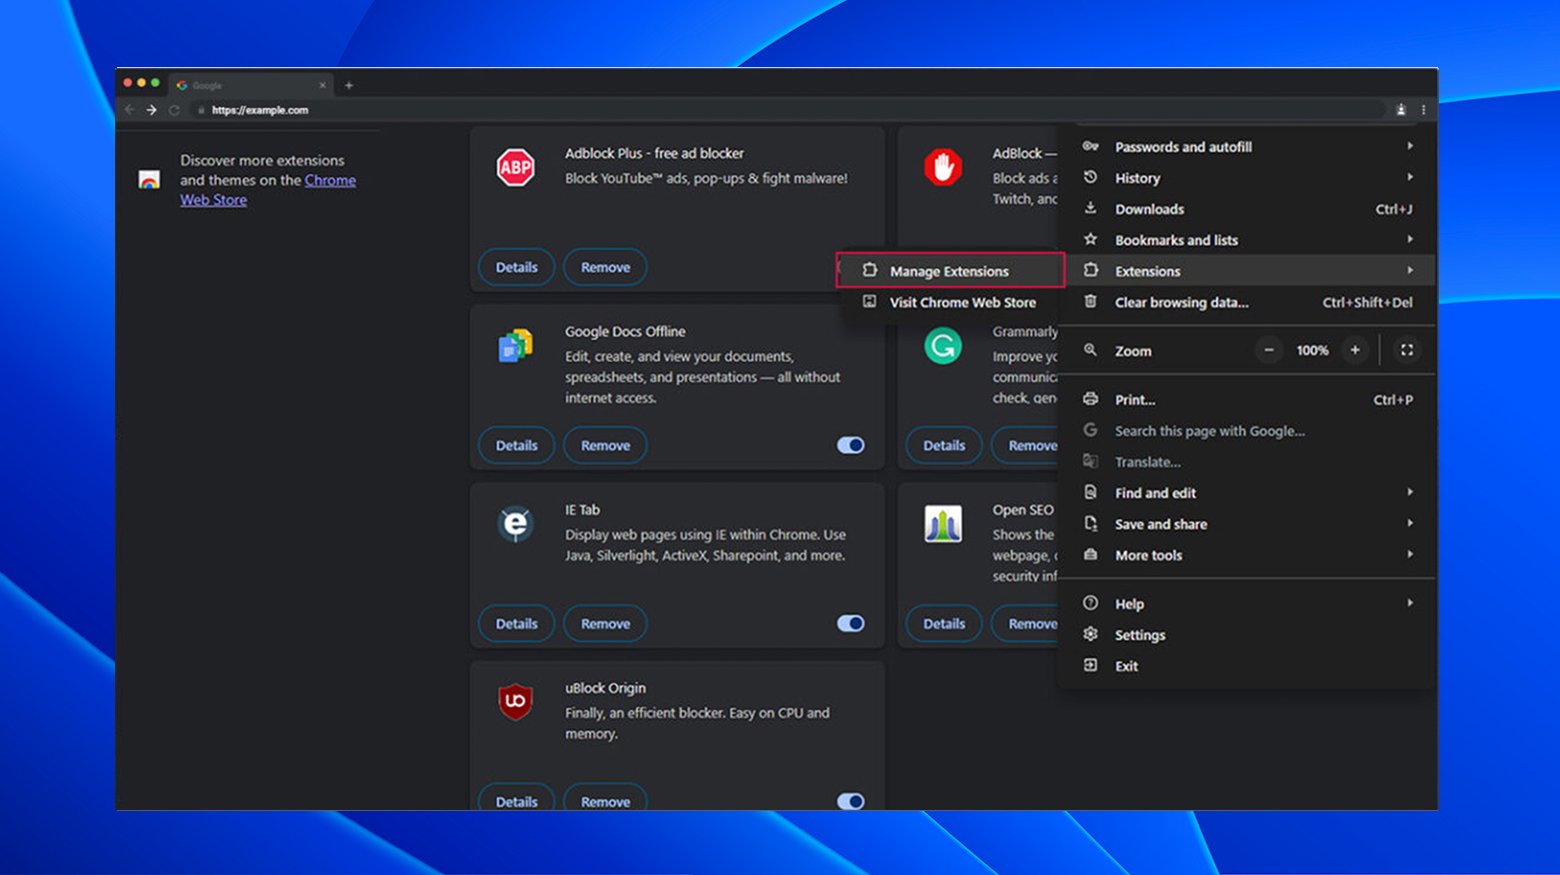
Here’s how to check Chrome extensions:
- Open the Extensions menu in Chrome by clicking the Ellipsis menu > Extensions > Manage extensions.
- Evaluate each extension you have. Consider if it’s necessary; if not, remove it with the Remove button.
- For the extensions you wish to retain, check their last update date. Let them go if they haven’t been updated during the previous three months.
- Temporarily disable all your extensions by turning each toggle off.
- If disabling them resolves the issue, it’s clear that one of the extensions is problematic.
- Reactivate them one at a time to identify the culprit.
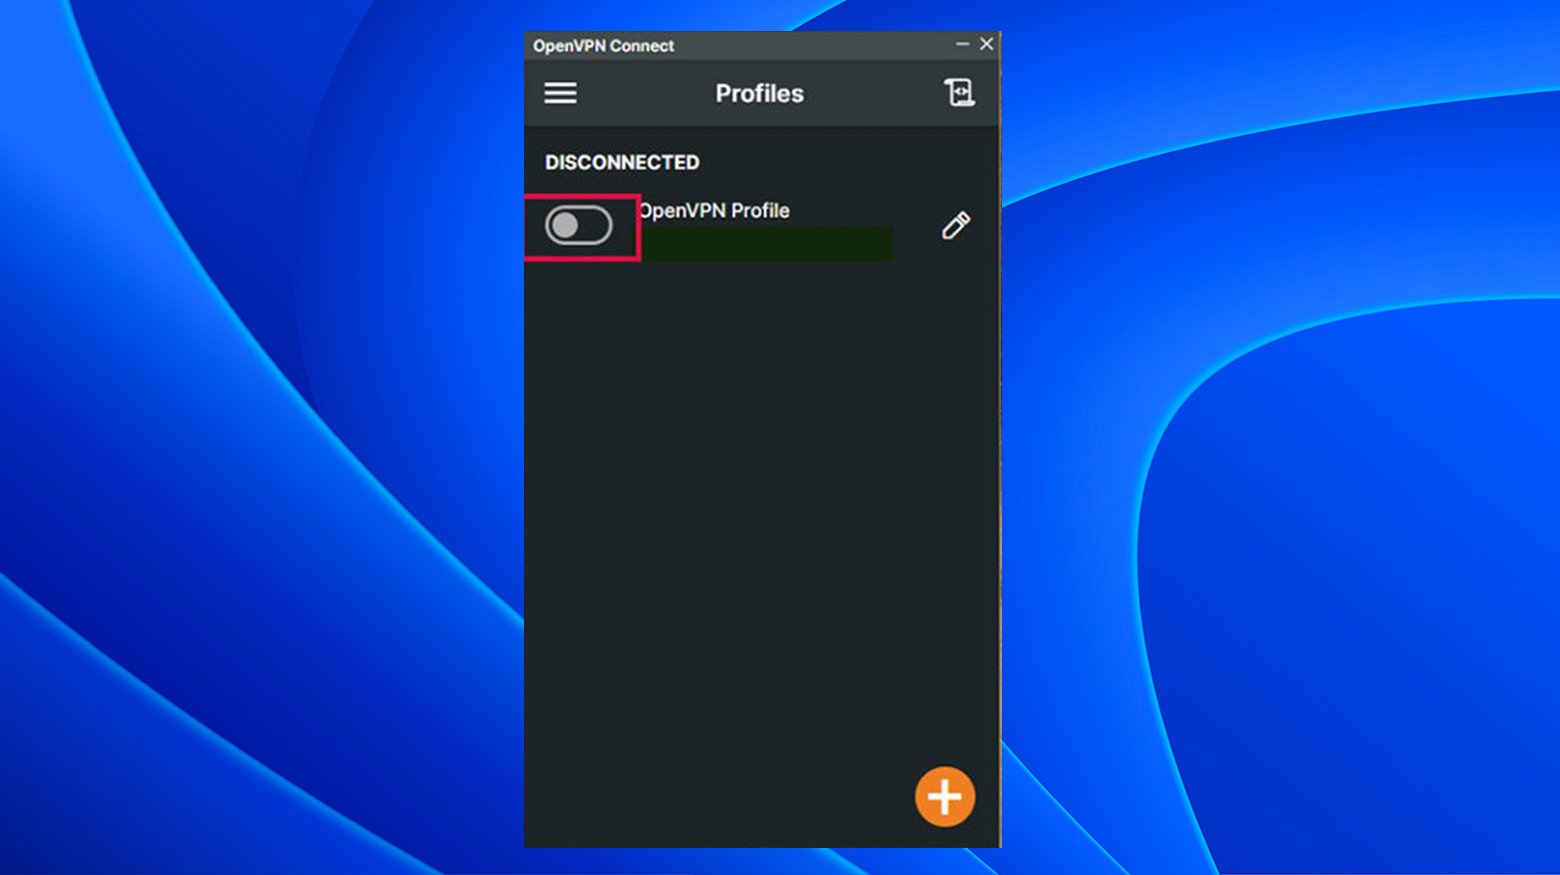
Disable your VPN or proxy
VPNs and proxies can block access to certain websites. Temporarily disabling them can pinpoint if they’re the cause. For example, to disconnect from your VPN using OpenVPN in Windows:
- Click on the system tray.
- Click the OpenVPN icon.
- Toggle the connection off to disconnect.
When turning off your VPN, remember to switch it back on after browsing or troubleshooting. Alternatively, take a look at your proxy settings to check for issues.
For Windows users:
- Click the Windows shortcut key
- Type Control Panel and press Enter
- Click Internet Options
- Click Connections > LAN Settings
- Uncheck the boxes for Automatically detect settings and Use proxy server for LAN
- Click OK
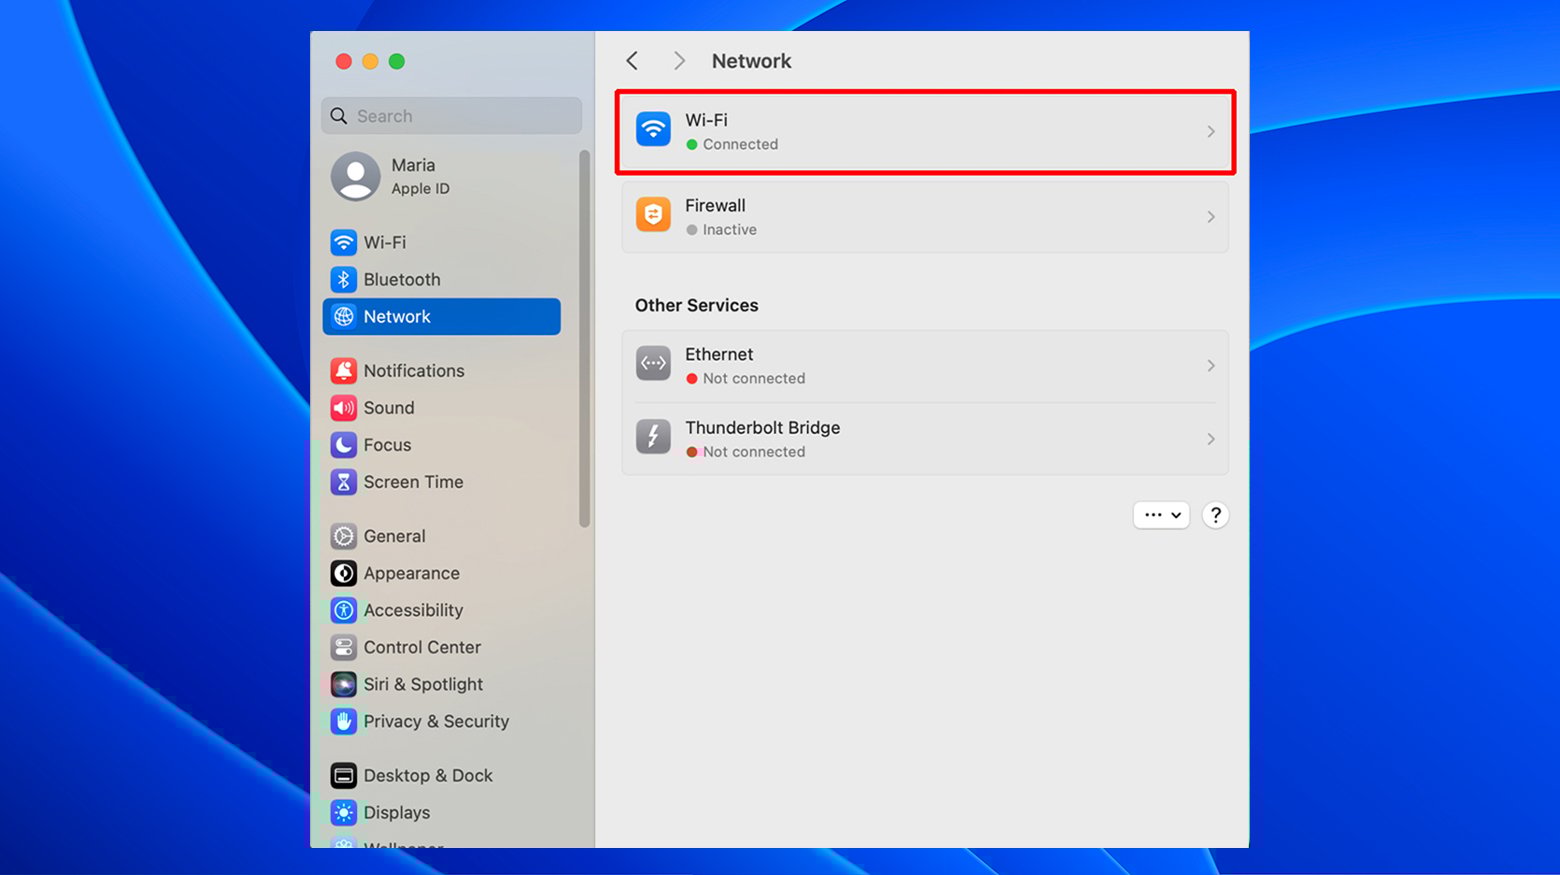
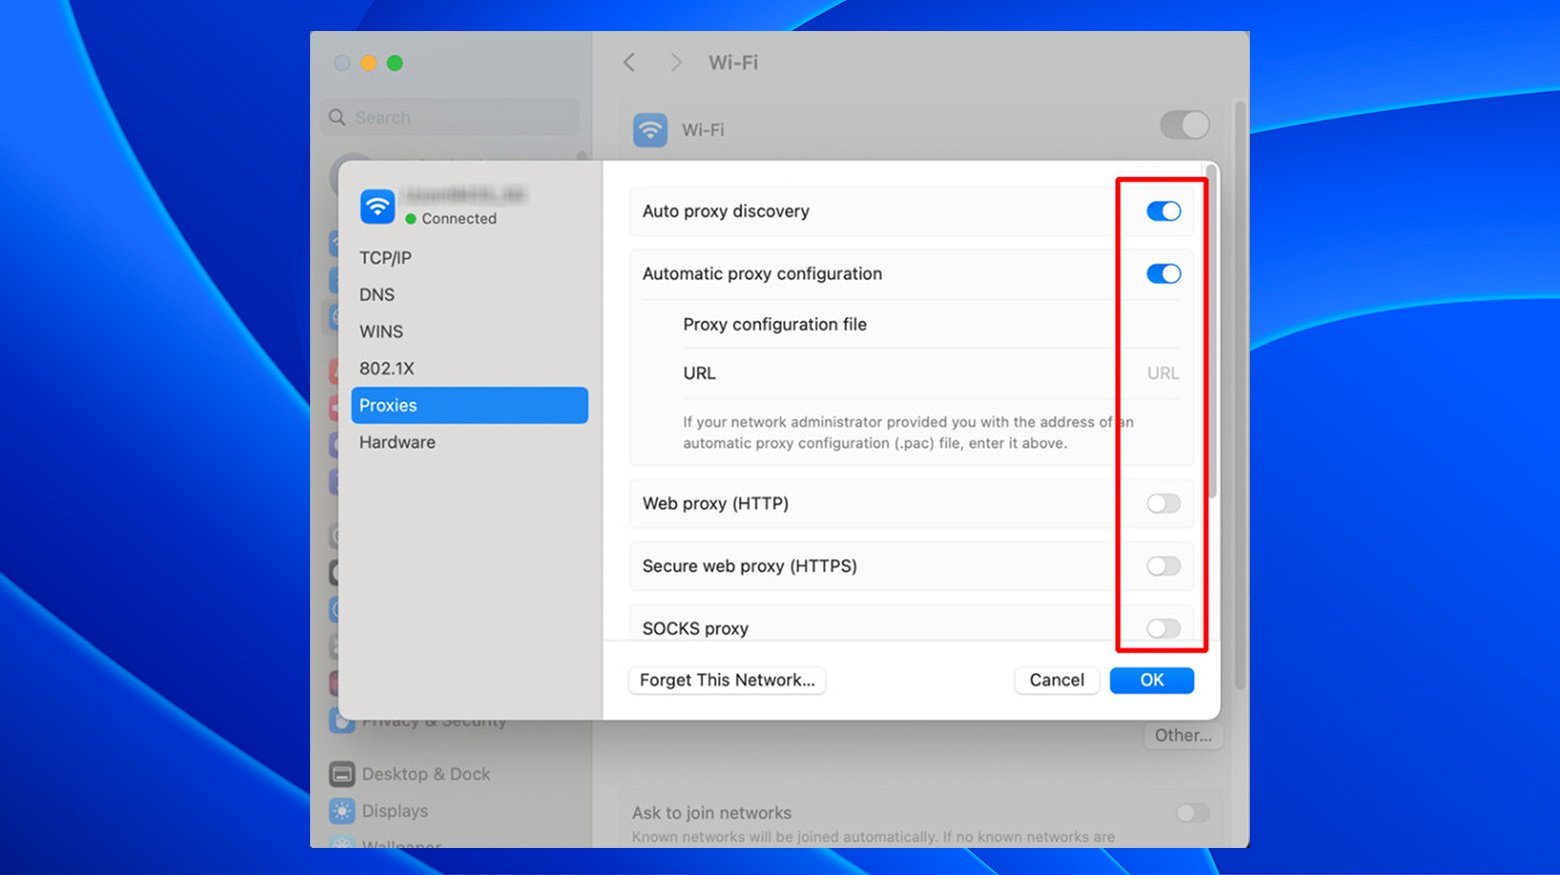
For Mac users:
- Click on the Apple icon on the top left and choose System Settings
- Click on Network
- Select the network you’re using (usually Wi-Fi or Ethernet)
- Click Details
- Click the Proxies tab
- Turn off all toggles for the different proxy protocols listed
Disable antivirus and firewalls
Occasionally, security software blocks harmless websites. Try temporarily disabling these programs to check if they’re causing the issue.
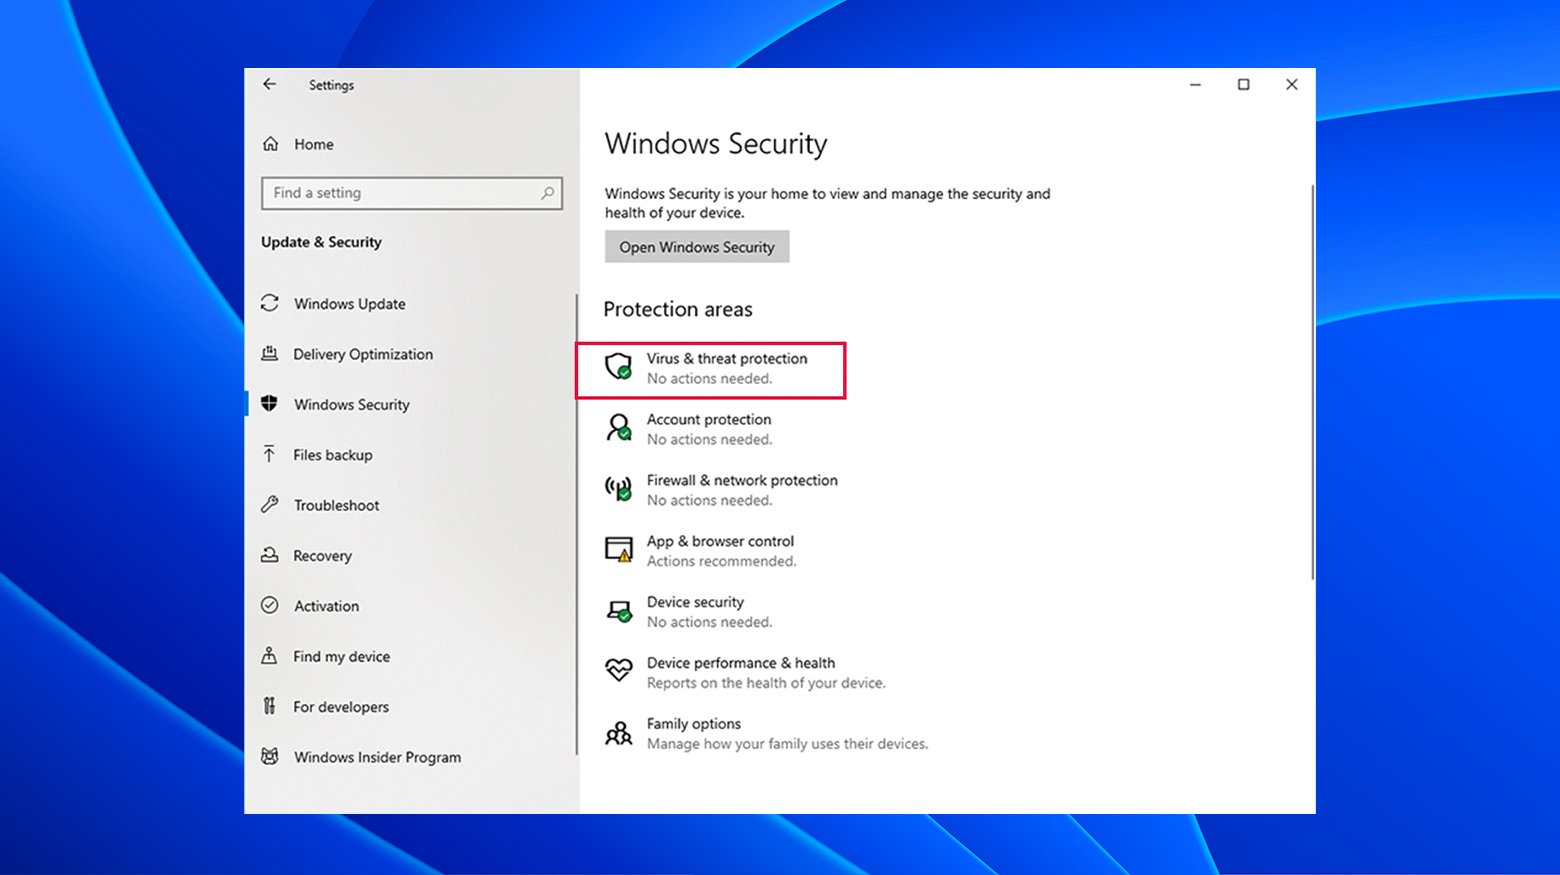
For Windows users:
- Press the Windows key and click the gear icon to open Settings.
- Click Update & Security > Windows Security > Virus & Threat Protection.
- Click Manage Settings in the Virus & threat protection settings section.
- Turn off protection by switching each toggle off. Turn them on again when you’re finished troubleshooting.
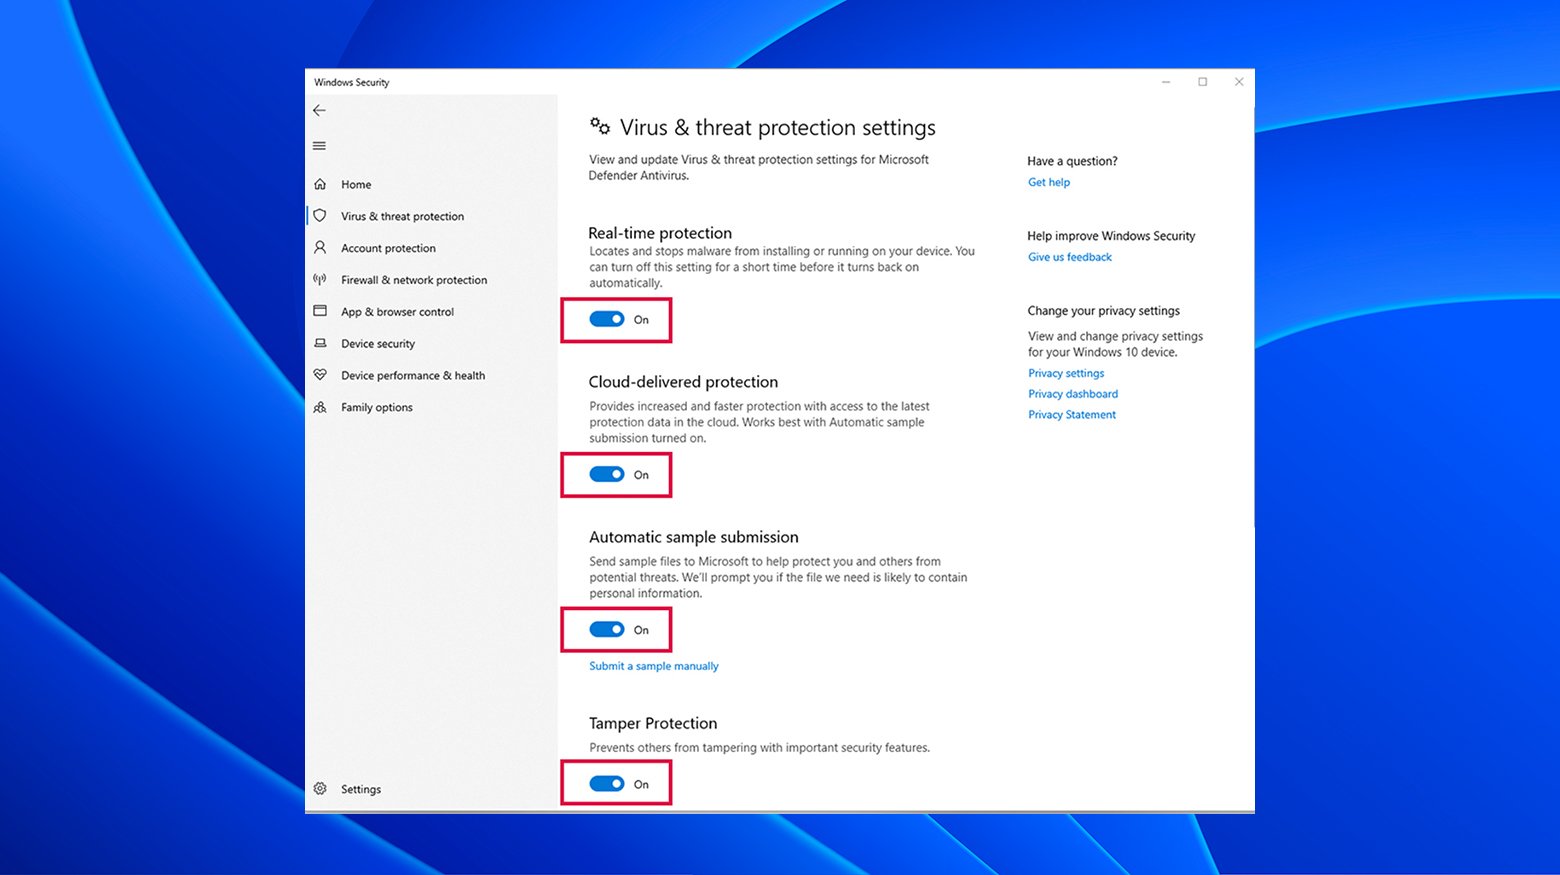
You can also add or remove exclusions if you need to adjust access settings for a particular application or service. Click the Add or remove exclusions link in the Exclusions sections for options.
For Windows users:
- In the same Windows Security screen from step 2 above, click Firewall & network protection.
- Choose the network type you currently use: Domain, Private, or Public.
- Click the toggle in the Microsoft Defender Firewall section to turn it off.
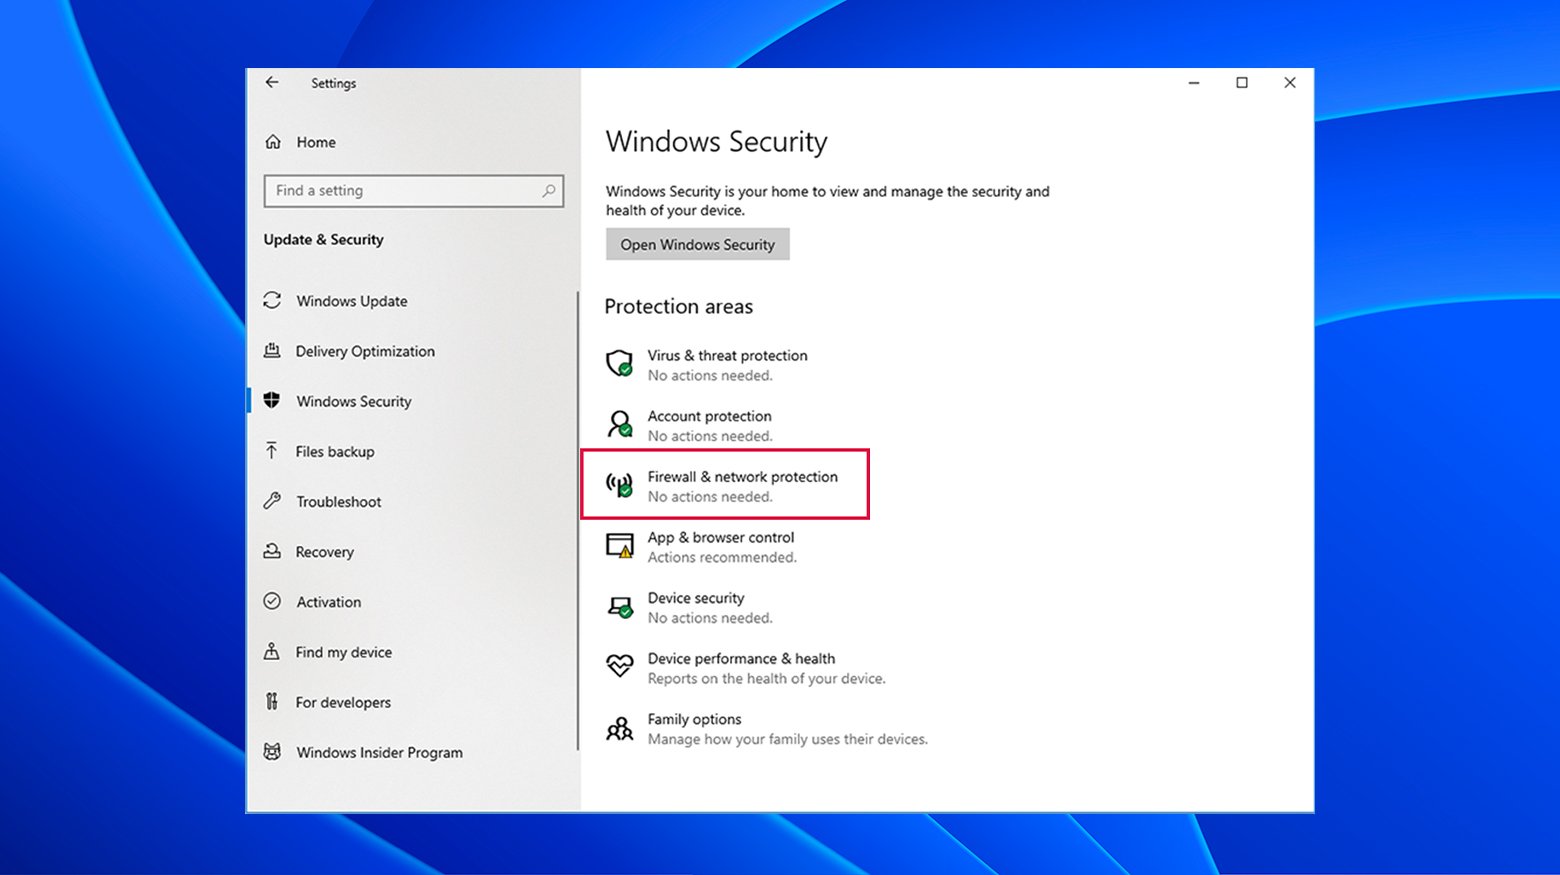
Additionally, the Allow an app through firewall link lets you control access for different apps through the firewall.
On a Mac:
- Head to System Settings.
- Click Network, and then the Firewall tab.
- Use the toggle to turn off the firewall.
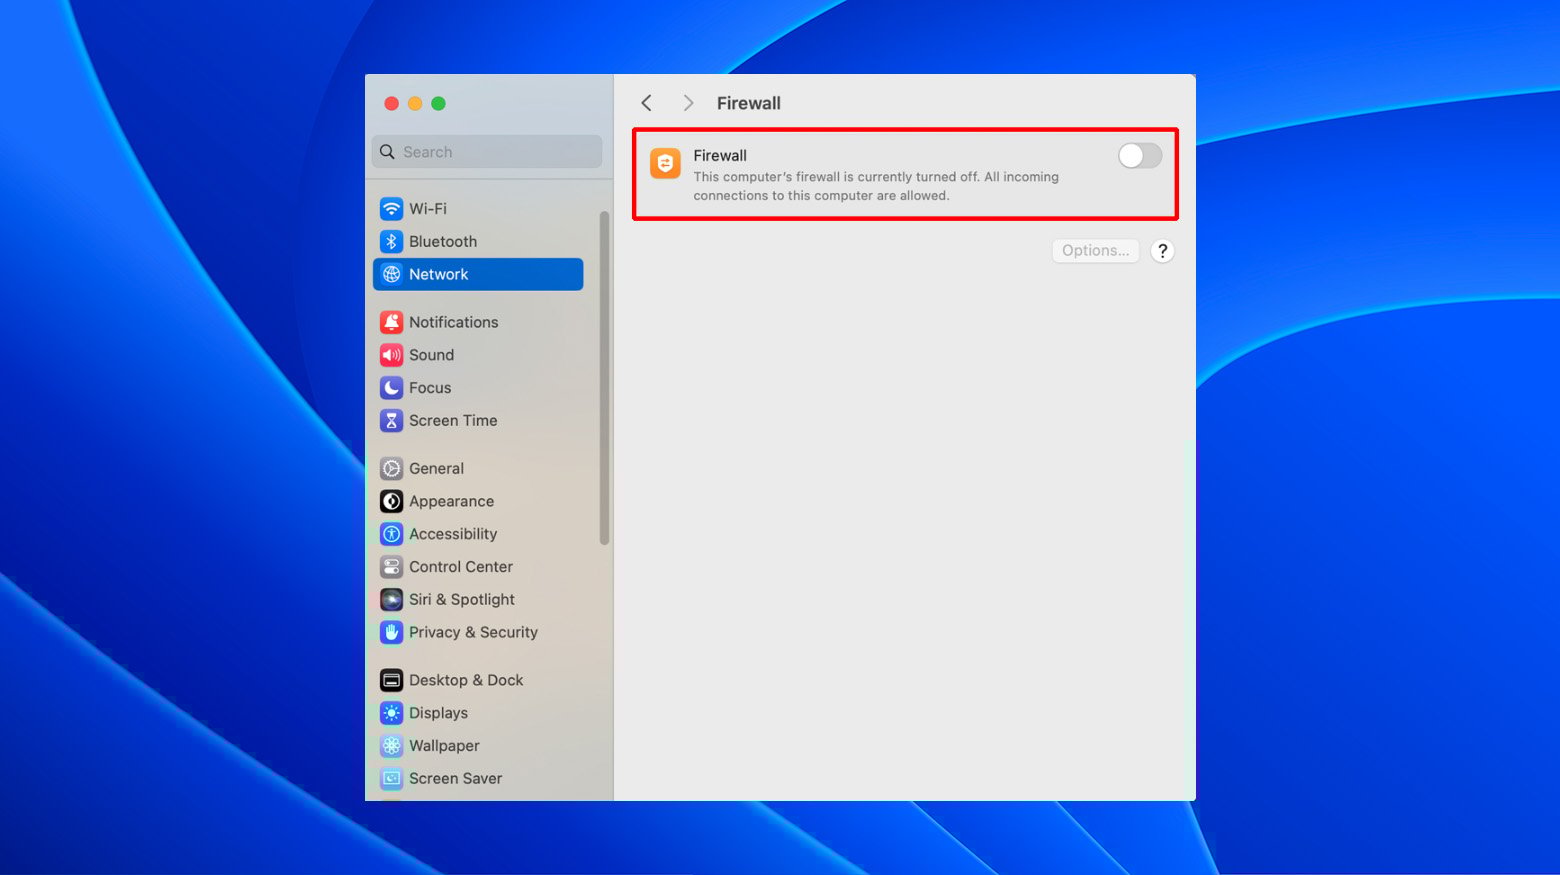
Finally, you can also use the Options button to block or allow access for different services and software. After you’ve turned these off:
- Recheck the DNS error. The issue might have been with your antivirus or firewall if everything works.
- If turning either of these off fixes the problem, be sure to update or adjust their rules or configuration so they don’t block your internet in the future.
- Remember to turn the firewall and antivirus back on when you’re done!
Summary
Navigating the “This site can’t be reached” error can be a tricky journey, whether you’re a website owner or just a visitor trying to access a site. We’ve covered many potential causes and solutions, but remember, the key is to systematically approach the issue, ruling out possible causes one by one.
Now, we’d love to hear from you! Have you faced the “This site can’t be reached” error? How did you resolve it? Or, if you’re still struggling with this issue, let us know in the comments below. Your experiences and questions help us improve our guidance and assist others facing similar challenges. So, don’t hesitate to jump into the conversation and share your story.
Say goodbye to website errors
Achieve peace of mind with 99.99% uptime on 10Web Managed
WordPress Hosting, powered by Google Cloud.
Say goodbye to website errors
Fix all the website errors in one click
Migrate your website to the world's best Managed WordPress Hosting.


Major thankies for the articleThanks Again Much obliged