When you’re navigating the web, clicking links, or submitting forms, behind the scenes, a flurry of digital handshakes and information exchanges are happening at lightning speed. At its core, the HTTP 302 error is a status code sent from the server to your web browser. It’s not necessarily a problem with your computer or internet connection but rather a signal from the website’s server communicating a specific instruction about the page’s location.
Understanding the HTTP 302 error requires a bit of insight into how the web works. Servers communicate with your browser using the Hypertext Transfer Protocol (HTTP), and status codes are part of this protocol. They’re the server’s way of telling your browser what’s happening. A 302 status code means that the resource you requested has been temporarily moved to another URL, and your browser is redirected to this new location. This can happen for various reasons, such as website maintenance, content updates, or redirection to a region-specific version of a site.
To grasp this concept fully, it’s essential to understand that the web is dynamic, and resources—like webpages—can change locations for numerous reasons. The 302 status is the server’s way of managing these changes without breaking the flow of user experience.
Say goodbye to website errors
Achieve peace of mind with 99.99% uptime on 10Web Managed
WordPress Hosting, powered by Google Cloud.
Variations of the HTTP 302 error
While the essence of a 302 error remains the same—indicating a temporary redirection—how it’s presented or encountered can vary based on the browser, device, or the specific setup of the website. Here are some common variations you might come across:
- HTTP 302 Found
- 302 Moved Temporarily
- HTTP/1.1 302 Found
- Temporary Redirect (302)
- This page has moved temporarily
- HTTP Redirect 302
Why does this error occur
The 302 status code, intended to signal a temporary redirect, can inadvertently lead to errors if aspects of your website are misconfigured. Such misconfigurations can manifest in several problematic ways:
- A page might redirect when it shouldn’t.
- A page could redirect users to an incorrect page.
- In a more severe scenario, users could find themselves trapped in a redirection loop.
This loop occurs when the destination page redirects back to the original page (or another page that leads back to the destination page), preventing the user from reaching the desired content. Here are some common causes.
Website maintenance or updates: Web administrators might temporarily redirect traffic to a different page while updating content or performing maintenance on the original page.
Content relocation: Websites often move content to new URLs. A 302 redirect temporarily sends users to the new location until the move is permanent, at which point a 301 (permanent redirect) might replace it.
Region-specific content: To provide localized content, a website might use 302 redirects to send users to region-specific versions of a page based on their IP address.
Load balancing: Large websites might use 302 redirects to distribute incoming traffic among several servers, improving performance and reducing load on any single server.
A/B testing: Websites testing different versions of a page to see which performs better might use 302 redirects to show different content to different users temporarily.
How to fix HTTP 302 status code errors
For most users, encountering a 302 error doesn’t require any action, as the browser automatically follows the redirect to the new URL. However, if the redirect isn’t working as expected, or you’re managing a website and want to ensure your redirects are set up correctly, here are some steps to consider:
Refresh the page
When you refresh a webpage, your browser makes a new request to the server for that URL. This action can solve issues caused by transient network errors or temporary server glitches that might have resulted in the initial redirect problem. Refreshing can also bypass cached versions of the page that may have been stored by your browser during a previous visit, which could be causing the redirect loop or error. In essence, it forces a clean slate, allowing for the possibility that any temporary hiccup in the communication between your browser and the server is cleared up.
- For Windows and Linux users, press F5 or Ctrl + R.
- For macOS users, press Cmd + R.
Clear browser cache and cookies
Browsers store cache and cookies to speed up your browsing experience by remembering parts of the webpages, like images, and your login status, so they don’t need to be downloaded or entered again. However, if a website has been updated since your last visit, your cache might hold outdated files that conflict with the new version of the site, leading to redirect issues. Clearing these stored files forces the browser to fetch the latest data from the web server, ensuring that any changes in redirect behavior are accurately reflected.
Chrome
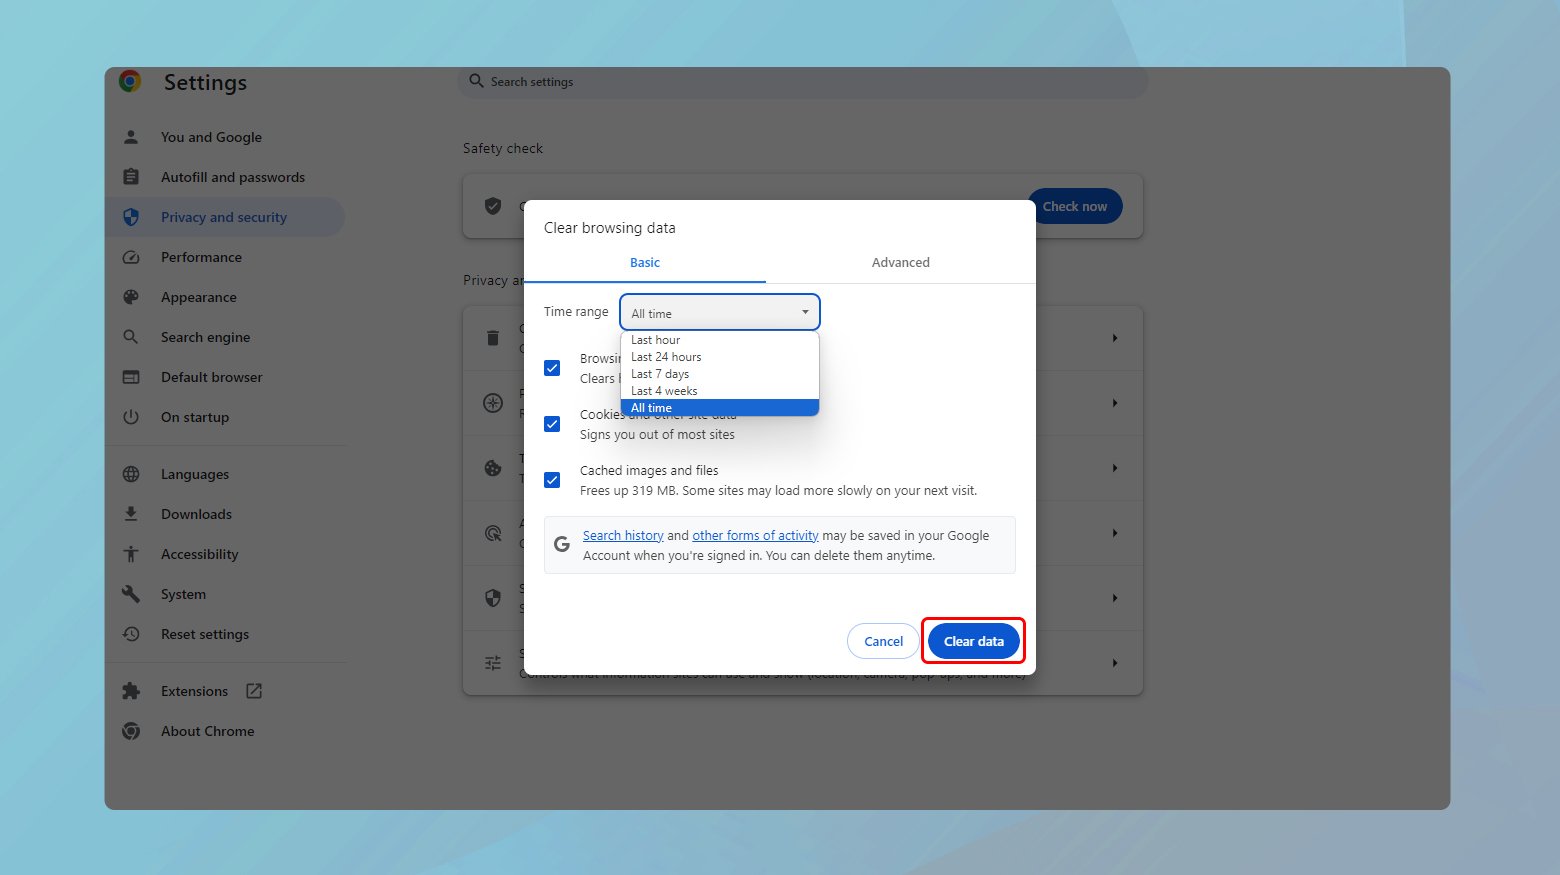
- Click on the three dots in the top-right corner.
- Go to “More tools” > “Clear browsing data”.
- Choose “Cookies and other site data” and “Cached images and files”.
- Select the time range to “All time” and click “Clear data”.
Firefox
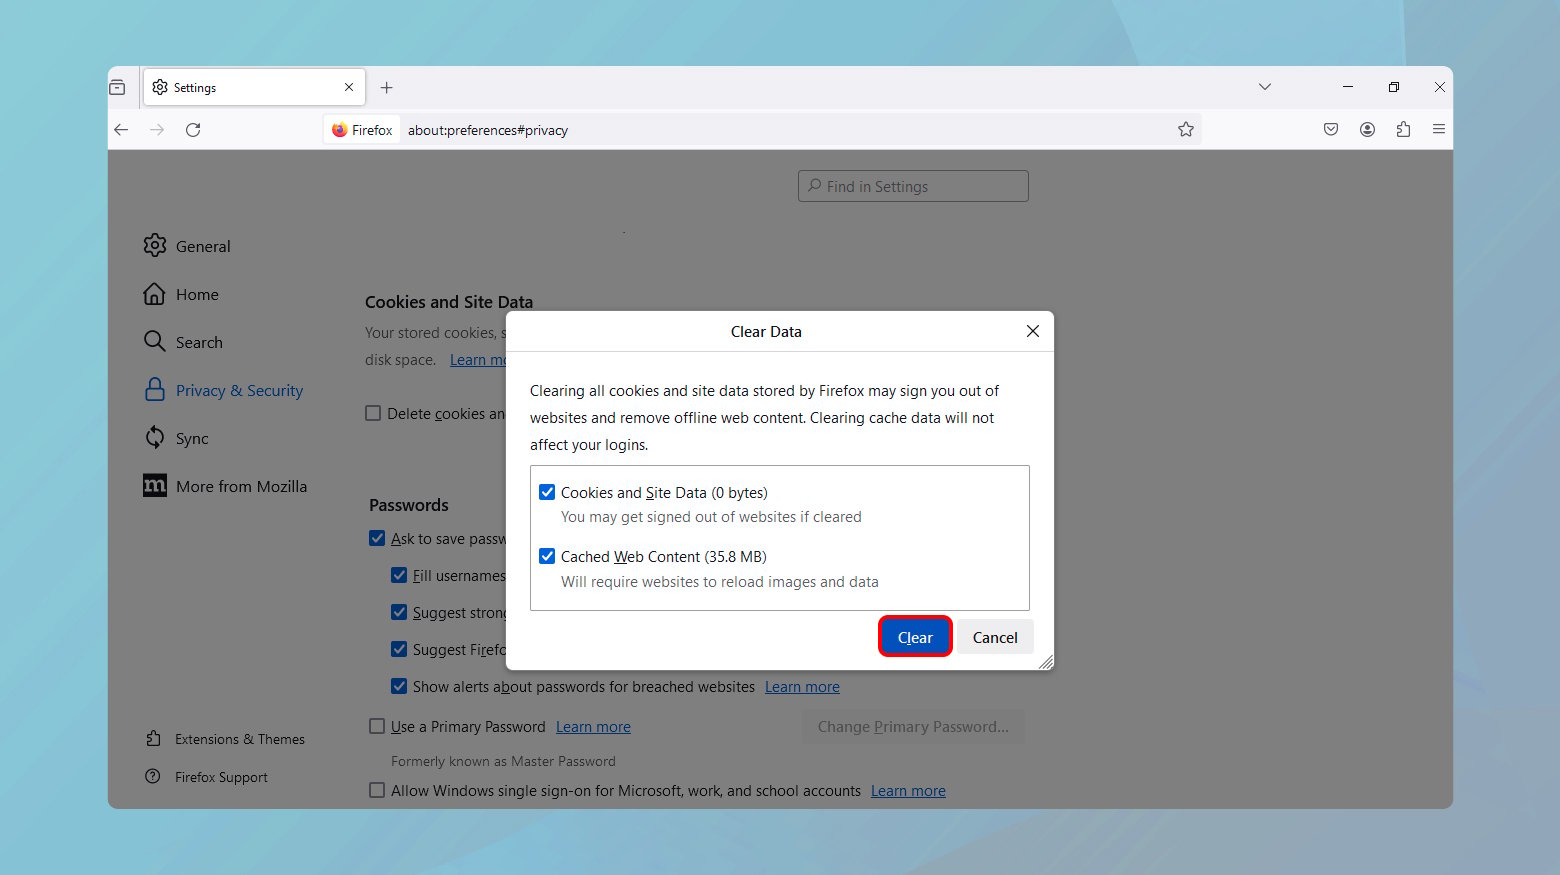
- Click on the menu button and select “Settings”.
- Go to “Privacy & Security” and scroll down to “Cookies and Site Data”.
- Click “Clear Data” and select both options.
- Confirm by clicking “Clear”.
Safari
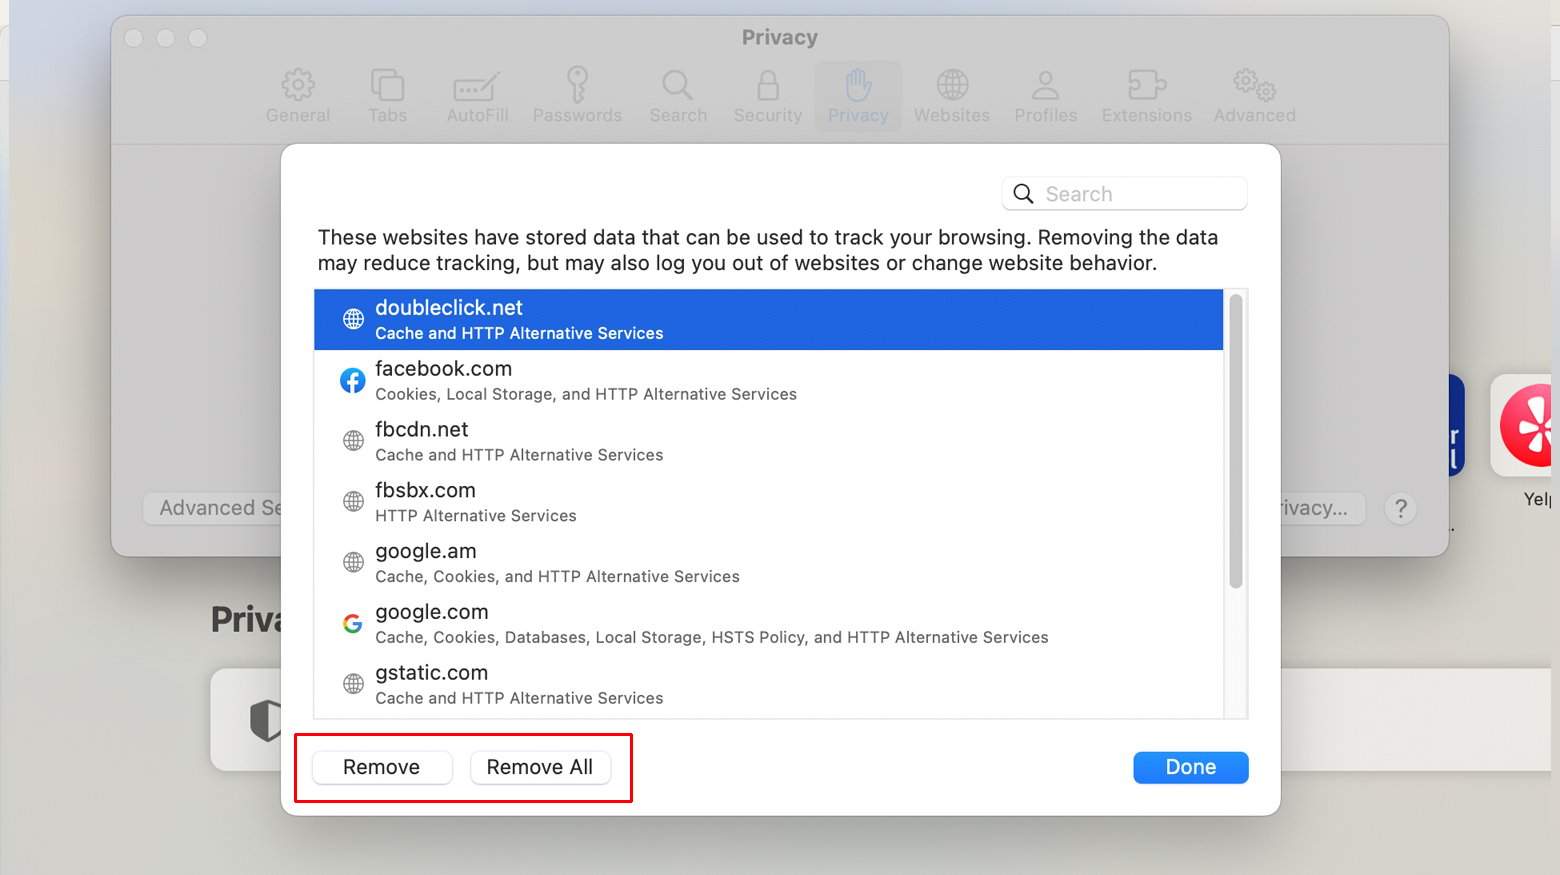
- Go to Safari menu > “Preferences”.
- Choose the “Privacy” tab and click on “Manage Website Data”.
- Click “Remove All” and confirm.
Check the URL
Typos or errors in the URL can inadvertently send requests to incorrect or unintended paths, which might trigger unexpected redirects or error responses from the server. Ensuring the URL is correct eliminates this basic yet common source of redirect issues. It’s a fundamental check that ensures the request being made is intended for the correct resource, preventing unnecessary troubleshooting for issues that are, at their core, simple input errors.
Check redirect validity
Checking the validity of a redirect involves verifying that the redirect actually exists and is functioning as intended. Redirects add extra HTTP requests during the page loading process. Verifying the necessity and efficiency of these redirects can help in reducing unnecessary load times. If a redirect is found to be invalid or no longer needed, removing it can streamline the access to your content, improving overall site performance. Below are some steps to help you with redirect maintenance.
Identify redirect generating URLs
Use tools like HTTP status code checker, Screaming Frog, or browser extensions like Redirect Path to identify which URLs are generating HTTP 302 codes.
Evaluate appropriateness of the redirect
Determine the purpose of each redirect. Is it directing users to a relevant page? Is the redirect necessary due to a temporary condition, or should it be replaced with a permanent redirect (HTTP 301) if the change is permanent?
Check the destination URL for relevance and accuracy. Ensure that it aligns with the user’s expectations and the original link’s intent.
Implement or adjust redirects as needed
If a redirect is confirmed to be valid and appropriate, no action is needed.
If a 302 redirect is found to be incorrect, unnecessary, or could be optimized (e.g., replaced with a 301 redirect for a permanent change), adjust the server configuration or CMS settings accordingly.
For Apache servers, this might involve editing the .htaccess file.
For Nginx, adjustments would be made in the nginx.conf file or specific site configuration files.
Review server redirect configuration
Redirects are often implemented for a variety of reasons, such as moving content to a new URL or directing users to a different site structure. However, if these redirects are not configured correctly in the server settings or content management system (CMS), it can lead to a range of issues, including infinite redirect loops, incorrect landing pages, or broken links. By reviewing and ensuring proper redirect configuration, you are directly addressing the root cause of many redirect-related problems. This step ensures that each redirect is intentional, correctly implemented, and serves its intended purpose without causing disruption to the user experience or site functionality.
To review redirect configurations:
-
- Locate and open .htaccess (Apache)
RewriteEngine On

RewriteRule ^oldpage.html$ /newpage.html [R=302,L]
-
- Or nginx.conf (Nginx) files.
rewrite ^/oldpage.html$ /newpage.html temporary;
- Look for lines starting with “Redirect” or “RewriteRule” (Apache) or “rewrite” (Nginx).
- Adjust any incorrect or outdated redirect configurations.
- Save the file and refresh your website to test the new configuration.
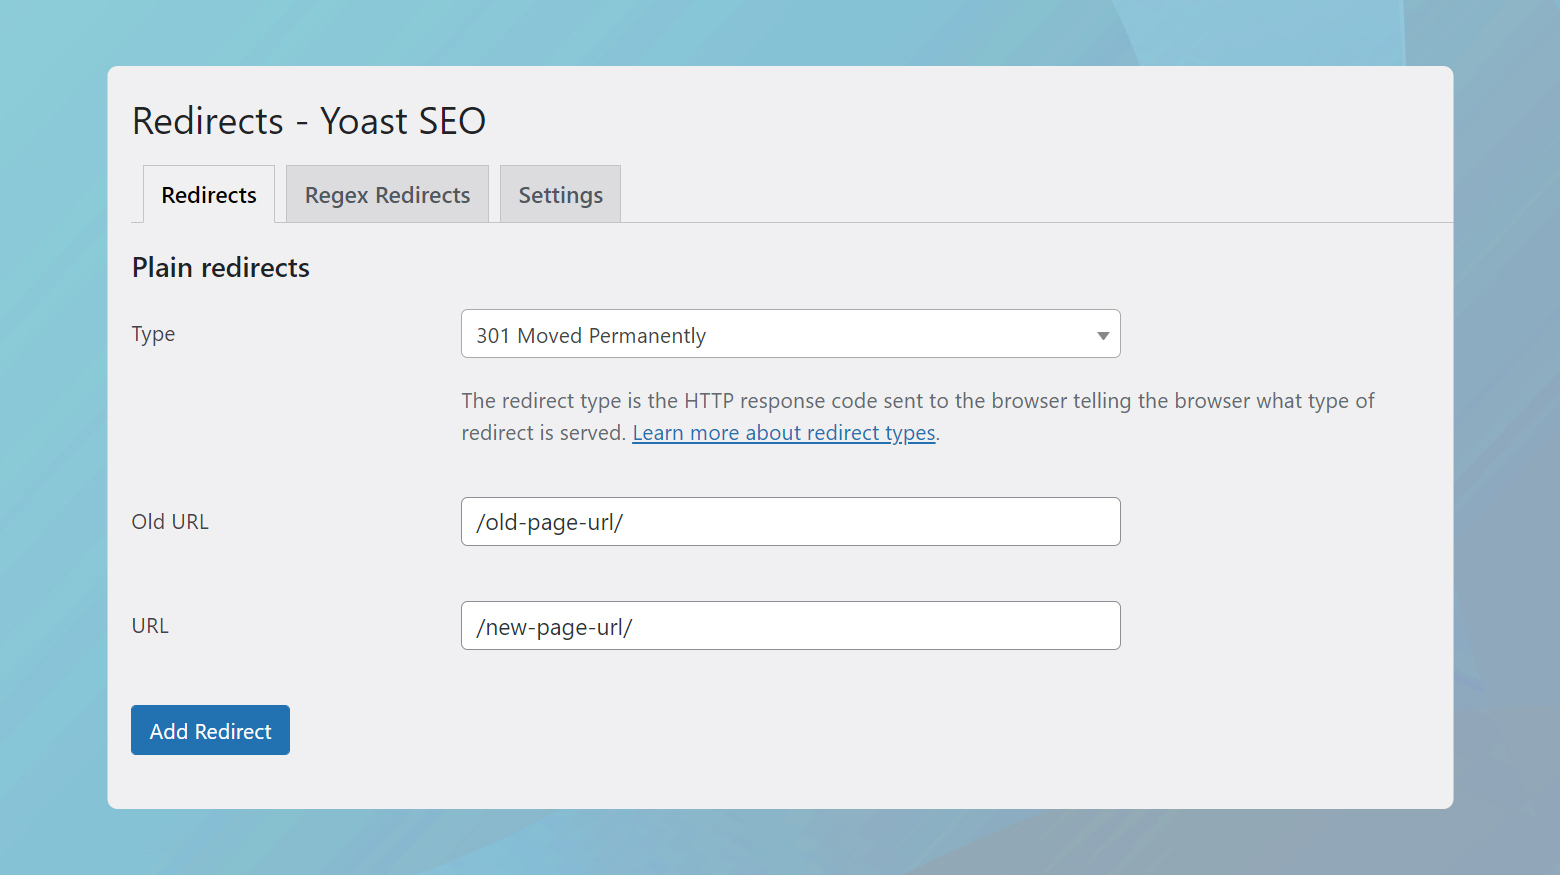
Check your redirect plugins
WordPress sites often rely on plugins to manage redirects, especially when migrating pages, implementing temporary redirects, or managing broken links. However, if these plugins are misconfigured, they can lead to a range of issues, including endless redirect loops, incorrect destination pages, or even site inaccessibility.
Here’s how to check and troubleshoot your redirect plugins:
- Log in to your WordPress admin area.
- From the left sidebar, click on “Plugins” > “Installed Plugins” to view a list of all your installed plugins.
- Look through the list for plugins that are specifically used for redirects, such as “Redirection” or other similar plugins.
- Click on the settings or configuration page for each redirect plugin.
- Review the redirect rules you have set up to ensure they are correct and not causing the redirect issue.
Test for plugin conflicts
Conflicts between different plugins, especially those that modify .htaccess files or manage redirects, can cause issues. Consequently, you can temporarily deactivate other plugins that might interact with your redirect plugins, one at a time, and check if the issue resolves. This process helps identify if there is a conflict causing the redirect issue.
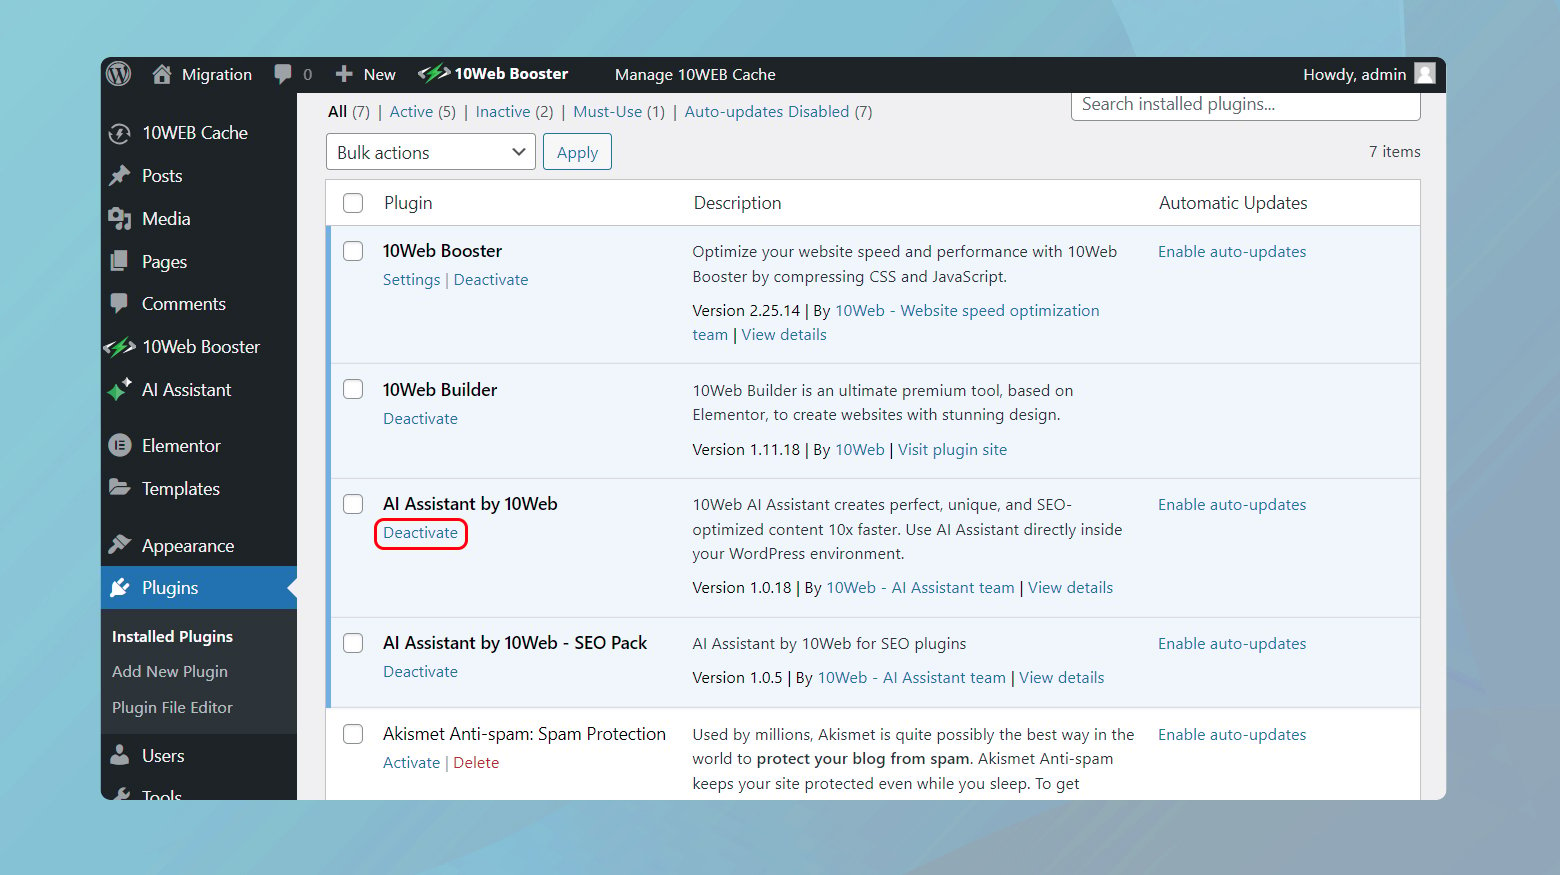
Remember to reactivate the plugins after testing to maintain site functionality.
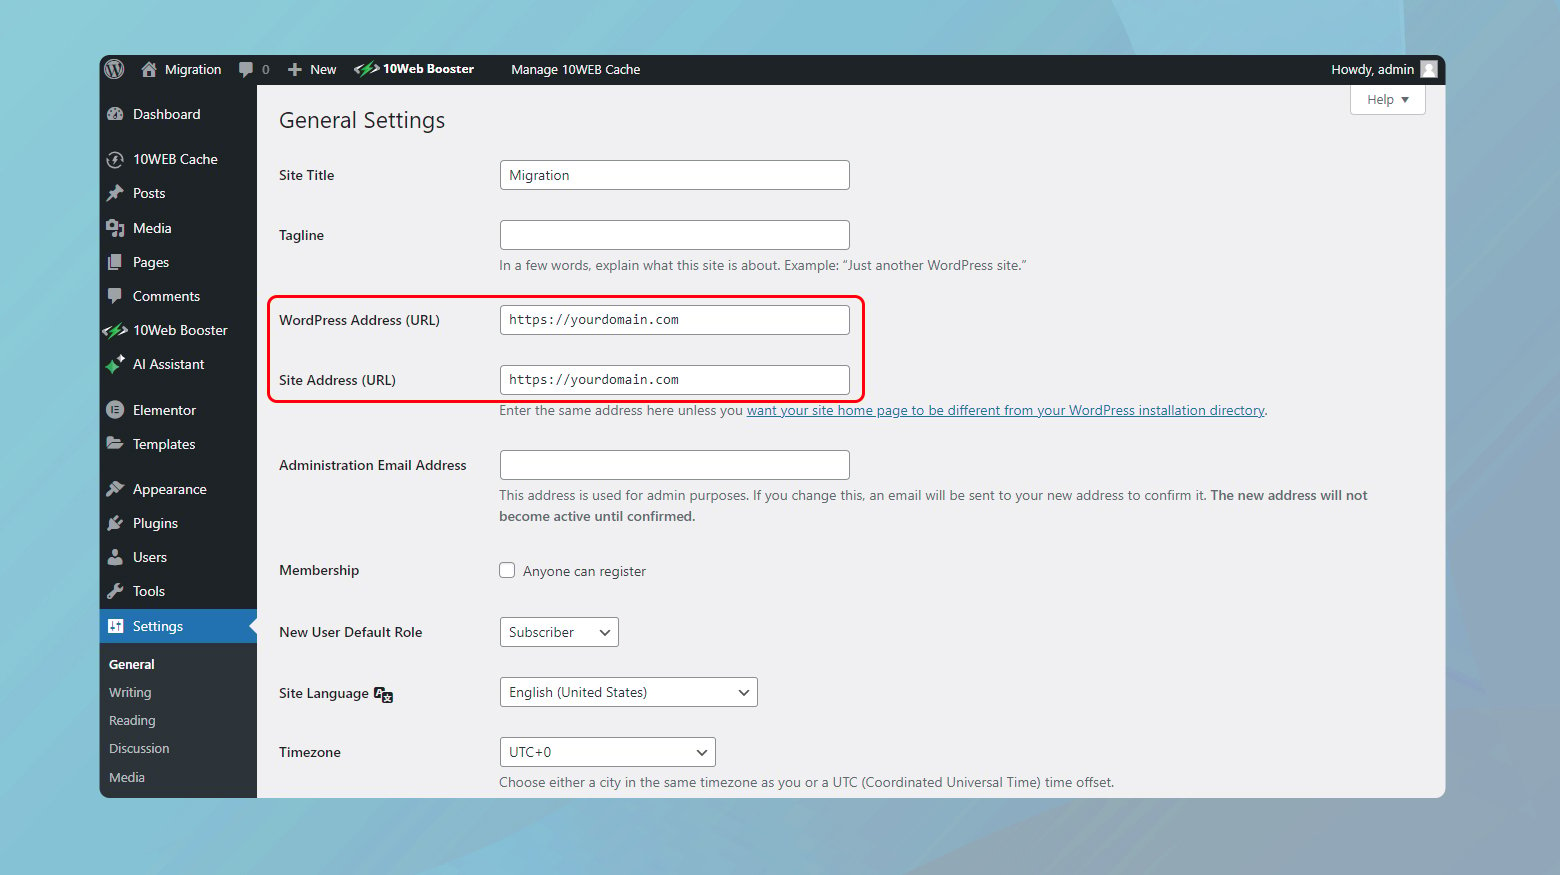
Check that your WordPress URL settings are correct
The WordPress Address (URL) and Site Address (URL) settings are fundamental to your WordPress site’s configuration. They determine where your site’s files are located and how visitors access your site. Incorrect settings here can lead to redirect issues, affect your site’s accessibility, and even impact SEO.
To ensure these settings are correctly configured:
-
- Log into your WordPress dashboard and navigate to “Settings” > “General”.
- Check WordPress address
This is the address where your WordPress core files reside. Ensure it’s correctly set to your website’s root directory or the correct subdirectory if WordPress is installed in one.
-
- Check site address (URL)
This is the address your visitors should use to access your site. It should match the WordPress Address unless you’re giving WordPress its own directory. Ensure both URLs are correct and include the appropriate http:// or https:// prefix.
define( 'WP_HOME', 'http://yourdomain.com' );

define( 'WP_SITEURL', 'http://yourdomain.com' );
- If you make any changes, scroll down and click “Save Changes” to update your settings.
- After making changes, clear your browser cache and try accessing your site again to see if the issue is resolved.
Monitor redirect chains
Each redirect introduces a delay as the browser must follow the sequence of URLs until it reaches the final destination. Long or unnecessary redirect chains can significantly slow down page loading times and degrade the user experience. Moreover, search engines may view extensive redirect chains as a sign of a poorly maintained site, which could negatively affect your site’s search ranking. Monitoring and minimizing these chains ensure that users and search engines can access content efficiently, without unnecessary delays or complications. This optimization is crucial for maintaining fast, accessible, and SEO-friendly websites.
Use redirects sparingly
While redirects are useful for navigating changes in website structure or content location, excessive use can create a complex web of requests that slows down page loading, confuses users, and dilutes link equity, which can negatively impact search engine optimization (SEO). By using redirects judiciously and opting for direct links whenever possible, you reduce the number of hops a user’s browser needs to make before reaching the desired content. This minimization of unnecessary redirects enhances site speed, improves user experience, and helps maintain the integrity of your site’s SEO rankings.
Closing thoughts
Tackling HTTP 302 status code redirect issues in WordPress is a systematic process that starts with basic actions like refreshing your page and clearing browser cache, and progresses to more in-depth checks such as verifying URL accuracy, adjusting redirect plugin settings, and ensuring correct WordPress URL configurations. It’s essential to use redirects wisely, keep an eye on redirect chains, and validate the necessity and functionality of each redirect to maintain optimal site performance and user experience.
Say goodbye to website errors
Achieve peace of mind with 99.99% uptime on 10Web Managed
WordPress Hosting, powered by Google Cloud.
Say goodbye to website errors
Fix all the website errors in one click
Migrate your website to the world's best Managed WordPress Hosting.