The 520 error pops up when Cloudflare, acting as a bridge between you (the visitor) and the website’s server, gets a response from the server that it just can’t interpret. Imagine you’re having a conversation where suddenly the other person starts speaking in an unknown language. You know they’re trying to communicate, but you can’t decipher the message. That’s Cloudflare with Error 520—it received something, but it can’t make heads or tails of it.
This issue could stem from a variety of sources: configuration mishaps on the server, network connectivity issues, overly aggressive firewall rules, or even faulty server hardware. Understanding Error 520 requires a grasp of how Cloudflare interacts with web servers and the myriad ways that this interaction can go awry.
Say goodbye to website errors
Achieve peace of mind with 99.99% uptime on 10Web Managed
WordPress Hosting, powered by Google Cloud.
Reasons why this error occurs
Server overload: The most straightforward reason. If the server is buckling under heavy traffic, it might fail to respond correctly to Cloudflare’s requests.
Configuration errors: Incorrect settings on the server can confuse Cloudflare. It’s akin to sending mixed signals—Cloudflare reaches out in the expected manner, but the server responds in an unexpected way.
Network issues: Sometimes, the path between Cloudflare and the server has bumps. Network interruptions or delays can corrupt or halt the response before it fully reaches Cloudflare.
Security software: Overzealous security settings or software on the server might see Cloudflare’s legitimate request as a threat and block or alter the response.
Faulty server hardware or software: Rare, but not unheard of. Faulty hardware or a bug in server software can lead to unpredictable responses.
Resolving common reasons for Error 520
Several common issues can trigger Error 520, including PHP crashes, blocked Cloudflare IPs, TCP idle timeouts, and oversized headers. Addressing these specific areas can help eliminate the error by ensuring your server is optimally configured to work with Cloudflare.
Restart PHP/Apache/Nginx
Web services like PHP, Apache, and Nginx form the backbone of your server’s ability to handle requests. Anomalies within these services can lead to various errors, including Error 520. Restarting these services can reset their state, potentially resolving any temporary glitches or errors that might be causing issues with Cloudflare.
For PHP-FPM (FastCGI Process Manager)
- Use a terminal or SSH to connect to your server.
- Use the following command to restart the PHP server:
sudo service php7.4-fpm restart
The command may vary based on the PHP version. A common command is sudo service php7.4-fpm restart, replacing 7.4 with your PHP version.
Apache
- Access Your Server via SSH.
- Use the following command for Apache:
sudo systemctl restart apache2
On older systems, the command might be sudo service apache2 restart.
Nginx
- Access your server via SSH.
- Use the following code to restart Nginx:
sudo systemctl restart nginx
For older systems, you might use sudo service nginx restart.
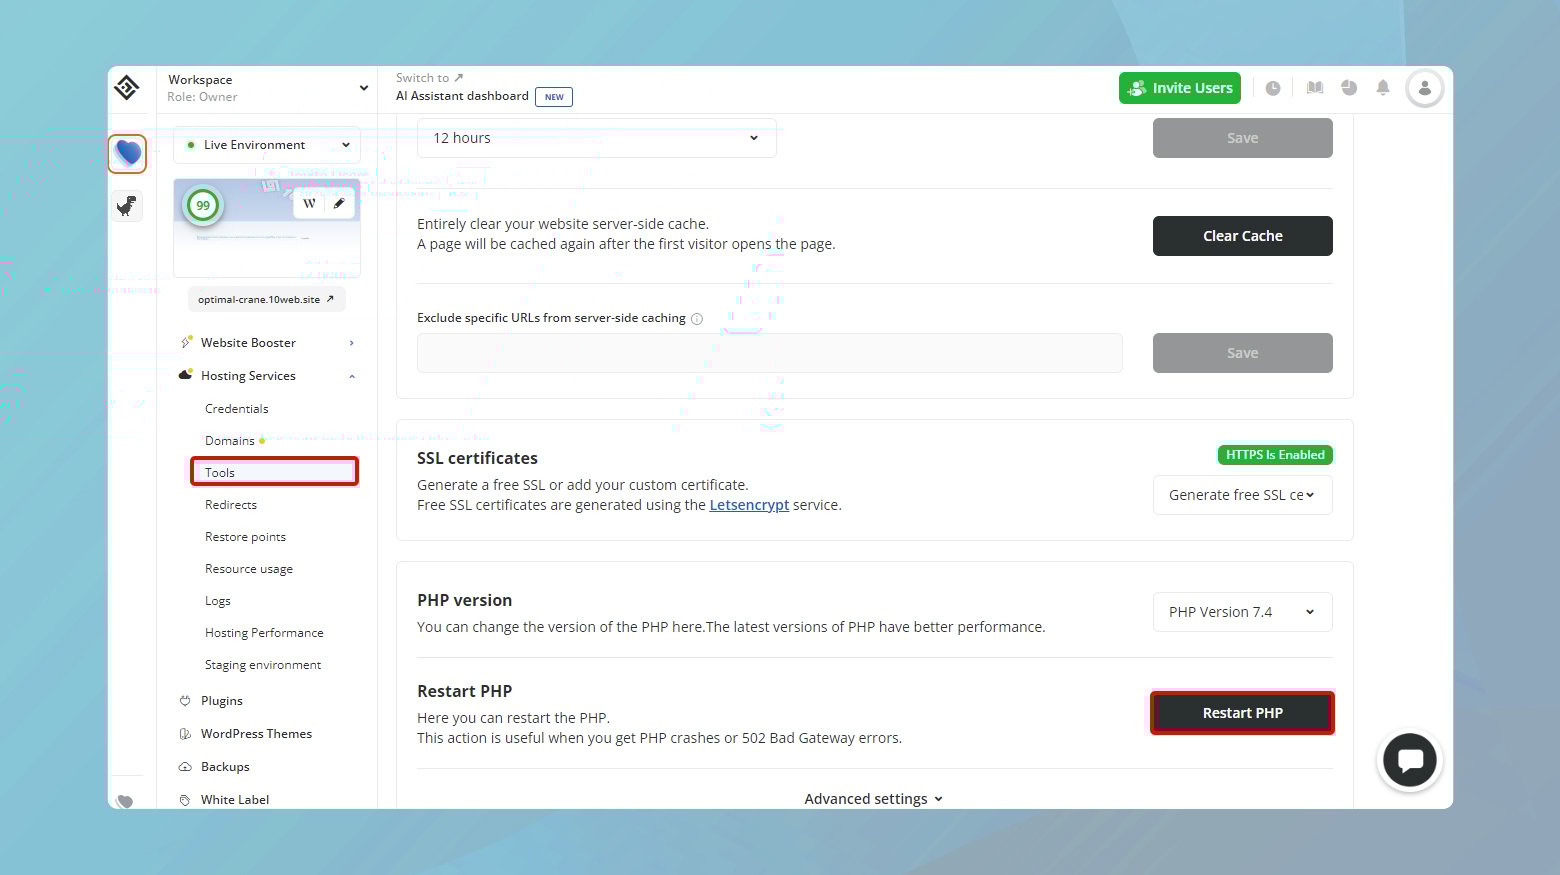
For websites hosted on 10Web, you can restart your PHP from the 10Web dashboard.
Whitelist Cloudflare IPs
Cloudflare’s IPs are used to proxy traffic to your server, enhancing security and performance. If your server’s firewall or security settings block these IPs, Cloudflare cannot communicate with your server, leading to Error 520. Whitelisting Cloudflare’s IPs ensure uninterrupted traffic flow.
To whitelist Cloudflare’s IPs:
-
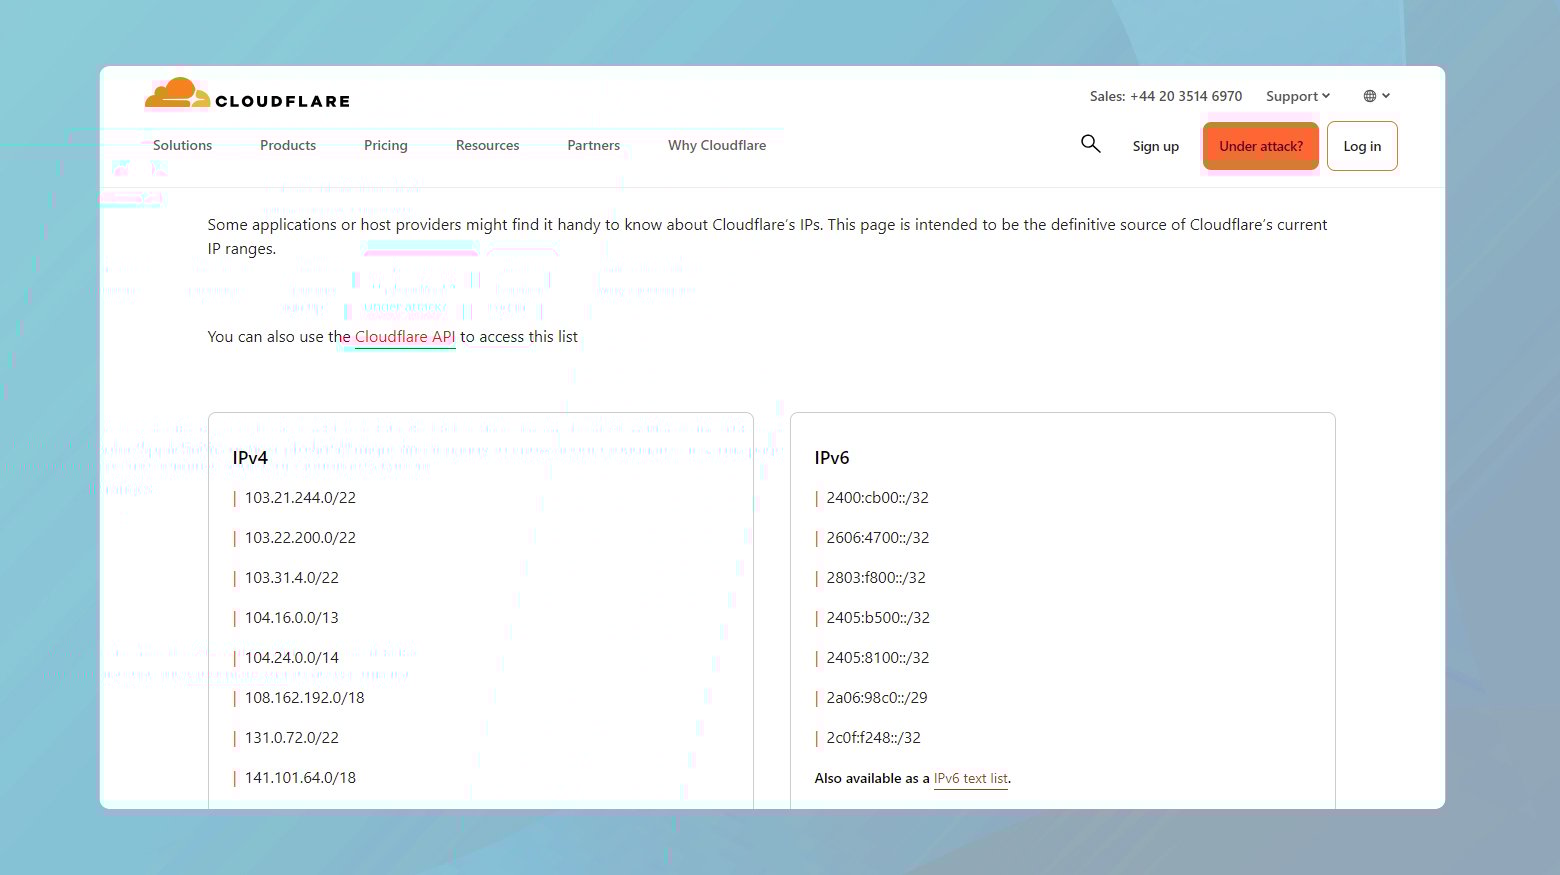
- Visit Cloudflare’s official documentation to find the latest list of IP ranges.
- Access your server’s firewall settings
- This might involve SSH access and using iptables or a firewall management interface.
- Use commands or interfaces to whitelist the IP ranges.
- For iptables, the command would look like:
sudo iptables -I INPUT -p tcp -s <Cloudflare_IP> --dport 80 -j ACCEPT,
- Replace <Cloudflare_IP> with each IP range from Cloudflare.
Adjust TCP idle timeouts
TCP idle timeouts can disconnect seemingly inactive connections, potentially disrupting Cloudflare’s ability to communicate with your server. Increasing these timeouts ensures that connections remain open for a sufficient duration, reducing the likelihood of premature disconnections. Adjust the timeout parameters so that they are at 300 seconds. Anything under 300 may be causing the error.
Reduce header size
Large request headers, especially when laden with cookies or extensive security tokens, can exceed Cloudflare’s limits, triggering Error 520. Reducing the size of these headers ensures compatibility with Cloudflare’s requirements.
- Tools like Chrome’s Developer Tools can help you see the size and content of your request headers.
- Review your server or application configuration to find where excessive headers are added. Look for excessive cookies, redundant custom headers, or overly large tokens.
- Implement changes in your server or application settings to minimize header output.
- For Apache, use LimitRequestFieldSize directive in httpd.conf to set maximum header size.
- For Nginx, adjust large_client_header_buffers in nginx.conf.
Empty response header
An empty response header or an empty response from your server indicates that a request was made to the server, but there was no information returned. This can manifest as a lack of HTTP status code or response body, leading browsers to show an error or a blank page. This problem often stems from incorrect DNS settings for your site’s domain.
Resolving this issue involves verifying and correcting your DNS configurations, ensuring they accurately point to your server. Since DNS settings are crucial for directing internet traffic to your server, any misconfiguration can lead to your site being inaccessible.
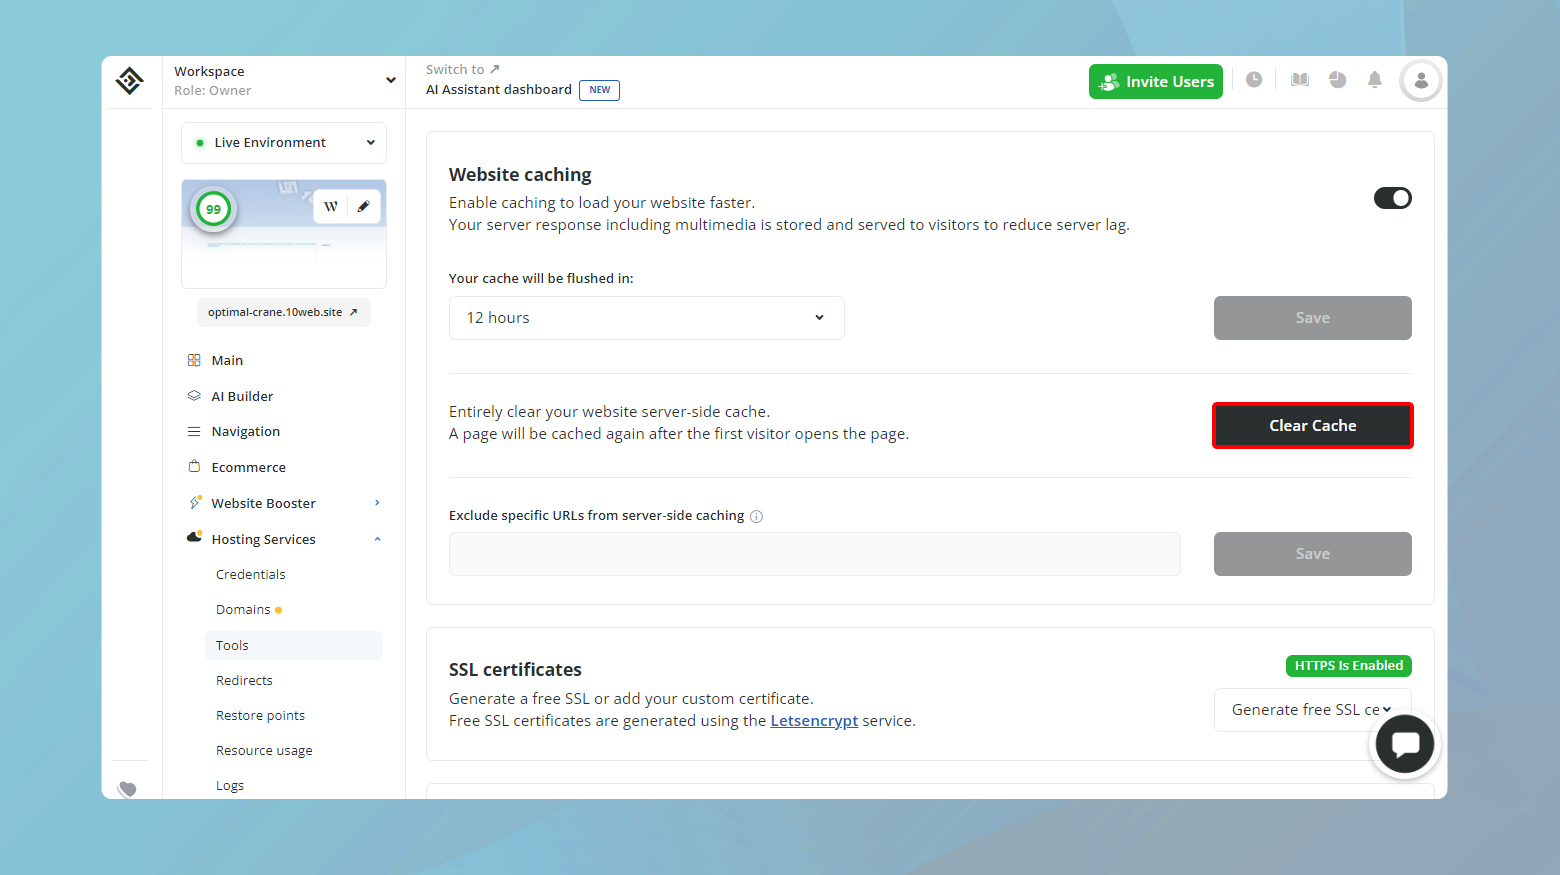
If you have recently changed your DNS settings, make sure you give ample time for propagation. Once your settings have been checked and adjusted, you should clear your website cache.
If your website is hosted on 10Web, you can clear your website cache using 10Web Cache either from your 10Web dashboard or from the admin dashboard of WordPress.
How to troubleshoot Error 520: A Comprehensive Guide
Temporarily disable Cloudflare
Disabling Cloudflare temporarily is a diagnostic step to determine if the error originates from Cloudflare’s configuration or from the server itself. By bypassing Cloudflare’s network, you can directly assess whether your server is the source of the problem. This step involves either disabling the proxy (the orange cloud icon in DNS settings) for individual records or pausing Cloudflare’s services entirely for your site.
Disabling Cloudflare’s proxy

- Log into your Cloudflare account
- Navigate to the dashboard and select the site experiencing issues.
- Click on the DNS tab.
- Look for DNS records with an orange cloud icon, signifying they are proxied through Cloudflare.
- Click on the orange cloud icons to turn them gray.
This action disables Cloudflare’s proxy.
Pausing Cloudflare entirely
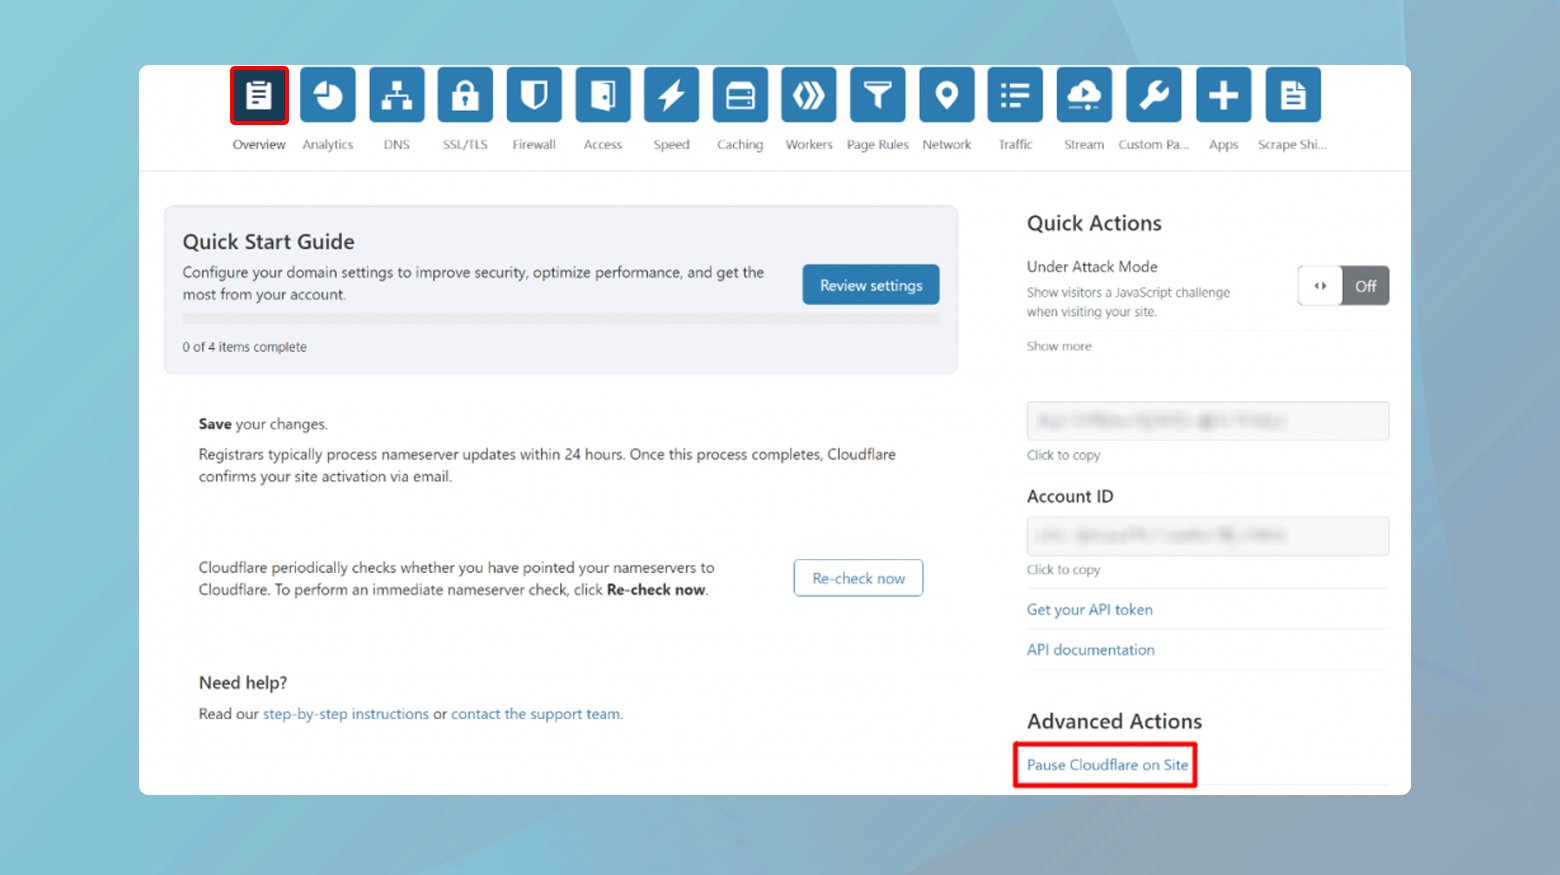
- On your site’s dashboard, locate the Overview tab.
- Find the Advanced Actions section and select Pause Cloudflare on Site.
- Confirm your choice.
This halts all Cloudflare’s operations, allowing traffic to reach your server directly.
Activate development mode
Activating Cloudflare’s Development Mode is useful for troubleshooting issues without fully disabling Cloudflare’s services. Development Mode temporarily suspends Cloudflare’s edge caching, allowing you to see changes in real-time. This is particularly helpful for identifying whether caching or Cloudflare-specific optimizations are contributing to the error.
To activate development mode:
- Log into Cloudflare and select your affected site.
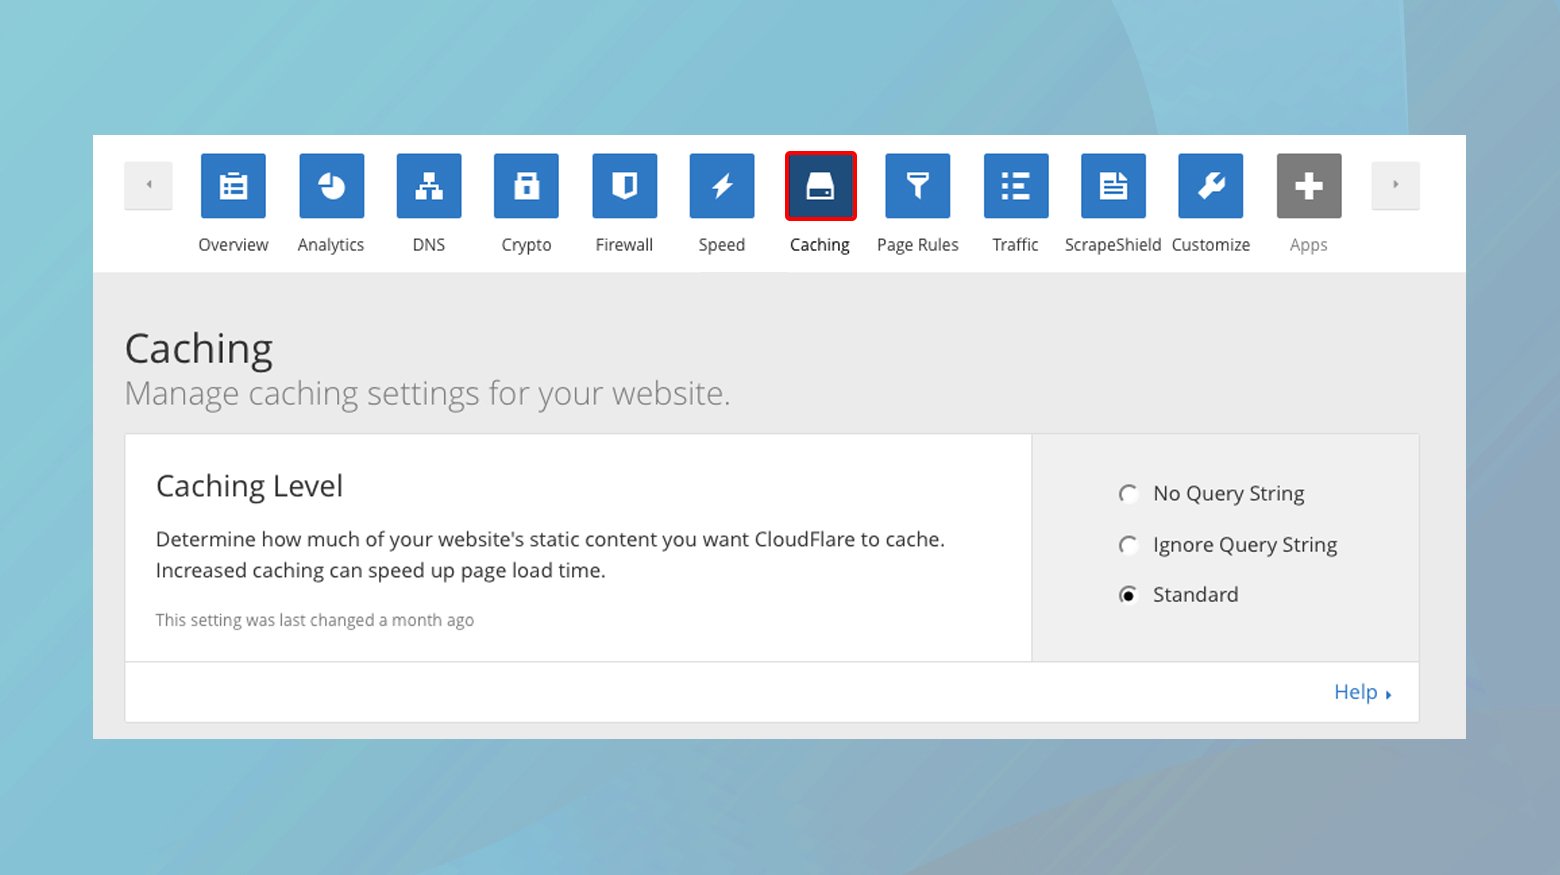
- Find the Caching Tab at the top of your Cloudflare dashboard.
- Scroll to the Development Mode section and toggle the switch to On.
This mode remains active for 3 hours, after which it automatically reverts.
Checking your server’s error logs
Server error logs are invaluable for diagnosing issues, providing insights into what’s happening on your server. These logs can reveal specific server-side errors that might cause Error 520. Accessing and interpreting these logs can help identify problematic patterns, such as script errors or configuration issues.
To check your error logs:
- Log into your web hosting account.
- Locate error logs.
- This can vary; for example, in cPanel, look under the Metrics section for Errors.
- Search for timestamps correlating with the occurrence of Error 520. Pay attention to any recurring errors or critical messages that could indicate server issues.
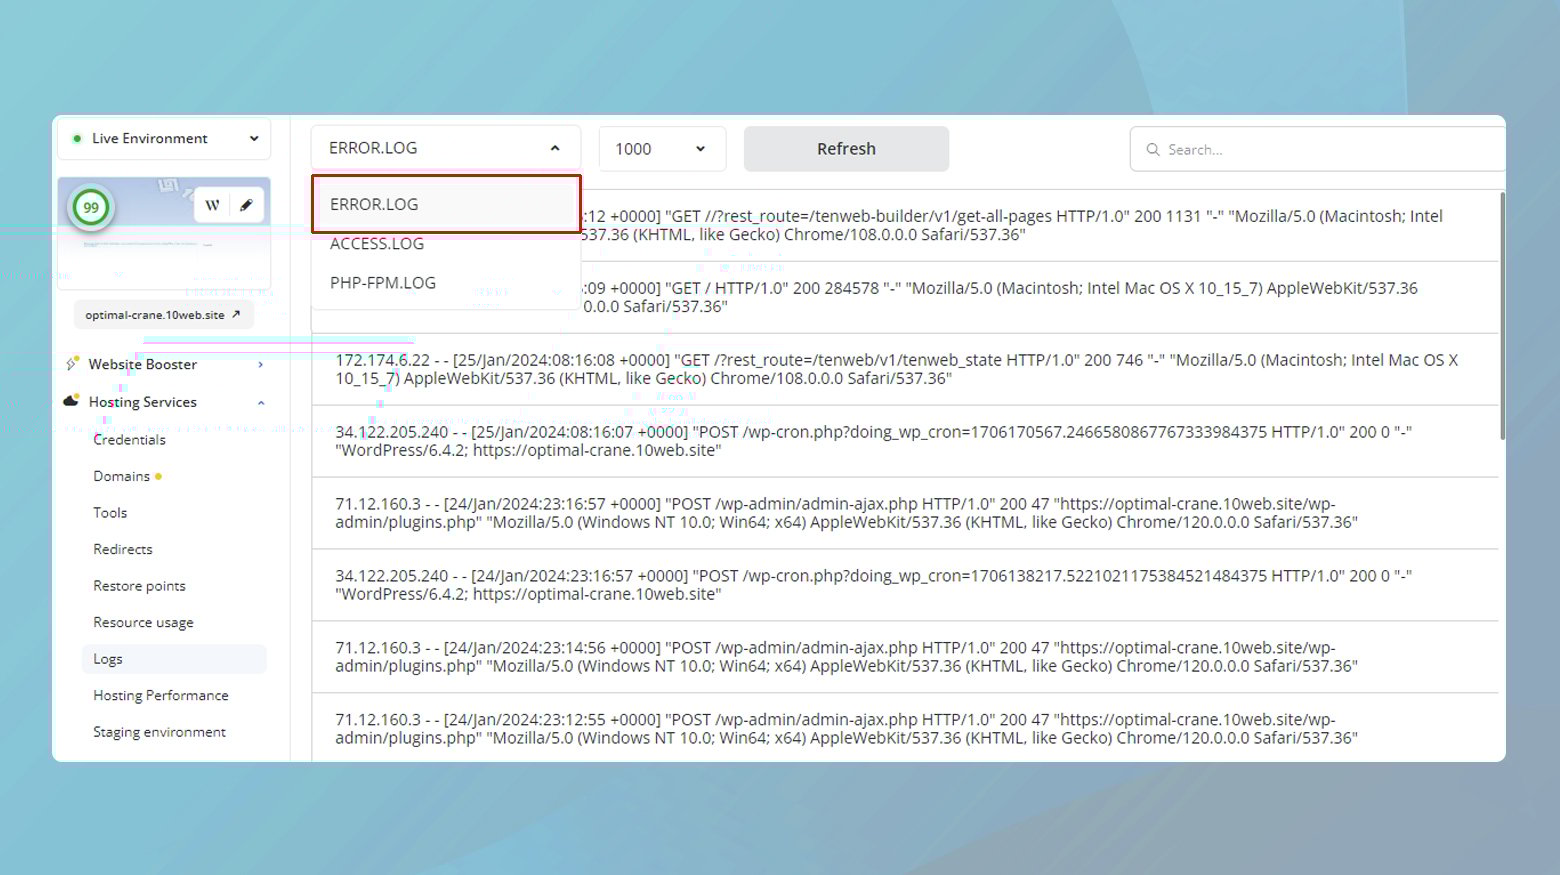
If your website is hosted at 10Web, you can access your logs from the 10Web dashboard under Hosting Services. Here is a guide on how to access the server logs of your site.
Using cURL to test directly
cURL is a versatile command-line tool used for transferring data with URLs. Its wide range of protocols makes it a powerful tool for testing web connectivity and server response. In the context of troubleshooting Error 520, cURL becomes particularly useful. It allows you to bypass Cloudflare’s network and directly test the accessibility and response of your origin server as if you were accessing it from a web browser. This direct approach is crucial for isolating whether Cloudflare or the origin server is the source of the issue. By simulating a browser request using cURL, you can observe the server’s raw response, including HTTP status codes, headers, and body content. This information can provide valuable insights into server behavior, configuration issues, or errors that might not be evident when traffic passes through Cloudflare’s proxy.
Detailed steps for using cURL to test server response
Before using cURL, ensure you have access to a command line interface (CLI), such as Terminal on macOS and Linux or Command Prompt on Windows. If cURL is not already installed on your system, you may need to download and install it from the official cURL website or use a package manager on Linux or macOS.
Let’s get started:
-
- On Windows, search for Command Prompt and open it.
- On macOS or Linux, open the Terminal application.
The basic syntax for a cURL command to test your website is as follows:
```bash

curl -Iv https://yourwebsite.com

```
-
- Replace https://yourwebsite.com with your actual domain name.
The -I option tells cURL to fetch the HTTP headers only, which is often sufficient for diagnosing connectivity issues. The -v option enables verbose output, providing detailed information about the request and response process.
- Type the constructed command into your CLI and press Enter.
Long information will be displayed, showing the entire connection process, including DNS resolution, the request sent, and the server’s response.
Analyze the output
-
- Look for the HTTP status code in the response.
A 200 series status code indicates success, while a 5xx error suggests server-side problems.
- Examine the headers for clues about server configuration, such as Server, Content-Type, and any specific security headers or cookies.
The long output may include errors or warnings about SSL certificates, redirection loops, or unreachable URLs, which can provide insights into issues affecting accessibility.
Testing direct server IP (Optional)
If you want to bypass DNS resolution and test the server directly using its IP address, you can modify the cURL command as follows:
```bash

curl -Iv --resolve yourwebsite.com:443:123.123.123.123 https://yourwebsite.com

```
- Replace 123.123.123.123 with your server’s IP address
- Adjust the port number (e.g., 443 for HTTPS or 80 for HTTP) accordingly.
The –resolve option tells cURL to use the specified IP address for the given domain, effectively bypassing DNS.
Simulating specific user agents (Optional)
To mimic requests from different browsers or devices, you can add a User-Agent header to your cURL command:
```bash

curl -Iv -H "User-Agent: Mozilla/5.0" https://yourwebsite.com

```
This can be useful for identifying issues that only appear under specific conditions, such as mobile browsers or search engine crawlers.
Creating a HAR file for deeper analysis
HTTP Archive (HAR) files are a structured format for recording the interactions between a web browser and a website’s servers. These files capture detailed information about each web request and response, including the headers, body content, status codes, and timings. HAR files are invaluable for diagnosing complex web issues because they provide a comprehensive snapshot of the browser’s activity during the occurrence of an error or issue. When dealing with Error 520 or similar problems, creating a HAR file while the error is being reproduced allows you to capture a detailed log of the network activity. This data can then be analyzed to pinpoint specific requests or responses that may be contributing to the issue. Additionally, HAR files are often requested by technical support teams as they offer a clear, chronological view of the web transactions, enabling a more accurate and swift diagnosis.
Google Chrome
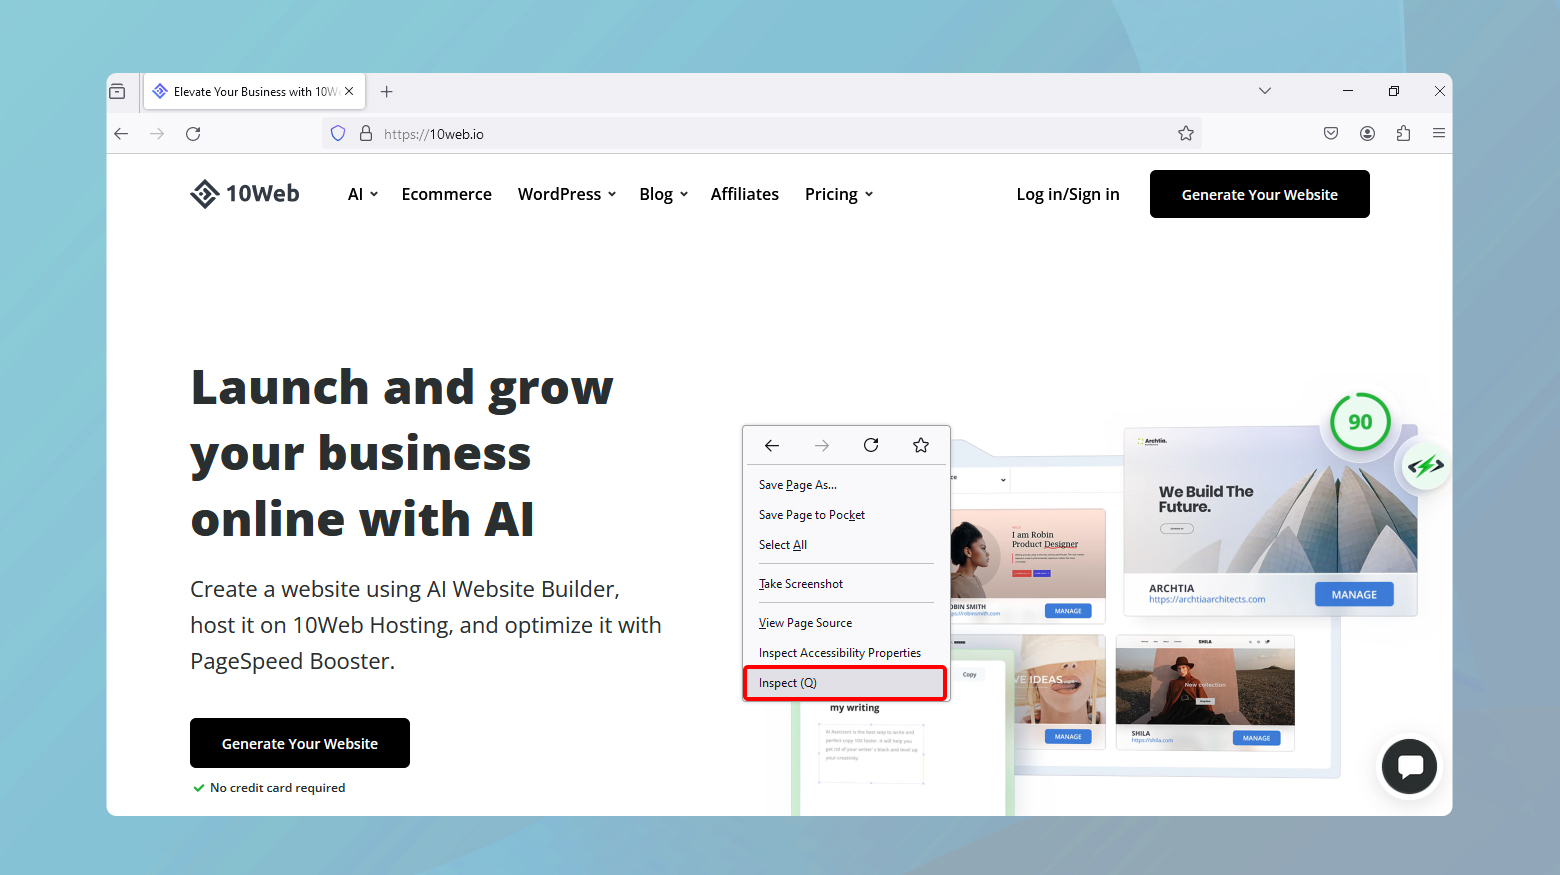
- Right-click and select Inspect. This opens the Developer Tools.
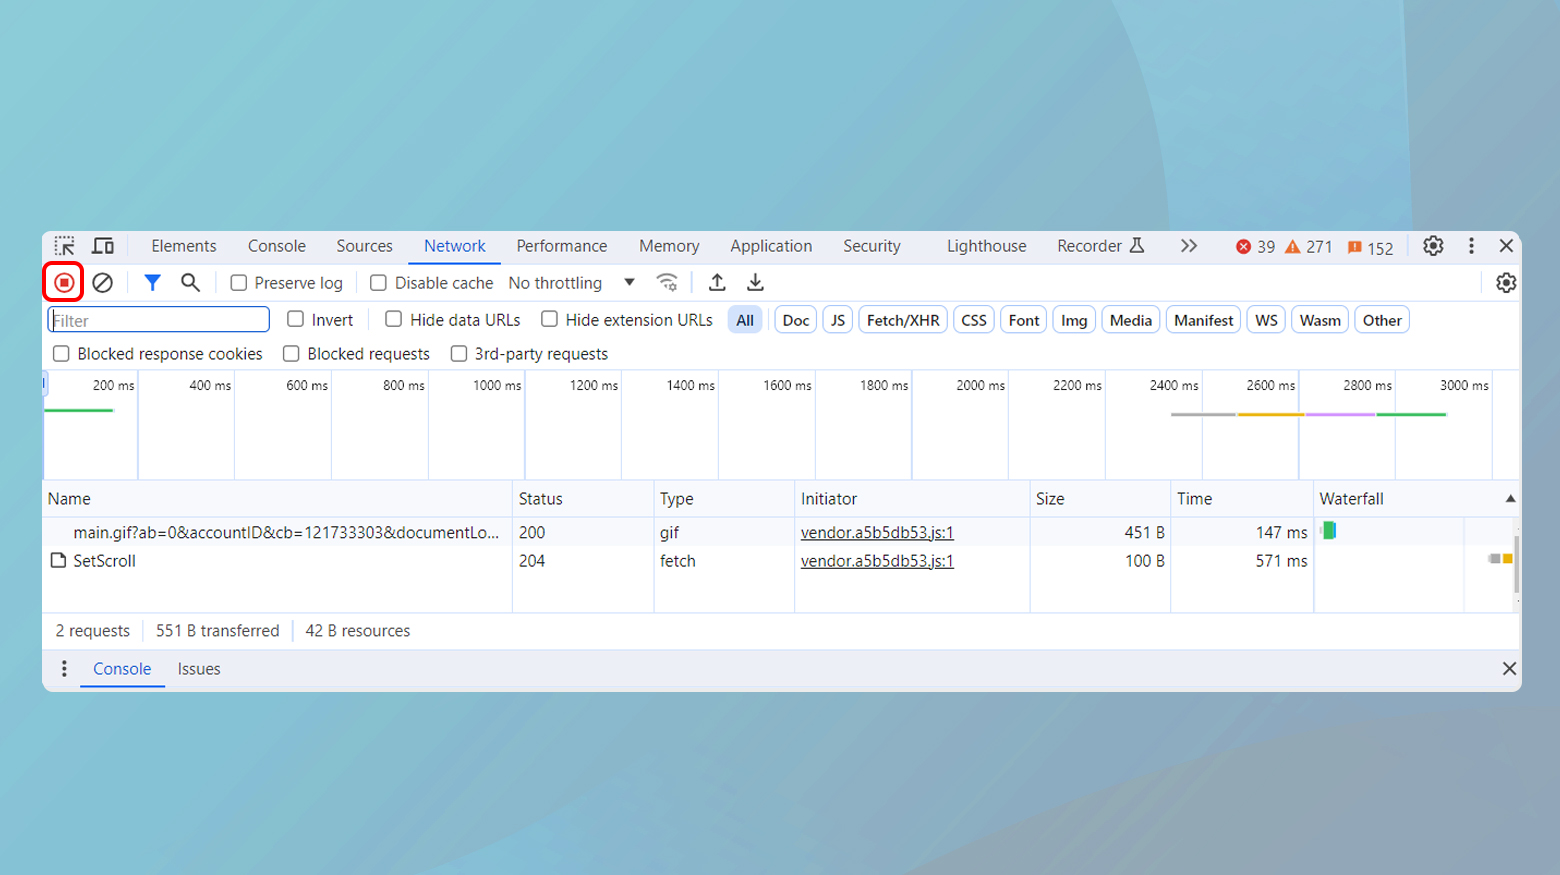
- Go to the Network Tab and ensure it’s recording (red circle icon).
- Navigate to the page where Error 520 occurs to reproduce the error.
- Right-click within the Network tab, choose Save all as HAR with content, and save the file.
Firefox
- Navigate to the webpage where the issue occurs.
- Right-click on the page and select Inspect Element from the context menu.
- Click on the Network tab to view all network requests and responses. If it’s not visible, you might have to click on the >> icon to find it.
- Ensure the recording is started by confirming that the red record button at the top left corner of the Network tab is activated. If it’s not, click it to start recording.
- Refresh the page or perform the actions that lead to the problem you’re diagnosing in order to reproduce the issue.
- Right-click anywhere within the list of network requests and select Save All As HAR from the context menu.
Safari

- Click on Safari in the menu bar and select Preferences.
- Go to the Advanced tab.
- Check the box at the bottom that says Show Develop menu in menu bar.
- Navigate to the webpage where the issue is occurring.
- Click on the Develop menu in the Safari menu bar and select Show Web Inspector. Alternatively, you can right-click on the webpage and select Inspect Element.
- Click on the Network tab within the Web Inspector to monitor network requests and responses.
- With the Network tab open, reload the webpage or perform the actions that trigger the issue. Ensure you do this step immediately after starting the recording to capture all necessary data.
- Once you’ve replicated the issue and captured the network activity, click on the Export button (represented by an arrow pointing out of a box) located at the bottom of the Network tab.
- Save the HAR file to your desired location on your computer.
Re-Enabling Cloudflare
After troubleshooting, it’s important to revert any temporary changes made during the diagnostic process.
- If Cloudflare was paused or disabled, return to your Cloudflare dashboard and reactivate the services.
- If in development mode, ensure to turn it off so Cloudflare’s caching and optimizations are re-enabled.
Conclusion
Troubleshooting Error 520 requires an efficient approach, starting from isolating the issue to identifying server-side errors and making necessary adjustments. By following these detailed steps, you can effectively diagnose and resolve the underlying causes of Error 520, ensuring your site remains accessible and performs optimally with Cloudflare.
Say goodbye to website errors
Achieve peace of mind with 99.99% uptime on 10Web Managed
WordPress Hosting, powered by Google Cloud.
Say goodbye to website errors
Fix all the website errors in one click
Migrate your website to the world's best Managed WordPress Hosting.