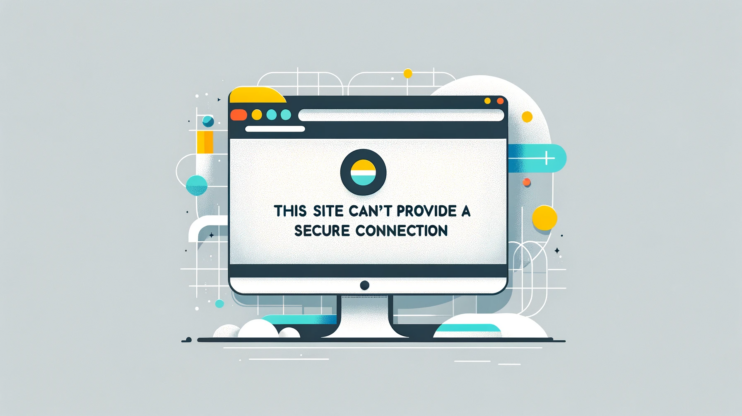
When you’re browsing the web and suddenly hit a roadblock with a warning that says “Your Connection is Not Private,” it’s more than just a minor hiccup. This error message is your browser’s way of telling you that the connection to the website you’re trying to visit isn’t secure. Essentially, it’s a protection mechanism designed to prevent your personal information from being exposed to potential cyber threats. At its core, this warning is about the integrity and confidentiality of the data exchanged between your browser and the website.
Say goodbye to website errors
Achieve peace of mind with 99.99% uptime on 10Web Managed
WordPress Hosting, powered by Google Cloud.
Variations of the error
This error can manifest in several ways across different browsers and devices, making it a versatile adversary to your browsing experience. Here are some common variations you might encounter:
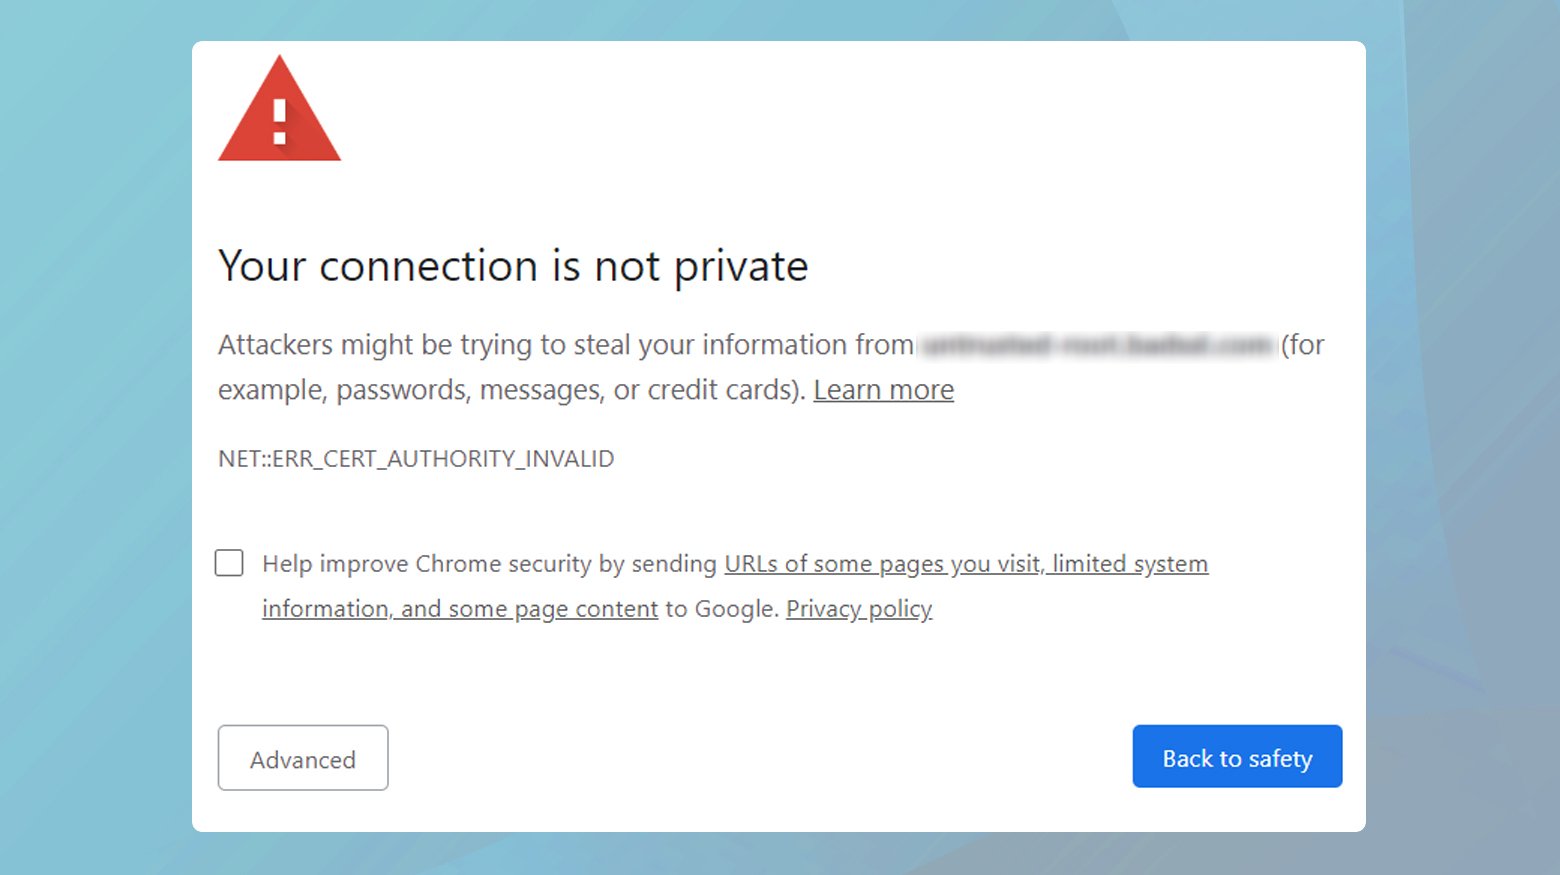
- Your Connection is Not Private
- NET::ERR_CERT_AUTHORITY_INVALID
- NET::ERR_CERT_COMMON_NAME_INVALID
- NET::ERR_CERT_DATE_INVALID
- NET::ERR_CERT_WEAK_SIGNATURE_ALGORITHM
- SSL Certificate Error
- Error Code: DLG_FLAGS_INVALID_CA
- Error Code: SEC_ERROR_UNKNOWN_ISSUER
- Safari Can’t Verify the Identity of the Website
- The site’s security certificate is not trusted!
Despite the different labels, the essence of the issue remains the same: there’s a problem with the website’s SSL (Secure Sockets Layer) certificate, which is crucial for establishing a secure HTTPS connection.
Why does this error occur?
The “Your Connection is Not Private” error is a safeguard against potential security risks, appearing when your browser encounters issues with a website’s SSL/TLS certificate. Understanding the root causes of this error can help users and website administrators alike navigate and resolve it effectively. Here’s a deeper dive into the common reasons behind this error:
Expired SSL certificate
SSL certificates have a validity period, and website owners must renew them before they expire. If a website’s SSL certificate has expired, browsers will no longer consider the connection secure, leading to this error message. This is akin to driving with an expired driver’s license; it’s an immediate red flag for authorities, or in this case, the browser.
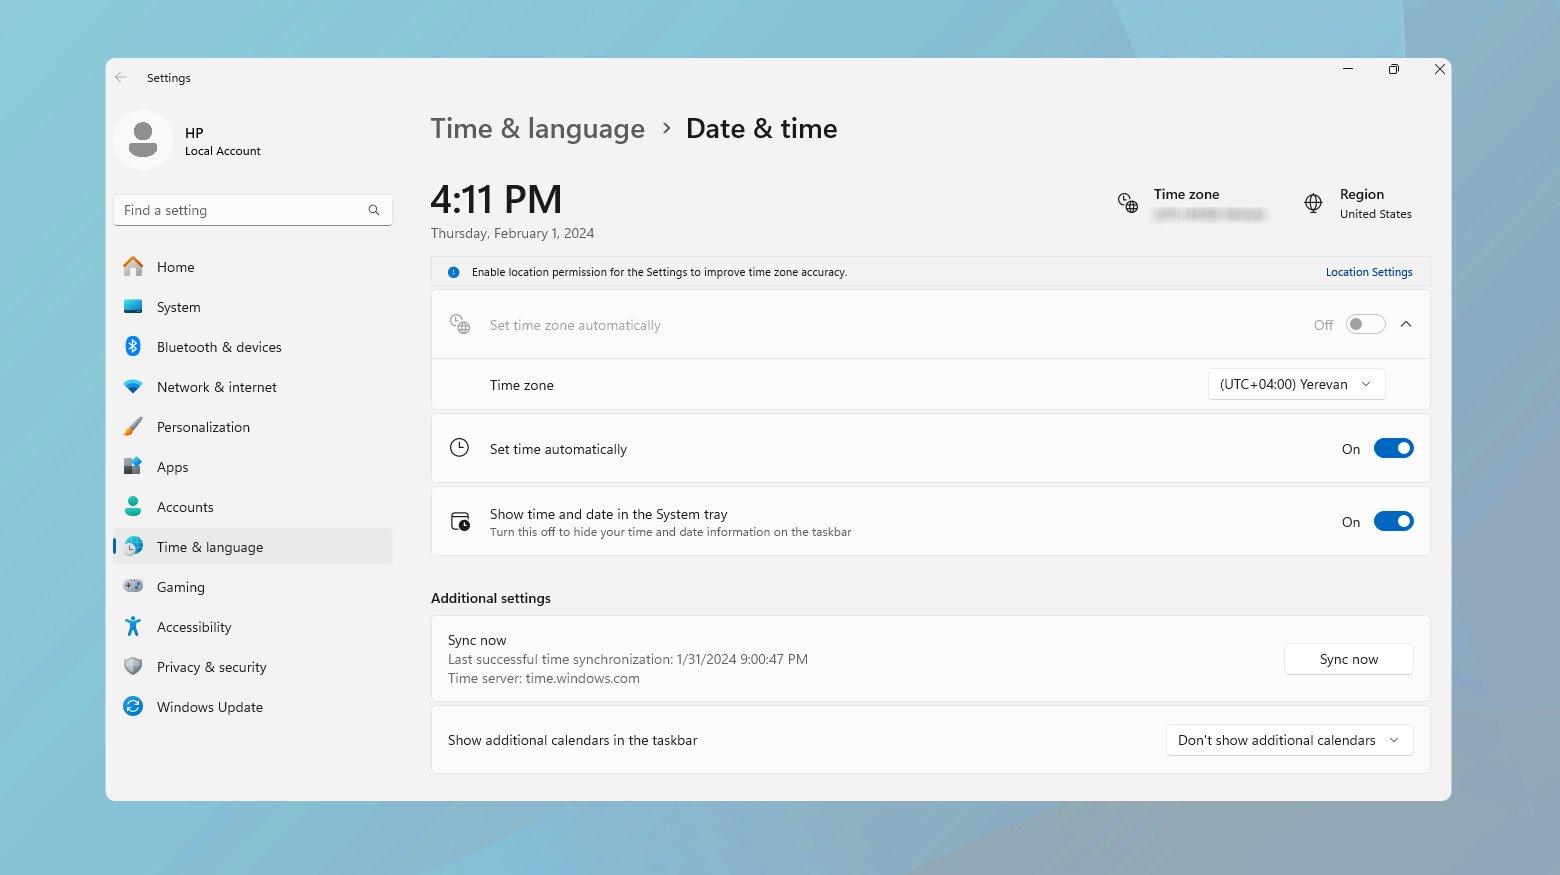
Incorrect date & time on client device
If the date and time settings on your device (the client) are incorrect, it can make SSL certificates seem invalid. This is because your browser checks the certificate’s validity against your device’s current date and time. If there’s a discrepancy, the browser errs on the side of caution and flags the connection as unsecure. Imagine trying to use a coupon before its start date; the store won’t accept it because, according to its valid timeframe, it’s not yet valid.
Untrusted certificate authority (CA)
Browsers maintain a list of trusted Certificate Authorities. If a website’s SSL certificate was issued by an authority not on this list, the browser will not trust the connection. This situation is like a foreign diplomat arriving in a new country without the proper credentials recognized by the host country—it leads to a lack of trust.
Misconfigured certificate or domain name mismatch
For an SSL certificate to be considered valid, it must be correctly configured for the domain name it’s securing. If there’s a mismatch—say, the certificate was issued for `www.example.com` but you’re trying to access `example.com` without the ‘www’—the browser will raise an alarm. This is akin to trying to enter a secured facility with an ID that doesn’t exactly match the name on the guest list.
Weak encryption or outdated protocol
Modern browsers require that SSL certificates use strong encryption algorithms and up-to-date protocols (such as TLS 1.2 or higher). If a certificate uses weak encryption or an outdated protocol, the browser deems the connection insecure. This can be compared to a security system using old, easily picked locks instead of modern, high-security locks.
HSTS policy misconfiguration
HTTP Strict Transport Security (HSTS) is a web security policy mechanism that forces browsers to interact with websites only over secure HTTPS connections. If a website has HSTS enabled but there’s an issue with its SSL certificate, browsers will not allow users to bypass the error message, even manually. This is because the policy tells the browser to strictly enforce secure connections, leaving no room for exceptions.
Interference by antivirus or network policies
Sometimes, antivirus software or network policies (especially in corporate environments) intercept and scan SSL connections for security threats. This interception can sometimes cause SSL errors if the scanning mechanism replaces the website’s SSL certificate with its own, which might not be trusted by the browser. It’s like a security guard at a concert swapping your ticket with a different one for inspection purposes, but the gatekeeper doesn’t recognize the swap and refuses entry.
In-depth Solutions to SSL certificate verification failures
Update your browser
Modern web browsers are equipped with the latest security standards, including the most recent SSL/TLS protocols and cipher suites, which are essential for the secure encryption of data between your device and the web servers. When a browser is outdated, it may not recognize or support newly issued SSL certificates, leading to verification failures. Regular updates ensure compatibility with the latest security certificates and encryption methods, significantly reducing the risk of encountering SSL errors.
Correct your system’s date and time
SSL certificates have a specific validity period, and web browsers rely on your system’s date and time to verify that the certificate is currently valid. If your device’s date and time are significantly incorrect, it may falsely appear that the SSL certificate has expired or is not yet valid, causing the browser to reject the connection. Ensuring your system’s clock is accurate is a simple yet effective measure to prevent such mismatches and ensure smooth SSL verifications.
Windows
- Right-click on the time display on the taskbar.
- Select “Adjust date/time”.
- Ensure “Set time automatically” is enabled or manually set the correct date and time.
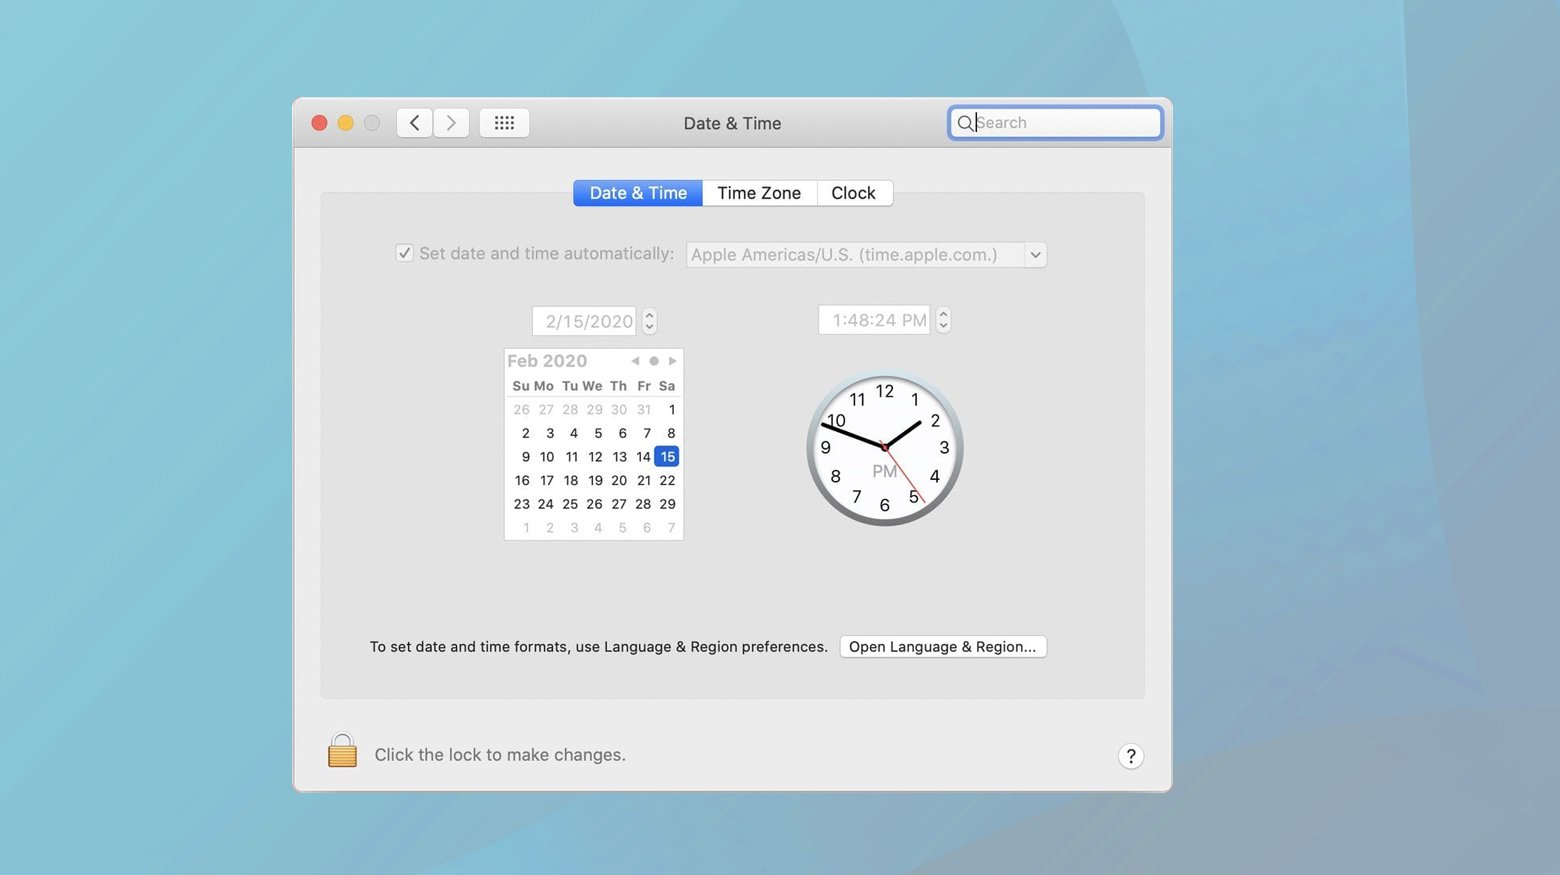
Mac
- Open “System Preferences”.
- Click on “Date & Time”.
- Check “Set date and time automatically” or manually adjust the settings.
Clear browser cache and cookies
The browser cache and cookies can store outdated SSL certificate information, which may conflict with the current valid certificates on subsequent visits to the website. This can cause the browser to refer to an old or invalid version of the certificate, leading to verification errors. Clearing the cache and cookies forces the browser to fetch the latest certificate from the server, facilitating a successful SSL handshake.
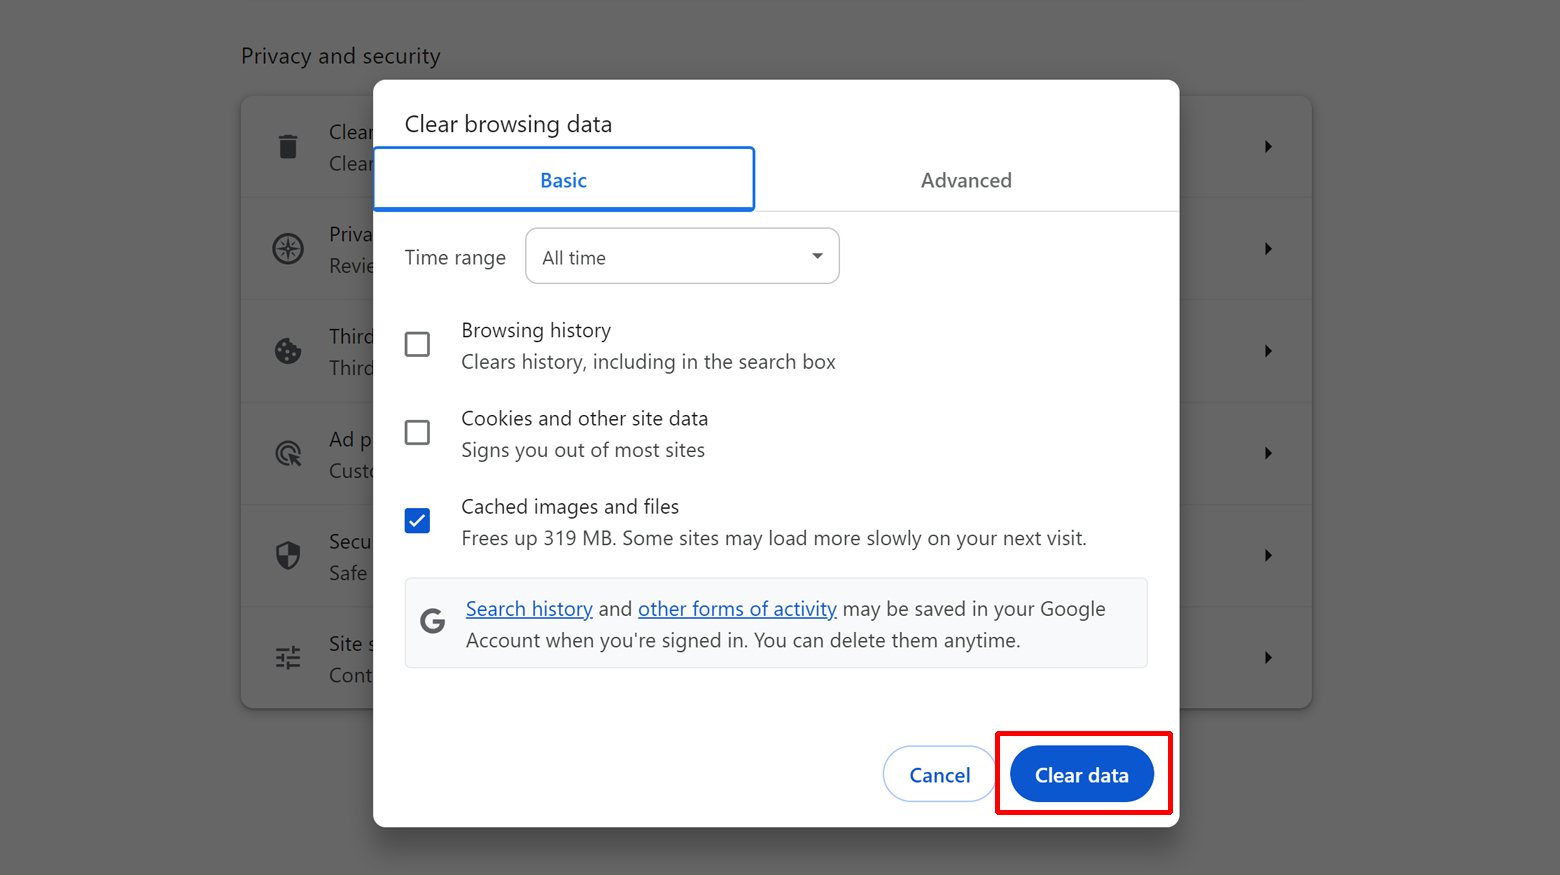
- Go to your browser’s settings or preferences.
- Find the “Privacy” or “History” section.
- Select “Clear browsing data” or a similar option.
- Choose to clear cache and cookies, selecting “All time” as the time range.
- Confirm by clicking “Clear data” or a similar confirmation button.
Clear the SSL state on your computer
The SSL state on a computer encompasses the cache of SSL certificates and the history of SSL sessions that have been established by the browser. Over time, this cache can accumulate outdated or invalid SSL certificates, which might interfere with the browser’s ability to establish secure connections with websites.
Clearing the SSL state forces the browser to retrieve a fresh copy of the SSL certificate directly from the web server during the next connection attempt. This ensures that any issues caused by cached certificate discrepancies are resolved, enabling a clean slate for SSL connections. This process is particularly effective in resolving persistent SSL errors that are not fixed by clearing the browser’s cache or cookies alone.
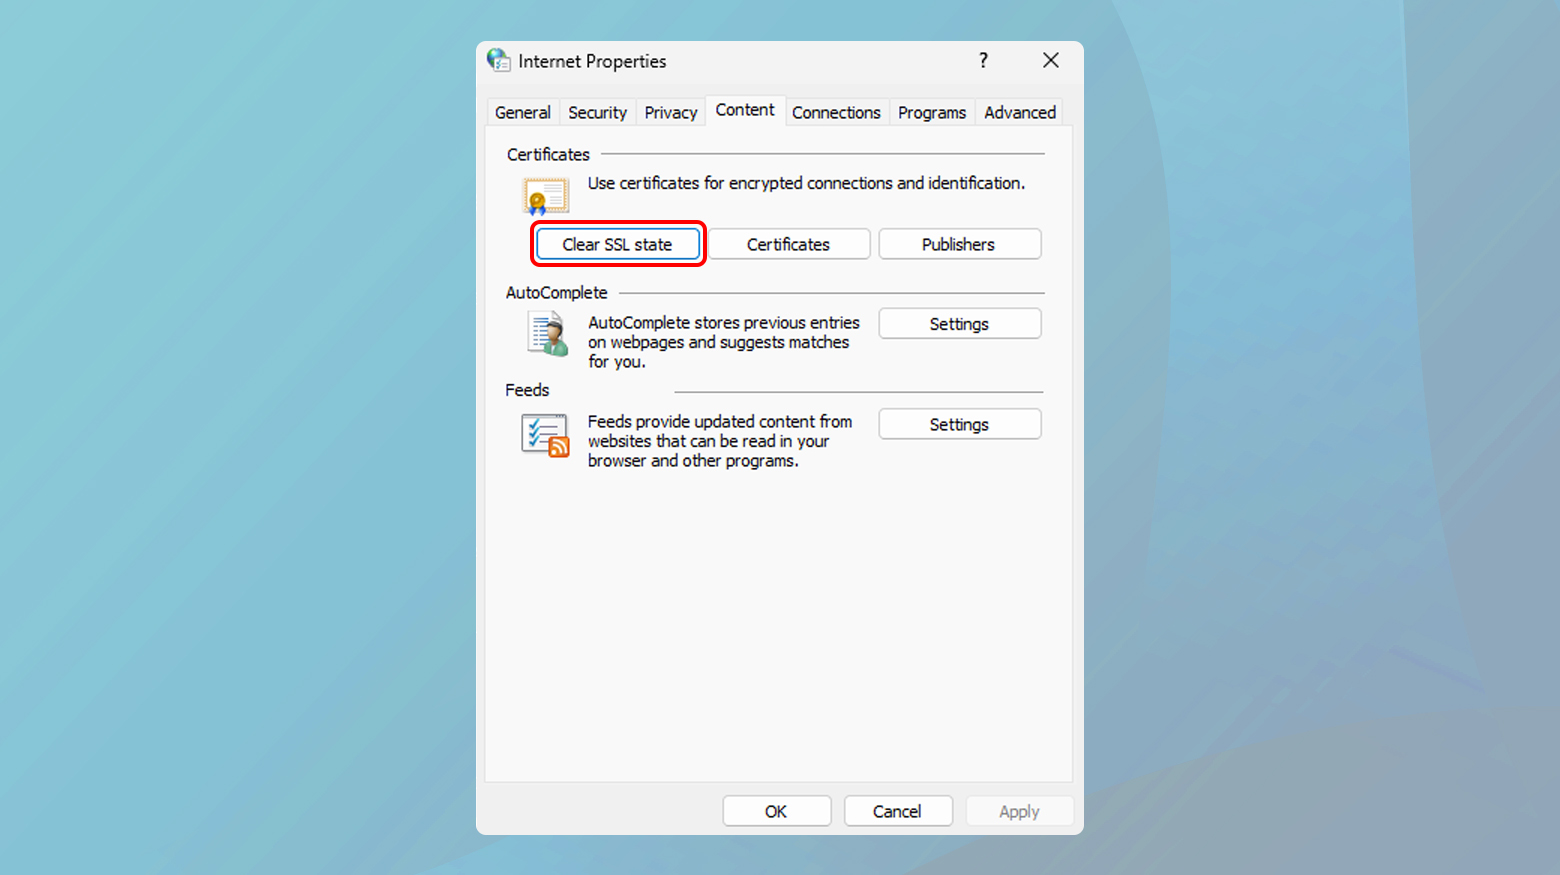
To clear SSL state:
- Press the Windows key, type “Internet Options,” and press Enter. This opens the Internet Properties window.
- In the Internet Properties window, click on the “Content” tab to access its settings.
- Within the Content tab, locate the “Clear SSL state” button and click on it. This will clear the SSL cache stored on your computer.
Disable antivirus SSL scanning
Antivirus programs may intercept and scan SSL-encrypted traffic to check for malware or phishing attempts. This process can inadvertently modify or block legitimate SSL certificates, causing browsers to flag them as untrustworthy. Disabling SSL/TLS scanning within your antivirus software prevents it from interfering with the web’s natural encryption processes, thus eliminating this source of verification failure.
- Open your antivirus software.
- Locate the “Advanced Settings” or “Network Protection” settings.
- Find the option for “SSL Scanning” or “HTTPS Scanning” and disable it.
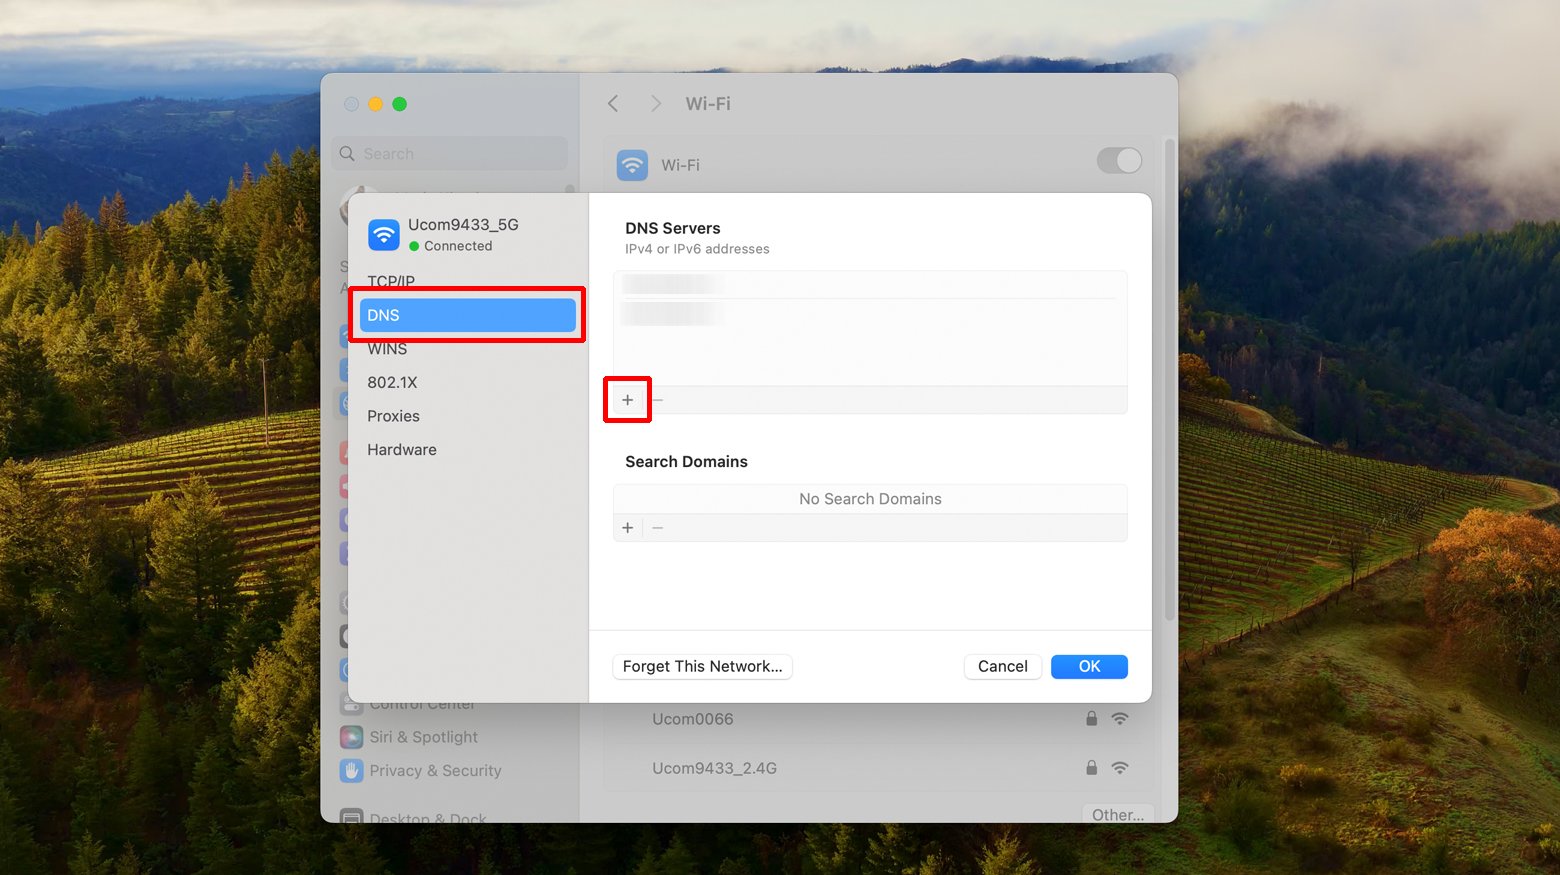
Change your DNS servers
DNS server issues can lead to a misroute of the request to a server that doesn’t host the website you’re trying to visit, potentially causing SSL errors if the server presents an incorrect SSL certificate. Using reliable public DNS servers, like those provided by Google or OpenDNS, can improve the accuracy of domain name resolutions and reduce the likelihood of encountering SSL certificate errors related to DNS misconfigurations.
Changing your DNS servers can improve your internet speed, enhance security, and sometimes help you access certain websites faster. Here’s a step-by-step guide on how to change your DNS servers on both Windows and Mac.
Windows
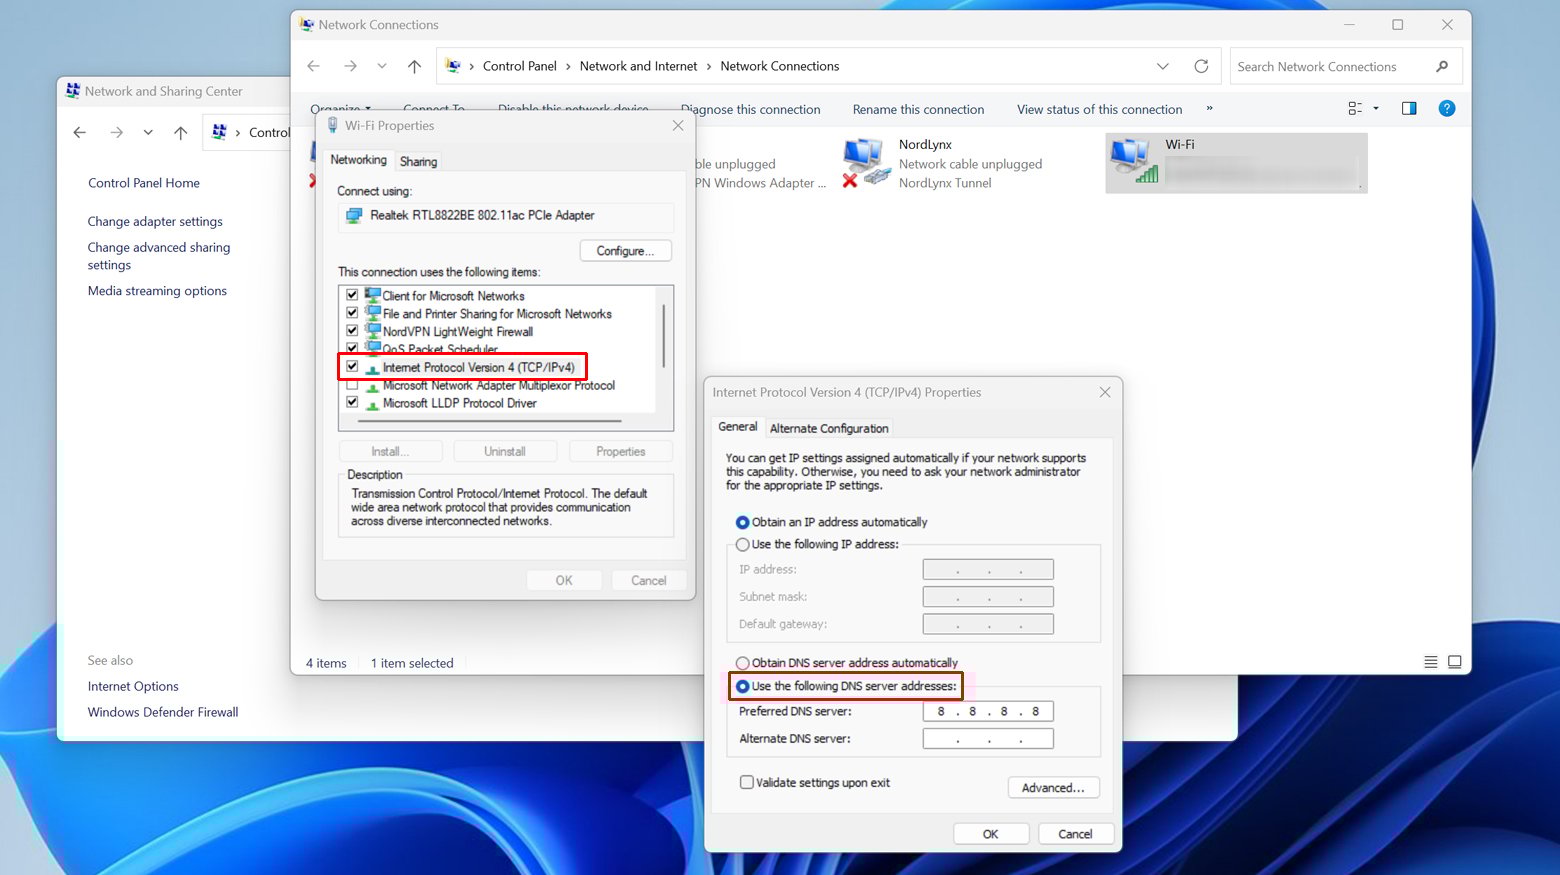
- Press the Windows key, type “Control Panel,” and press Enter.
- Click on “Network and Sharing Center.”
- On the left, click on “Change adapter settings.”
- Right-click your network connection (it could be “Wi-Fi” or “Ethernet,” depending on how you’re connected) and select “Properties.”
- Scroll down to “Internet Protocol Version 4 (TCP/IPv4)” or IPv6 and select it, then click on “Properties.”
- Select “Use the following DNS server addresses.”
- Enter your preferred DNS server in the “Preferred DNS server” box and the alternate DNS server in the “Alternate DNS server” box. For example, for Google DNS, you would use 8.8.8.8 and 8.8.4.4, respectively.
- Click “OK” to save your changes.
- Open Command Prompt by typing “cmd” in the start menu, then type `ipconfig /flushdns` to clear your DNS cache. This ensures your new DNS settings are used immediately.
Mac
- Click on the Apple menu and select “System Preferences.”
- Click on “Network.”
- Select the network connection you want to configure (Wi-Fi or Ethernet) on the left pane, then click “Advanced…”
- Click the “DNS” tab at the top of the window.
- Click the “+” button under the DNS Servers list to add a new DNS server. Enter the address of your preferred DNS server. Repeat this step to add an alternate DNS server.
- Click “OK,” then click “Apply” to save your changes.
- Open Terminal and type `sudo killall -HUP mDNSResponder` to clear the DNS cache on macOS. This ensures your new DNS settings are used immediately.
Bypass the warning (Proceed with caution)
Bypassing SSL warnings is generally insecure and should only be done in cases where you have absolute trust in the website’s authenticity and understand the risks. This step temporarily ignores the SSL verification process, allowing access to sites despite potential security concerns. It’s crucial to recognize that this undermines the purpose of SSL certificates, which is to ensure the integrity and confidentiality of data exchanged online.
To bypass the warning:
Before you proceed, make sure you understand the risks involved.
- Click on “Advanced” on the warning page.
- Look for an option to proceed to the website.
Renew expired SSL certificates
An expired SSL certificate is one of the most common causes of SSL errors. Certificates are issued for a limited period, and expiration is a security measure ensuring that credentials are periodically renewed and updated with the latest encryption standards. Timely renewal of SSL certificates is crucial for maintaining the trustworthiness and security of your website, preventing browsers from displaying security warnings to visitors.
Ensure proper certificate installation
Proper installation of an SSL certificate involves not just the certificate itself but also the correct configuration of intermediate certificates and the certificate chain. A misconfigured certificate chain can lead to verification failures, as browsers may not be able to trace the trust path back to a root certificate authority they recognize. Using SSL configuration verification tools can help identify and correct such issues, ensuring a seamless verification process.
Use a recognized certificate authority (CA)
SSL certificates issued by well-recognized CAs are more likely to be trusted by web browsers, as these authorities are included in the browsers’ pre-installed list of trusted CAs. Certificates from unrecognized or less reputable CAs may not be automatically trusted, leading to verification errors. Choosing a reputable CA ensures broad compatibility and trust, facilitating secure connections without interruptions.
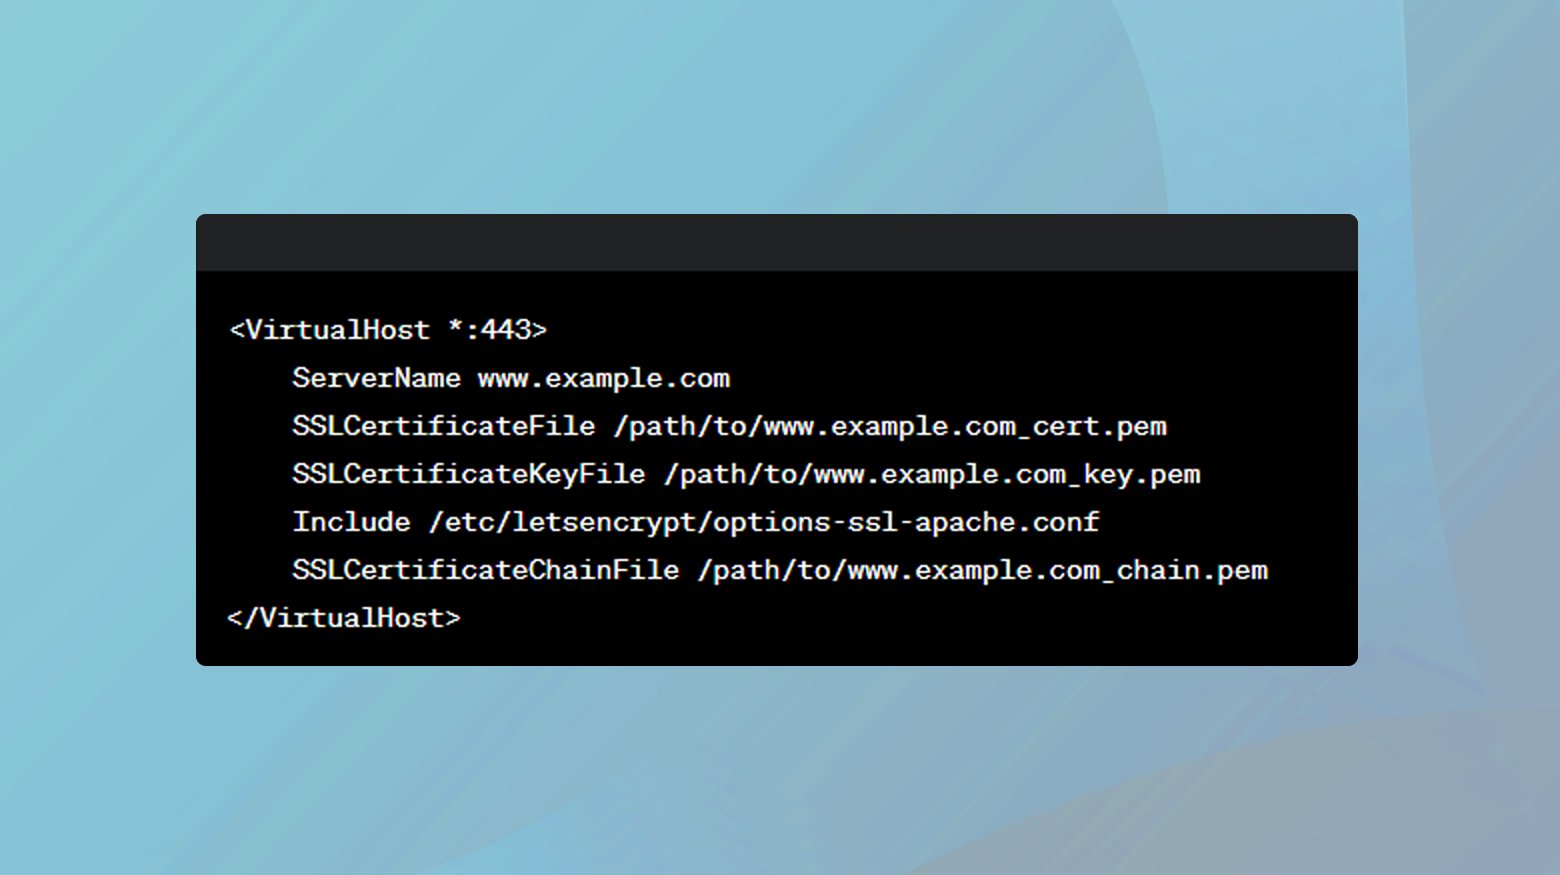
Configure server for SNI support
Server Name Indication (SNI) is a technology that allows multiple SSL certificates to be hosted on a single IP address, enabling the server to present the correct certificate based on the domain name requested by the client. Without SNI, servers with multiple domains on a single IP may inadvertently present the wrong SSL certificate, causing verification failures for some sites. Configuring SNI ensures that the correct certificate is used for each domain, avoiding such conflicts.
Before you begin, ensure your server software (e.g., Apache, Nginx) and the underlying operating system support SNI.
Apache
For Apache, ensure you’re running version 2.2.12 or later.
- Edit the VirtualHost configuration for each domain in your ’httpd.conf’ or ‘ssl.conf’ file.
- Specify a unique ‘ServerName’ directive and the path to the certificate and key files using ‘SSLCertificateFile’ and ‘SSLCertificateKeyFile’ directives.
- Apply the changes by restarting your web server. For Apache, use ‘sudo service apache2 restart.’
Nginx
For Nginx, ensure you’re using version 0.5.32 or later.
In your server block, set the server_name to your domain and specify the SSL certificate and key:
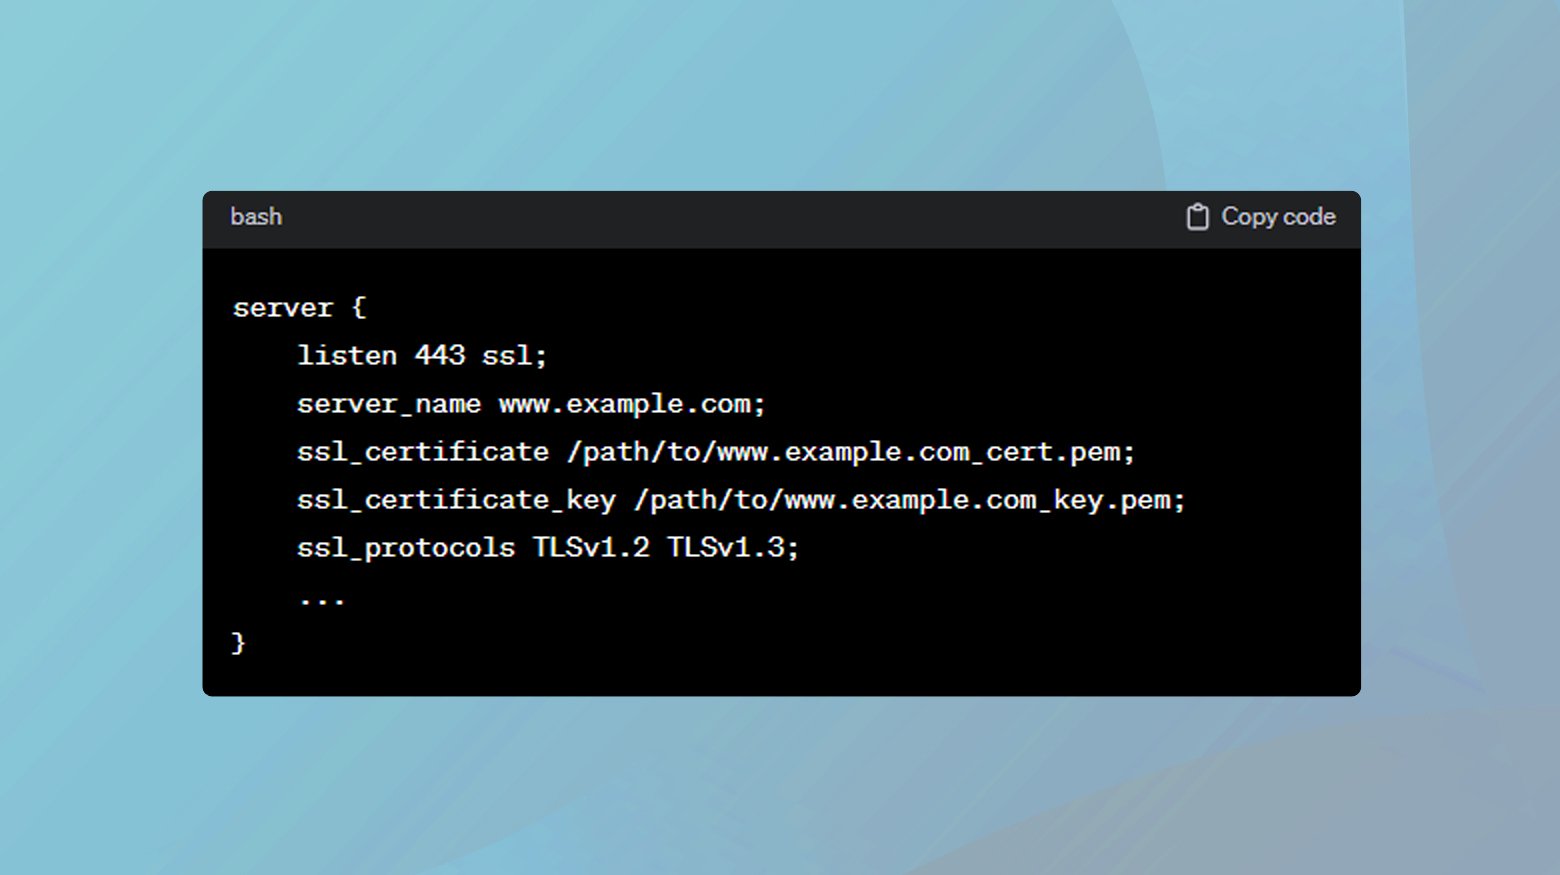
Apply the changes by restarting your web server. For Nginx, use ‘sudo service nginx restart’.
Upgrade to secure protocols and ciphers
The security of an SSL/TLS connection depends not only on the validity of the certificate but also on the strength of the encryption protocols and ciphers used. Older protocols like SSL 3.0 and early versions of TLS are vulnerable to attacks and are considered insecure. Upgrading to the latest supported protocols and ciphers enhances the security of connections and ensures compatibility with the security standards enforced by modern browsers. Strong data immutability measures add another layer of protection by helping prevent unauthorized changes to critical information.
Modify server configuration
Apache: Edit your httpd.conf or ssl.conf file to include:
SSLProtocol all -SSLv2 -SSLv3 -TLSv1 -TLSv1.1
SSLCipherSuite HIGH:!aNULL:!MD5:!RC4
SSLHonorCipherOrder on
Nginx: Update your server block in nginx.conf:
ssl_protocols TLSv1.2 TLSv1.3;
ssl_ciphers 'ECDHE-ECDSA-AES256-GCM-SHA384:ECDHE-RSA-AES256-GCM-SHA384:ECDHE-ECDSA-CHACHA20-POLY1305:ECDHE-RSA-CHACHA20-POLY1305:ECDHE-ECDSA-AES128-GCM-SHA256:ECDHE-RSA-AES128-GCM-SHA256';
ssl_prefer_server_ciphers on;
Apply the changes by restarting the server as described in the SNI configuration step.
Implement HTTP Strict Transport Security (HSTS)
HSTS is a policy mechanism that forces browsers to interact with your website over HTTPS only, eliminating the risk of downgrade attacks and ensuring that all communications are securely encrypted. While HSTS strengthens security, it requires that your site’s SSL configuration is error-free, as any SSL error could render your site inaccessible to visitors until the issue is resolved.
Apache:Add the following to your VirtualHost in httpd.conf or ssl.conf:
Header always set Strict-Transport-Security "max-age=31536000; includeSubDomains"
Nginx:Add the following to your server block in nginx.conf:
add_header Strict-Transport-Security "max-age=31536000; includeSubDomains" always;
Restart your web server to apply the HSTS policy.
Correct domain name configuration
The SSL certificate must match the domain name visitors use to access your site, including any subdomains. Mismatches between the certificate and the domain name are a common cause of SSL errors, as they indicate a potential security risk. Ensuring that your SSL certificate accurately reflects your domain structure is essential for successful verification.
To check domain configurations:
- Use an SSL Checker tool online to verify that your SSL certificate matches the domain and subdomains you intend to secure.
- Ensure your DNS records (A, CNAME) correctly point to the server’s IP address hosting the SSL certificate.
- If there’s a mismatch, renew or reissue your SSL certificate with the correct domain names listed, including any necessary SAN entries.
Monitor and resolve mixed content issues
Mixed content occurs when a secure HTTPS website includes resources (like images or scripts) loaded over an insecure HTTP connection. This can undermine the security of the site and lead to browser warnings. Identifying and resolving mixed content issues by ensuring all resources are loaded over HTTPS is critical for maintaining the integrity and security of your site.
To resolve mixed content issues:
- Use browser developer tools (F12) to find mixed content warnings in the Console tab.
- Online tools like “Why No Padlock?” can also help identify mixed content on your pages.
- Update Content Links:
- Manually check your webpage’s source code and update all HTTP links to HTTPS. This includes links to images, scripts, iframes, and stylesheets.
- Add a CSP header in your web server configuration to help mitigate and prevent mixed content issues.
For Apache, add to .htaccess:
Header set Content-Security-Policy "upgrade-insecure-requests"
For Nginx, add to your server block:
add_header Content-Security-Policy "upgrade-insecure-requests";
After making changes, thoroughly test your website to ensure that all resources load correctly over HTTPS and that there are no mixed content warnings.
Consult SSL/TLS community forums
Complex SSL/TLS issues may require specialized knowledge or troubleshooting techniques. Participating in community forums allows you to tap into the collective expertise of web security professionals, offering insights and solutions that may not be readily available through standard troubleshooting guides.
Checking Subject Alternative Name (SAN) in SSL certificates
The Subject Alternative Name (SAN) field in SSL certificates allows a single certificate to provide coverage for multiple domain names or subdomains. This is particularly useful for organizations that manage multiple services across various domains and subdomains but want to simplify their SSL certificate management.
An SSL error might occur if a user tries to access a website using a domain name or subdomain that is not listed in the SAN field of the website’s SSL certificate. By checking the SAN field, administrators and users can verify that the certificate is correctly configured to secure all necessary domain variations, thereby avoiding mismatch errors.
Using a web browser
- Open your web browser and go to the website whose SSL certificate you wish to check.
- Click on the padlock icon in the address bar, followed by a menu option that usually says something like “Certificate” (the exact wording may vary by browser).
- In the certificate window, look for the “Details” tab and scroll through the list of fields until you find “Subject Alternative Name”.
- Under the SAN field, you will see a list of domain names and possibly IP addresses. Verify that the domain name you are using to access the website is listed. If it’s not, this is likely the cause of any SSL verification errors you are experiencing.
Using online tools
Several online services allow you to check the details of a website’s SSL certificate, including the SAN field.
- Search for “SSL Checker” or “SSL Certificate Checker” in a search engine.
- Once you’ve chosen an SSL Checker tool, enter the domain name of the website you’re investigating into the provided field and submit it for checking.
The tool will generate a report detailing the SSL certificate’s properties, including the SAN field. Look through this report to see all the domain names the certificate covers.
Conclusion
SSL certificate verification failures can undermine the security and accessibility of websites, but they can be effectively addressed through a combination of user vigilance and administrator diligence. Users can ensure a secure browsing experience by keeping their browsers up-to-date, accurately setting their system’s date and time, clearing cache and cookies, adjusting antivirus and DNS settings, and understanding the risks of bypassing security warnings. Website administrators, on the other hand, must maintain valid and properly configured SSL certificates, choose reputable CAs, implement secure protocols and ciphers, and ensure their websites are free from mixed content and other configuration errors. By adhering to these best practices, both users and administrators contribute to a safer, more secure internet.
Say goodbye to website errors
Achieve peace of mind with 99.99% uptime on 10Web Managed
WordPress Hosting, powered by Google Cloud.
Say goodbye to website errors
Fix all the website errors in one click
Migrate your website to the world's best Managed WordPress Hosting.