The ERR_TOO_MANY_REDIRECTS, also known as a redirect loop, is a common browser error that can be perplexing but is generally straightforward to resolve. This error typically surfaces after recent changes on a website, misconfigurations of server redirects, incorrect settings with third-party services, or sometimes due to issues with the browser’s cache or cookies.
What is the ERR_TOO_MANY_REDIRECTS error?
This error indicates that your website is stuck in an infinite redirection loop. For instance, URL 1 might redirect to URL 2, and URL 2 might redirect back to URL 1, creating a cycle that the browser cannot escape. Variations of this error message include:
- This page isn’t working. domain.com redirected you too many times.
- The page isn’t redirecting properly.
- Safari Can’t Open the Page.
- This page isn’t working right now.
- This page isn’t working. example.com redirected you too many times.
- Messages about exceeding a limit of internal redirects.
Common causes of ERR_TOO_MANY_REDIRECTS
Several factors can trigger this error:
Misconfigured WordPress settings or plugins: Incorrect settings in WordPress or conflicts caused by plugins can initiate a redirect loop.
Browser cache/cookies issues: Corrupted cookies or outdated cache in your browser can also cause this error.
Third-party service issues: Problems with services such as Content Delivery Networks (CDNs) can lead to excessive redirects.
Incorrect HTTPS settings: Misconfiguration of SSL certificates or HTTPS redirect rules can trigger this error. Server configuration issues: Misconfigurations in server settings or the .htaccess file can cause redirect loops.
Say goodbye to website errors
Achieve peace of mind with 99.99% uptime on 10Web Managed
WordPress Hosting, powered by Google Cloud.
How to fix the ERR_TOO_MANY_REDIRECTS error
Delete site specific cookies
Cookies are small data files used by websites to remember users’ settings and login states. When a user visits a website, these cookies are used to direct them to relevant pages based on their past interactions. However, if cookies become corrupted or outdated, they might instruct the browser to request pages that lead to a loop, causing ERR_TOO_MANY_REDIRECTS. It’s akin to a broken record that keeps looping over the same part. By clearing these specific cookies, you reset the interaction, allowing for a fresh and correct sequence of redirects.
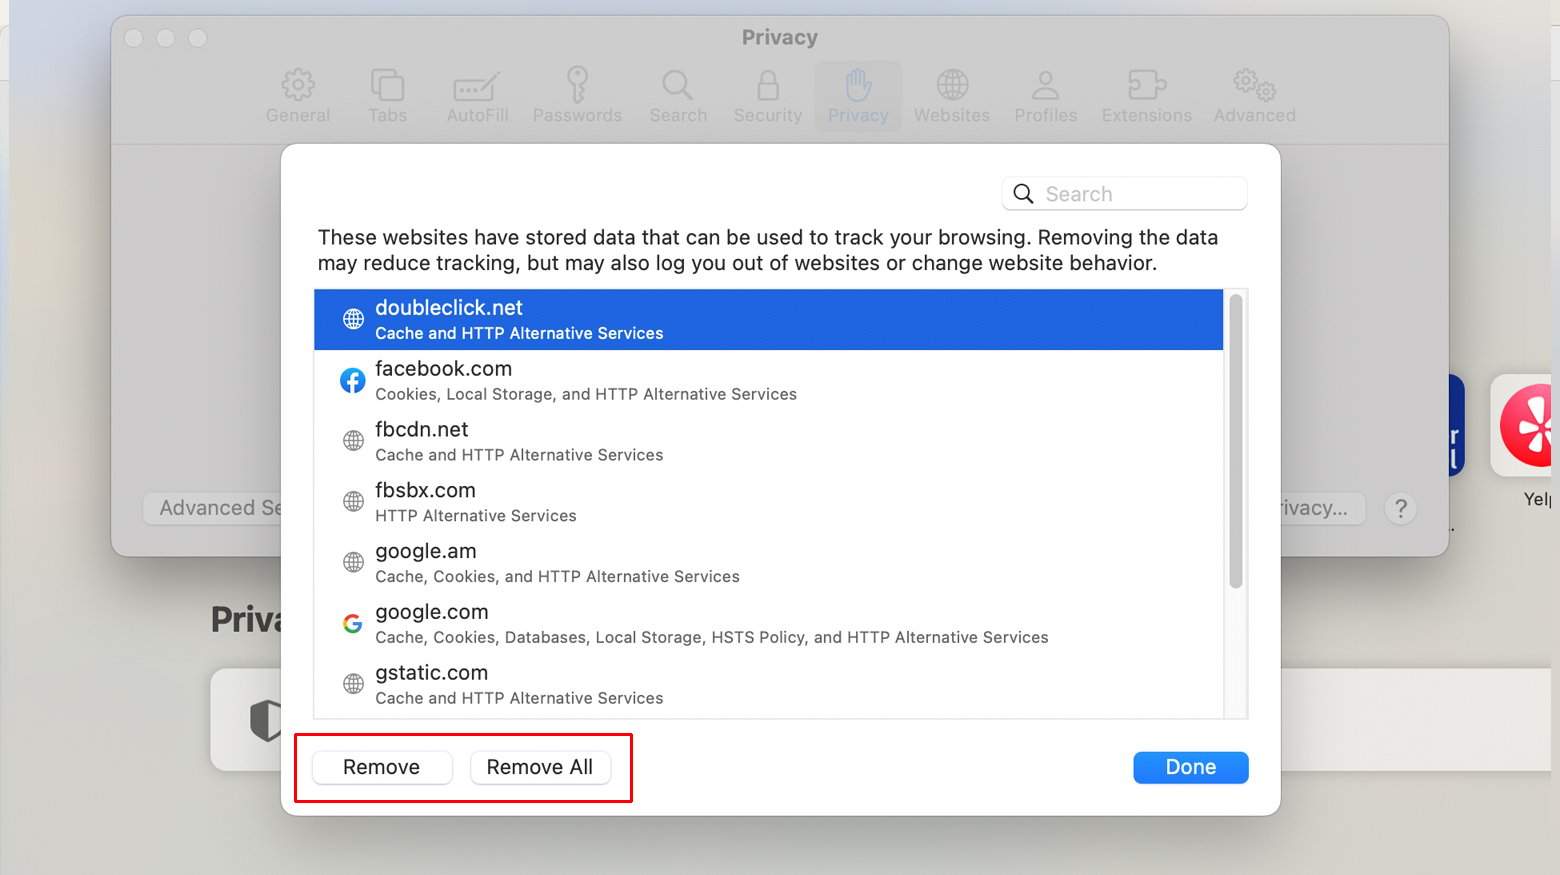
Mac (Safari)
- Open Safari and select ‘Safari’ in the menu bar.
- Choose ‘Preferences’ and navigate to the ‘Privacy’ tab.
- Click on ‘Manage Website Data’.
- Find and select the website causing the error.
- Click ‘Remove’ or ‘Remove All’ to clear the cookies for the site
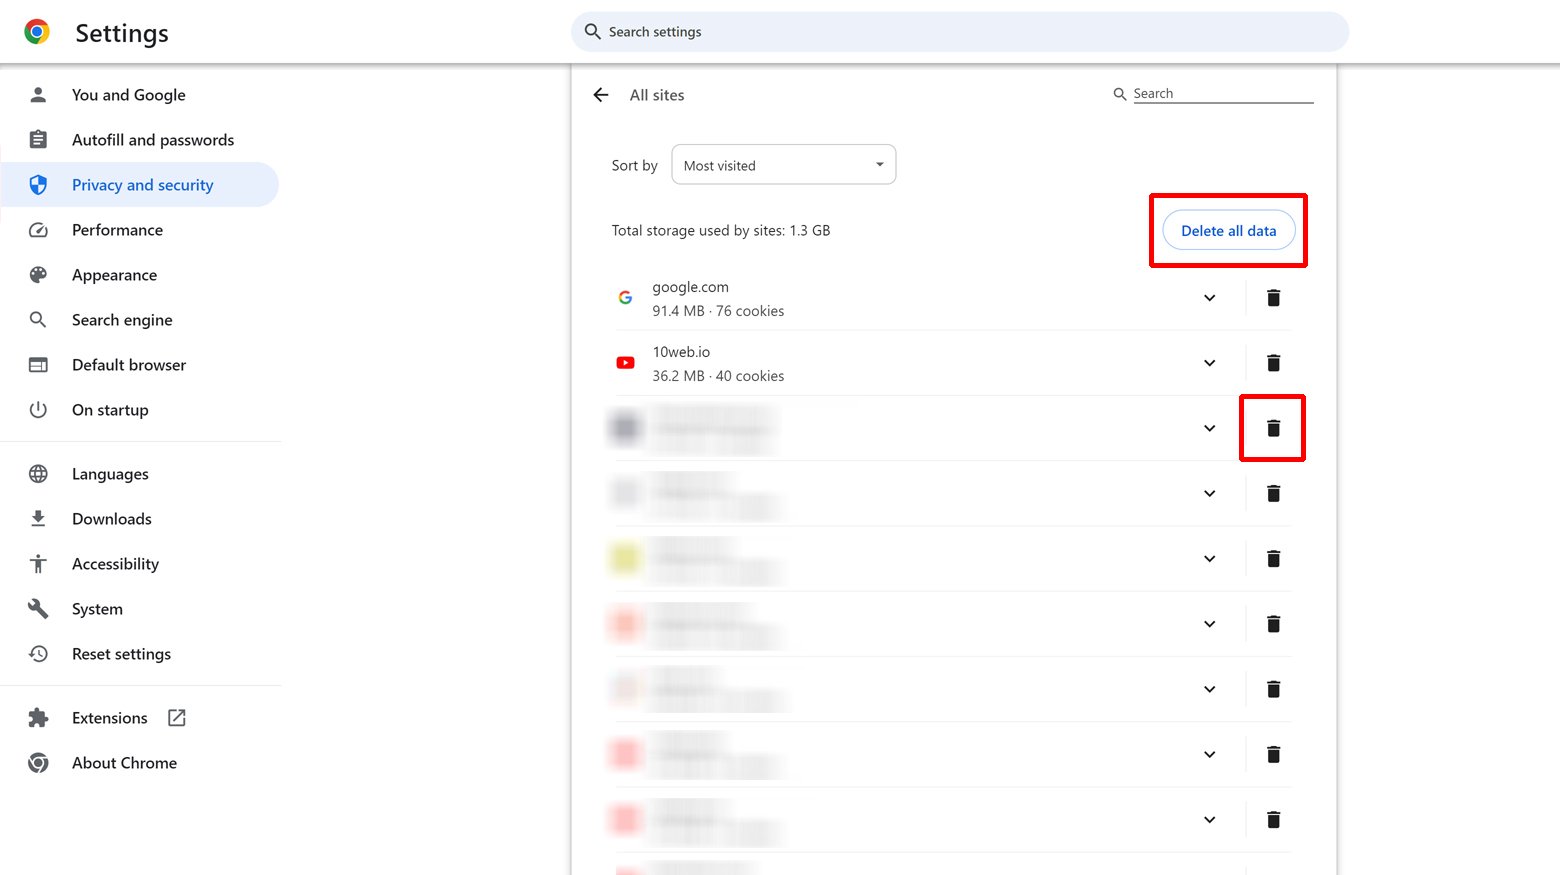
Windows (Chrome)
- Open Chrome and click the three dots at the top right.
- Select ‘Settings’, then ‘Privacy and security’.
- Choose ‘Cookies and other site data’.
- Go to ‘See all cookies and site data’.
- Find and remove the cookies of the problematic site.
Clear browser cache
Caches are like memory banks where frequently accessed data is stored for quick retrieval. However, when cached data becomes outdated, especially after updates or changes to a website, it can conflict with new data. This might result in a browser or a server trying to access an old version of a page that no longer exists or has been moved, causing redirect loops. Clearing the cache is like updating an outdated map, ensuring that you’re navigating with the most current information.
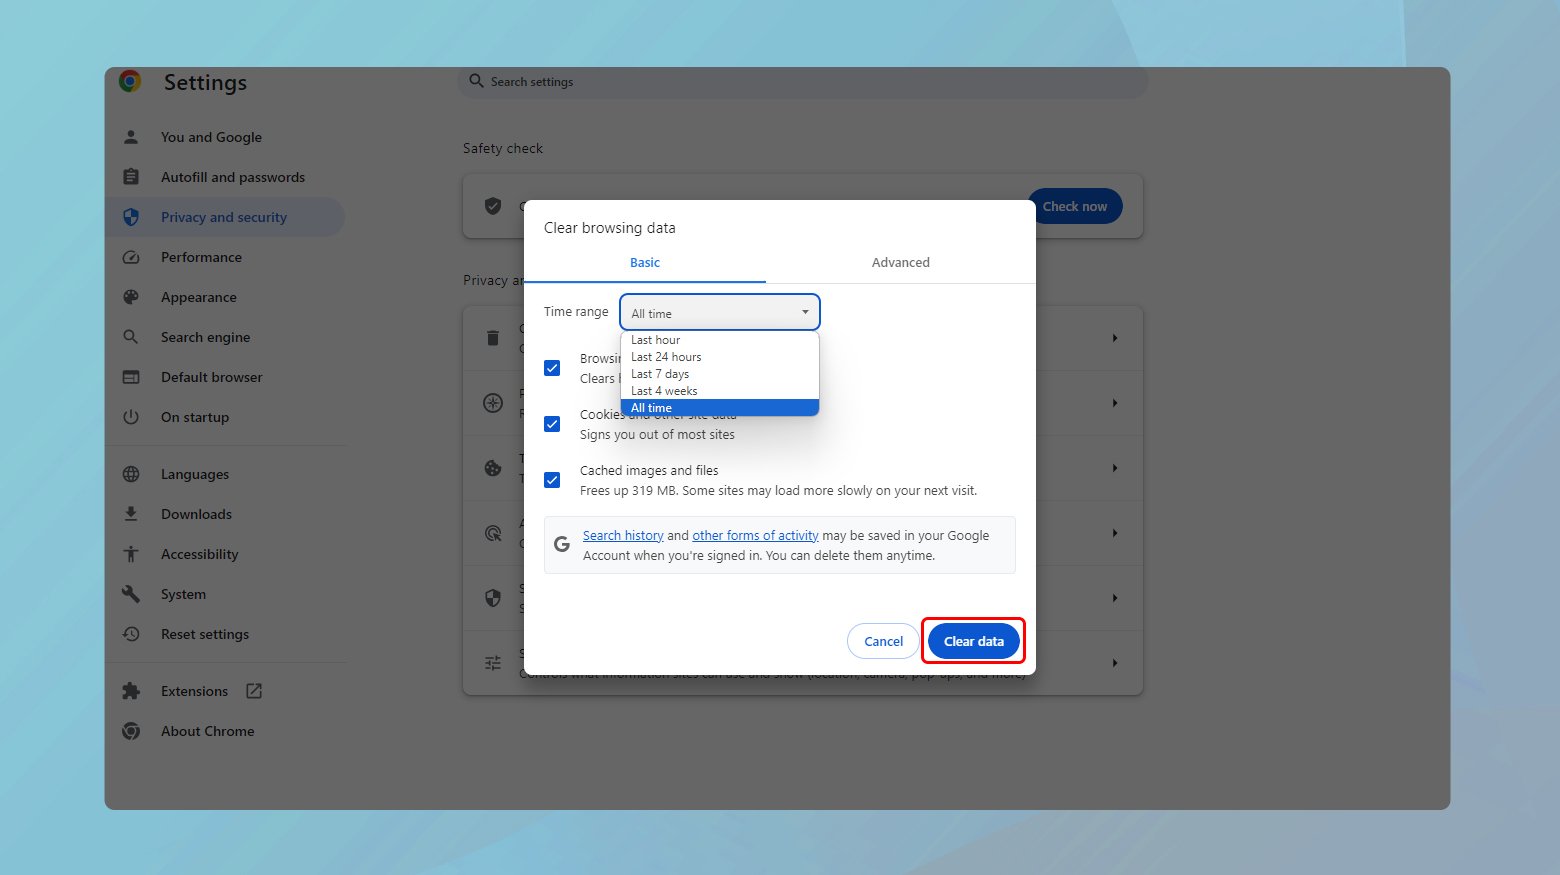
To clear browser cache:
- Open Chrome and access the menu via the three dots in the top right.
- Go to ‘More tools’ and select ‘Clear browsing data’.
- Choose the time range, preferably ‘All time’.
- Ensure ‘Cookies and other site data’ and ‘Cached images and files’ are checked.
- Click ‘Clear data’.
Clear cache from WordPress plugin
Many WordPress sites use caching plugins to speed up load times. These plugins create static versions of your pages to serve to visitors, reducing server load. Over time, however, these static pages can become outdated, especially after updates or changes, leading to issues like redirect loops. Clearing this cache ensures that users see the most current version of your site.
Here is what to do:
- Go to your WordPress Dashboard.
- Find the caching plugin you are using (e.g., W3 Total Cache, WP Super Cache, WP Fastest Cache). This can usually be found in the plugin’s tab or in the top menu bar.
- Look for an option labeled ‘Empty Cache’, ‘Clear Cache’, or something similar. This is usually a prominent feature of caching plugins.
- Click this option to clear the cache.
Clear cache from your hosting provider
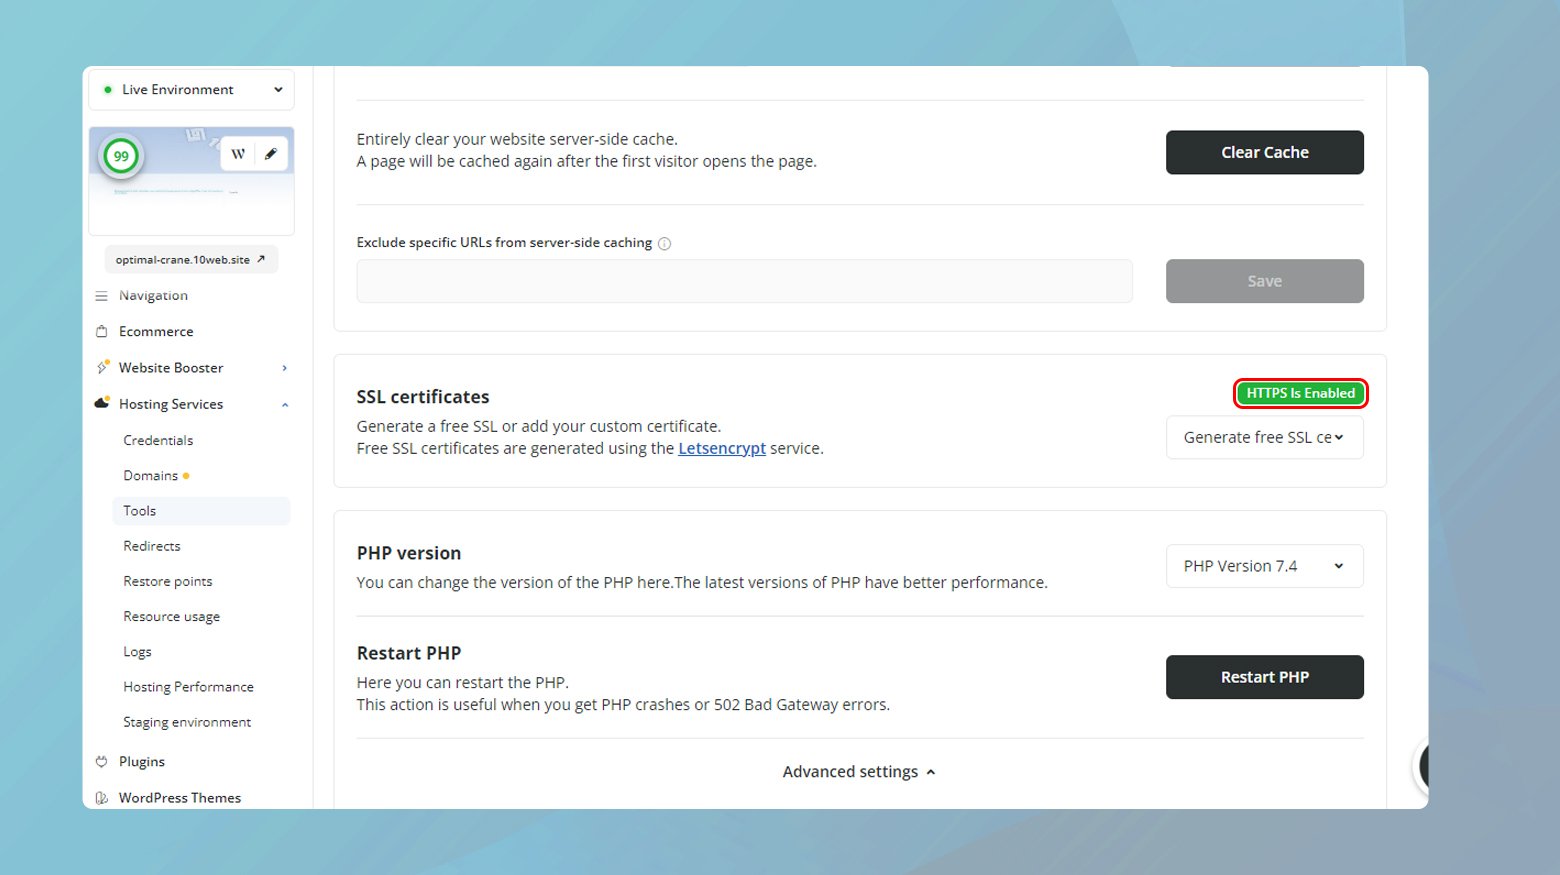
Some WordPress hosting providers offer built-in caching solutions. These work at the server level to deliver fast loading times. Like plugin caches, these can also become outdated. Clearing this ensures that the server provides the latest content to your website visitors. If your website is hosted on 10Web, you can clear 10Web cache both from the 10Web dashboard or from your WordPress admin dashboard.
General steps:
- Log in to your hosting account’s control panel.
- Look for a section dedicated to performance or caching. The location and naming convention can vary depending on the host.
- Find the option to clear or purge cache. This might be labeled as ‘Clear Cache’, ‘Purge Cache’, etc.
- Click the option to clear the cache.
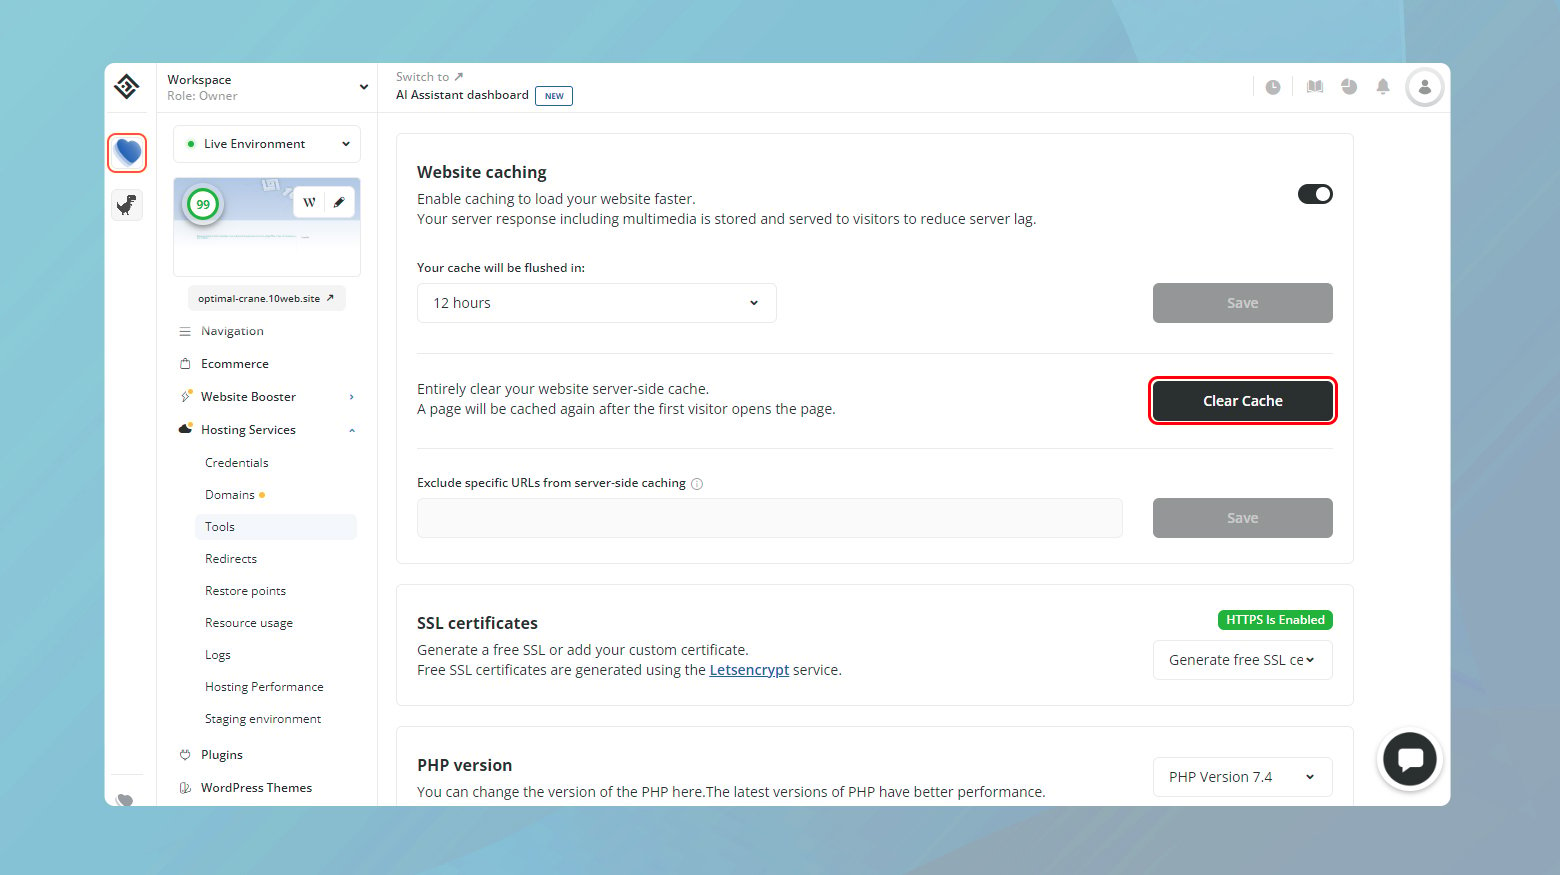
Clearing cache in 10Web:
- Log in to your 10Web dashboard.
- Click on the website where you want to clear the cache.
- Navigate to ‘Hosting Services’ > ‘Tools’.
- Click Clear Cache to clear your site server-side cache.
Examine third-party services
Third-party services like CDNs (Content Delivery Networks) can impact how content is delivered and redirected on your site. Incorrect configurations can inadvertently create redirect loops. It’s similar to a miscommunication in a relay race, where the baton is passed incorrectly, disrupting the flow. Ensuring these services are correctly configured ensures smooth content delivery without redirect errors.
To enable the correct configurations:
- Log into the dashboard of your third-party service (e.g., Cloudflare).
- Review settings related to caching, SSL, and page rules.
- Adjust settings if they conflict with your site’s redirect logic or SSL configuration.
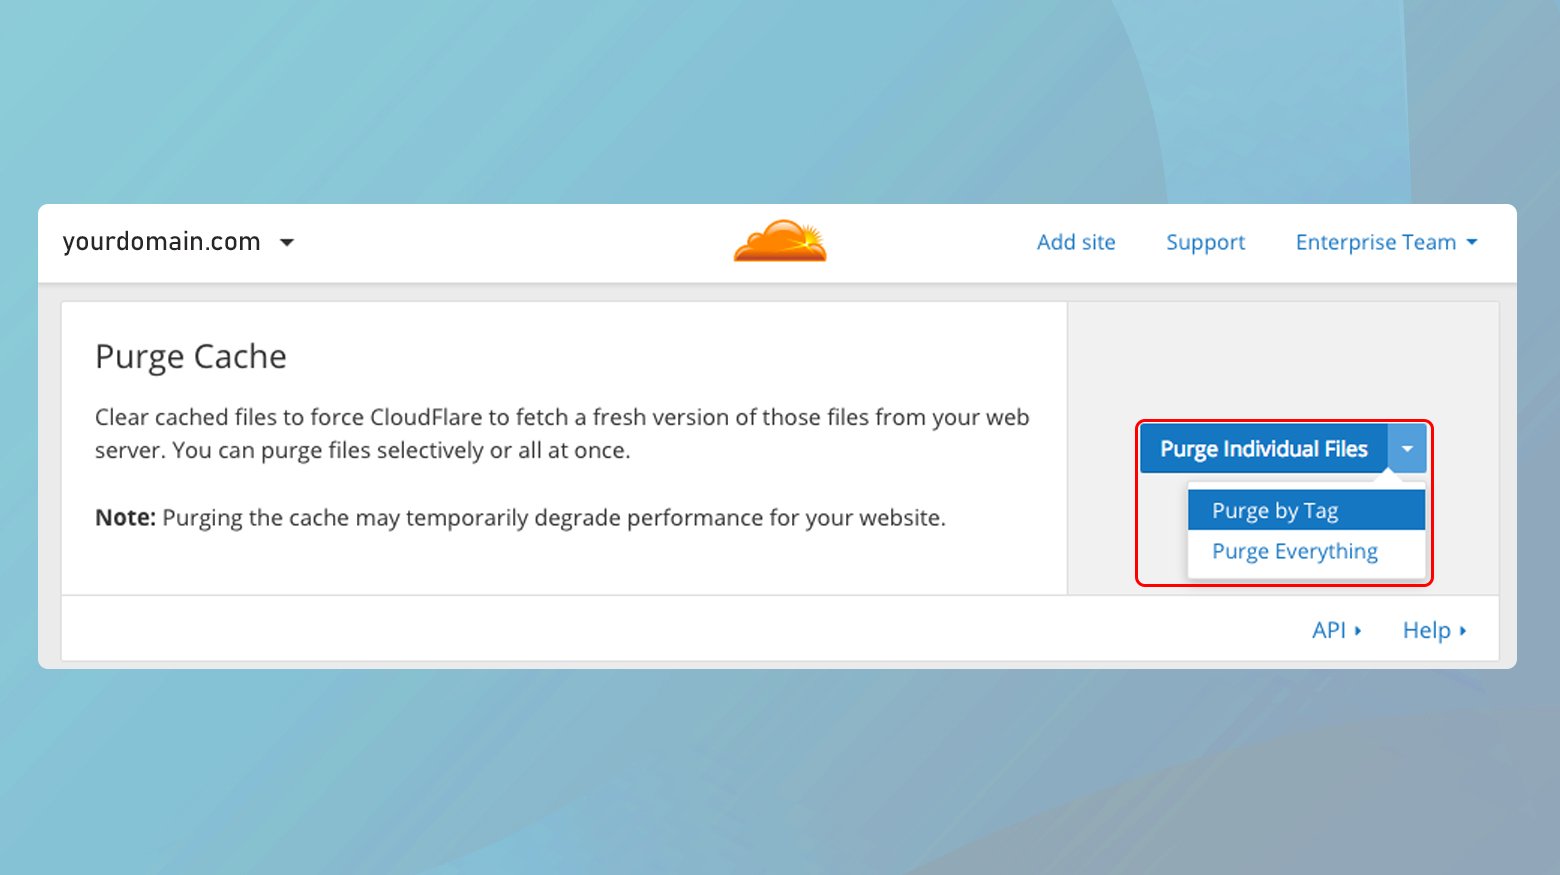
Clear CDN cache
If you’re using a Content Delivery Network (CDN) like Cloudflare, it also caches content to speed up load times globally. This cache can, like others, become outdated. Clearing the CDN cache ensures that it delivers the most recent version of your site to users around the world.
To clear CDN cache:
- Log into your CDN provider’s dashboard.
- Navigate to the caching section.
- Look for an option to purge or clear the cache.
- Select to purge individual or everything.
Identify the redirect loop path
Understanding the redirect loop is like unraveling a knot. The loop occurs when a page redirects to another page, which then redirects back to the original page, creating an endless cycle. By using redirect tracing tools, you can visualize this path and identify the point of failure. It’s similar to following breadcrumbs to understand where you’ve gone wrong in a maze.
Here is what you can do:
- Use a browser extension like ‘Redirect Path’ for Chrome or an online redirect tracing tool.
- Enter your website’s URL in the tool.
- Analyze the trace report to identify where and why the loop occurs.
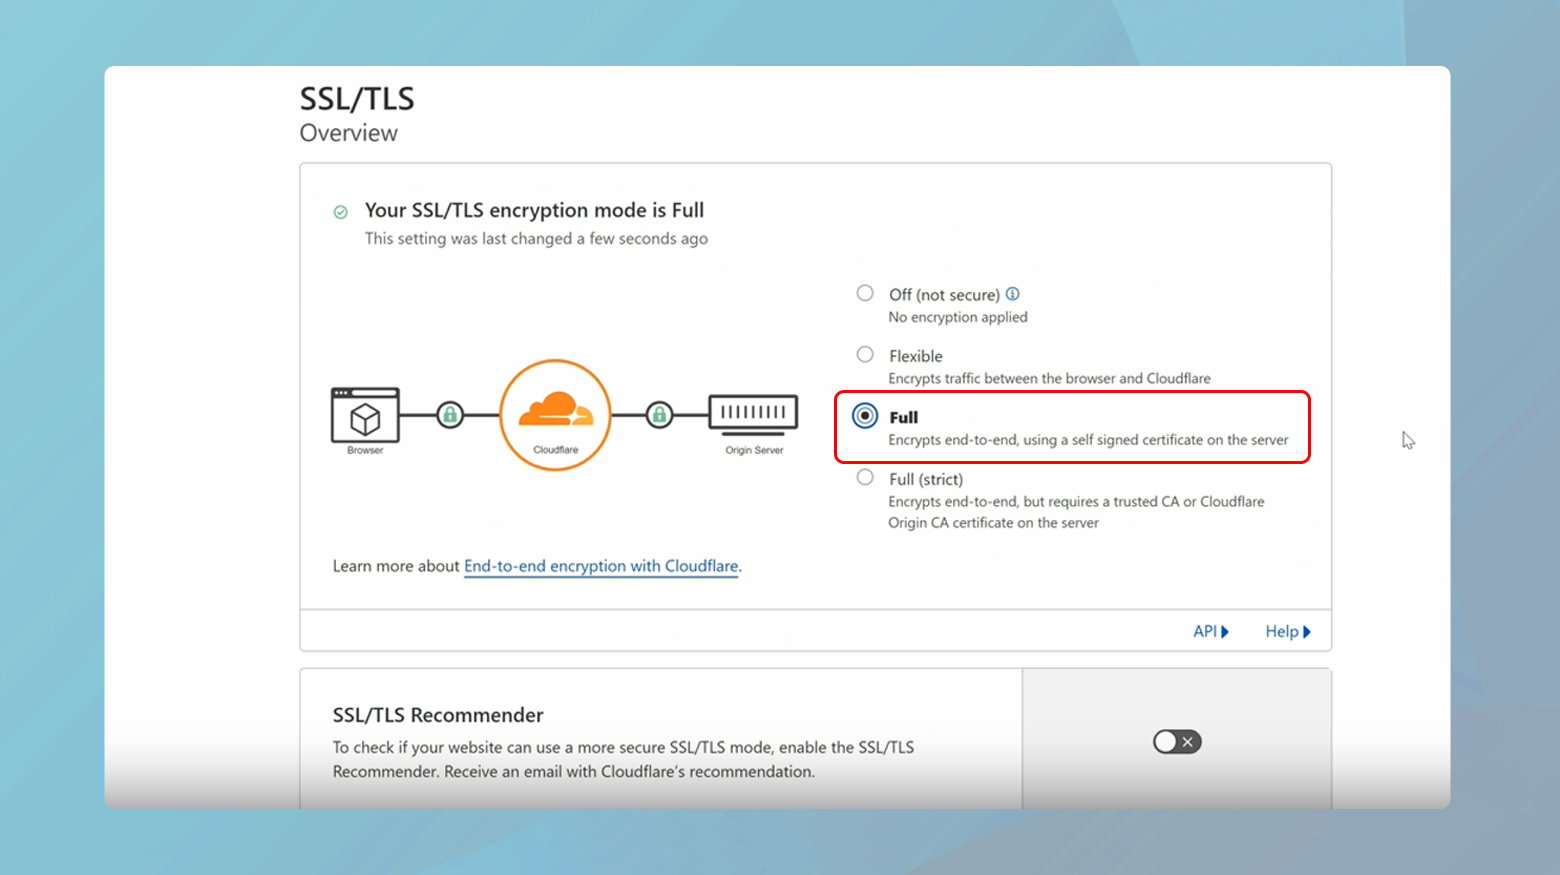
Review HTTPS settings
The HTTPS protocol ensures secure communication over the internet. If SSL certificates (which enable HTTPS) are improperly configured or if HTTPS rules in server settings are incorrect, the browser may get confused between secure (HTTPS) and insecure (HTTP) versions of a site. This confusion can manifest as a redirect loop, akin to a security guard who keeps sending you back and forth between two doors because your pass isn’t recognized correctly.
To review settings:
- Verify that your SSL certificate is valid and properly installed. This can usually be done through your hosting provider’s control panel.
- Ensure all website links are using HTTPS, not HTTP.
- Set up server configurations (like .htaccess in Apache) to redirect all HTTP traffic to HTTPS.
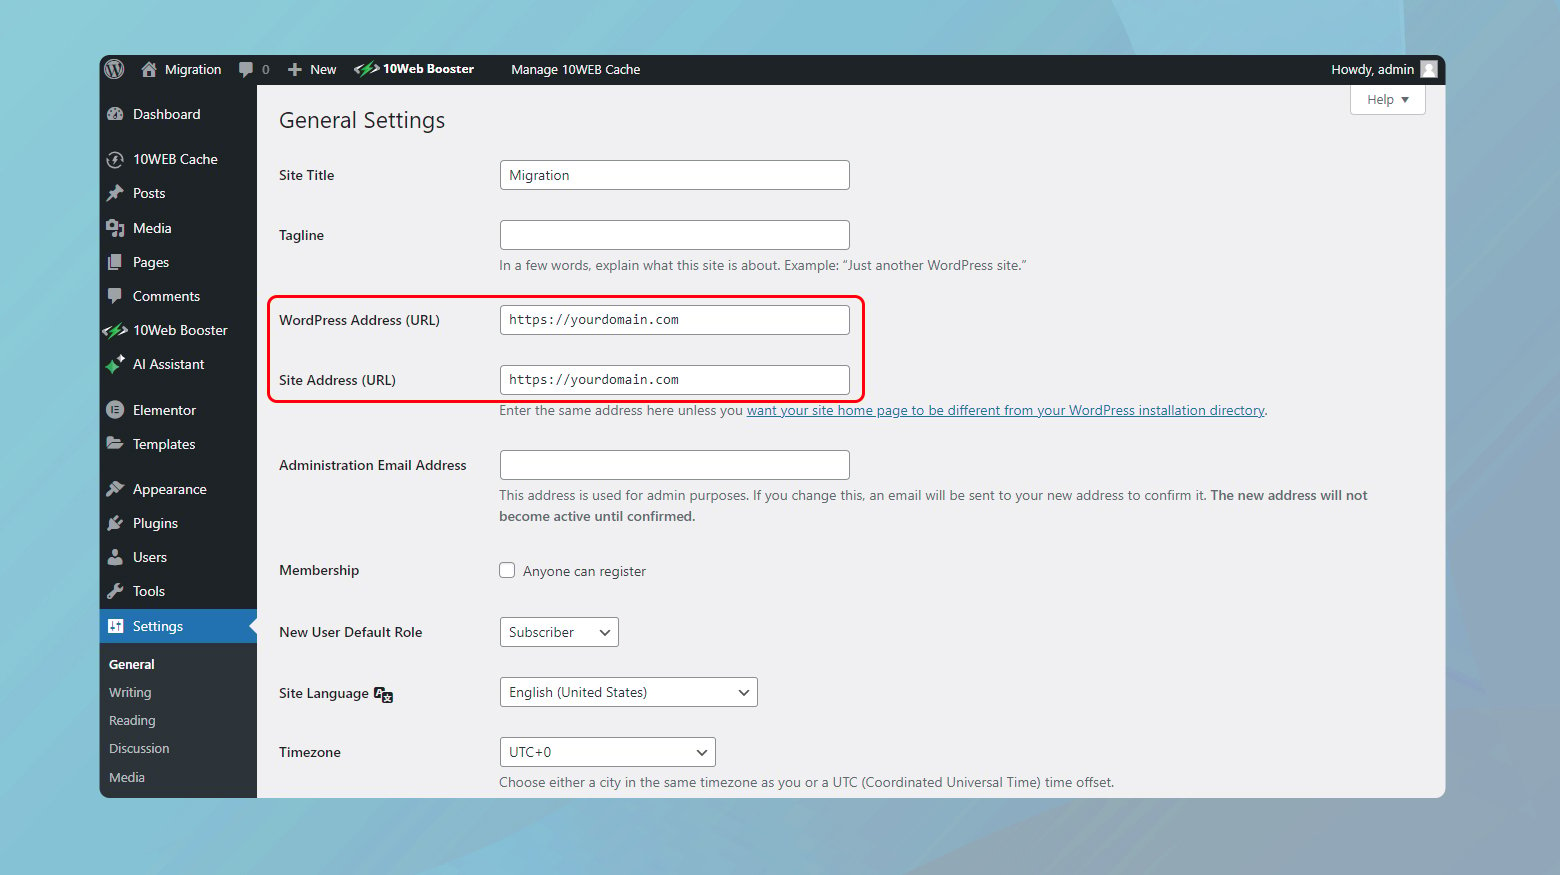
Inspect WordPress site settings
In WordPress, settings like the site URL define how your site is accessed. If these URLs are incorrect or inconsistent, WordPress might redirect requests in an attempt to correct them, leading to a loop. It’s like having an incorrect home address in your GPS; you’ll end up going in circles trying to reach the right destination.
To view site settings:
- Log into your WordPress admin area.
- Navigate to ‘Settings’, then ‘General’.
- Check ‘WordPress Address (URL)’ and ‘Site Address (URL)’. Ensure they are correct and consistent, particularly with regard to HTTP vs HTTPS.
Inspect WordPress plugins
Plugins can introduce complex functionalities to your site, but they can also cause conflicts, including redirect loops. Disabling them temporarily is a process of elimination, similar to troubleshooting a faulty circuit by turning off switches one by one to find the problem source.
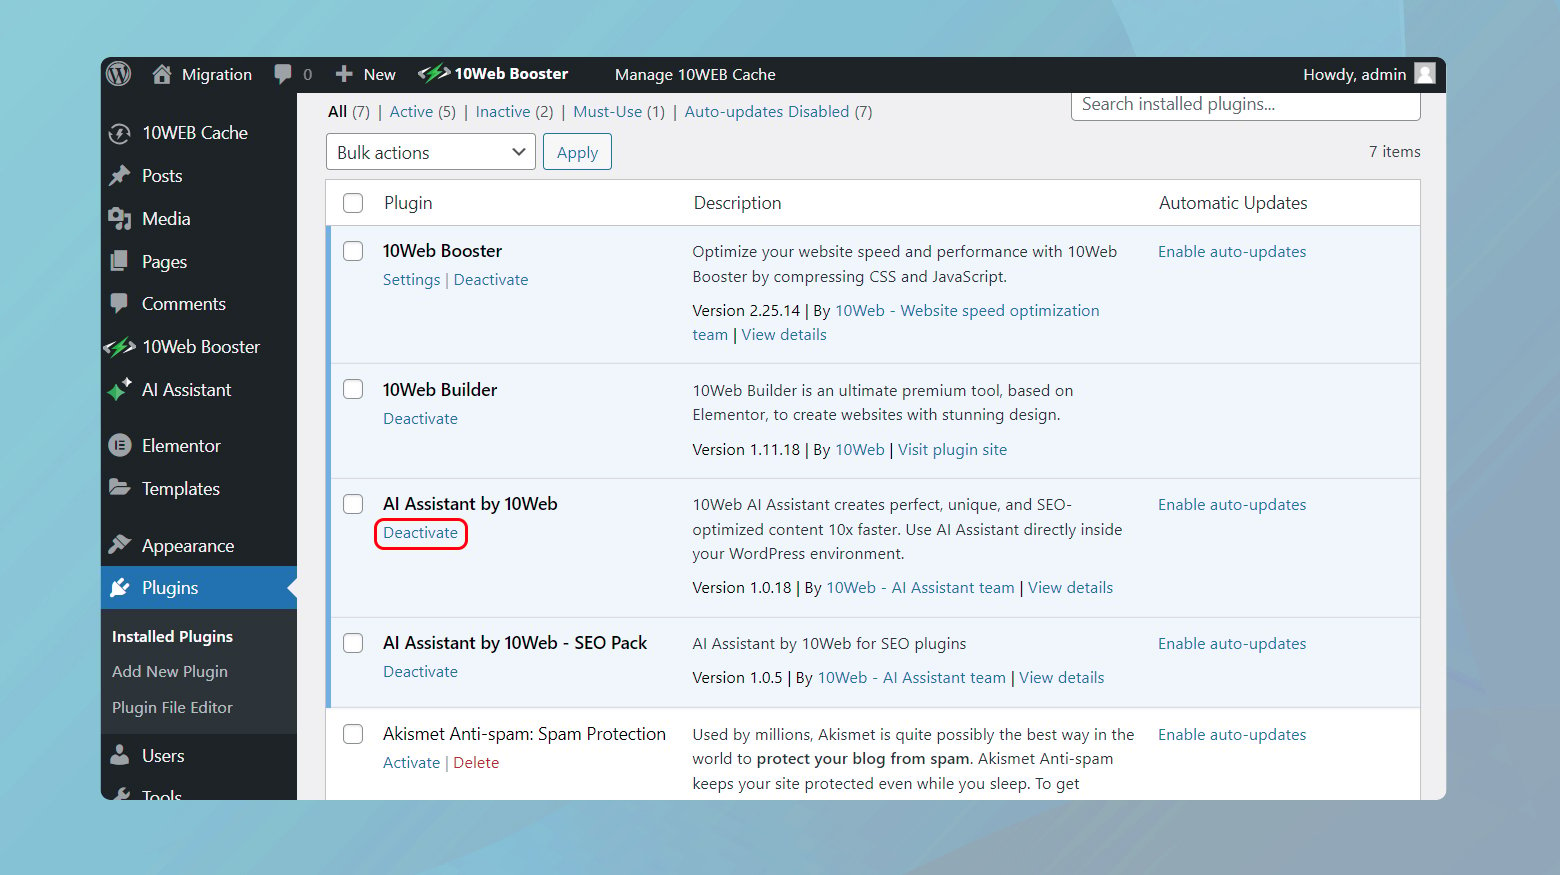
To deactivate your plugins:
- Access your WordPress dashboard.
- Go to ‘Plugins’ and then ‘Installed Plugins’.
- Deactivate each plugin one by one, checking your site after each to see if the issue resolves.
Check server redirects
Server configuration files like .htaccess in Apache control how requests are handled and redirected. Incorrect rules or syntax in these files can cause redirect loops, much like misinterpreted traffic signs causing drivers to go in circles. Ensuring these configurations are correct is crucial for directing web traffic properly.
To audit your .htaccess file:
- Connect to your server via FTP or through the hosting control panel.
- Locate and open the .htaccess file (or equivalent) in the root directory.
- Review and correct any redirect or rewrite rules that may be causing the loop.
Conclusion
Addressing the ERR_TOO_MANY_REDIRECTS error requires a thorough approach, examining each potential cause from browser interactions (like cookies and cache) to deep server configurations. By methodically following these steps and understanding the underlying mechanisms, you can effectively troubleshoot and resolve this complex but common web issue.
Say goodbye to website errors
Achieve peace of mind with 99.99% uptime on 10Web Managed
WordPress Hosting, powered by Google Cloud.
Say goodbye to website errors
Fix all the website errors in one click
Migrate your website to the world's best Managed WordPress Hosting.