Have you ever tried to visit a website and been greeted by the frustrating message, “This Site Can’t Provide a Secure Connection”? This error, although a bit cryptic, plays a crucial role in ensuring your online security. In essence, it occurs when your browser detects a problem with the website’s security certificate, the digital passport that establishes a secure, encrypted connection between your device and the website. It’s a bit like trying to enter a club where the bouncer isn’t convinced your ID is valid; in this case, your browser is the bouncer, and the website’s security certificate is your ID.
Say goodbye to website errors
Achieve peace of mind with 99.99% uptime on 10Web Managed
WordPress Hosting, powered by Google Cloud.
Variations of the issue
The “This Site Can’t Provide a Secure Connection” error can manifest in several ways, depending on the browser or device you’re using. Some common variations include:
- ERR_SSL_PROTOCOL_ERROR (Google Chrome)
- SSL_ERROR_RX_RECORD_TOO_LONG (Mozilla Firefox)
- The page cannot be displayed (Internet Explorer)
- Can’t connect securely to this page (Microsoft Edge)
- Safari can’t establish a secure connection to the server
- This website may not be secure (Mobile browsers)
- ERR_SSL_VERSION_OR_CIPHER_MISMATCH (Chrome, Edge)
- SSL Certificate Error
- The connection is not private (Browsers on MacOS)
- Your connection is not secure (General message across various browsers)
Reasons why this error occurs
Outdated SSL certificate
An outdated SSL (Secure Sockets Layer) certificate is a critical issue in the realm of internet security. It occurs when the digital certificate that facilitates secure connections between a web server and a client’s browser has passed its expiration date. This lapse can lead to a multitude of problems, including warning messages in browsers, loss of customer trust, and potentially a complete blockage of access to the website. Understanding and managing SSL certificate validity is essential for maintaining the integrity and security of any website or online service.
Missing SSL certificate in local environment
When you’re setting up a website or a web application in a local development environment – essentially, your own computer – you might encounter an issue where your setup lacks an SSL (Secure Sockets Layer) certificate. This might seem like a small hiccup, but it’s akin to trying to secure your house without a lock. An SSL certificate is crucial for establishing a secure connection between your server (in this case, your local machine) and the client (your web browser). Without it, any data transfer lacks encryption, like sending a letter without an envelope.
Incorrect system time
Incorrect time and date settings on a computer can lead to various issues, particularly in establishing secure connections online. This problem arises because SSL certificates rely on accurate time stamps to validate the security of a connection. When the system time is off, it can cause SSL certificates to appear invalid or untrustworthy.
Weak SSL protocol or cipher suite
Modern browsers reject connections to websites using outdated and insecure SSL protocols or cipher suites. Outdated SSL caches in a browser can cause a variety of connection problems. This issue occurs when the browser retains old security information, leading to conflicts with newly visited or updated websites. It’s a significant challenge as it can prevent access to sites and interfere with the testing of secure connections during development.
Firewall or antivirus blocking the connection
Sometimes, these security tools can be overzealous and block your connection to a secure website. Overprotective antivirus software can inadvertently cause issues with SSL connections. While intended to protect the system, these programs can sometimes be too aggressive, wrongly identifying legitimate SSL certificates as threats. This interference can disrupt secure connections, leading to errors and access problems on secure websites.
Browser bugs or outdated version
Browser bugs or using an outdated version of a web browser can lead to a range of issues impacting user experience, security, and compatibility with modern web standards. These problems can manifest as minor glitches in website display or as major security vulnerabilities, hindering the browser’s ability to interact effectively with websites, especially those using the latest web technologies. Keeping a browser updated is crucial for ensuring optimal performance, security, and a seamless online experience.
Browser extensions gone bad
Rogue browser extensions are an often-overlooked issue that can significantly impact web browsing and online security. These extensions, which may operate without the user’s full knowledge, can interfere with normal browser operations, including how SSL certificates are handled, potentially leading to security vulnerabilities and compromised user data.
Say goodbye to website errors
Achieve peace of mind with 99.99% uptime on 10Web Managed
WordPress Hosting, powered by Google Cloud.
How to fix the SSL certificate issue in local environments
Enabling SSL in local server software
Local server environments like XAMPP, WAMP, or MAMP often include options to enable SSL. Activating SSL in these environments is crucial for testing web applications in a secure, HTTPS-based setting. This practice mirrors the secure communication protocol used in live production environments, thus ensuring that your local testing is as close to real-world scenarios as possible.
Steps
-
- Identify your local server software (e.g., XAMPP, WAMP, MAMP).
- Access the server software’s control panel or configuration settings.
- Locate the SSL/TLS settings or module. This could be in the web server settings like Apache or Nginx.
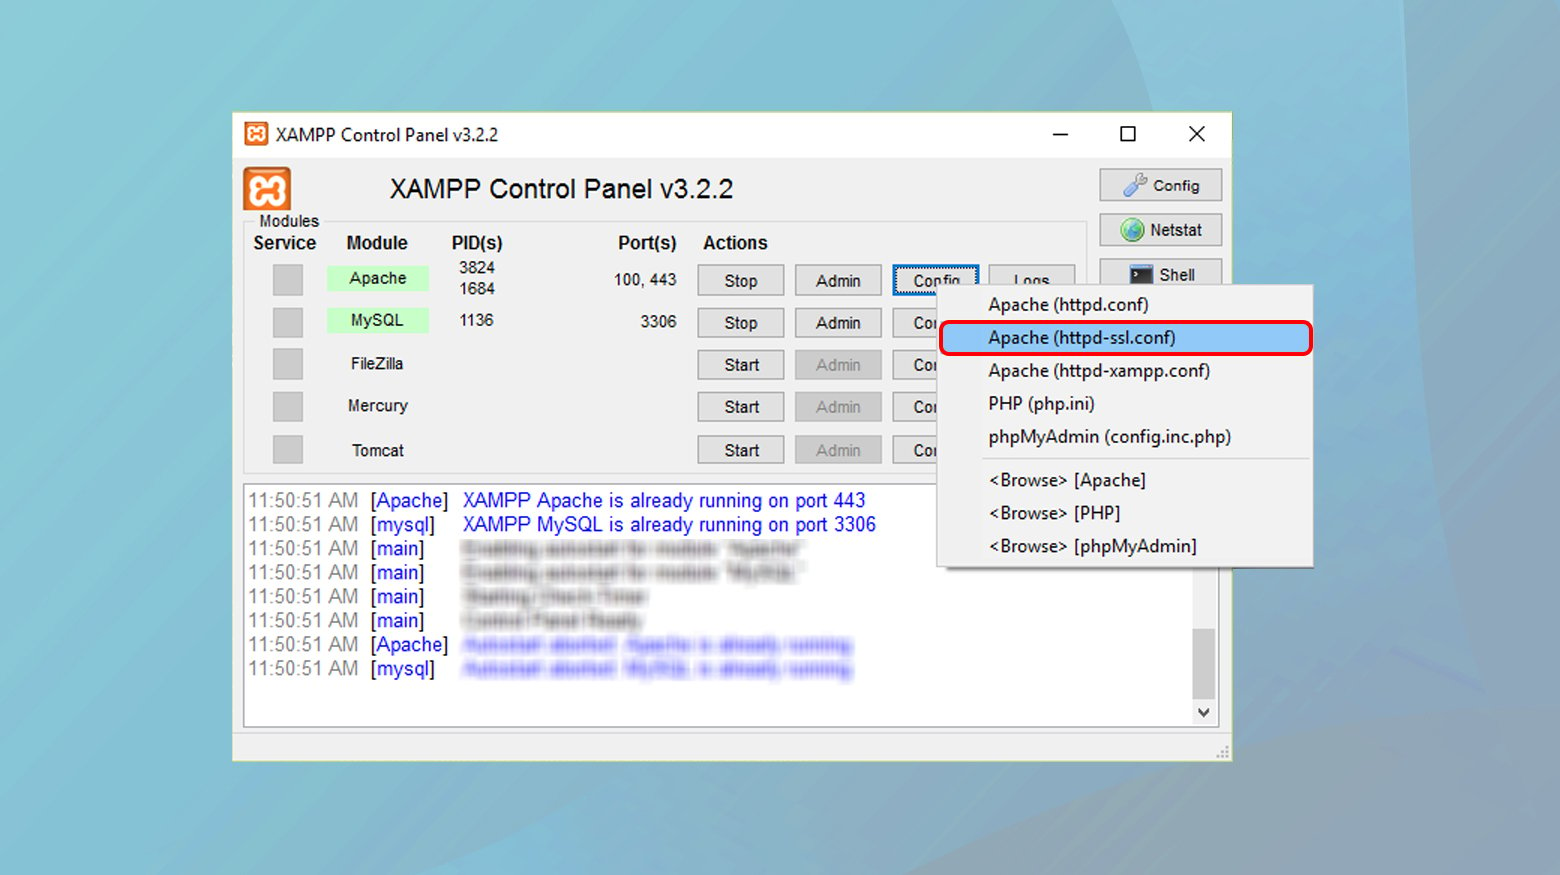
- Follow the specific instructions provided by the software to enable SSL. This usually involves uncommenting certain lines in configuration files (like `httpd-ssl.conf` in Apache) and specifying the path to your SSL certificate and key.
- Restart your server software to apply the changes.
Updating your development environment
Keeping your development environment updated is critical for compatibility and security. Updates often include support for the latest SSL/TLS protocols and ciphers, which enhances the security of your local testing environment. Outdated environments may lack support for newer SSL standards or have known vulnerabilities that could compromise the integrity of your SSL implementation.
Steps
- Check for updates in your development environment. This could be through an integrated update checker in your IDE or server software.
- Apply all recommended updates, focusing on components that affect web server functionality and SSL/TLS processing.
- If you’re using additional tools or plugins for SSL management, ensure they are also updated.
- After updating, restart your development environment and test to ensure that SSL functionality is working correctly.
Configuring your local server for HTTPS
Proper configuration of your local server to handle HTTPS requests is crucial. This involves ensuring the server listens on the correct port (usually 443 for HTTPS) and is configured to use the SSL certificate you’ve generated or obtained.
Steps
- Edit your local server’s configuration files (e.g., Apache’s `httpd.conf` or Nginx’s `nginx.conf`).
- Define a server block or virtual host that listens on port 443.
- Include the path to your SSL certificate and private key in the configuration.
- Ensure any firewall or router settings allow traffic on port 443.
- Restart the server to apply the changes.
Adjusting firewall and network settings
Sometimes, local firewalls or network configurations may inadvertently block SSL/TLS connections. Ensuring these settings are configured to allow HTTPS traffic is essential for a functioning local SSL setup.
Steps
- Check your operating system’s firewall settings. On Windows, this can be done in the Control Panel; on macOS, it’s in the System Preferences.
- Ensure that inbound rules allow traffic on port 443 (HTTPS).
- If using a router or additional network security software, check those settings as well.
- After adjusting settings, test the SSL connection to confirm everything is working correctly.
Advanced troubleshooting
Setting up a local certificate authority (CA)
Establishing a local Certificate Authority (CA) is a step towards creating a more production-like environment for local development. A local CA allows you to issue your own SSL certificates, which can be trusted across all your local applications. This setup is particularly useful when working with multiple local services or microservices that need to communicate over SSL.
Steps
Install a tool like OpenSSL, which can be used to create your own CA. The first step in creating a root certificate is to generate a private key. This key is used to sign the root certificate and any subsequent certificates.
Generate a root CA key and certificate. The root CA certificate will be used to sign other certificates.
- Open a terminal or command prompt.
- Run the command:
- openssl genrsa -out rootCA.key 2048.

This creates a 2048-bit RSA private key named rootCA.key.
With the private key in place, the next step is to create a root SSL certificate. This certificate serves as the top-level certificate in your local CA hierarchy.
- Still in the terminal, run the command:
- openssl req -x509 -new -nodes -key rootCA.key -sha256 -days 1024 -out rootCA.pem.
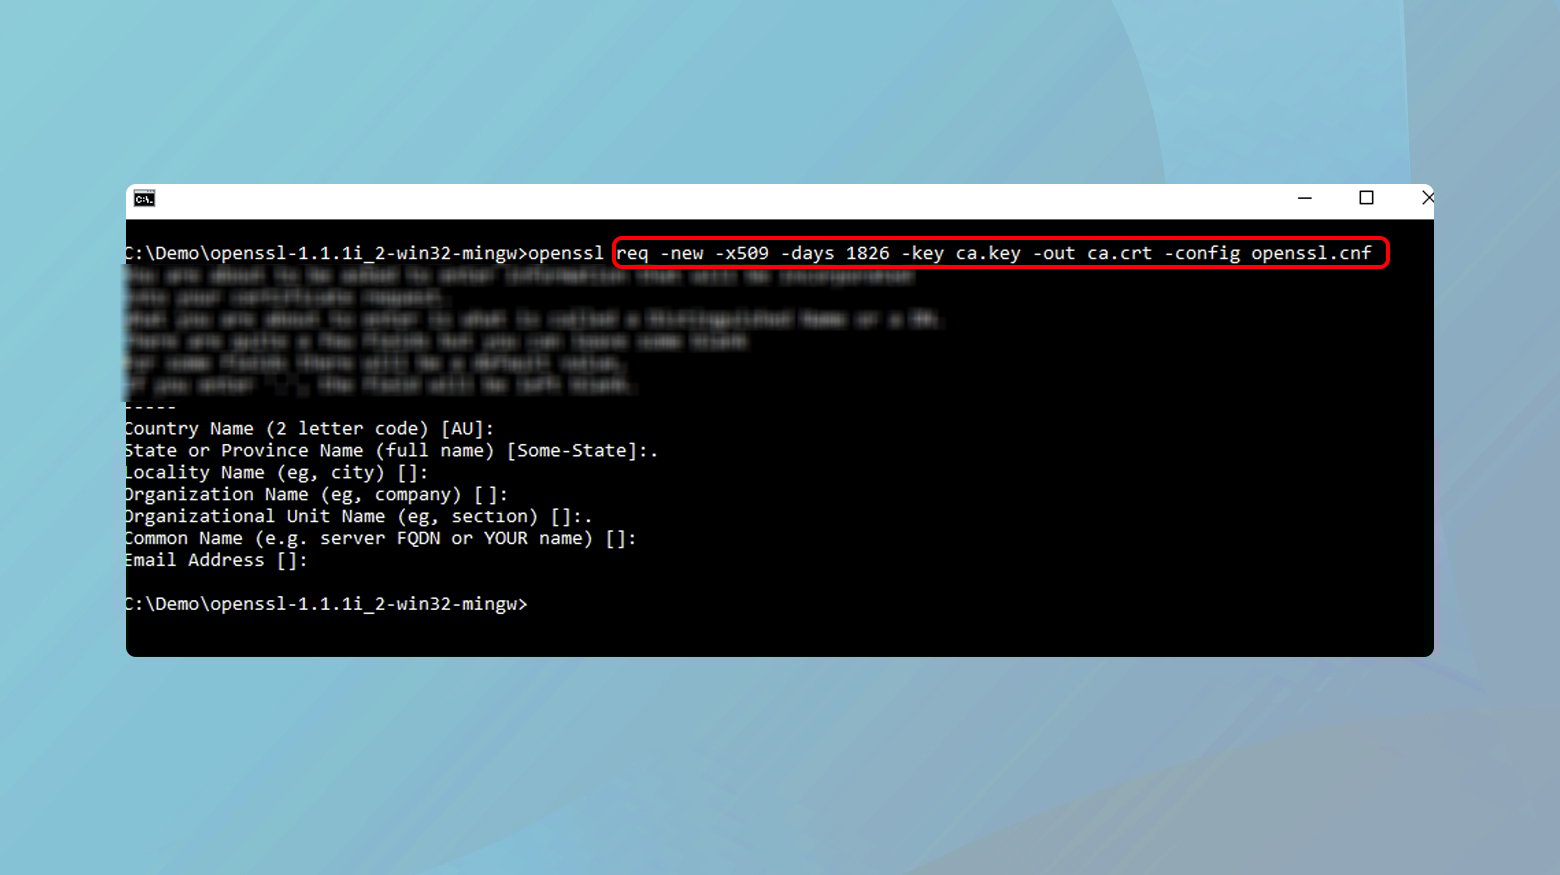
This command creates a new certificate (rootCA.pem) that is self-signed with the rootCA.key.
You will be prompted to enter details like country, state, organization, etc. Fill these out as desired; they will appear in the certificate.
The next step in the process is to trust the root certificate. This step makes all certificates signed by your local CA trusted automatically, preventing browser warnings. For your local applications and browsers to trust certificates signed by this root CA, you need to add the rootCA.pem to your system’s and browsers’ trusted certificate stores.
- On macOS, open Keychain Access, go to Certificates, and import rootCA.pem. Set the certificate to “Always Trust”.
- On Windows, open the Certificate Manager, import rootCA.pem under “Trusted Root Certification Authorities”.
- For browsers like Firefox that use their own certificate store, import rootCA.pem in the browser’s security settings.
Once all the above steps are done, you are set up and ready to create an SSL certificate for your domain. Follow the instructions below for each segment of the process.
Create configuration files for OpenSSL
OpenSSL configuration files specify parameters for certificate generation. These include details about the certificate authority, policy requirements, and extensions for the certificates.
- Create a new file named openssl.cnf in a directory of your choice.
- Open the file in a text editor and set the basic configurations. This includes default bits for the keys, default message digest, and policy options. A basic example can be found in the OpenSSL documentation or online resources.
- Specify the [ v3_ca ] and [ v3_req ] sections to include parameters for CA and SSL certificate generation.
- Save the file.
Produce localhost certificate key
The certificate key is a private key used in the creation of the SSL certificate. This key should be kept secure and private.
- Open the command line or terminal.
- Navigate to the directory where you want to save the key.
- Run the command:
- openssl genrsa -out localhost.key 2048.
This generates a 2048-bit RSA private key named localhost.key.
Generate an SSL certificate for local domain
An SSL certificate is required for setting up a secure HTTPS connection. For localhost, you’ll create a self-signed certificate.
- With the private key (localhost.key) generated, create a certificate signing request (CSR) by running: openssl req -new -key localhost.key -out localhost.csr.
- You’ll be prompted to enter details; make sure the common name (CN) matches your local domain (e.g., localhost).
- To generate an SSL certificate from the CSR, run:
- openssl x509 -req -days 365 -in localhost.csr -signkey localhost.key -out localhost.crt.
SSL certificate activation
Locate the configuration file for your web server (e.g., Apache’s httpd.conf, Nginx’s nginx.conf).
- Edit the file to include the path to your ‘localhost.crt’ and ‘localhost.key’.
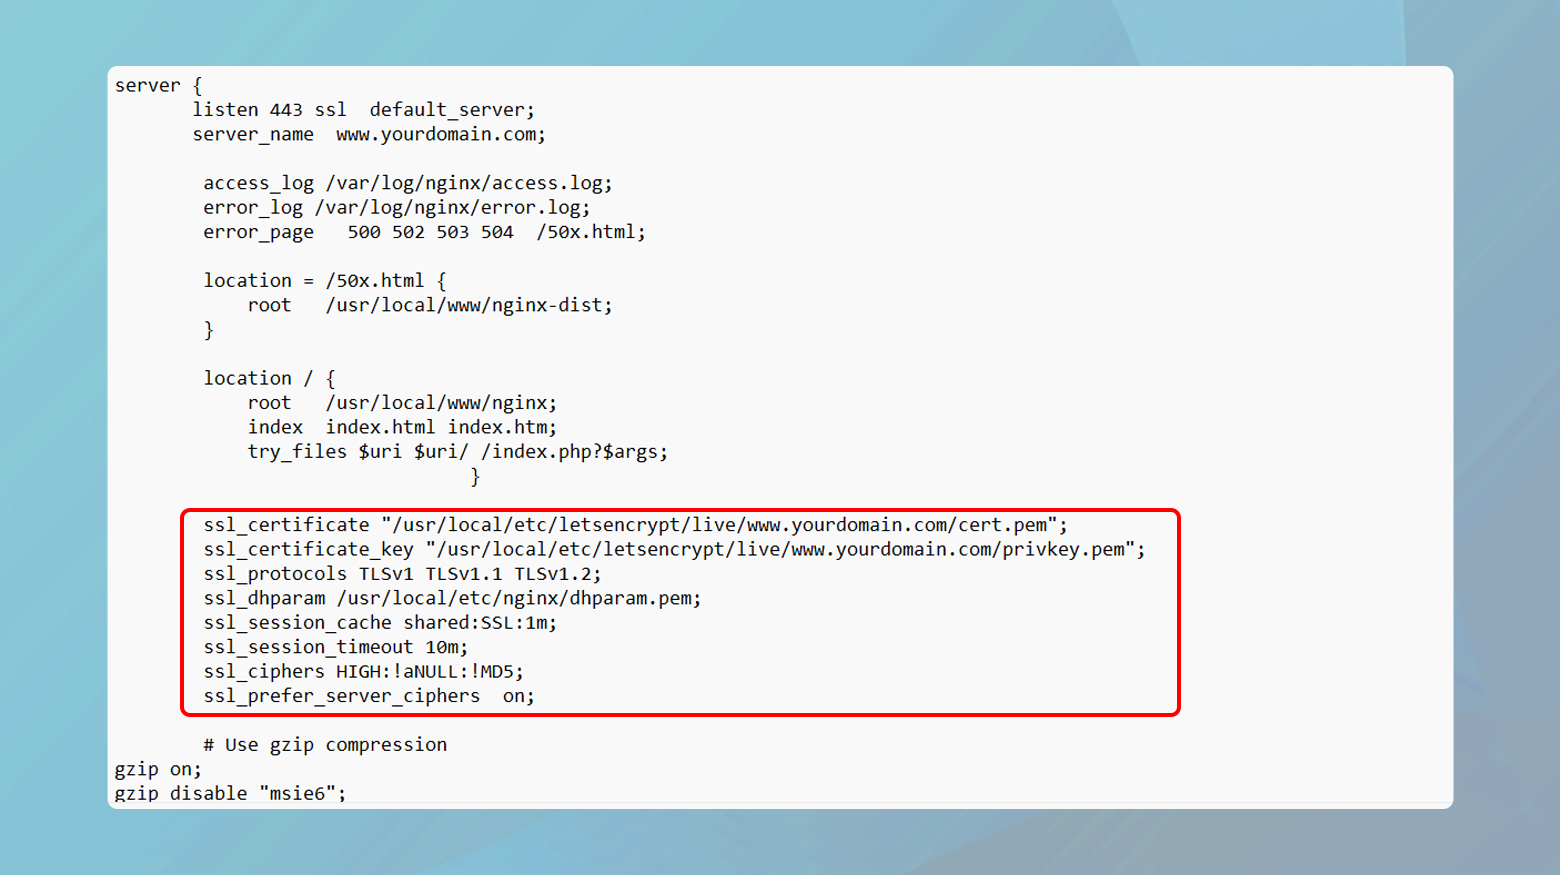
- For Apache, use the SSLCertificateFile and SSLCertificateKeyFile directives; for Nginx, use the ssl_certificate and ssl_certificate_key directives.
- Ensure the server is set to listen on HTTPS, typically on port 443.
- Restart the web server to apply the changes.
Utilizing development proxies
Development proxies like NGINX or Apache can be configured as reverse proxies to manage SSL connections. This setup can simulate a production environment more accurately, as it separates SSL termination (handling the SSL connection) from application logic. It’s especially useful in microservices architecture or when you want to mimic load balancing and SSL termination scenarios.
Steps
- Choose a reverse proxy tool, such as NGINX or Apache.
- Install and configure the reverse proxy on your local machine.
- Set up the reverse proxy to listen on the HTTPS port (443) and to forward requests to your application running on a non-HTTPS port (like 8080 or 3000).
- Configure SSL in the reverse proxy by specifying the path to your SSL certificate and private key. These can be self-signed or signed by your local CA.
- Optionally, configure advanced SSL settings in the proxy, such as SSL ciphers and protocols, to mimic your production environment’s SSL configuration.
- Update your application settings, if necessary, to trust and recognize the reverse proxy as the source of SSL-secured requests.
Conclusion
To resolve SSL certificate issues in local environments, start with general fixes like enabling SSL in your local server software and ensuring your development environment is up to date. For technical fixes, consider creating and installing a self-signed SSL certificate, configuring your local server for HTTPS, and adjusting firewall and network settings. For advanced setups, using a local CA or development proxies like NGINX or Apache can provide a more realistic and robust testing environment. These steps will help in emulating a secure, production-like environment locally.
Say goodbye to website errors
Fix all the website errors in one click
Migrate your website to the world's best Managed WordPress Hosting.