When you’re trying to get your WordPress site off the ground or just doing some maintenance, stumbling across the error message “Your PHP installation appears to be missing the MySQL extension which is required by WordPress” can throw a wrench in your plans. This hurdle can be a bit of a head-scratcher, especially if you’re not deeply entrenched in the technical side of website management. But don’t worry! This issue, while technical, isn’t insurmountable. Let’s dive into understanding what’s at play here and how you can navigate your way through it.
Understanding the causes of the missing MySQL extension error in WordPress
This error isn’t just throwing you off for no reason. It’s indicative of a specific mismatch in your server’s software configuration, directly impacting your WordPress site’s ability to communicate with its MySQL database. The problem lies in how PHP (the scripting language WordPress is built on) is set up on your server. Here’s a closer look at the two main causes.
Compatibility issues between WordPress and PHP versions
The evolution of PHP has led to significant changes in how database connections are handled, directly impacting WordPress sites.
Starting with PHP 7.0, the original MySQL extension, which was a staple for connecting PHP applications like WordPress to MySQL databases, was officially deprecated. This deprecation meant that PHP removed the extension entirely, favoring the MySQLi (MySQL Improved) and PDO_MySQL extensions. These newer extensions offer more robust and secure database interaction capabilities. WordPress, in keeping with these changes, updated its core to utilize MySQLi or PDO_MySQL for database connections. However, if your WordPress site is stuck on a version older than 3.9, it’s still looking to use the now-nonexistent MySQL extension when run on a server with PHP 7 or higher, resulting in the error.
The compatibility issue often arises from an oversight in maintaining the WordPress software and server PHP version in sync. WordPress continually evolves to leverage new PHP features and security improvements. Running an outdated WordPress version on a modern PHP server can lead to several issues, including the missing MySQL extension error, because of mismatched expectations between the software and the server environment.
PHP 5.6 or lower configuration issues
This version of PHP inherently supports the MySQL extension required by older WordPress versions. If you’re encountering this error while on PHP 5.6 or below, it’s likely due to the MySQL extension missing from your PHP installation. This situation can occur if the server’s PHP installation was customized or if certain extensions were explicitly disabled.
Even if the MySQL extension is present, it needs to be correctly configured to be recognized by WordPress. Improper configuration might include incorrect settings in the `php.ini` file, the main configuration file for PHP. For instance, the extension might not be enabled, or its directive could be pointing to the wrong location for the extension file. Additionally, server-specific restrictions or custom PHP configurations can prevent the extension from loading correctly, even if it’s technically present on the server.
Addressing these root causes involves a detailed check of your server’s PHP version and configuration, aligning your WordPress version with the PHP version, or ensuring the correct installation and configuration of the MySQL extension on older PHP versions. By understanding the specific dynamics between WordPress’s database connection requirements and PHP’s evolving support for MySQL extensions, you can more effectively troubleshoot and resolve this error, paving the way for a smooth WordPress experience.
Fixing the “Your PHP installation appears to be missing the MySQL extension which is required by WordPress” error
Now that you’re familiar with the nature of the error and its underlying causes, let’s explore some effective solutions for resolving this issue.
Check Your PHP Version
Understanding the specific PHP version your site is running on is critical because it directly impacts compatibility with WordPress core, themes, and plugins. Each PHP version has a lifecycle; it is supported for a certain period and then reaches its end-of-life (EOL). Once a PHP version is no longer supported, it no longer receives security updates, making your site vulnerable to new threats. Moreover, WordPress core and many plugins and themes update their codebase to leverage improvements and new features offered by newer PHP versions, potentially leaving behind those on outdated PHP.
Checking PHP version via FTP or cPanel
Via FTP
First, you’ll need to access your WordPress site’s server. This requires your FTP credentials, which you can obtain from your web hosting provider. You’ll also need an FTP client (like FileZilla) to connect to your server.
Via cPanel
Alternatively, if your hosting uses cPanel, you can utilize the cPanel File Manager for a more straightforward approach.
Creating the PHP info file
- Once connected, navigate to the root directory of your WordPress installation. This is the folder where you find the wp-config.php file, which is essential for your WordPress configuration.
- Create a new file in this directory and name it phpinfo.php.
- Edit the newly created phpinfo.php file and insert the following PHP code:
<?php
phpinfo();
?>
This code snippet creates a page that will display your server’s current PHP configuration and version.
Viewing PHP configuration
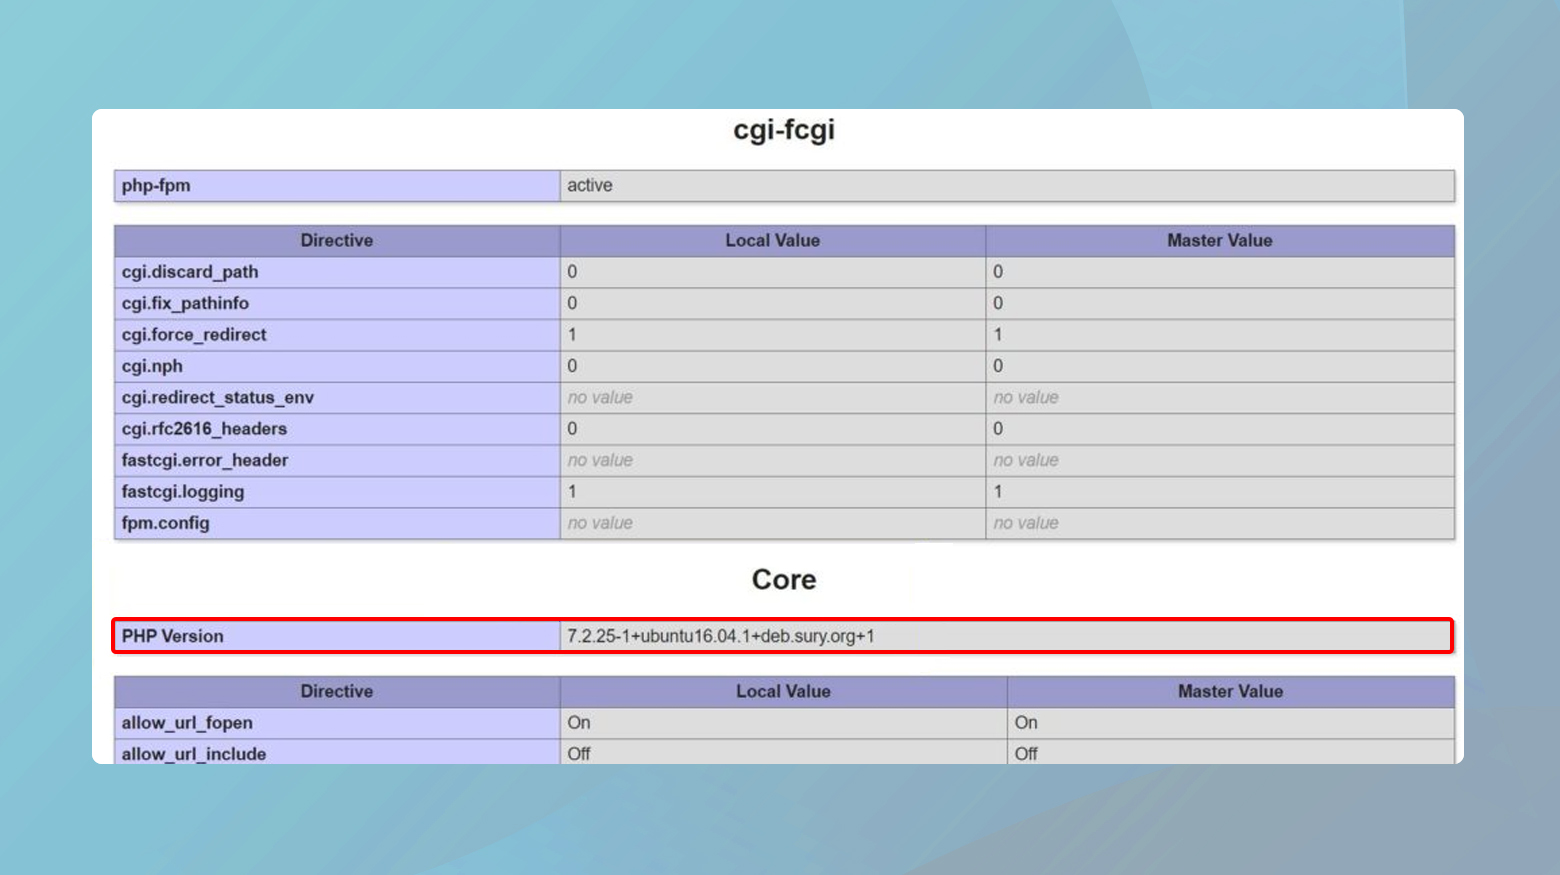
Save and, if necessary, re-upload the file to your server. Then, open a web browser and go to http://yourdomain.com/phpinfo.php—make sure to replace yourdomain.com with your actual domain name.
The page that loads will provide a wealth of information about your server’s PHP environment. Scroll to the Core section and locate the PHP Version to see the version number (e.g., 7.2.25 or 5.6.8).
Interpreting your findings
PHP 7.x: If you find that your server is running on PHP version 7, it might be time to consider updating your WordPress installation. WordPress works best with the latest versions of PHP, ensuring optimal performance and security.
PHP 5.x: Should your server still be on a PHP 5.x version, you could be missing critical extensions like MySQL, which are essential for WordPress databases. This is particularly concerning because it can lead to significant functionality issues with your site.
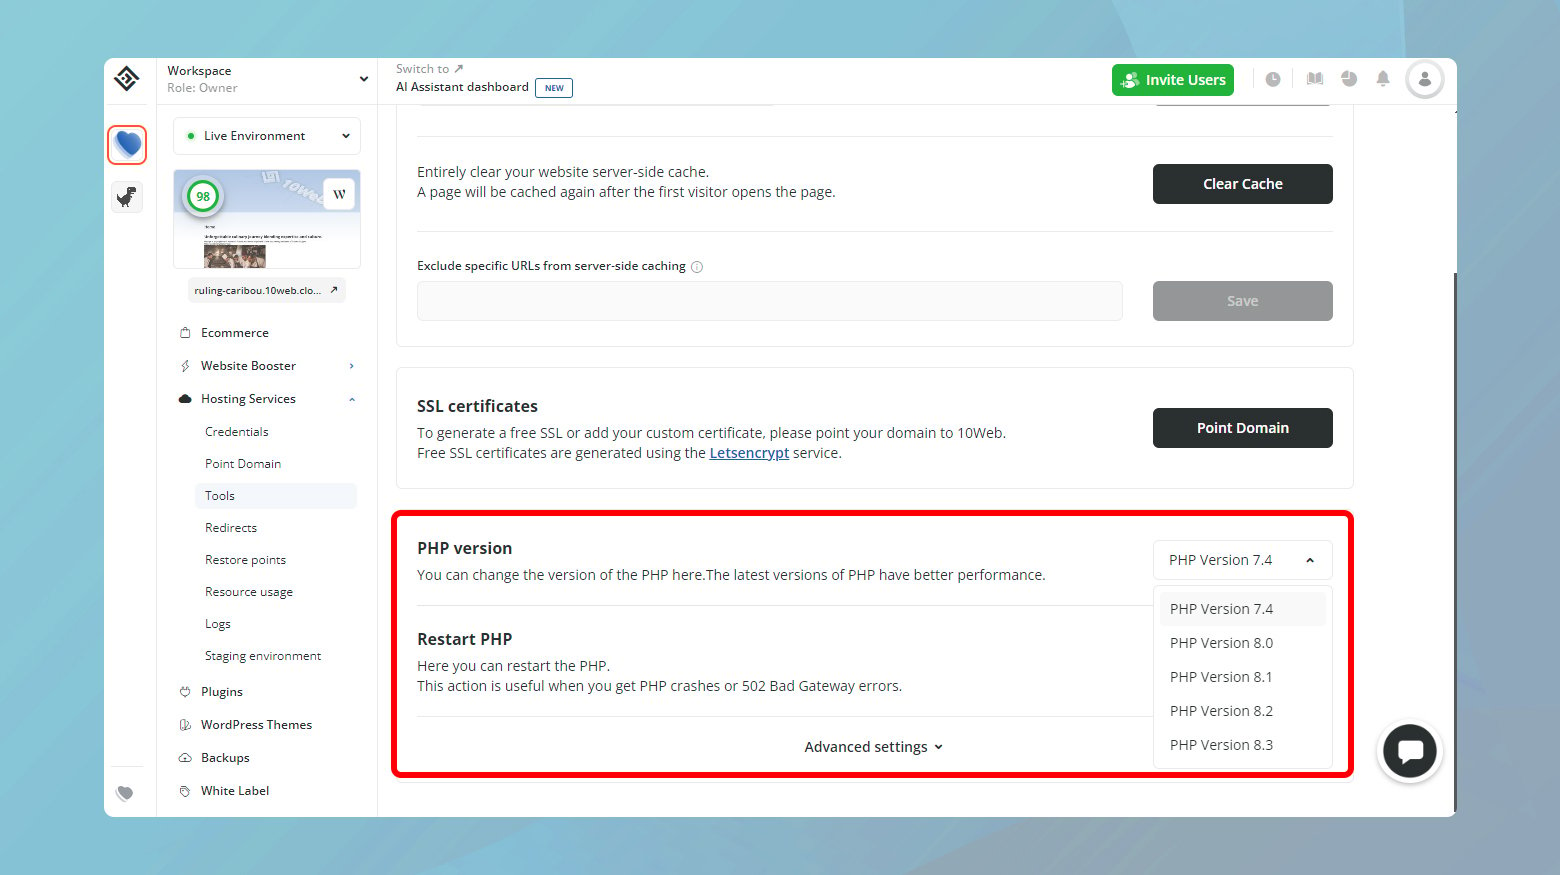
If your site is hosted on 10Web, you can find your PHP version in the tools page under hosting services. From this page you can upgrade your PHP version with a single click.
Update WordPress Core
Regularly updating WordPress is crucial for several reasons. Firstly, updates often bring compatibility with newer PHP versions, ensuring your site can leverage the latest PHP features and security fixes. Secondly, updates patch security vulnerabilities in WordPress itself, protecting your site from being exploited. Lastly, updates can enhance site performance and introduce new features, improving the overall user experience.
How to update WordPress core
Before you update WordPress core, you will need to backup your website for security reasons. Use a plugin like UpdraftPlus or your hosting provider’s backup feature to create a full site backup. Ensure you back up both your site’s files and its database.
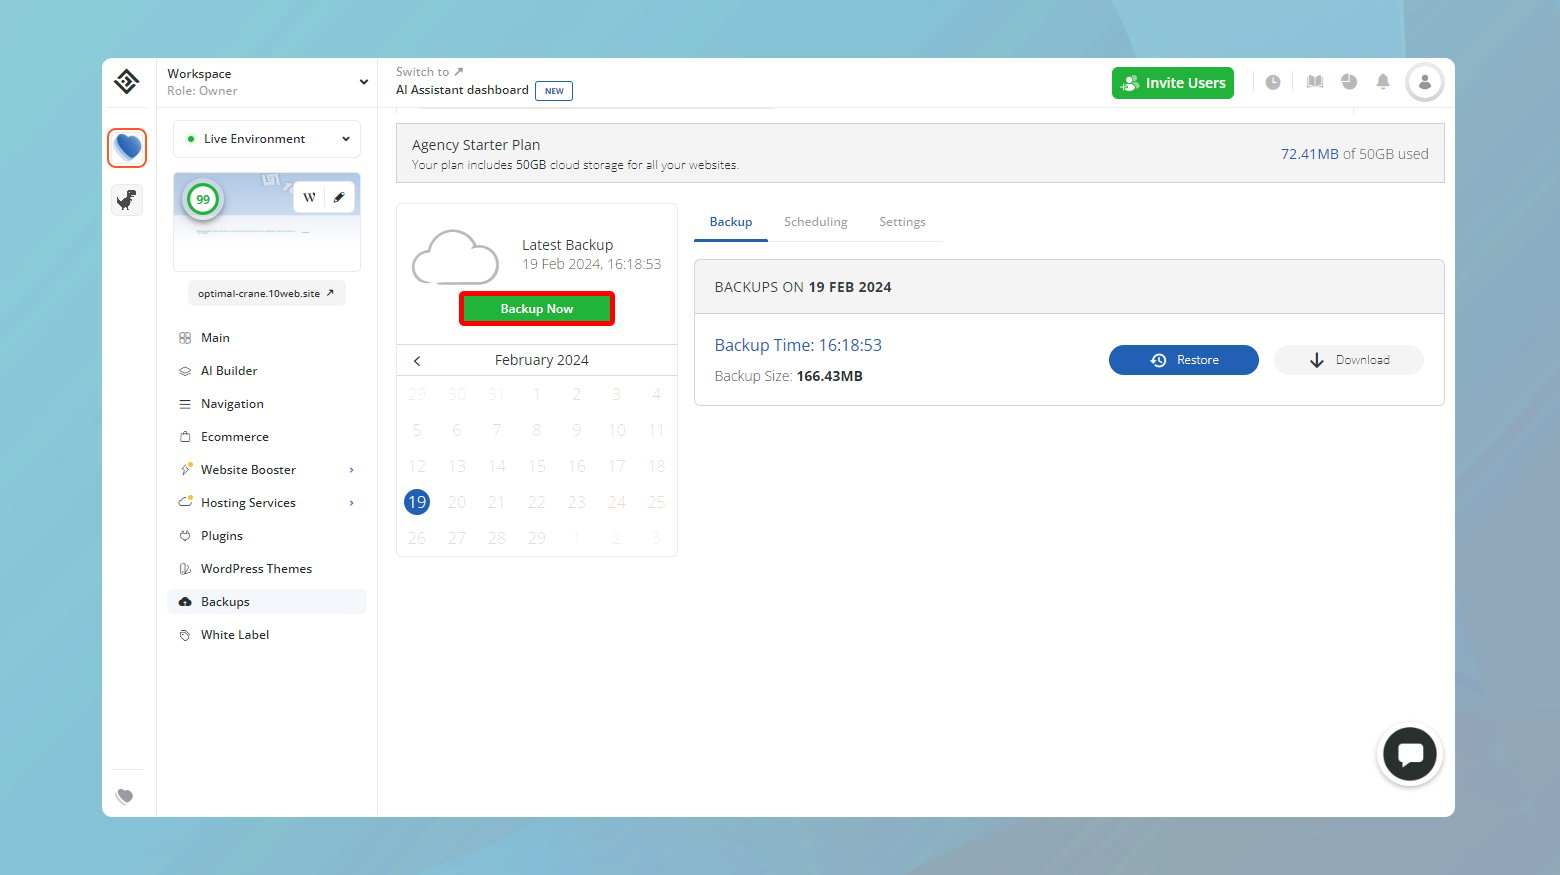
Websites hosted on 10Web can perform a manual backup from their 10Web dashboard. Simply navigate to Backups and click on Backup Now. This will backup both your files and database.
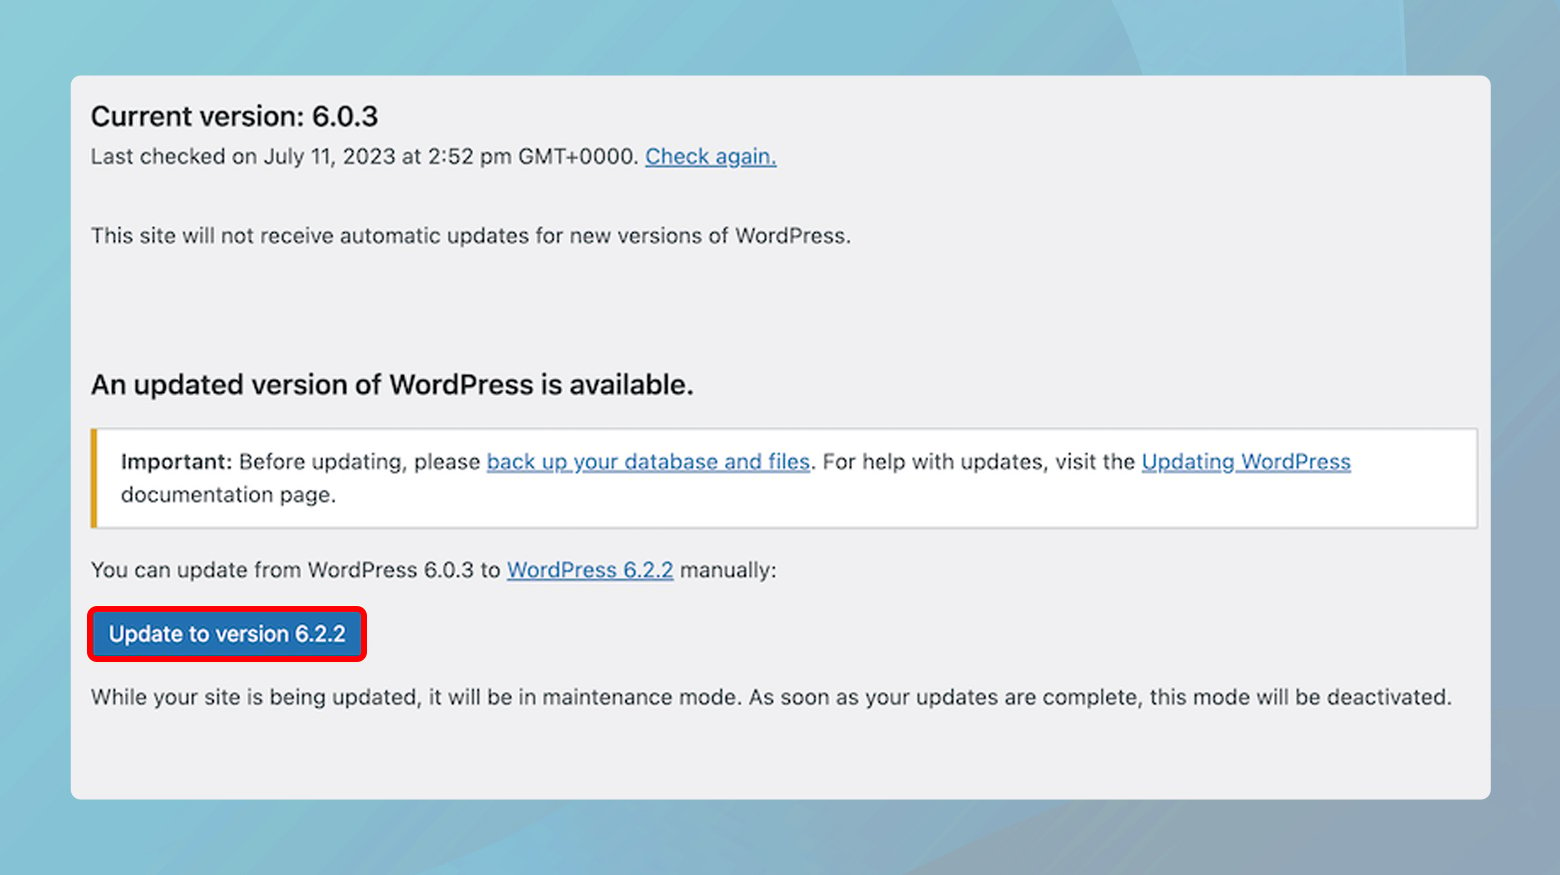
To start the update, navigate to the Dashboard > Updates in your WordPress admin area. If a core update is available, you’ll see a message prompting you to update. Click the button to initiate the update. After the update, check your site’s front and back end to ensure everything is functioning correctly.
Updating WordPress core manually
Before proceeding with any update, it’s crucial to back up your site.
- Visit [WordPress.org](https://wordpress.org/download/) and download the most recent version of the WordPress software. This will download as a `.zip` file.
- Once the download is complete, extract the `.zip` file to a folder on your computer. This will create a folder containing all of the WordPress files you need to upload.
Before uploading, you need to delete the following files and folders to prevent overwriting important configurations or content:
- The `wp-config-sample.php` file: This is a sample configuration file and is not needed for the update.
- The `wp-config.php` file: This file contains your site’s database connection details. If it appears in the new WordPress folder, delete it since you will continue using the existing one on your server.
- The `wp-content` folder: This folder contains your themes, plugins, and uploads. Deleting it from the update ensures you don’t overwrite your existing content and extensions.
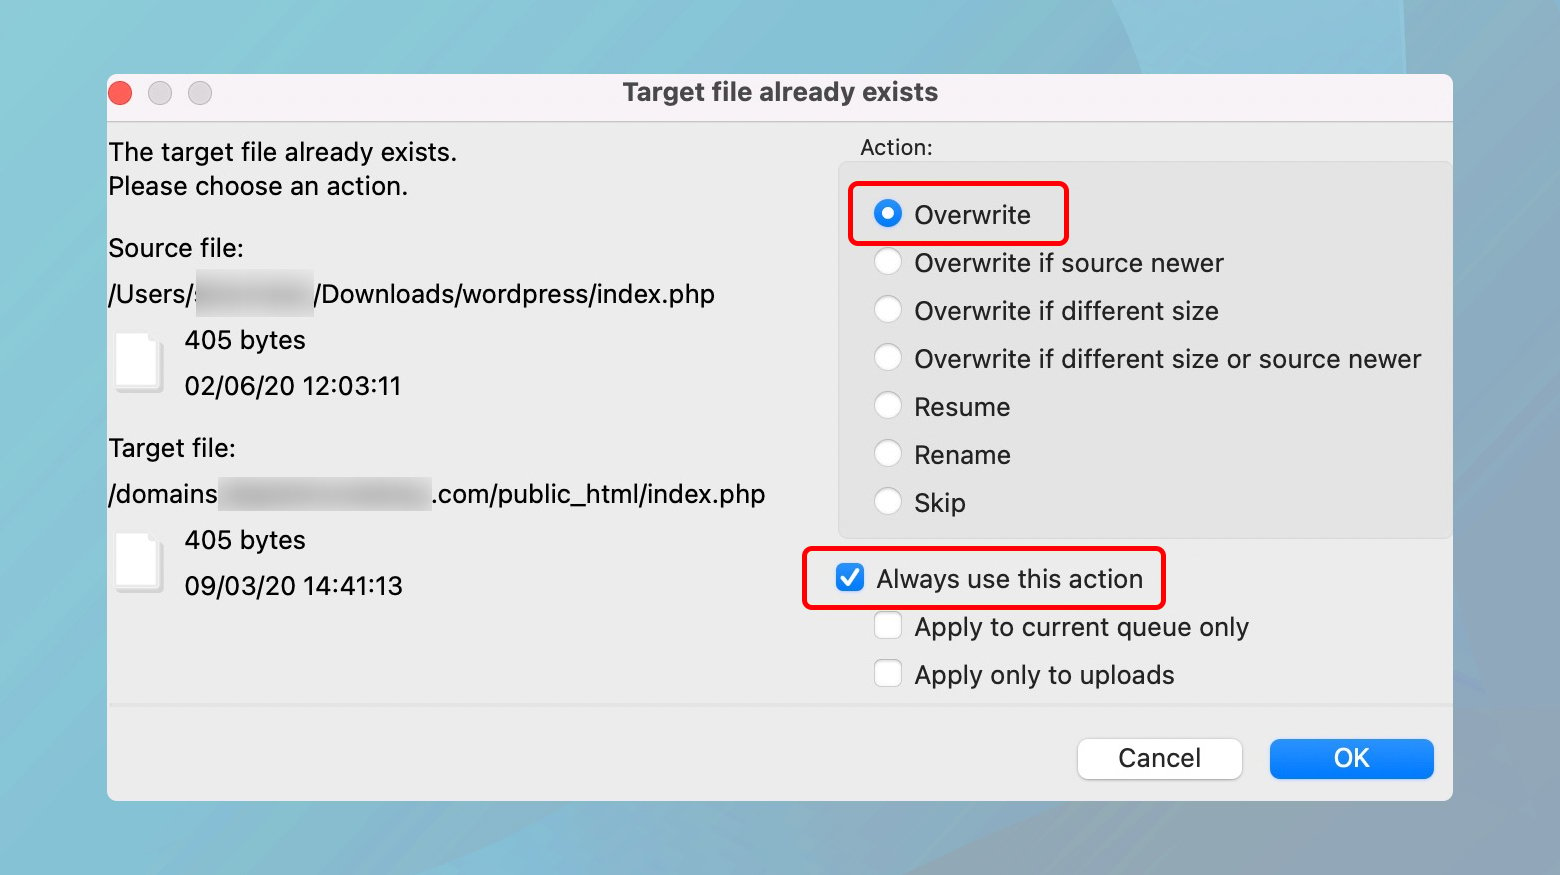
- Using your FTP client, connect to your website’s server.
- Navigate to the root directory of your WordPress installation, where you typically find the wp-config.php file.
- Upload the remaining files and folders from the new WordPress folder on your computer to your server.
- If your FTP client prompts you about duplicate files, choose to overwrite all. This process replaces the old WordPress core files with the new versions, effectively updating your site.
Updating plugins and themes
After successfully updating WordPress, don’t forget to update your plugins and themes to the latest versions. This ensures compatibility with the new WordPress version and strengthens your site’s security and functionality.
- Navigate to your WordPress dashboard, then go to Dashboard > Updates.
- Check for any available updates for plugins and themes and apply them.
Verify MySQL Extension Installation
WordPress requires a database to store and retrieve your site’s content. PHP provides extensions (like MySQLi and PDO_MySQL) that enable WordPress to communicate with the database. Ensuring the correct PHP extension is installed and active is fundamental for this communication. The MySQL extension is deprecated in PHP 5.5 and removed in PHP 7, so modern WordPress sites need the MySQLi or PDO_MySQL extension.
Having your WordPress site run smoothly requires a compatible PHP version that supports the necessary MySQL extensions. PHP 5.6 and older versions may not come with the required MySQL extension that WordPress needs to communicate with its database. Here’s how you can check for MySQL extension support and what steps to take if it’s missing.
Checking for MySQL or MySQLi extension
- Return to the phpinfo.php file you uploaded to your server earlier. This file provides a comprehensive overview of your server’s PHP configuration.
- Navigate to http://yourdomain.com/phpinfo.php in your web browser, replacing yourdomain.com with your actual domain name to access the PHP information page.
- On the PHP information page, look for sections titled mysql or mysqli. These sections indicate the installation status of the MySQL extensions.
- Specifically, locate the Client API library version item within these sections. A version number here signifies that the MySQL extension is installed and active.
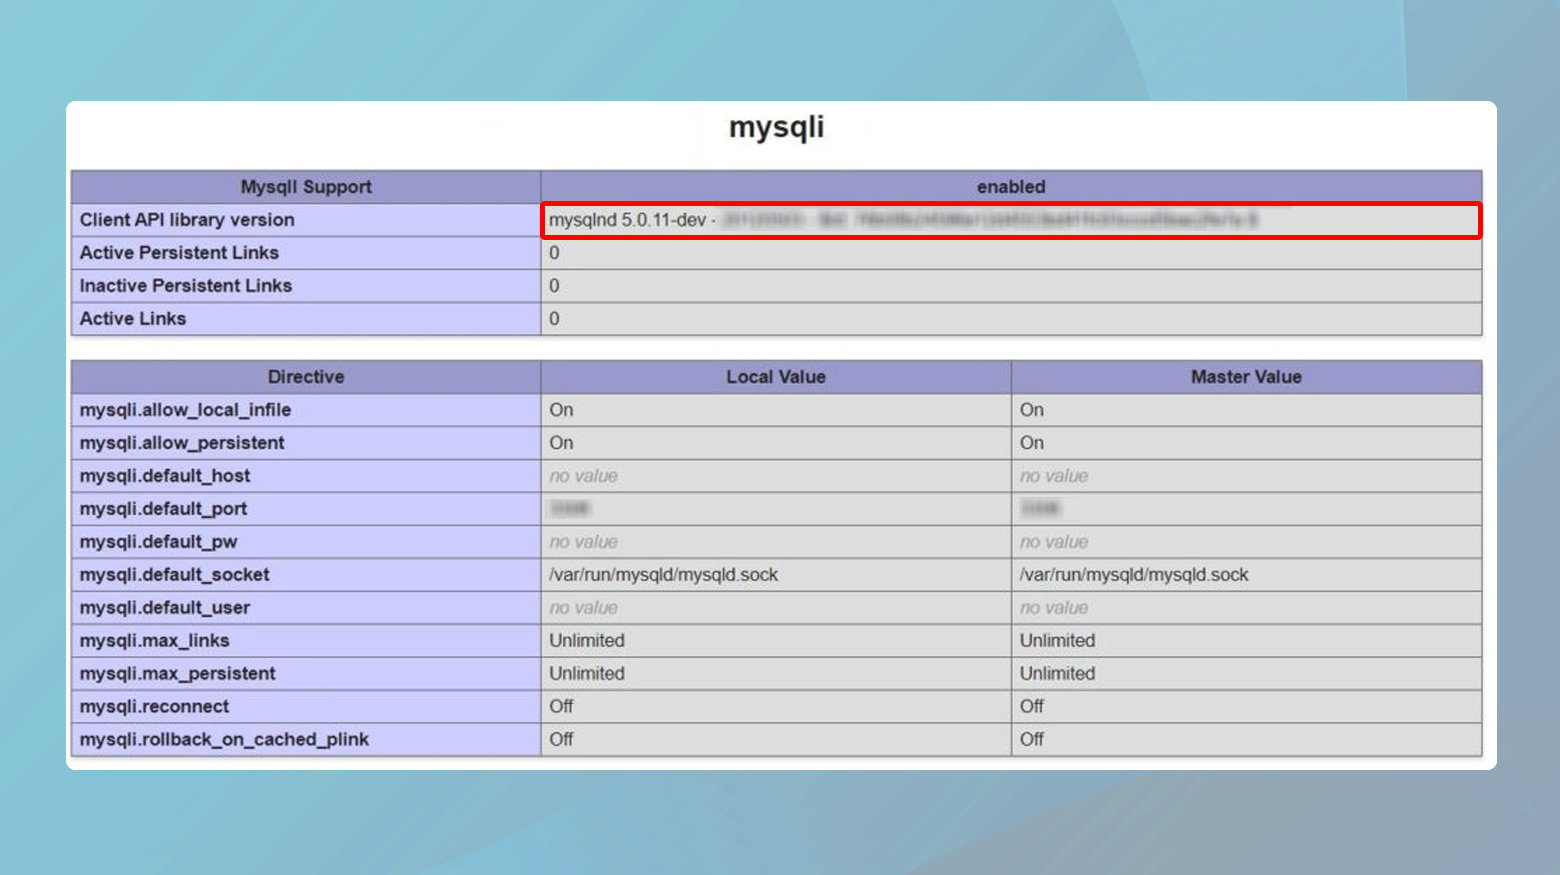
If you cannot find any mysql or mysqli section, or there’s no Client API library version listed, it indicates the MySQL extension is not installed on your server.
Ensure proper PHP configuration
Having the MySQL extension installed is one thing, but ensuring it’s correctly configured to work with WordPress is another. If the necessary MySQL extension is installed but you’re still facing issues, incorrect PHP configuration could be to blame. This often stems from two main problems:
- using a php.ini file intended for Windows servers on a Linux server
- having incorrect file paths within your php.ini file.
Here’s how to tackle these issues effectively:
- Revisit the phpinfo.php file you uploaded to your server.
- Access it by navigating to http://yourdomain.com/phpinfo.php in your web browser, substituting yourdomain.com with your actual domain name.
- On the PHP information page, search for Loaded Configuration File. This line will indicate the path to the currently active php.ini file on your server.
Before making any changes, it’s crucial to have a backup of your existing php.ini file.
- Connect to your server using an FTP client and navigate to the directory containing your php.ini file, as identified from the PHP information page.
- Download the php.ini file to your local computer for safekeeping. This ensures you have a recovery point in case any changes lead to further issues.
- Using your FTP client, delete the php.ini file from your server.
This might sound counterintuitive, but many hosting environments provide a default PHP configuration that works adequately for WordPress. Deleting the php.ini file can revert your PHP configuration to these defaults, which may resolve the issue if it was caused by incorrect custom settings. Once deleted, it’s important to test your WordPress site for any improvements or changes in behavior.
Closing thoughts
Tackling WordPress and PHP compatibility issues by thoroughly understanding your PHP version, ensuring WordPress is up to date, verifying MySQL extensions, and ensuring proper configuration can seem complex. However, these steps are crucial for maintaining a secure, efficient, and smoothly running WordPress site. Remember, keeping your PHP version and WordPress core updated is not just about chasing the latest features; it’s about security, performance, and compatibility. If you encounter difficulties or are unsure about any step, seeking assistance from a professional or your hosting provider is a wise move.
Accelerate your WordPress website creation with AI
Create a custom WordPress website tailored to your business needs 10X faster with 10Web AI Website Builder.
Say goodbye to website errors
Fix all the website errors in one click
Migrate your website to the world's best Managed WordPress Hosting.