
When you’re working to upload a file to a website or a server and come across the error message stating “the uploaded file exceeds the upload_max_filesize directive in php.ini,” it’s like hitting an invisible wall. This error directly points to a restriction in your server’s PHP configuration that’s preventing your file from making it through. Understanding this error requires a bit of a deep dive into how PHP settings work and what they mean for your website or application’s file handling capabilities.
What this error means
The idea of limiting the size of an uploaded file comes down to a practical need: preserving server resources. Web hosting providers implement this limit to ensure the server remains fast and responsive for everyone. This cap on file size, measured in megabytes (MB), is governed by a specific directive known as `upload_max_filesize`.
The `upload_max_filesize` setting resides in a configuration file called `php.ini`. This file is the backbone of server settings for applications that run PHP, which is a widespread server-side scripting language used in web development. When you encounter an error related to exceeding the upload_max_filesize limit, it’s this PHP configuration setting that’s at the heart of the matter.
It’s essential to distinguish that this upload limit isn’t something WordPress, or any other application, decides on its own. However, you’ll definitely run into this limit within WordPress when attempting to upload media. For instance, if you navigate to Media → Add New on your WordPress dashboard, you’ll see the maximum upload file size specified there. This limit varies depending on your hosting provider. For example, 10Web offers a 128 MB limit, which is more than sufficient for most needs. In contrast, other hosting services might set this limit as low as 2 MB or 4 MB, which can be quite restrictive.
So, when you attempt to upload a file that’s larger than the allowed limit, you’re met with “the uploaded file exceeds the upload_max_filesize directive in php.ini” error. Alternatively, you might see a variation like “file_name exceeds the maximum upload size for this site.”
Understanding this limitation and knowing how to navigate it is key to managing your website effectively. If you find yourself frequently bumping up against this limit, there are ways to adjust it, which involves accessing and modifying the `php.ini` file, or using other methods like `.htaccess` or `wp-config.php` for WordPress-specific sites. Each method has its own set of steps and considerations, but adjusting this limit can greatly enhance your site’s media handling capabilities, making it more versatile and user-friendly.
Variations of this error
This error can present itself in various ways depending on the environment you’re working in. Some common variations include:
- “File too large to upload” in web applications
- “Exceeds the maximum upload size for this site” on WordPress or other CMS platforms
- Direct references to `upload_max_filesize` in PHP error logs or debugging tools
- A generic “HTTP error” when trying to upload files in certain web interfaces
Reasons why this error occurs
Several reasons can trigger this error, including:
Server default settings: Many servers come with a conservative `upload_max_filesize` setting by default, often 2MB or 8MB, to manage resources effectively and prevent abuse.
Application requirements: Some applications or websites require the upload of large files (e.g., videos, PDFs, or large datasets), which can easily exceed the default limits set in `php.ini`.
Mismatched settings: The `upload_max_filesize` directive isn’t the only setting that controls file uploads. The `post_max_size` directive, which limits the maximum size of POST data, must also be configured appropriately; otherwise, increasing `upload_max_filesize` alone won’t resolve the issue.
Fixing the uploaded file exceeds the upload_max_filesize directive in php.ini
Resolving this error involves increasing the upload_max_filesize. You can choose the method you are most comfortable with. The method also depends on setup provided by your hosting service.
Contact support
Sometimes, the easiest solution doesn’t require you to touch any configuration files at all.
Reaching out to your hosting provider’s support team can be the quickest and most hassle-free way to solve this issue. This approach isn’t just about saving time; it’s about leveraging the expertise of professionals who handle such requests daily. Whether you’re running a small blog or a large e-commerce platform, your hosting support is there to ensure your website operates smoothly.
Modify the php.ini file in cPanel
Adjusting the `upload_max_filesize` and `post_max_size` directives in your `php.ini` file is a straightforward way to lift those limits.
The `php.ini` file is the cornerstone of PHP configuration on your server. Depending on your hosting setup, this file can usually be found in the root directory of your website or in a PHP configuration directory.
For shared hosting or environments where you don’t have direct file access, cPanel offers a user-friendly way to edit PHP settings without needing to open a text editor or access the server via SSH.
Using cPanel to edit `php.ini` settings
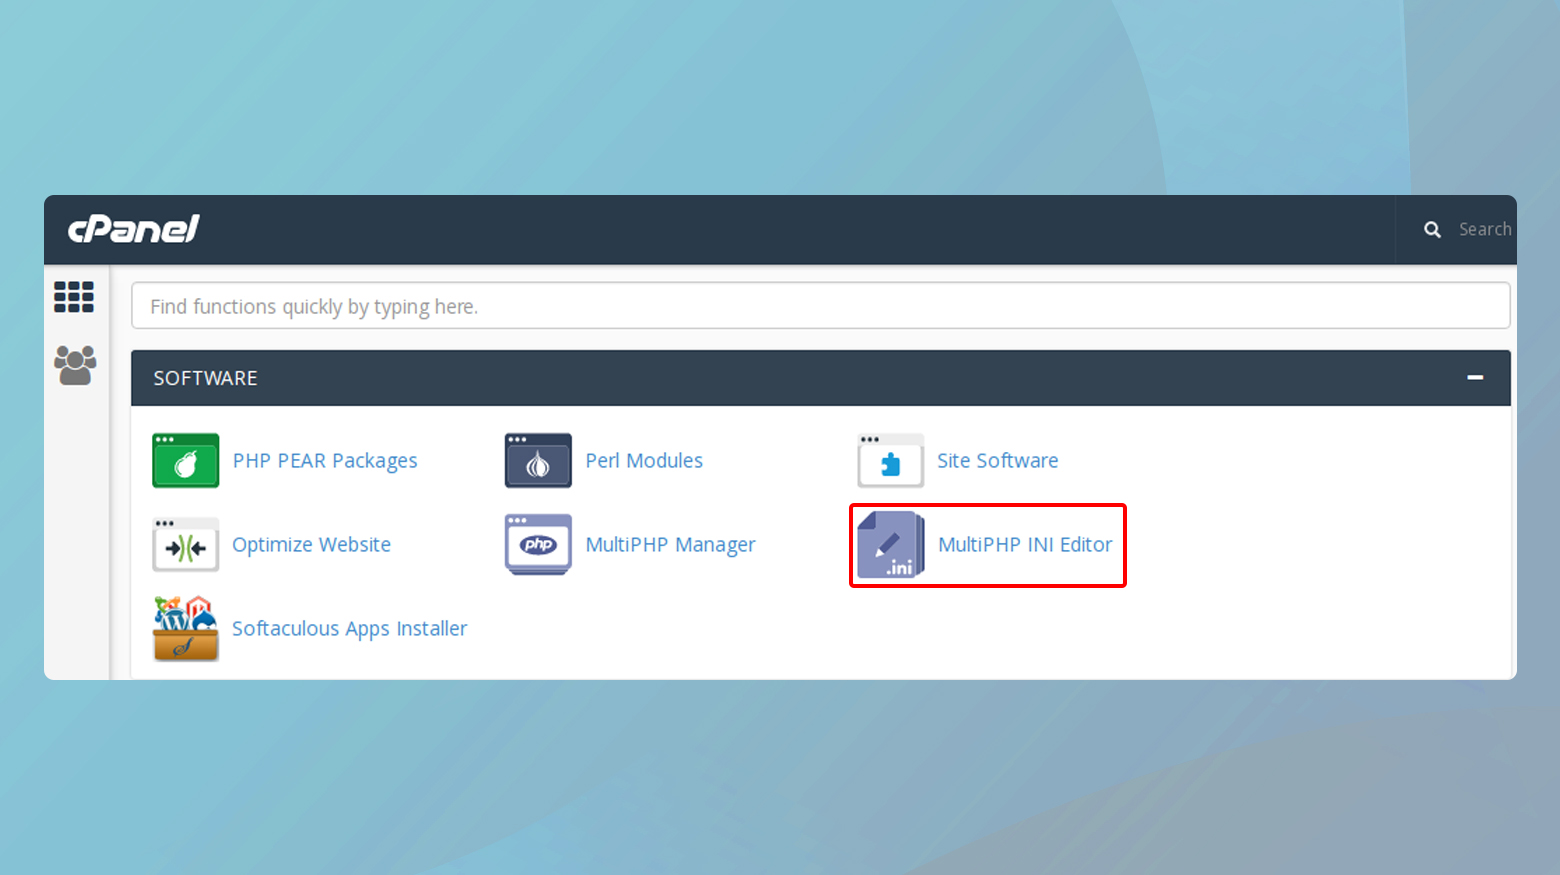
- Log into your cPanel dashboard and look for the “MultiPHP INI Editor” under the Software section. This tool is designed to simplify the process of modifying PHP configuration.
- Once you’re in the MultiPHP INI Editor, you’ll see a drop-down menu where you can choose the specific domain or application you’re adjusting settings for.
- After selecting your site, look for the `upload_max_filesize` and `post_max_size` directives. These two settings control the maximum size of files that can be uploaded through PHP and the maximum size of POST data that PHP will accept, respectively. Set both values to whatever limit you require.
- After inputting your new values, make sure to save your changes.

To ensure everything is working as expected, try uploading a file that previously exceeded the limit. If done correctly, you should no longer encounter the upload size error.
In some cases, especially on VPS or dedicated servers, you might need to restart your web server for the changes to take effect. This can usually be done through cPanel’s interface or by contacting your hosting provider’s support.
Modifying the php.ini via FTP
Not all hosts allow direct modifications to the `php.ini` file, leading to an interesting workaround involving the `.htaccess` file. You can check to see if you have permission to alter or create a
php.ini file using an FTP client. If this doesn’t work, then you can move forward with modifying the .htaccess file.
Modifying or creating a php.ini file
- Use an FTP client to access your server. This step requires FTP credentials, which are typically provided by your hosting service.
- Navigate to the site’s root folder usually named `public_html`, `www`, or similarly. It’s the directory that houses your website’s files.
- If a `php.ini` file already exists in your root folder, open it with a text editor. If not, create a new text file and name it `php.ini`.
- Add or modify the following lines. Adjust the numbers according to your requirements:
upload_max_filesize = 12M
post_max_size = 13M
memory_limit = 15M
The `upload_max_filesize` and `post_max_size` values ensure you can upload large files, while `memory_limit` affects how much memory a PHP script can consume, crucial for intensive plugins or themes.
Some hosting environments, especially those running suPHP (a tool for executing PHP scripts with the permissions of their owners), require a special declaration in your `.htaccess` file to acknowledge your `php.ini` changes.
Edit your .htaccess file with the following code, replacing yourusername with the real file path of your website:<IfModule mod_suphp.c>
suPHP_ConfigPath /home/yourusername/public_html
</IfModule>
Modifying .htaccess to increase upload limits
This method is particularly helpful for those who find themselves at a standstill with `php.ini` modifications, either due to host restrictions or simply because the changes aren’t taking effect as expected. Here’s how you can use the `.htaccess` file to tweak your PHP settings, specifically targeting file upload limits and memory allocation.
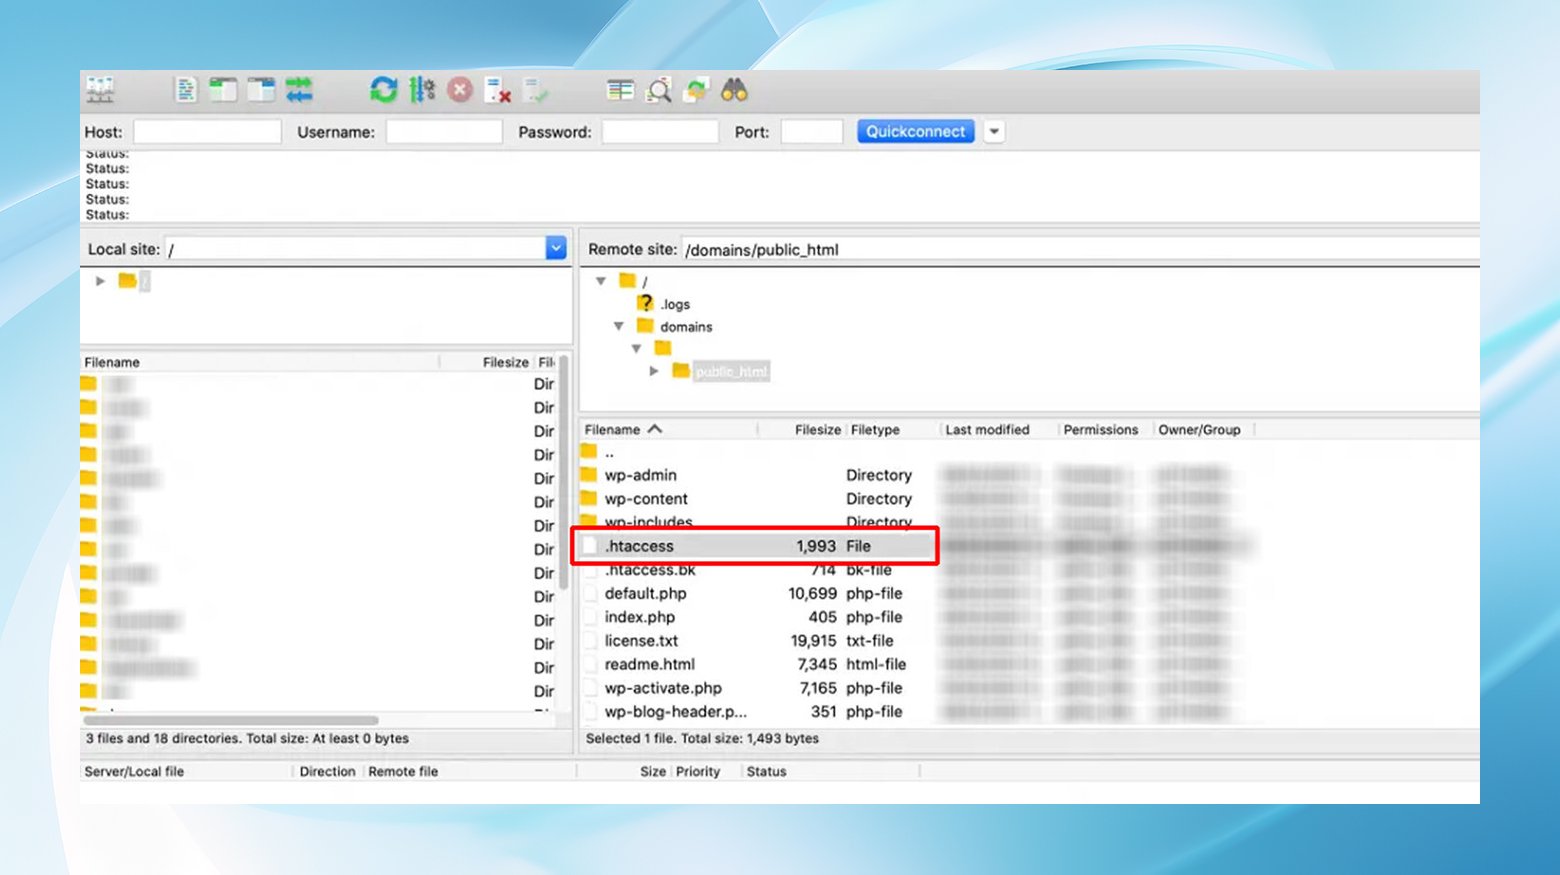
- Connect to your site via FTP
- Once connected, navigate to the root folder of your site, commonly named `public_html` or `www`.
- Locate the `.htaccess` file. It should be in your site’s root directory.
- If you can’t see it, ensure your FTP client is set to show hidden files by navigating to ‘Server’ > ‘Force showing hidden files.’
- Double click on the .htaccess file to open it with a text editor. If you’re creating a new one because it doesn’t exist, simply create a new text file and name it `.htaccess`.
- Add the following lines at the top of the file, adjusting the values to meet your specific needs:
php_value upload_max_filesize 12M
php_value post_max_size 13M
php_value memory_limit 15M
It’s important to note that after making these changes, if your site starts showing an internal server error, it’s likely that your server is running PHP in CGI mode, which does not support these `.htaccess` directives.
Remove the lines you just added from the `.htaccess` file to restore your site’s functionality.
Adjusting PHP values for 10Web customers
10Web utilizes NGINX instead of Apache, which means there’s no `.htaccess` file to modify. For 10Web users encountering upload limit issues, 10Web has a quick and user friendly approach. You can find the solution in your dashboard.
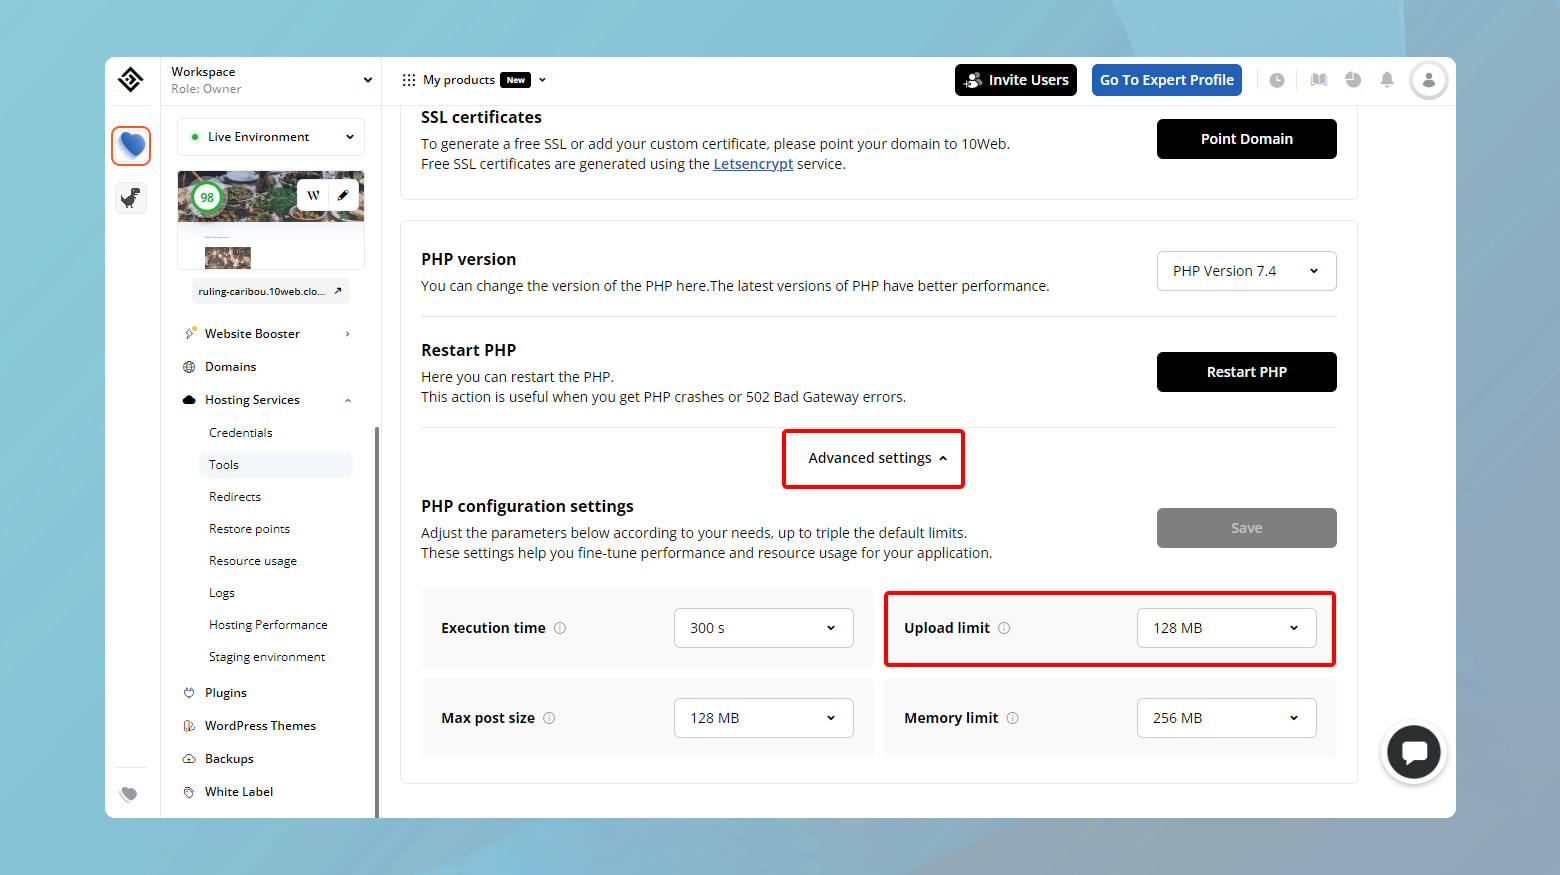
To adjust or increase your site’s PHP values:
- Log in to your 10Web account.
- Click on the website where the error has occurred.
- Navigate to ‘Hosting Services’ > ‘Tools.’
- Scroll down and click ‘Advanced settings.’
- To fix the error, click on the dropdown and adjust the value for ‘Upload Limit.’
- Click ‘Save’ to implement the changes.
Closing thoughts
Navigating the “uploaded file exceeds the upload_max_filesize directive in php.ini” error involves a few different strategies based on server setup and access levels. We’ve discussed direct adjustments in the php.ini file and leveraging the .htaccess file for those on Apache servers. For instances where direct file access isn’t feasible, contacting hosting support is recommended. For 10Web customers, the scenario differs slightly due to 10Web’s use of NGINX, which doesn’t support .htaccess modifications. However, 10Web offers a streamlined, user-friendly method for adjusting PHP values directly from the dashboard. Each approach aims to enhance your website’s functionality, enabling larger file uploads and improved performance.
Accelerate your WordPress website creation with AI
Create a custom WordPress website tailored to your business needs 10X faster with 10Web AI Website Builder.
Say goodbye to website errors
Fix all the website errors in one click
Migrate your website to the world's best Managed WordPress Hosting.