The ERR_INTERNET_DISCONNECTED error is a common issue that users encounter while browsing the internet, indicating that the browser is unable to establish a connection to the internet.
This error can be frustrating as it halts online activities, presenting itself as a clear sign that your computer or device is not communicating with the network or the internet service is interrupted. The reasons behind this error are varied and can range from simple misconfigurations in your network settings to more complex issues with your internet service provider.
Say goodbye to website errors
Achieve peace of mind with 99.99% uptime on 10Web Managed
WordPress Hosting, powered by Google Cloud.
Variations of the issue
The ERR_INTERNET_DISCONNECTED error may manifest in several forms across different browsers and devices, highlighting the diversity of internet connection issues. Some common variations include:
- ERR_INTERNET_DISCONNECTED
- No Internet Connection
- Check your internet connection
- Unable to connect to the internet
- The device is not connected to the internet
- Internet connection has been lost
- You are offline
- No network access
- Network connection lost
- The connection has timed out
These variations essentially communicate the same problem: the inability of the browser or device to access the internet due to a lost connection.
Why does this error occur?
Several factors can cause the ERR_INTERNET_DISCONNECTED error, each with its own set of solutions. Common reasons include:
Network configuration issues: Incorrectly configured network settings can prevent a device from connecting to the internet. This can include misconfigured IP addresses, DNS settings, or proxy server settings.
Router or modem issues: Problems with your router or modem, such as outdated firmware, overheating, or hardware malfunctions, can disrupt your internet connection.
ISP outages: Sometimes, the problem is beyond your control and lies with your Internet Service Provider (ISP). Outages or maintenance work by your ISP can temporarily disconnect you from the internet.
Wireless interference: For wireless connections, interference from other wireless devices, physical obstructions, or distance from the router can weaken or disrupt the connection.
Device-specific problems: Issues with the device’s network adapter, outdated network drivers, or operating system problems can also lead to this error.
Firewall or antivirus software: Sometimes, overly aggressive firewall or antivirus settings can block your device from accessing the internet.
How to troubleshoot and resolve the ERR_INTERNET_DISCONNECTED error
Internet connectivity issues can disrupt your work, entertainment, and communication online. Before delving into complex troubleshooting, a good starting point involves checking the basics, such as physical connections and hardware functionality. Here’s a detailed guide on identifying and fixing common internet connectivity problems, ensuring a smoother online experience.
Check physical connections
Physical connections are the literal links between your internet service provider (ISP) and your devices. These include power connections to your modem and router, the coaxial or DSL cable bringing internet to your modem, and Ethernet cables connecting your modem to your router and possibly your PC. A disconnection or fault in any of these links can disrupt the flow of data, leading to connectivity issues. Regular wear and tear, moving equipment, or even pets can cause cables to become loose or damaged over time, which is why this step is critical in troubleshooting internet problems.
How to check and secure physical connections
- Inspect all cables connecting your modem and router. This includes the power cables, Ethernet cables, and coaxial cable (if using a cable internet service).
- Ensure that each cable is firmly plugged in at both ends. It’s not uncommon for cables to appear connected at a glance but actually be loose. Unplugging and replugging each connection can sometimes resolve the issue.
- Check for visible damage on the cables and replace any that are frayed, bent, or otherwise compromised. Damaged cables can significantly degrade the quality of your connection.
- Verify that your router and modem are powered on. Look for the power indicator lights on both devices. If they’re off or blinking in an unusual pattern, this could indicate a problem with the power supply or the device itself.
By starting with the basics and ensuring all physical connections are secure and undamaged, you can often resolve connectivity issues without needing to delve into more complex troubleshooting steps. This foundational check is an essential part of maintaining a reliable internet connection.
Restart your modem and router
One of the most effective and straightforward troubleshooting steps is to restart your network equipment. This action can resolve a myriad of connectivity issues. Restarting your modem and router essentially resets the devices’ internal software, also known as firmware. This process can clear out any errors that have developed over time due to prolonged operation, software bugs, or temporary conflicts within the network. A restart can also prompt your devices to re-establish a fresh connection with your ISP, which can be beneficial if the previous connection was poor or had become unstable.
How to restart your modem and router
- Unplug the power cords from both your modem and router. If your modem has a backup battery, you may need to remove it as well.
- Wait at least one minute before plugging the power back in. This waiting period allows the devices to fully reset.
- Plug the modem back in first, and wait a few minutes for it to boot up completely. You should see the indicator lights stabilize, signifying a connection to your ISP.
- Plug in your router next, allowing it a few minutes to boot up and establish a connection to the modem.
- Test your internet connection on a device to see if the issue has been resolved.
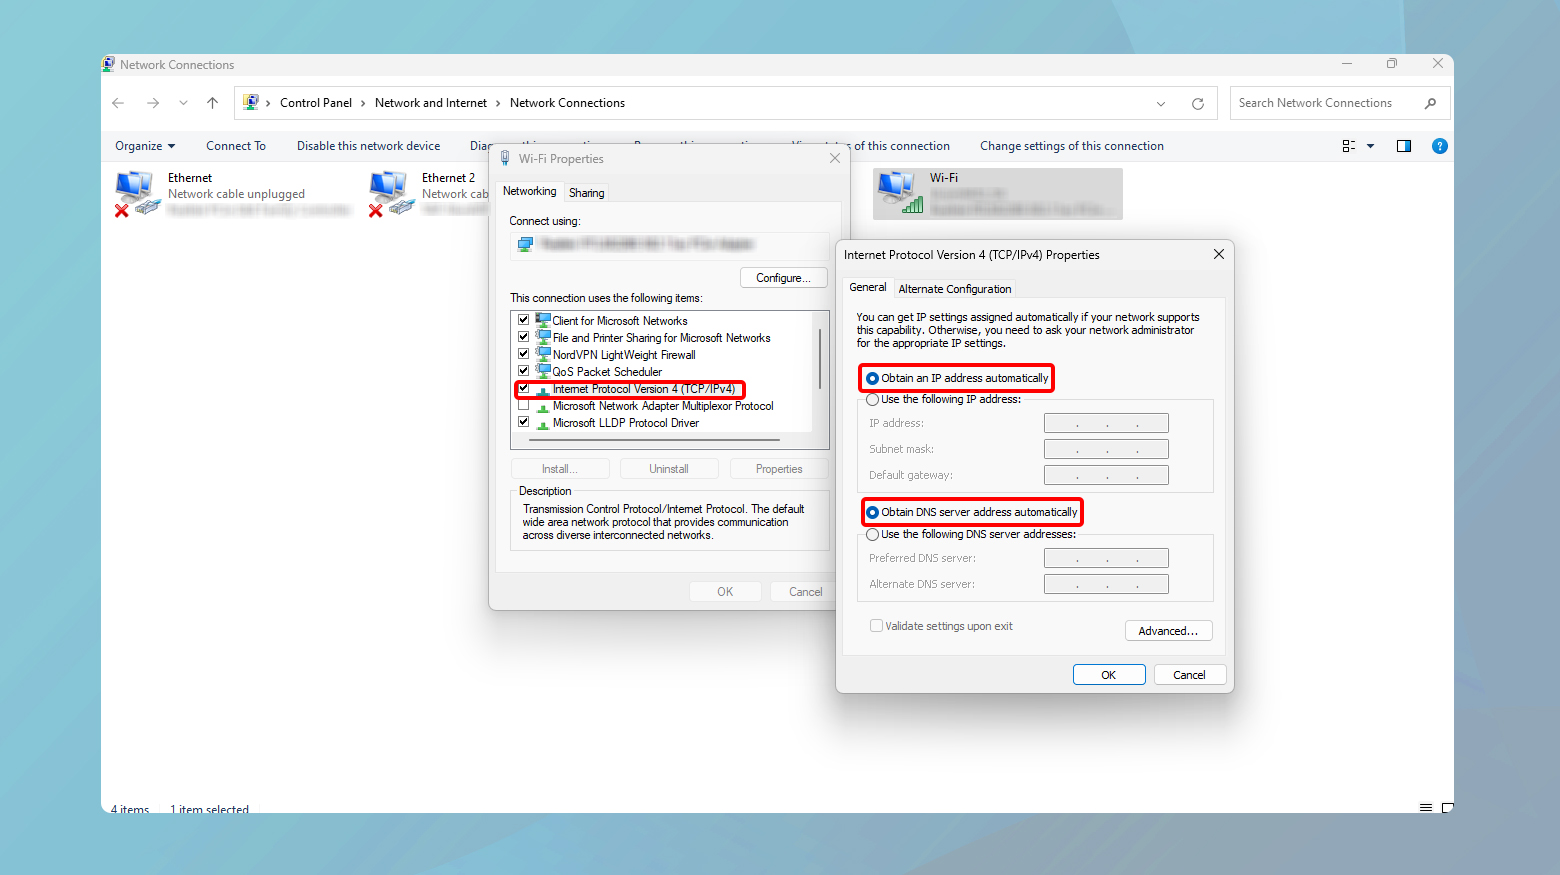
Check your network settings
Incorrect network settings on your device can prevent you from accessing the internet even if your network equipment is functioning properly. These settings include IP configurations, DNS servers, and proxy settings.
Network settings govern how your device communicates with the rest of your network and the internet. Incorrect IP settings can lead to conflicts within your network, while incorrect DNS settings might prevent your device from translating domain names into IP addresses, a crucial step for accessing websites. Proxy settings, if incorrectly configured, can reroute your internet traffic in unintended ways or block it altogether.
Windows
- Open Control Panel > Network and Sharing Center > Change adapter settings.
- Right-click your connection > Properties.
- Select Internet Protocol Version 4 (TCP/IPv4) or IPV6 > Properties.
- Ensure settings for “Obtain an IP address automatically” and “Obtain DNS server address automatically” are on.
Mac
- Go to System Preferences > Network.
- Select your connection and click Advanced.
- Under TCP/IP, set “Configure IPv4” to “Using DHCP”.
- For DNS, ensure no unnecessary DNS servers are listed, or add preferred ones like 8.8.8.8 (Google DNS).

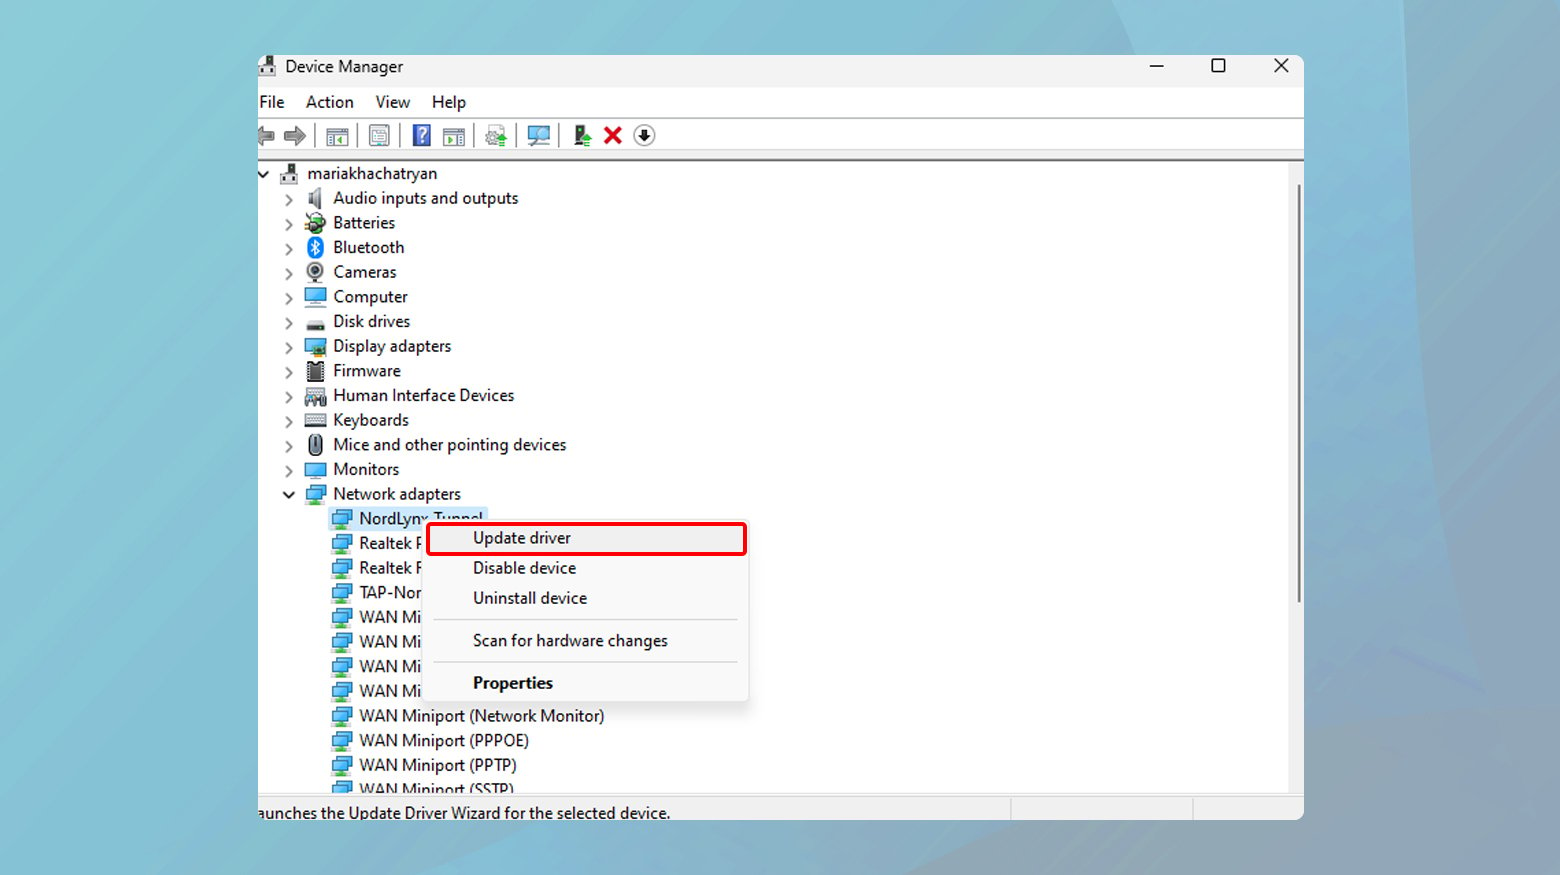
Update network drivers
Network drivers enable your operating system to communicate with your network hardware. Outdated drivers can impede this communication, leading to subpar internet performance.
Drivers are the software layer that directly interacts with your computer’s hardware. They translate your OS’s commands into actions the hardware can execute. Outdated or corrupt drivers may not fully leverage the hardware capabilities or might cause instability and connectivity issues. Regular updates can also address security vulnerabilities and improve overall network performance.
Windows
- Open Device Manager > Network adapters.
- Right-click your network device > Update driver > Search automatically for updated driver software.
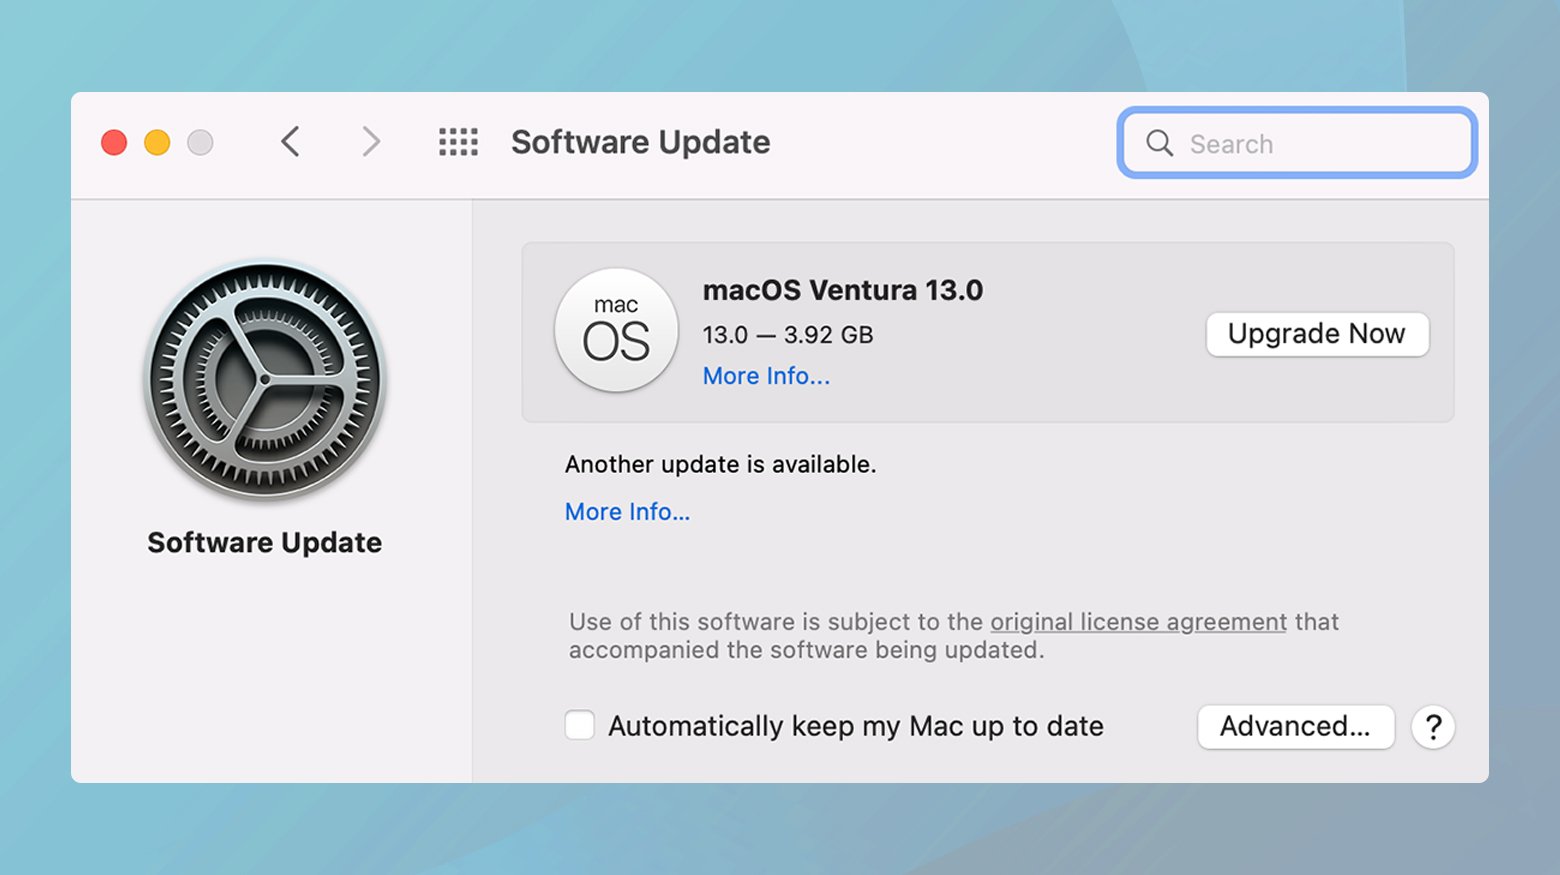
Mac
MacOS automatically manages drivers through system updates. Go to System Preferences > Software Update to install any available updates.
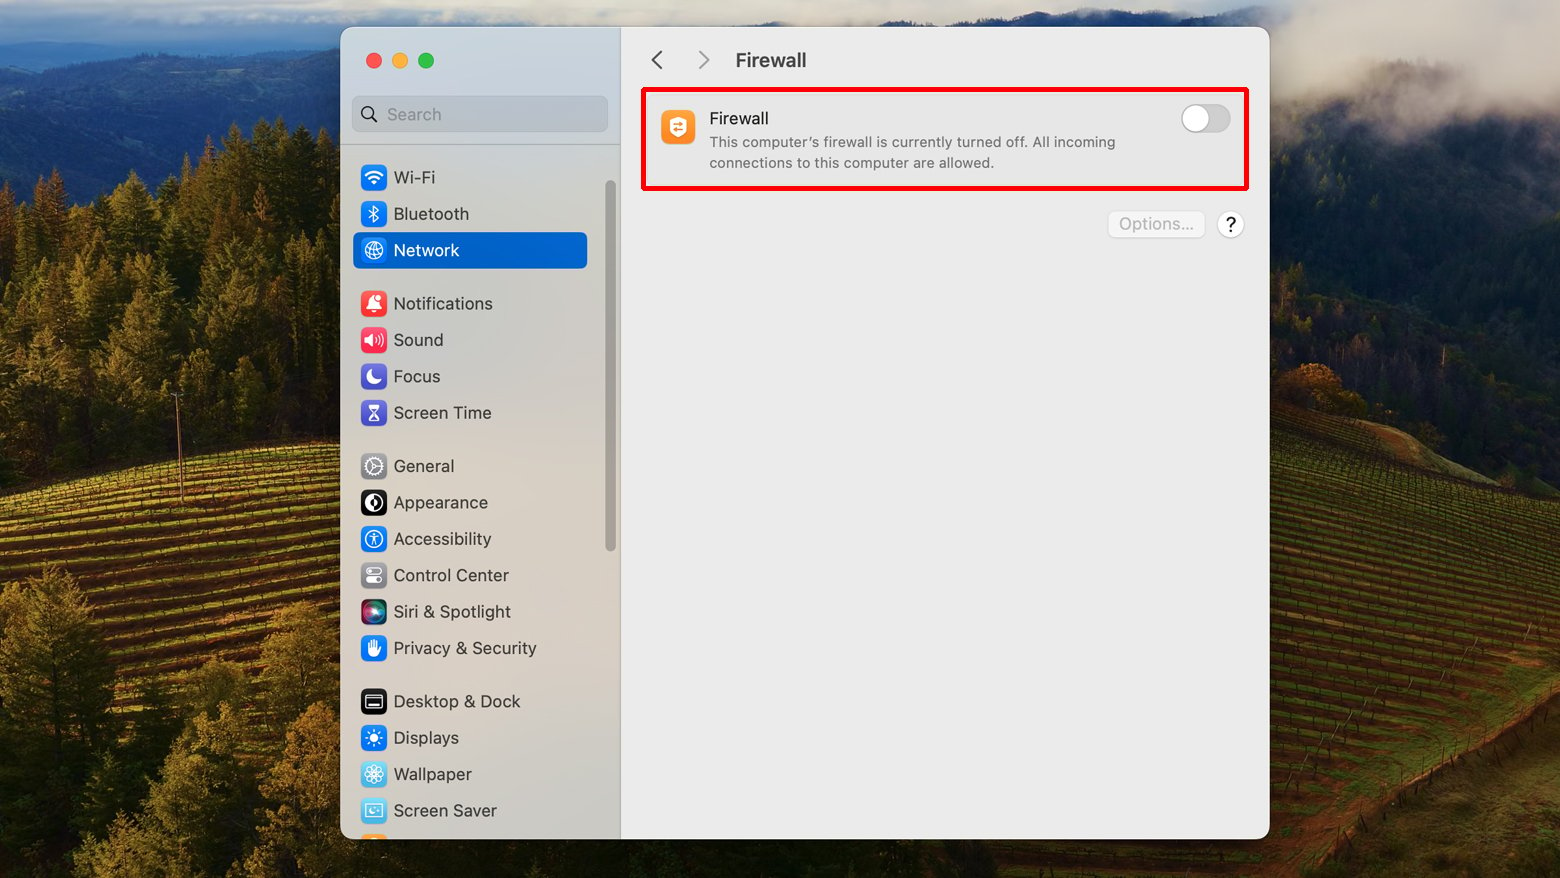
Disable firewall/antivirus temporarily
Firewalls and antivirus software are crucial for protecting your device from malicious threats. However, they can sometimes interfere with legitimate internet connections.
These security solutions scrutinize incoming and outgoing data, potentially blocking legitimate connections based on false positives or misconfigurations. Temporarily disabling these can help diagnose connectivity issues, but it’s crucial to re-enable them afterward to maintain security.
Windows
Firewall
- Go to Control Panel > System and Security > Windows Defender Firewall
- Click on Turn Windows Defender Firewall on or off.
- Click on the radial to turn off the firewall.
- Click Ok.

Antivirus
Open the antivirus software and look for a “disable” or “turn off” option, usually available in the settings menu.
Mac
Firewall
- Go to System Preferences > Security & Privacy
- Click on Firewall > Turn Off Firewall.
Antivirus
Open the antivirus application and find the option to disable or pause protection, often in the preferences or settings.
Flush DNS cache
The DNS cache stores domain name resolutions, facilitating quicker access to frequently visited sites. However, outdated or corrupt entries can cause connectivity issues.
Flushing the DNS cache removes outdated or incorrect entries, forcing your computer to retrieve the latest domain name resolutions. This can resolve issues accessing websites and improve your browsing experience by eliminating erroneous cache data.
Windows
Open Command Prompt as administrator, type the following command and hit Enter:
ipconfig /flushdns
Mac
-
- Open Terminal
Depending on your macOS version, the command will be different.
- Type the specific command for your version and hit Enter.
- You will be prompted to enter your password. After entering your password, DNS cache will be flushed.
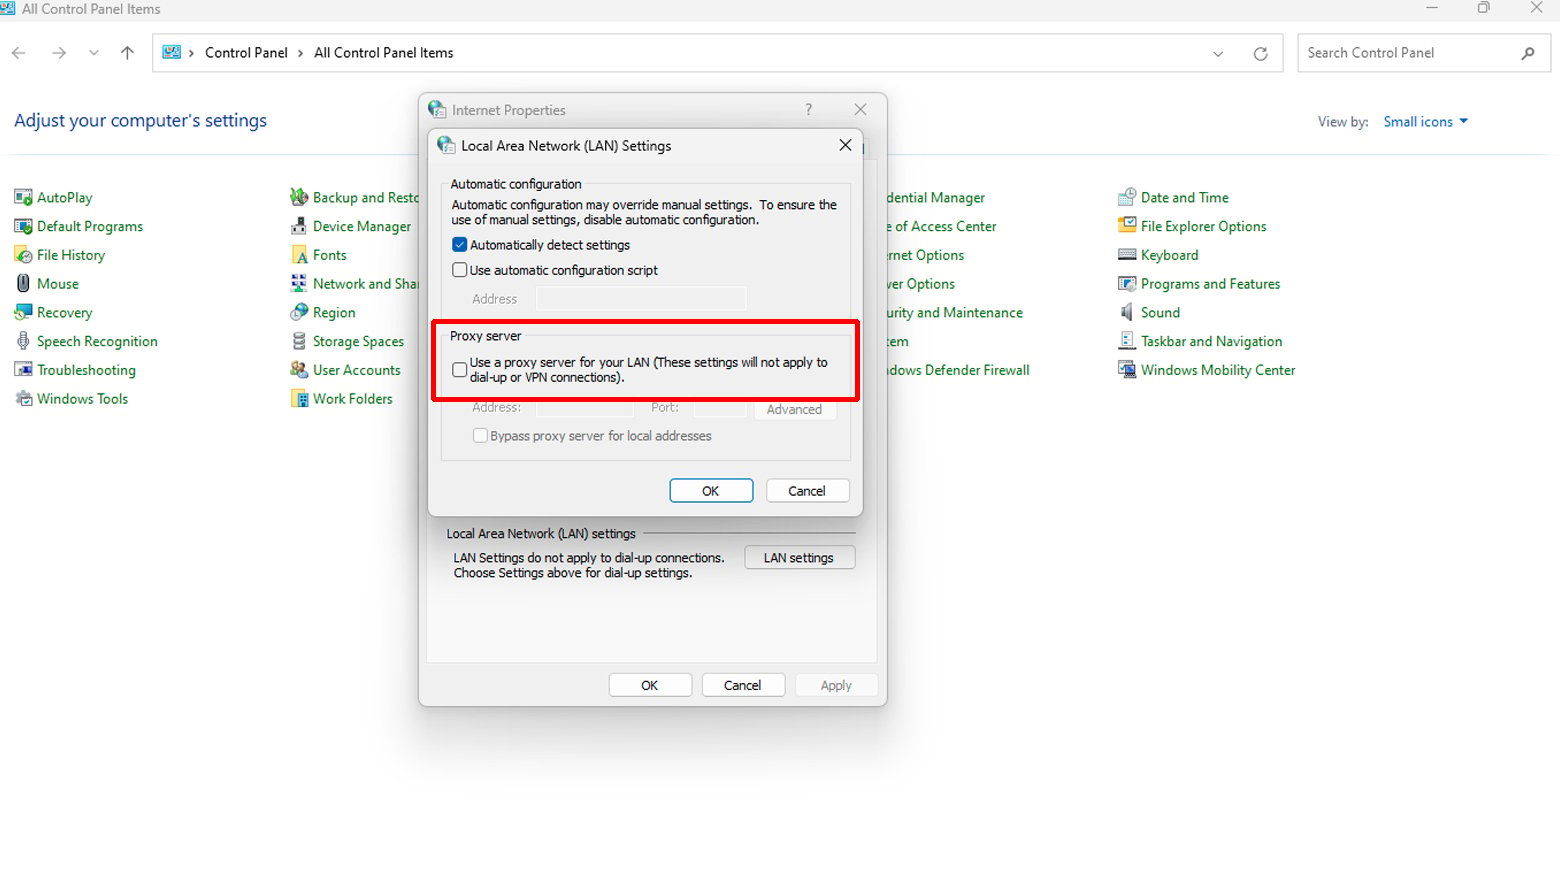
Adjust your LAN settings
Local Area Network (LAN) settings are crucial for defining how your device connects to the internet via your local network. Incorrect settings can prevent access to the internet, particularly if they’re misconfigured to use a proxy server when not needed.
Correct LAN settings ensure your device communicates properly with your router and through it, to the wider internet. Misconfigured proxy settings, for example, can reroute your internet traffic unnecessarily or block it altogether, leading to connectivity issues. Ensuring these settings are accurate avoids such pitfalls and guarantees your device utilizes the intended path for internet access.
Windows
- Go to Control Panel > Internet Options > Connections tab.
- Click on LAN settings.
- Ensure “Automatically detect settings” is checked and “Use a proxy server for your LAN” is unchecked unless you’re explicitly using a proxy.
Delete wireless network (WLAN) profiles
Wireless Network (WLAN) profiles store information about the Wi-Fi networks you’ve connected to, including security keys and network preferences. Sometimes, these profiles become corrupted or outdated, causing connection issues.
Removing old or corrupted WLAN profiles can resolve connectivity problems by forcing your computer to create a fresh profile upon reconnecting to a network. This process eliminates any errors or conflicts that may have been stored in the problematic profiles, leading to a more stable and reliable connection.
Windows
- Click on the Start menu.
- Open Settings.
- Navigate to Network & Internet.
- Select WiFi.
- Click on “Manage known networks.”
- Find the network you want to remove and select “Forget.”
- Restart your computer to apply the changes.
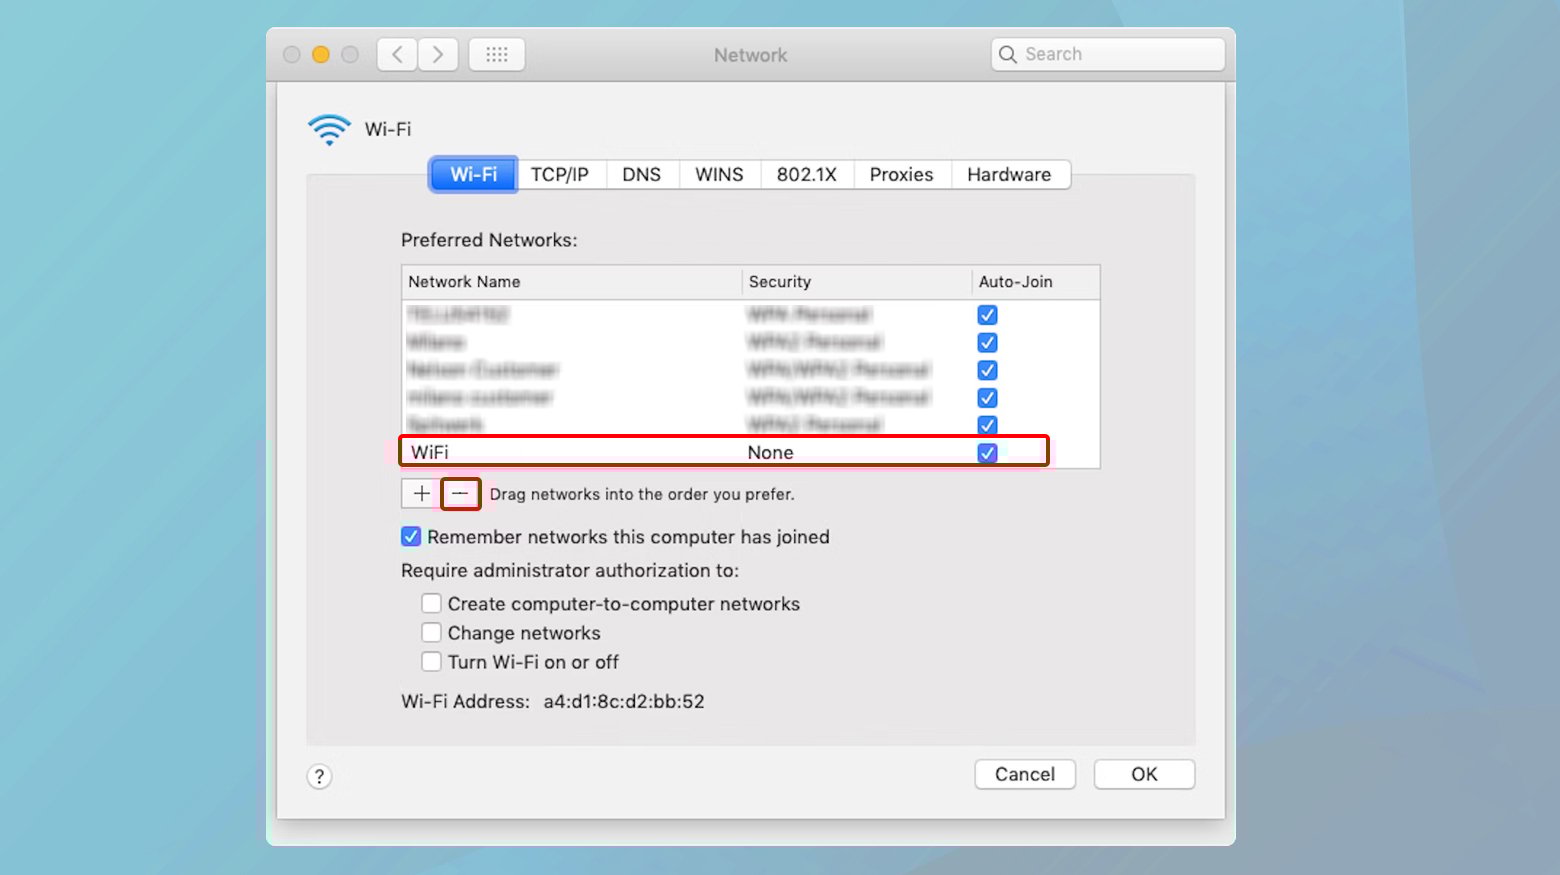
Mac
- Go to System Preferences.
- Click on Network.
- Select WiFi from the sidebar.
- Click on the “Advanced” button.
- Scroll to find the network you want to forget.
- Hit the minus (-) button next to it to remove it.
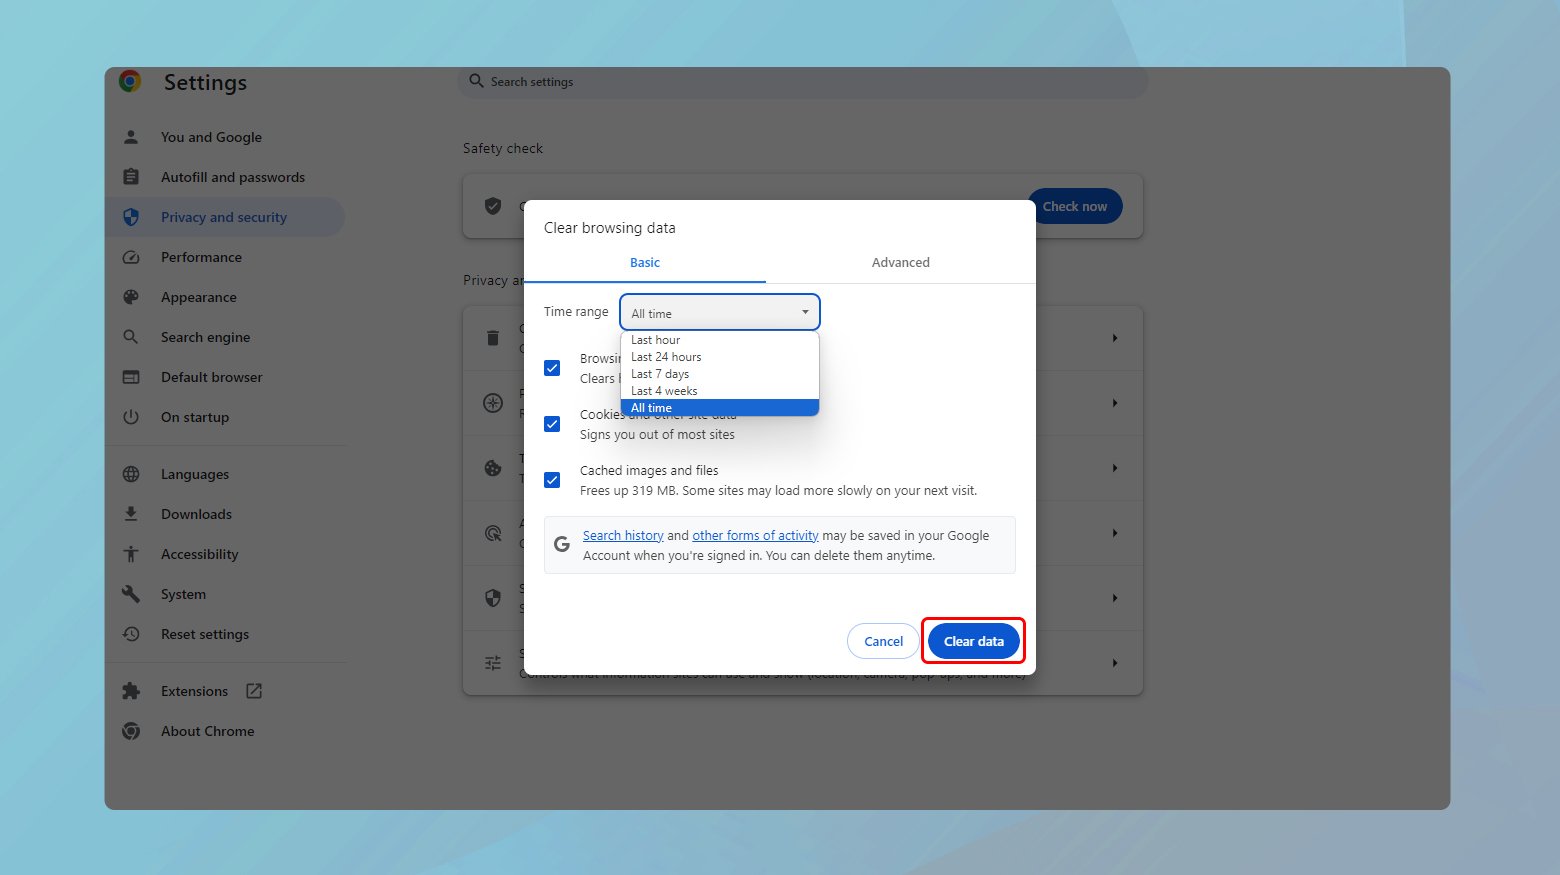
Clear browser data
Over time, your browser accumulates a cache of data, including cookies, which can sometimes interfere with your ability to connect to or correctly load websites.
This stored data can become outdated or corrupt, which may result in loading errors or difficulties accessing certain sites. Clearing your browser’s cache and cookies refreshes its storage, potentially resolving these access issues and improving overall browsing speed.
Chrome
- Click the three dots in the upper right corner > More tools > Clear browsing data.
- Select the time range and the types of information you want to remove.
- Click “Clear data.”
Firefox
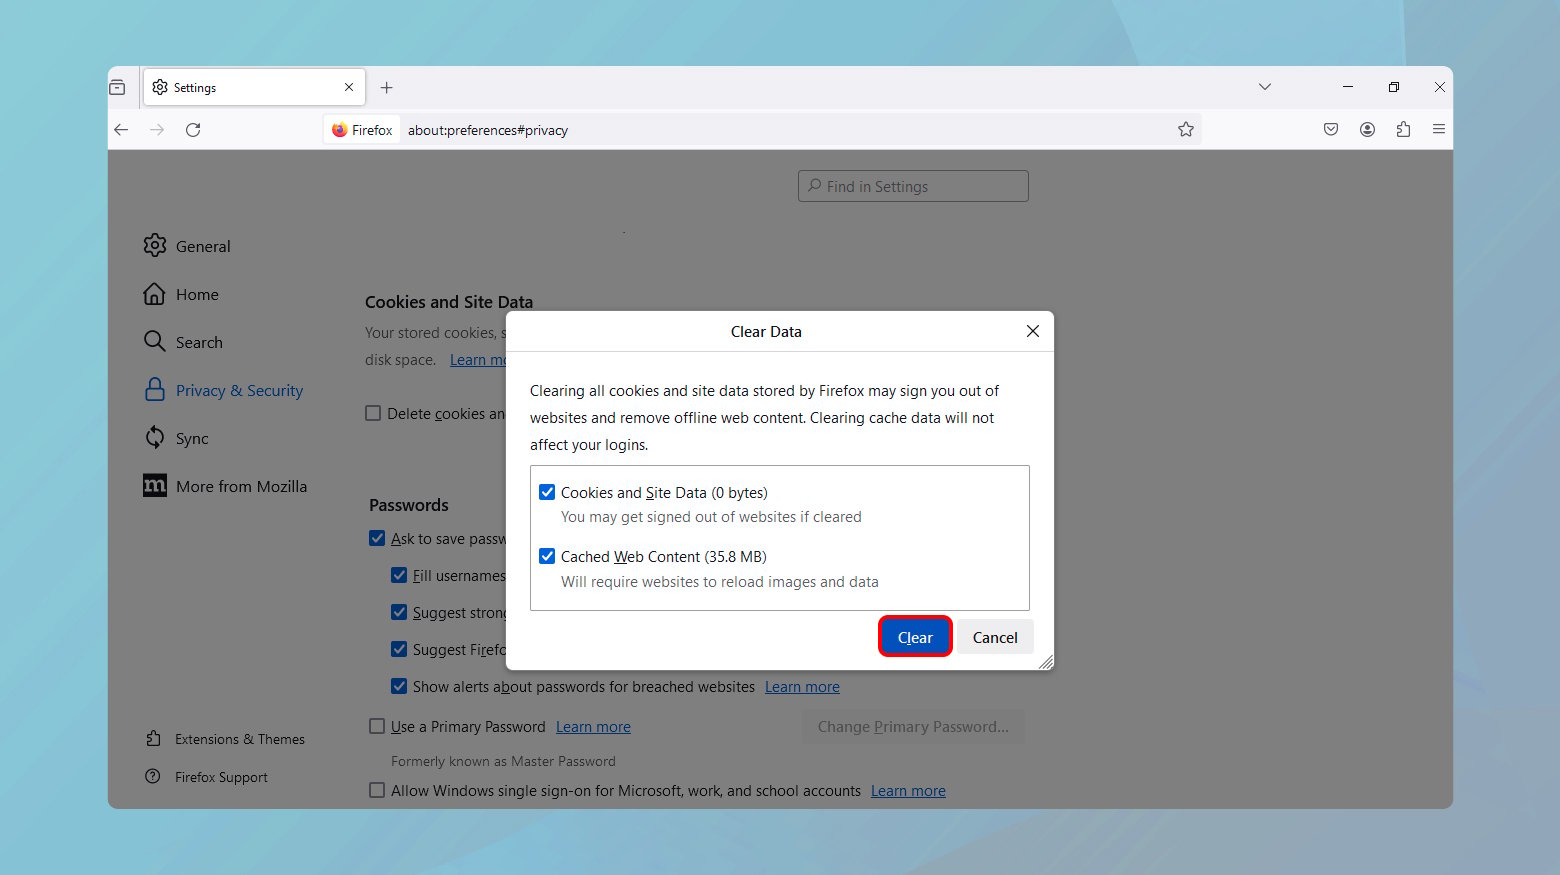
- Click the menu button > Preferences > Privacy & Security.
- Under Cookies and Site Data, click “Clear Data.”
- Select what to clear and confirm by clicking “Clear.”
Safari
- Click on ‘Safari’ > ‘Preferences’.
- Go to the ‘Advanced’ tab and check the box at the bottom that says ‘Show Develop menu in menu bar’.
- From the menu bar, select ‘Develop’ > ‘Empty Caches’.
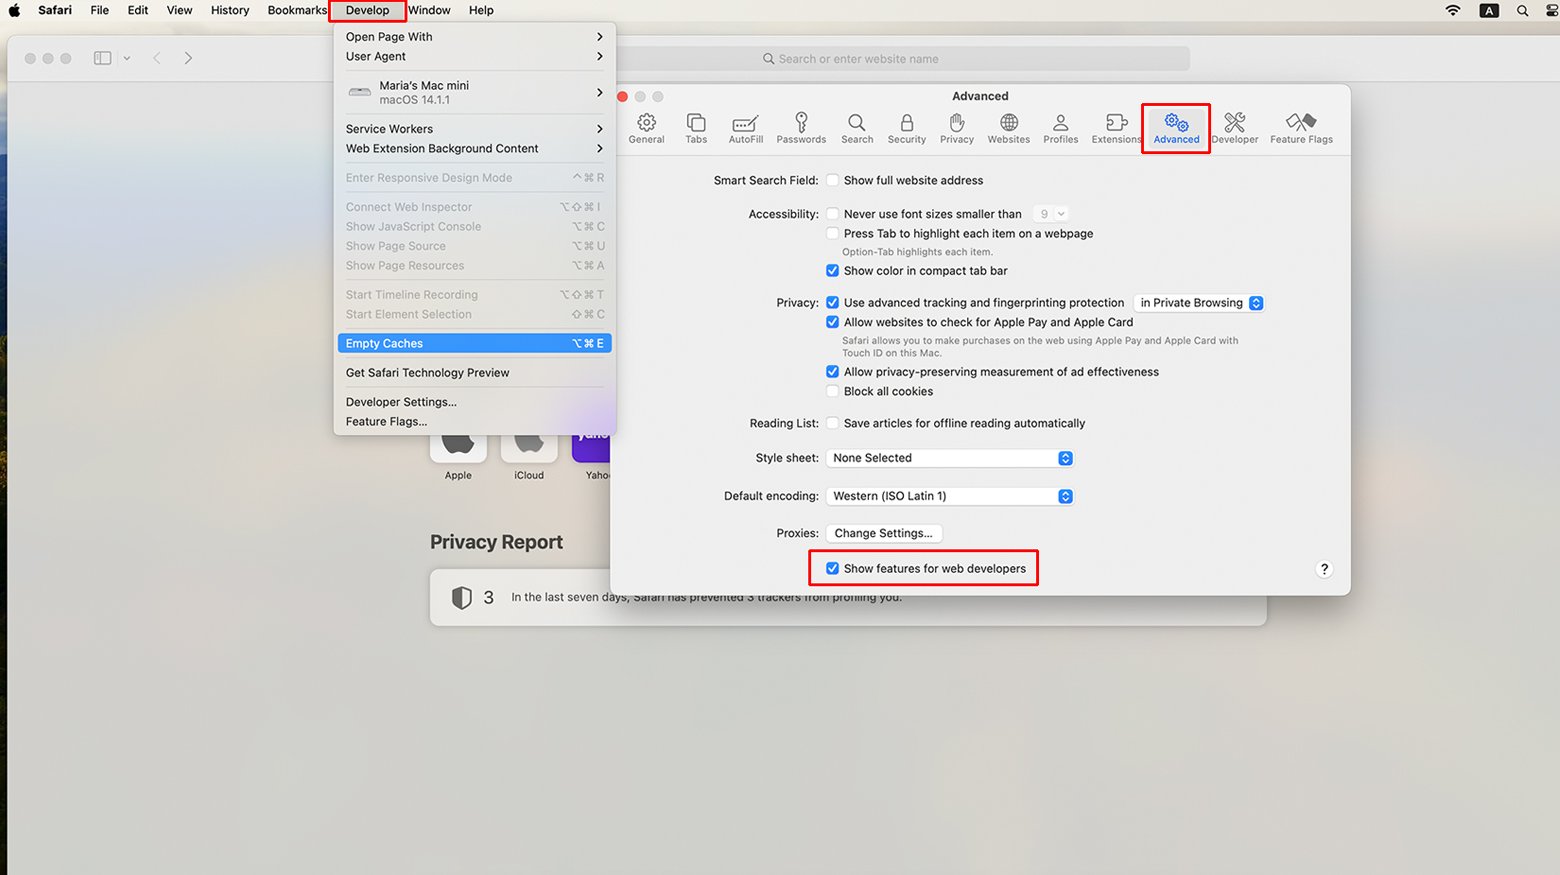
You might also want to clear history, which can be done by clicking ‘Safari’ > ‘Clear History’.
Reset the TCP/IP stack
The Transmission Control Protocol/Internet Protocol (TCP/IP) stack is a set of network protocol layers that enable internet connectivity. Resetting it can resolve issues stemming from corrupt or incorrect network configuration.
This reset restores the TCP/IP stack to its original state, which can resolve connectivity problems caused by improper configurations or software conflicts. It’s a more comprehensive approach to restoring network functionality, especially when simpler fixes have failed.
Windows
-
- Open Command Prompt as administrator.
- Type the following commands and press Enter.
netsh winsock reset
netsh int ip reset
ipconfig/ release
ipconfig/renew
- Click Enter after each command to run it.
- Restart your computer to apply the changes.
Flush the DNS cache at the end of the reset. To flush DNS cache type the following command and hit Enter:ipconfig/flushdns
Mac
While macOS doesn’t offer a direct command to reset the TCP/IP stack, renewing the DHCP lease can have a similar effect.
- Go to System Preferences > Network,
- Select your network, click Advanced.
- Click the “Renew DHCP Lease” button.
Once you are done, flush the DNS cache.The exact command to be used will depend on your MacOs version. You can find your OS version by clicking on the apple icon and selecting About this Mac.
To flush the DNS cache:
- Click on Go > Utilities.
- Type the command for your version and hit Enter
- Enter your password when prompted.
Monitor network performance
Regular monitoring of your network’s performance can preemptively identify issues before they escalate into significant connectivity problems. Tools like speed tests and network diagnostics can provide insights into the health and efficiency of your internet connection.
Regular checks can reveal inconsistencies in speed, latency, or packet loss that may indicate underlying problems with your network setup or service provider. Early detection allows for timely adjustments or interventions, ensuring consistently high-quality internet access.
Use speed test websites: Visit reputable speed test websites to check your connection speed and ping. Compare the results over time for consistency.
Check router health: Access your router’s admin page to monitor connected devices, bandwidth usage, and any errors that may be affecting performance.
Closing thoughts
Troubleshooting internet connectivity issues involves a combination of checking and adjusting settings, updating software and hardware, and understanding when to seek professional advice. By methodically working through potential problems and making informed upgrades when necessary, you can ensure a stable and fast internet connection. Regular monitoring and maintenance of your network will also help prevent future connectivity issues, providing a seamless online experience.
Say goodbye to website errors
Achieve peace of mind with 99.99% uptime on 10Web Managed
WordPress Hosting, powered by Google Cloud.
Say goodbye to website errors
Fix all the website errors in one click
Migrate your website to the world's best Managed WordPress Hosting.