Understanding the 500 Internal Server Error
The 500 Internal Server Error is the digital equivalent of a shrug from your server. It’s a general-purpose error message indicating that the server encountered something unexpected that prevented it from fulfilling the request. This error is particularly tricky because it’s a catch-all response for when the server knows something is wrong but can’t specify what exactly.
Error variations
Depending on the web server, operating system, browser, or even the specific circumstances of the error, the 500 Internal Server Error can appear in various guises. Some of its common incarnations include:
- 500 Internal Server Error
- HTTP 500
- Internal Server Error
- HTTP 500 – Internal Server Error
- 500 Error
- HTTP Error 500
- 500 – Internal Server Error
In IIS 7.0 (Windows) or higher servers, you might see even more specific variations, like:
- 500.0 – Module or ISAPI error occurred.
- 500.13 – Web server is too busy.
- 500.100 – Internal ASP error.
… and so forth.
Reasons behind the error
A 500 Internal Server Error can stem from numerous issues, often related to the server-side infrastructure of a website. Common causes include:
Browser cache: Outdated or corrupted files in your browser cache.
Database issues: Incorrect database login credentials or a corrupted database.
File corruption: This could be within your WordPress installation, the .htaccess file, or PHP files.
Server limitations: Issues like an exhausted PHP memory limit or a busy server.
Permissions and script errors: Incorrect file/folder permissions or errors in CGI/Perl scripts.
Third-party plugins/themes: These can sometimes introduce conflicts or errors.
500 error’s impact on SEO
While temporary 500 errors (lasting a few minutes) are usually not a problem for SEO, extended downtimes can signal Google and other search engines that there’s a significant issue with your website. This can potentially harm your search rankings if not addressed promptly.
Say goodbye to website errors
Achieve peace of mind with 99.99% uptime on 10Web Managed
WordPress Hosting, powered by Google Cloud.
Resolving the 500 internal server error
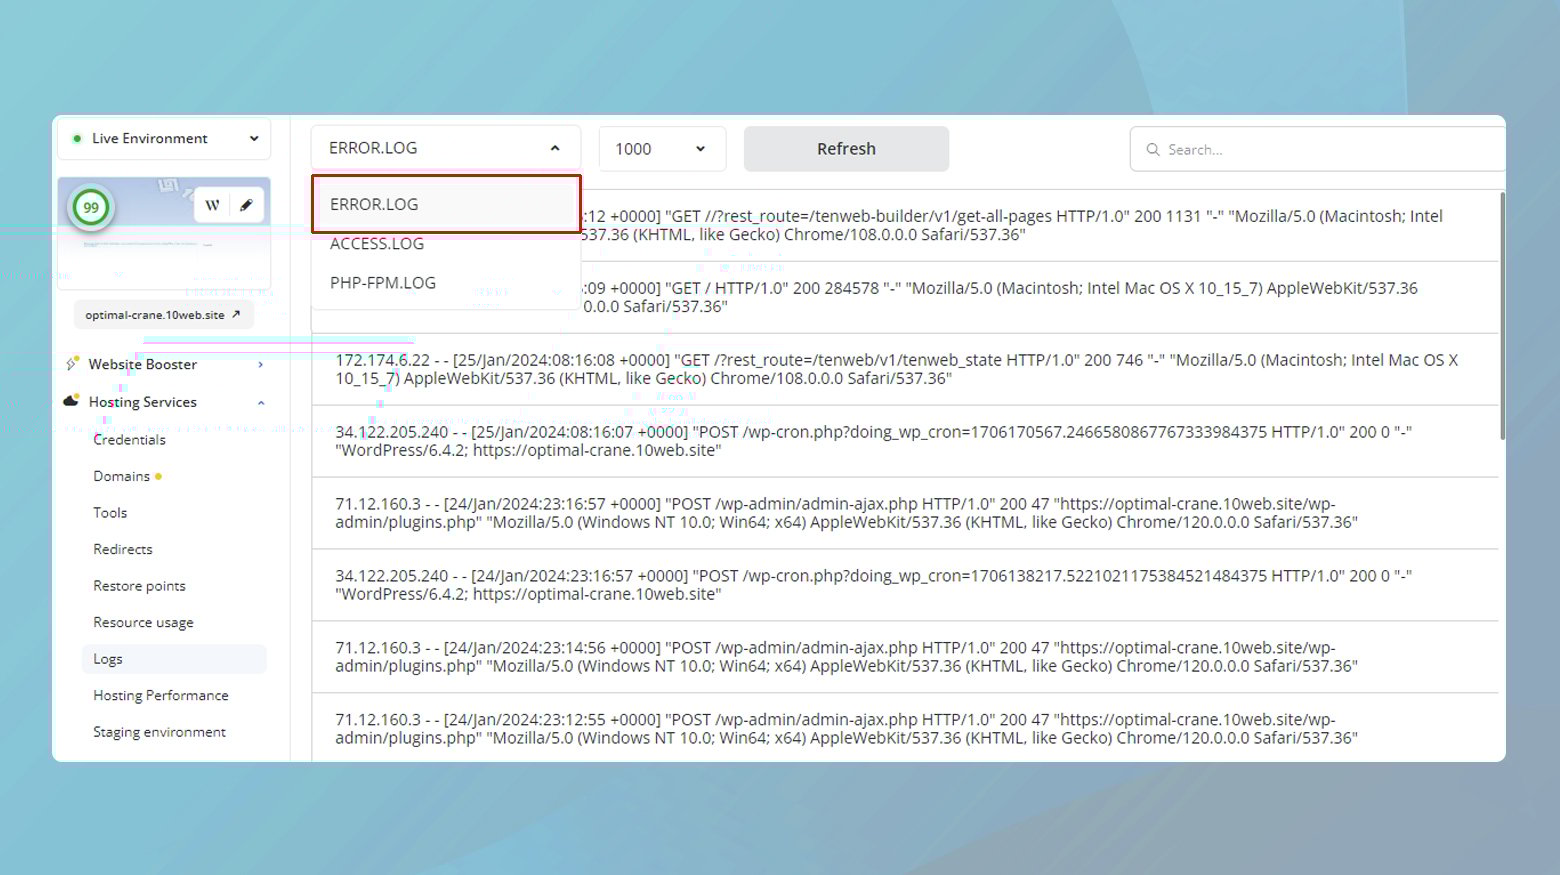
Check server logs
Server logs are like a flight recorder (“black box”) in an airplane. Just as the flight recorder provides crucial information about the moments before an incident, server logs chronicle detailed events on your server, including errors and system messages. By examining these logs, you can pinpoint the root cause of the 500 Internal Server Error. This process is critical because it offers direct insights into what the server was processing at the time of the error, which might include script failures, resource overloads, or configuration issues. Essentially, server logs are the first and most reliable source of information to diagnose the internal workings of your server at the time of the error. Here is what to do:
- Log into your hosting account and access the control panel.
- If your website is hosted at 10Web, you can access your server logs from your 10Web dashboard.
- Locate and open the ‘Logs’ section, typically named ‘Error Logs’ or ‘Server Logs’.
- Review the logs for entries corresponding to the time of the error.
- Analyze these entries to identify specific error messages or patterns.
Clear browser cache
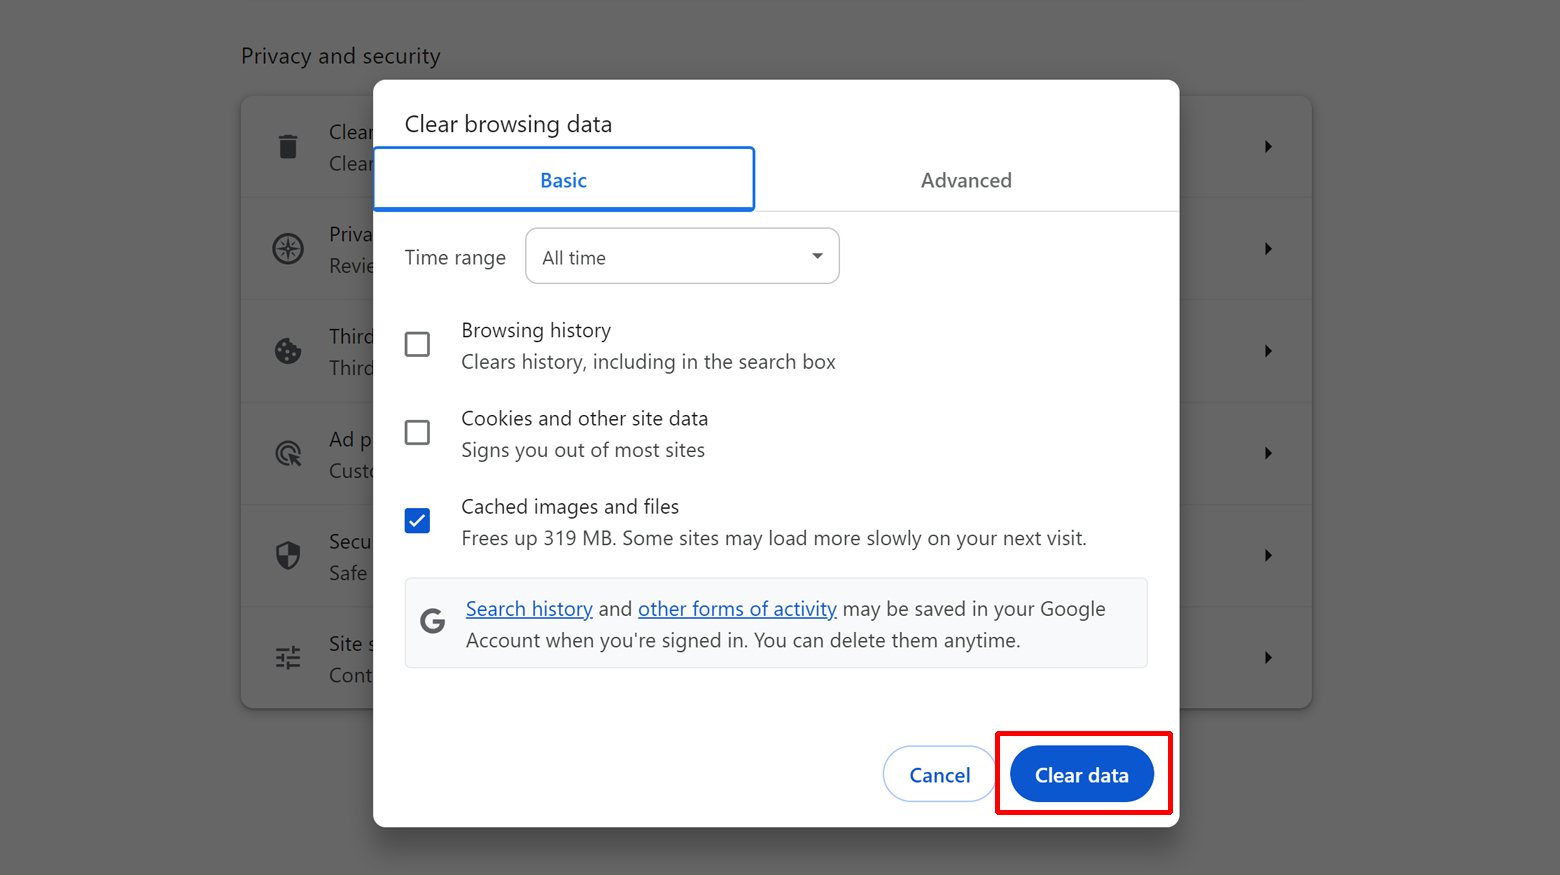
Clearing the browser cache is like resetting the memory of your browser. The cache is a storage area for data that your browser uses to quickly load previously visited websites. However, over time, this data can become outdated or corrupt, which can cause issues like the 500 Internal Server Error. By clearing the cache, you eliminate these potentially problematic data, ensuring that your browser is loading the most current version of the website. This is analogous to clearing a cluttered desk to ensure all documents are current and relevant, thus avoiding the confusion of outdated information. To clear your browser cache:
- Open your browser (e.g., Chrome, Firefox, Safari).
- Go to the settings or options menu.
- Navigate to the privacy or history settings.
- Select ‘Clear browsing data’ or a similar option.
- Choose to clear cache and cookies, and select the appropriate time range.
- Confirm to clear the data.
Deactivate plugins and themes
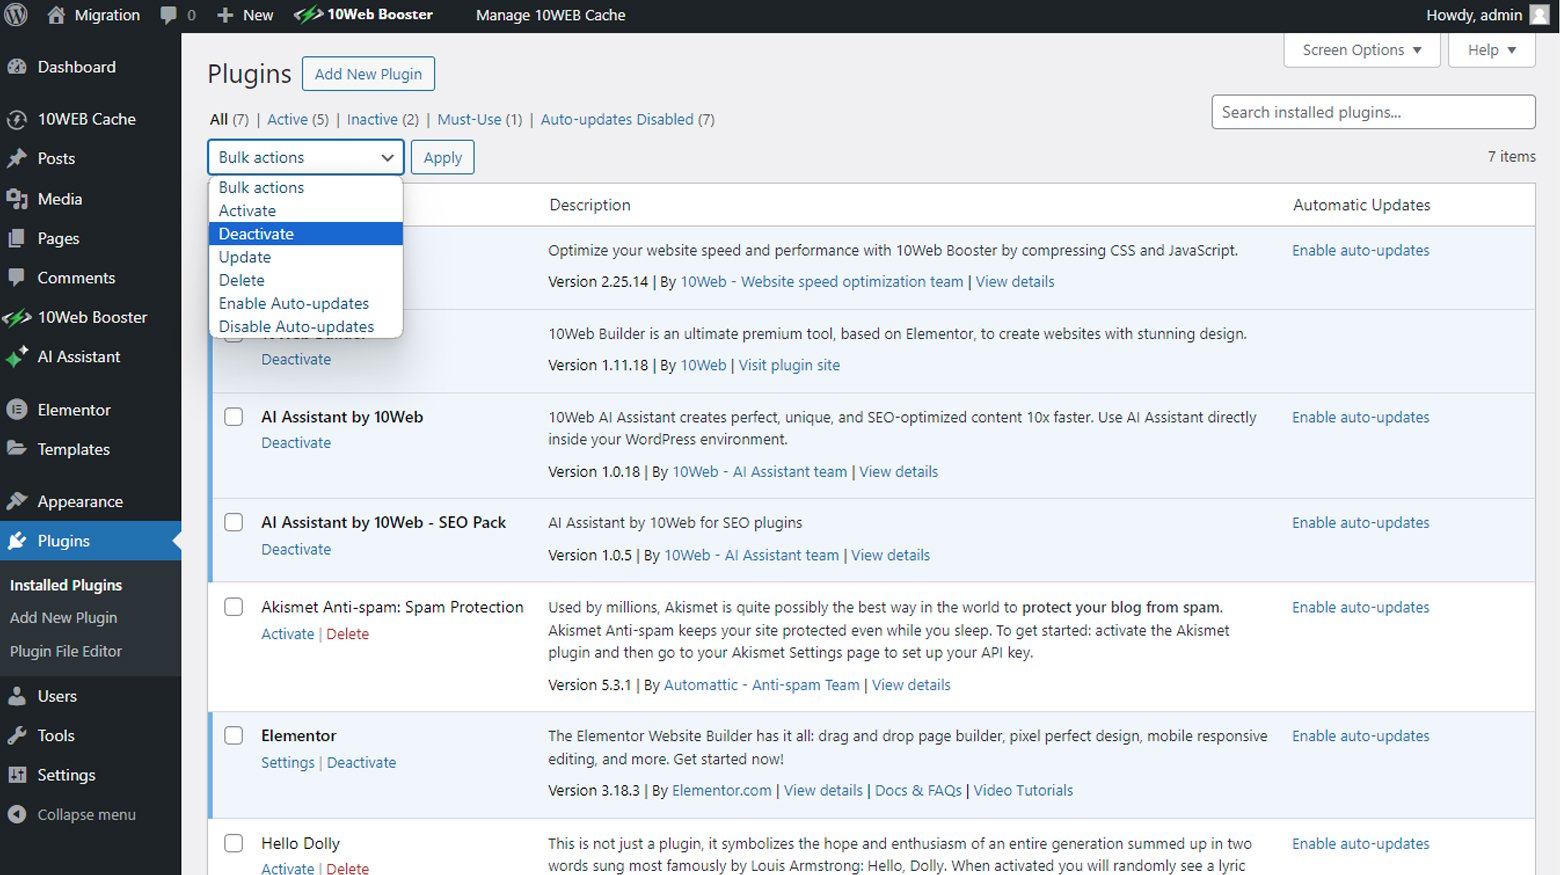
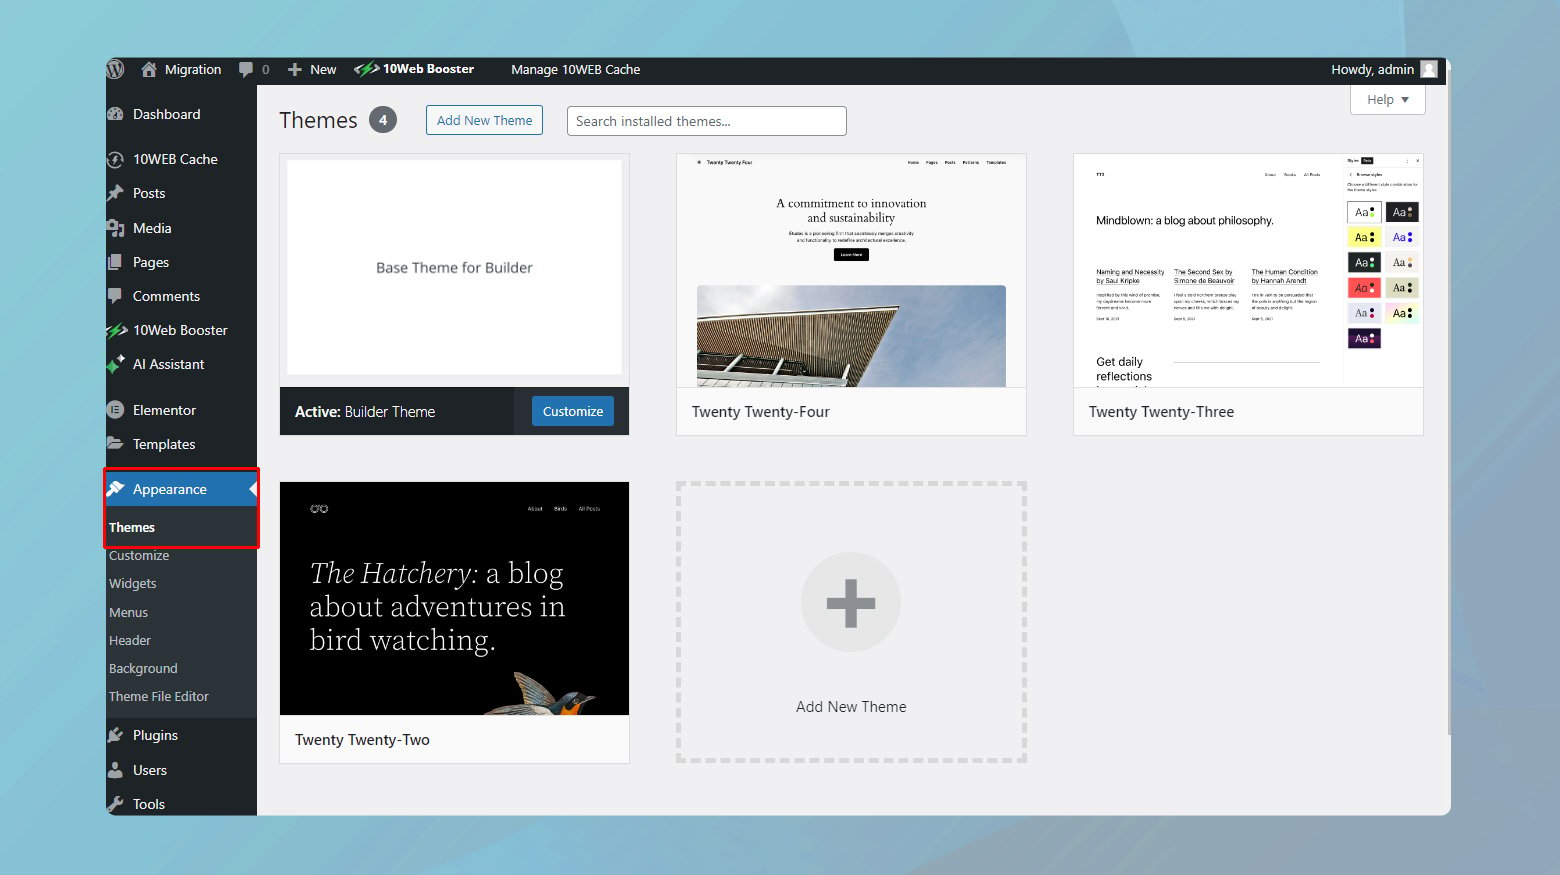
Deactivating plugins and themes can be compared to troubleshooting a complex electrical circuit by removing one component at a time. Plugins and themes can sometimes conflict with each other or with the core website software, leading to errors like the 500 Internal Server Error. By deactivating them, you can isolate the problem, much like a technician testing each part of an electrical setup to identify the faulty component. This step-by-step isolation helps in identifying whether a specific plugin or theme is causing the problem, allowing you to take corrective action. To deactivate plugins and themes:
-
- Log into your WordPress dashboard.
- Navigate to the ‘Plugins’ section and deactivate all plugins.
- Switch to a default theme by going to ‘Appearance > Themes’.
 After each deactivation, check your site for the error. Reactivate each plugin and theme one by one to pinpoint the problematic one.
Reinstall WordPress core
Reinstalling the WordPress core is like resetting the operating system of your website. It’s highly effective because it replaces all the core files of WordPress, which might have become corrupted or modified unintentionally. Corruption can occur due to various reasons like failed updates, malicious attacks, or inadvertent file modifications. This step ensures that the foundation of your WordPress site is solid and error-free. It’s akin to reinstalling the operating system on a computer to fix persistent system errors. By reinstalling, you’re essentially starting fresh with the core software while retaining your themes, plugins, and content. To reinstall WordPress core using FTP: Before making any changes, ensure you have a complete backup of your website. This includes your database and all website files.
-
- Go to WordPress.org and download the latest version of WordPress.
- Use an FTP client like FileZilla to access your site’s server. FTP credentials can usually be found in your hosting account.
- On the server, navigate to the root directory of your WordPress installation.
- Delete all files and folders except for `wp-content`, and the `wp-config.php` file. Do not delete the `wp-content` folder as it contains your themes, plugins, and uploads.
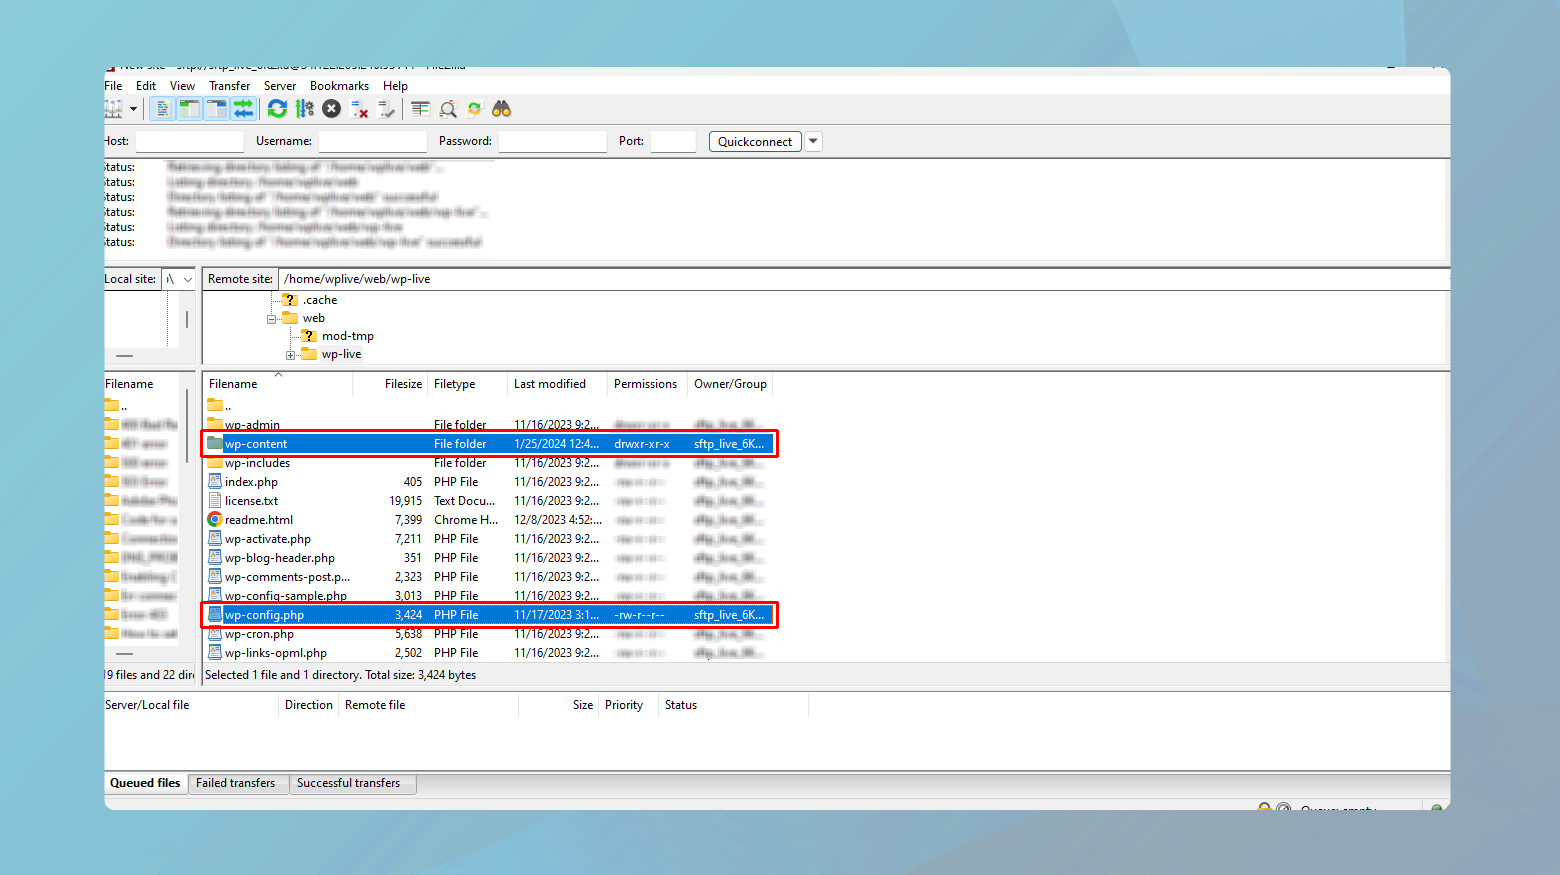
- Unzip the downloaded WordPress file on your local machine.
- Upload the new WordPress files from your local machine to your website’s root directory via FTP, except for the `wp-content` folder.
- Ensure that the `wp-config.php` file remains intact since it contains important configuration information.
- Once all files are uploaded, access your website. WordPress might prompt you to update your database.
After the update is complete, check your website to see if the issue is resolved.
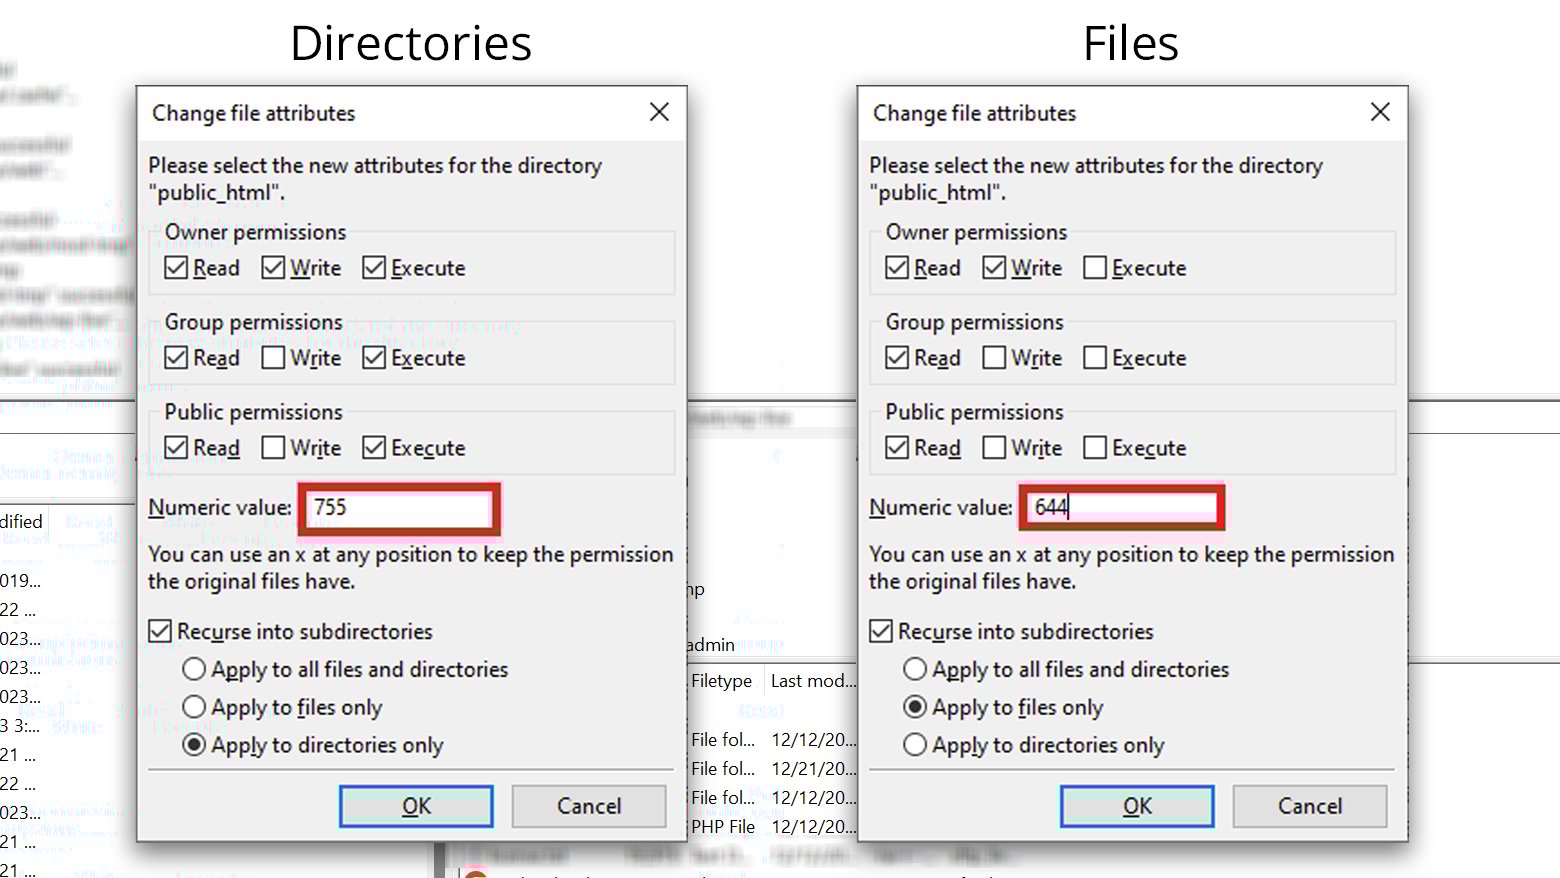
Check file permissions
File permissions dictate who can read, write, or execute files on your server. Incorrect permissions can be likened to having the wrong keys for different doors – you either can’t access what you need or can’t secure it properly. Ensuring correct permissions is essential for the smooth operation of your website. It prevents unauthorized access while allowing your server to interact with files as needed, reducing the risk of a 500 Internal Server Error which could be caused by the server being denied access to critical files. To check permissions:
- Connect to your server using an FTP client like FileZilla.
- Navigate to your root directory (usually `public_html` or `www`).
- Right-click on files and folders and select ‘File permissions’.
- Set permissions to 755 for directories and 644 for files.
- Apply these permissions and check if the error resolves.
Review the .htaccess file
The `.htaccess` file acts like the director of traffic in your website’s server, managing how requests are handled. A corrupted `.htaccess` file can misdirect or block this traffic, leading to a 500 error. Renaming this file is like temporarily removing a potentially faulty traffic signal to see if traffic flow (web requests) improves. If your site works after renaming, it indicates the issue was with the `.htaccess` file, and a new, error-free version should be created. Here is what to do:
- Use an FTP client to access your server.
- Locate the `.htaccess` file in the root directory of your site.
- Rename this file to something like `.htaccess_old`.
- Check your website. If it works, the issue was with this file.
- To create a new `.htaccess` file, in WordPress, go to ‘Settings’ > ‘Permalinks’ and click ‘Save Changes’.
PHP version incompatibility
Addressing an incompatible PHP version to resolve a 500 Internal Server Error is similar to ensuring a software application is compatible with your computer’s operating system. Just as certain applications require specific versions of macOS or Windows to function correctly, web applications like WordPress need a compatible PHP version for optimal operation. An incompatible PHP version can lead to errors and malfunctions, much like trying to run a modern app on an outdated operating system. Aligning the PHP version with your website’s requirements ensures smooth communication between your site and the server, preventing errors related to incompatibility. To start, review the documentation of your CMS, themes, and plugins to determine the recommended PHP version. Once you have determined the version you need:
- Create a file named `phpinfo.php` with the content `<?php phpinfo(); ?>`.
- Upload it to your website’s root directory using an FTP client.
- Visit `yourdomain.com/phpinfo.php` in a browser to see the current PHP version.
- Log into your hosting control panel, such as cPanel or Plesk.
- Find a section named ‘PHP Version Manager’, ‘Select PHP Version’, or similar.
- Choose a PHP version that matches your website’s requirements.
- If unsure, incrementally update to a version slightly higher than the current one.
- Save the changes and wait for them to take effect.
- Refresh your website to check if the error is resolved.
After the update, navigate through your website to check all functionalities. Pay close attention to dynamic features and components. For websites hosted on 10Web, you can view and change you PHP version from your 10Web dashboard.
Increase PHP memory limit
The PHP memory limit is like the RAM in a computer – it’s the amount of memory that PHP processes are allowed to use. If your website requires more memory than this limit, it can result in a 500 error, much like a computer freezing when it runs out of RAM. Increasing this limit provides more ‘breathing space’ for your site’s processes, potentially resolving the error. If you have a hosted site on 10Web, you can increase your site’s limitations in the 10Web dashboard. 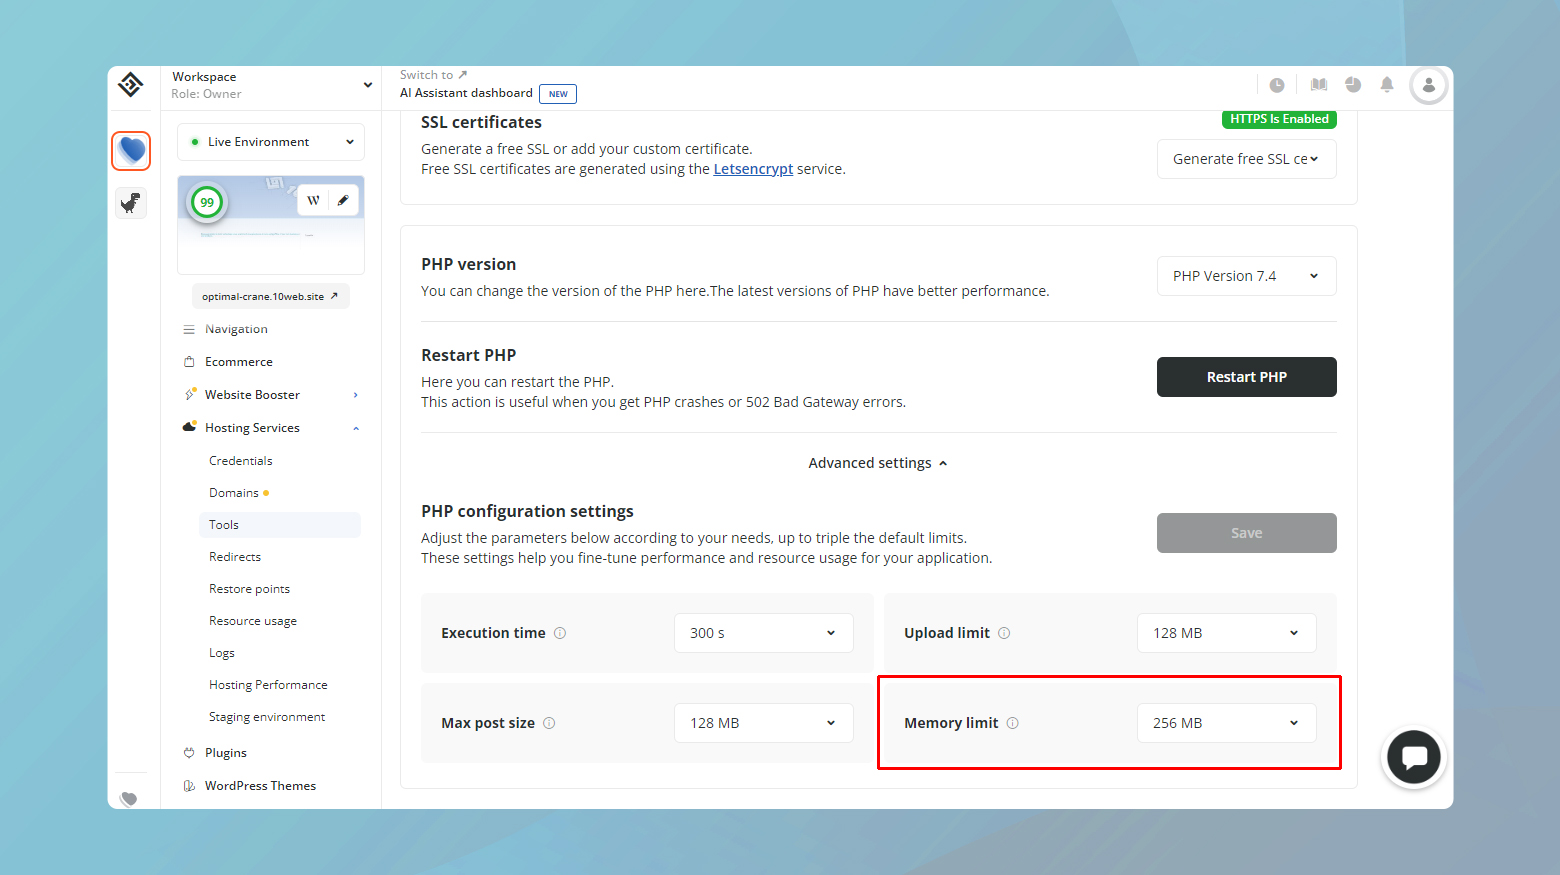
To customize using FTP:
- Edit the `wp-config.php` file, which can be accessed via FTP.
- Add the line `define(‘WP_MEMORY_LIMIT’, ‘256M’);` to increase the limit.
- Save the file and re-upload it if necessary.
- Check your website to see if the error is resolved.
Consult with hosting provider
Sometimes, the issue causing a 500 Internal Server Error may be beyond your immediate control and lies within the server or hosting infrastructure. Consulting with your hosting provider is like calling in a specialist when you’ve exhausted your knowledge. They have deeper insights into their systems and can often identify and resolve issues that are not apparent to the site owner.
Long-term solutions
Regular Maintenance: Regularly updating and maintaining your site is like regular health check-ups; it prevents many potential issues from turning serious.
Optimize database: Keeping your database optimized is akin to keeping your files organized; it helps in maintaining performance and avoiding data-related issues.
Use reliable plugins/themes: Choose well-coded, frequently updated plugins and themes to ensure its smooth operation.
Implement monitoring tools: Use tools to monitor your site’s health regularly, similar to having a security system in place for early detection of potential issues.
Regular backups: Ensure you have a recent backup of your site, akin to having insurance, so you can restore your site quickly in case of major issues.
Conclusion
Resolving a 500 Internal Server Error on your website involves a combination of immediate troubleshooting steps and long-term preventive measures. Understanding the technical rationale behind each step aids in effectively addressing the root causes of the error. Regular maintenance and proactive monitoring are key to minimizing the chances of such errors occurring, ensuring a smooth and reliable experience for both site owners and visitors.
Say goodbye to website errors
Achieve peace of mind with 99.99% uptime on 10Web Managed
WordPress Hosting, powered by Google Cloud.
Say goodbye to website errors
Fix all the website errors in one click
Migrate your website to the world's best Managed WordPress Hosting.