When managing a WordPress website, you may need to move content from one place to another. Whether it’s for transferring to a new host, backing up your site, or archiving data, exporting your WordPress site effectively is important. Exporting is the process of downloading your site’s content, including posts, pages, comments, and media, into a single file that can be transferred as needed. If you are wondering how to download the WordPress site, keep reading.
The process might seem intuitive, but you need a structured, step-by-step approach. In this guide, we will discuss how to export WordPress site effectively. To ensure smooth transitions and avoid data loss, it’s important to familiarize yourself with the available options and prepare accordingly for an export that suits your WordPress site’s requirements.
FAQ
Is it possible to export a WordPress site's content to HTML format?
How do I copy my WordPress site to another website?
How do I export a WordPress site without plugins?
How do I extract a WordPress file?
How do I export my WordPress site to local?
Preparing to export your WordPress site
Before initiating the export process of your WordPress site, it’s critical to decide on the content to export, ensure that you’ve created a backup, and verify the compatibility of your WordPress version. These preparatory steps are the foundation leading to the answers to how to export WordPress site.
Choose what to export
Your WordPress site comprises various elements: posts, pages, comments, custom fields, categories, and tags. Additionally, it might contain media files and themes. In your WordPress admin area, visit Tools > Export to choose the All Content option if you aim to export everything. On the other hand, should you wish to download specific components, such as media or posts from a particular category, you can select them individually in this section.
Create a backup
When learning how to download WordPress site, creating a backup is a non-negotiable step of the process. A backup acts as a safety net in case of data loss during the transition. Use tools that can aid in making real-time backups of your website.
If you are a 10Web user, you can backup your site by accessing the 10Web dashboard > backups > backup now.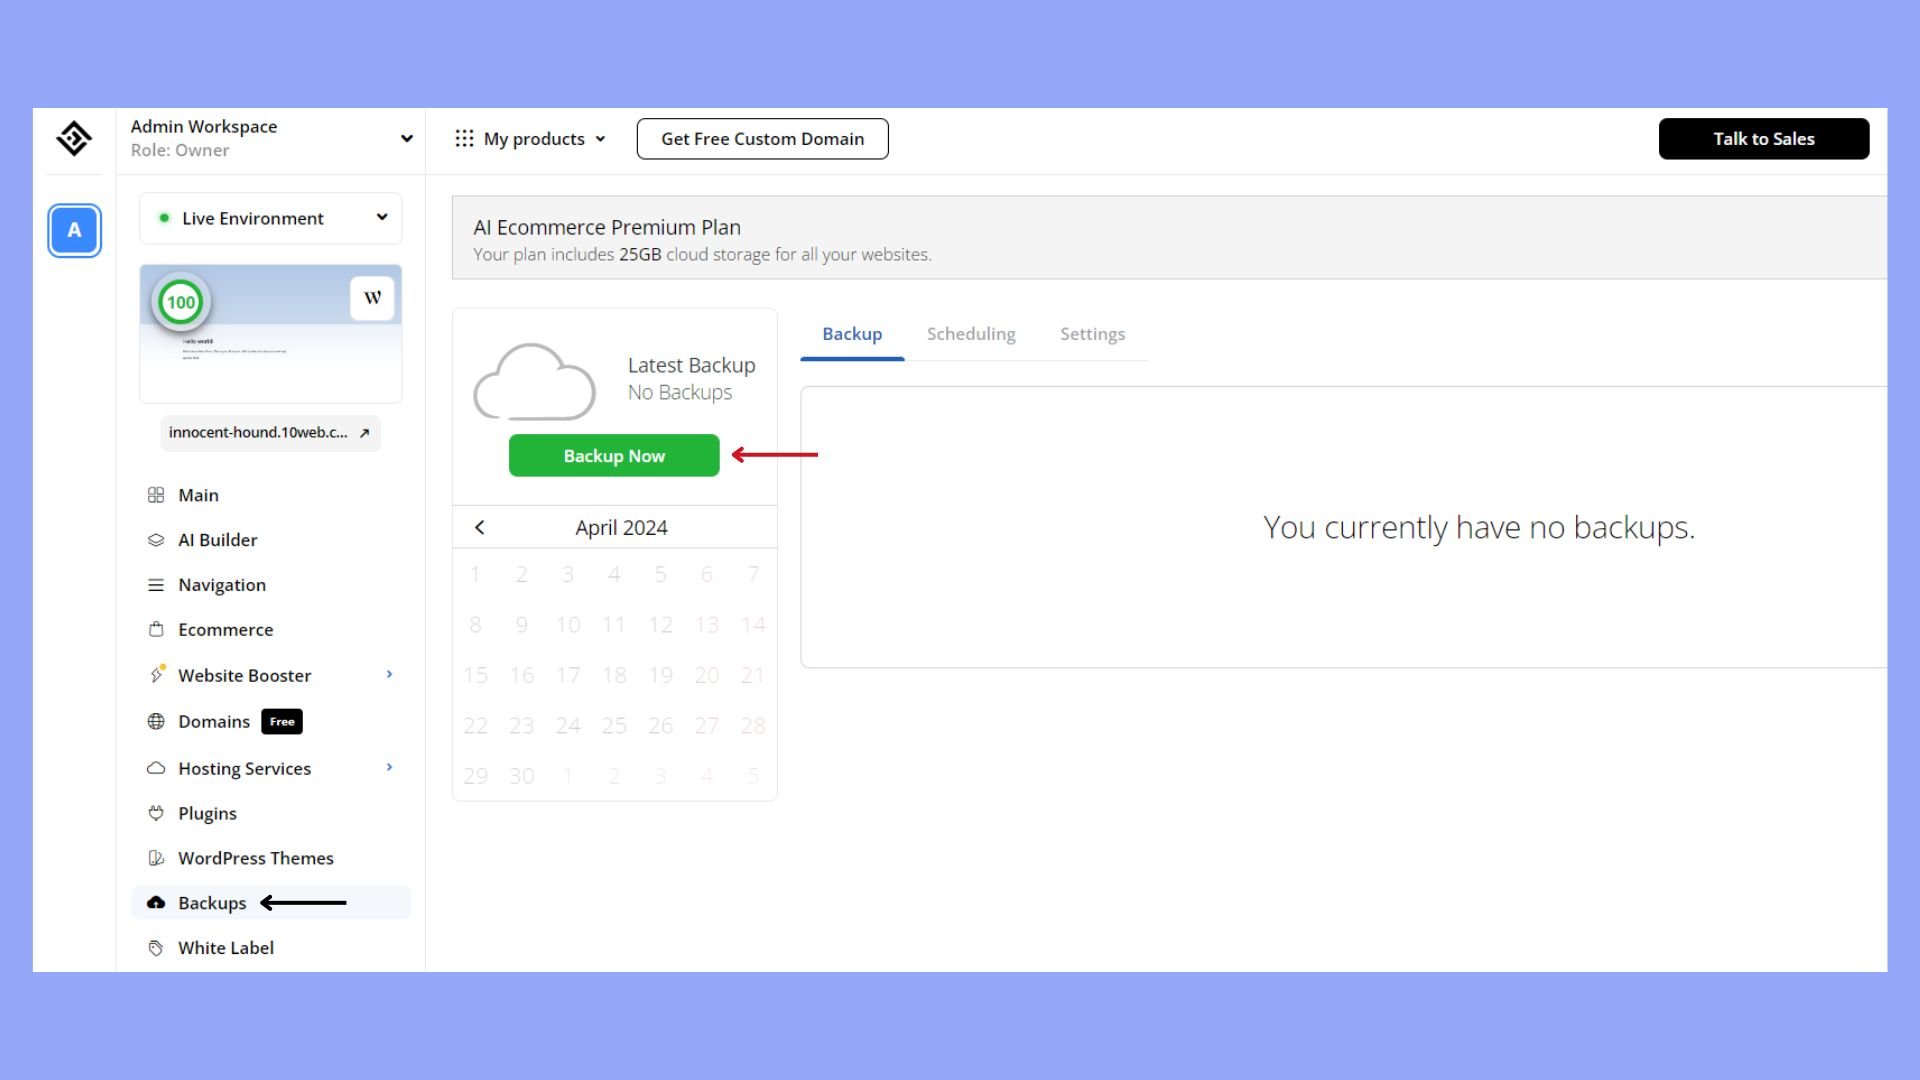
The backup should include your website’s database, media files, themes, and plugins. Ensure that the backup is stored in a secure location, such as a remote cloud service or an external hard drive.
Simplify WordPress with 10Web
Automate manual work with 10Web Managed WordPress Hosting and 10Web AI Website Builder. Optimize your WordPress website effortlessly.
Check WordPress compatibility
Ensure that the WordPress version on the destination site is compatible with your current site, especially if you’re moving between WordPress.com and WordPress.org platforms. This check is to prevent any compatibility issues post-export. If you’re exporting to a different hosting provider, verify that they support the version of WordPress you’re currently using, along with the themes and plugins that are integral to your site’s functionality.
How to export WordPress site: methods
When deciding to export your WordPress site, you have several approaches to consider. Each method has its own benefits, depending on your needs for migration or backup. Let’s learn how to export WordPress site in 3 methods.
Method 1: Using WordPress built-in tools
Within your WordPress dashboard, go to Tools > Export where you’ll find the option to download your site’s content as an XML file. This option is ideal if you intend to export posts, pages, and media. The XML file contains all the necessary configurations and content links, ensuring that your images and other media are properly mapped to their respective posts or pages when you set up your content on another site.
Pro Tip: Exporting only specific content can be useful if you’re looking to transfer or back up individual sections of your website, like just your images or links, instead of the entire site.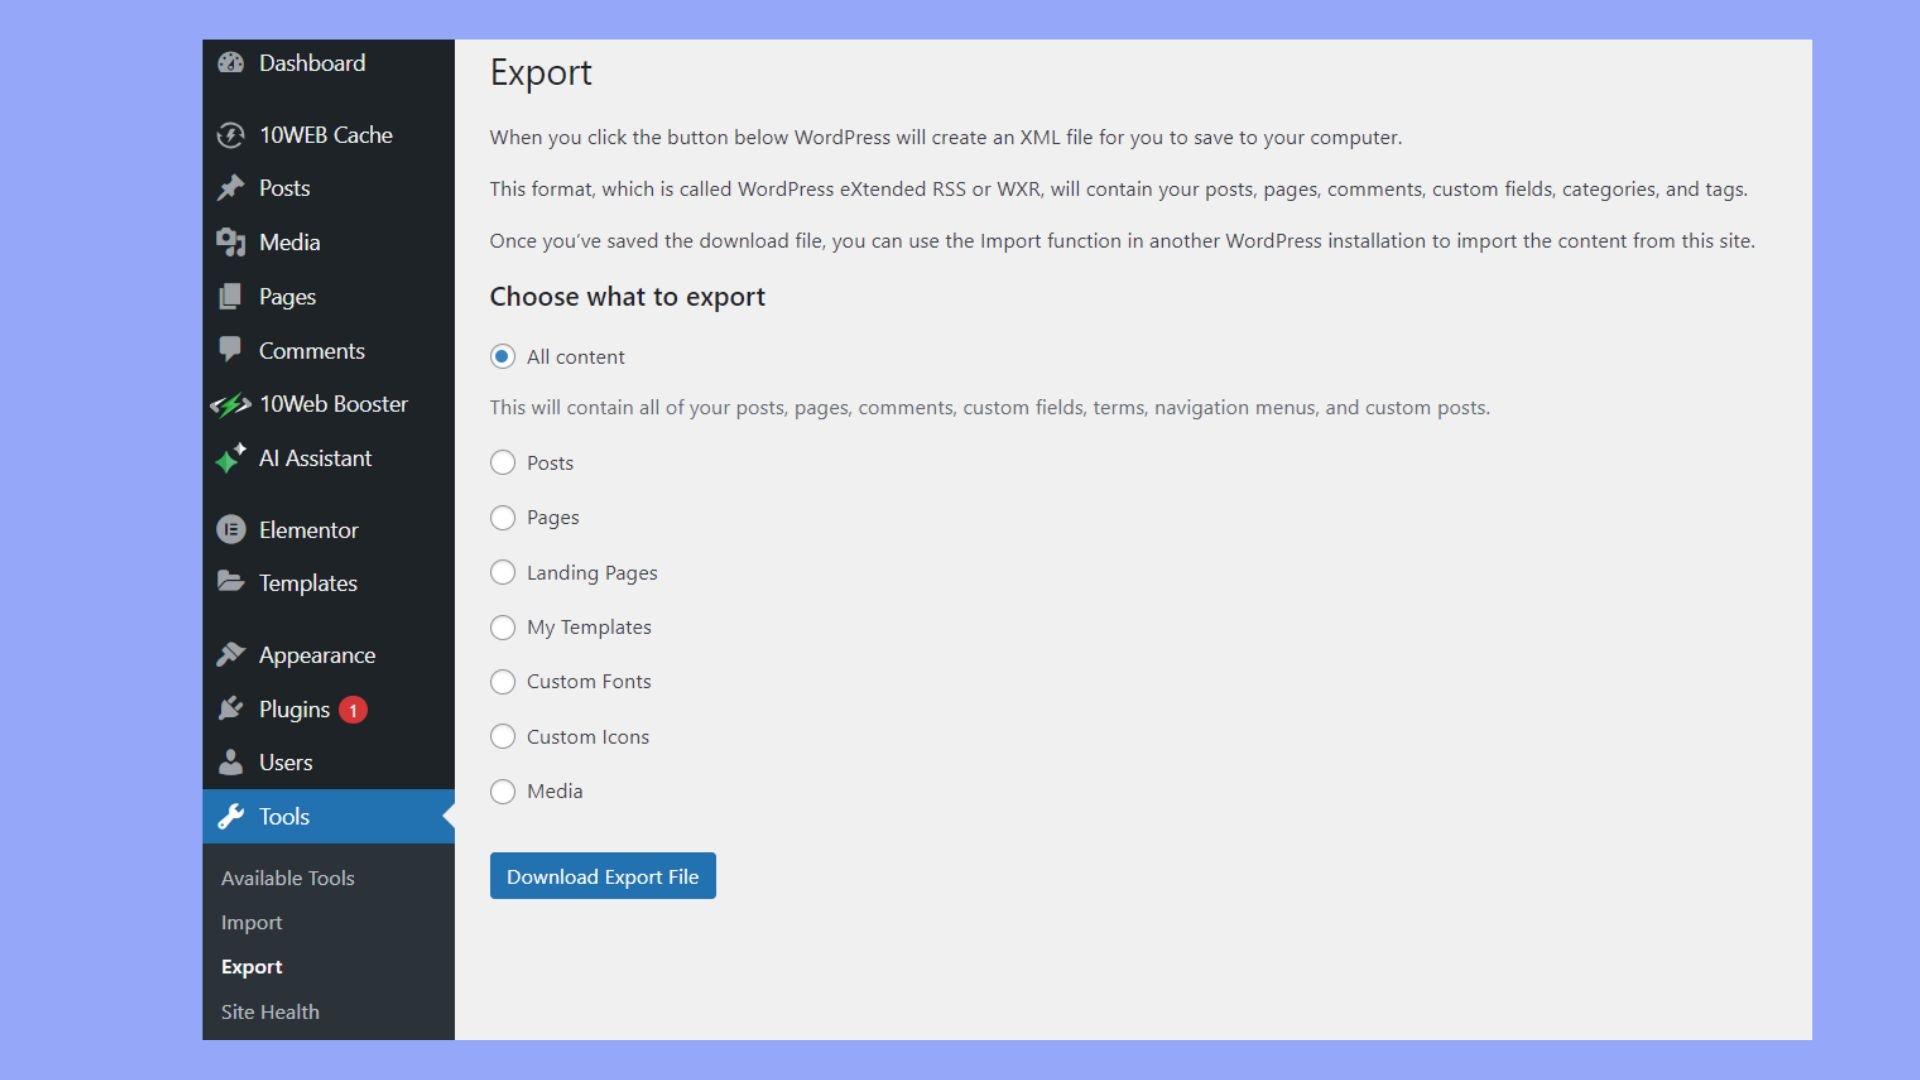
Method 2: Manual export via FTP and phpMyAdmin
When you need to back up or migrate your WordPress site, exporting the database is an essential step. It contains all your site’s content and information, so it’s crucial to do it correctly. This comprehensive backup includes your themes, plugins, and the entire site structure.
Step 1: Connect via FTP
- Install an FTP client.
- Go to your 10Web dashboard and retrieve your FTP credentials. Or get it from your hosting provider, if different.

- Enter your credentials in the FTP client and connect.
- Go to your site’s root directory (usually public_html), find the wp-content folder, and download it. This folder contains your themes, plugins, and media files.

Step 2: Export your database via phpMyAdmin
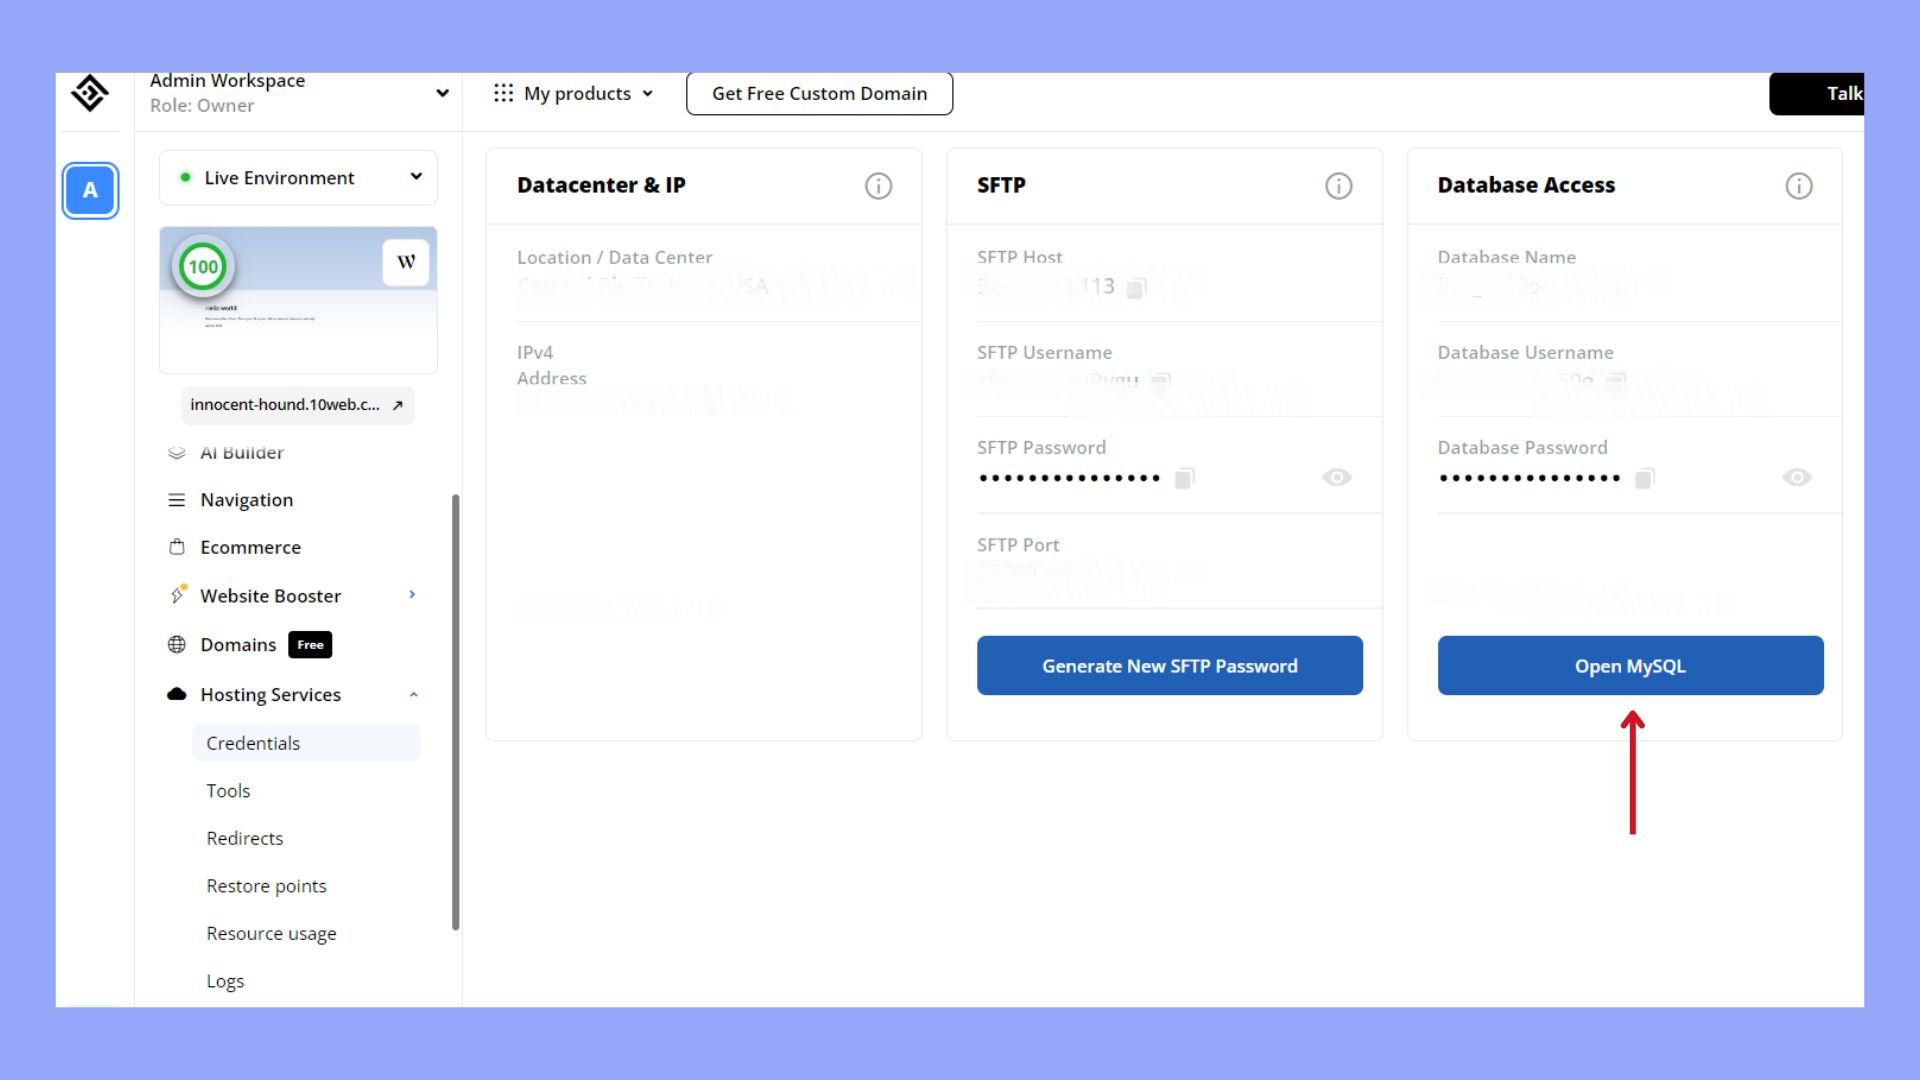
- Log into your 10Web dashboard (or hosting control panel if different) and open phpMyAdmin.
- Choose the database that your WordPress site uses from the list.
- Go to the Export tab > select the Quick export method, and the SQL format > Go. This will download the SQL file containing your site’s data.
Simplify WordPress with 10Web
Automate manual work with 10Web Managed WordPress Hosting and 10Web AI Website Builder. Optimize your WordPress website effortlessly.
Method 3: Use plugins
For a more streamlined backup process or when migrating your site, consider utilizing plugins. These backups include the database, themes, and plugins and are highly effective for moving to a new host. After installing and activating a plugin like WP Migrate DB, navigate to the plugin’s settings in your WordPress dashboard. You can select specific tables to export or include media files. The plugin generates an export file that you can download directly to your computer.
How to handle media files and uploads
Now that you have learned how to export WordPress site, it’s worth discussing how to handle media files and uploads. When you migrate a WordPress site, handling media files and uploads is an important component. It’s essential to preserve the integrity of your media library, which contains images, videos, and other files that enhance your content.
Method 1: Migrating media manually
If you prefer a hands-on approach, manually migrating your media files is achievable via FTP (File Transfer Protocol) or SFTP (Secure File Transfer Protocol).
Get an FTP client
- Open your FTP client and connect to your hosting account.
- Navigate to the public_html/wp-content/uploads.
- Download the entire uploads directory to your computer.
- Upload this directory to the new hosting environment’s corresponding uploads directory.
Method 2: Automation with plugins
Alternatively, you can automate the process using a dedicated plugin, which substantially simplifies the migration. Plugins like All-in-One WP Migration can handle the heavy lifting for you. After installing the plugin:
- Go to the WordPress dashboard.
- Click on Tools > Export.
- Choose the Media option to export just the media library.
Plugins may offer the option to select a date range for the media files to be exported. By employing a plugin, you can ensure that all media files are correctly transferred with their associated metadata, such as dates, names, and descriptions, fully intact.
Themes and plugins migration
After learning how to export WordPress site properly comes the migrating process. At this stage, it is crucial to ensure that all your themes and plugins are transferred accurately. This step is essential for maintaining the look and functionality of your site at the new location.
Migrating themes
To migrate your themes, you’ll want to use a reliable migration plugin such as the All-in-One WP Migration to handle the transfer smoothly. First, ensure that the theme you wish to transport is active. You can then use the plugin to export an entire website with, including your theme and related files. Keep in mind that any customizations made directly to theme files will need special attention during the migration process to ensure they are preserved.
Migrating plugins
When relocating your plugins, the process is similar to themes. Using the same migration plugin, you can copy your plugins, their settings, and data. Select the plugins you need to move, and the migration tool will encapsulate them into the migration package. It’s crucial to check each plugin post-migration to ensure proper functionality.
Transferring to a new host
When moving your WordPress site, selecting the right hosting provider, handling domain name transfer, and changing DNS settings are crucial for a smooth transition. If you want an all-in-one solution and managed hosting for your new hosting provider, you can check out 10Web.
Select a new hosting provider
When selecting a new hosting provider for your WordPress site, it’s crucial to choose one that fulfills your specific needs. Consider a host like 10Web, which offers robust features tailored for WordPress users. These include AI-powered website-building tools, strong customer support, and scalable resources to support your site as it grows. This approach ensures a smooth operation and future expansion capabilities for your WordPress website.
Consider a domain name
Keep your domain name consistent to maintain brand identity and SEO rankings. When transferring to a new server, you can transfer the domain to your new host or keep it registered with the original provider, pointing it to the new host servers. This decision may hinge on factors like pricing, convenience, and any bundled services offered by your hosting providers.
Change DNS settings
After acquiring your new host service, update your Domain Name System (DNS) settings to reflect your new server’s IP address. This process ensures that visitors are directed to your newly hosted WordPress site. You will modify the DNS records, typically A records and possibly MX records if you have email services through your domain, to point to the hosting provider’s servers. It can take up to 48 hours for these changes to propagate fully across the internet.
Configuring the new environment
Before you begin to work with your new website, it’s vital to correctly set up your hosting environment to ensure a smooth transition. This involves configuring critical files and settings related to the WordPress installation.
Modify the wp-config.php
Your wp-config.php file contains the essential configuration details for your WordPress site. Find this file in the root folder and update the database connection details—database name, user, password, and host. Be careful to input the correct information to avoid connection issues.
Here is an example of database settings in wp-config.php:
define('DB_NAME', 'your_new_database_name');

define('DB_USER', 'your_new_database_username');

define('DB_PASSWORD', 'your_new_database_password');

define('DB_HOST', 'localhost');

Set up the database
In your host provider’s dashboard, go to MySQL Databases to create a new database for your WordPress installation. Create a user and assign it to the database with full permissions. After importing your WordPress data, ensure your wp-content folder and other WordPress files are uploaded to the new host’s root directory.
Simplify WordPress with 10Web
Automate manual work with 10Web Managed WordPress Hosting and 10Web AI Website Builder. Optimize your WordPress website effortlessly.
Adjusting for a new domain
If your domain name has changed with the move to a new host, you’ll need to update your wp-config.php or run a search and replace it in your database. This ensures that all links and references to media files within your wp-content directory are functioning correctly. Use a reliable plugin or script to replace the old domain with the new one across all database tables. Remember to clear your cache after making these changes for them to take effect immediately.
- Old Domain: oldsite.com
- New Domain: newsite.com
Importing to the new site
After exporting from your previous WordPress site, you’ll need to import the content and database to your new domain to ensure a successful migration.
Step 1: Import the content
- Go to the dashboard of your new site > Tools > Import in your WordPress admin area.
- Find the WordPress importer and install it if it’s not already available.
- Run the importer and upload the XML file you exported from your old site.
- Assign authors and decide whether to import attachments.
This should import all your posts, pages, comments, custom fields, categories, and tags.
Step 2: Import the database
- Access phpMyAdmin from your hosting provider’s dashboard.
- Select your new site’s database and click on the Import tab.
- Click on Choose File and select the SQL database file.
- Click Go to begin the upload process.
Your database will be imported, connecting all your site’s structure and settings with the content.
Step 3: Troubleshoot issues
While importing, you might encounter issues like file size limits or server timeouts. Here are fixes for common problems:
- File Size Limits: Increase the upload limit by adjusting your php.ini file or contact your hosting provider for assistance.
- Server Timeouts: Opt to import your content in smaller chunks if you face server timeout errors. Plugins can help break down your content into parts.
Post-export considerations
After successfully exporting your WordPress site, you need to ensure that the data transfer has been executed perfectly and that your site operates smoothly in the new environment.
Verify data integrity
To confirm that all your data made it through the export process unscathed, you should perform verification checks. This includes ensuring posts, pages, comments, custom fields, categories, and tags are present and accounted for. Start by comparing the number of entries in each category on your new site with the original. Look into each navigation menu to check if they mirror the ones on your old site. If discrepancies arise, you might need to re-export or manually adjust the missing elements.
Test site functionality
Once you’ve checked the data integrity, it’s time to ensure everything works as expected. Navigate through your site: click links, load images, post comments, and access the admin panel. Pay attention to the functionality of each page and whether any plugins or themes fail to operate. It’s important that categories and navigation menus not only exist but also link to the correct content. Correct any issues immediately to maintain a clean and professional site appearance.
Final thoughts
Exporting a WordPress site is essential know-how if you manage website backups, migrations, or archiving data effectively. Through a structured approach, as outlined in this guide, you can ensure that all aspects of your site are safely transitioned to a new environment or preserved for future needs. By thoroughly preparing for the export—selecting content, verifying compatibility, and securing backups—you safeguard against data loss and ensure a smooth process.
The variety of methods available for exporting a WordPress site—from using built-in tools for basic content to employing manual or plugin-based approaches for comprehensive backups—provides flexibility to handle different scenarios. Whichever way you choose to download your site, you now have a complete guide answering your questions on how to export WordPress site.
Simplify WordPress with 10Web
Simplify WordPress with 10Web
Skip and automate manual work with 10Web Managed WordPress Hosting and the 10Web AI Website Builder.