Installing WordPress plugins is a straightforward process that can greatly enhance the functionality of your WordPress site. Plugins extend the capabilities of your website by adding new features, improving performance, or even changing the way your site looks. Whether you want to add a contact form, improve SEO, or create a storefront, there’s a plugin for almost every need.
Plugins can be found and added from the WordPress Plugin Repository, which offers thousands of free options, or you can upload plugins manually if you’ve purchased or downloaded a premium plugin from a third-party developer.
FAQ
How do I add more plugins to WordPress?
In the WordPress dashboard, go to Plugins > Add New. Search for the plugin you want, and click Install Now. After installation, click Activate to start using the plugin.
Where are plugins installed in WordPress?
Plugins are installed in the wp-content/plugins directory of your WordPress installation.
How do I activate a plugin in WordPress?
Go to the Plugins section in your WordPress dashboard, find the plugin you want to activate, and click Activate next to it.
How do I access my WordPress plugins?
Access your plugins by navigating to the Plugins menu in your WordPress dashboard. Here you can manage, activate, deactivate, or delete your plugins.
Preparing to install WordPress plugins
Before you dive into adding new functionality to your WordPress site with plugins, it’s essential to ensure that everything is set up correctly to avoid potential issues down the line.
Understand plugin compatibility
It’s crucial that the plugins you’re considering are compatible with your version of WordPress. To check this, you can:
- Visit wordpress.org and look up the plugin.
- Check the Tested up to section to see if it matches your WordPress version.
Choose the right plugin for your needs
Finding the perfect plugin can be like searching for a needle in a haystack. Here’s how to refine your search:
- Define your requirements: Be clear about the features you need.
- Read reviews: Look for user feedback on the plugin’s page on WordPress.org or other forums.
- Performance: Consider how the plugin may affect your site’s speed.
Check WordPress hosting requirements
Your hosting provider plays a significant role in plugin installation. To ensure harmony between your plugins and hosting:
- PHP version: Confirm that your hosting supports the latest PHP version recommended by WordPress.
- Memory limit: Some plugins require more memory. Check the memory limit of your hosting plan.
- Server permissions: Ensure you have the necessary permissions to install plugins. This may differ between wordpress.com and self-hosted WordPress sites.
Simplify WordPress with 10Web
Automate manual work with 10Web Managed WordPress Hosting and 10Web AI Website Builder. Optimize your WordPress website effortlessly.
How to install WordPress plugins via search function
The WordPress dashboard simplifies the process of plugin installation. With just a few clicks, you can search, install, and activate plugins directly from your dashboard.
To locate a specific plugin or explore new plugins, use the Search function within your WordPress dashboard.
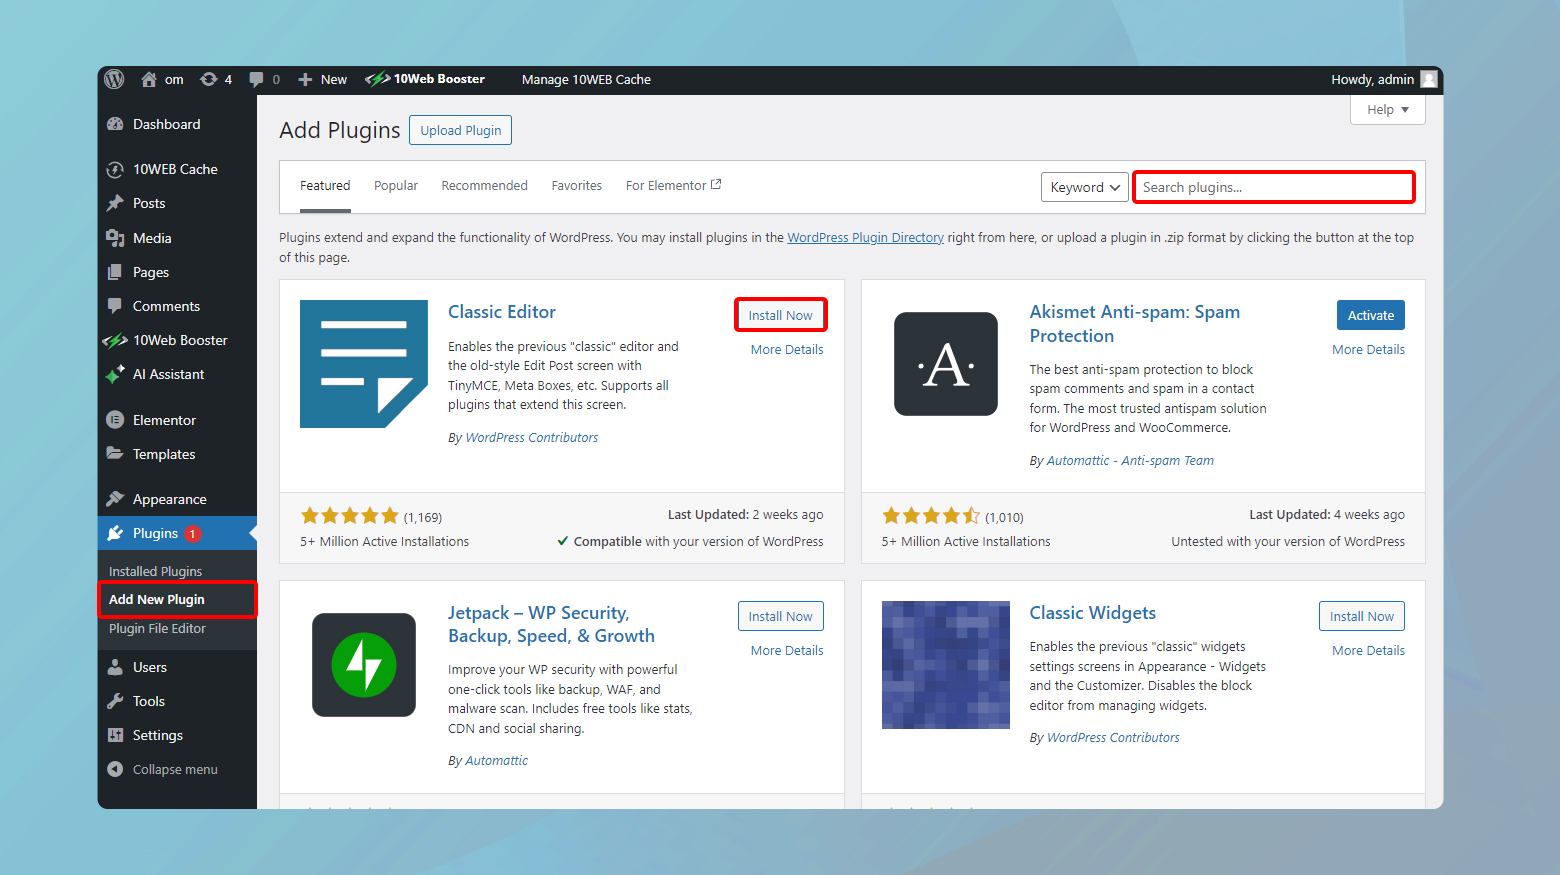
- Go to Plugins > Add New.
- Use the search box to find plugins by typing in keywords.
The search results will list plugins that match your query, allowing you to review them before installation.
Once you’ve found a plugin, you can install it directly from the dashboard.
- Click the Install Now button next to the plugin you want.
- WordPress will download and install the plugin for you.
After installation, the plugin is not yet live on your site. To activate it:
- Navigate to Plugins > Installed Plugins.
- Find your newly installed plugin and click on the Activate link beneath it.
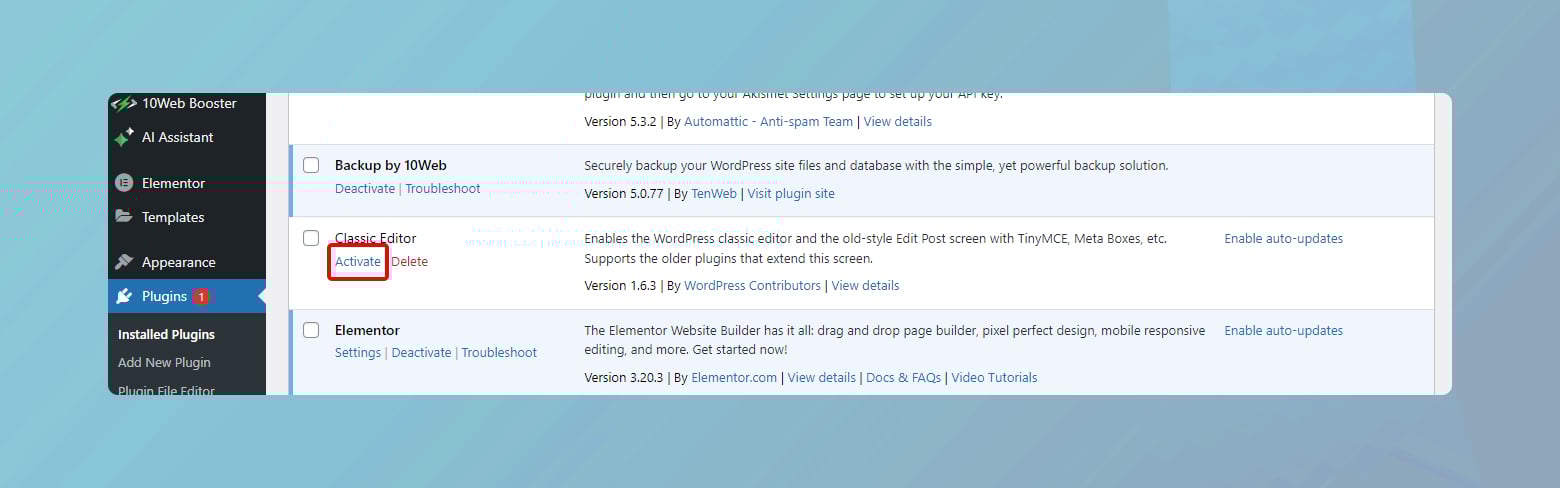
This will enable the plugin features on your WordPress site. Remember to configure any necessary settings within the plugin to tailor it to your needs.
How to install WordPress plugins via upload
Installing WordPress plugins via upload is a useful method when the plugin you want to use isn’t available in the WordPress plugin directory. This could be due to the plugin being a premium version, a custom-developed plugin, or simply not listed in the directory for various reasons. Let’s walk through the steps to upload and activate the plugin.
Download the plugin zip file
If you’ve purchased a premium WordPress plugin, you’ll need to download it:
- Navigate to the plugin vendor’s website.
- Log in to your account.
- Locate the plugin download link.
- Click the link to download the plugin zip file to your computer.
Make sure not to unzip the file, as WordPress requires the plugin to be uploaded in .zip format.
Upload and install from dashboard
To install the plugin from your WordPress dashboard:
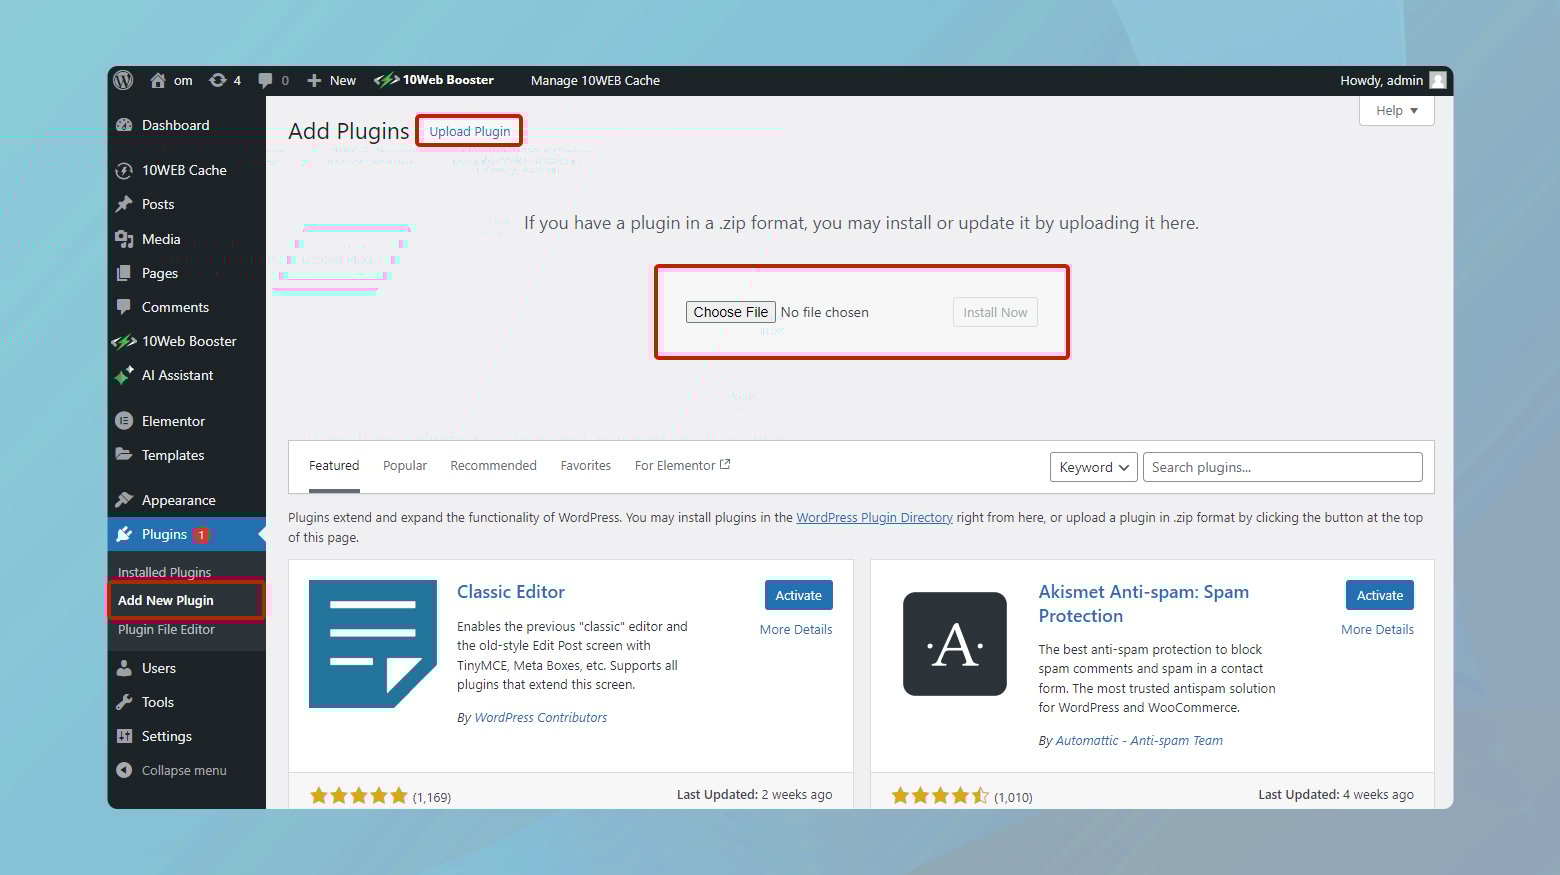
- Log in to your WordPress admin area.
- Go to Plugins > Add New.
- Click on the Upload Plugin button at the top of the page.
- Choose the plugin zip file from your computer and click Install Now.
- After the installation is complete, click Activate Plugin to start using your premium plugin on your site.
This method is straightforward and doesn’t require any additional tools.
Simplify WordPress with 10Web
Automate manual work with 10Web Managed WordPress Hosting and 10Web AI Website Builder. Optimize your WordPress website effortlessly.
Manual installation via FTP
If your server has restrictions that prevent direct uploads of plugins, or you prefer a manual approach, you can install your plugin via FTP (File Transfer Protocol):
- Extract the plugin zip file on your computer.
- Open your FTP client (like FileZilla) and connect to your web hosting account.
- Navigate to the wp-content/plugins directory on your server.
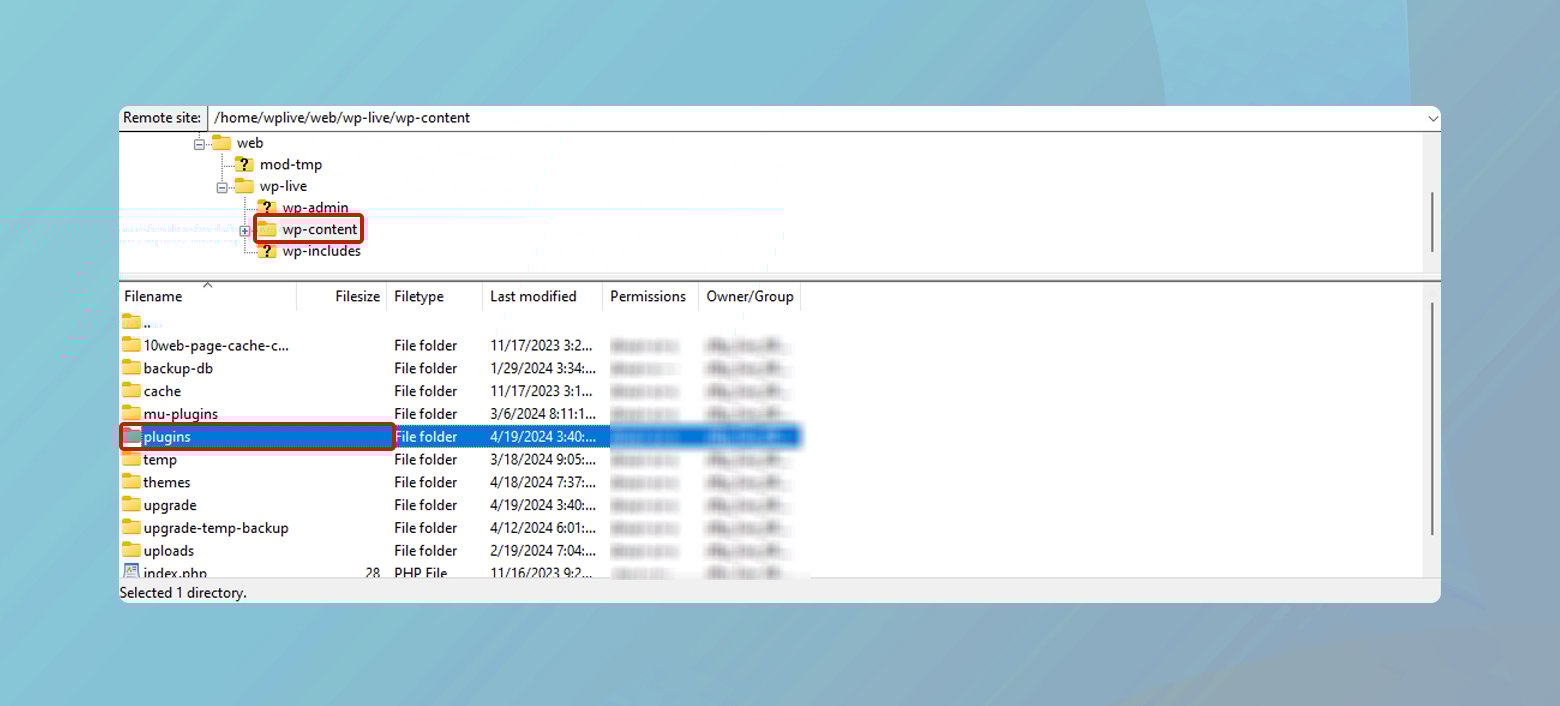
- Upload the extracted plugin folder to the plugins directory.
- Once the transfer is complete, go to your WordPress admin area and click Plugins.
- Find your newly uploaded plugin in the list and click Activate.
Installing plugins via FTP is slightly more advanced but gives you more control over the file transfer process.
Simplify WordPress with 10Web
Automate manual work with 10Web Managed WordPress Hosting and 10Web AI Website Builder. Optimize your WordPress website effortlessly.
Configuring plugin settings
After installing a WordPress plugin, you’ll want to ensure it’s set up correctly to benefit your site. Whether it’s a contact form plugin or an SEO tool, proper configuration is key.
Accessing settings after installation
Once a plugin is installed and activated in your WordPress dashboard, you usually can access its settings directly from the plugins page. Look for a Settings link under the plugin’s name. Alternatively, some plugins add a menu item to the dashboard sidebar; this can often be identified by the plugin’s icon or name.
Understanding basic configuration options
Most plugins come with a variety of settings that allow you to adjust their functionality and behavior to suit your needs. Here’s what you might typically encounter:
General Settings: This is where you can usually set global options that affect how the plugin operates across your entire site.
Functionality Tweaks: Depending on the plugin, you may enable or disable specific features here.
SEO Settings: If the plugin is SEO-related, you’ll have options to optimize your content for search engines.
Field Customizations: For plugins like contact forms, you can usually personalize form fields and messages to visitors.
Remember, each plugin can be different, so it’s important to go through all the provided documentation and settings to ensure it’s tailored to your site’s needs. As a beginner, don’t hesitate to use the plugin’s help resources if you’re unsure about any settings.
Managing and troubleshooting plugins
When working with WordPress, it’s important to keep your plugins well-managed and to troubleshoot any issues that may arise. This ensures your website remains secure, performs well, and provides the best possible experience for your visitors.
Updating plugins for security & performance
Regularly check your plugins directory for updates to ensure optimal security and performance. Most updates contain patches and enhancements that can prevent potential vulnerabilities. Here’s how to manage updates:
- Go to Dashboard > Plugins to see a list of your installed plugins.
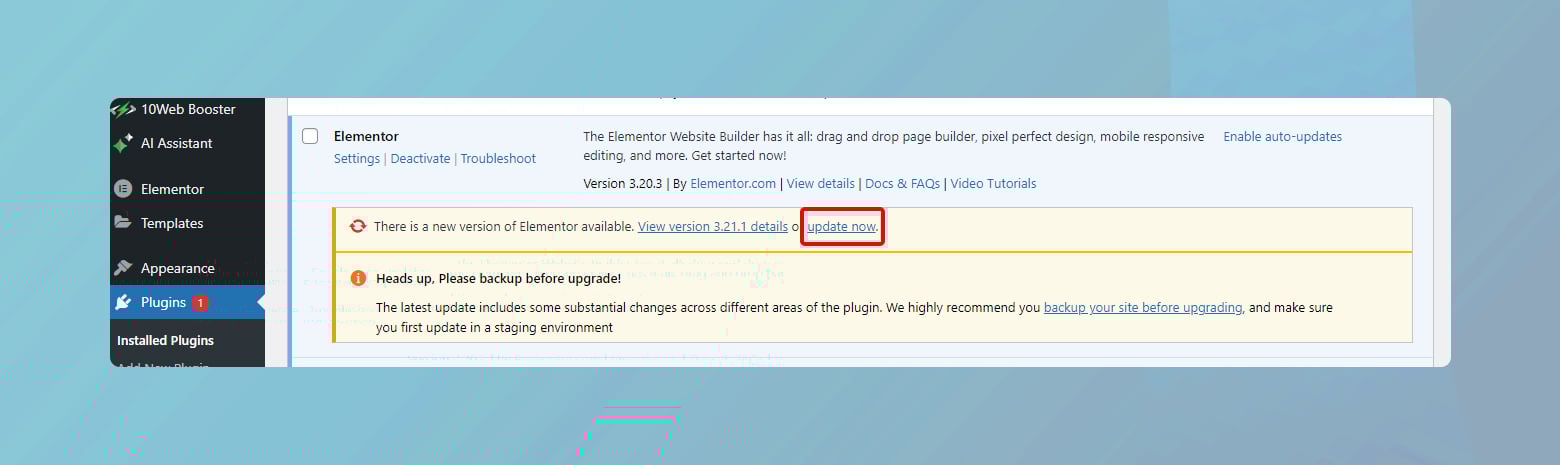
- Look for a notification beneath each plugin that has an available update.
- Before updating, ensure compatibility with your WordPress version.
- Click Update Now to install the latest version.
Remember, a backup of your site is recommended before updating, to avoid any potential issues.
If your website is hosted on 10Web, you can schedule automatic updates of your plugins.
Simplify WordPress with 10Web
Automate manual work with 10Web Managed WordPress Hosting and 10Web AI Website Builder. Optimize your WordPress website effortlessly.
Deactivating and uninstalling plugins
Sometimes a plugin needs to be removed, either due to issues or because it’s no longer required. Here’s the correct process to deactivate and uninstall:
- Navigate to Dashboard > Plugins.
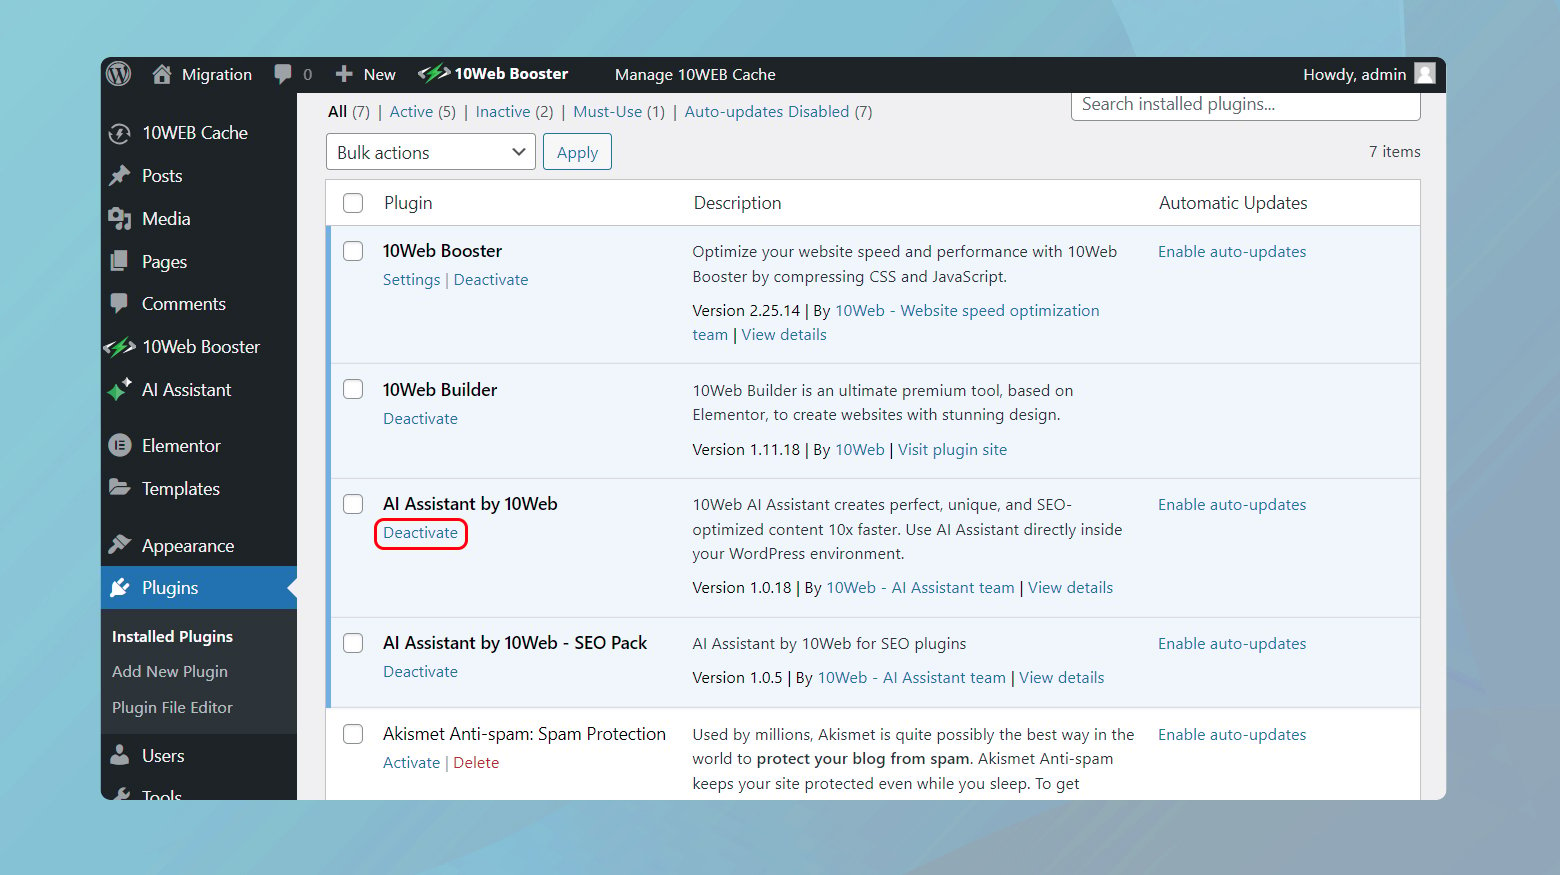
- Find the plugin you wish to deactivate.
- Click the Deactivate link below the plugin’s name.
After deactivation, you can safely uninstall the plugin by clicking the Delete link that appears.
Clearing unused plugins can increase your site’s speed and reduce security risks.
Simplify WordPress with 10Web
Automate manual work with 10Web Managed WordPress Hosting and 10Web AI Website Builder. Optimize your WordPress website effortlessly.
Seeking support and finding resources
If you’re facing issues or have questions about your plugins, plenty of support resources are available:
- Visit support forums and look for existing threads or start a new one.
- Check plugin reviews and ratings, as they often contain valuable user feedback and can hint at the plugin’s quality and reliability.
- Submit questions or review the plugin if you have specific feedback to share.
Utilize community knowledge and contribute to it when you can. Your experiences can guide others facing similar situations.
Conclusion
Effectively managing WordPress plugins is crucial for enhancing and securing your website. From selecting compatible and performance-optimized plugins to navigating the installation process—whether directly through the WordPress dashboard or manually via FTP—the steps outlined provide a clear pathway for website owners.
Proper configuration and regular updates are essential to harness the full potential of each plugin, ensuring they contribute positively to your site’s functionality and user experience.
Additionally, staying informed about plugin management and troubleshooting helps maintain your site’s performance and security. By following these guidelines, you can make informed decisions and efficiently manage your WordPress plugins, leading to a more robust and dynamic website.
Simplify WordPress with 10Web
Simplify WordPress with 10Web
Skip and automate manual work with 10Web Managed WordPress Hosting and the 10Web AI Website Builder.