Updating PHP in WordPress can significantly enhance your site’s performance and security. PHP is the scripting language that powers WordPress, and just like the content management system itself, it’s important to keep it up to date.
New PHP versions bring improvements such as increased speed and patch security vulnerabilities. Your website’s overall health depends on running a supported PHP version, which ensures compatibility with the latest plugins and themes.
Don’t worry if you’re not a tech wizard – updating PHP is easier than you think! We’ll walk you through the process step by step, whether you prefer using the WordPress dashboard, cPanel, or getting help from your hosting provider. Plus, we’ll make sure you create a backup of your site before making any changes, so you can update with confidence.
FAQ
How can I update my PHP version in WordPress if I don't have access to cPanel?
If you don’t have cPanel access, you can update your PHP version through your hosting provider’s dashboard. Look for a section related to PHP configuration or website settings, where you can select and apply a new PHP version.
Can I update the PHP version for my WordPress site through the 10Web dashboard?
Yes, you can update the PHP version for your WordPress site through 10Web’s dashboard. This option is available in the website’s Hosting Services page in the Tools section.
Is there a way to upgrade the PHP version for a local WordPress environment on my computer?
For a local WordPress environment, update the PHP version by altering your local server software. This often means using applications like MAMP, WAMP, or XAMPP, where you can download and switch to newer PHP versions in their respective settings.
How can I ensure my WordPress site is compatible with the updated PHP version after an upgrade?
To ensure compatibility, run a PHP compatibility check on your site using a WordPress plugin designed for this purpose. It helps to identify themes or plugins that might not be compatible with the new PHP version so you can update or replace them.
What are the implications of not updating to the latest PHP version for my WordPress website?
Not updating to the latest PHP version can lead to security vulnerabilities, slower performance, and incompatibility issues with new plugins and themes.
Can I use a plugin to update the PHP version in WordPress, and how does that work?
While you can’t directly update the PHP version with a plugin, some plugins help to assess your site’s readiness for a PHP upgrade. The actual update process needs to be done through your hosting provider’s control panel.
Preparing to update PHP in WordPress
Before updating the PHP version of your WordPress site, it’s crucial to take certain preparatory steps to ensure the process is smooth and risk-free.
Backup your site: Always start by backing up your WordPress site. A backup ensures that you can restore your site to its previous state if something goes wrong during the update.
Plugins and themes update: Ensure all your plugins and themes are up to date. This minimizes the risk of compatibility issues with the new PHP version.
Create a staging site: If possible, set up a staging site to test your new PHP version. This is a clone of your live site where you can test the PHP update without affecting your real site.
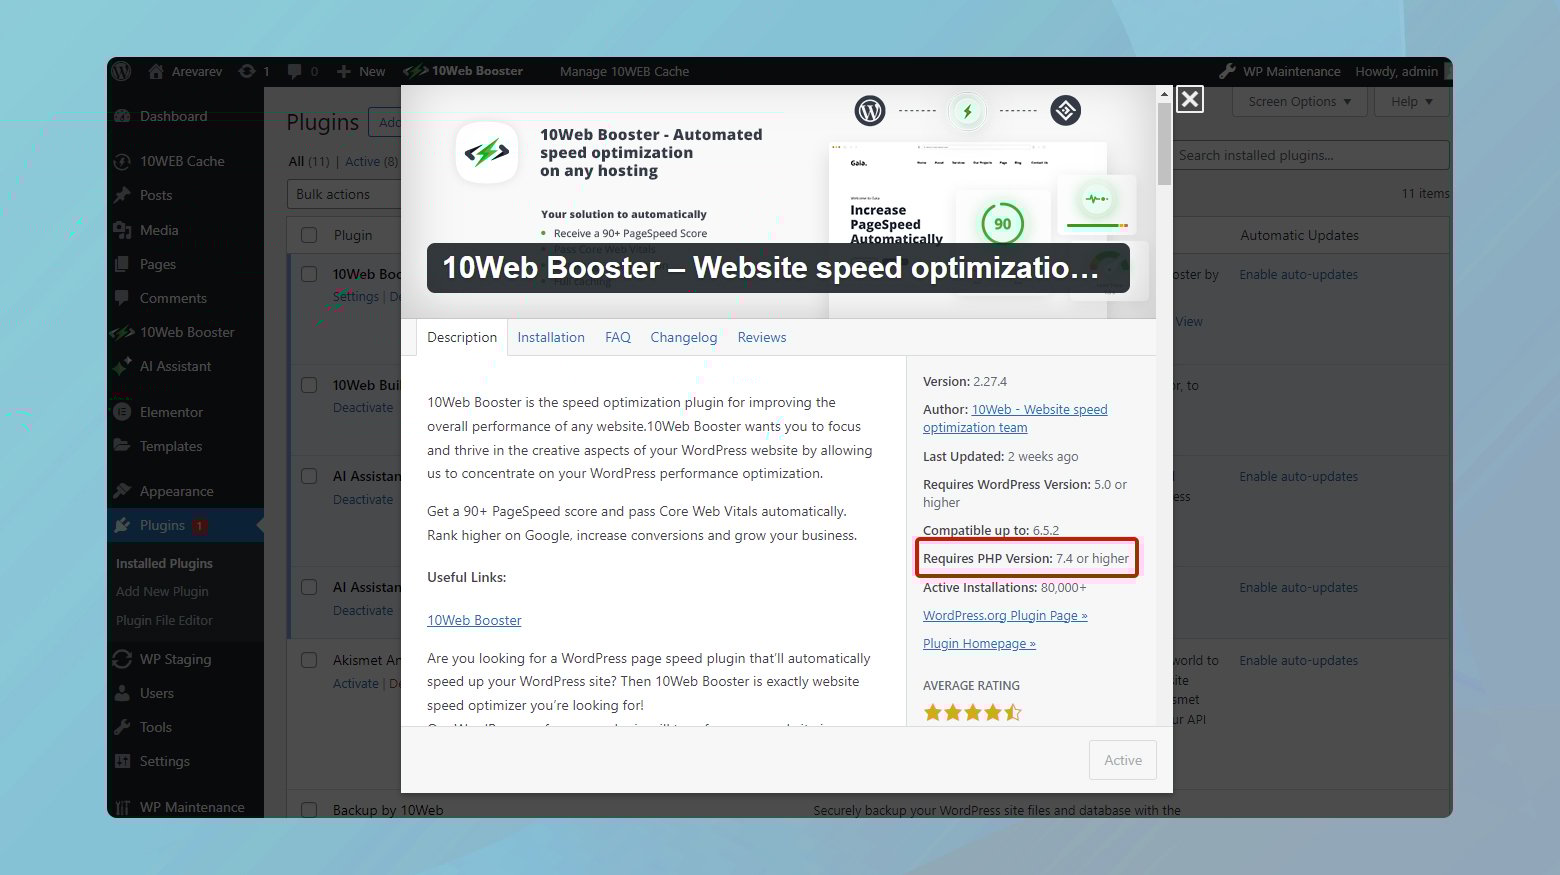
Check PHP version compatibility: Make sure that your site is compatible with the new PHP version.
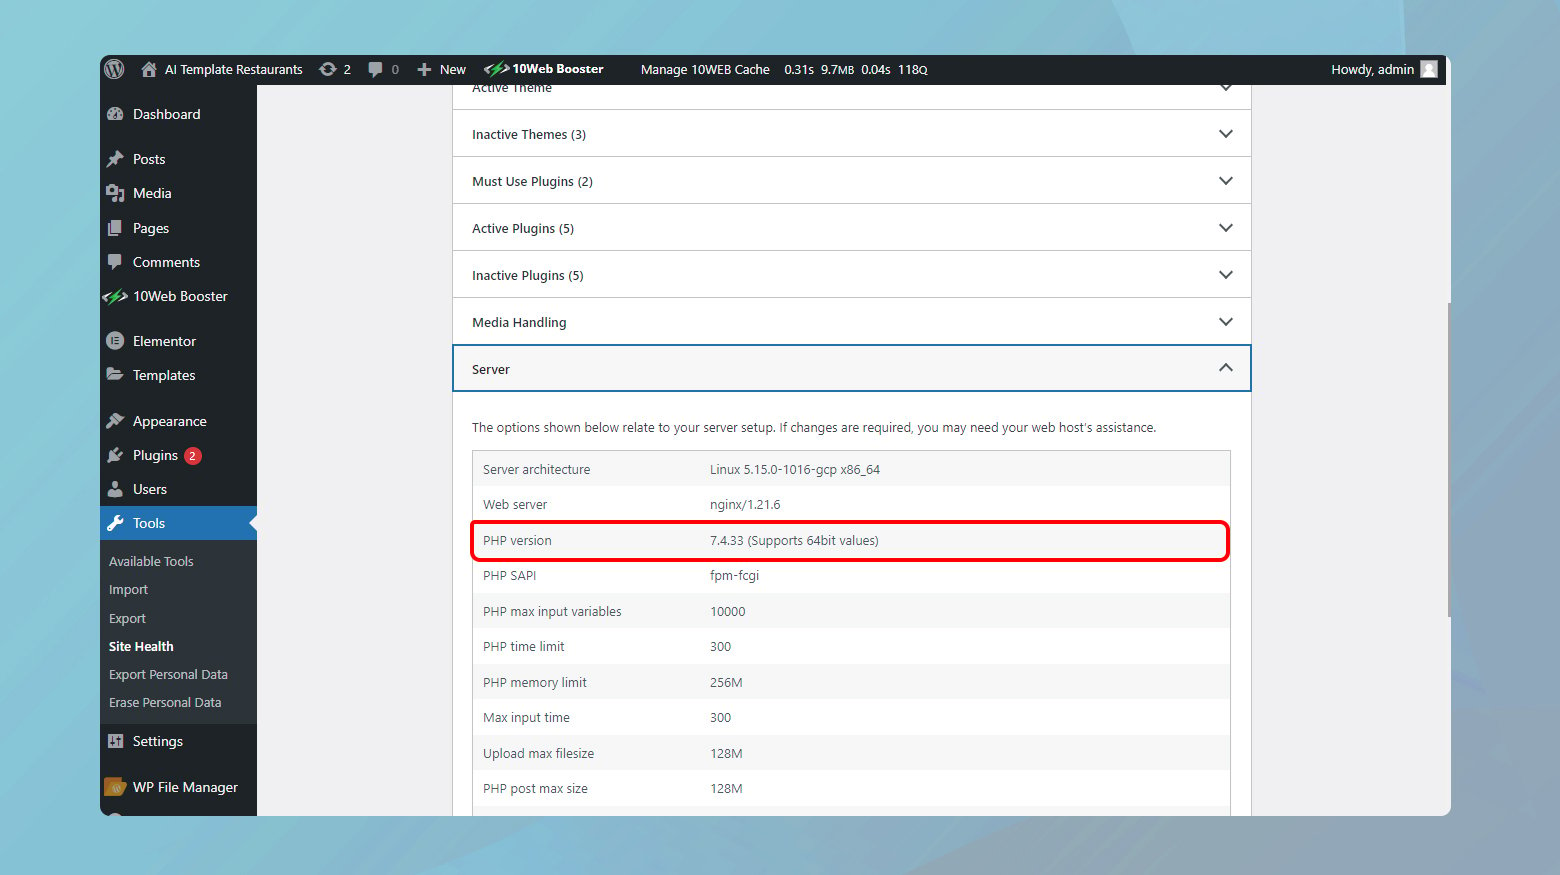
How to check your PHP version
You can check the version of PHP you are using from the WordPress dashboard.
-
-
- Go to Tools > Site Health.
- Click on the Info tab and expand the Server category.
- Check your current PHP version and ensure your site supports the intended update.
-
By following these steps, you’re setting a solid foundation for a successful PHP upgrade. Remember, keeping your PHP version up to date is important for security and performance, but taking these preliminary actions will ensure you do it the right way.
Use PHP compatibility checker
To assess whether your site is ready for a PHP upgrade, utilize the PHP Compatibility Checker plugin. Here’s how you can use this tool in a few simple steps:
-
-
- Install the PHP Compatibility Checker plugin from the WordPress plugin repository.
- Activate the plugin, and go to Tools > PHP Compatibility in your WordPress dashboard.
- Choose if you want to scan only active or all plugins.
- Click the Scan site button to start the compatibility check.
-
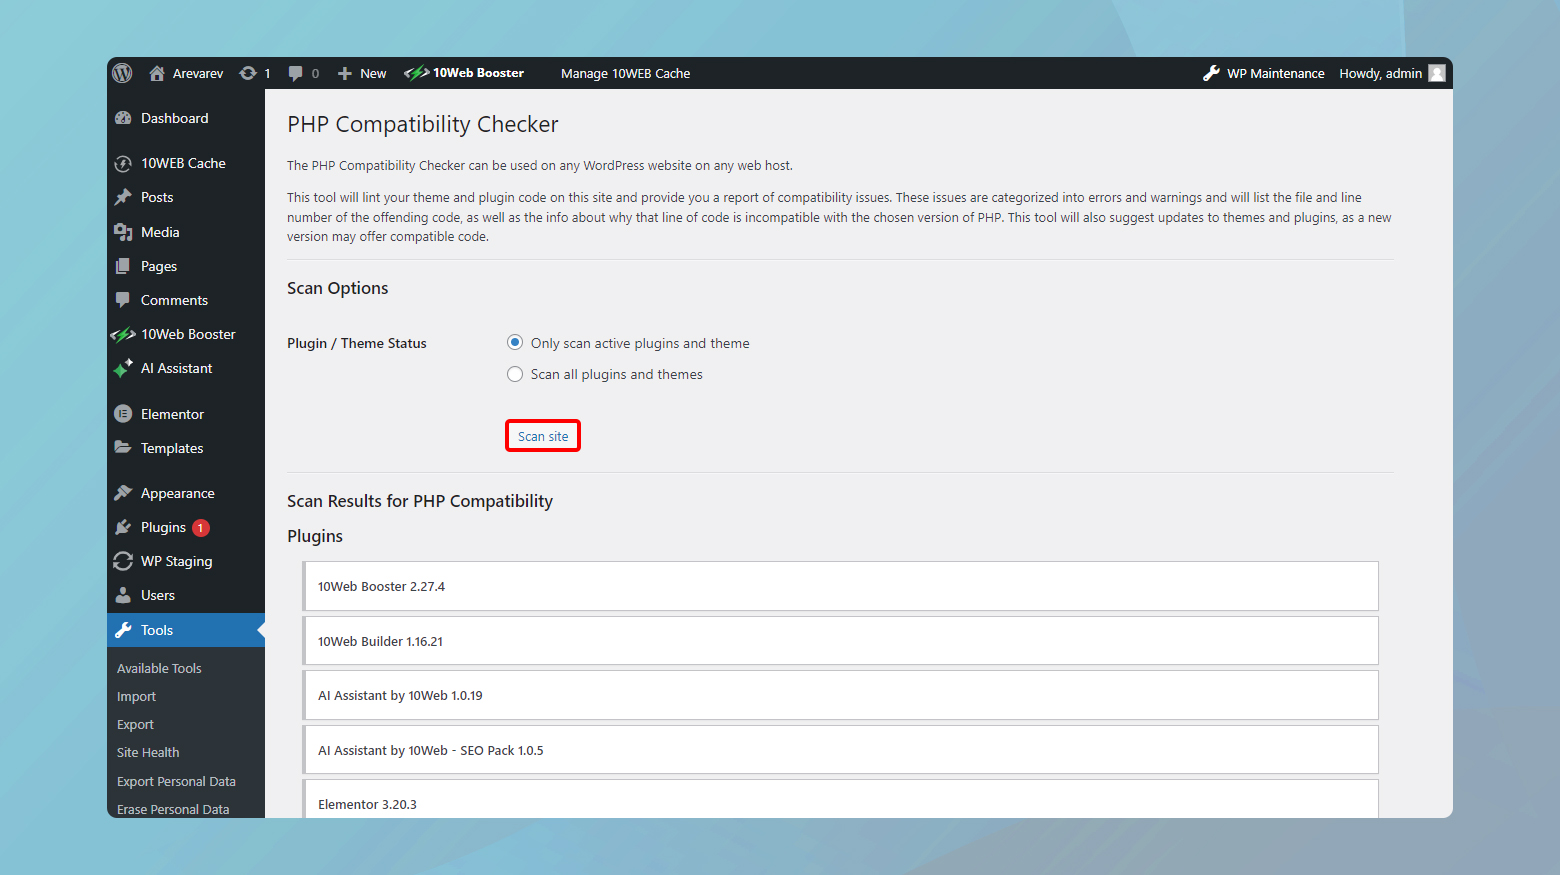
The plugin will run a scan and provide a detailed report that highlights any compatibility issues.
Simplify WordPress with 10Web
Automate manual work with 10Web Managed WordPress Hosting and 10Web AI Website Builder. Optimize your WordPress website effortlessly.
Review plugin and theme compatibility
Aside from using a PHP Compatibility Checker, it’s a good idea to manually check the compatibility of your themes and plugins.
Plugins
- Visit the plugin’s page in the WordPress Plugin Directory and check the section Tested up to. This should mention the latest WordPress version the plugin is tested with, which often correlates with PHP compatibility.
- Check the Changelog for recent updates and mentions of PHP version compatibility.
Themes
- Check the theme’s details in the WordPress Theme Directory or the theme developer’s website for compatibility information.
- Review the theme’s update logs for any notes on PHP version support.
Keep in mind that plugins or themes not listed in the official WordPress directories may need you to contact the developer directly for compatibility information. Always ensure that all components of your website are compatible to avoid any disruptions to your site’s functionality.
How to update PHP in 10Web
If your website is hosted on 10Web, updating your PHP version boils down to a few clicks. First and foremost, you should make a complete backup of your website. Once your backup is done, go ahead and enable the staging environment of your website. Now you are ready to update the PHP version of your WordPress site, test it, then push it to live.
Let’s walk through all the steps:
-
- Log in to your 10Web dashboard.
- Click on the website where you want to update the PHP.
- Navigate to Backups, click on the Settings tab. Make sure that both files and database are checked.
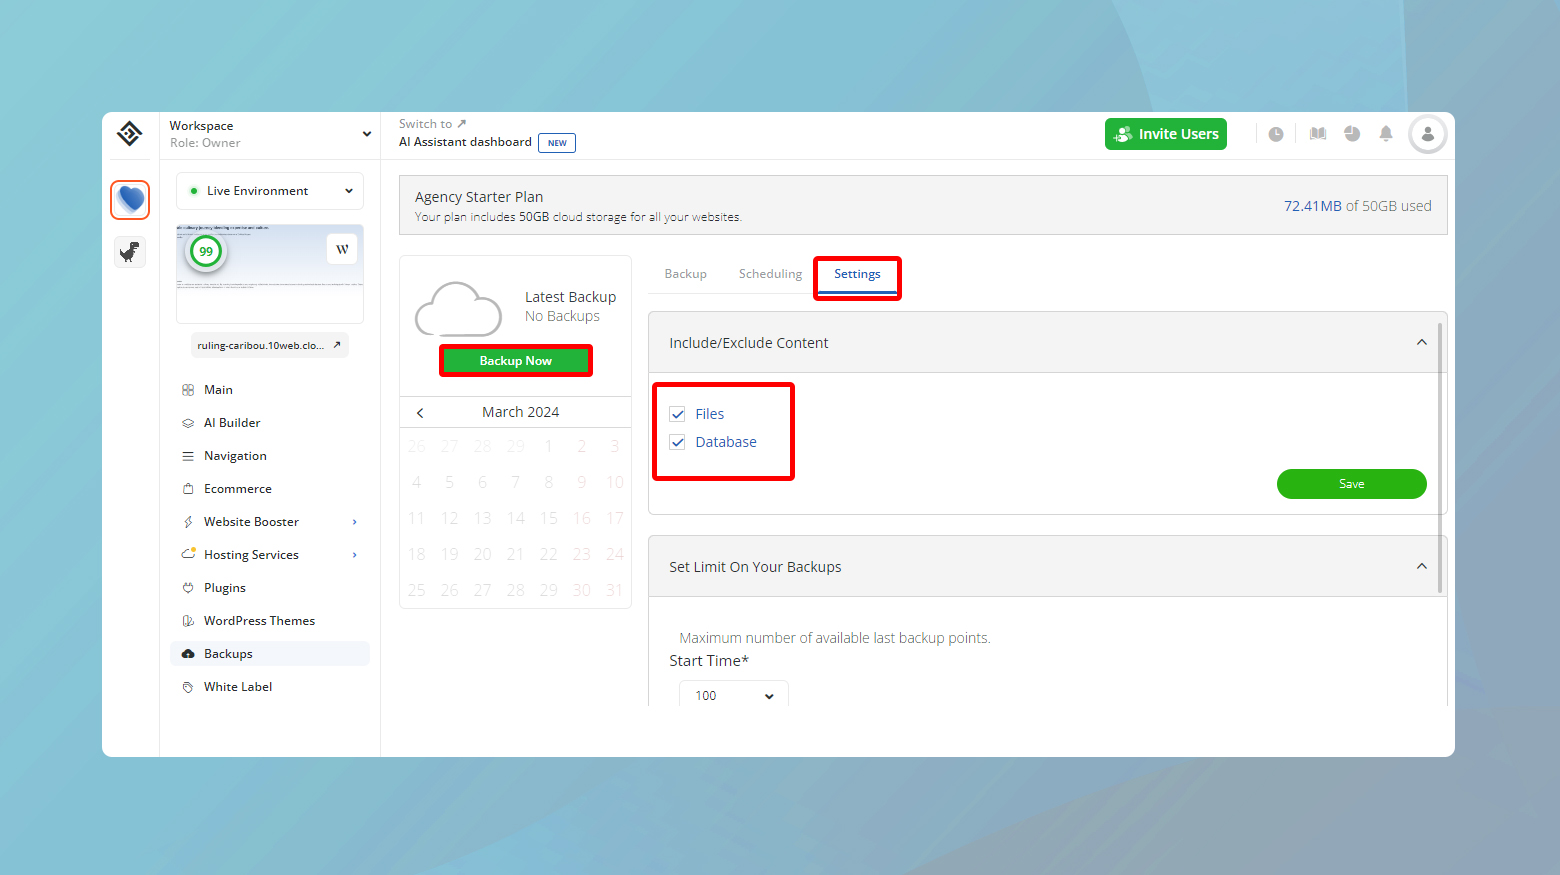
- Click Backup Now.
- After the backup has been created, click on the Live Environment drop down menu and choose Staging Environment.
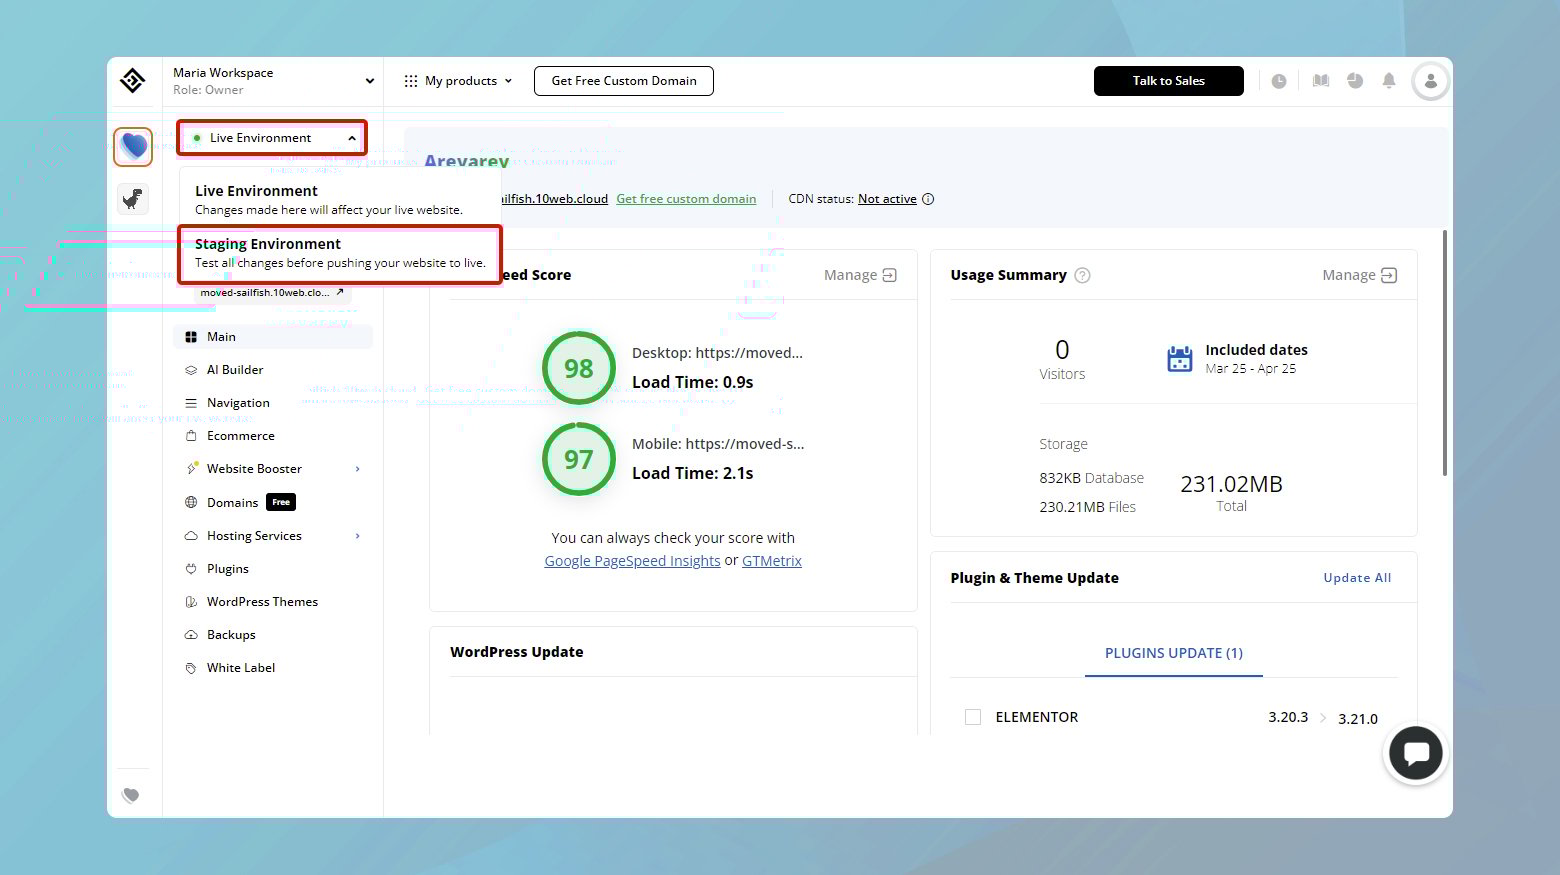
Now that you’re in the staging environment, you’re ready to test the new PHP version.
- Navigate to Hosting Services > Tools.
- Scroll down to the PHP version.
- Click on the drop down and choose the version you want to update to.
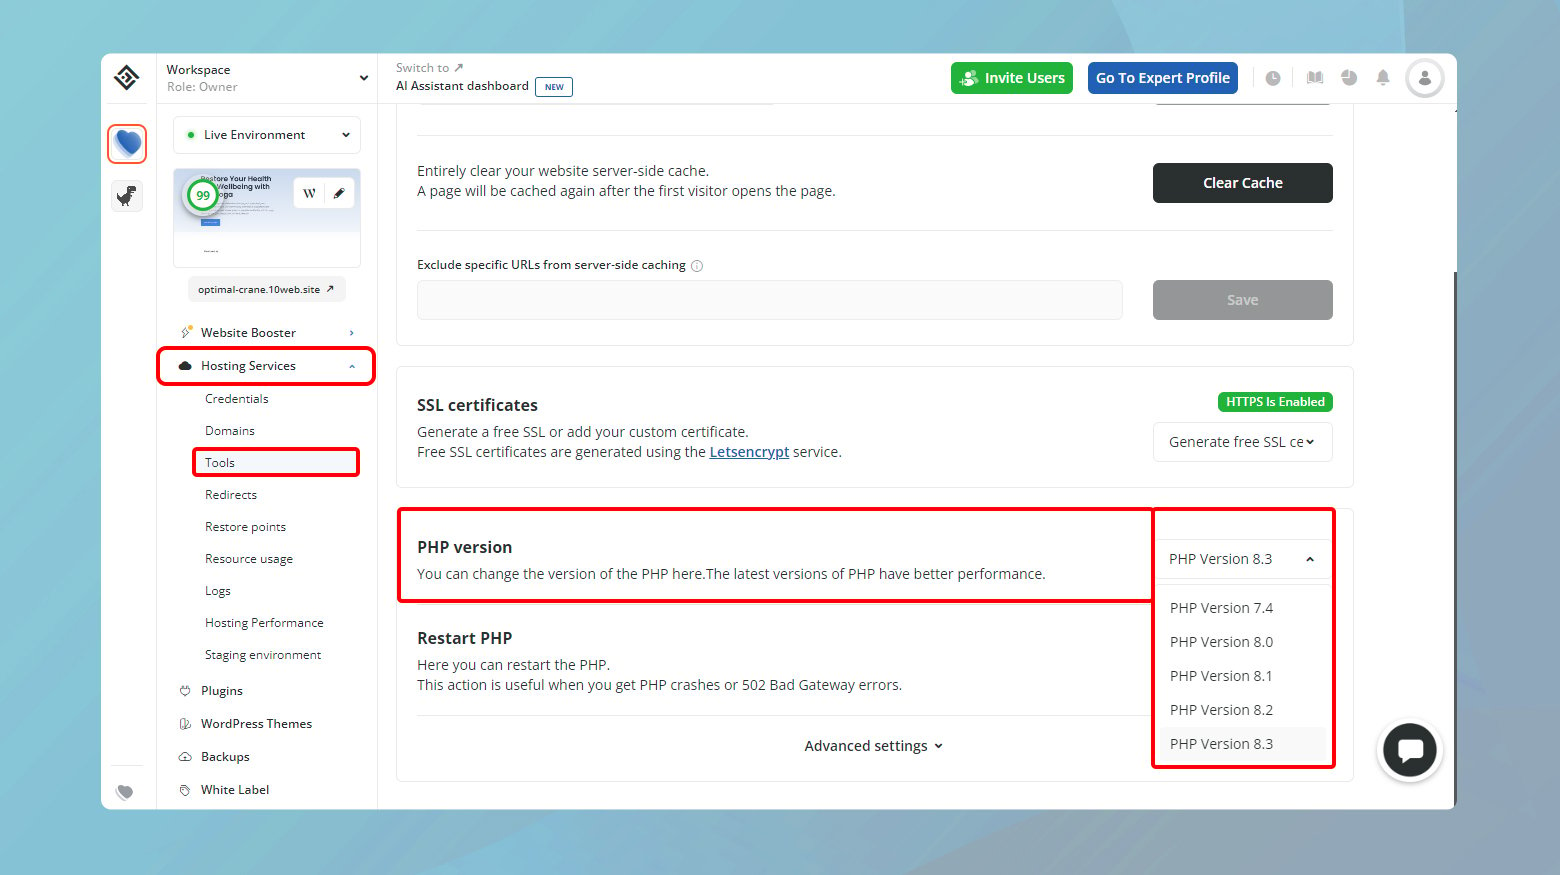
If the version runs smoothly on your staging site, you can push it to live with a single click.
Simplify WordPress with 10Web
Automate manual work with 10Web Managed WordPress Hosting and 10Web AI Website Builder. Optimize your WordPress website effortlessly.
How to update PHP using cPanel
Now that you’ve ensured that you are choosing a compatible version and that your hosting control panel provides the necessary tools for update, it’s time to carry out the update. Here’s a quick guide using cPanel:
Note: You can set up a staging site to test the PHP version before implementing the changes on yor live site.
-
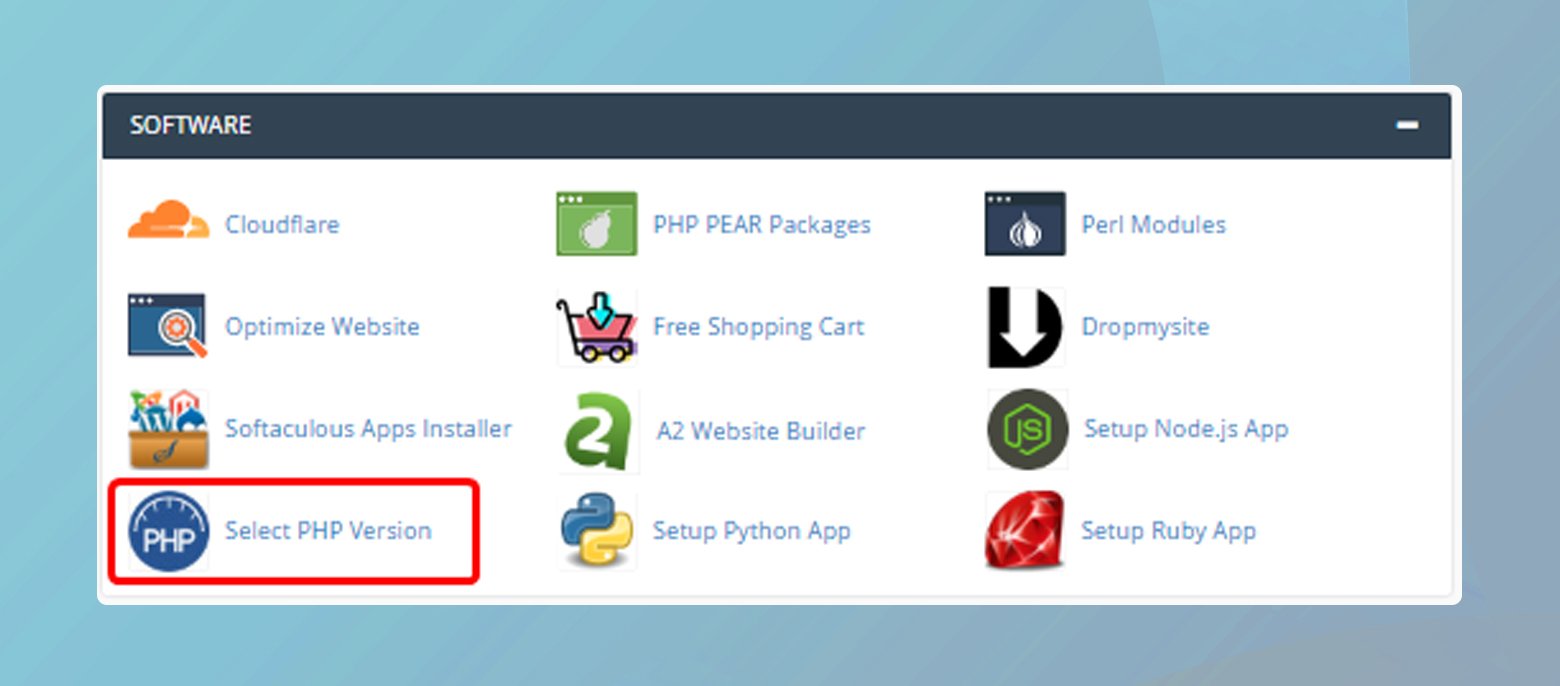
- Log into your cPanel.
- Navigate to the Software section and click on Select PHP Version.
-
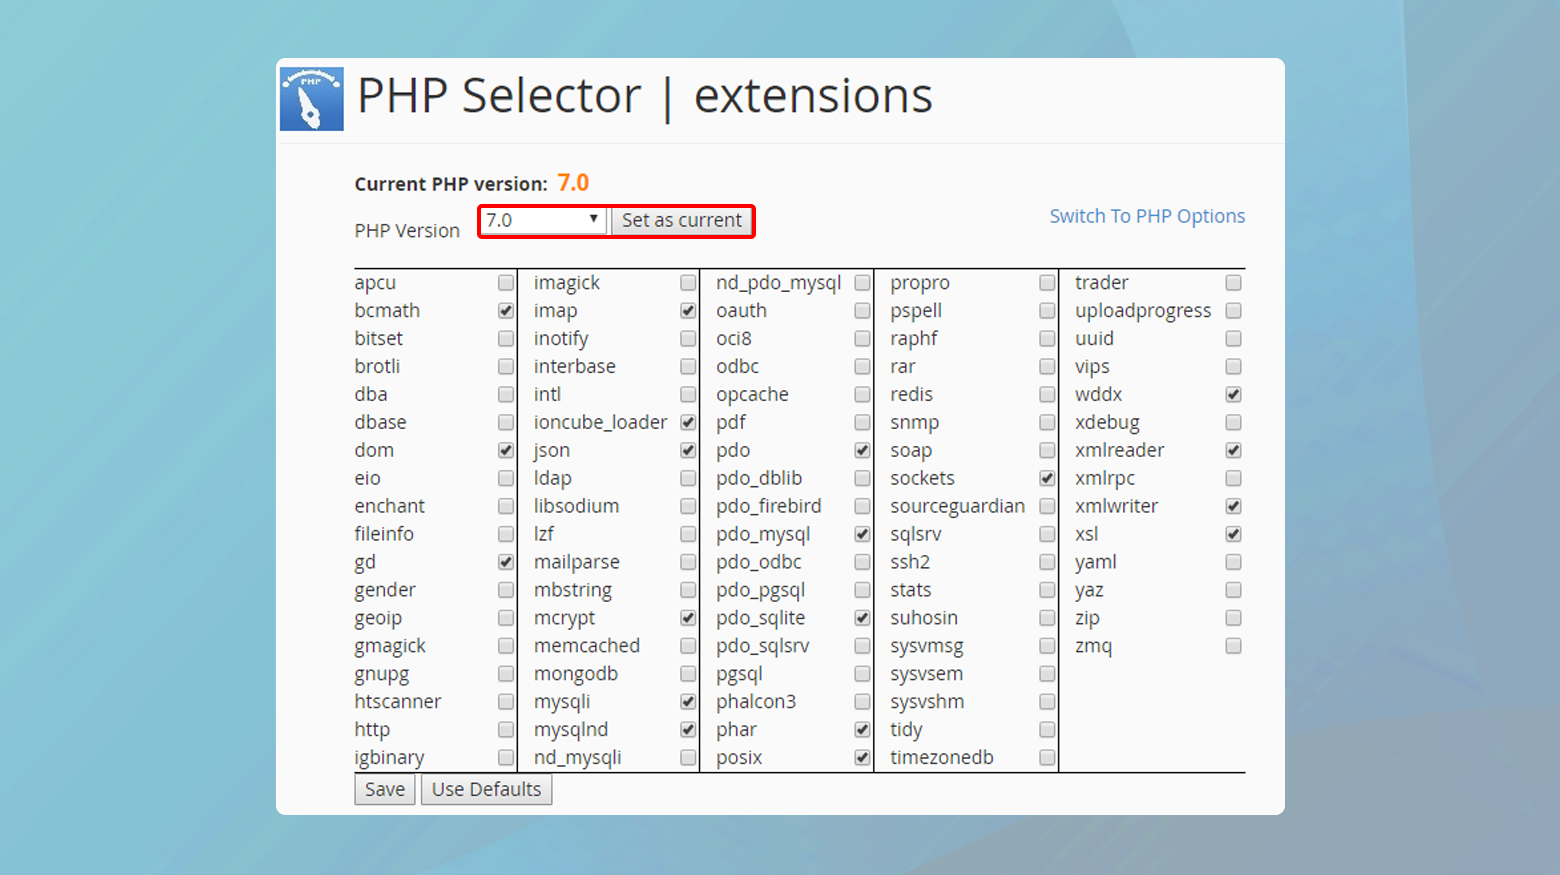
- From the PHP version drop-down menu, choose the version you wish to use (e.g., PHP 8.3).
- Click Set as current to apply the PHP version to your server.
Verify the update
After updating, it’s important to verify that your WordPress site is running the new PHP version:
-
-
- From your WordPress dashboard, go to Tools > Site Health.
- Check the Info tab and expand the Server section.
- Look for the PHP version to confirm the update has been successful.
-
Remember, keeping your PHP version updated is key to ensuring your site’s speed and security.
After the update
Once you’ve successfully updated PHP in your WordPress site, the primary focus should shift to ensuring everything runs as smoothly as anticipated. Your vigilance during this phase is critical for maintaining the site’s performance and security.
Troubleshooting common issues
Troubleshooting is a key step after updating PHP because it keeps your site functioning properly. Keep an eye out for these common issues:
-
-
- White screen of death: If you see a blank screen, it might be due to a theme or plugin conflict with the new PHP version. Try disabling all plugins and revert to a default theme to isolate the problem.
- Error messages: Messages such as “500 Internal Server Error” can be concerning but often stem from incorrect PHP file permissions. Check your file permissions to ensure they are set correctly (usually 644 for files and 755 for directories).
-
Should your site encounter other issues, consult your hosting provider’s support or look up specific WordPress community forums that specialize in troubleshooting.
Simplify WordPress with 10Web
Automate manual work with 10Web Managed WordPress Hosting and 10Web AI Website Builder. Optimize your WordPress website effortlessly.
Monitor site performance
After resolving any initial issues, it’s time to monitor your site’s performance:
-
-
- Site health: WordPress comes with a Site Health feature that can be very helpful. Navigate to Tools > Site Health and review any recommendations.
- Load times: Use tools like Google PageSpeed Insights to check if your site is loading faster post-update.
- Error logs: Check your error logs for anything unusual.
-
Monitoring performance can provide insights into the benefits of the PHP update, such as improved site speed or better handling of traffic, which together enhance site functionality and user experience. Keep a regular check and ensure all security updates are applied to protect the integrity of your site.
Remember, your site’s health and performance are continual responsibilities—regular checks can preempt many issues before they affect your site’s operation.
Conclusion
Updating PHP in WordPress is important for enhancing your website’s performance and security. By staying current with PHP versions, you ensure optimal compatibility with themes, plugins, and the core WordPress system.
The process of updating PHP, though straightforward, requires careful planning and execution. Ensuring compatibility through tools like the PHP Compatibility Checker plugin, updating in a staging environment, and keeping backups are crucial steps to mitigate risks.
After the update, continuous monitoring and troubleshooting ensure that the site maintains its functionality and security. Ultimately, regular PHP updates are not just a technical requirement; they are essential to maintaining a robust, secure, and fast-loading website.
Simplify WordPress with 10Web
Simplify WordPress with 10Web
Skip and automate manual work with 10Web Managed WordPress Hosting and the 10Web AI Website Builder.