Maintaining a dynamic yet reliable online presence demands not only creativity but also caution. As website administrators, developers, or content creators, the challenge lies in implementing changes that enhance functionality and user experience without disrupting the live environment. A WordPress staging site serves as the solution.
This comprehensive guide is designed to explore what a WordPress staging site is and how to create a WordPress staging site. By the end of this blog, you’ll be equipped with the knowledge to create and use staging environments effectively, ensuring that every update or modification is seamlessly integrated into your WordPress site without impacting the live version of your site.
What is a WordPress staging site?
A WordPress staging site serves as a complete yet private replica of your live website, functioning as a secure environment where you can conduct various modifications and tests. This includes updating themes, plugins, or even implementing major WordPress version changes.
The key advantage of using a staging site is that it allows for extensive experimentation and adjustments without risking the integrity or availability of your live website to your audience. Essentially, it acts as a protective layer, ensuring any updates can be thoroughly vetted and perfected before being applied to the live environment.
Why do you need a staging site?
The idea behind a WordPress staging environment boils down to one word: safety. The digital world is unpredictable. A single update can sometimes throw your website off balance—links may break, layouts could shift, and your site might even face downtime. Not exactly the best way to impress your visitors, right? A staging site acts as a protective layer, allowing you to:
- Test updates and changes thoroughly before going live.
- Avoid unplanned downtime and potential bugs affecting user experience.
- Ensure compatibility between new plugins or themes and your existing site.
Staging site vs test site
While both staging and test sites are used for trial runs before making changes to the live site, there’s a thin line differentiating them. A test site might be a more rudimentary setup used for initial developments or testing specific features in isolation. It’s not necessarily an exact replica of your live site.
On the other hand, a WordPress staging site is your website’s mirror image, housed in a private environment away from your live site. It’s designed for final testing before updates are pushed live, ensuring that everything works perfectly in a clone of your actual site. You can also push the staging sites to live with just one click. A test site does not allow for that.
How to create a WordPress staging site
Let’s explore how you can create a WordPress staging environment through your hosting provider, using a WordPress plugin, or manually from the WordPress admin area.
Create a staging site through your hosting provider
Creating a WordPress staging site through your hosting provider is one of the most straightforward methods available, particularly if your hosting provider offers built-in staging functionality. Let’s take a look at the steps for enabling a staging site on 10Web.
How to enable a staging site on 10Web
Websites hosted on 10Web have a staging environment that can be enabled with a click of a button. This feature allows you to quickly test new plugins, design and content, and core updates.
Enabling the staging environment of your live site
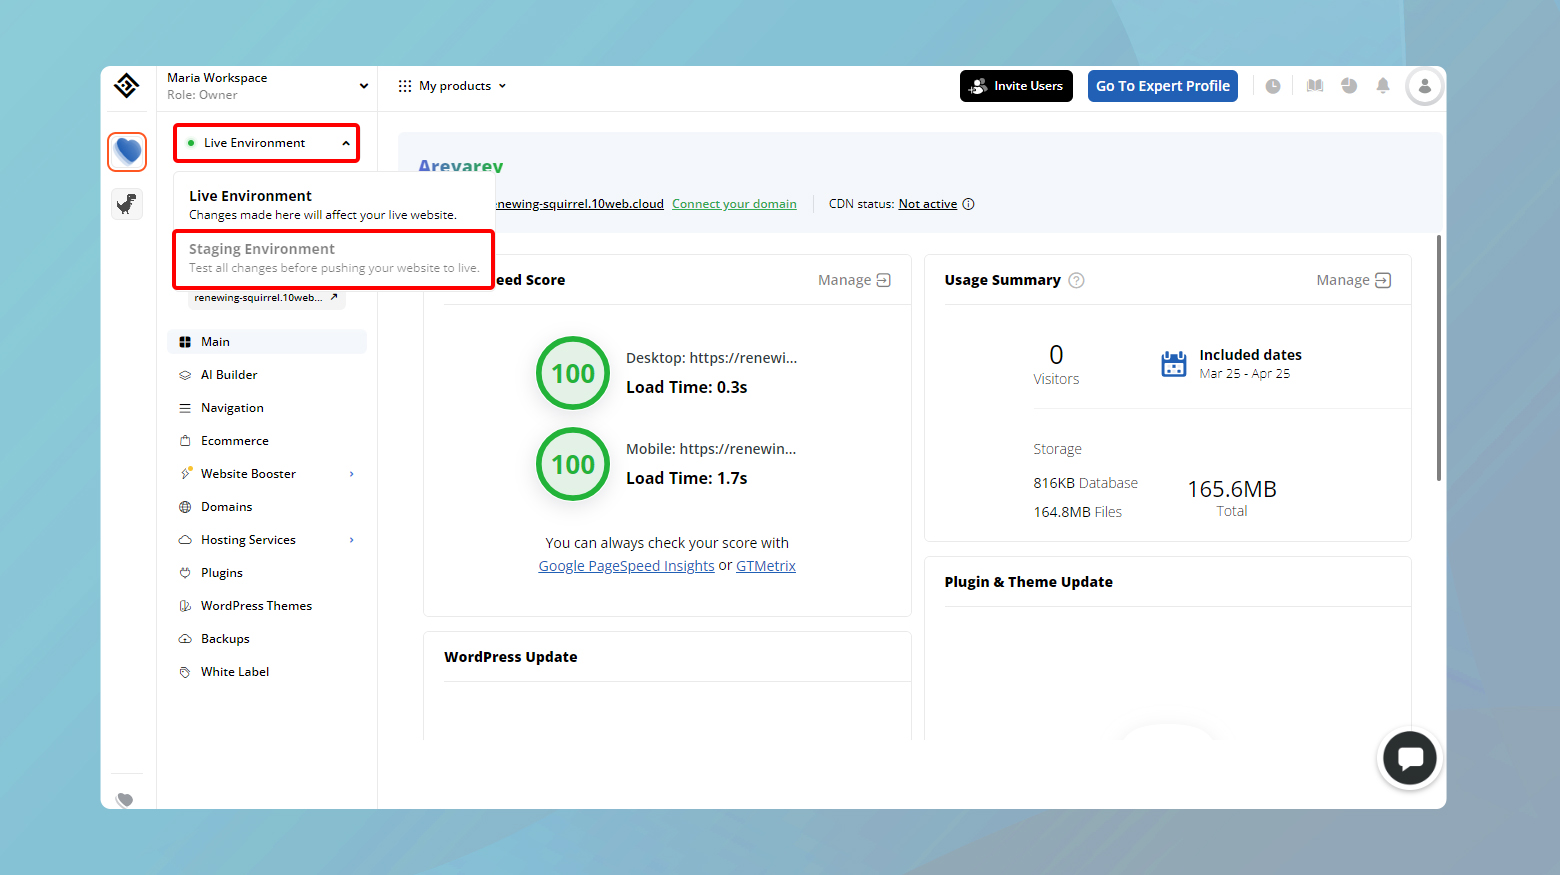
- Log into your 10Web dashboard.
- Click on the website where you want to enable the staging environment.
- At the top of your website thumbnail, you will see a dropdown Live environment.
- Click on the dropdown and choose Staging Environment.
- Click on the Enable Now button to confirm the transition to the staging environment.
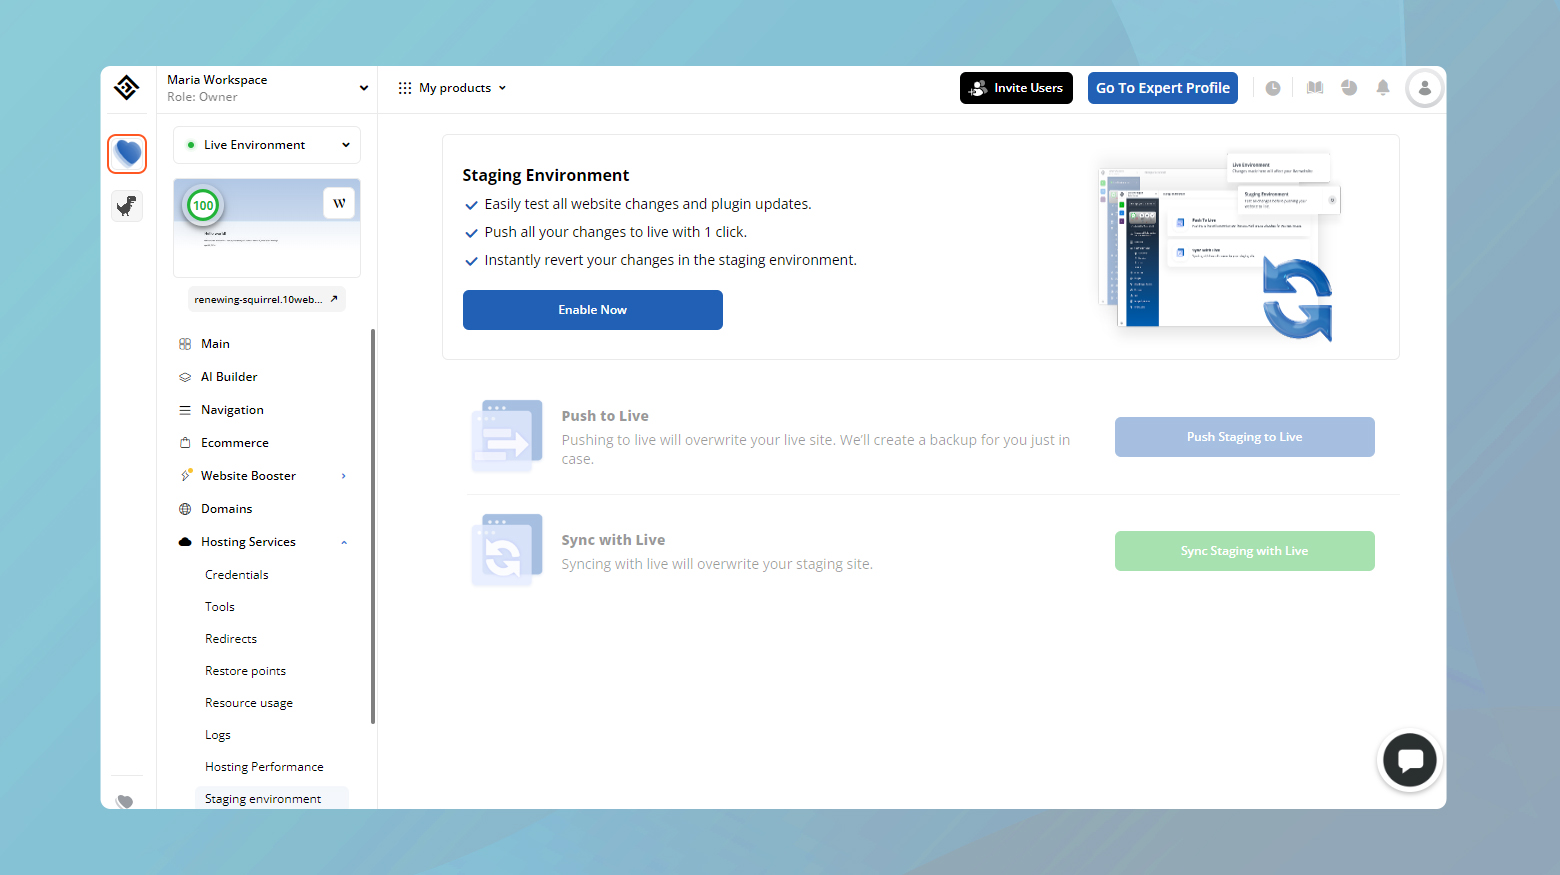
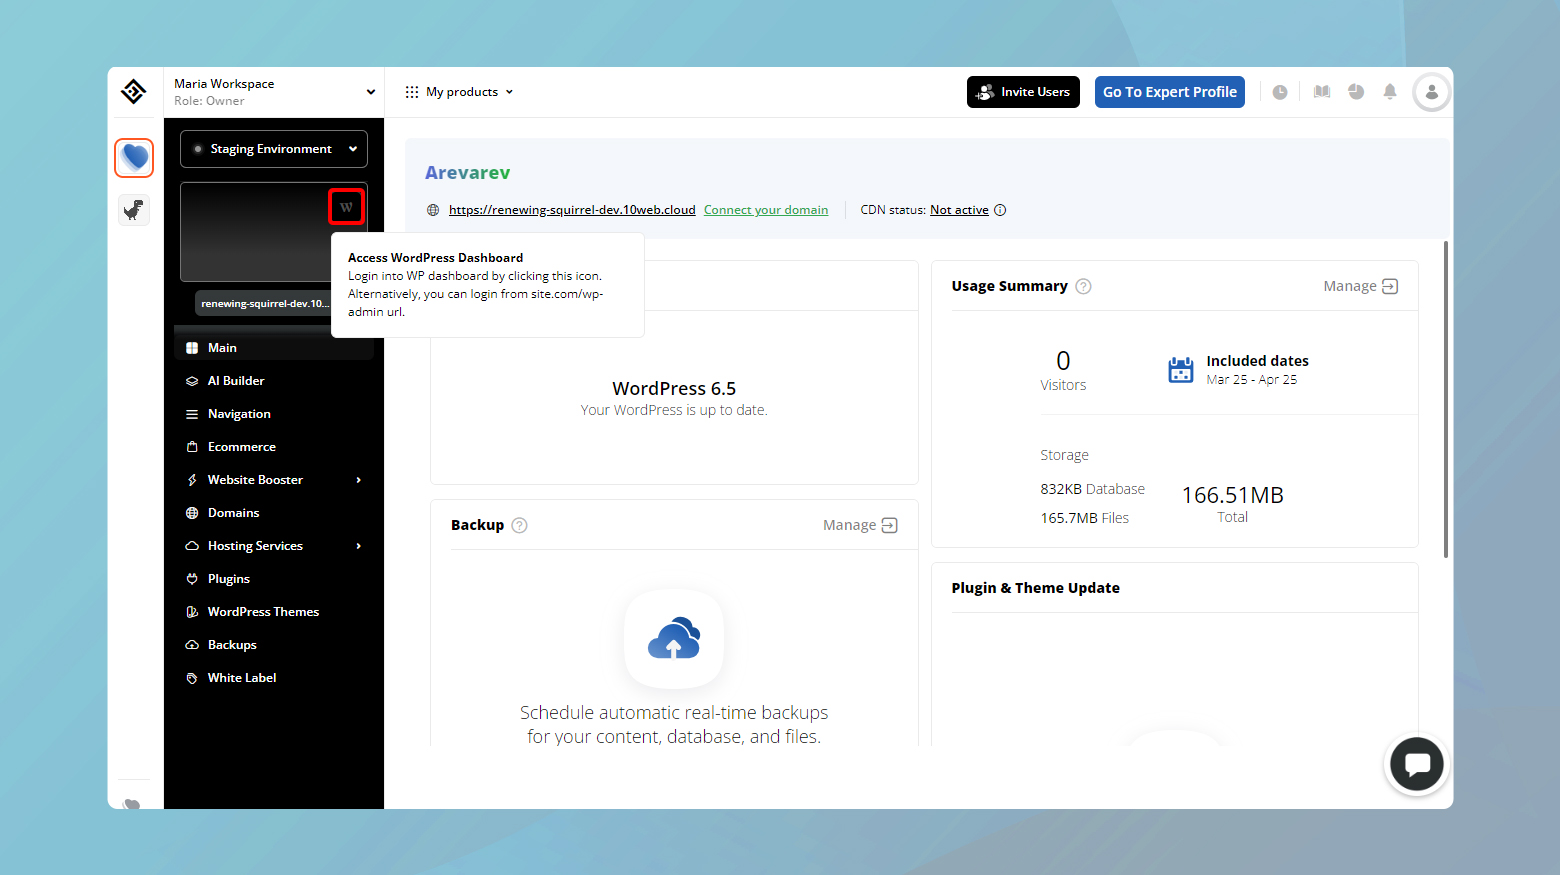
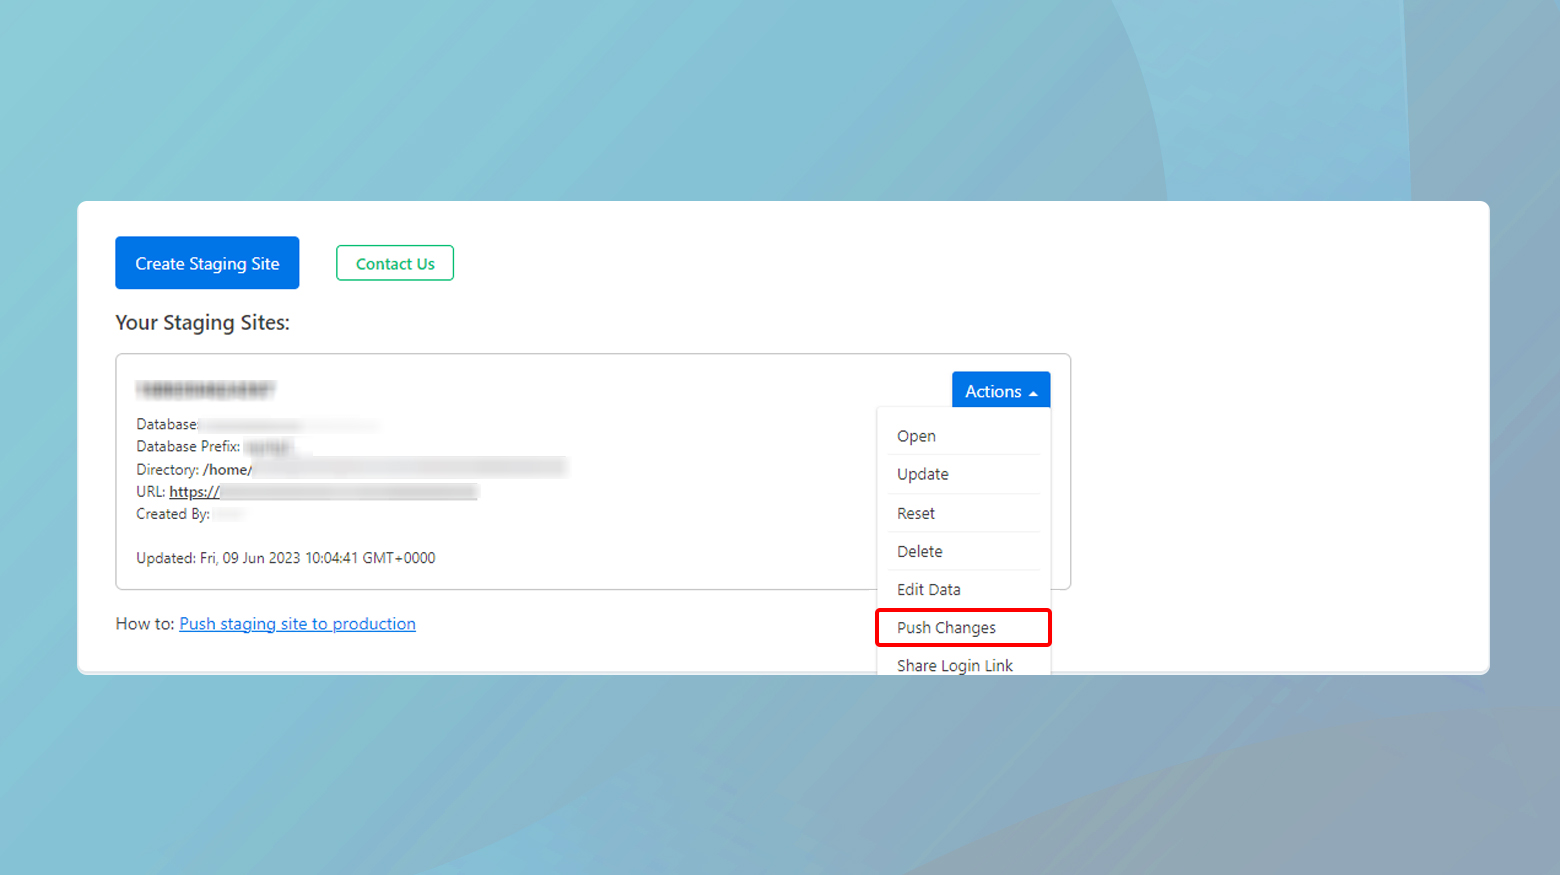
Your dashboard will change its colors, indicating that you have switched to the staging environment. To go to the backend or WordPress dashboard of your staging environment, click on the W icon located on the top right corner of your website thumbnail.
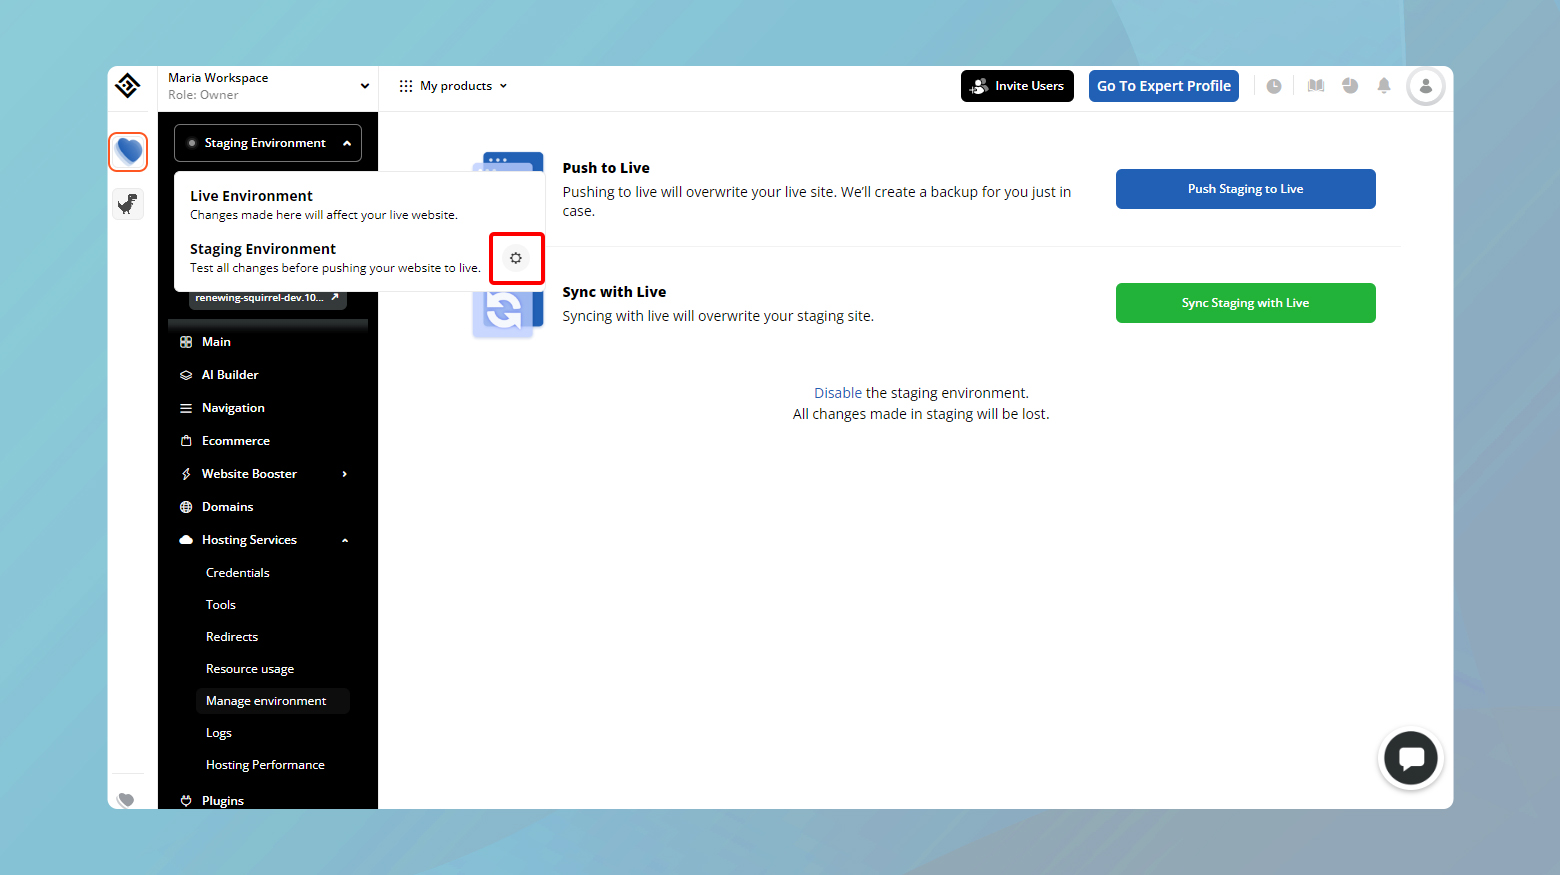
After you are done with testing, you can push your staging to live or sync your staging with your live website. Read the comprehensive guide to find out more about how to manage the staging environment in 10Web.
Use a WordPress plugin
WordPress staging plugins work by automating the process of creating a clone of your live site, which serves as a staging environment. This clone includes all elements of your site: the WordPress database, files (themes, plugins, media), and the entire directory structure.
The staging site is configured to prevent public access and search engine indexing. This might involve password protection, modifying the robots.txt file, or other methods to ensure that the staging site remains private and does not affect the live site’s search engine ranking.
Creating a staging site within WordPress can be a seamless process with the right tools. Among the myriad of plugins available, WP Stagecoach and WP Staging stand out for their ease of use and robust functionality. Let’s dive into the step-by-step process of creating a staging site using these two plugins.
How to create a WordPress staging site using WP Stagecoach
WP Stagecoach is a premium plugin that offers a straightforward way to create a staging site with just a few clicks, along with the convenience of pushing changes to the live site.
Step 1: Install WP Stagecoach
- Log in to your WordPress dashboard.
- Navigate to Plugins > Add New.
- In the search bar, type WP Stagecoach and press Enter.
- Find WP Stagecoach in the search results, click Install Now, then Activate.
Step 2: Set up your staging site
- After activation, a new menu item, WP Stagecoach, will appear in your dashboard. Click on it.
- You’ll be prompted to enter your WP Stagecoach username and password. These are provided when you sign up for their service on the WP Stagecoach website.
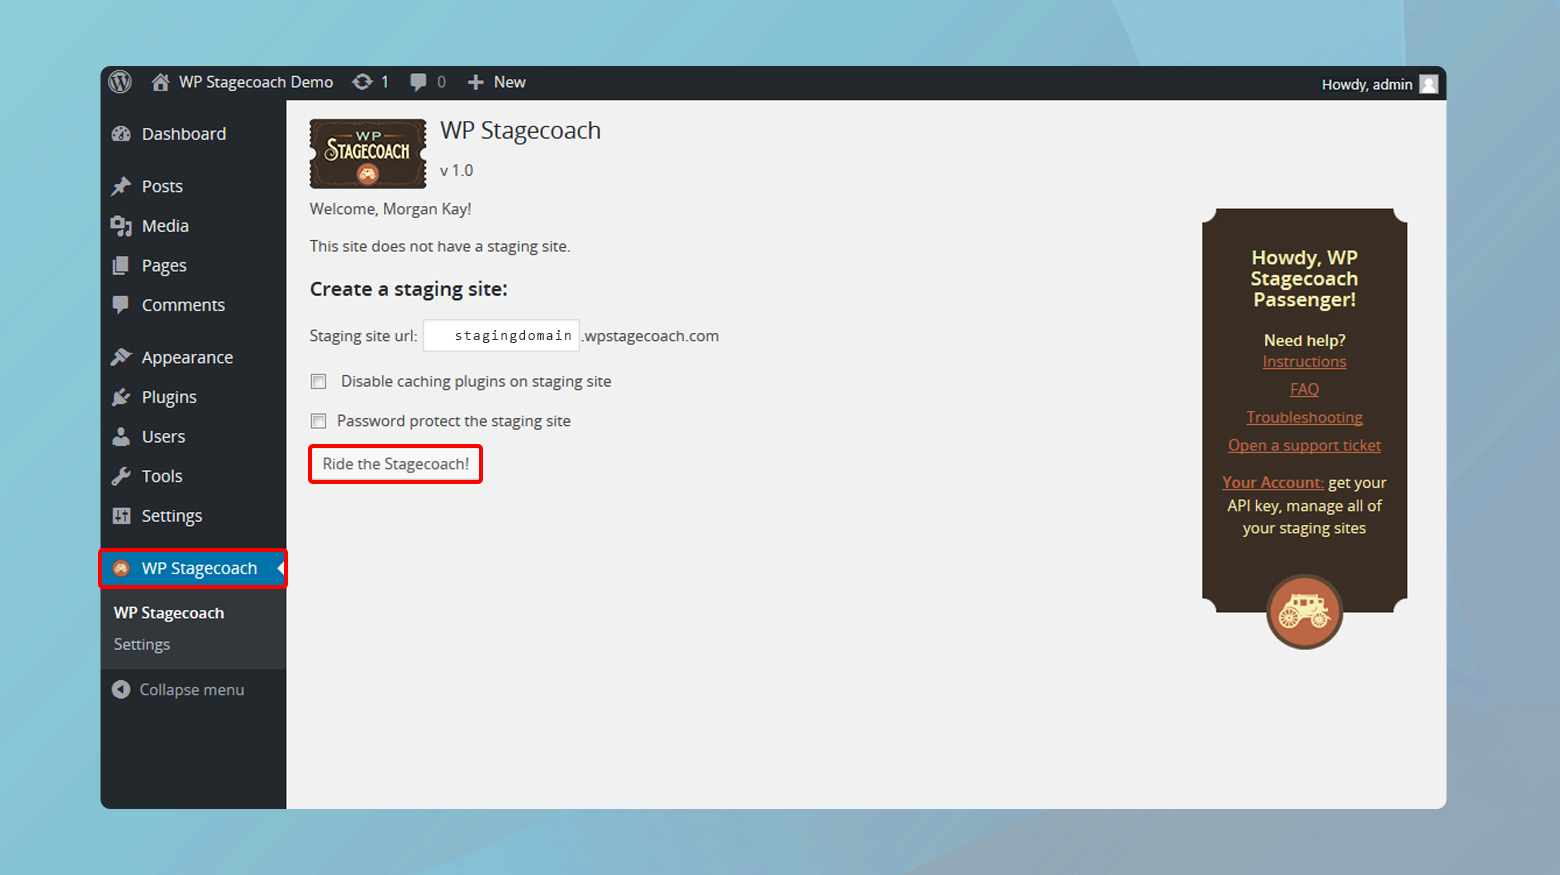
- Once logged in, you’re given the option to name your staging site. This name will be used as a subdomain (e.g., mystagingsite.wpstagecoach.com), so choose something unique but identifiable.
Step 3: Create the staging site
- After naming your staging site, click on the Ride the Stagecoach button to start the creation process.
- The process may take several minutes, depending on the size of your website. WP Stagecoach will copy your site’s files and database to the staging environment.
- When the process is complete, WP Stagecoach will provide you with a link to your staging site and login credentials.
Use the provided link to access your staging site. It’s a complete replica of your live site, where you can test updates, new plugins, themes, or any changes you wish to make.
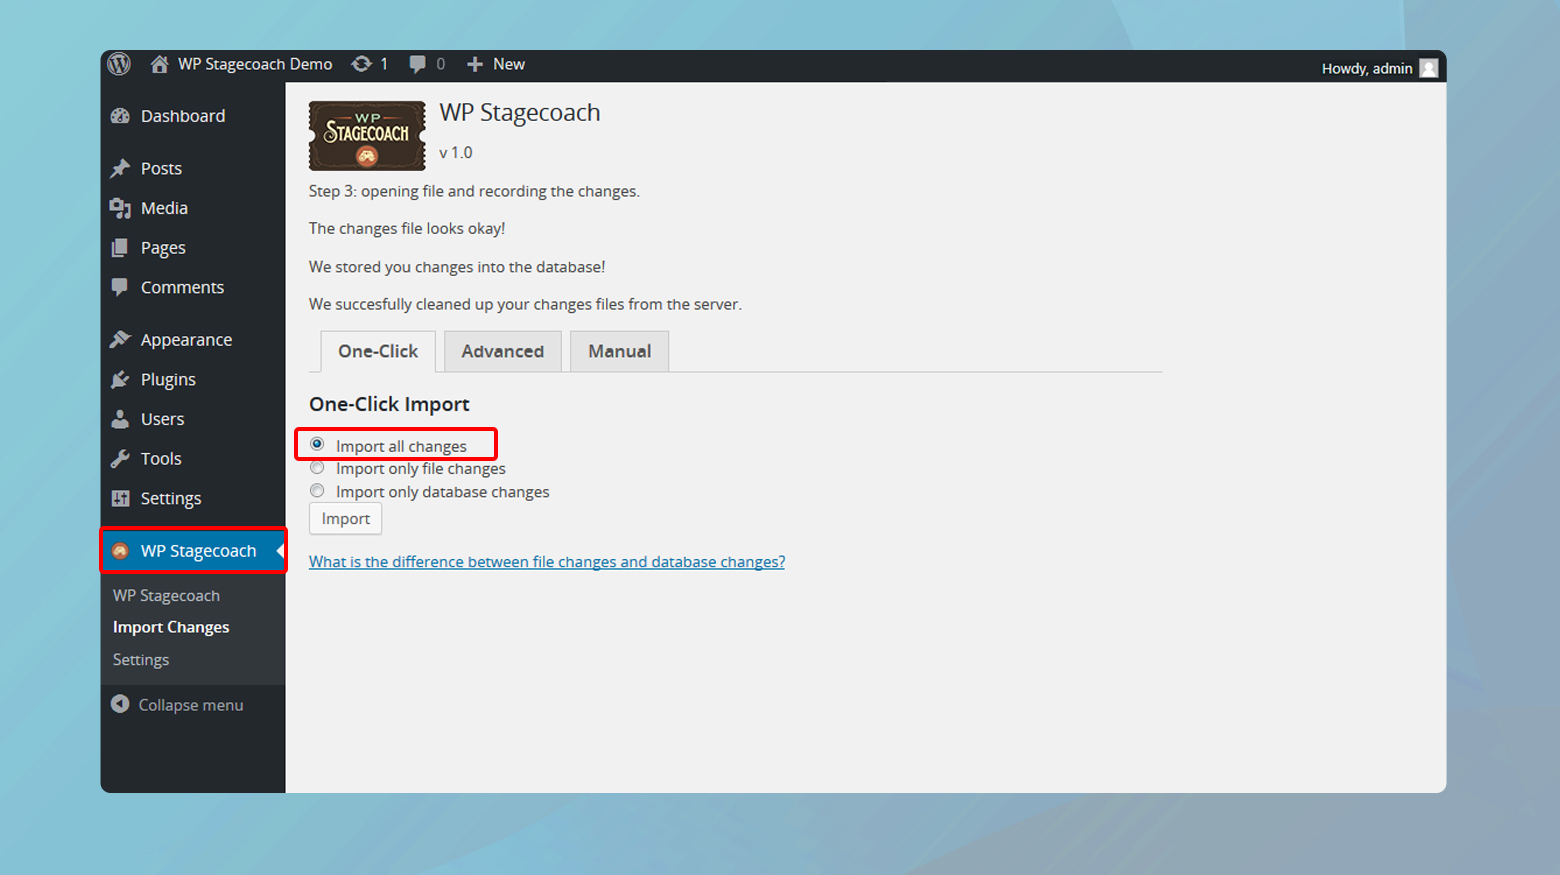
Step 4: Pushing changes to live
- Once you’re satisfied with the changes on your staging site, navigate to the WP Stagecoach menu in your staging site’s dashboard.
- Click on Import Changes to Live Site. You’ll be given the option to review the changes before they’re pushed.
- After reviewing, confirm the action, and WP Stagecoach will update your live site with the changes from your staging site.
How to create a WordPress staging site using WP Staging
WP Staging is a popular free plugin that offers an easy way to clone your WordPress site for staging purposes, with a premium option available for additional features like pushing changes to the live site.
Step 1
Install the plugin in the same way as described in the previous section.
Step 2: Creating your staging site
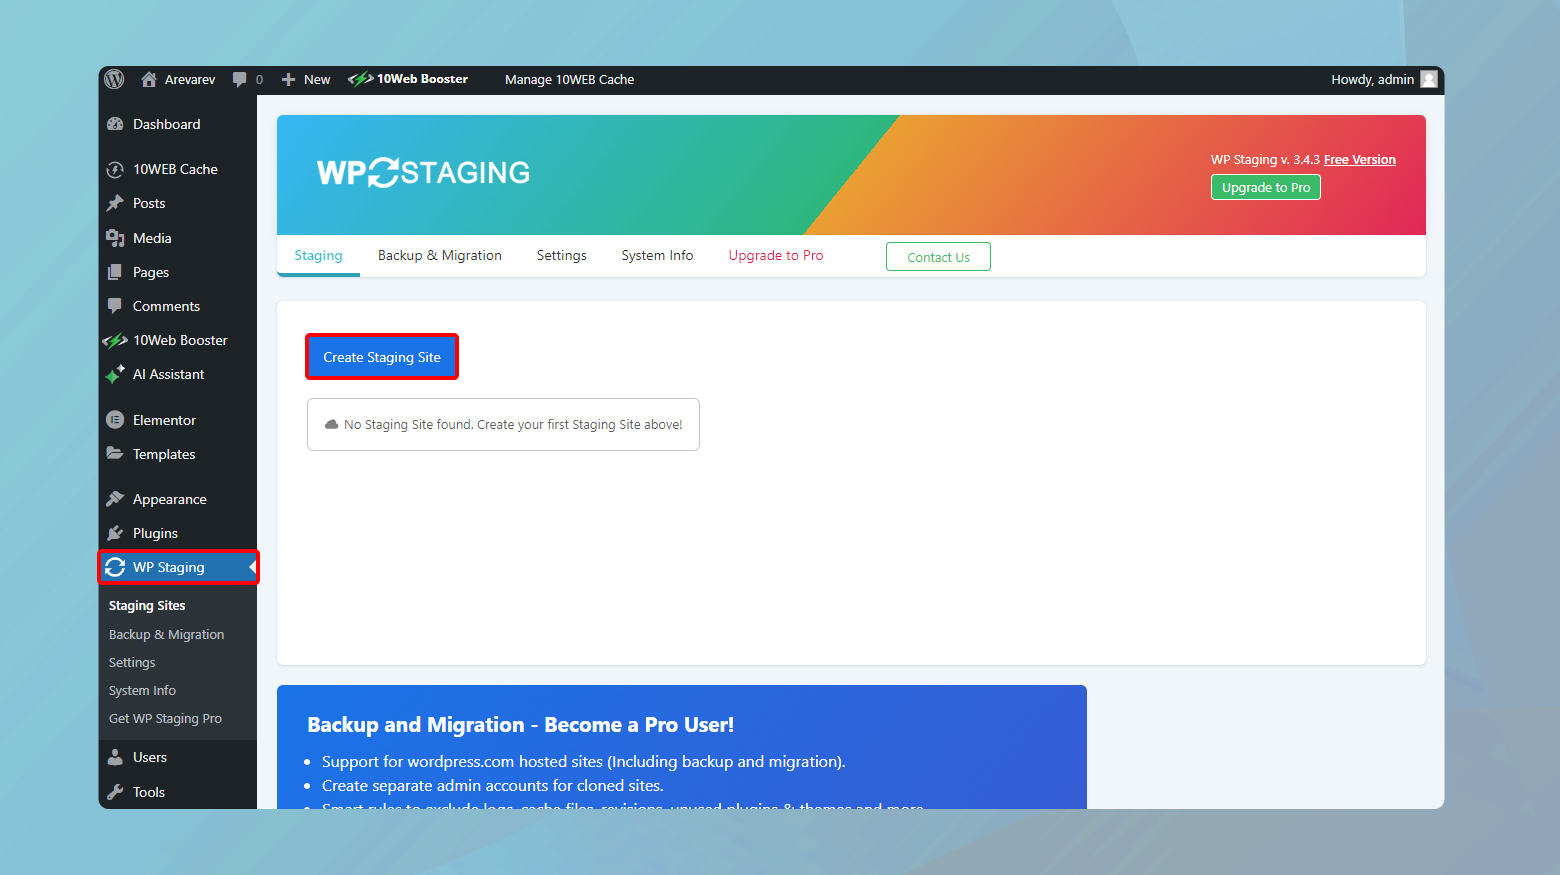
- Upon activation, WP Staging adds a new menu item to your dashboard. Click on WP Staging > Sites / Start.
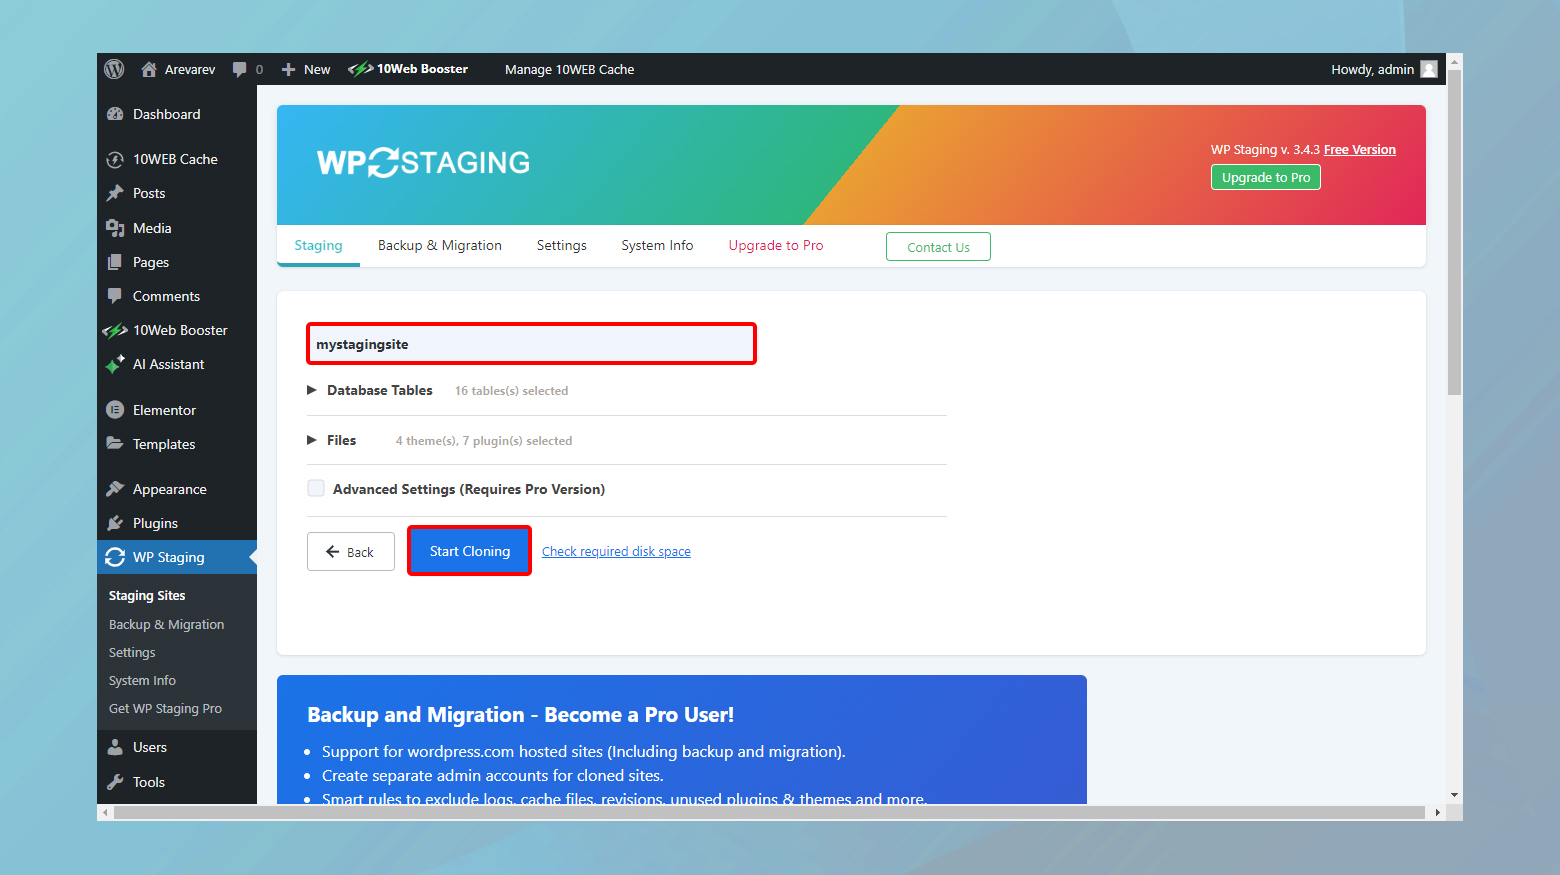
- Click on the Create New Staging Site button. You’ll be prompted to name your staging site.
- After naming your staging site, select the database tables and directories you wish to clone. For a full replica, keep all options checked.
- Click Start Cloning. The cloning process might take a few minutes.
After the cloning is complete, WP Staging provides a link to your staging site. Click on it to log in using your usual WordPress credentials and begin testing or making changes.
Step 3: Pushing changes to your live site (Premium Feature)
- To push changes to your live site, you’ll need the premium version of WP Staging.
- Navigate to WP Staging > Push Changes on your staging site’s dashboard.
- Select the changes or files you wish to push to the live site.
- Click Start Pushing. Review the changes, then finalize the push.
By utilizing either WP Stagecoach or WP Staging, WordPress users can efficiently manage and test website updates in a staging environment before going live, minimizing risks and ensuring a smooth user experience.
Manually create a staging site in WordPress
Creating a staging site manually in WordPress offers the most control and customization for testing and development purposes. This detailed guide will walk you through each step of the process, ensuring you can successfully set up a staging environment that mirrors your live site.
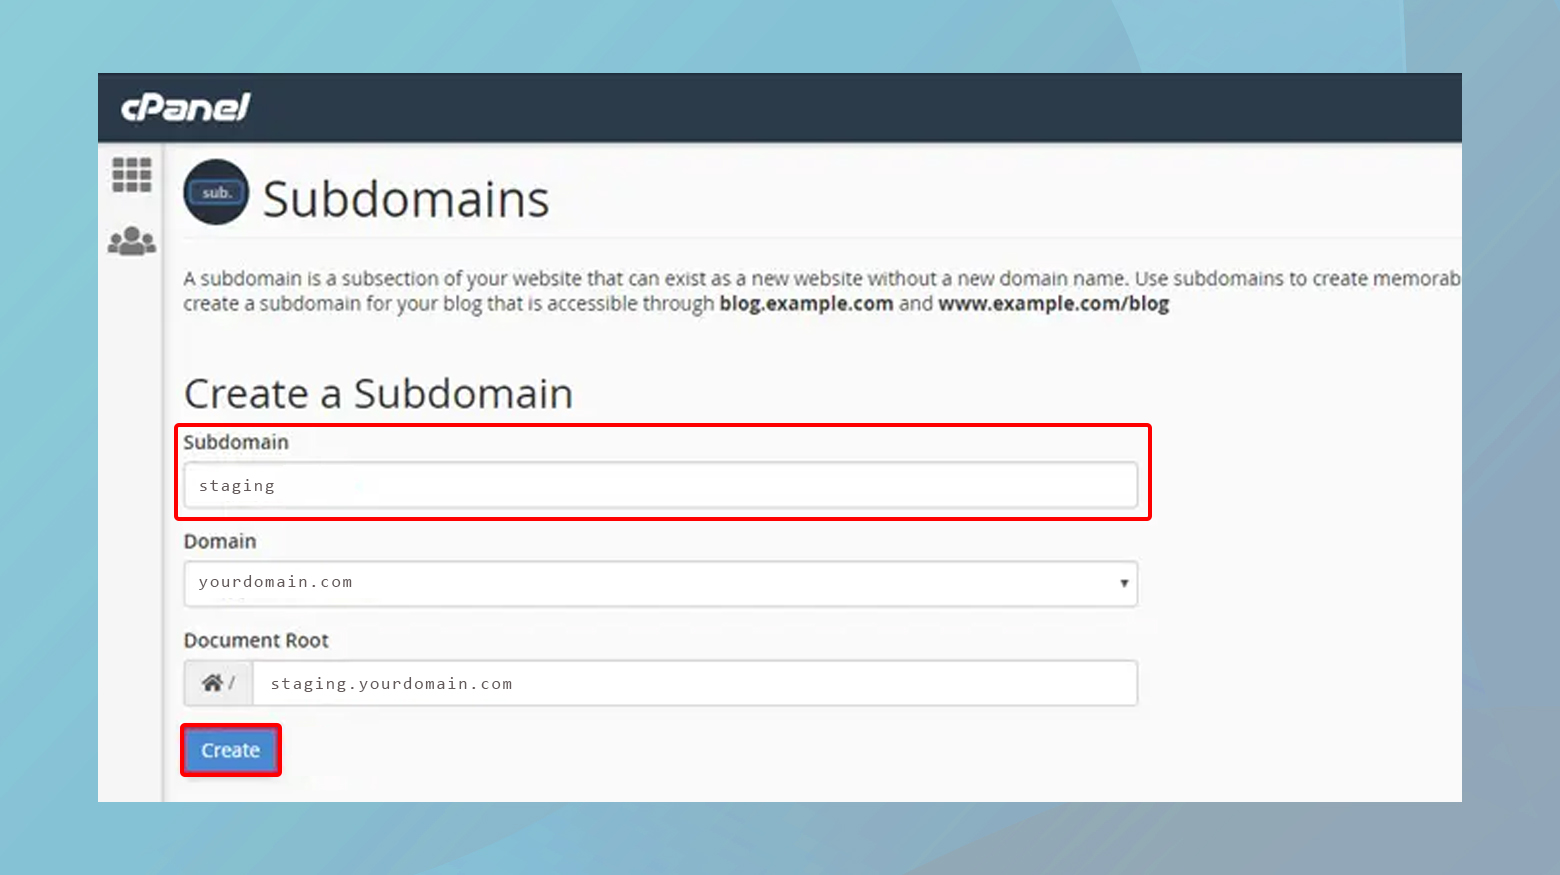
Create a subdomain for your staging site
- Access your web hosting account and navigate to the control panel provided by your host.
- Look for a section labeled Domains or Subdomains. This is typically found in the cPanel dashboard or a similar interface.
- Enter the desired subdomain prefix, such as staging, and select the domain to which it will be attached. This will create a URL like `staging.yourwebsite.com`.
- Once created, your hosting service will confirm the subdomain is active. This process usually takes only a few minutes.
Install WordPress on the subdomain
- Many hosts offer a one-click WordPress installation feature through their control panel. Find this option, which might be under Website or WordPress.
- Choose the subdomain you just created as the installation destination.
- Follow the on-screen instructions to install WordPress. You’ll need to enter details such as site name, admin username, and password.
- Once the installation is complete, you’ll receive a confirmation message with a link to the WordPress dashboard of your new staging site.
Clone your website to the staging environment
Clone files using FTP
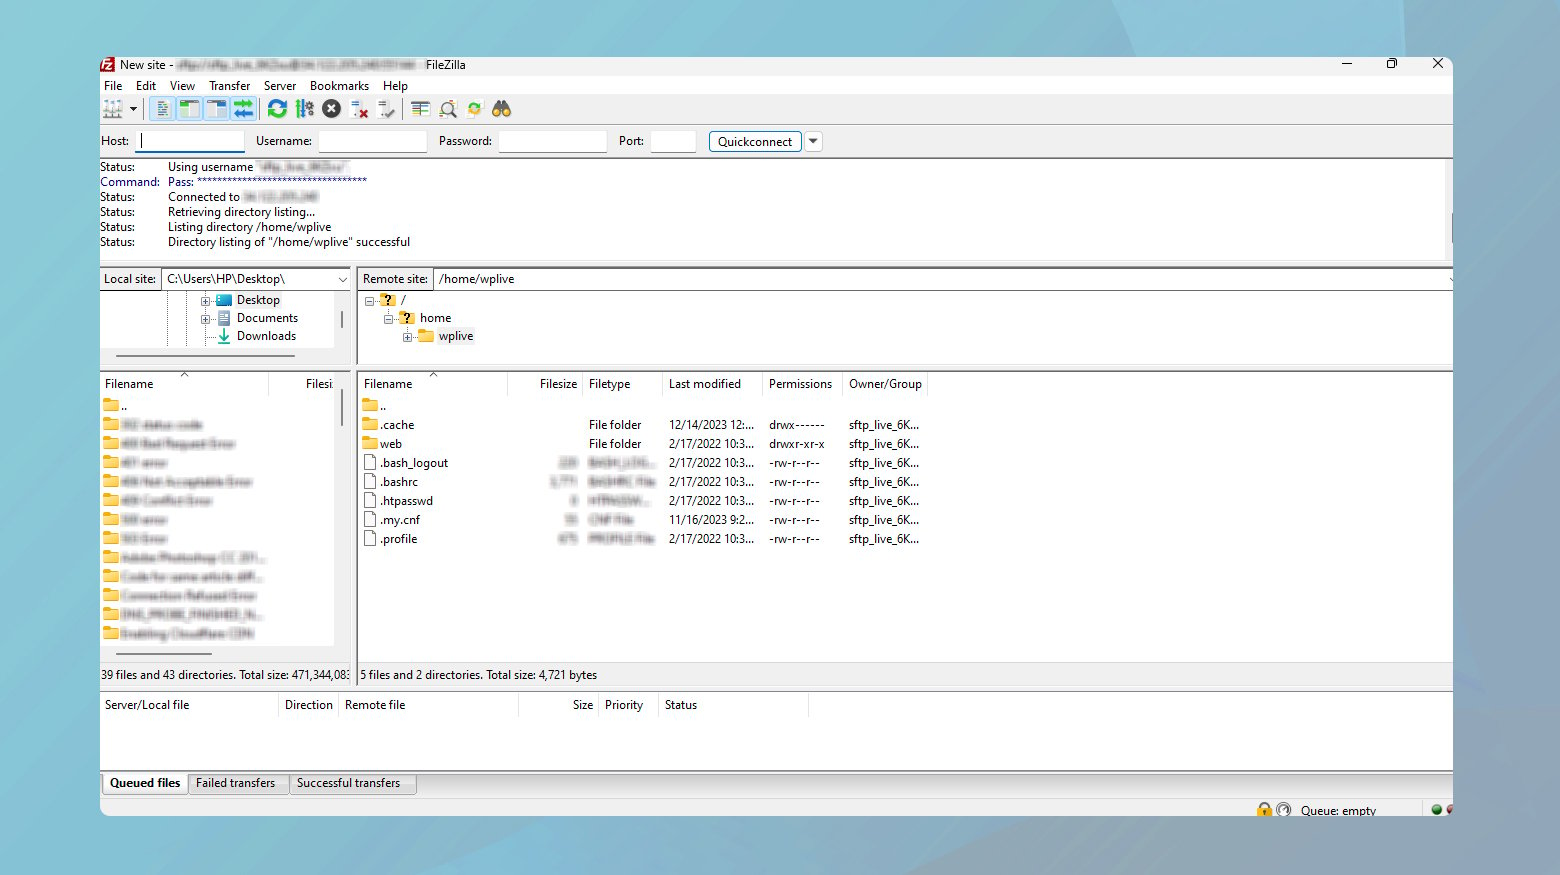
- Use an FTP client (like FileZilla) to connect to your live site. Enter your FTP credentials, which are available in your hosting control panel.
- Navigate to the root directory of your live site, select all files, and download them to your computer.
- Connect to the FTP server for your staging site (it may use the same FTP credentials) and upload the files you just downloaded to the root directory of your staging site.
Clone database using phpMyAdmin
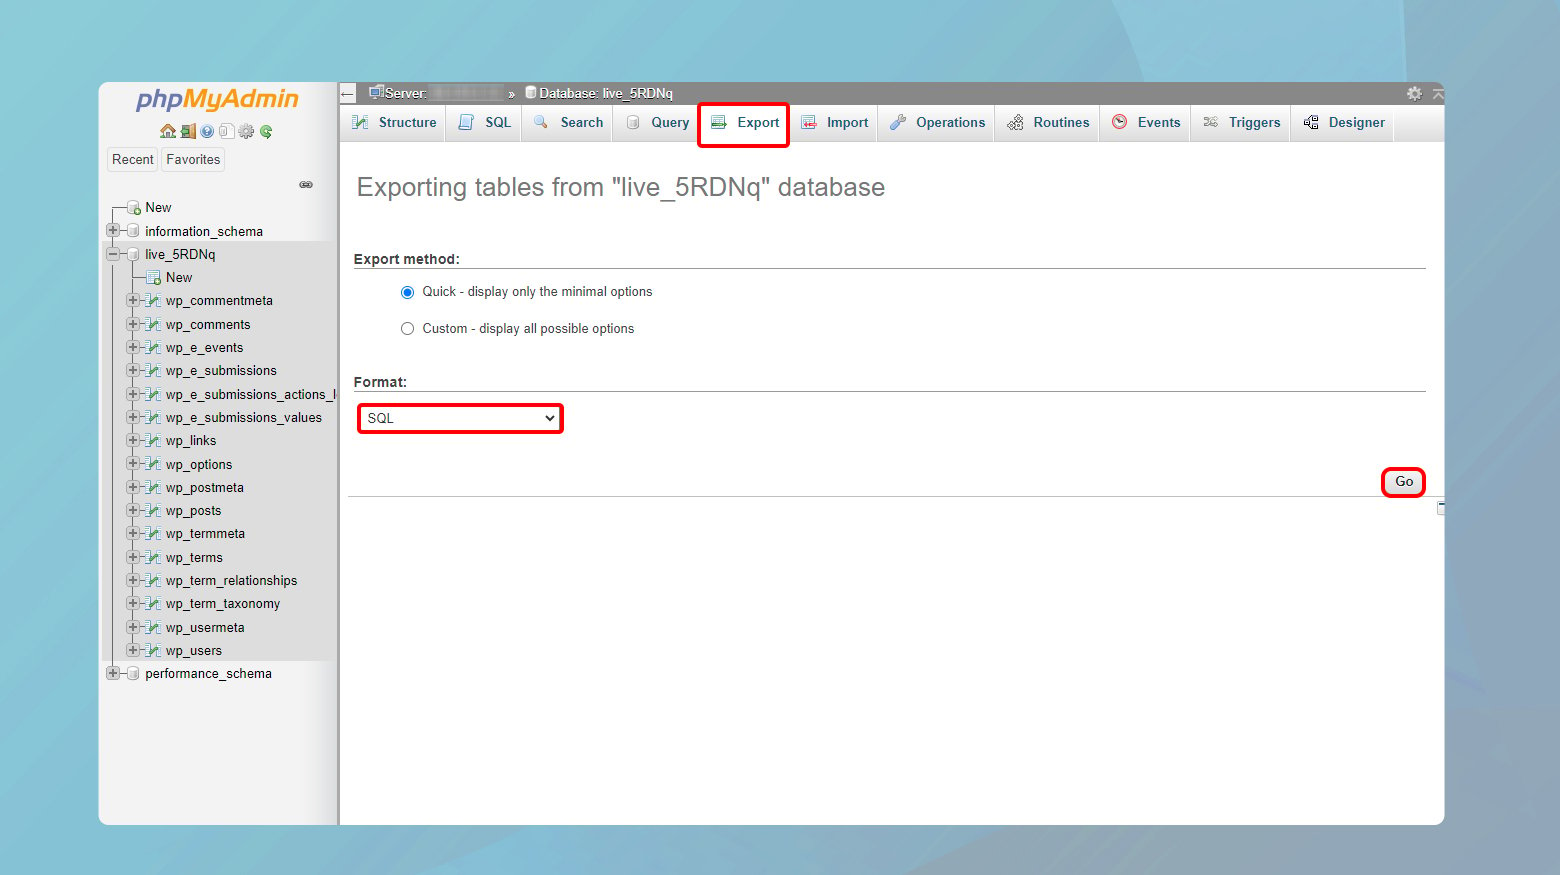
- Log into your hosting control panel and open phpMyAdmin. Select your live site’s database and click on the Export tab. Choose the Quick export method and the SQL format, then click Go to download the database.
- In your hosting control panel, locate the MySQL Databases section and create a new database for your staging site. Note the database name, username, and password.
- Go back to phpMyAdmin, select the new database you just created for your staging site, and click on the Import tab. Choose the file you exported from your live site and start the import process.
Update URLs in the staging site’s database
- Access phpMyAdmin from your hosting control panel and select your staging site’s database.
- Use the SQL query feature to run a search and replace for your live site’s URL to your staging site’s URL. This can be done with a query like:
- Run similar queries on the wp_posts table to update URLs in your content.
UPDATE wp_options SET option_value = replace(option_value, 'http://www.yourlivesite.com', 'http://staging.yourlivesite.com') WHERE option_name = 'home' OR option_name = 'siteurl';
Modify the wp-config.php file
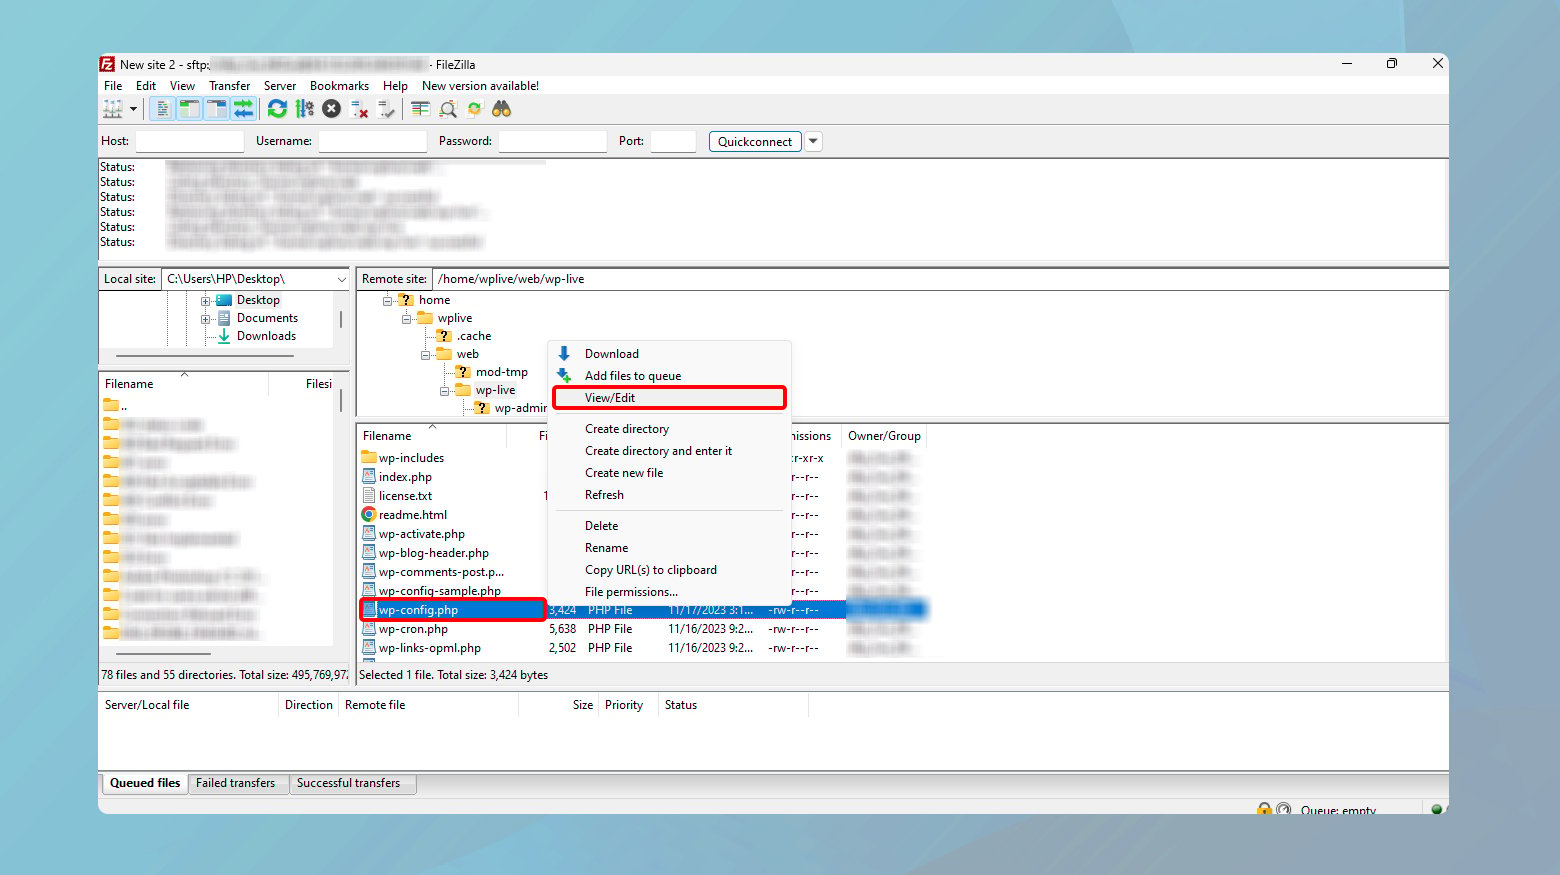
- Using FTP, find and edit the wp-config.php file on your staging site.
- Change the database name, user, and password to match the new database you created for your staging site.
Test and develop on your staging site
Use the staging site URL to access the WordPress admin dashboard.
You can now safely make changes, test updates, and develop new features without affecting your live site.
Conclusion
Staging sites serve as essential tools for testing website changes, ensuring that live sites remain uninterrupted and functional. Whether through plugins or manual creation, the ability to test in a staging environment before going live is crucial for website reliability and user experience.
In our blog, we’ve highlighted the importance of WordPress staging sites for safe web development and updates. We covered how to create staging environments through hosting providers, WordPress plugins like WP Stagecoach and WP Staging, and manually for those needing custom setups. Each method was broken down into detailed steps for ease of implementation, catering to both technical and non-technical users.
Simplify WordPress with 10Web
Simplify WordPress with 10Web
Skip and automate manual work with 10Web Managed WordPress Hosting and the 10Web AI Website Builder.