Backing up your WordPress site is an essential step in ensuring that your website data is secure and can be recovered in case of any unforeseen events. A backup is a copy of all your website’s files, including the core WordPress files, themes, plugins, and your database, which contains posts, comments, and links. Whether you prefer to backup WordPress site using a plugin, or you like having control by backing up manually, each approach offers its own balance of convenience and control.
FAQ
How do I back up my entire WordPress site?
How do I back up and migrate my WordPress site?
Does WordPress automatically backup?
Understanding WordPress backups
Understanding WordPress backups is essential for maintaining the integrity and security of your website. A WordPress site is made up of both files—including the core files, themes, plugins, and media uploads—and a MySQL database that stores dynamic content like posts, comments, and user settings.
Regular backups protect against data loss from events like server failures or security breaches, and should ideally include both these components.
By implementing a backup strategy that features regular, automated backups stored in a secure, off-site location, you ensure that you can restore your site to its previous state quickly and efficiently, minimizing downtime and potential data loss.
A comprehensive backup includes:
- Database: Carries all your content and site configurations.
- Files: Includes plugins, themes, media files, and necessary code files.
Here’s a quick guide on what to keep in mind:
- Frequency: The more updates you make, the more frequent your backups should be.
- Storage: Use secure, offsite storage locations to keep your backups safe.
- Backup plugins: Leveraging tools like UpdraftPlus or BackupBuddy can automate the process.
Simplify WordPress with 10Web
Automate manual work with 10Web Managed WordPress Hosting and 10Web AI Website Builder. Optimize your WordPress website effortlessly.
Setting up your backup
Method 1: How to backup WordPress site using a plugin
Choosing a backup plugin
When selecting a WordPress backup plugin, your primary considerations should be the balance between cost and features, and the inclusion of must-have functionalities.
Free vs. Premium options
Free backup plugins like UpdraftPlus or BackWPup offer standard backup capabilities and are ideal if you have a limited budget. They cover basic needs such as scheduled backups and storage in cloud services like Dropbox or Google Drive. On the other hand, premium options such as Jetpack, BackupBuddy, or Duplicator Pro, include advanced features like real-time backups, incremental backups, and dedicated support. Premium plugins may cost you a subscription fee, but for dynamic websites that frequently update content, they could be a wise investment.
Essential features to look for
When examining backup plugins, ensure the chosen one supports both automatic backups and manual backup options, granting you peace of mind and control. Incremental backup functionality is crucial as it only backs up changes since the last backup, saving your server resources. Look for plugins with cloud storage integration to keep your backups off-site for added security. An option to perform a real-time backup can be important if your site is updated frequently. UpdraftPlus, for instance, integrates with multiple cloud storage options, while Jetpack provides real-time backup solutions.
Choose a plugin that fits both your technical requirements and budget. Carefully evaluate what each plugin offers and consider the value of time-saving and security-enhancing features that premium plugins can offer.
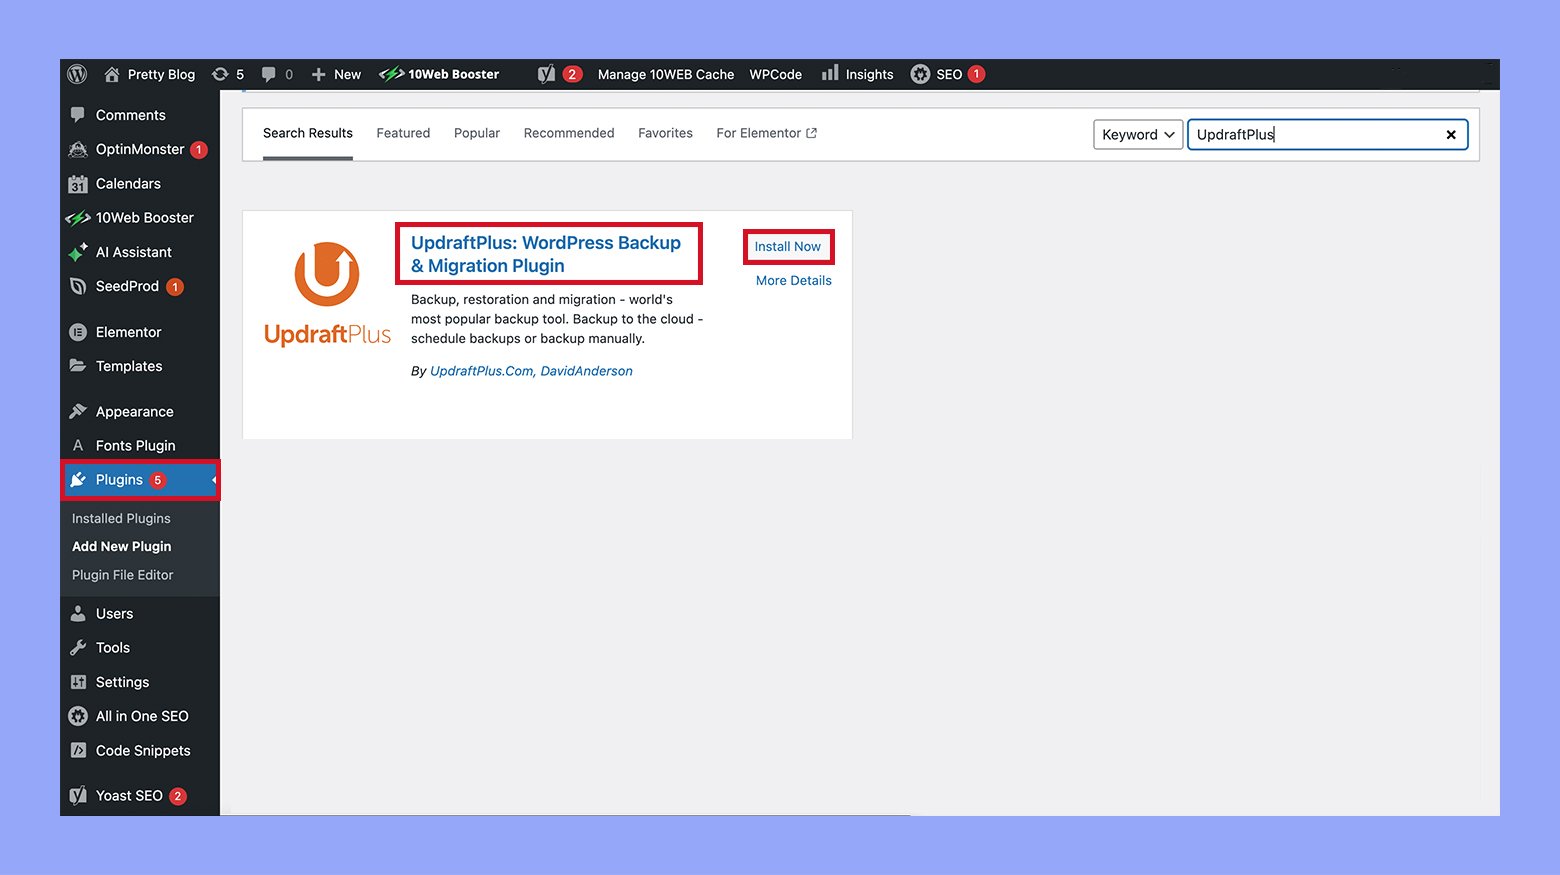
Choosing to backup WordPress site using a plugin is one of the easiest and most convenient methods. Here are the steps:
- Start by logging into your WordPress dashboard.
- Go to the Plugins tab and click on Add new.
- Search for UpdraftPlus and click on Install now once it shows up.

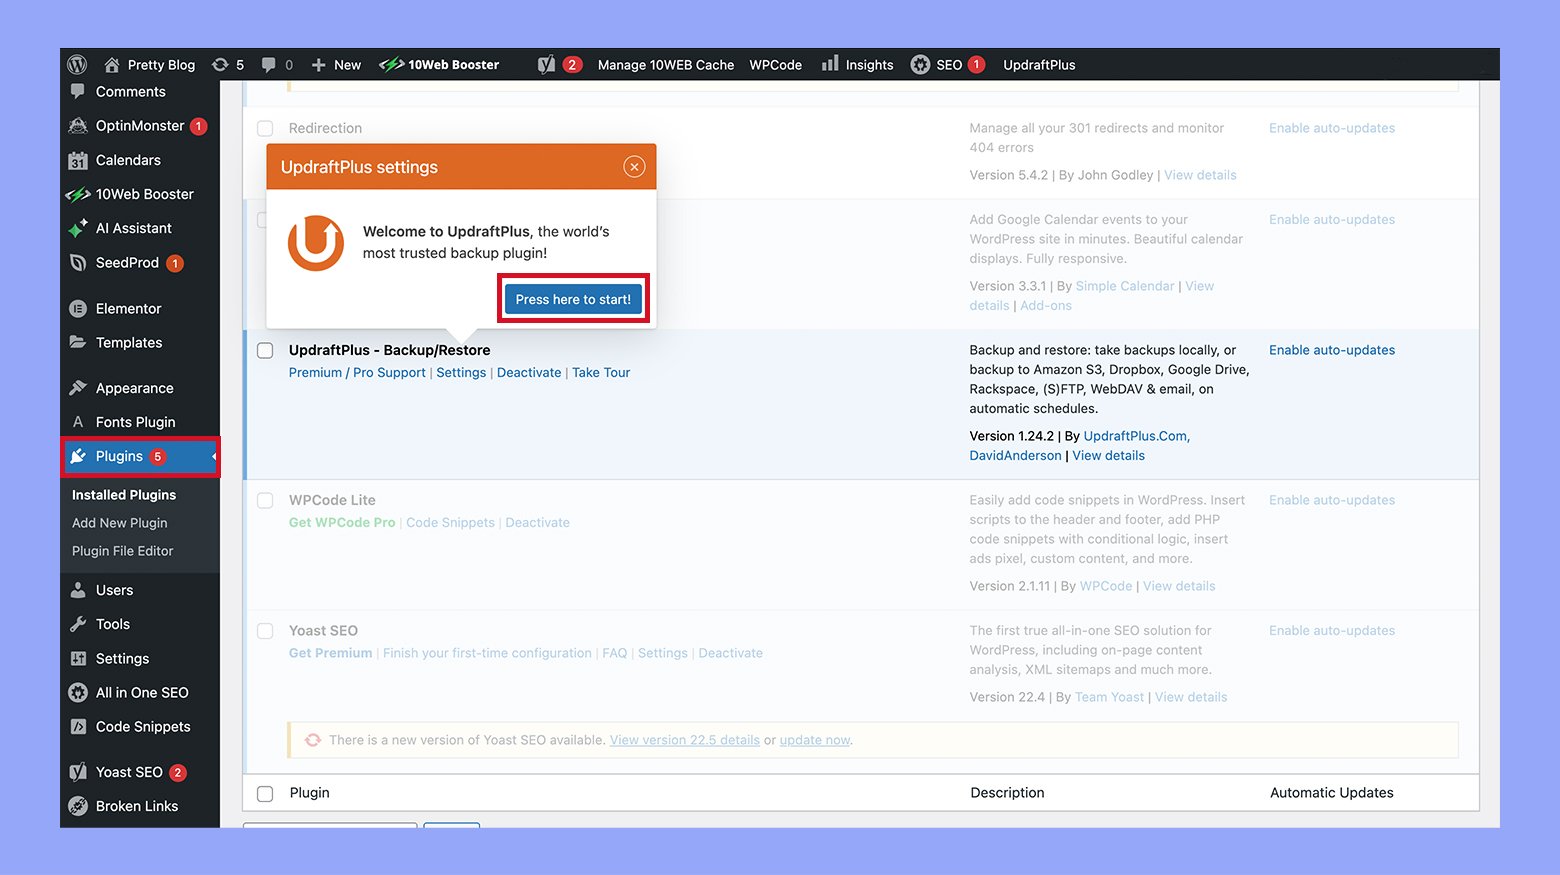
- Activate the plugin to be redirected to your installed plugins list.
- Configure the plugin by accessing its settings, which might prompt you with a Press here to start button.
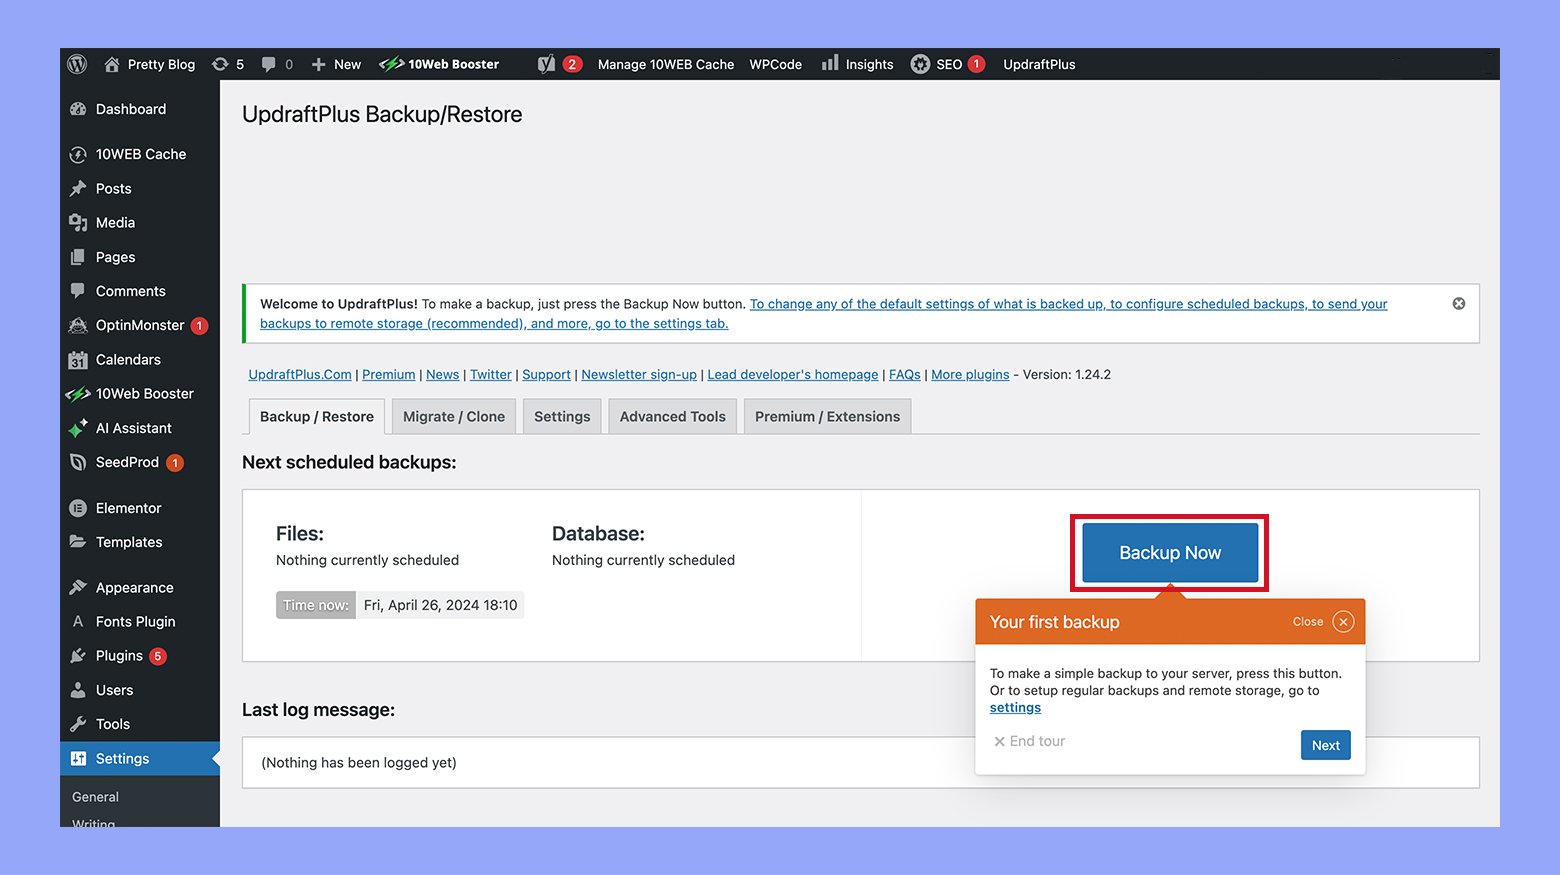
- To perform a backup right away, select the Backup now button.
- Set up automatic backups by configuring your preferred schedule under the Settings tab.
- Choose a remote storage provider for your backups, such as Dropbox, and save your settings.
- Decide which files you want to back up.
- Save these preferences by clicking the Save Changes button.
- Follow the prompt to verify your account with the storage provider by clicking on the provided link.
- Complete the setup by filling in your account details on the new window that opens.
- Grant UpdraftPlus access to your chosen provider and finalize the setup. You’ll be redirected back to your WordPress dashboard where a success message confirms the authentication.
Method 2: How to backup WordPress site using managed WordPress hosting
Using managed hosting to backup WordPress site is another user-friendly method.
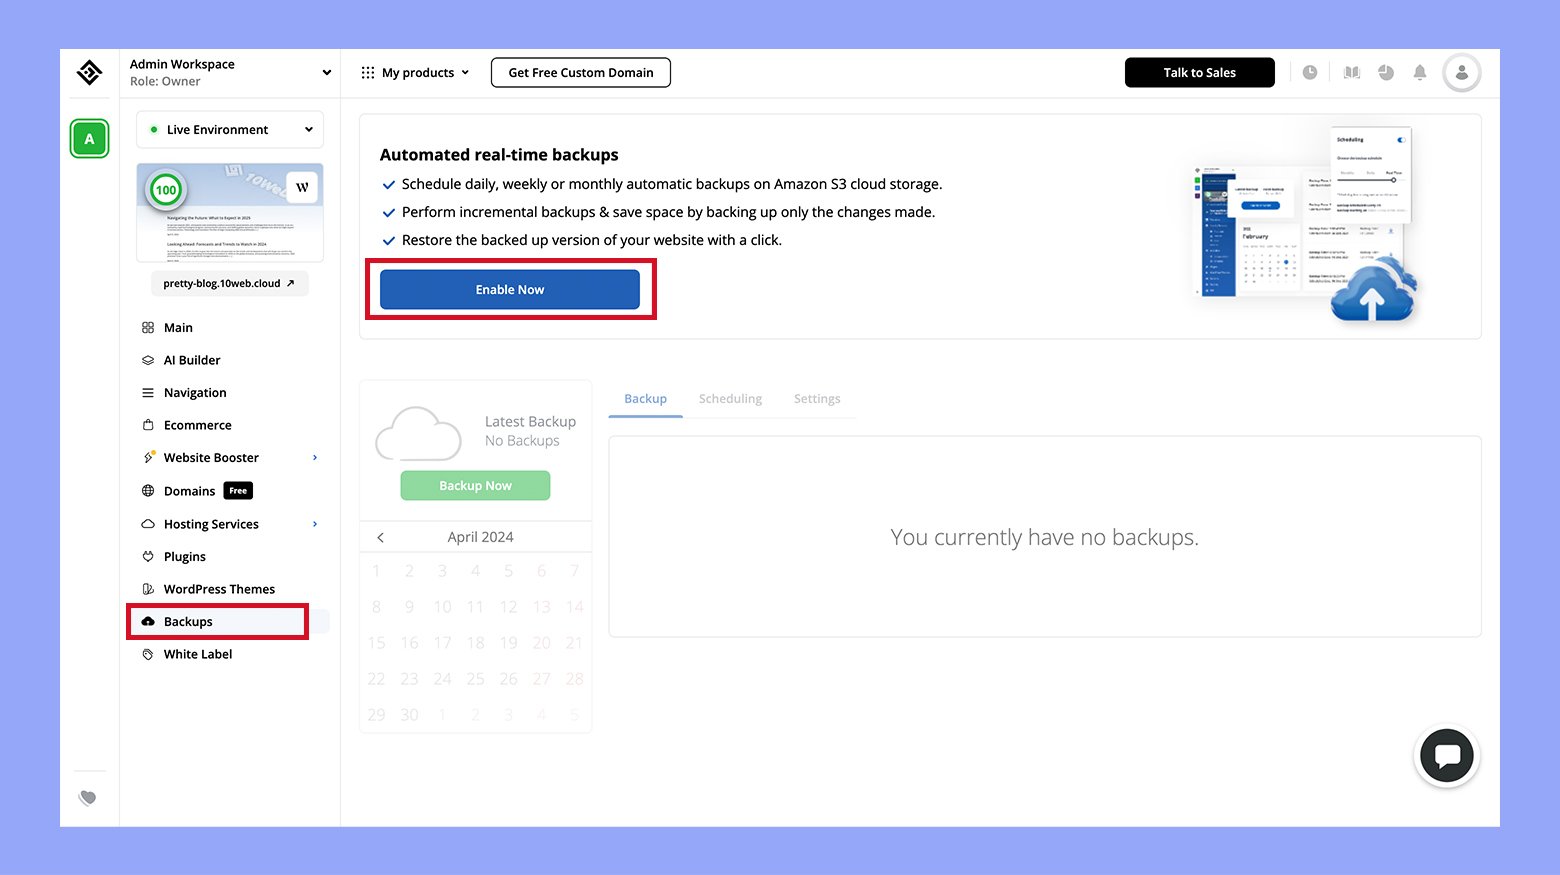
- Log into the hosting dashboard and navigate to the specific WordPress site you want to back up.
- Access the backup tool from the dedicated Backups tab.
- Select Enable now to initiate the backup.
- Wait for the backup to be processed and appear in your backup list.
- Managed hosting typically stores backups off-site, ensuring their safety without further action required on your part.
After initiating the backup, you just need to wait for it to process and appear in your backup list. One of the key advantages of using managed WordPress hosting, like 10Web offers, is that backups are typically stored off-site. This means they are kept in a separate location, which enhances security and ensures that your data remains safe even in the event of local issues such as server failures or security breaches.
Advantages of managed WordPress hosting for backups
- Automated backups: Managed hosting solutions usually offer automated backup services, ensuring that your data is regularly saved without needing to remember to do it manually.
- Off-site storage: Backups are stored in different locations, protecting your data against local failures or disasters.
- Easy recovery: Managed hosting providers often include easy tools to restore your site from a backup, minimizing downtime in case of a problem.
- Security: The off-site backups are also securely stored, providing an additional layer of protection against data theft or loss.
For more details on how 10Web can help you manage your WordPress backups efficiently, you can visit 10Web. Here, you’ll find more information about the backup tools and other WordPress management features.
Method 3: How to backup WordPress site with FTP and phpMyAdmin
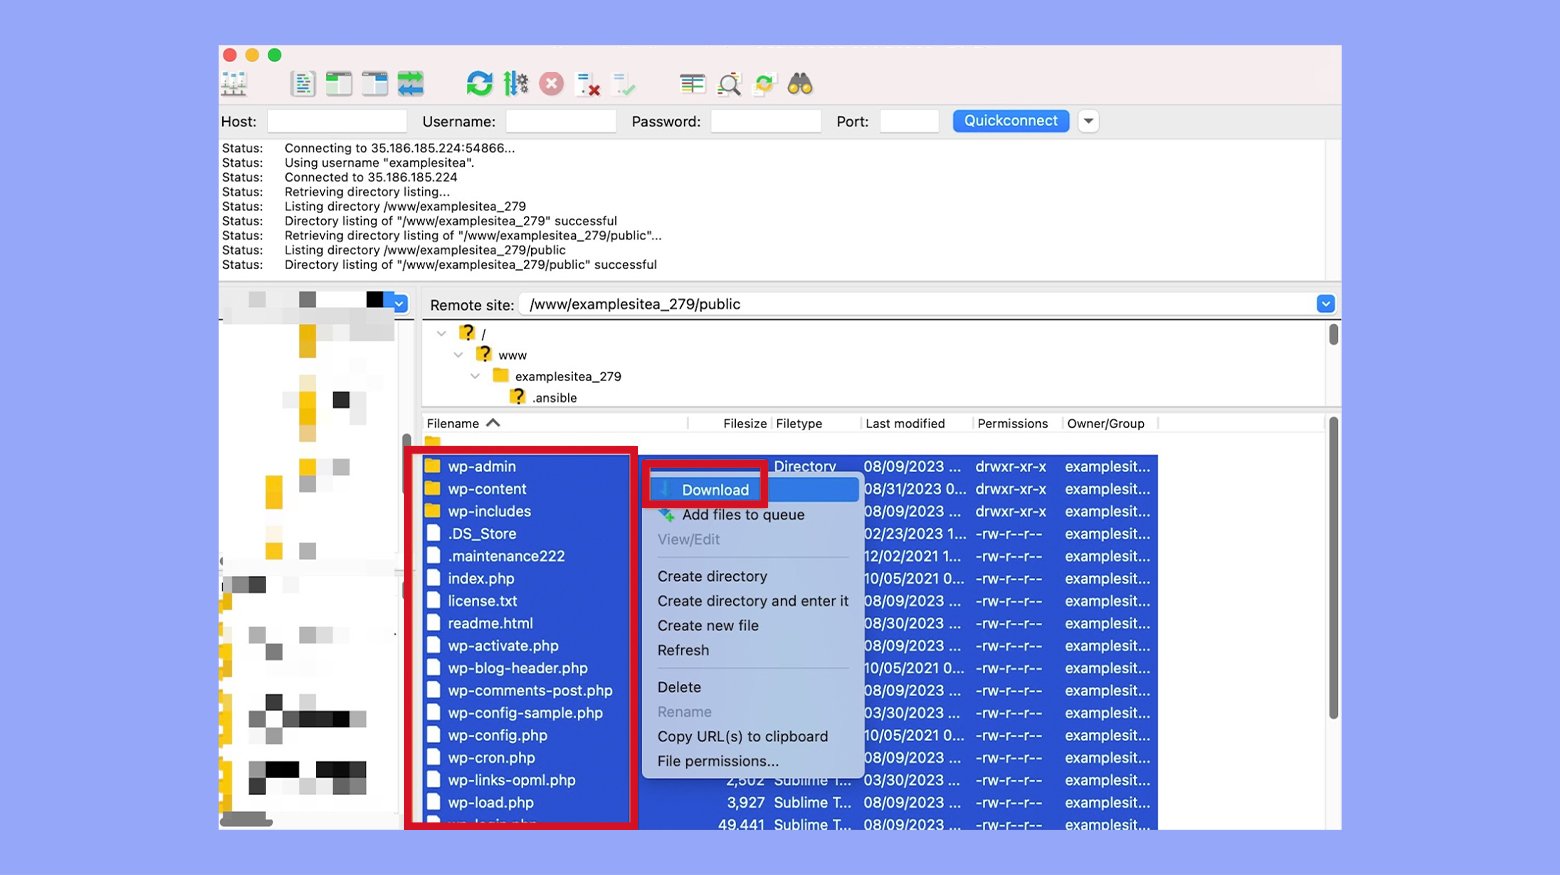
- Begin by connecting to your server with an FTP client such as FileZilla, using the FTP credentials available from your hosting dashboard.
- After connecting, navigate to the directory containing your WordPress site’s files, often named public or public_html. Download all the files and folders to your local computer to create a complete backup of your site’s files.
- While you now have your site’s files, your WordPress content is actually stored in a database. Therefore, a full manual backup also requires you to save your site’s database.
- Log into your hosting dashboard and open the phpMyAdmin tool. The access method can vary by host, so consult your host’s support if needed. In cPanel, phpMyAdmin is typically found in the Databases section.
- In phpMyAdmin, select your site’s database (if you have multiple databases). Then navigate to the Export tab in the top menu, choose Quick as the export method and SQL as the format. Click Go to download the database to your computer.
- With both your site’s files and database downloaded, you have a complete backup of your WordPress site.
Method 4: How to backup WordPress site using the cPanel Backup tool
- Log into cPanel. You can typically access it from your hosting provider’s dashboard.
- Go to the Files section in cPanel and select Backup Wizard.
- Click the Back up option on the left side of the interface.
- Choose Full backup for a complete backup of your site’s files and database. You also have the option to perform a partial backup of either just the files (Home Directory) or just the database (MySQL Databases). If unsure, opt for Full Backup.
- Click Generate backup. You can enter your email address to receive a notification when the backup is complete.
- Once the backup is processed, which might take some time, you’ll receive an email notification. You can then download the backup from the Backup Wizard under the Backups available for download section. Perform these steps regularly to ensure you have up-to-date backups of your site.
Storing your WordPress backups
When it comes to ensuring the safety of your WordPress site, where you store your backups is just as crucial as creating them. It’s important to select storage locations that are secure and easily accessible when needed.
Choosing storage locations
Your backup storage strategy should include multiple locations to mitigate the risk of data loss. Storing copies of your site backup on your local computer provides quick access, but it’s also important to keep a copy off-site to protect against local hardware failures or physical events like theft or natural disasters. Think about having both a site backup and a database backup in each location to maximize your site’s data security. Backup frequency should be determined by the rate of content change on your site—daily backups for busy sites and weekly for those with less activity.
Cloud storage solutions
Cloud storage is a reliable and scalable option for your backups. Services like Google Drive or Amazon S3 offer robust storage solutions with different pricing plans to suit your needs. These platforms have the added benefit of built-in redundancy, ensuring that your backups are saved in multiple data centers across the globe. To backup to these solutions, you can use plugins that often provide the option to schedule automatic backups. Just navigate to the settings and select the Backup Now or Schedule Backup button. With such cloud storage options, you trust the storage infrastructure of established tech giants and leverage their security capabilities.
Restoring from backup
Restoring your WordPress site from a backup is a safeguard against data loss, site crashes, and other issues that can take your site offline. The right restoration process and knowing how to troubleshoot common issues can make reviving your site a smooth operation.
Restoration process
When you’re ready to restore your WordPress site, start by identifying the desired recovery point. This is a snapshot of your website’s data, including WordPress files and the WordPress database, from when the backup was made. Access the backup tool you’ve used, which might be a migration tool if you’re moving your site to a new host.
Here are the standard steps to follow:
- Log in to your hosting control panel or your backup tool.
- Locate and select the backup you want to use for restoration.
- Confirm the details of the backup, ensuring it includes your latest content and changes.
- Click Restore to begin the process.
During the process, your files and databases will be reverted to their state at the recovery point. For manual restorations, you’ll need to upload files via FTP and import the database through tools like phpMyAdmin.
Troubleshooting common issues
If you encounter problems during the restoration, these steps can help:
- Ensure that you are working with a complete backup. A partial backup may miss vital WordPress files or the WordPress database.
- If you get errors related to PHP, check that your server’s PHP version is compatible with the backup you’re trying to restore.
- When your site is live again, clear your browser’s cache and check your site’s functionality.
Remember, if your website data doesn’t seem to reflect recent changes, you might be looking at an outdated recovery point. Always label your backups clearly with dates and content included to avoid confusion.
Maintaining WordPress site health
Keeping your WordPress site healthy involves a diligent approach to regular maintenance and security measures. Ensuring up-to-date elements and conducting consistent security scans are crucial parts of safeguarding your site from malware and other vulnerabilities.
Regular updates
The first step in maintaining site health is to update your WordPress core, plugins, and themes diligently. It is important to:
- Update WordPress to the latest version. WordPress releases updates that often contain security patches and new features. Always check your Dashboard for any available updates and click Update Now when prompted.
- Keep plugins and themes current. Outdated plugins and themes can be potential security risks. Navigate to Plugins → Installed Plugins and Appearance → Themes to check for updates. Use the Update link when available.
Security scans
To ensure the security of your WordPress website, regular scans are a must. They help identify any signs of malware or breaches:
- Use security plugins to conduct scans. Plugins like Wordfence Security can automate the scanning process. Go to Plugins → Add New and search for security plugins. After Install and Activate, look for the security plugin on your Dashboard and run a Scan.
- Follow good security practices. Always make sure you have strong passwords, keep track of user permissions, and delete any accounts or plugins that are not in use. Keeping a clean and secure environment deters many common threats.
Remember to back up your site before making significant changes or updates, which is essential for recovering your site should you encounter problems.
Preventing data loss
When managing your WordPress site, preventing data loss is paramount for maintaining security and ensuring peace of mind. Human error, hacking, and system failures are common culprits behind lost content, but with proper precautions and the use of backup tools, you can safeguard your website.
Firstly, you should regularly backup your wp-content folder, which contains your themes, plugins, and media. Having a recent backup means you can quickly restore your site to its previous state should any data loss occur. Navigate to the wp-admin area and find a reliable backup plugin to schedule automatic backups.
| Essential Backup components | Description |
| wp-content | Contains themes, plugins, and media. |
| Database | Houses your site’s content and settings. |
Backup tools come with different options such as full backups or database-only backups. For a comprehensive safety net, choose a full backup which includes the public_html folder, databases, and all the files related to your WordPress installation.
To start, go to your wp-admin, then to Plugins > Add new. Search for a trusted backup plugin like UpdraftPlus. Click on Install Now and after installation, press Activate. Upon activation, you can access the backup settings by clicking on UpdraftPlus Backup and then selecting Backup now.
Remember to keep your backups in a secure off-site location — like cloud storage — to protect against server-related issues. With these steps, you can rest easy knowing your website is protected against unforeseen data loss.
Additional tips
Remember to monitor your backups. Just having them isn’t enough. Check if they’re up-to-date and complete. A good practice is to backup your site before making significant changes or updates to prevent loss of critical data.
And remember, backing up isn’t just a one-click affair. Navigate to Backup migration and hit Create backup now to initiate the process. Notably, some hosting providers offer backup services, which you can typically find in your hosting account panel.
By understanding and regularly creating WordPress backups, you fortify your website against unforeseen circumstances that might otherwise cause data loss.
Conclusion
Regularly backing up your WordPress site is a vital step in safeguarding your online content and ensuring its availability, regardless of unforeseen challenges. By prioritizing regular backups and choosing reliable storage solutions, you can protect your site from data loss and maintain its integrity, allowing for quick recovery and continued engagement with your audience. Whether you prefer to backup WordPress site manually or prefer automated backups for convenience, the key is consistency and a clear understanding of the backup and restore process.
Simplify WordPress with 10Web
Simplify WordPress with 10Web
Skip and automate manual work with 10Web Managed WordPress Hosting and the 10Web AI Website Builder.