WordPress is a versatile platform that lets users do a lot, from blogging to building websites. One of its key features is the ability to use different types of files, including HTML files.
This is important for people who want to add custom pages or unique features to their websites that they can’t get from the usual WordPress themes or plugins. Learning how to upload HTML files to WordPress gives users more freedom to customize their sites exactly how they want.
FAQ
What is an HTML file?
How do I upload an HTML file to WordPress?
Can we convert HTML website to WordPress?
Understanding HTML files
HTML, or HyperText Markup Language, is the backbone of the web. It’s a standard markup language used to create and structure sections on the web page, from headers and links to paragraphs and tables. HTML files are essentially text files saved with an .html or .htm extension, containing HTML code that browsers interpret to display web pages.
A common misconception among WordPress users is equating HTML templates with WordPress themes. While both serve to design and structure web content, they operate differently. WordPress themes are collections of templates and stylesheets that define the appearance and design of a WordPress site, incorporating PHP, HTML, CSS, and JavaScript. Conversely, HTML templates are static and don’t include the dynamic features or content management functionalities of WordPress themes. Understanding this distinction is crucial for effectively integrating HTML files into a WordPress site.
Simplify WordPress with 10Web
Automate manual work with 10Web Managed WordPress Hosting and 10Web AI Website Builder. Optimize your WordPress website effortlessly.
Reasons to upload HTML files to WordPress
There are several scenarios where uploading an HTML file to WordPress is advantageous.
- To implement a unique design or layout that differs from your WordPress theme for specific pages.
- For creating static pages that load quickly and don’t require WordPress theme features, like landing pages or special campaign pages.
- To use HTML files provided by third-party services (e.g., verification files, custom widgets) that need to be added directly to your site.
- When migrating content from another platform or site, you might need to upload HTML files directly before converting them to WordPress pages or posts.
- For testing or development purposes, especially when creating custom components that need to be tested directly on the WordPress site.
- To have finer control over the SEO elements of a page, such as meta tags and structured data, which might be easier to manage directly in HTML for some users.
- Static HTML pages can be faster than dynamic pages, as they require fewer server resources to load, which can improve site performance and user experience.
- To archive content in its original HTML format, ensuring that it can be easily restored or used elsewhere.
3 methods to upload HTML files to WordPress
Before uploading an HTML file to WordPress, ensure it’s properly formatted and free of errors. Use an HTML validator tool to check your code. Also, consider the file’s destination on your WordPress site and whether it requires integration into an existing page or should be accessible as a standalone page.
Method 1: Using the WordPress dashboard
The most straightforward method for uploading HTML files is through the WordPress Dashboard, leveraging the built-in functionality of posts, pages, or the Media Library.
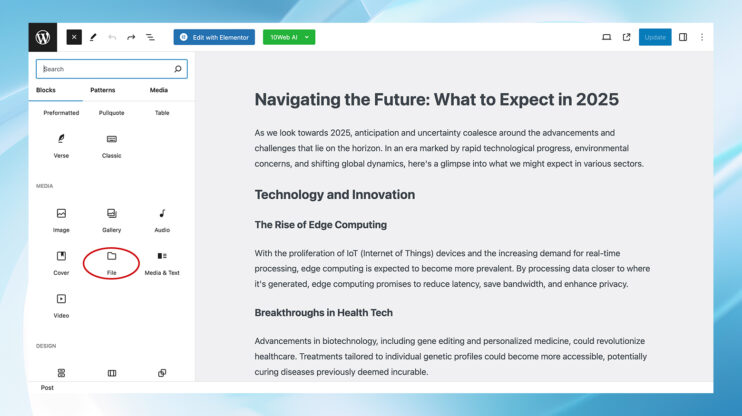
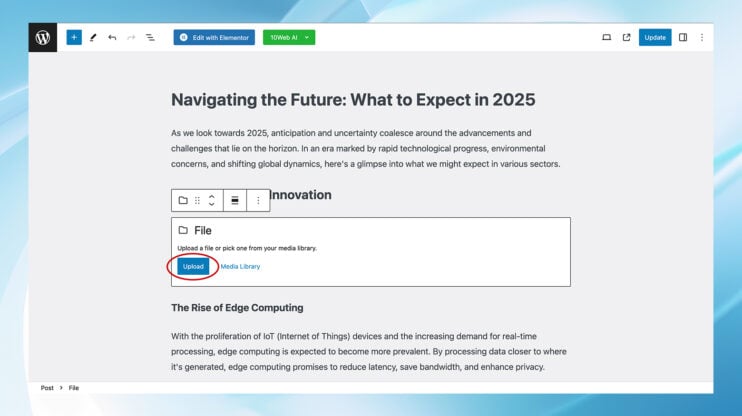
Using Gutenberg editor
- Navigate to the post or page where you want to upload the HTML file.
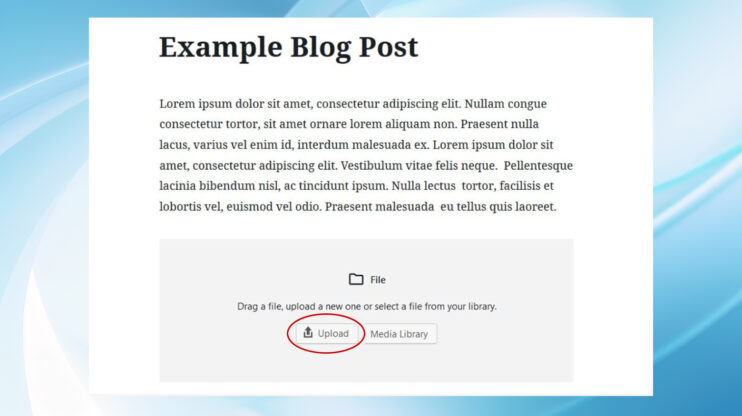
- Insert a file block in the Gutenberg Editor.

- Click upload to add your HTML file.
Simplify WordPress with 10Web
Automate manual work with 10Web Managed WordPress Hosting and 10Web AI Website Builder. Optimize your WordPress website effortlessly.
Using classic editor
- Go to the post or page for your HTML file upload.
- Click add media then select upload to find your HTML file.
- Choose ‘Insert into post’ after selecting your HTML file to add it to your page or post and save it to your Media Library automatically.
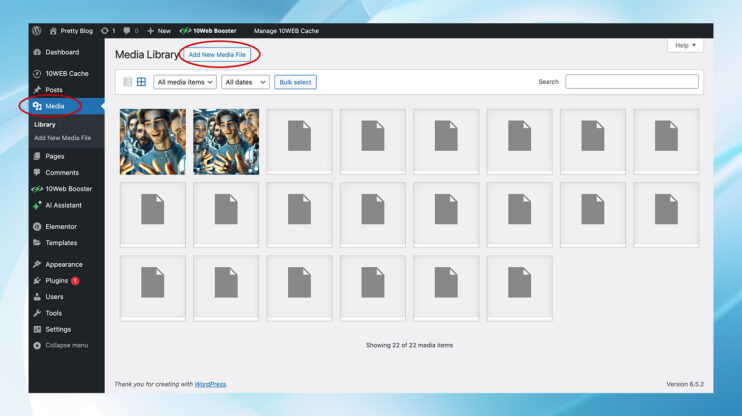
Uploading directly to the media library
- From the WordPress dashboard, click on media library.
- Select Add new and then choose your HTML file from its saved location (like your computer or an external storage device).
These steps provide a streamlined process of uploading HTML files to a WordPress site, whether you’re adding them to specific content or directly to the Media Library for broader use.
Method 2: Using an FTP client
For larger HTML files or templates, or when working on your site locally, an FTP client offers a more robust solution.
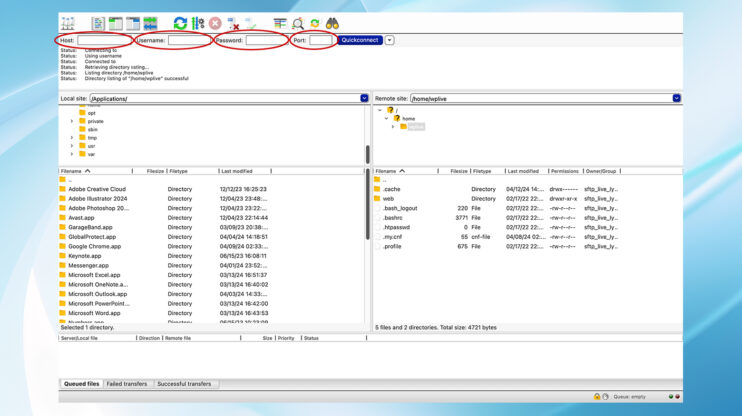
- Open Your FTP Client: Launch an FTP client like FileZilla to handle file transfers. This tool is especially useful for managing large templates or working on a test site before going live.
- Connect to Your Web Host: Use your FTP credentials to connect to your web hosting account. You can find these credentials in your hosting account’s dashboard.
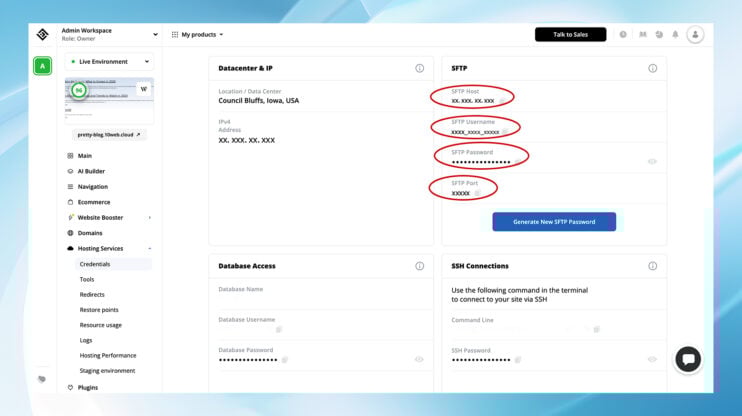
For example, if you’re using 10web hosting, log into your account navigate to Hosting services > Credentials, and find information on your SFTP/SSH details.
- Enter credentials in FileZilla:
-
- Enter the host, username, password, and port number found in your 10Web dashboard.
- Click OK once you’ve entered these details.
- Upload the HTML file:
-
- Navigate to your website’s root directory in FileZilla, where you’ll find folders like wp-content and files like wp-config.php.
- On the left side of FileZilla (your local machine), locate the HTML file you want to upload. Right-click on it and choose Upload.
- Ensure all hidden files are visible in FileZilla if you need to manage them. There’s a tutorial in FileZilla that shows you how to do this.
- Verify the upload: After uploading, check if the HTML file is visible on your website by typing your website’s URL followed by the HTML file name (e.g., www.mywebsite.com/html-file). This should redirect you to the new webpage created with the uploaded HTML file.
Using this method, you can efficiently upload HTML files to WordPress site, minimizing downtime and ensuring everything runs smoothly.
Simplify WordPress with 10Web
Automate manual work with 10Web Managed WordPress Hosting and 10Web AI Website Builder. Optimize your WordPress website effortlessly.
Method 3: Using cPanel
If your hosting provides cPanel, you can upload HTML files directly to your server.
- Log into cPanel: Access your hosting account and open the cPanel dashboard.
- From the cPanel dashboard, navigate to and open the File Manager.
- Choose upload location:
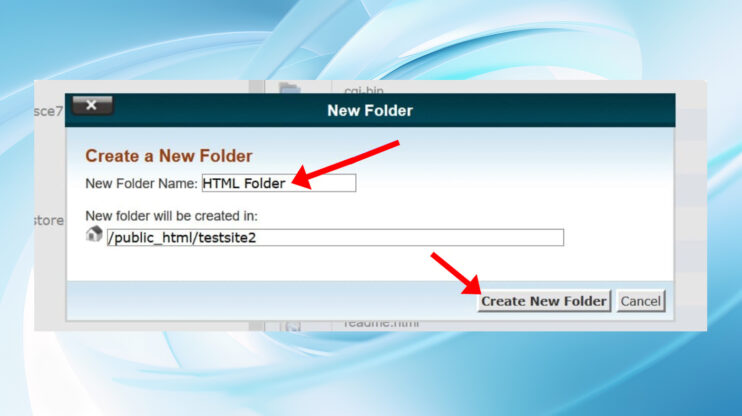
- Create a new folder. Consider creating a new folder in your site’s root folder to keep your HTML files organized.
- Upload directly to the root folder. If you choose this option, ensure the HTML file does not overwrite important files like your site’s index.html by renaming it before uploading.
- Upload HTML file:
- If creating a new folder, first navigate to your site’s root folder, then select “New Folder,” name it, and create it.
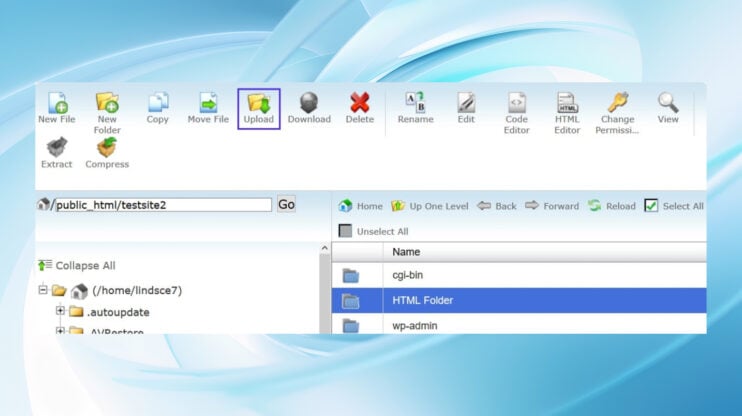
- Double-click to open the new folder and click on the upload button to select and upload your HTML file.
These steps will help you safely upload HTML files to WordPress site using cPanel and File Manager, with minimal risk of disrupting your site’s existing structure.
Which method is best for you?
1. WordPress Dashboard
Best for: Users who are less technical or need to make quick, small additions of HTML directly into posts or pages. This method is most convenient for adding HTML code snippets, such as embedding a third-party widget or a small piece of custom content.
Advantages:
- User-friendly, with no additional tools required.
- Ideal for integrating HTML directly within the content of posts or pages.
2. FTP Client
Best for: More technical users who need to upload full HTML files or directories, especially when these files need to be placed in specific locations within the WordPress file structure. This method is preferred for adding standalone HTML pages or assets that are part of a larger, custom web development project.
Advantages:
- Offers full control over where files are placed within the WordPress directory.
- Bypasses WordPress security restrictions on file types, allowing for a wider range of file uploads.
- Suitable for bulk uploads or managing large files.
3. cPanel
Best for: Users who are comfortable navigating their hosting environment and prefer a graphical interface for file management. This method is useful for uploading HTML files or entire folders directly to the server without using an FTP client.
Advantages:
- Provides a graphical user interface, which might be more intuitive for some users.
- Allows for file and folder management directly within the hosting environment.
- Like FTP, it offers more control over file placement and can handle a wide range of file types.
Simplify WordPress with 10Web
Automate manual work with 10Web Managed WordPress Hosting and 10Web AI Website Builder. Optimize your WordPress website effortlessly.
Troubleshooting common issues
Troubleshooting common issues when uploading HTML files to WordPress can save you a lot of time and frustration. Here are some typical problems you might encounter and how to address them:
1. File type not permitted
Issue: WordPress security measures restrict the upload of certain file types through the dashboard, resulting in a “File type not permitted for security reasons” error message.
Solution:
-
- Use an FTP client or the cPanel method to upload your HTML files directly to the server. This bypasses WordPress’s security restrictions. Alternatively, you can install a plugin that allows additional file types to be uploaded. However, proceed with caution, as expanding the allowed file types can introduce security vulnerabilities if not managed properly.
2. 404 Error on uploaded file
Issue: After uploading an HTML file, trying to access it via its URL leads to a 404 error, indicating the server can’t find the requested file.
Solution:
- Ensure the file was uploaded to the correct directory. WordPress typically serves files from within the wp-content directory, but your file’s URL will depend on its exact location within the WordPress file structure.
- Verify file permissions as incorrect file permissions can prevent the server from serving the file correctly. Using an FTP client, check that your HTML file has the correct permissions (usually, 644 is appropriate for files).
- Flush rewrite rules, as sometimes, WordPress’s permalink structure can interfere with accessing new files. Go to Settings > Permalinks in the WordPress dashboard and simply click “Save Changes” without making any changes. This can refresh the permalink structure and resolve the issue.
3. HTML file not displaying correctly
Issue: The HTML file uploads successfully, but when viewed, it doesn’t display as expected. This can be due to missing CSS/JS files, incorrect paths, or code errors.
Solution:
- Use a tool like the W3C Markup Validation Service to check for errors in your HTML file. Correcting these errors can often resolve display issues.
- If your HTML file relies on external CSS or JavaScript files, ensure they are also uploaded to your server and accessible. Verify the paths to these files in your HTML code are correct relative to your WordPress directory structure.
- Test in different browsers, because sometimes, HTML files may look different in various browsers due to compatibility issues. Test your HTML page in different browsers and consider adding vendor prefixes or fallbacks to your CSS.
4. File uploads but doesn’t execute JavaScript or PHP
Issue: For security reasons, WordPress does not execute PHP code within HTML files, and JavaScript execution can be limited depending on how and where the file is included.
Solution:
- For PHP: WordPress doesn’t allow PHP execution within uploaded files for security. To include PHP functionality, consider developing a custom plugin or theme, or use WordPress’s built-in functions and hooks in your theme’s functions.php file.
- For JavaScript: Ensure JavaScript is correctly included and not blocked by WordPress or browser security settings. For extensive JS functionality, consider enqueuing scripts through the WordPress way in your theme’s functions.php file or using a custom plugin.
5. Security concerns
Issue: Uploading HTML files can introduce security risks, especially if they contain JavaScript or link to external resources.
Solution:
- Always sanitize any user input or data imported from external sources to avoid XSS (Cross-Site Scripting) attacks.
- Use WordPress security plugins. They help monitor and block malicious activities. Configuring security plugins to scan uploaded files can prevent the introduction of malware.
- Periodically review uploaded files and their contents to ensure they do not contain vulnerable or malicious code.
Troubleshooting these common issues requires a blend of technical knowledge and attentiveness. By methodically addressing each problem and implementing best practices, you can ensure that your HTML uploads enhance your WordPress site safely and effectively.
Best practices for managing HTML files
In WordPress development, it’s crucial to handle HTML files carefully to keep your website strong, secure, and fast. Whether you’re experienced or new to website management, following certain practices can reduce risks and improve your site’s performance. Let’s explore how you can use them effectively.
- Back-up your site: Always back up your WordPress site before uploading new files or making significant changes.
- Test on a staging environment: If possible, test HTML uploads and changes on a staging site before going live.
- Maintain security and performance: Be cautious of the HTML content you’re adding, ensuring it doesn’t compromise your site’s security or performance.
Conclusion
Learning hot to upload HTML files to WordPress can significantly enhance your website’s functionality and design flexibility. Whether you choose to utilize the WordPress dashboard, an FTP client, or cPanel, each method offers distinct advantages tailored to different levels of technical expertise.
By following the guidelines and troubleshooting tips provided, you can seamlessly integrate HTML files, ensuring they contribute positively to your site’s aesthetic and performance. Embrace these techniques to unlock a new level of customization and make your WordPress site truly unique, all while maintaining the security and efficiency that are paramount in the digital landscape.
Simplify WordPress with 10Web
Simplify WordPress with 10Web
Skip and automate manual work with 10Web Managed WordPress Hosting and the 10Web AI Website Builder.