What is Padding in WordPress
Padding in WordPress is an important aspect of web design that can help your site look more organized and appealing. In WordPress, padding is the space between the content and the border of a block. This technique helps to create a cleaner and more readable layout for your website.
Imagine your content as a painting, and the padding is the frame that surrounds it. Adding padding can make your text and images stand out, providing breathing space that enhances the overall design. It’s a powerful way to improve the user experience on your site.
Using padding wisely can also prevent your content from feeling cramped or cluttered. This means your visitors will have a better reading experience, which can keep them engaged and more likely to explore other parts of your website.
Understanding padding in WordPress
What is padding in WordPress? Padding is an important part of web design in WordPress. It controls the space inside a block, helping to improve the layout and design of your website.
The basics of padding and spacing
Padding adds space between content and the edge or boundary of a block or element. It helps make your website look neat by ensuring that text and other elements do not touch the boundaries of the block.
Adding padding can improve readability and create a more visually appealing layout. This makes elements easier to distinguish and interact with.
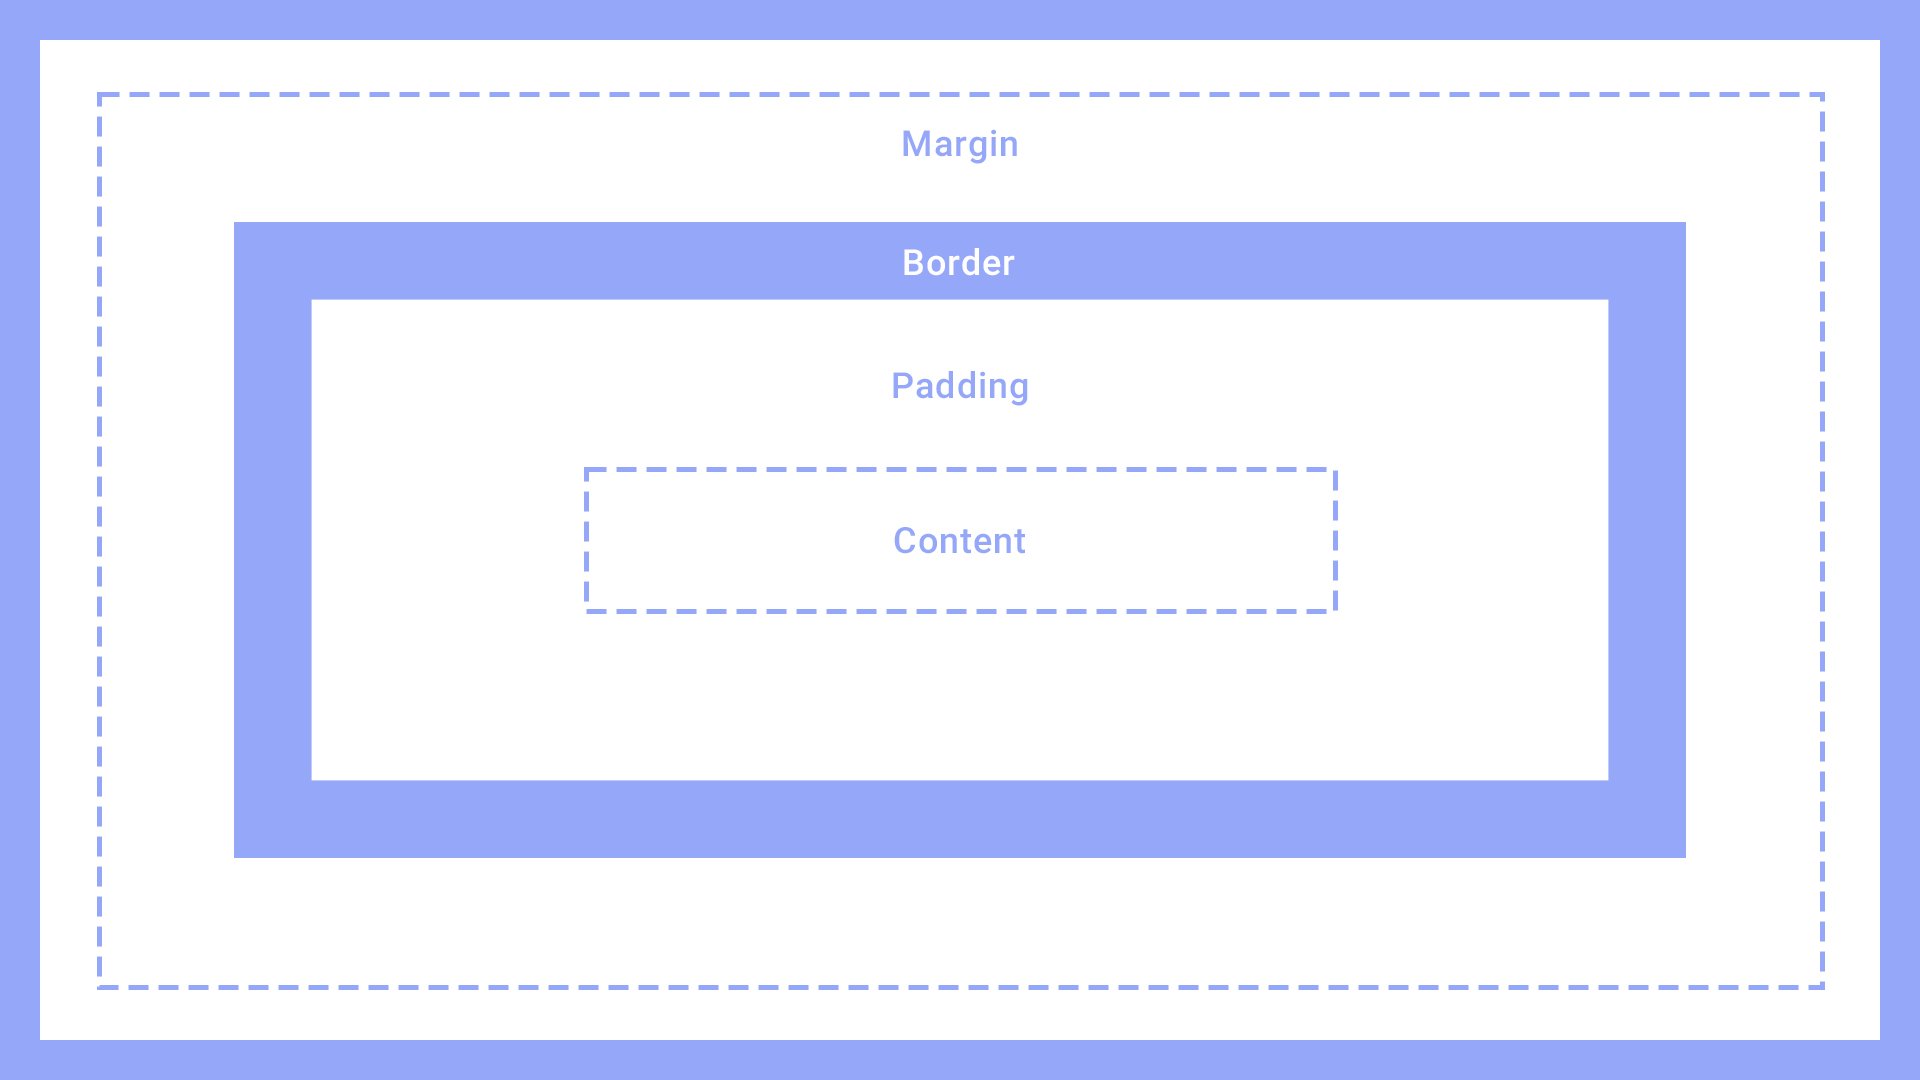
Padding vs. margin: key differences
Padding is similar to margins in that they both control the amount of space in and around a block or elements. While padding adds space inside a block, margin adds space outside the block. This means padding controls the internal space of an element.
While margin manages the outer space between different elements.
For instance, padding keeps content from touching the edges of a block. On the other hand, margin helps ensure blocks or elements do not touch each other. Knowing when to use each can help you create a well-spaced, clean design.
Standard padding values and units
In WordPress, padding values can be set using various units such as pixels (px), percentage (%), and em units. Pixels are precise and fixed, while percentages are relative to the parent element’s size.
Here’s a quick reference:
- px – fixed and precise (e.g., 10px).
- % – relative to parent element size (e.g., 5%).
- em – relative to the font size (e.g., 1em).
Using these units effectively can help you achieve the exact look you want for your website. Some WordPress themes may also have default padding values settings that you can adjust to fit your design preferences.
Configuring padding in WordPress editor
Padding in WordPress helps you create space inside your website’s elements. You can adjust padding through the Block Editor, use custom CSS, or manipulate the Theme Customizer for a tailored look.
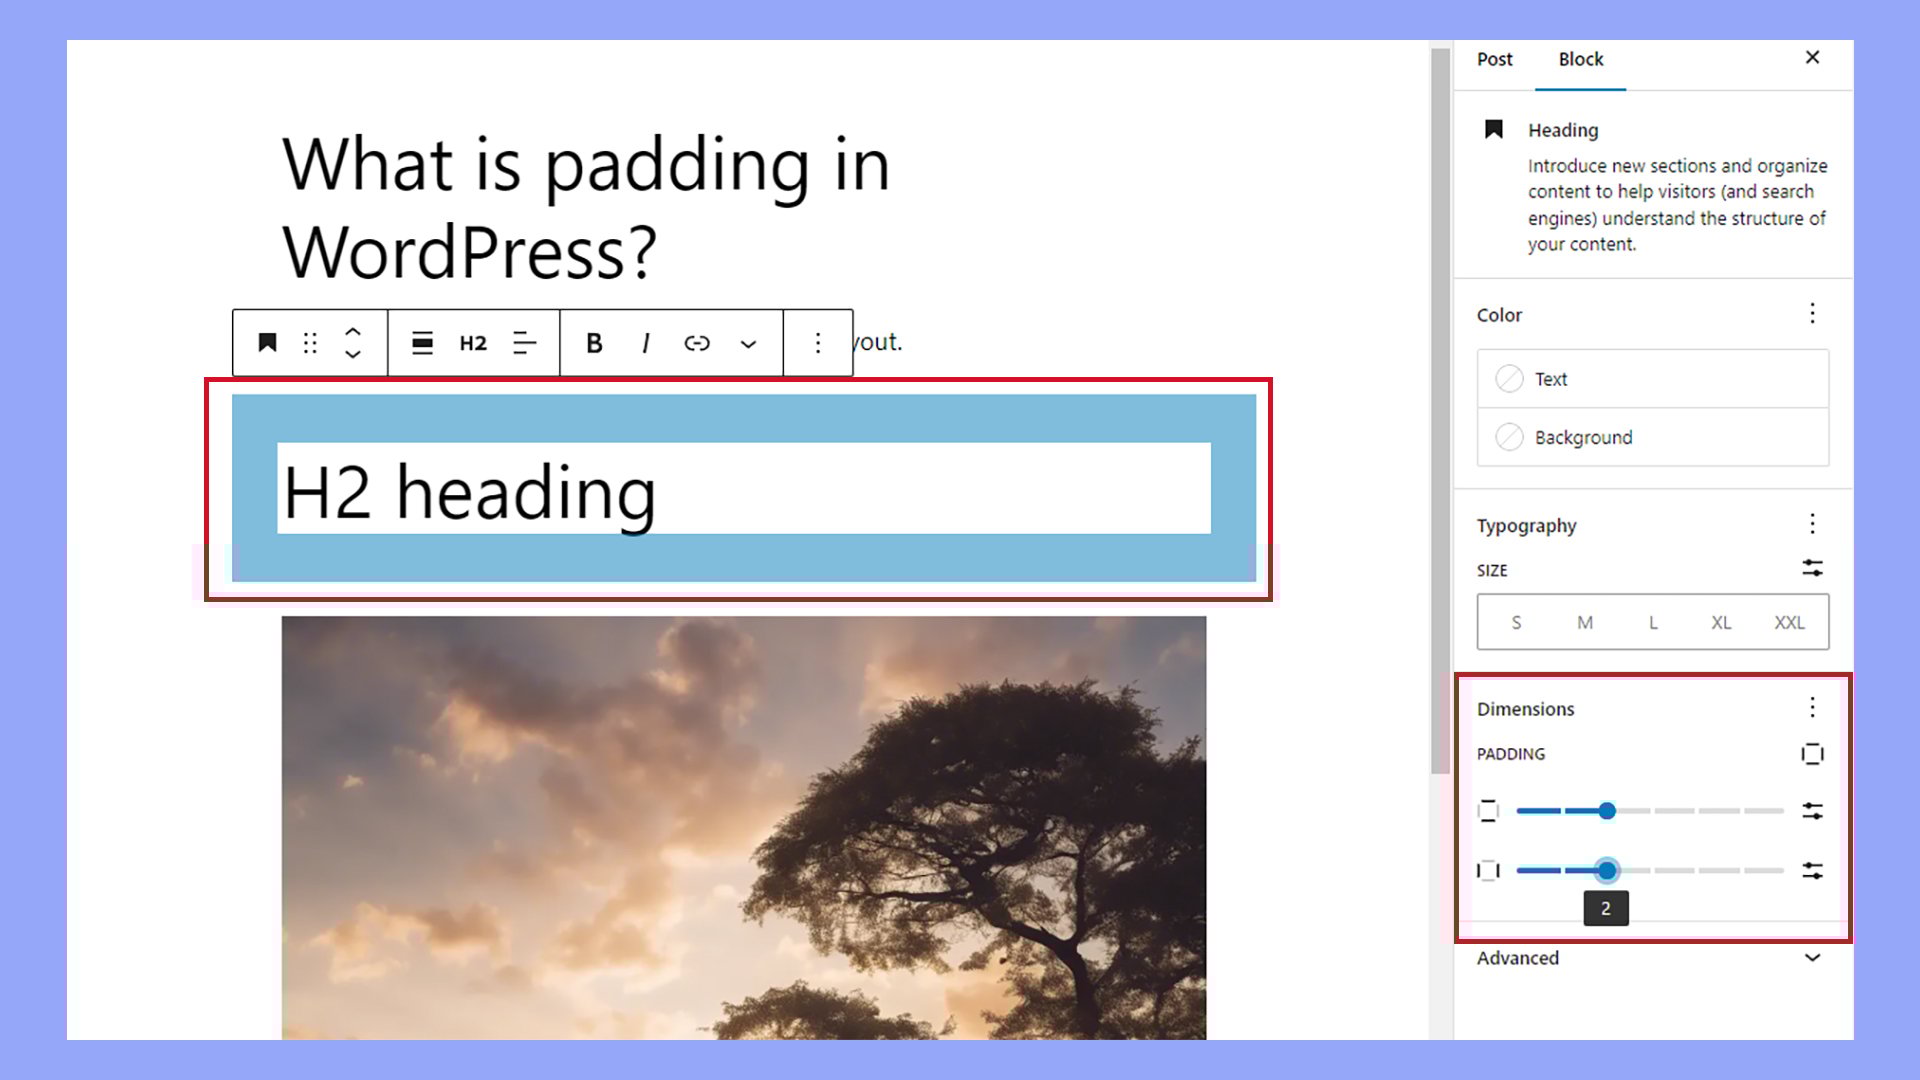
Adjusting padding with block editor
In the Block Editor, you can easily change padding for individual blocks.
To do this, select the block you want to adjust. Then, open the Block settings on the right side.
Look for the Dimension settings section. Here, you can find options to customize padding. You might see sliders or input fields where you can adjust the padding values.
If you want different padding sizes on each side, toggle the option to unlink sides. Now, you can set padding for the top, right, bottom, and left individually. It’s a simple way to fine-tune spacing.
Using custom CSS for padding
For more control, you can use custom CSS to set padding in WordPress. This method is useful if you have specific design needs.
To start, go to your WordPress dashboard and navigate to Appearance > Customize. Then, select Additional CSS.
Add CSS code to target elements on your site:
/* Example of adding padding to a specific class */
.your-class {
    padding: 20px;
}
Replace .your-class with the actual class or ID of the element. You can also specify padding for each side:
/* Example of setting padding individually */
.your-class {
    padding-top: 10px;
    padding-right: 15px;
    padding-bottom: 20px;
    padding-left: 25px;
}
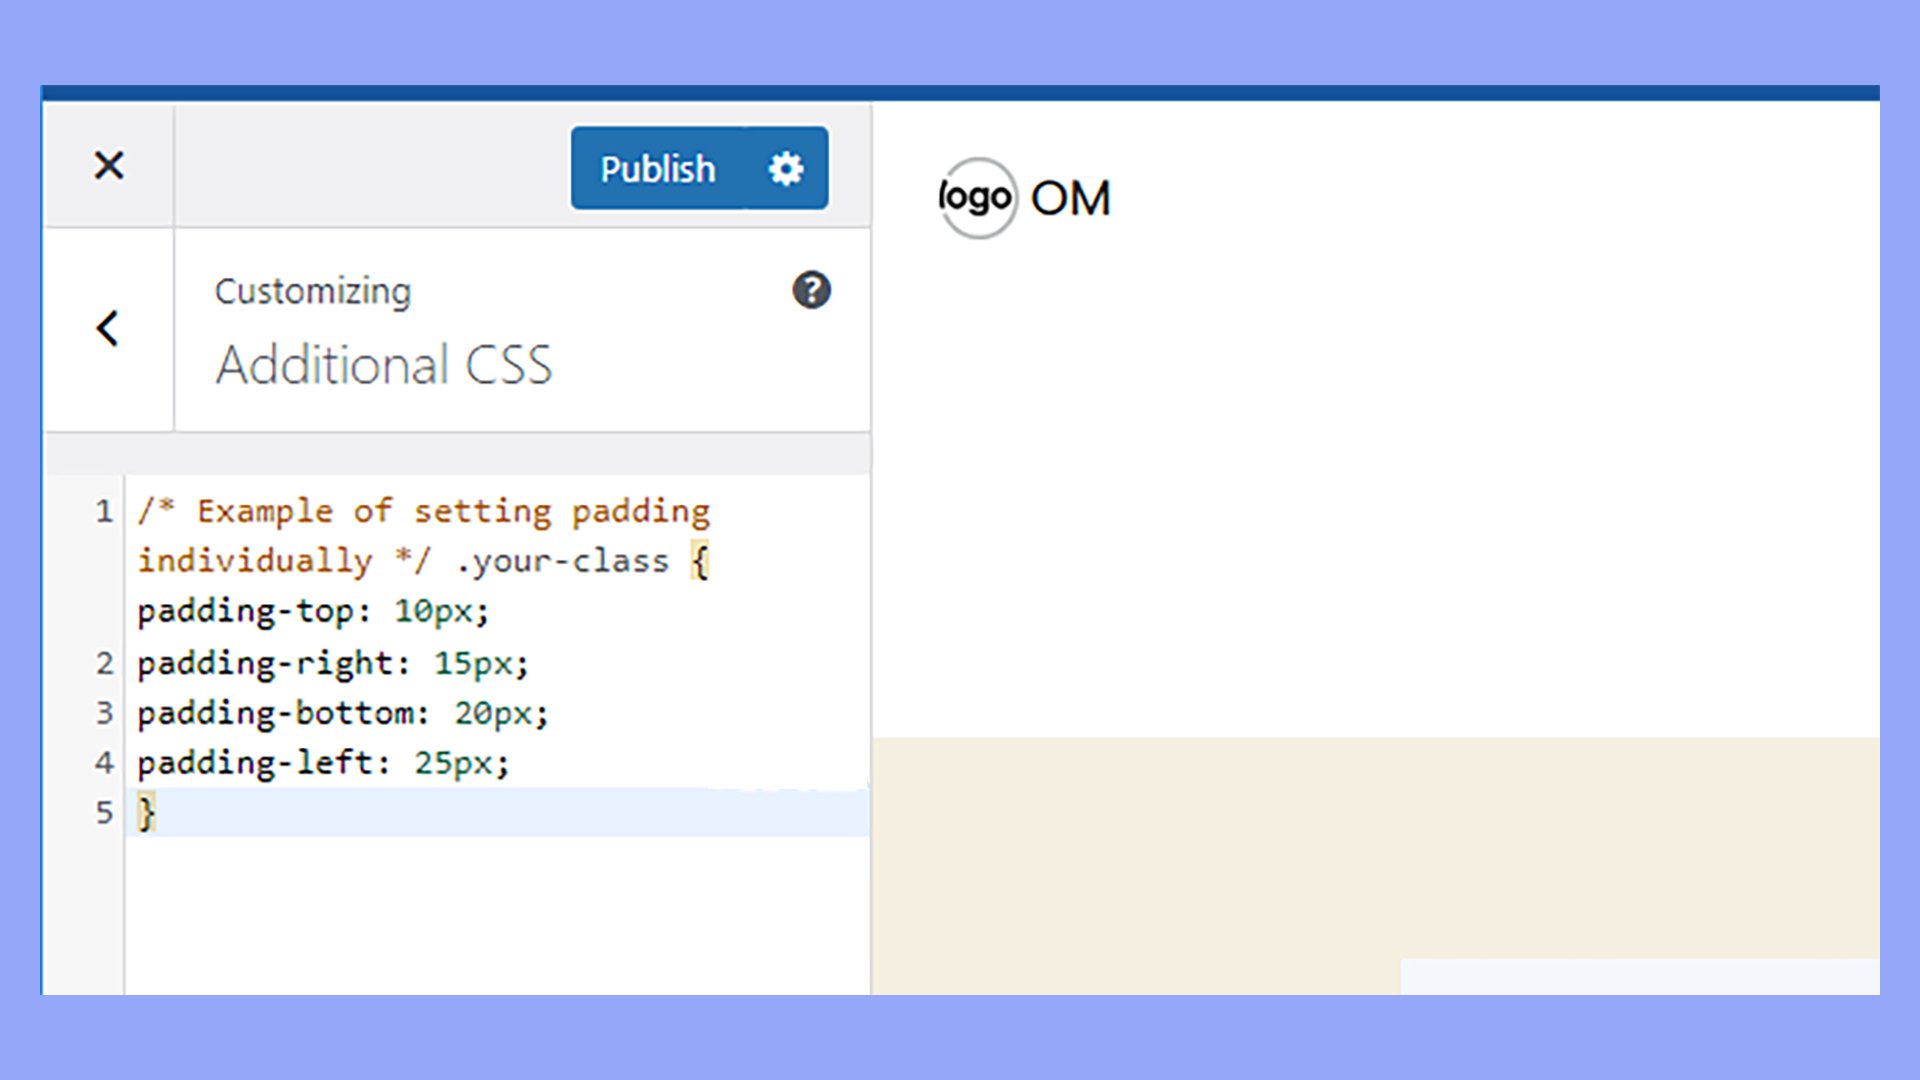
Save your changes, and check your website to see if the padding looks correct.
Padding controls in theme customizer
The Theme Customizer in WordPress also offers padding controls for global styles. This means you can adjust padding across your entire site, rather than one element at a time.
Go to Appearance > Customize to access the Theme Customizer.
Look for settings like Global Styles. Depending on your theme, these settings might be under different names.
In the padding section, you can set values to suit your design needs. Some themes have sliders, while others use input fields for precise values.
Working with blocks and padding
When designing your WordPress pages, padding helps you manage the space within your blocks, improving the layout and readability. You can apply padding to individual blocks, columns, and group blocks for better control over your page’s elements.
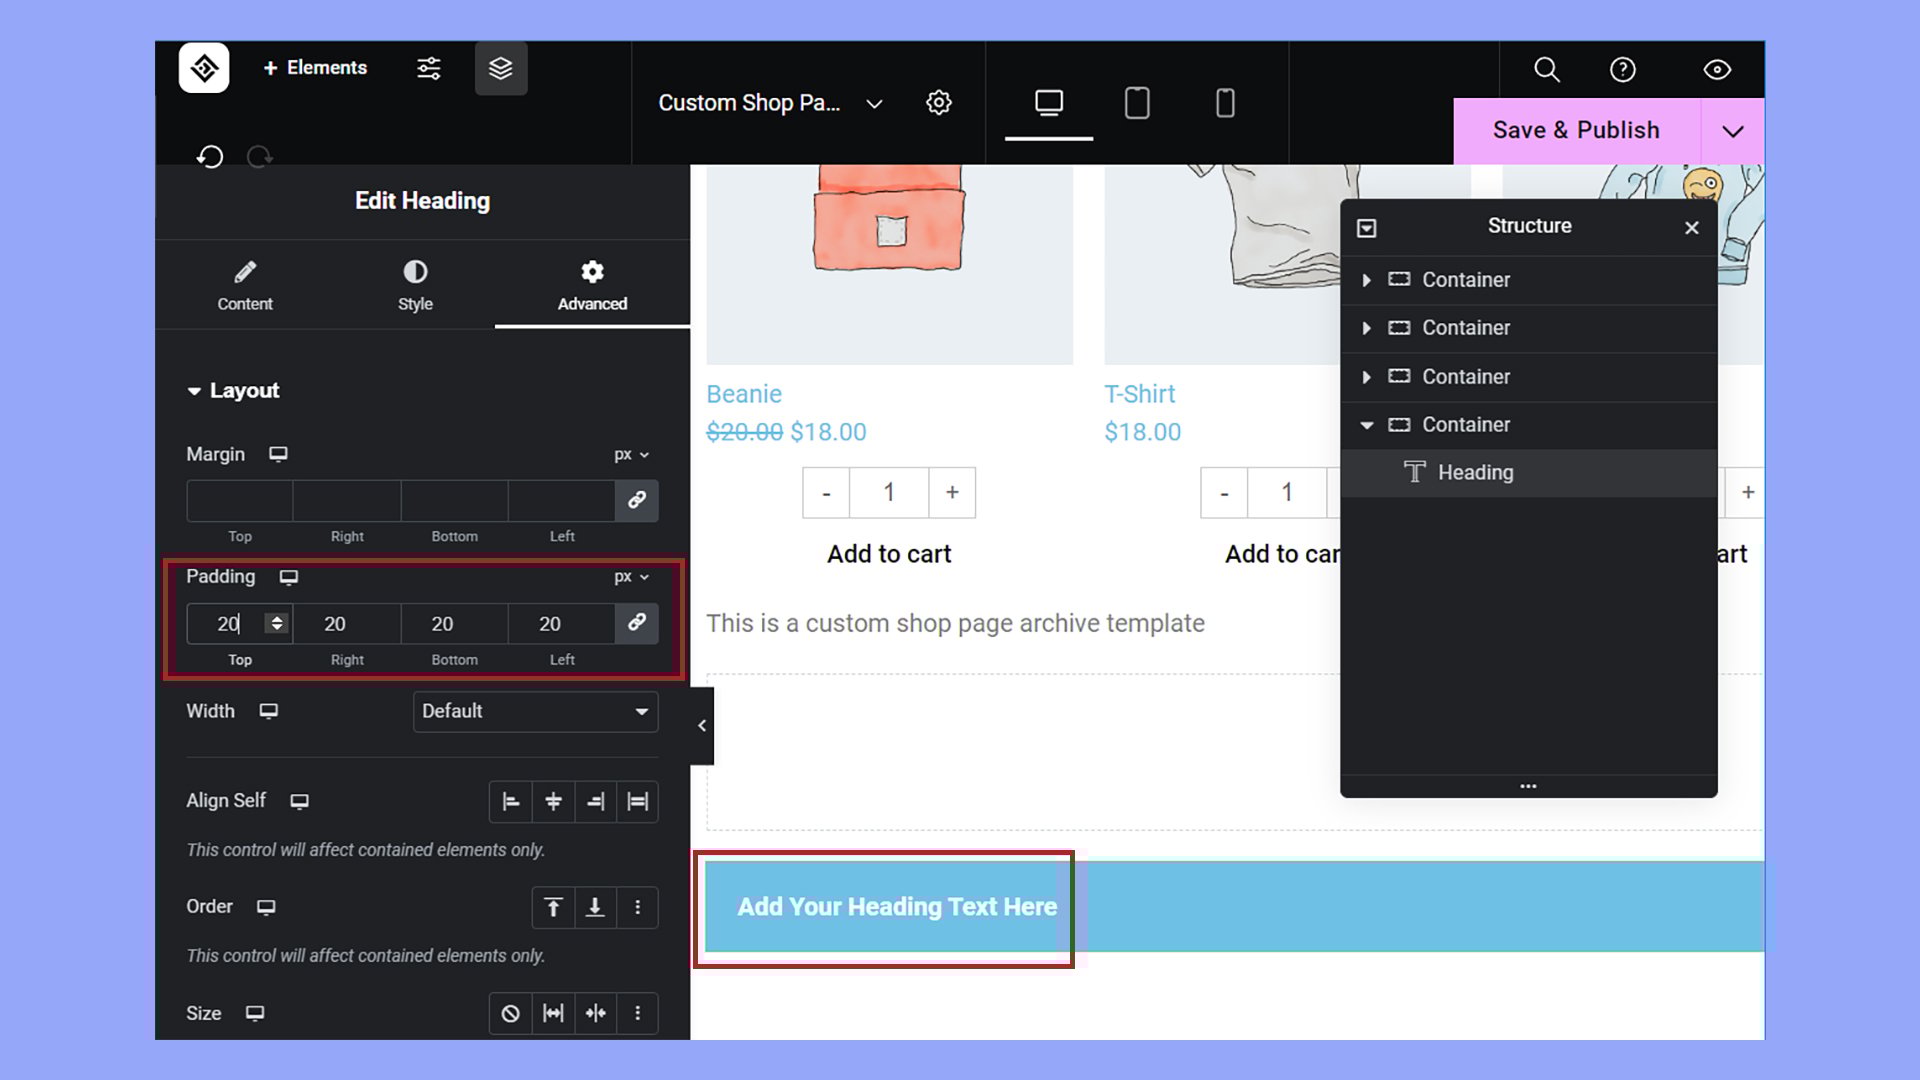
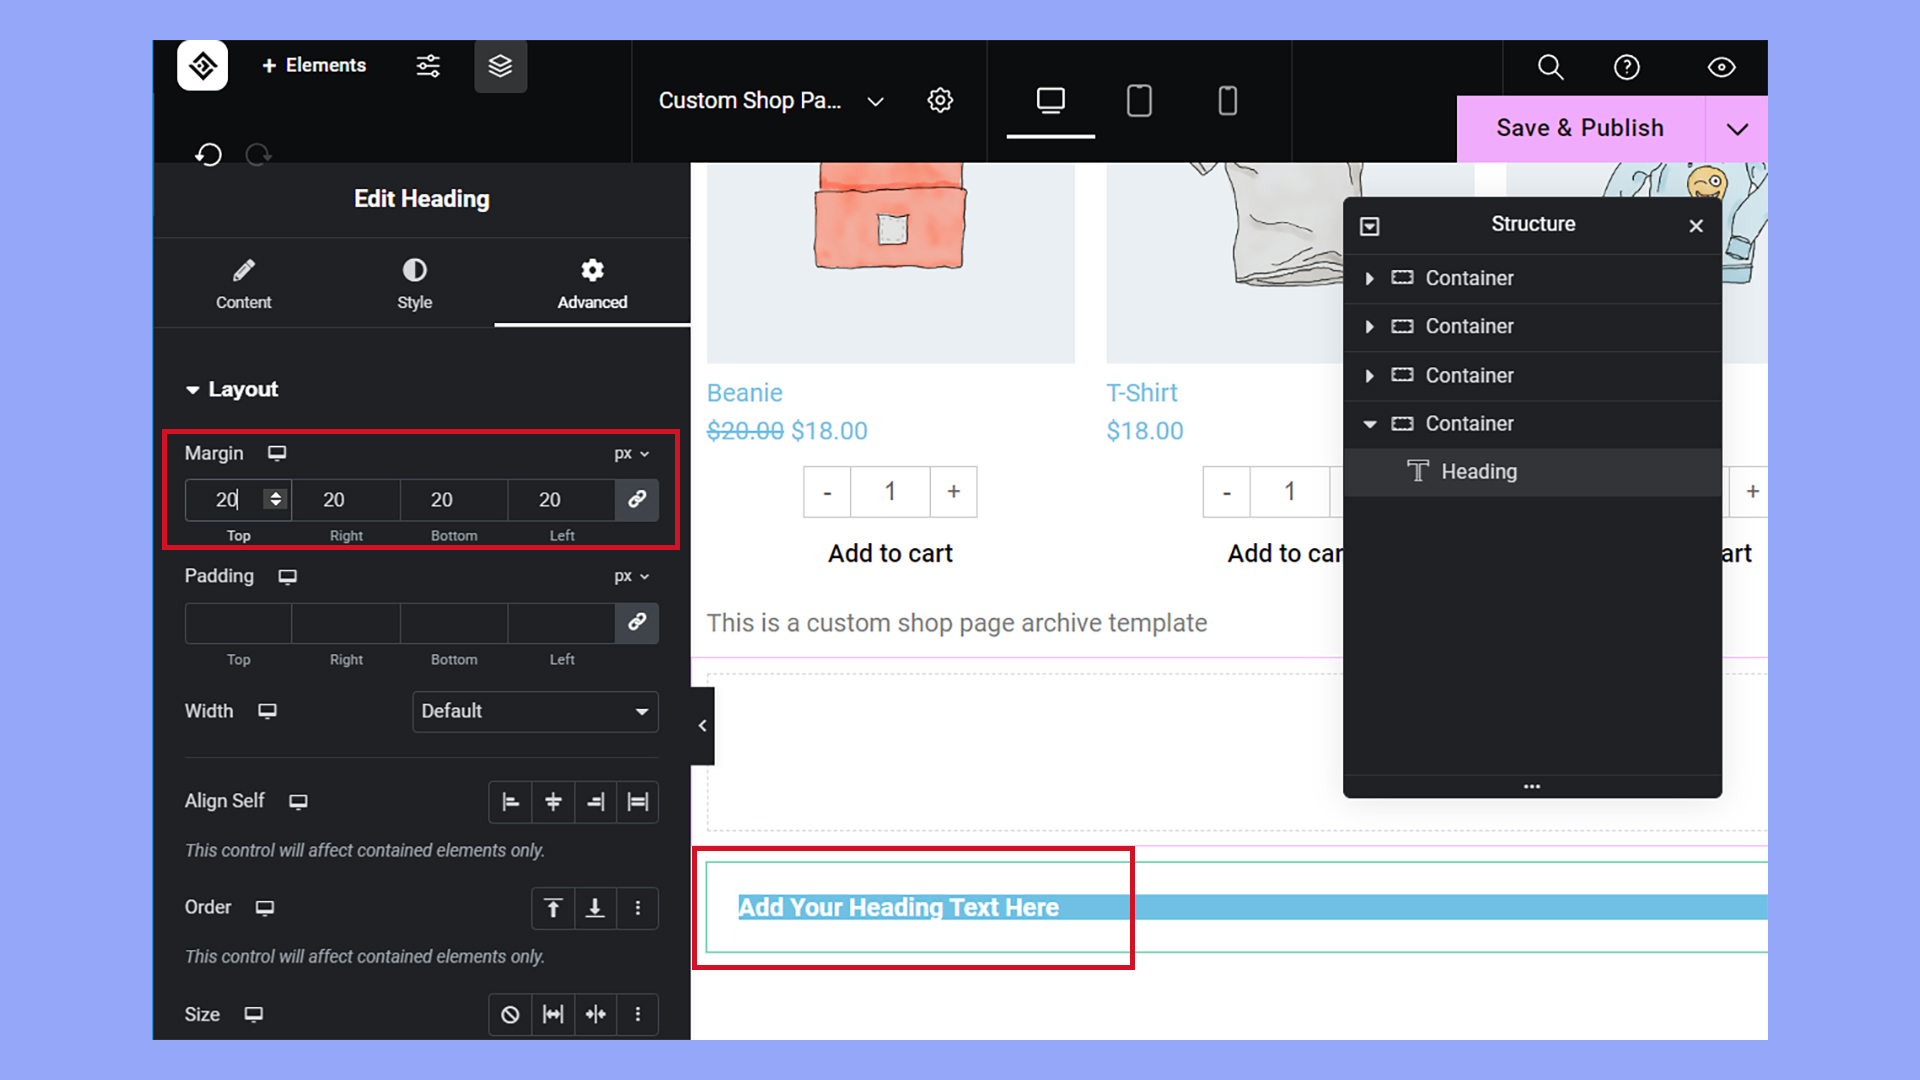
Padding settings for individual blocks
To adjust padding for individual blocks, you can find these settings in the block editor. Each block type may have different padding options based on its design.
For example, when using a Button block, you can add padding to make the button larger or smaller, affecting the space between the text and the button’s border.
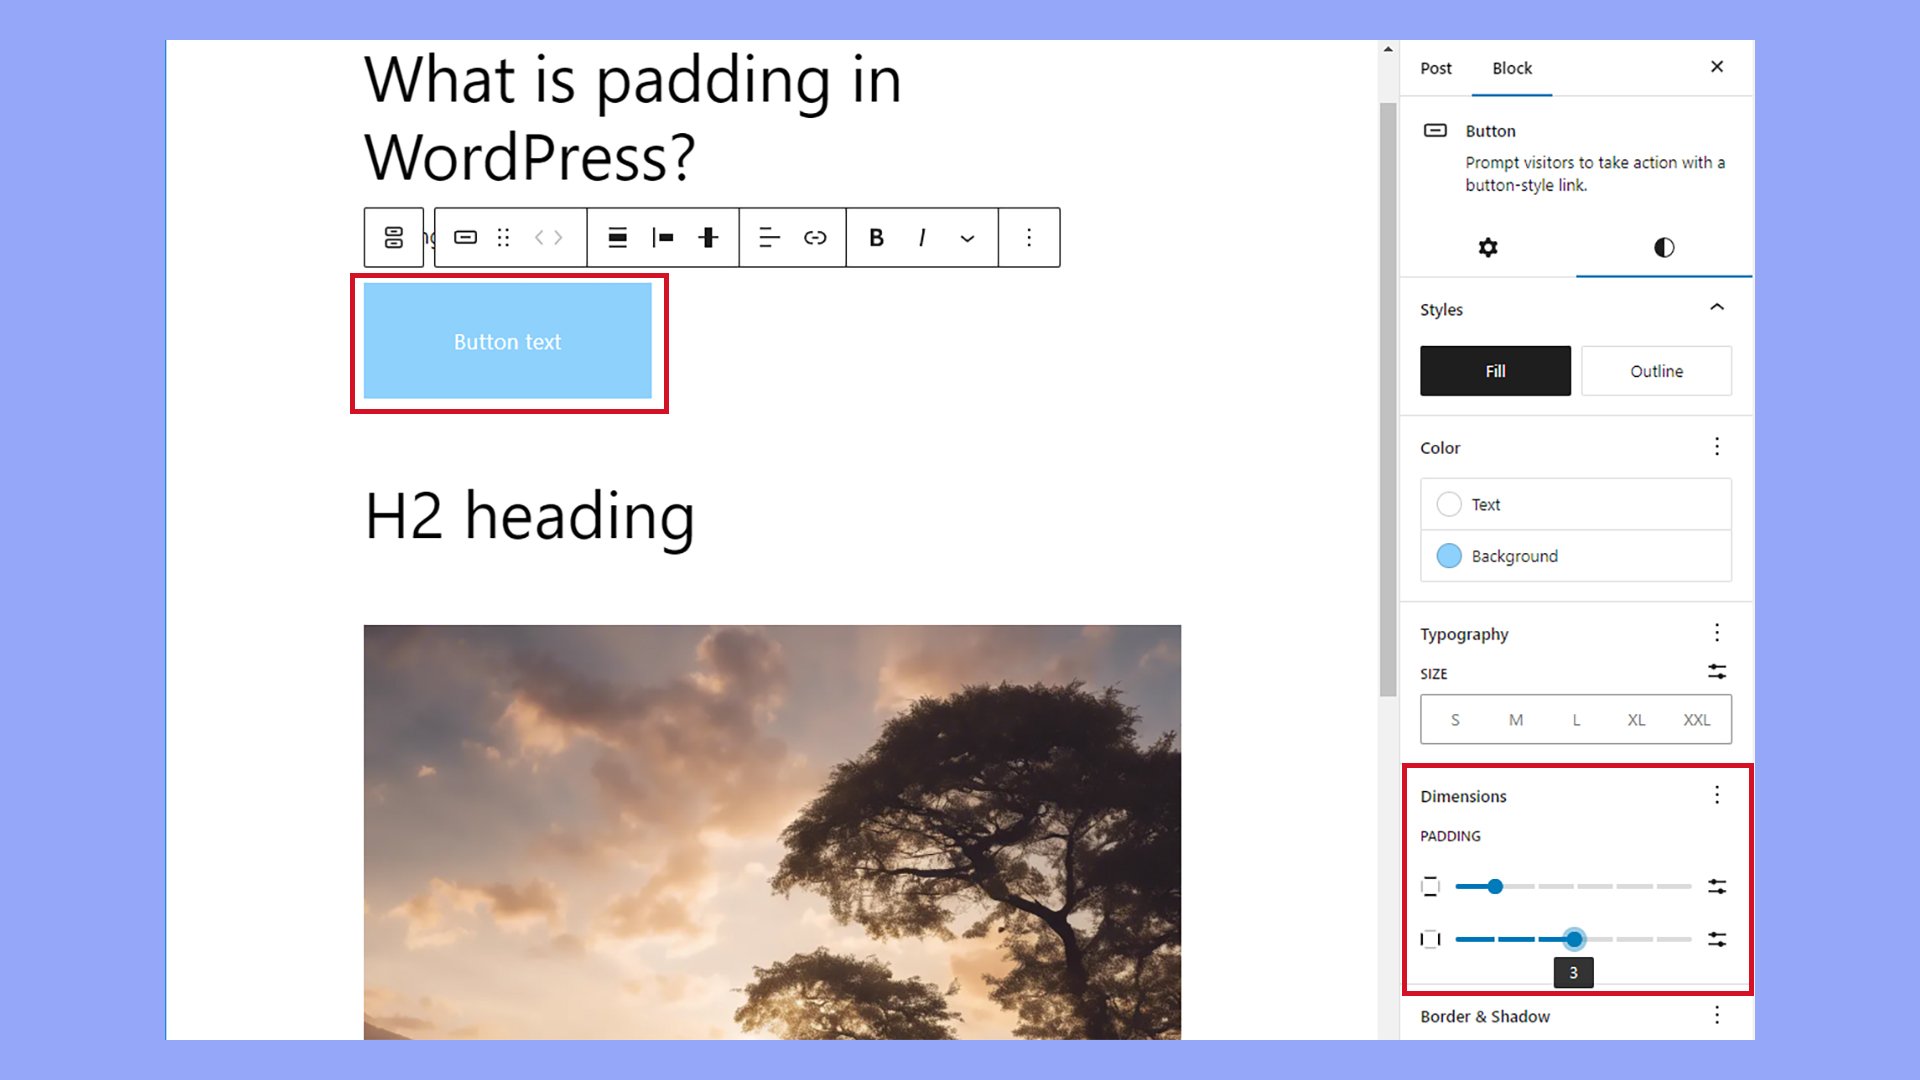
Adjusting padding does not impact other surrounding blocks, so you can fine-tune each block’s appearance without affecting your overall layout.
Inside the block settings, look for the Dimensions panel. This is where you can change the padding values. Some blocks may provide sliders for easy adjustments, while others might require you to enter specific values.
Managing padding in columns and group blocks
Using Columns Blocks and Group Blocks allows for more complex layouts with multiple elements. Here, padding control becomes significant.
To adjust padding for a group of blocks, you first select the entire group.
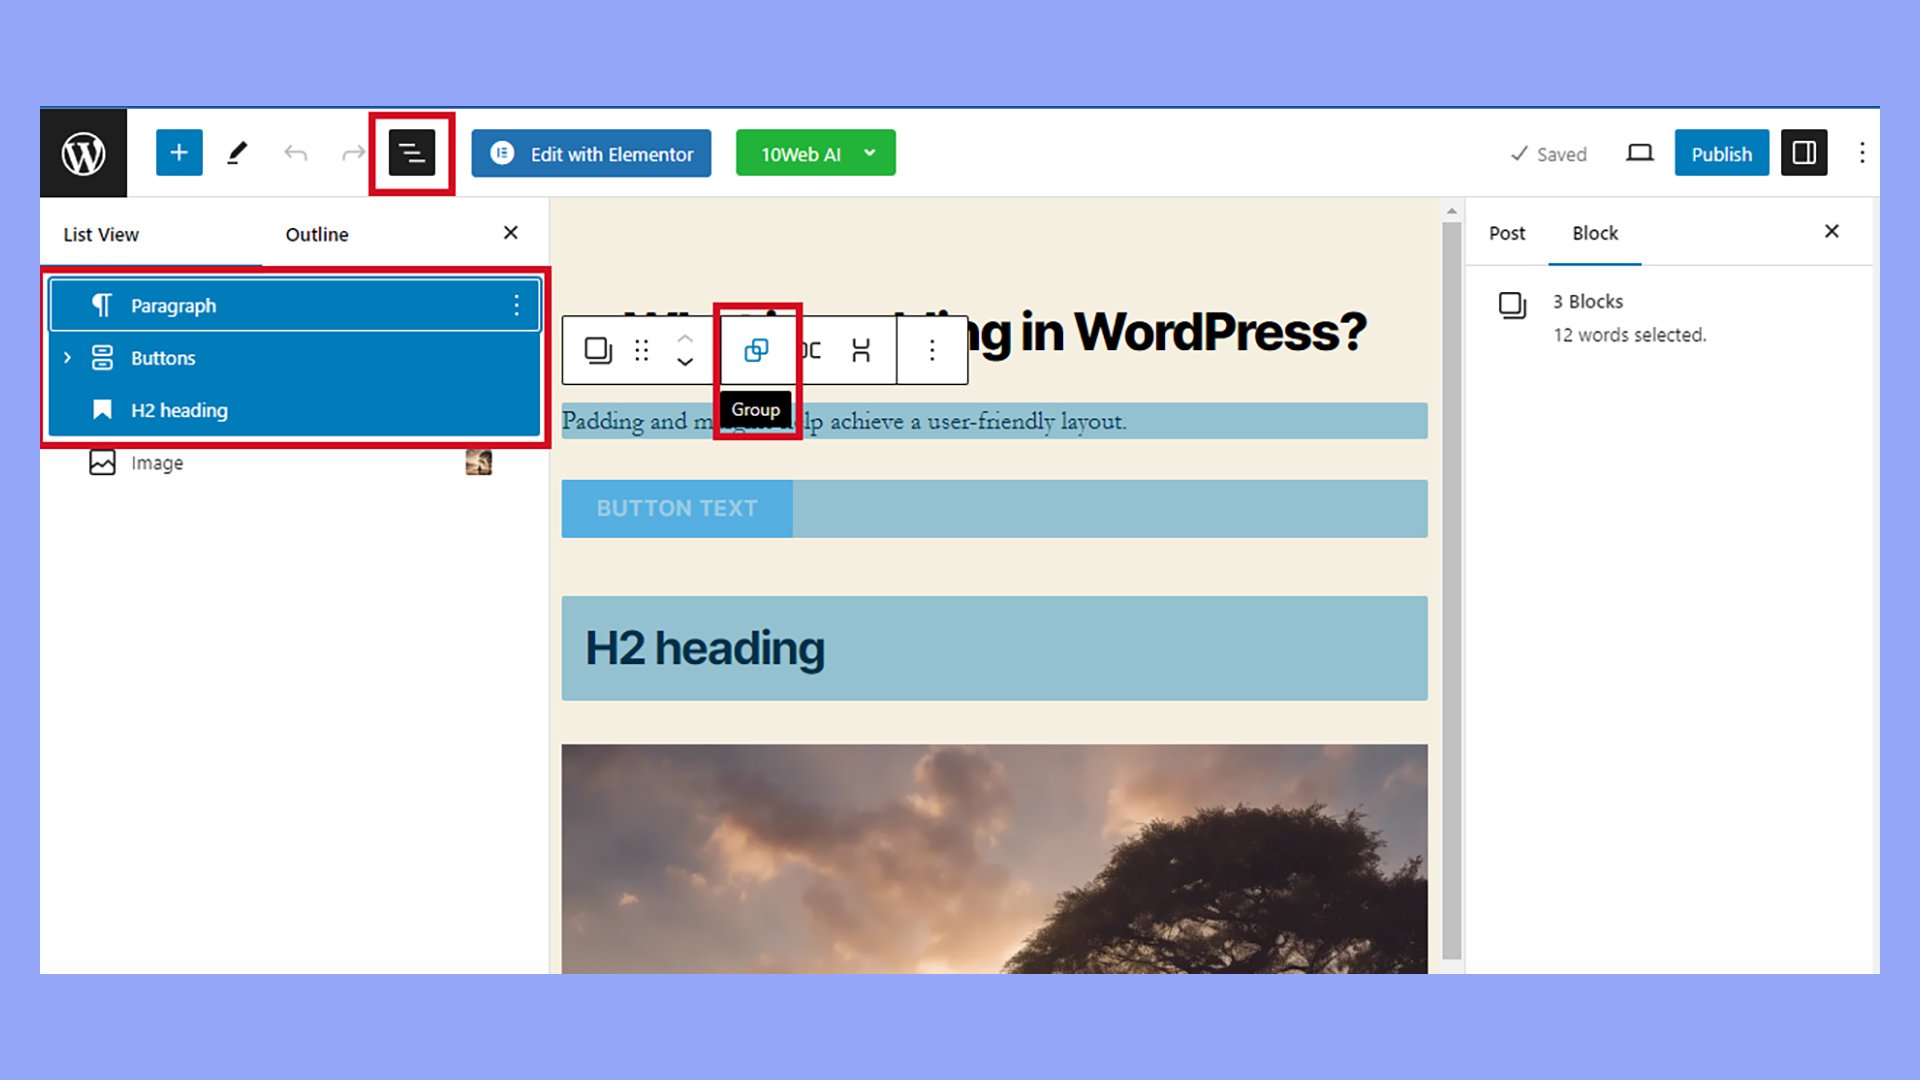
Inside the group settings, use the Dimensions panel to manage the padding. This ensures an even space around the various nested blocks within the group.
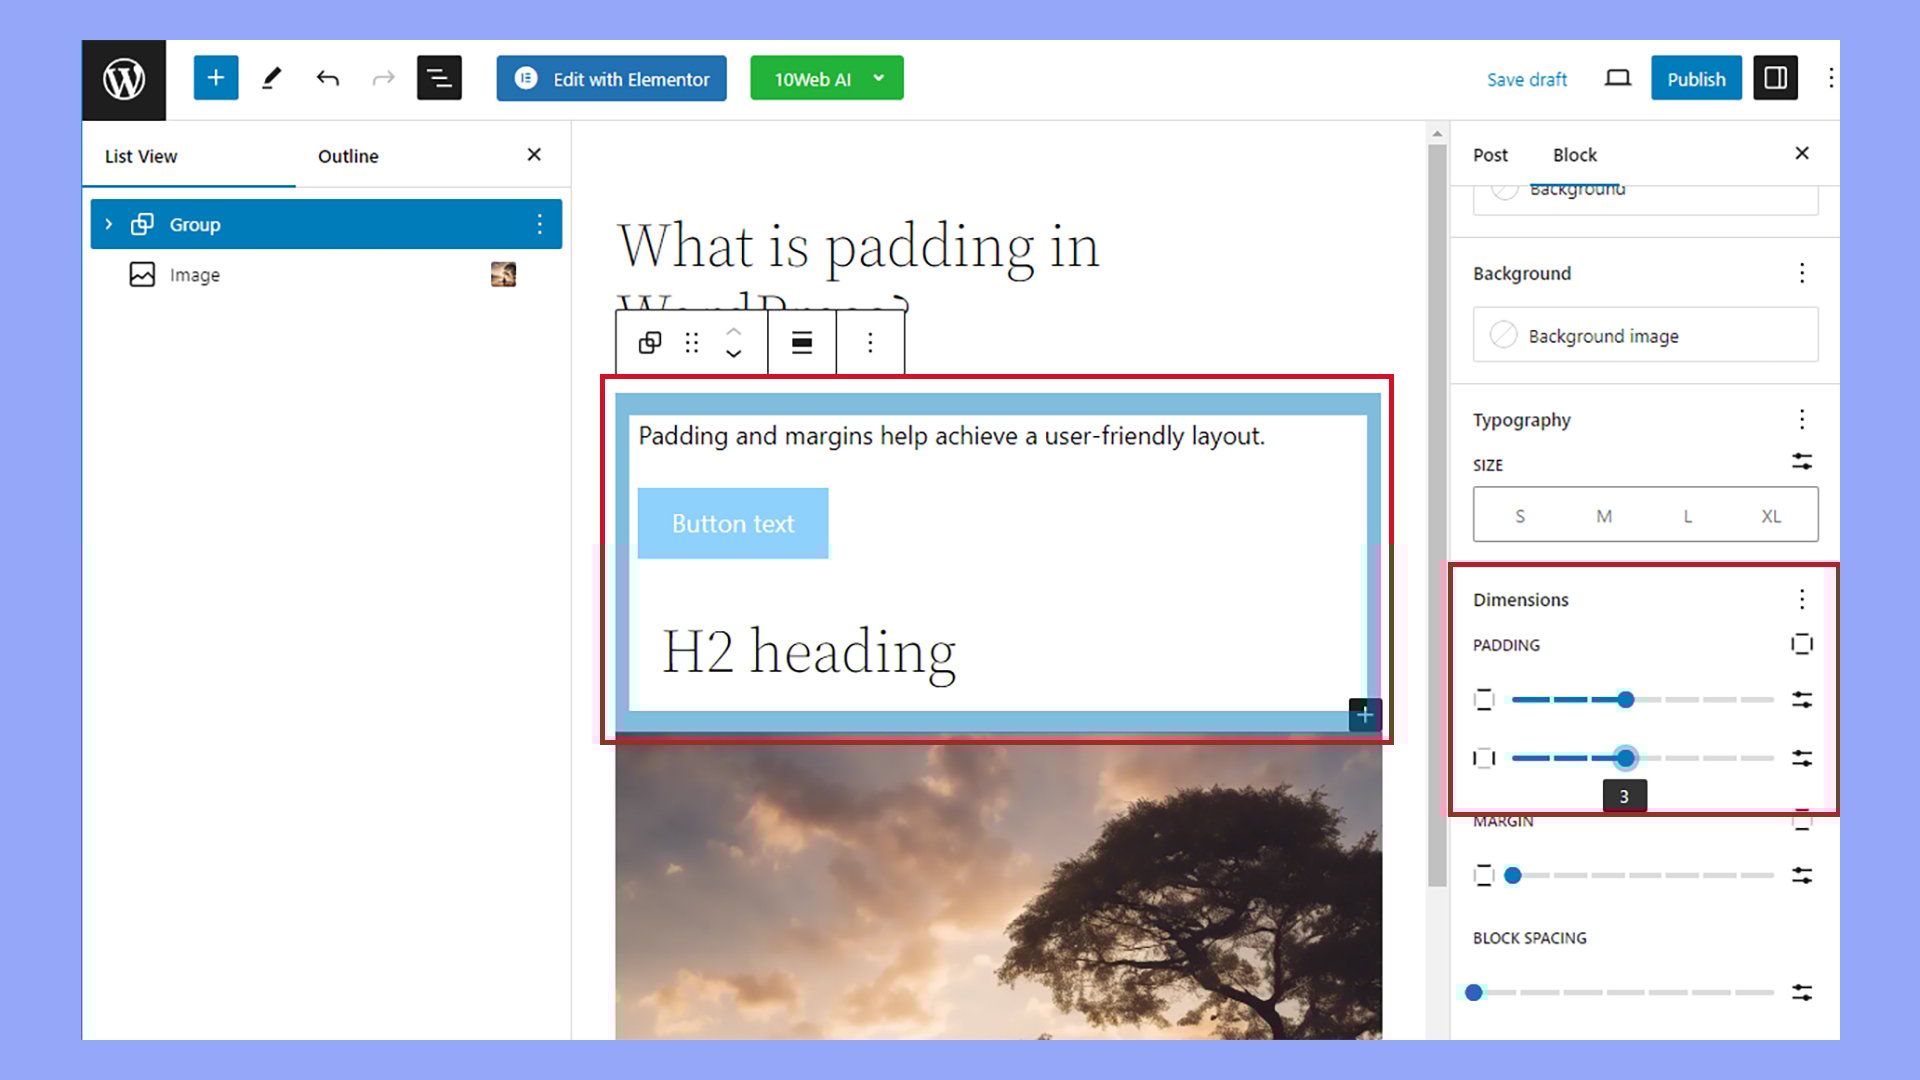
For Columns Blocks, each column can have its padding adjusted independently. This lets you create balanced spacing between narrow or wide columns.
Adjusting padding in these complex blocks ensures a cohesive design and better user experience.
Advanced techniques for editing padding in WordPress
Customizing padding in WordPress brings flexibility and precision to your site’s design. You can ensure your site looks great on all devices and make advanced adjustments using plugins.
Responsive padding for different devices
Using responsive padding helps make your site look good on any device.
You can set custom values for padding that change based on screen size. In WordPress, you can use CSS to create these custom size settings. For example:
@media (max-width: 600px) {
  .your-element {
    padding: 10px;
  }
}

@media (min-width: 601px) and (max-width: 1200px) {
  .your-element {
    padding: 20px;
  }
}

@media (min-width: 1201px) {
  .your-element {
    padding: 30px;
  }
}
This code ensures different padding for mobile, tablet, and desktop devices. Use these techniques to ensure all elements have appropriate space, making your site visually appealing and easy to navigate.
Using plugins for padding
Plugins can make managing padding much easier. Some plugins allow you to visually adjust padding without writing CSS.
Elementor and WPBakery are popular options. They offer drag-and-drop interfaces where you can set custom values for padding.
For example, in Elementor:
- Select your element.
- Click on the Advanced tab.
- Set the padding values for top, right, bottom, and left.
Plugins give you more control and flexibility, enabling you to create a customized layout. They also help maintain consistency by applying the same settings across multiple elements or pages.
With these tools, enhancing your site’s design becomes more accessible, even if you’re not a coding expert.
In conclusion, understanding what padding is in WordPress is crucial for enhancing your website’s design and user experience. Padding creates space within elements, improving readability and aesthetics. Whether using the Block Editor, custom CSS, or plugins, learning how to use padding in WordPress ensures a clean, organized layout that engages visitors effectively.
Subscribe to AI insights
- The latest trending AI news
- How AI boosts efficiency at 10Web
- In-depth reviews of AI tools
- Entrepreneurial wisdom and insights
- Valuable business growth tips
Share article
-
 Copy
Copy
-
-
-