What Is a WordPress Staging Tool
A WordPress staging tool allows you to create a copy of your live site where you can safely test changes and updates before pushing them live. This means any plugins, themes, or content changes can be verified without any risk to your actual website.
Creating a staging environment is a much-needed safety net for website owners. It lets you experiment with new features and troubleshoot problems without any stress. Imagine the peace of mind that comes from knowing you can test everything in a staging site, and once you’re satisfied, make those updates on your live site seamlessly. This process ensures your audience always has a smooth experience and saves you from potential headaches down the line. WordPress staging tools allow you to take control of your website updates like never before.
WordPress staging and its importance
As discussed above, a WordPress staging site ensures that any changes you make don’t disrupt your live website. It offers a safe environment to test updates and new features.
The staging environment helps you detect and fix errors without affecting your live site. You can experiment freely and ensure everything works correctly. This step is essential for maintaining a smooth and uninterrupted user experience on your main site.
Setting up a staging environment is quite simple with the right tools or plugins. Some hosting providers also offer built-in staging environments, making it even easier for you to manage your site updates safely.
Benefits of using a staging site
Using a staging site comes with many benefits. First, it keeps your live site secure by allowing you to test updates without any risk. You can identify and fix bugs in the staging environment, ensuring your live site remains functional.
Another key benefit is the backup capability. Staging creates a snapshot of your website, so you can easily revert changes if something goes wrong. This can save you a lot of headaches in case of a critical error.
Staging sites also improve the overall user experience. By testing in a controlled environment, you can ensure that new features work as intended before they go live. This reduces the risk of downtime or broken features on your main site.
Setting up your WordPress staging site
Setting up a staging site for WordPress is an important step in testing changes before they go live. You can choose between manual methods and plugin-based solutions, each with its own pros and cons. Working with your hosting provider can also simplify this process.
Choosing a staging method
There are several methods for setting up a staging environment. You can create your staging site manually or use plugins that automate the process. Each method has its advantages and disadvantages.
The manual setup gives you more control, but it’s more time-consuming. Plugins are easier but may come with limitations or costs. Think about your specific needs and technical skills when deciding which method to use.
Manual staging vs. staging plugins
When manually creating a staging site, you need to clone your WordPress files and database. This involves exporting your database, setting up a new database on your staging server, and importing it there. Then, you copy your WordPress files over to the staging location.
On the other hand, plugins like WP Staging or BlogVault simplify this process. They can clone your site with just a few clicks. These tools often include extra features, like automatic updates and backups.
Manual methods require more technical knowledge but provide greater customization. Plugins are user-friendly and faster but might have limitations.
Creating a staging site with your hosting provider
Many hosting providers, like 10Web, offer easy staging options directly from their control panels.
To set up a staging site with your hosting provider, log in to your hosting control panel. Go to the staging section, create a new staging site, and select a subdomain or subdirectory where it will reside. This method is straightforward and often comes with managed hosting plans.
Using your hosting provider simplifies the process and integrates well with other hosted services, ensuring you have everything you need in one place. It’s particularly useful for those less comfortable with technical tasks.
Developing and testing on your staging site
Using a WordPress staging site allows you to develop and test changes safely before applying them to your live site. This ensures that any modifications do not disrupt your visitors’ experience or break any functionality.
Workflow for testing changes
To test changes using a WordPress staging tool, the process begins by creating a duplicate of your live site within the staging environment. This environment is crucial for safely testing new features, theme updates, or plugin installations without affecting the live site. Before initiating changes, it’s essential to create backups of your live site to ensure that you can restore the original state if necessary. Again, if you’ve hosted your website on 10Web, you get to easily backup your site from your my.10web.io dashboard.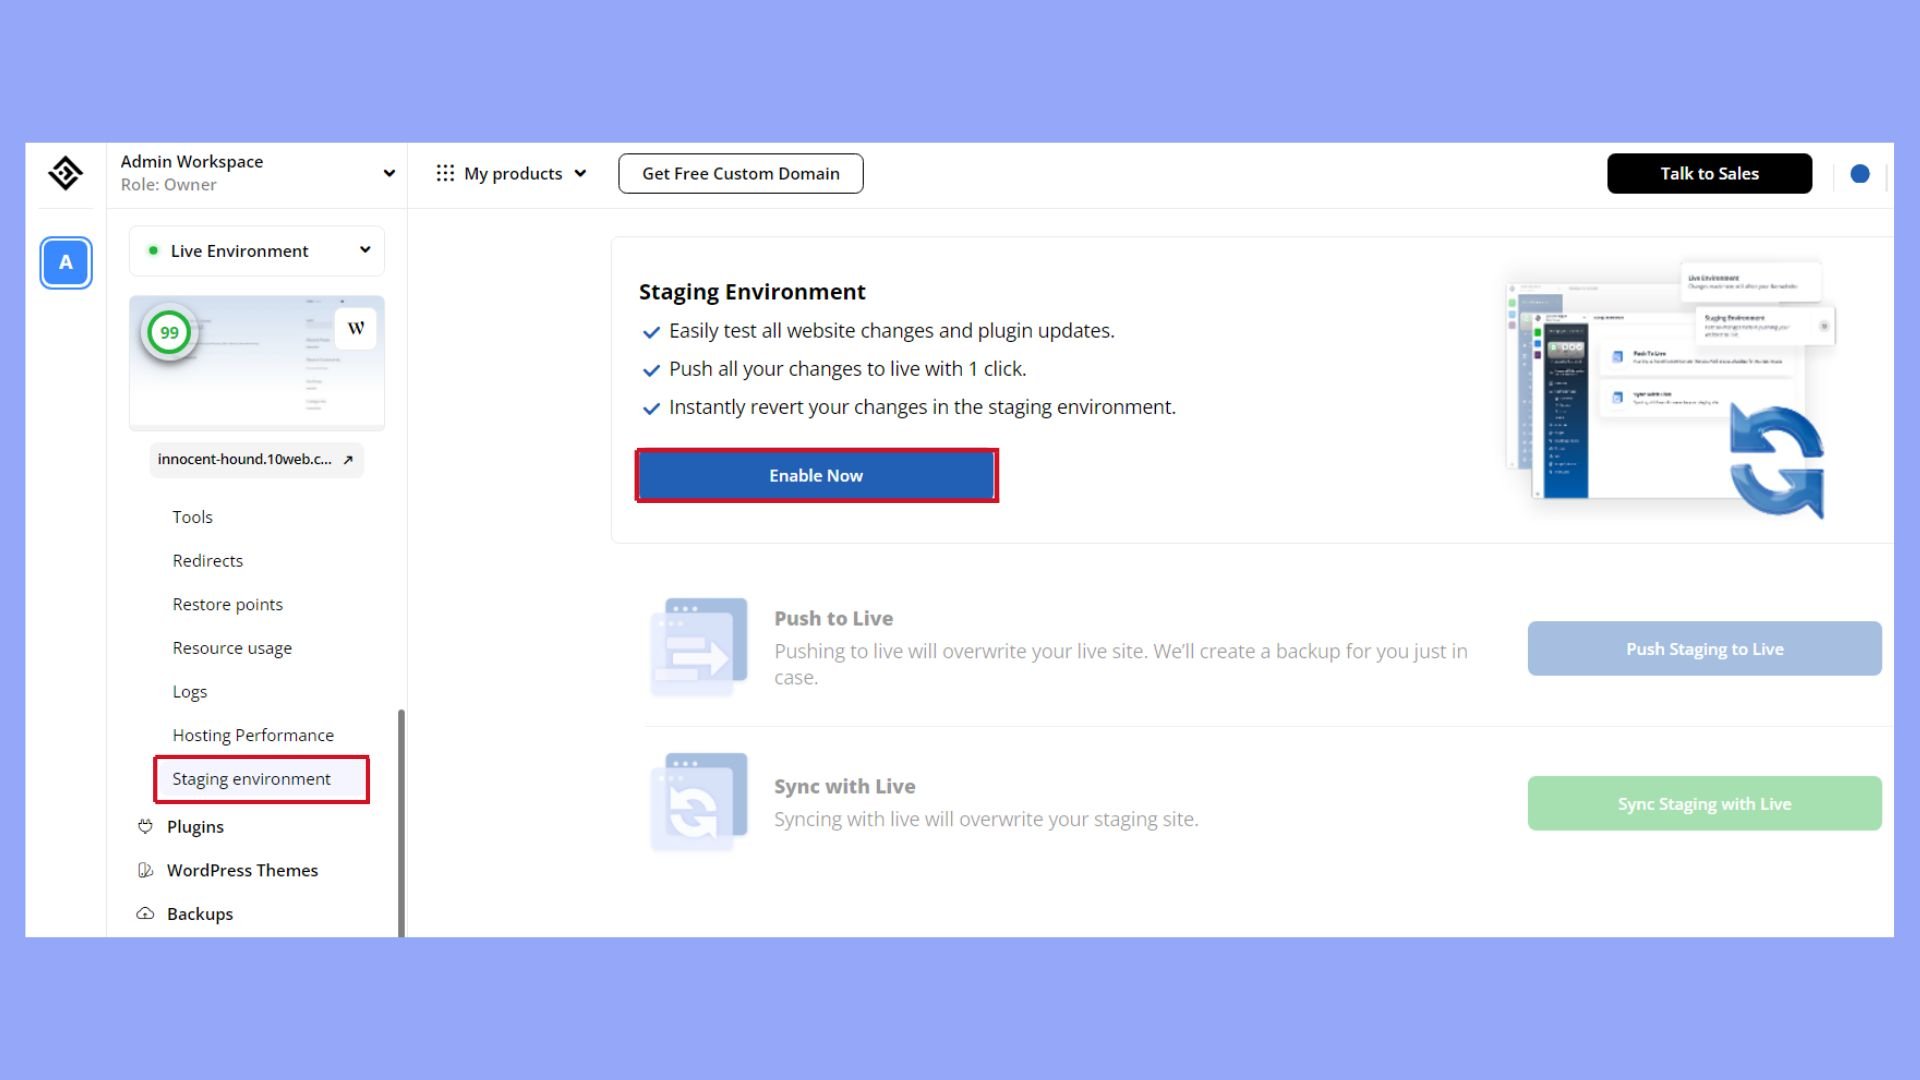
After setting up the staging environment, proceed to implement the updates or changes. It is important to thoroughly test all new features and modifications on the staging site to check for functionality and performance. Once everything is confirmed to be working correctly and efficiently, the changes can then be safely applied to the live site, minimizing the risk of disruptions or errors.
Managing updates and backups
Managing backups and updates is crucial to maintaining a secure and stable website. Ensure you always have recent backups before making any changes.
- Regularly backup both live and staging sites.
- Apply updates on the staging environment to test compatibility.
- If everything works as expected, update the live site.
If you’re not hosting your website on 10Web and don’t have automated backups, using automated backup tools can make this process easier. This way, you can quickly restore your site if something goes wrong.
Troubleshooting common errors
A staging site helps you identify and troubleshoot errors without affecting your live site. Common issues can include theme conflicts, plugin errors, or performance problems.
To fix, test each change individually to catch specific errors. Also, use debugging tools in WordPress to identify problems.
By resolving these errors in your staging environment, you ensure a smooth user experience on your live site.
Deploying changes to live
When you’re ready to push your changes to the live site, it’s essential to ensure a seamless transition while avoiding any disruptions. This involves merging changes, avoiding downtime, and performing final checks.
Merging changes to the live environment
Merging changes from your staging site to the live environment should be done with care. Start by using tools provided by your hosting service or plugins which often include options like “Full Deploy” or “Custom Deploy”.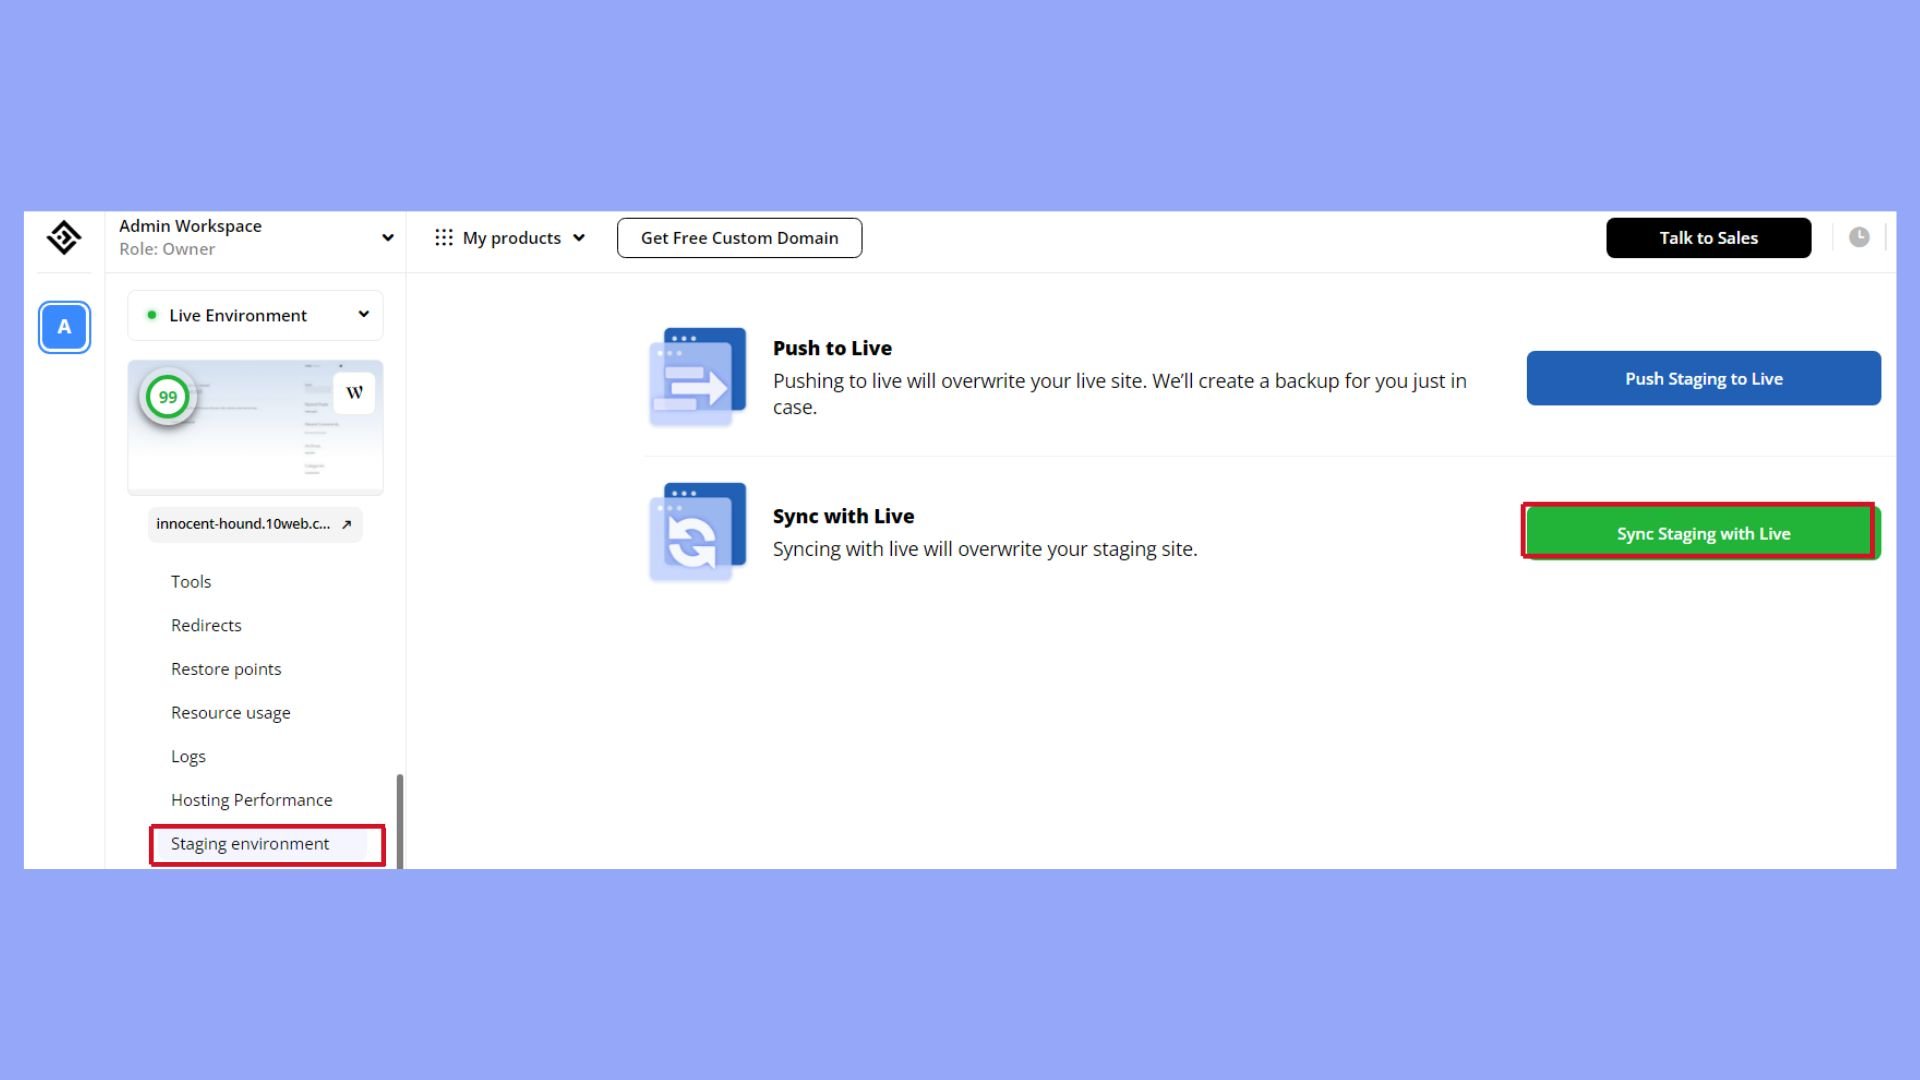
Choose the option that best fits your needs. Full Deploy transfers all changes, while Custom Deploy allows you to push specific updates and avoid unnecessary changes. Make sure you track every modification to avoid conflicts during the merge.
Avoiding downtime during deployment
Ensuring your live site remains accessible during deployment is crucial. Work in phases to minimize downtime. Use strategies like:
- Incremental updates: Apply updates in small batches to quickly identify and fix issues.
- Scheduled maintenance: Perform deployments during low-traffic periods.
- Staging environment: Thoroughly test changes before going live to reduce unexpected issues.
Using a reliable hosting provider, like 10Web, that supports staging environments will make this easier.
Final checks before going live
Before pushing your changes live, it’s essential to conduct thorough final checks to ensure everything is functioning correctly. Always start by creating a recent backup of your production site to safeguard your data. Next, check for security by verifying that the new code introduced does not contain any vulnerabilities.
Performance testing is also crucial; ensure the site’s speed and overall functionality meet your standards. Additionally, verify that all links are operational and that forms submit correctly. After these checks, once the site goes live, continue to monitor it closely to quickly address any issues that may arise, ensuring a smooth and stable user experience.
In conclusion, a WordPress staging tool is indispensable for any website owner who values stability and security during updates and changes. By enabling you to create a mirror of your live site in a safe environment, this tool allows for thorough testing and validation of new features or updates without risking your live website’s performance. Such tools are a critical component in maintaining the integrity and continuity of your online presence.
Subscribe to AI insights
- The latest trending AI news
- How AI boosts efficiency at 10Web
- In-depth reviews of AI tools
- Entrepreneurial wisdom and insights
- Valuable business growth tips
Share article
-
 Copy
Copy
-
-
-