Cloning a WordPress site can be a straightforward process with the right tools at your disposal. Whether you’re moving to a new host, creating a staging environment, or just backing up your site, cloning gives you an exact replica of your WordPress site at a different location.
The advantage of cloning is that it preserves all your website settings, themes, plugins, and content, allowing you to work with a carbon copy of your live site without risking any changes that could disrupt your visitors’ experience.
The cloning process involves copying your site’s files and database, creating a new database for the clone, and adjusting configurations so that the cloned site functions correctly on its new server. Let’s get started.
FAQ
Is it possible to clone a WordPress site?
How do I duplicate a WordPress site without plugins?
How do I clone an existing website?
How do I recreate my WordPress site?
Understanding WordPress cloning
Cloning your WordPress site essentially creates an exact copy of your site, including all of its files, database, and settings. This process can be beneficial for several reasons:
- Testing: You can experiment with new themes, plugins, or changes without affecting your live site.
- Development: It’s easier to develop new features or redesign your site on a clone.
- Migration: When moving to a new host or domain, cloning ensures you have a working copy of your site without downtime.
Steps usually involved in cloning a WordPress site:
- Backup: Your entire site needs to be backed up, typically in the form of a bundled file which includes the WordPress core, media files, plugins, themes, and the database.
- Creation of a clone Install: A second WordPress installation is where you’ll deploy your site’s clone.
- Transfer: Moving your backup file to the new hosting environment or location.
- Unpack and Setup: You’ll install the backup file into the new environment, connecting it with a database, and configuring it so the clone functions correctly.
Tools for cloning:
- Duplicator: A popular plugin designed to clone and migrate WordPress sites.
- Softaculous: Offers a one-click staging feature within cPanel often used for cloning.
- Manual methods: Involve copying files and databases via FTP and phpMyAdmin.
Key considerations:
- Domain name: You may need to replace URLs if the domain changes.
- Environmental differences: Make sure the clone’s environment matches that of the original site to avoid issues.
Remember, the goal of cloning isn’t just to copy your site, but also to do so reliably and efficiently, ensuring a seamless transition for any tasks you have in mind.
Preparing for cloning
Before you start cloning your WordPress site, it is crucial to carefully examine your current website and ensure you have all the necessary tools at your disposal.
Assessing your current site
Firstly, take a complete inventory of your website. This includes all:
- Themes: Make note of the active theme and any others installed.
- Plugins: Document all active plugins and their settings.
- Content: Include posts, pages, and media files.
- Customizations: Any custom code or special settings.
It’s also important to check your website for any potential issues that could arise during cloning, such as data security, plugin or theme conflicts, and overall website functionality.
Simplify WordPress with 10Web
Automate manual work with 10Web Managed WordPress Hosting and 10Web AI Website Builder. Optimize your WordPress website effortlessly.
Gathering required tools
To clone your site efficiently, you’ll need:
- A WordPress cloning plugin: Duplicator is a popular choice.
- Access to your WordPress dashboard: to install and activate the chosen plugin.
- FTP client or hosting control panel access: for transferring files if needed.
- Database access: sometimes required for manual adjustments.
Make sure to have all the credentials for your hosting control panel, FTP, and database on hand before starting the cloning process.
How to clone your WordPress site using a plugin
Firstly, ensure the safety of your site by creating a full backup. This involves using a plugin like Duplicator, which will package your entire website’s content, themes, plugins, and database into one downloadable file. Follow these steps:
-
- Install and activate the Duplicator plugin.
- Navigate to Duplicator > Packages in your WordPress dashboard.
- Click on Create New and follow the plugin’s steps to build a package.
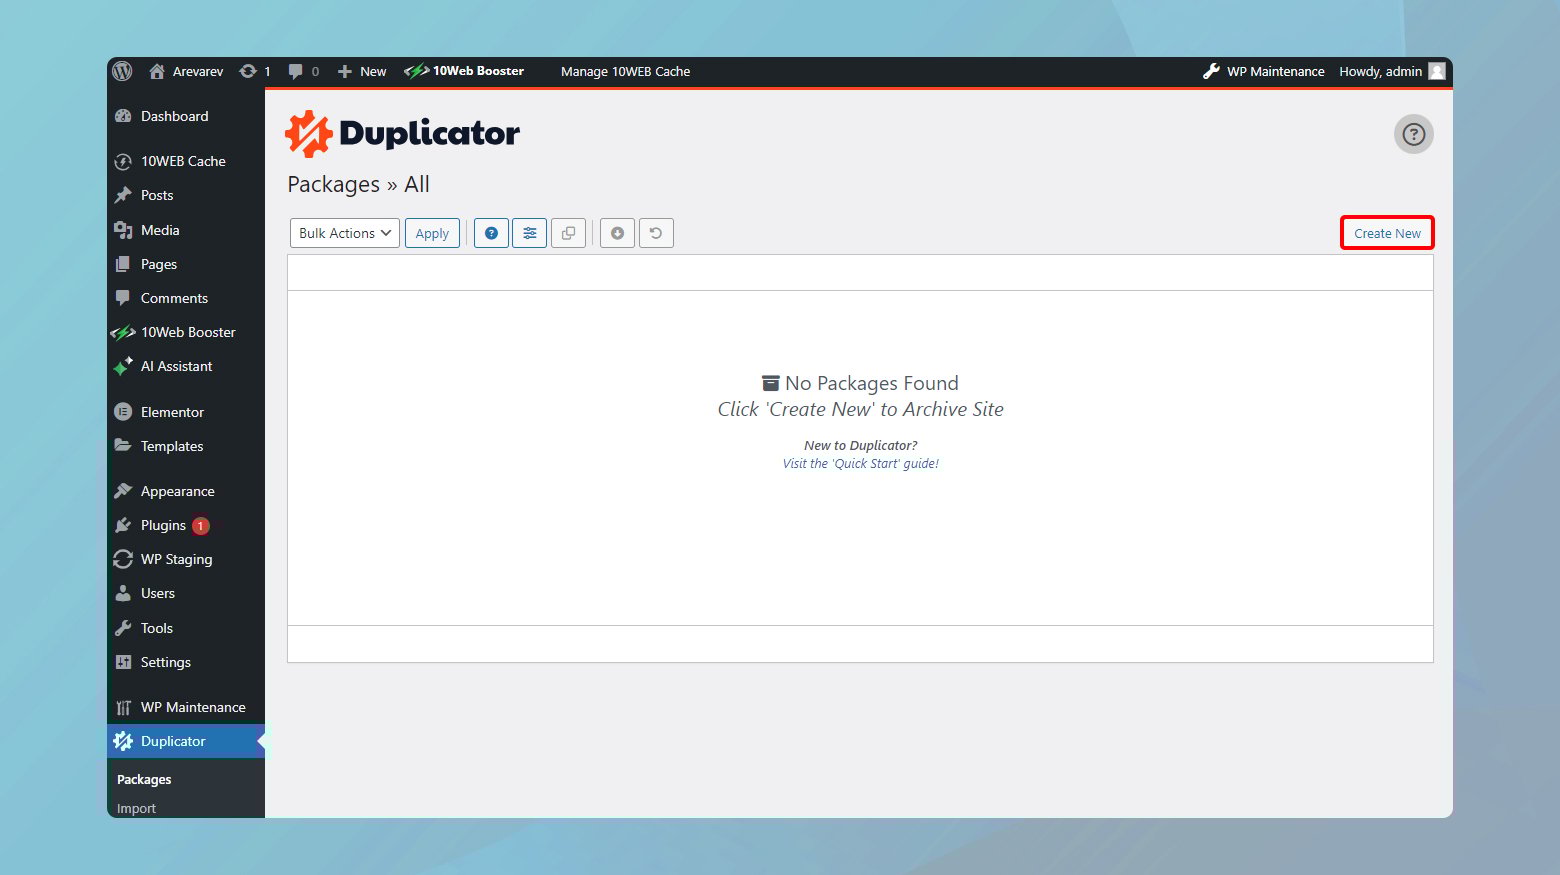
- Once complete, download both the archive and the installer script.

Copying files and database
After the backup, you’ll copy your website’s files and its database.
- Transfer Files: Use FTP or a file manager to upload the archive and installer to your new location.
- Database upload: If your host does not allow direct database creation, use phpMyAdmin to create a new database, and then:
- Import the SQL file from the backup or
- Run the Duplicator installer, which will automate the database setup.
Ensure to keep the database details handy as you will need them for configuring the wp-config.php file.
Setting up the clone on a new domain
Finally, let’s get your clone up and running on a new domain.
- Modify the wp-config.php with the new database details.
- Run the Duplicator installer on the new domain by accessing yourdomain.com/installer.php.
- Follow the prompts to enter your new database details and install.
- Perform a Search and Replace in your database if your domain has changed, to ensure all links point to the new domain.
Remember that if you encounter any domain-related issues or need to replace URLs, many cloning plugins offer “Search and Replace” features for final adjustments.
Simplify WordPress with 10Web
Automate manual work with 10Web Managed WordPress Hosting and 10Web AI Website Builder. Optimize your WordPress website effortlessly.
How to clone your WordPress site in 10Web
If you’re a 10Web customer, you can clone your website with a few clicks and the rest is automated. No need for plugins or for downloading your files and database. Here is how:
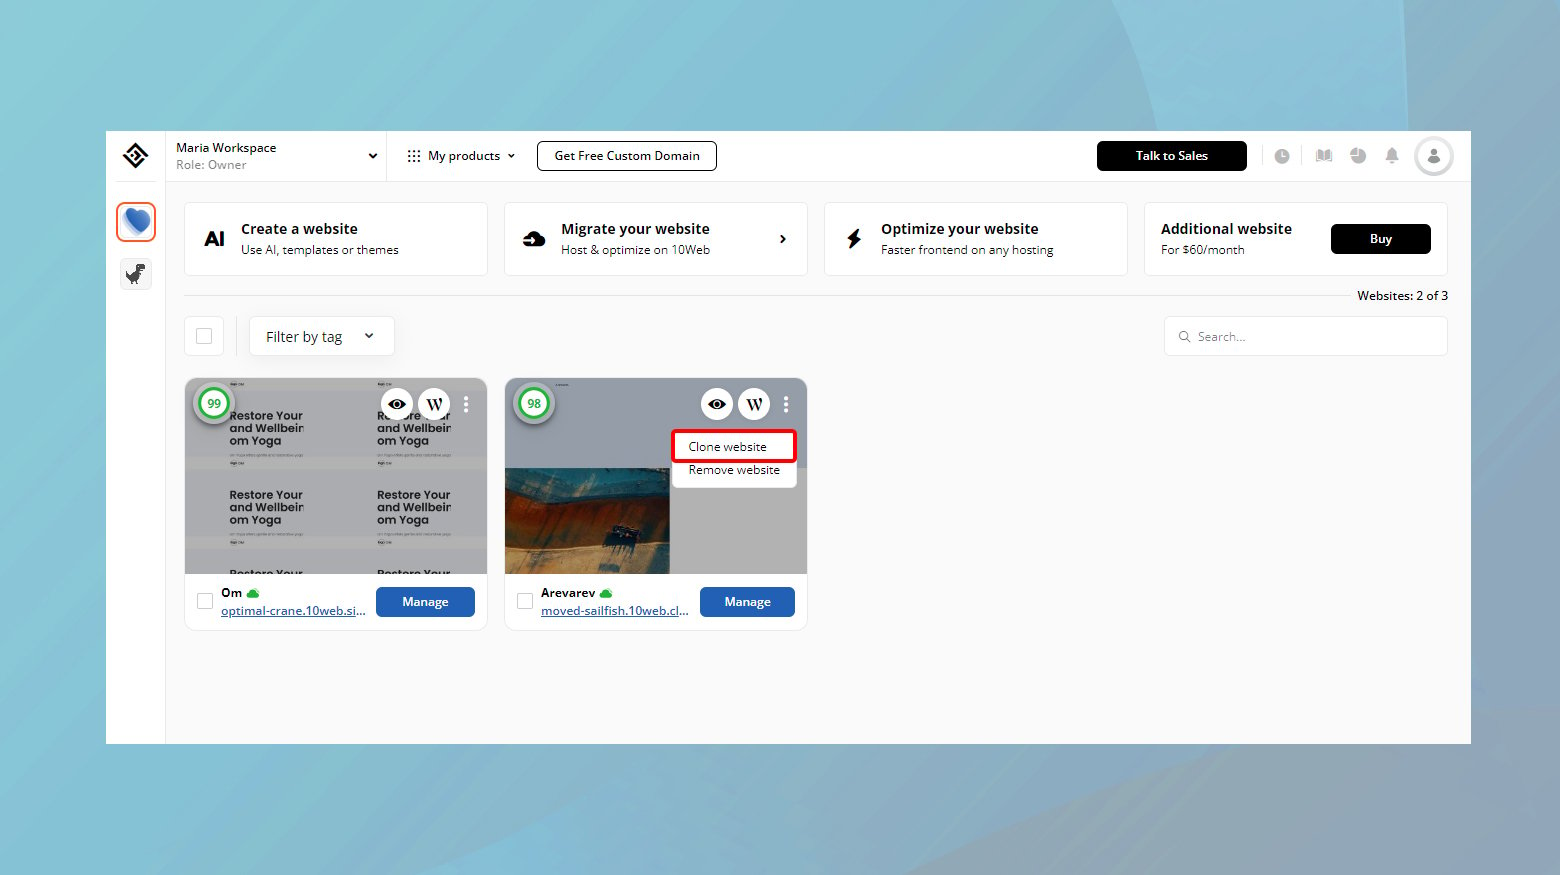
- Log in to your 10Web dashboard.
- Find the website you want to clone.
- At the right corner of the website’s thumbnail, click on the three dots and choose Clone website.
-
- Choose the environment you want to clone it to, Live or Staging.
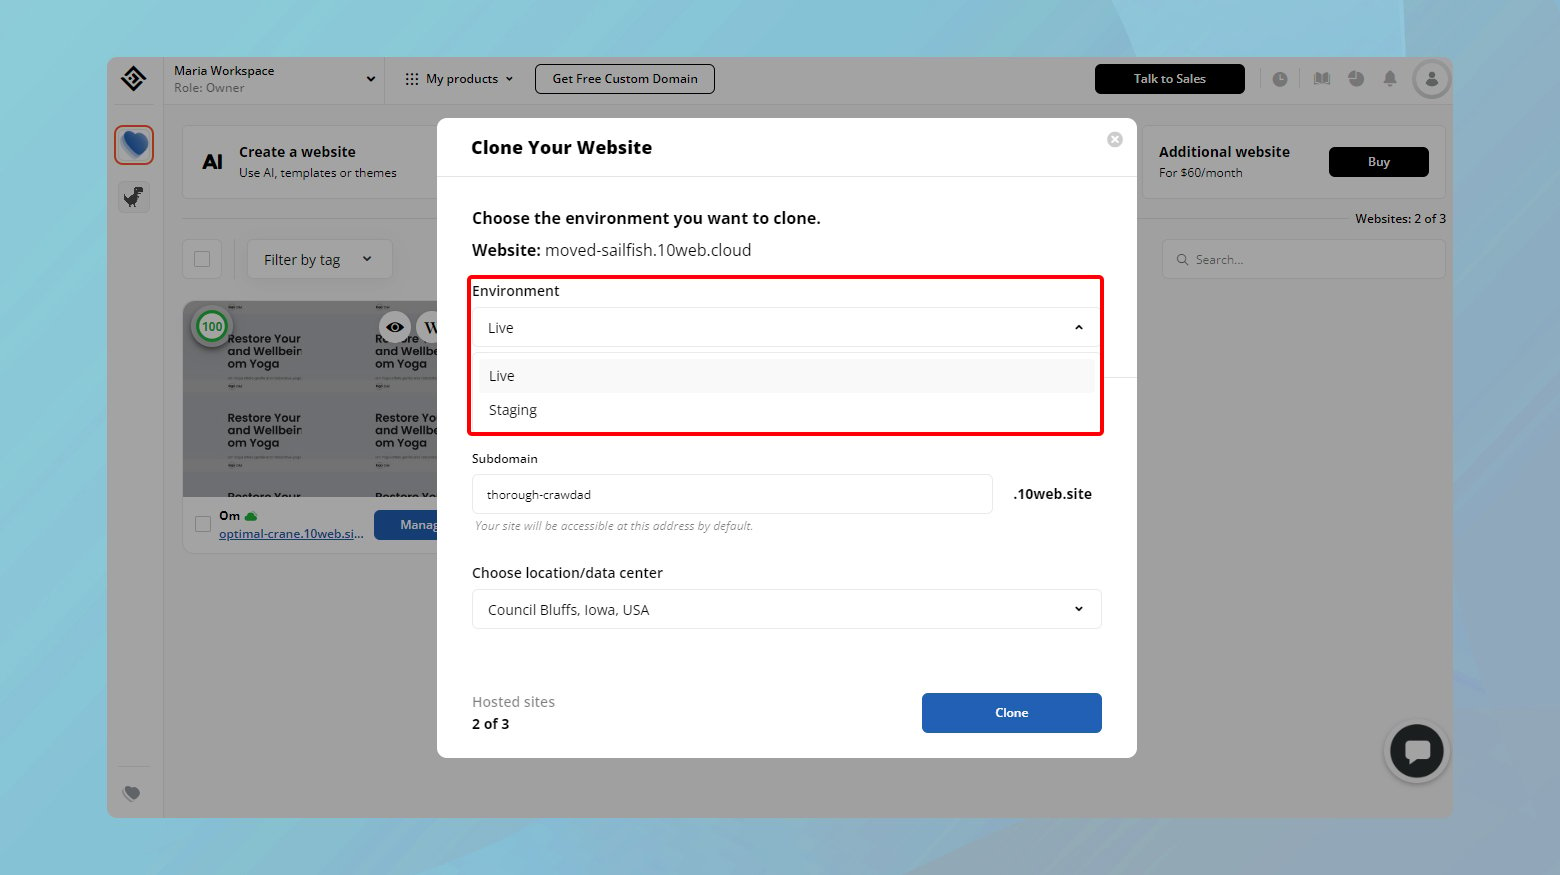
- Enter a subdomain for your clone site.
- Choose a datacenter for your clone site and press Clone to start the process.
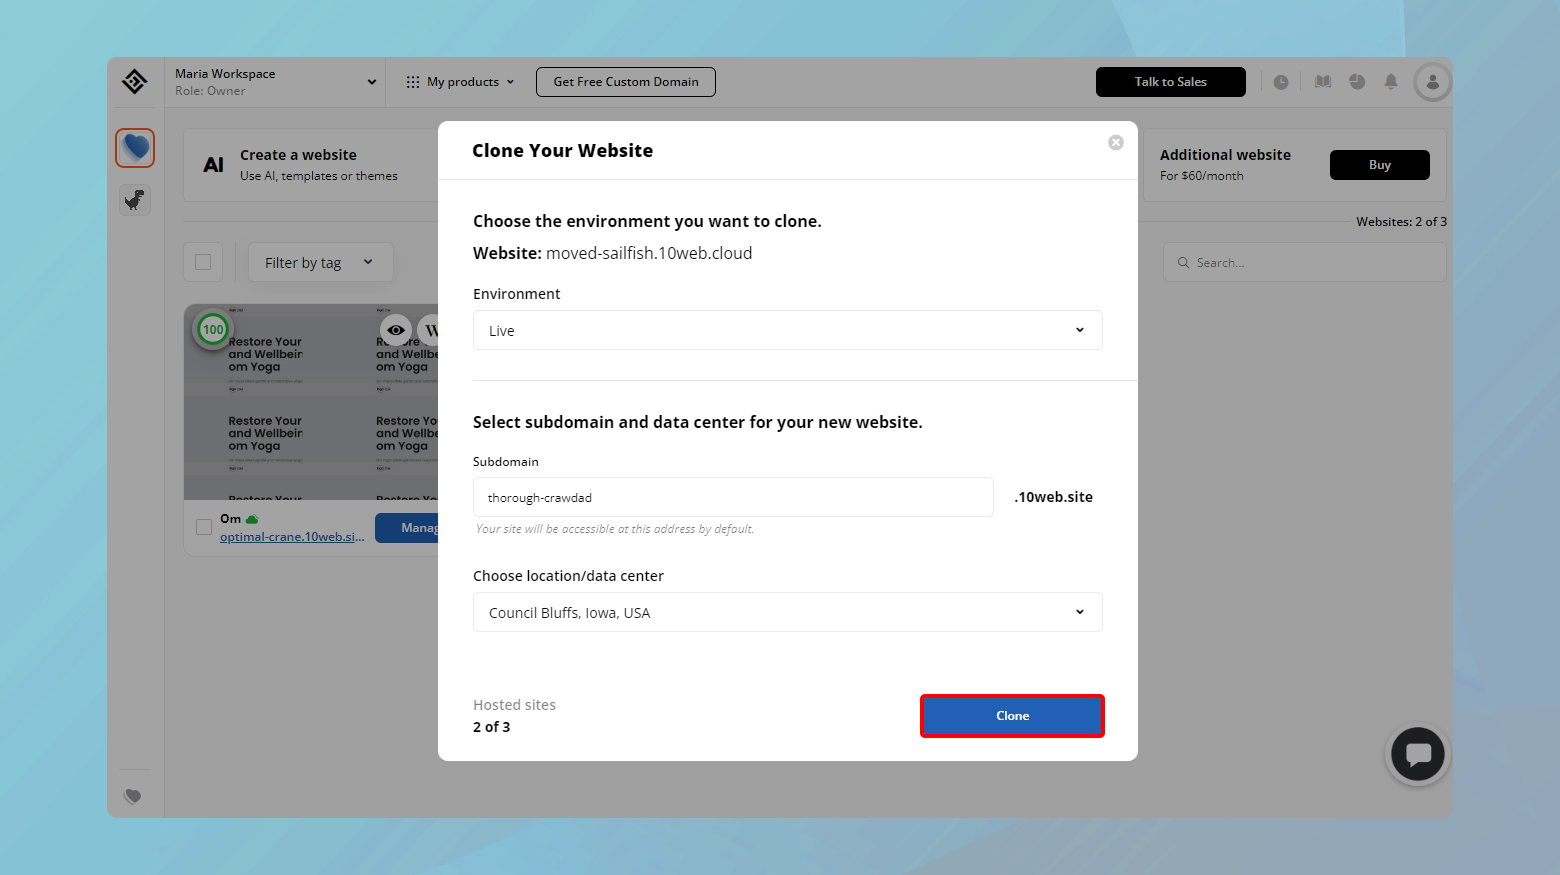
10Web will then start the automatic cloning of your website. This will be an exact copy of the website you chose to clone. Once the cloning is completed, you will see the website in the dashboard.
How to clone your WordPress site manually
Cloning your WordPress site manually may seem challenging, but with a clear set of steps, you can efficiently duplicate your site.
Export your database
- Log into your control panel and open phpMyAdmin.
- Select the database of the WordPress site you want to clone.
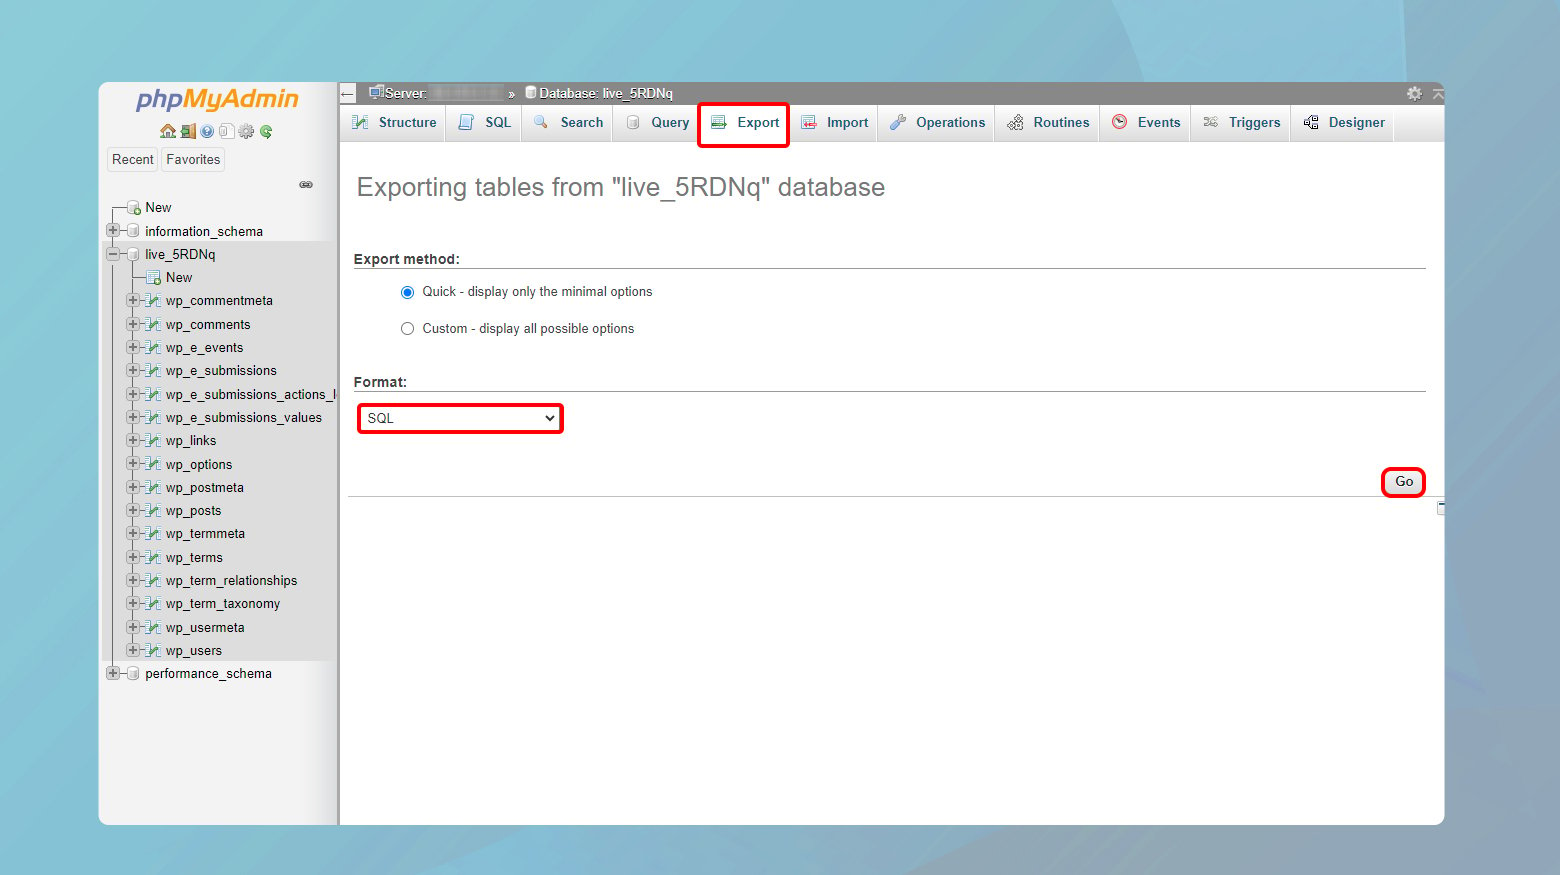
- Click on the Export tab.
- Choose the Quick export method and select SQL as the format.
- Click Go to download your database SQL file.
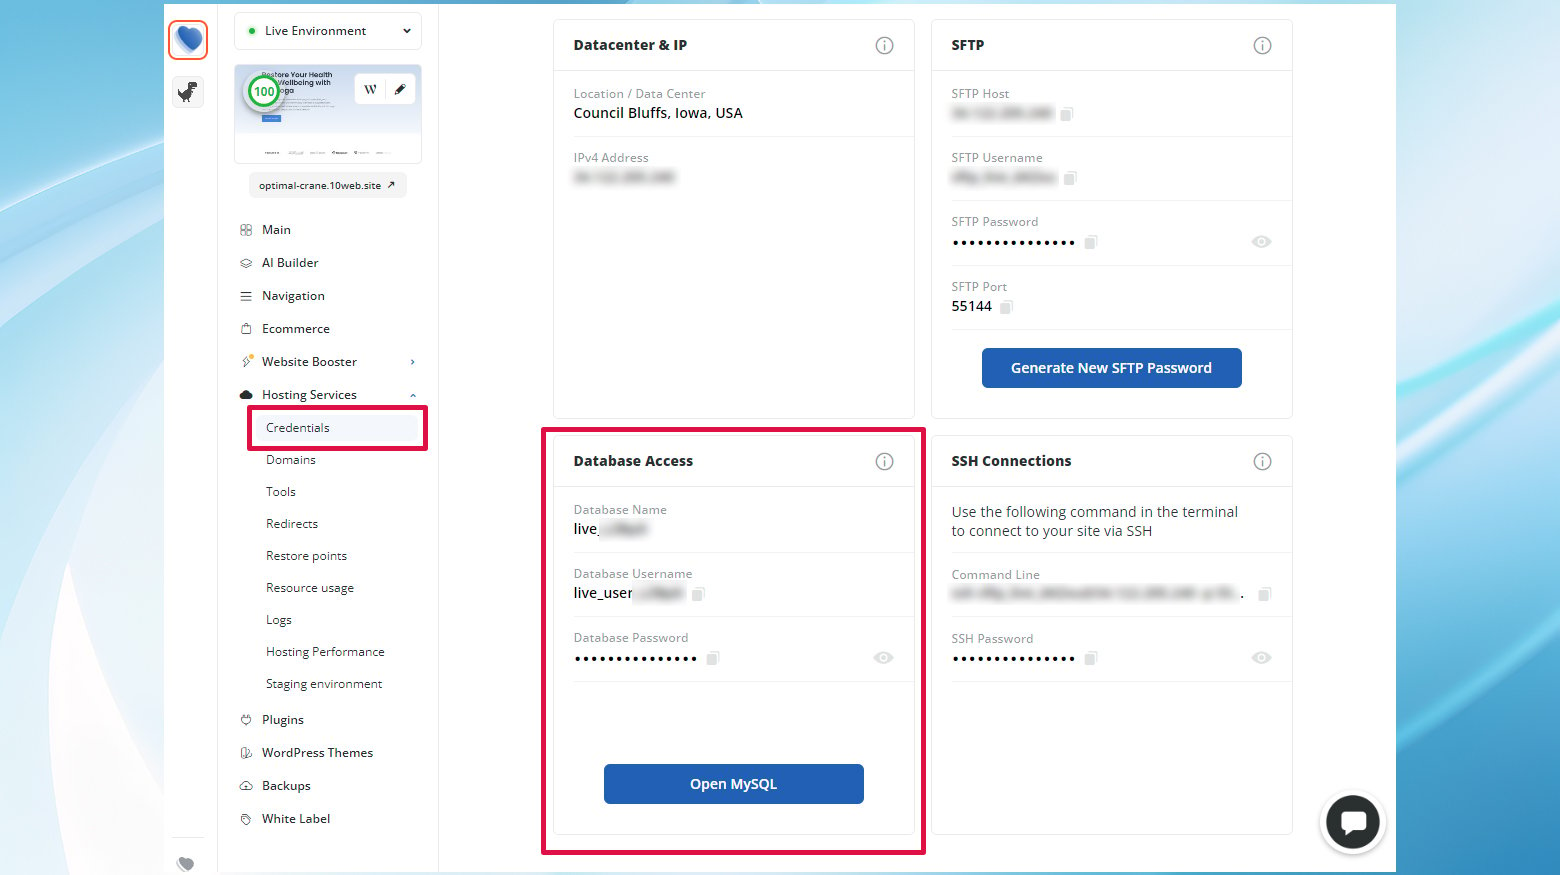
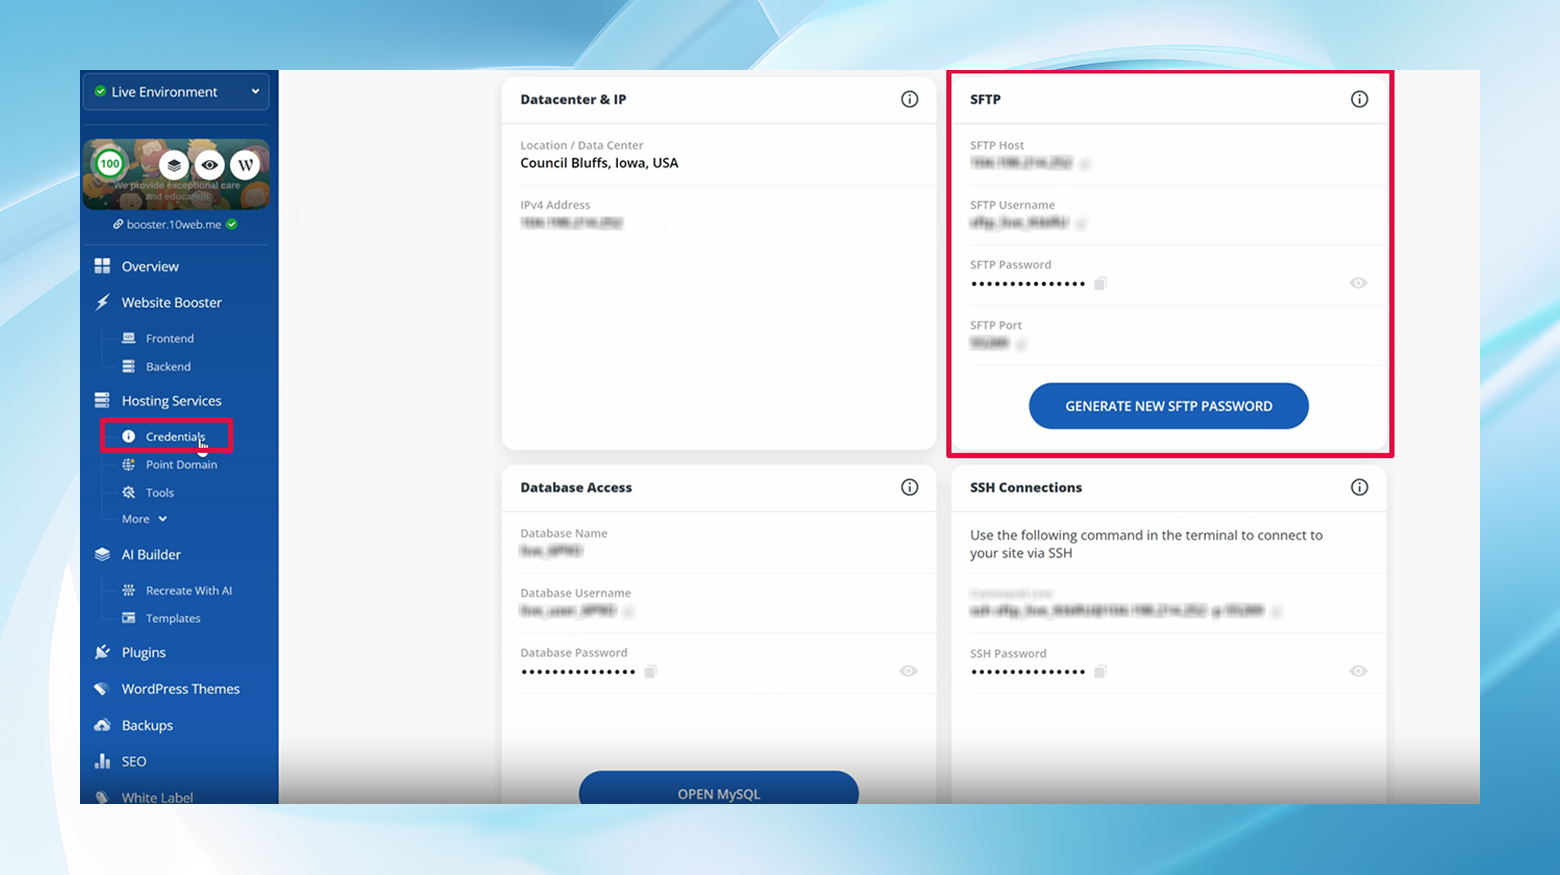
10Web users can access phpMyAdmin by going to Hosting Services > Credentials.
Copy WordPress files
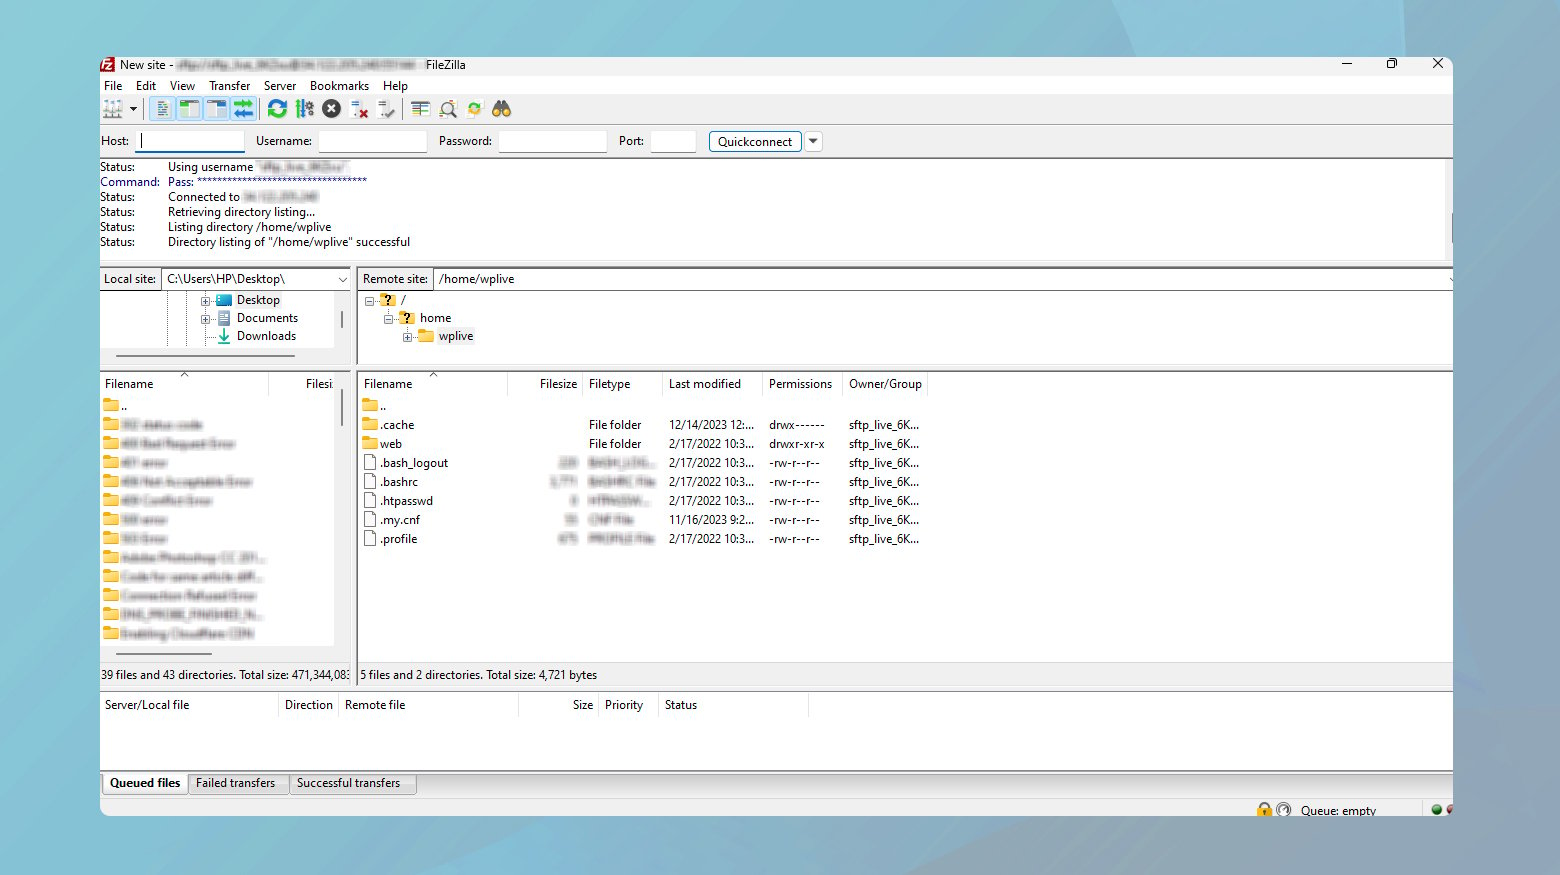
- Connect to your website using an FTP client or via the hosting File Manager.
- Navigate to the directory where your website is located.
- Select all the WordPress files.
- Download them to your local computer.
10Web users can access FTP credentials by going to Hosting Services > Credentials.
Create the new database
- On the server where you are cloning the site, access your hosting control panel.
- Launch the MySQL Database Wizard.
- Follow the steps to create a new database and a new user.
- Assign all privileges to the new user.
Import the database
- Open phpMyAdmin on the new server.
- Select your new database.
- Click on the Import tab.
- Choose the SQL file you exported previously.
- Start the import process to transfer all your data to the new database.
Update the wp-config.php file
- Locate the wp-config.php file among your downloaded WordPress files.
- Edit the DB_NAME’, ‘DB_USER, and DB_PASSWORD values to match those of your new database.
- Save the changes.
- Upload the updated WordPress files to the new site location via FTP.
After completing the above steps, visit your newly cloned site to ensure everything is functioning correctly.
Post-cloning setup
After you’ve successfully cloned your WordPress site, you’ll need to make a few important adjustments to ensure everything is running smoothly on the new site.
Configuring the cloned site
First, access your WordPress dashboard on the cloned site. Navigate to Settings and then to General. Here, you’ll need to update the Site Title and Tagline appropriately. If your cloned site is a staging environment, labeling it as such can help avoid confusion.
Updating links and URLs
Use a plugin or a SQL query in your database management tool to replace old URLs with the new ones. Navigate to Tools, select the plugin you’re using for search and replace, and carefully update the following:
- Site address (URL)
- Home address (URL)
- Links in posts and pages
- Links in navigation menus and widgets
It’s crucial to backup your database before making these changes, to avoid any potential loss of data.
Testing the cloned site
Thorough testing is key to ensuring your cloned site functions as expected. Start by checking the following:
- All pages and posts: Confirm that they load without errors.
- Forms and integrations: Test contact forms, sign-ups, e-commerce checkout processes, etc.
- Responsive design: Confirm the site displays correctly on various devices.
Taking the time to systematically check these areas will help you catch issues early and maintain a quality experience for users.
Simplify WordPress with 10Web
Automate manual work with 10Web Managed WordPress Hosting and 10Web AI Website Builder. Optimize your WordPress website effortlessly.
Maintenance and best practices
When you clone a WordPress site, ongoing maintenance and implementation of best practices ensure that your cloned site remains secure, optimized, and reliable. Paying attention to regular backups and robust security measures can help you avoid potential pitfalls in the future.
Regular backups
Backing up your WordPress site regularly is crucial to safeguard your data. Set up a schedule for automatic backups to avoid forgetting:
- Daily: Ideal for high-traffic sites.
- Weekly: Sufficient for most standard sites.
- Monthly: For sites with infrequent updates.
Store backups in multiple locations, such as:
- On your hosting service.
- Cloud storage (e.g., Dropbox, Google Drive).
- External hard drives.
Security measures
Implementing strong security measures is non-negotiable to protect your cloned site from threats. Here are specifics to ensure your site’s safety:
- Keep WordPress, themes, and plugins up to date.
- Use strong passwords and change them regularly.
- Apply Two-Factor Authentication (2FA) for an extra layer of security.
- Install a reputable security plugin and configure it properly.
- Regularly scan your site for malware and any vulnerabilities.
Conclusion
Cloning a WordPress site is an efficient method for creating backups, testing changes, and moving to new hosts without affecting the live site. Using plugins like Duplicator streamlines the process by packaging all site components into one file, ensuring an exact copy of your site.
The cloning process includes backing up, transferring, and configuring the new site. Post-cloning, it’s crucial to update settings, test thoroughly, and implement strong security measures. This approach simplifies site management and enhances development flexibility.
Simplify WordPress with 10Web
Automate manual work with 10Web Managed WordPress Hosting and 10Web AI Website Builder. Optimize your WordPress website effortlessly.
Simplify WordPress with 10Web
Simplify WordPress with 10Web
Skip and automate manual work with 10Web Managed WordPress Hosting and the 10Web AI Website Builder.