What is Purge Cache in WordPres
Ever wondered why your WordPress site is not showing the latest updates? It might be because your cache is storing an older version of your pages. Purge cache in WordPress means clearing out that stored data so your visitors see the most up-to-date content.
When you use the WordPress dashboard, cached files can speed up loading times, but sometimes this cache can prevent new changes from appearing. By purging the cache, you can improve your user experience by ensuring everyone sees the latest updates on your site.
Navigating plugins like WP Super Cache or W3 Total Cache makes this process simple. In just a few clicks, you can delete cached files and let fresh data load in their place. This small action can make a big difference in how users interact with your WordPress site.
Understanding WordPress caching
WordPress caching can significantly improve your website’s performance by storing static versions of your content. This reduces server load and speeds up page loading, enhancing the user experience and boosting SEO.
Types of caches
Browser cache: When a user visits your site, their browser saves some of the site’s static files. This way, when they visit again, the browser can load these files from its cache rather than fetching them from the server. This speeds up the page load time for returning visitors.
Server cache: This happens on the server side. It stores copies of your pages and posts. When a user visits your site, the server delivers the cached version instead of generating it anew each time. This helps reduce server strain and speeds up loading times. You may find this type of caching built-in to managed WordPress hosting.
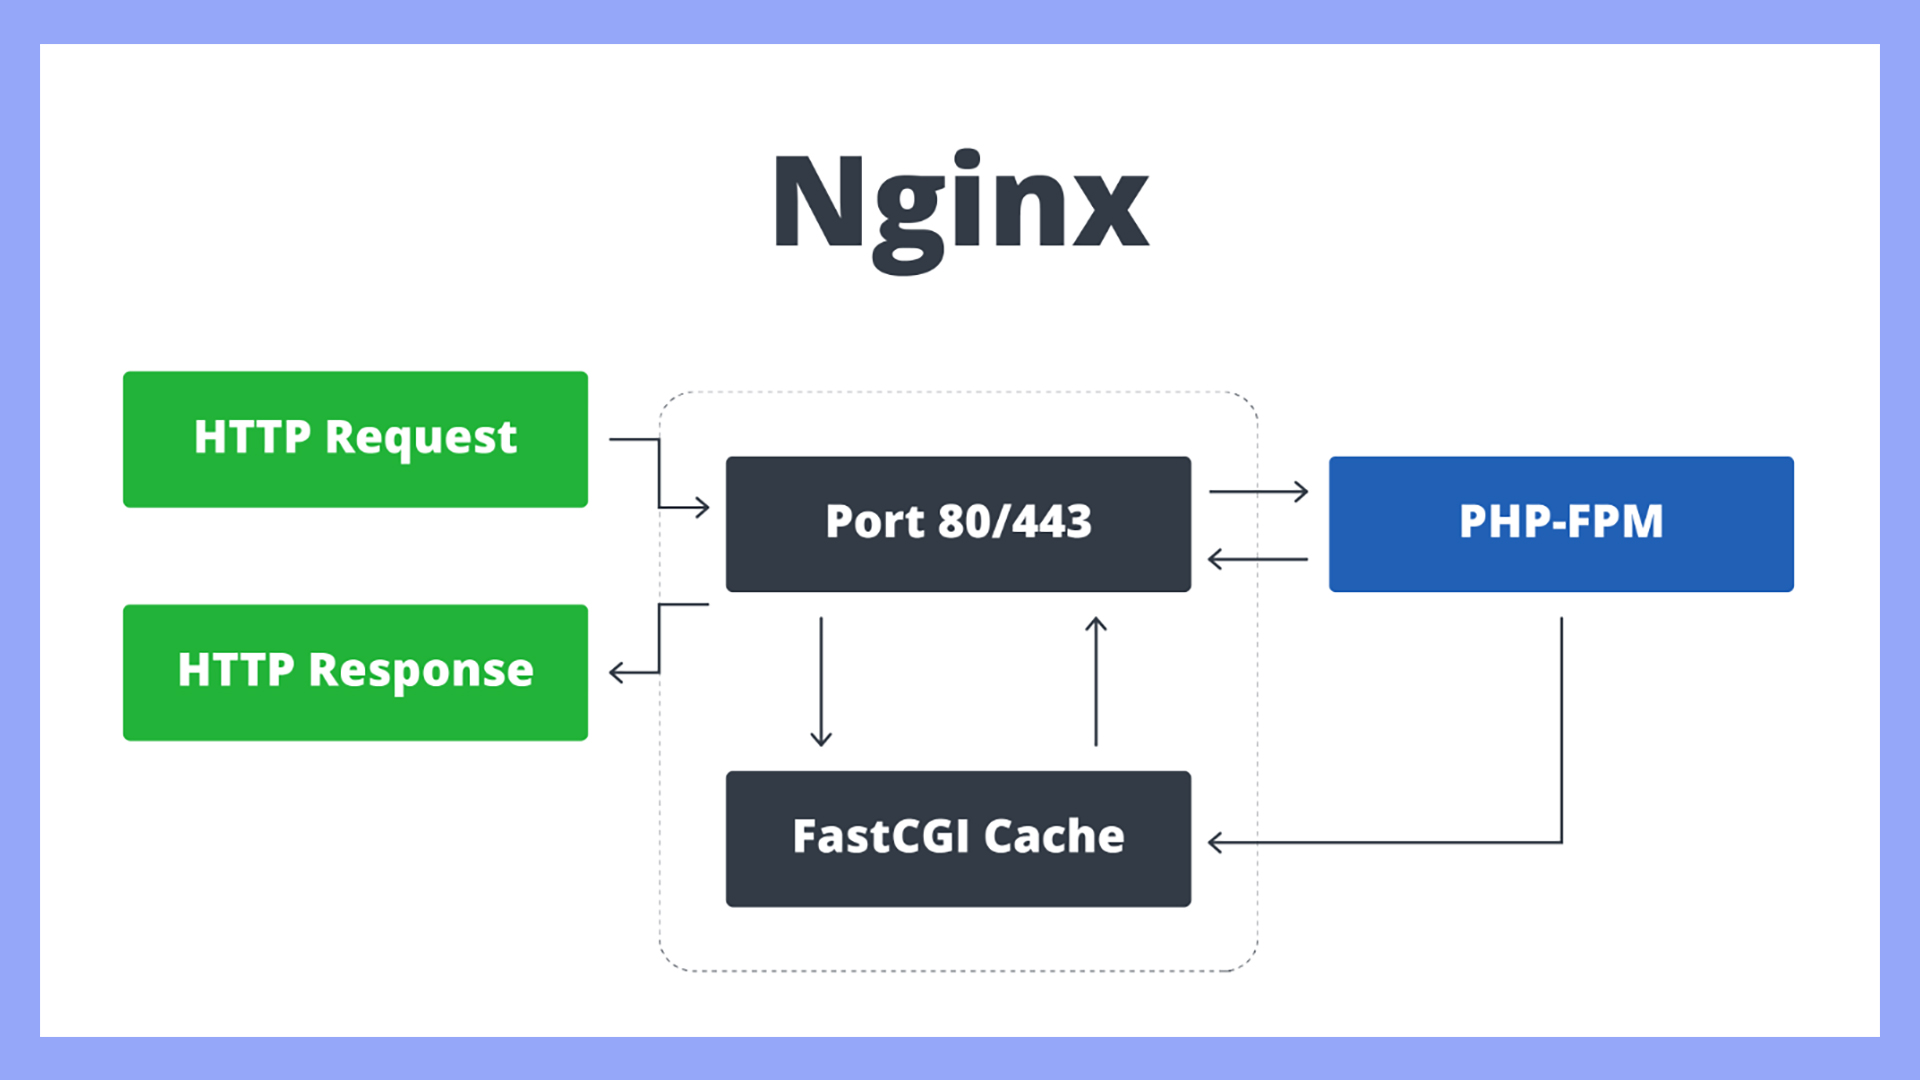
Object cache: This caches database query results. For example, it can store the results of complex database queries so that the next time the data is needed, it can be pulled from the cache. This reduces the time it takes to load your site pages that rely heavily on database queries.
Benefits of caching
Improved website performance: Caching helps your site load faster, which is crucial for user experience (UX). Faster sites keep visitors engaged and reduce bounce rates.
Reduced server load: By serving cached pages, your server doesn’t have to process every request from scratch. This can be especially beneficial during traffic spikes.
Better SEO: Search engines like Google rank fast-loading websites higher. Caching can reduce loading times, helping your site perform better in search rankings.
Enhanced user experience: Visitors expect fast and responsive websites. Quick loading times keep users happy and improve their overall browsing experience.
What is purge cache in WordPress?
Purge cache in WordPress means removing the stored versions of your website’s files. This helps you see the latest changes to your site. You can do this through the dashboard, by using caching plugins, or manually.
Using dashboard features
You can often clear your WordPress cache directly from the dashboard. Many themes and plugins add options for cache clearing. For example, if WP Super Cache is installed, you’ll find a Delete Cache button under Settings. Clicking this removes all cached files instantly. This method is convenient and doesn’t require extra tools or advanced knowledge. Always check your plugin settings to see if there’s a Clear Cache option available to make your task easier.
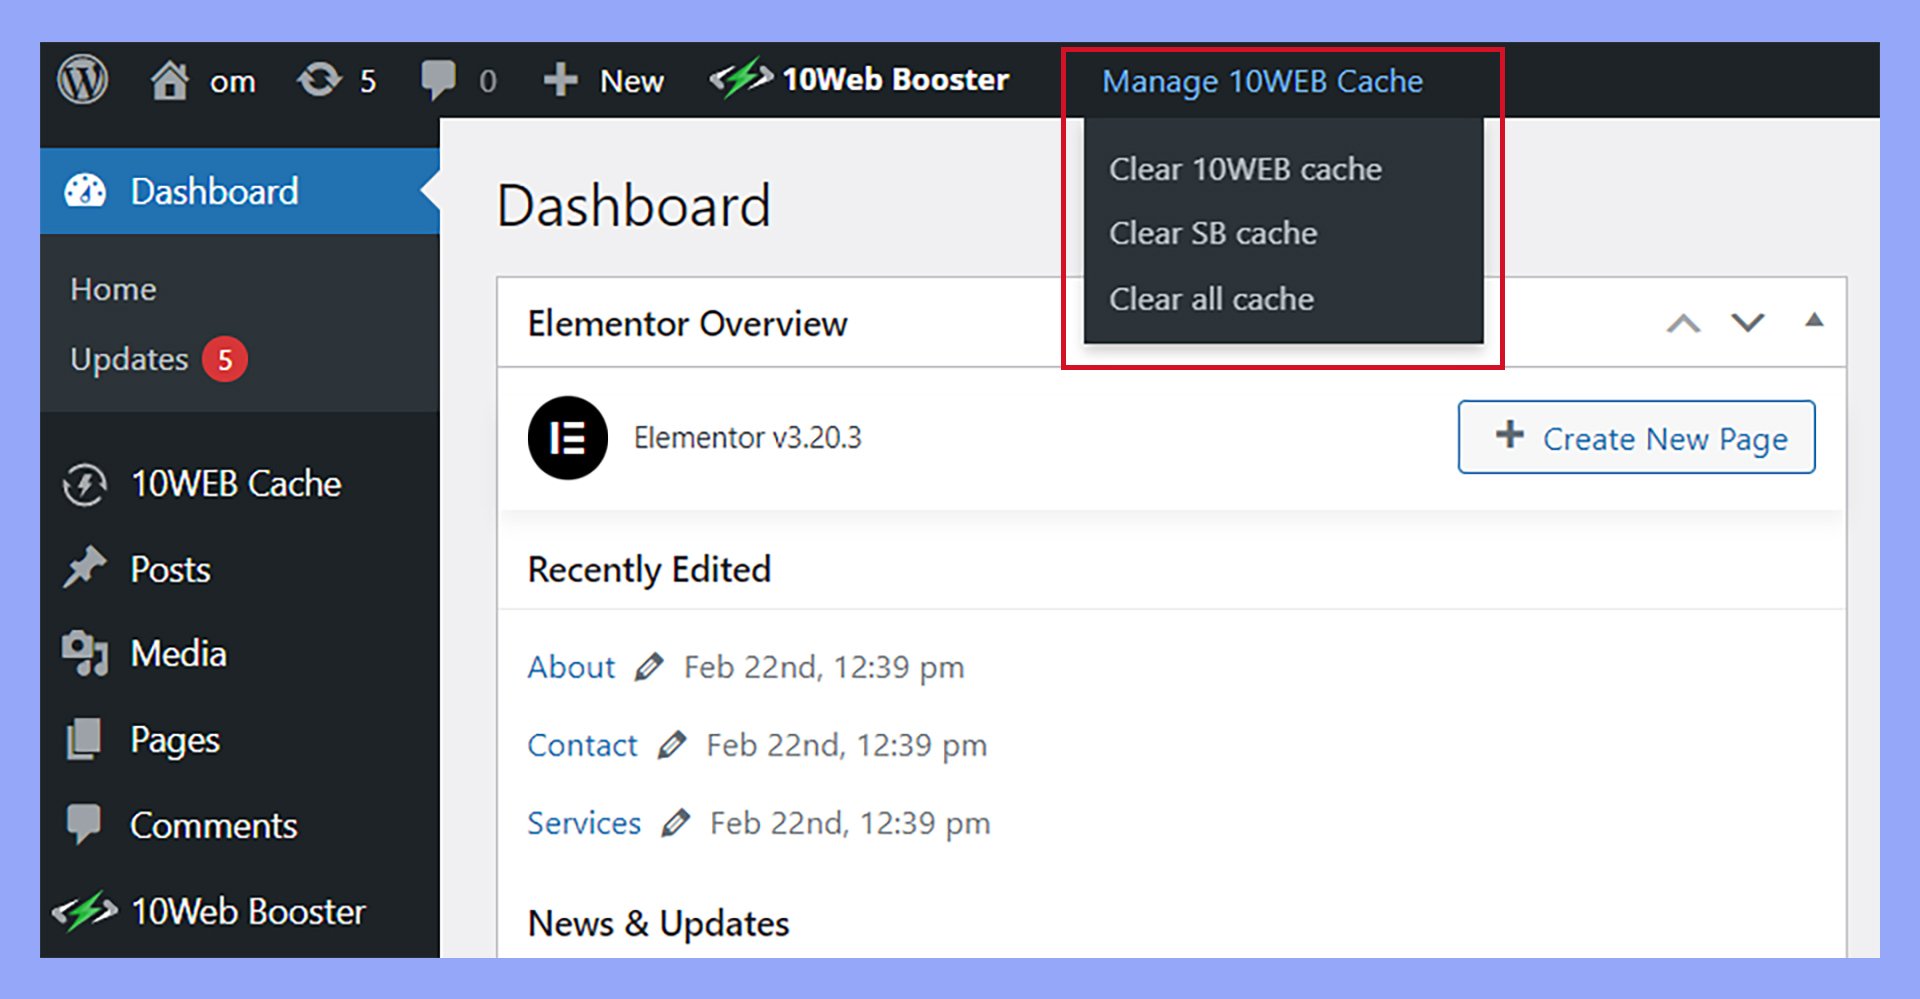
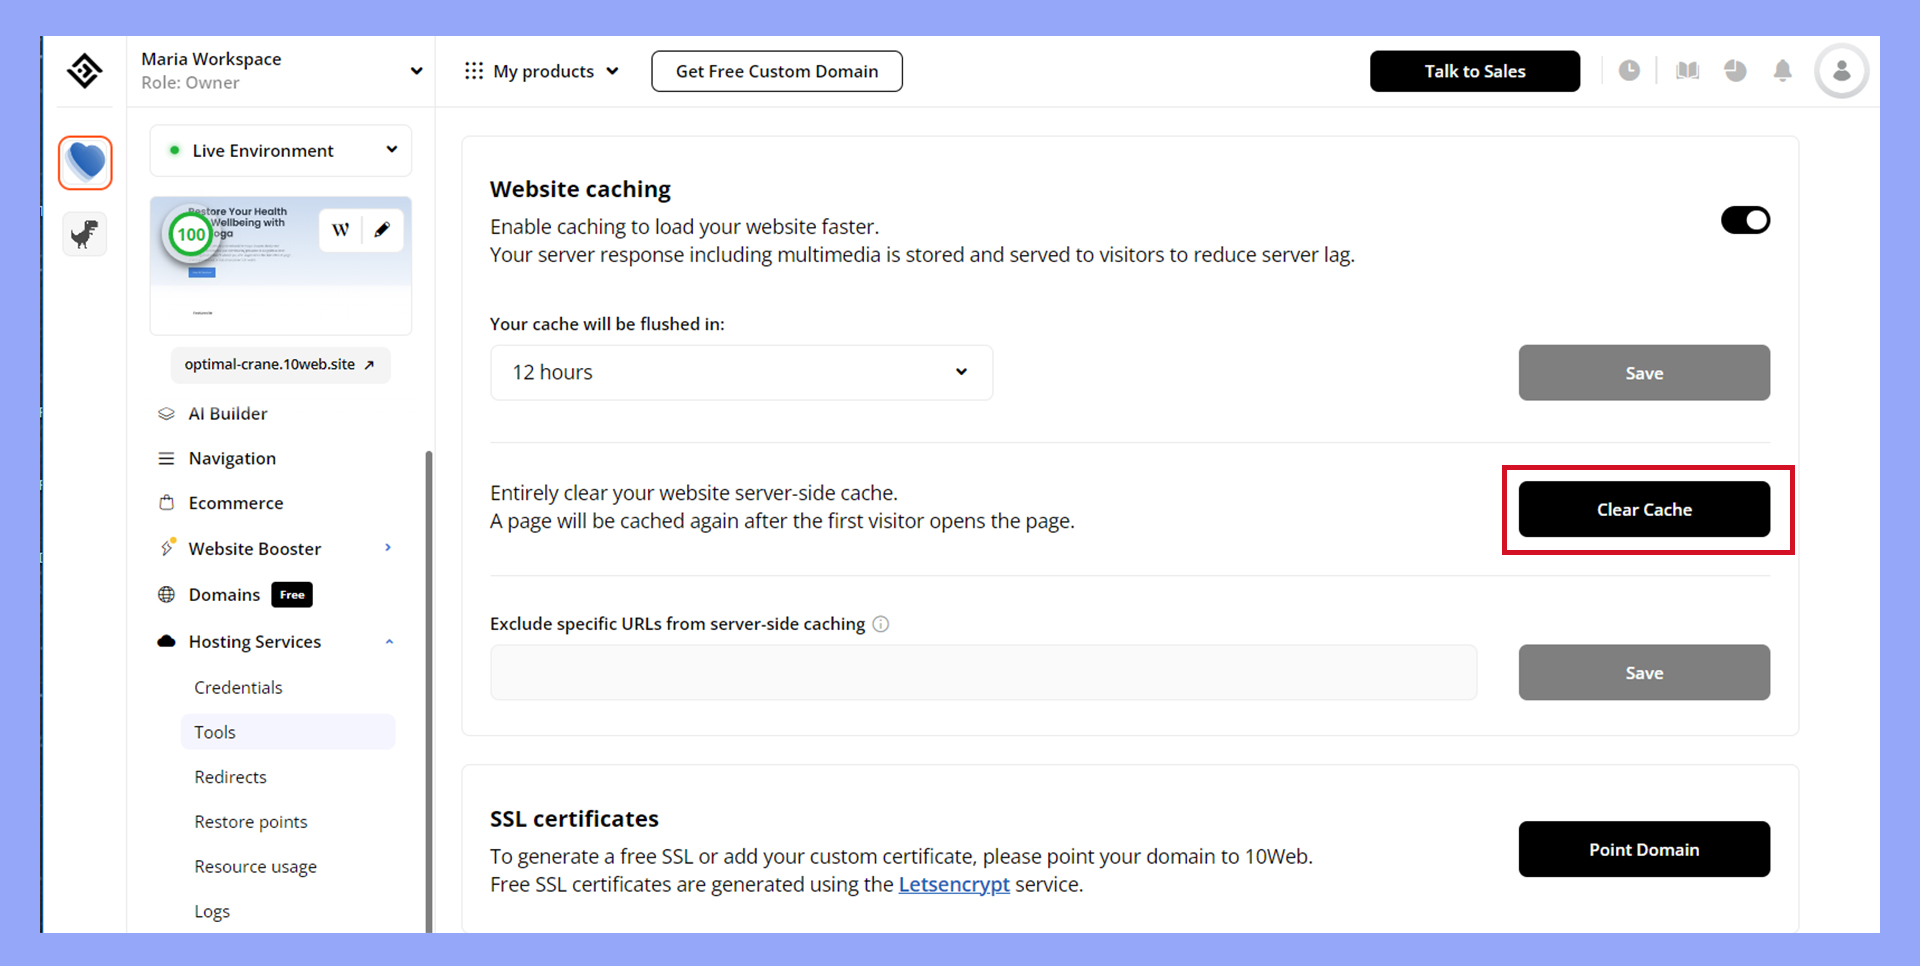
10Web users can purge cache in WordPress through the 10Web dashboard or the site’s WordPress admin.
Via caching plugins
Caching plugins streamline the process of clearing WordPress caches. Plugins like W3 Total Cache, WP Super Cache, WP Rocket, and LiteSpeed Cache offer Purge All Cache buttons in the wp-admin toolbar or plugin settings. These plugins handle various cached elements, such as minified files and scripts.
In W3 Total Cache, for example, you can hover over the Performance tab and then click on Purge All Caches from the dropdown menu. These plugins often come with extra features, such as scheduling cache purges or clearing specific types of caches only.
Manual purge methods
Sometimes, you may need to clear the cache manually. This might involve deleting files via FTP or using PHP scripts for advanced control.
For example, using an FTP client, you can navigate to the cache directory in your WordPress installation and delete its contents.
With PHP scripts, you can create custom code snippets to clear caches based on specific criteria. These methods are more complex but can be necessary if the automatic options fail or you need more granular control. Always back up your website before attempting manual cache clearing to avoid accidental data loss.
Cache management best practices
Effective cache management can significantly improve your WordPress site’s performance and reduce server load. Below, we explore how to configure caching plugins and maintain cache health.
Configuring caching plugins
To start, choose a reliable caching plugin. Popular options include WP Super Cache, W3 Total Cache, and WP Rocket. Each plugin offers various settings for optimizing your cache.
After installing your chosen plugin, navigate to the settings section in the WordPress dashboard. Look for options such as Page Cache, Browser Cache, and Object Cache.
Enable these settings to store static website content. This ensures that repeat visitors load your site faster.
Cache timeout rules are another important setting. These rules determine how long cached data is stored before being refreshed. Adjust these settings based on how frequently you update your website.
For managed hosting solutions like WP Engine, Bluehost, SiteGround, and Kinsta, often built-in caching options are available. Enable and configure these tools to optimize your site’s performance.
Maintaining cache health
Keeping your cache in good shape is crucial for smooth site operation.
Regularly clear your cache to ensure users see the most current content.
This is especially important after making updates or publishing new content.
Most caching plugins provide an easy-to-find clear cache button in their settings.
Use this feature after changes to prevent outdated data from being served.
Plugins like WP Fastest Cache offer advanced options for selective cache clearing.
This helps in managing the cache effectively without always purging the entire cache.
Regularly review server load and performance metrics.
Tools provided by managed hosting services like WP Engine or SiteGround can help you spot and fix caching-related issues.
By following these practices, you ensure your caching system remains efficient, and your website performs at its best.
In conclusion, understanding what purge cache is in WordPress is crucial for maintaining an up-to-date and efficient website. Purging the cache ensures that visitors see the latest content by clearing stored versions of your pages. Using dashboard features, caching plugins, or manual methods, you can easily manage your cache to improve user experience and site performance.
Subscribe to AI insights
- The latest trending AI news
- How AI boosts efficiency at 10Web
- In-depth reviews of AI tools
- Entrepreneurial wisdom and insights
- Valuable business growth tips
Share article
-
 Copy
Copy
-
-
-