Adding tax in WooCommerce is a crucial step for ensuring your online store complies with applicable tax laws, and providing transparent pricing for your customers. This simple guide for beginners covers everything you need to know to get started with tax settings in WooCommerce.
You’ll learn how to add tax in WooCommerce, from enabling to configuring the settings. Additionally, you will learn about handling international tax rates, managing shipping taxes, and generating comprehensive tax reports. By following these steps, you’ll maintain accurate tax calculations, comply with regional regulations, and enhance your store’s operational efficiency.
FAQ
How do I add sales tax to WooCommerce?
How do I add taxes to my WooCommerce order?
How do I get the total tax in WooCommerce?
How do I automatically calculate tax in WooCommerce?
How taxes work in WooCommerce
Before learning how to add tax in WooComemrce, it’s essential to understand how WooCommerce taxes work. In WooCommerce taxes are calculated based on various factors including the store’s base location, the customer’s shipping address, and the class of products being purchased. Your store collects and manages taxes according to these parameters.
WooCommerce has three default tax classes: standard, reduced, and zero rate. Each class can have different tax rates based on location and other variables.
- Standard rate: This is the default and most commonly used tax rate. You can set a rate that applies to most products.
- Reduced rate: Some products may qualify for a lower tax rate. For example, essential goods may carry less tax than luxury items.
- Zero rate: Tax-exempt Items will have this rate, such as some food items or children’s clothing, depending on the law.
Understanding and configuring your tax classes and rates correctly is essential when learning how to add tax in WooCommerce. Follow these guidelines to ensure proper tax handling for all your transactions.
How to add tax in WooCommerce: Initial setup
Setting up tax in your WooCommerce store ensures compliance with tax regulations and provides customers with transparent pricing. Let’s walk through the general tax configuration and the setup of standard rates.
Configure general tax settings
Before adding tax rates, you need to configure the general tax settings in WooCommerce. This is a crucial step to ensure that your store’s taxes are applied correctly.
- From your WordPress dashboard, go to WooCommerce > Settings > General.
- Scroll down to find the Enable taxes and tax calculations checkbox and tick it to enable the tax settings in WooCommerce.

- Scroll to the bottom of the page and click Save changes to apply your settings.
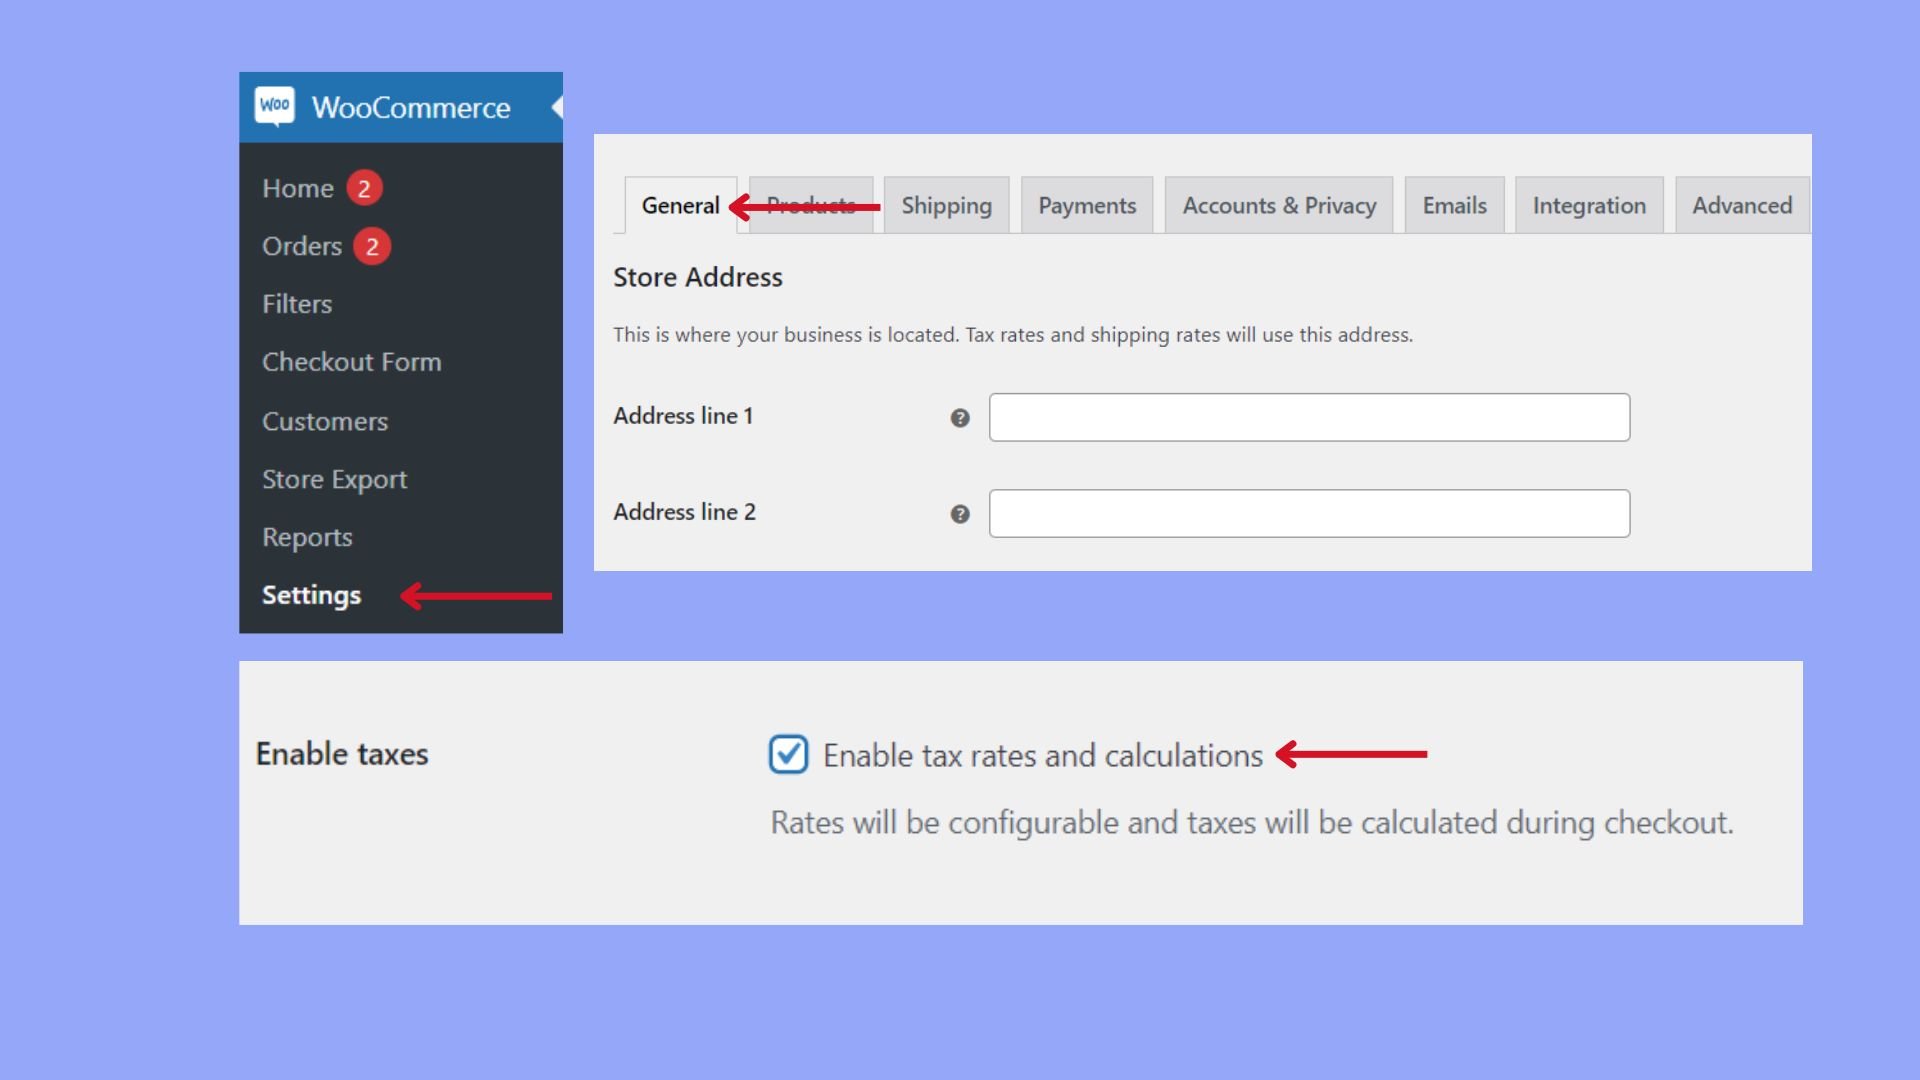
Once taxes are enabled, you can see additional tax options available in the settings.
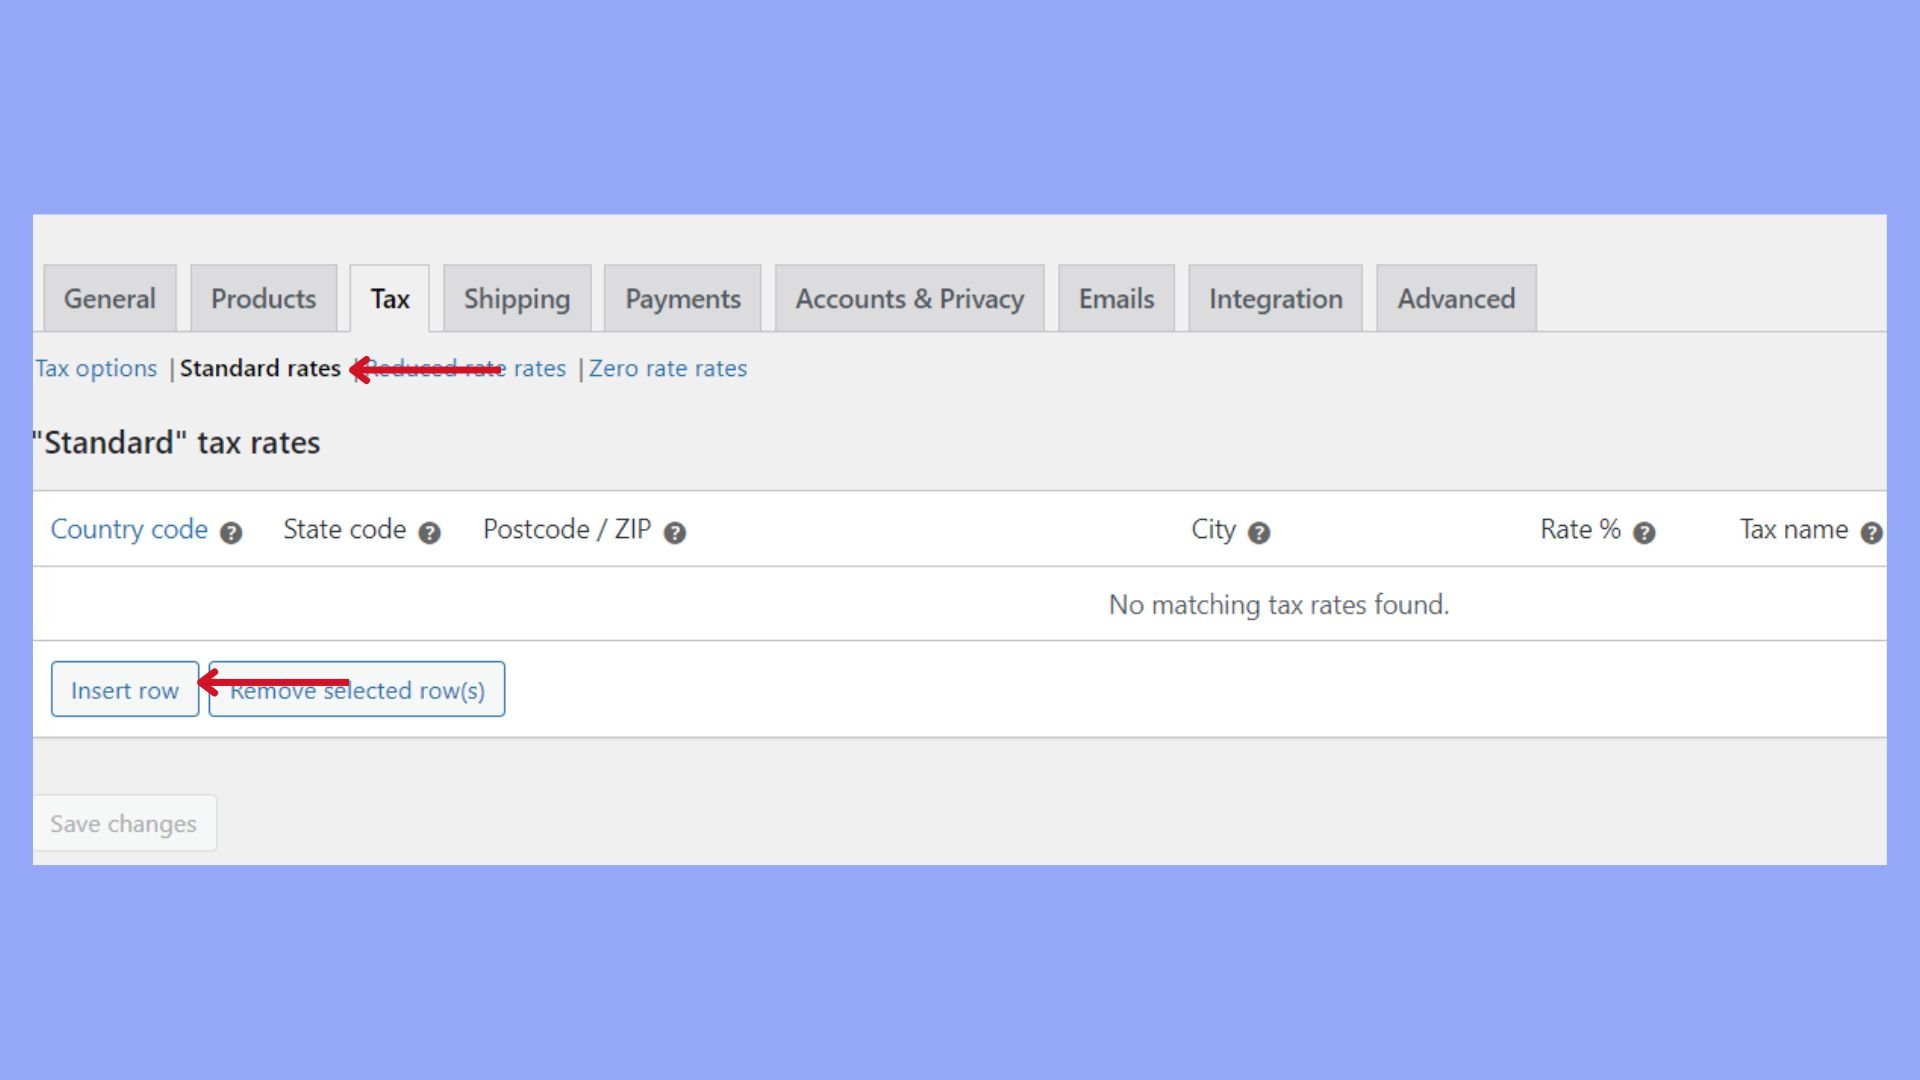
Set up standard rates
After enabling the tax settings, your next step is to define standard tax rates applicable to your store’s products.
- From the WooCommerce settings, select the Tax tab.
- You will see a section titled Standard rates; click on it.
- To add a new tax rate, click the Insert row button.
- Fill in the tax rate details such as Country Code, State Code, Tax Rate, Tax Name, and Priority. Ensure you use official country and state codes.
- After entering the necessary information, you can click Save changes.
Note: When entering prices for your products in WooCommerce, you can decide whether they should be inputted inclusive or exclusive of tax. Choose the option that best fits your pricing strategy.
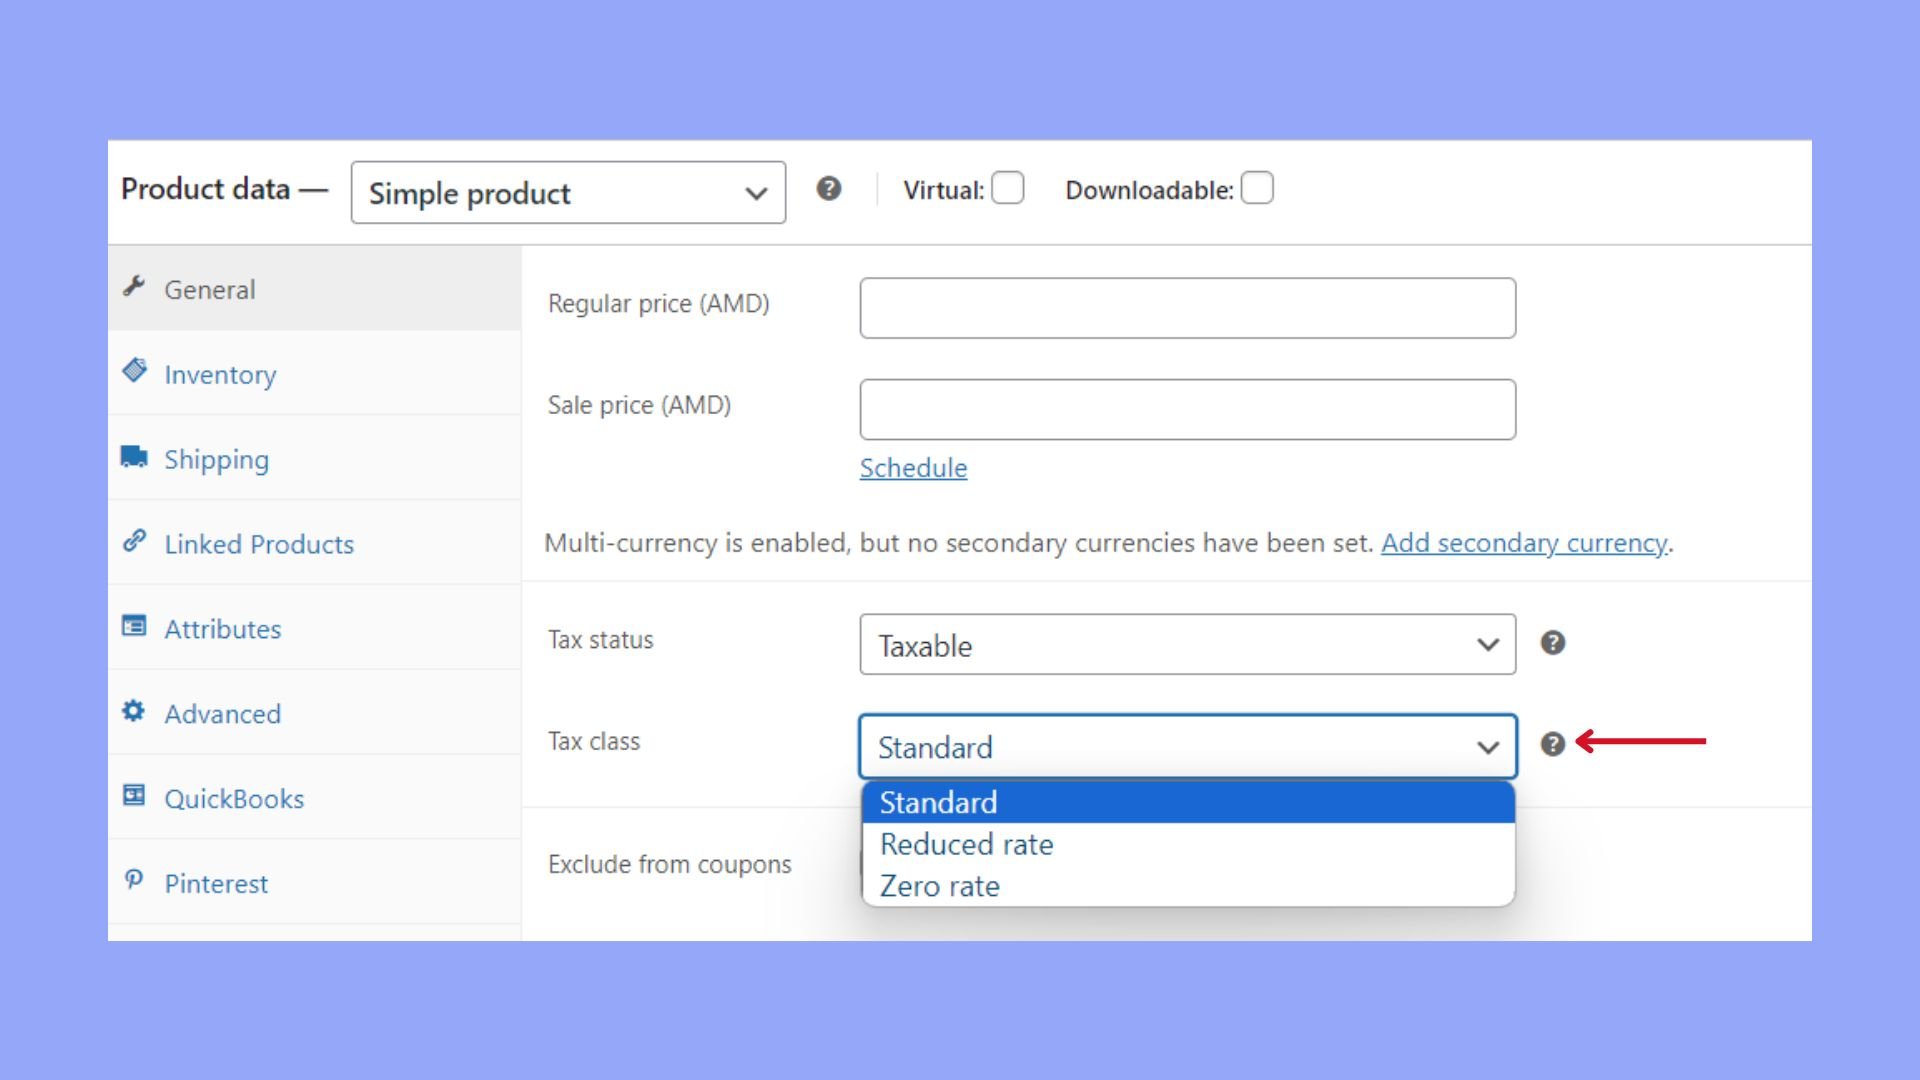
Assign tax classes to products
When learning how to add tax in WooCommerce, it’s important that each product is assigned the correct tax class and that you manage taxes for shipping if applicable.
- Navigate to WooCommerce > Products and select the product you want to apply taxes to.
- Scroll down to the Product data section and click on the Tax tab.
- From the Tax class dropdown, choose the appropriate tax class for your product. The Standard rate is typically selected for general products.
Manage tax rates for shipping
If you charge tax on shipping, you’ll need to assign a Shipping tax class to your shipping methods in WooCommerce. It is possible to use the same tax classes as you do for products, but you might need to set specific rates based on your shipping destinations.
- Go to WooCommerce > Settings > Tax.
- Under the Shipping tax class section, select which tax class applies to your shipping costs. You can opt for Shipping tax class based on cart items to apply the highest tax class of the items in the cart.
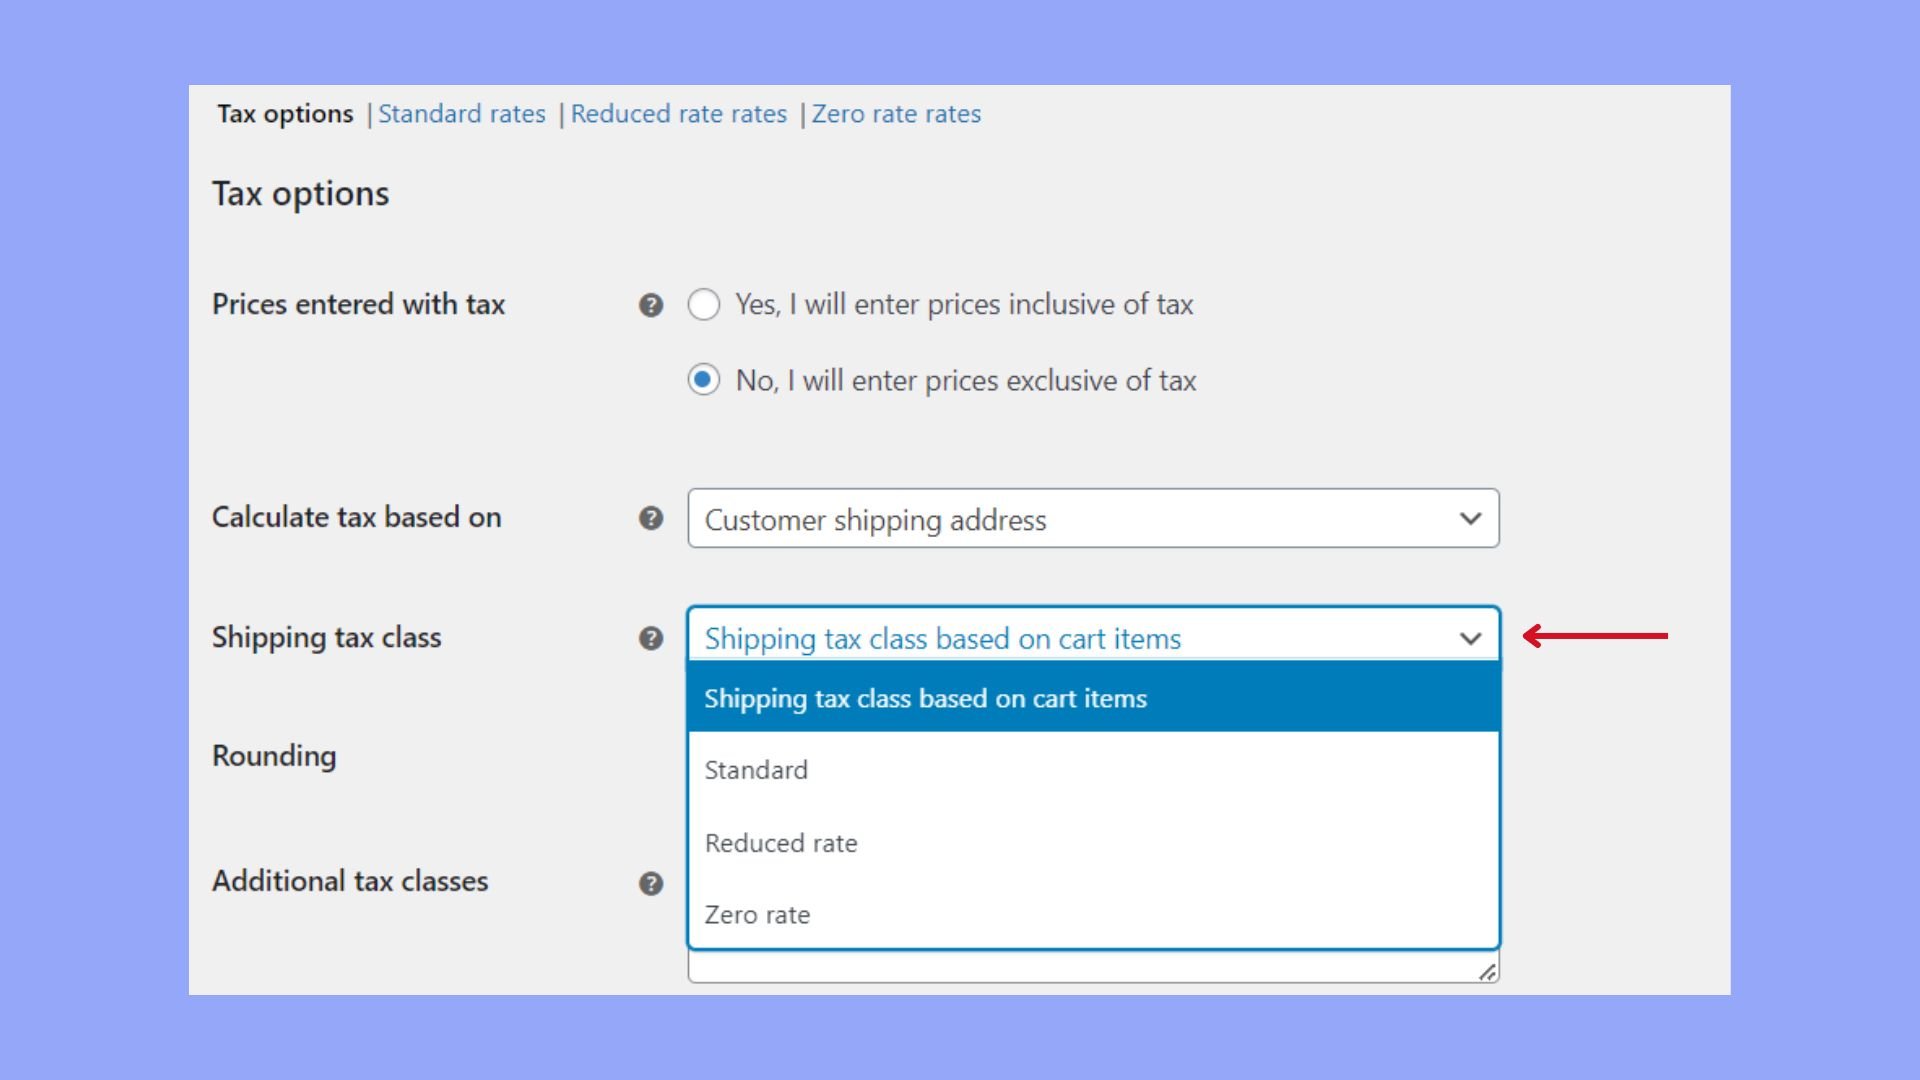
Click Save changes after you update your tax settings. By carefully assigning the correct tax class to each product and managing tax rates for shipping, you’ll maintain accurate tax calculations in your online store.
Advanced tax options
When you’re setting up your online store, it’s essential to understand how to add tax in WooCommerce to ensure that tax calculations at checkout are accurate and comply with local tax laws.
Determine tax calculation based on address
To begin, WooCommerce can calculate taxes based on your customer’s shipping address, billing address, or your store’s base address. Here’s how you can set this up:
- Go to WooCommerce > Settings > Tax.
- Select the Tax options section.
- Choose whether to calculate tax based on your customer’s Shipping address, Billing address, or Shop base address.
- If you’re dealing with VAT, make sure your store complies with VAT regulations and displays prices accordingly.
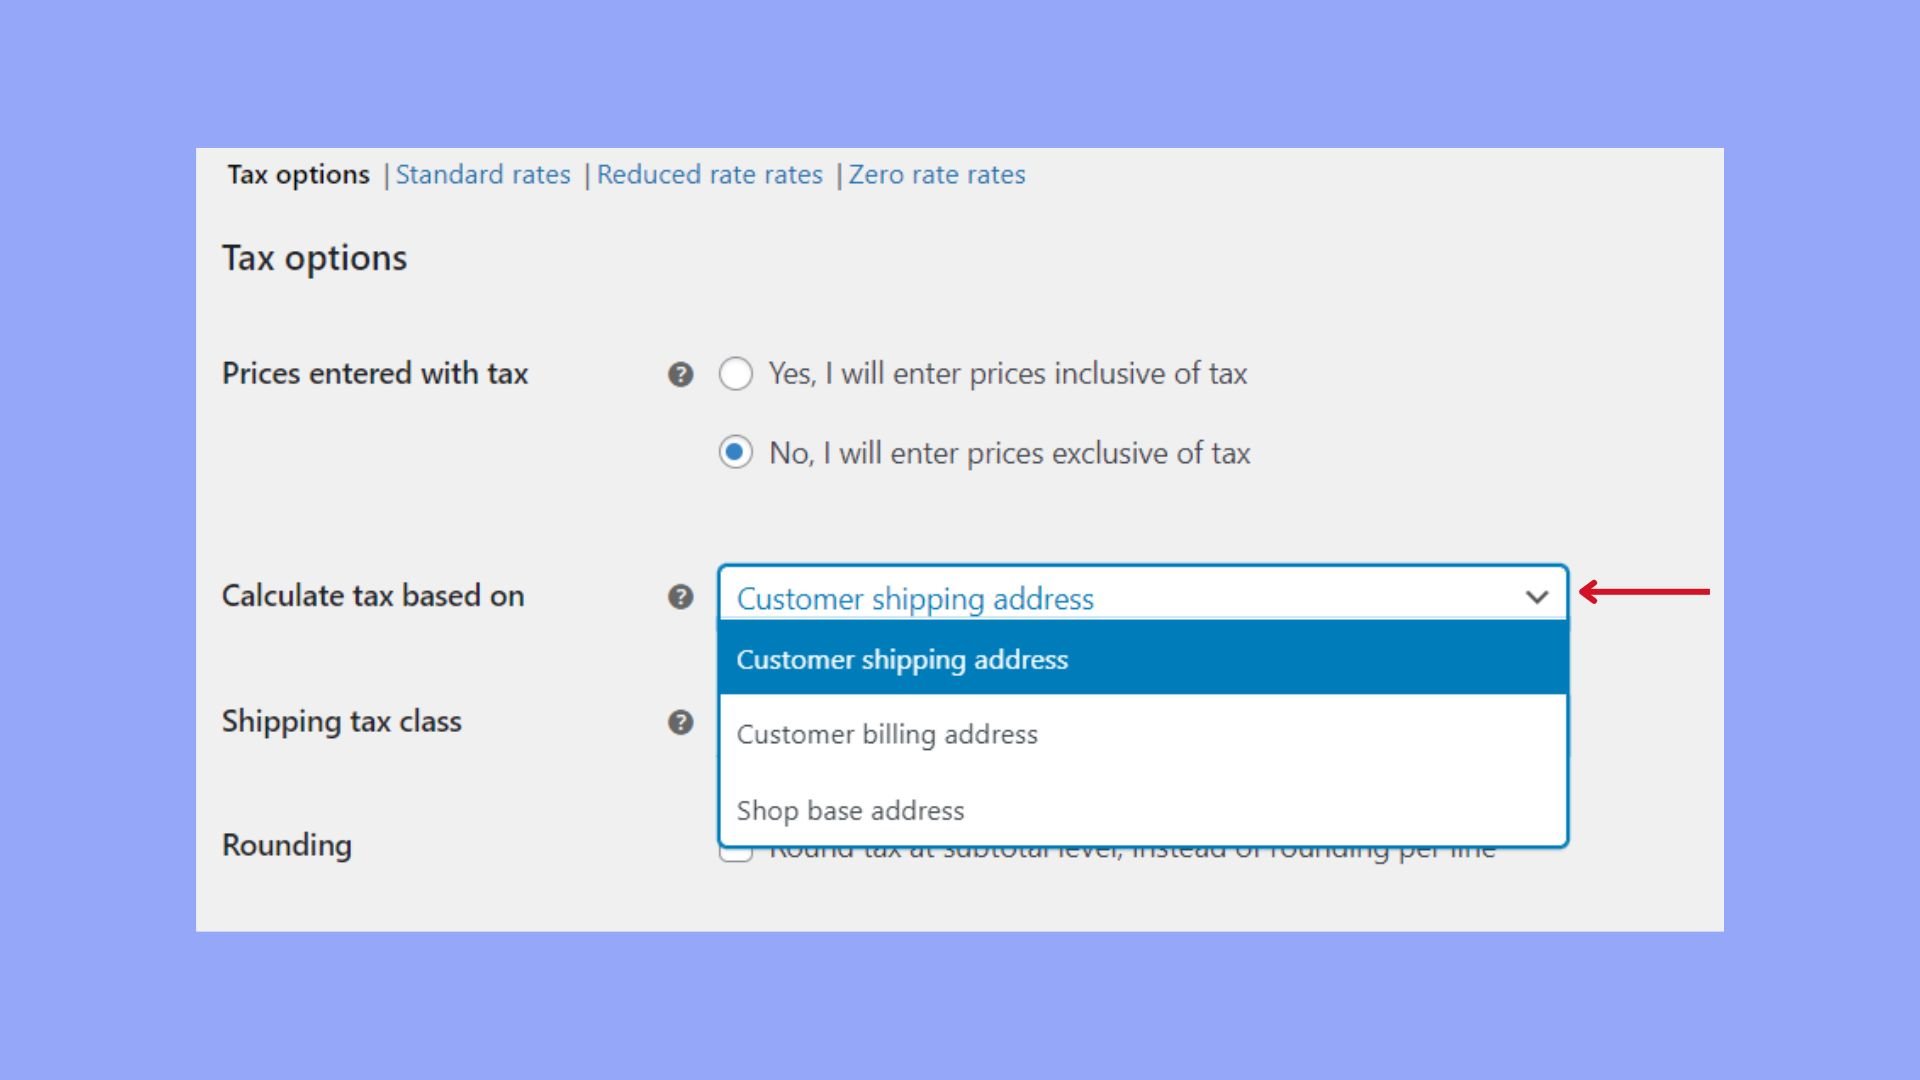
Each tax rate you configure requires a 2-digit country code to specify the region the tax applies to. This ensures taxes are calculated correctly for each location.
Setting tax totals display
Displaying tax totals clearly during checkout is crucial for a transparent transaction. You can control how tax is displayed in the cart and checkout:
- Go back to the Tax options in your WooCommerce settings.
- Find the section titled Display prices during cart and checkout.
- You’ll have the option to display prices including tax or excluding tax. Select your preference.
- To ensure clarity for your customers, also configure the Price display suffix with text like “incl. VAT” if applicable.
- Scroll down and click on Save changes to apply your settings.
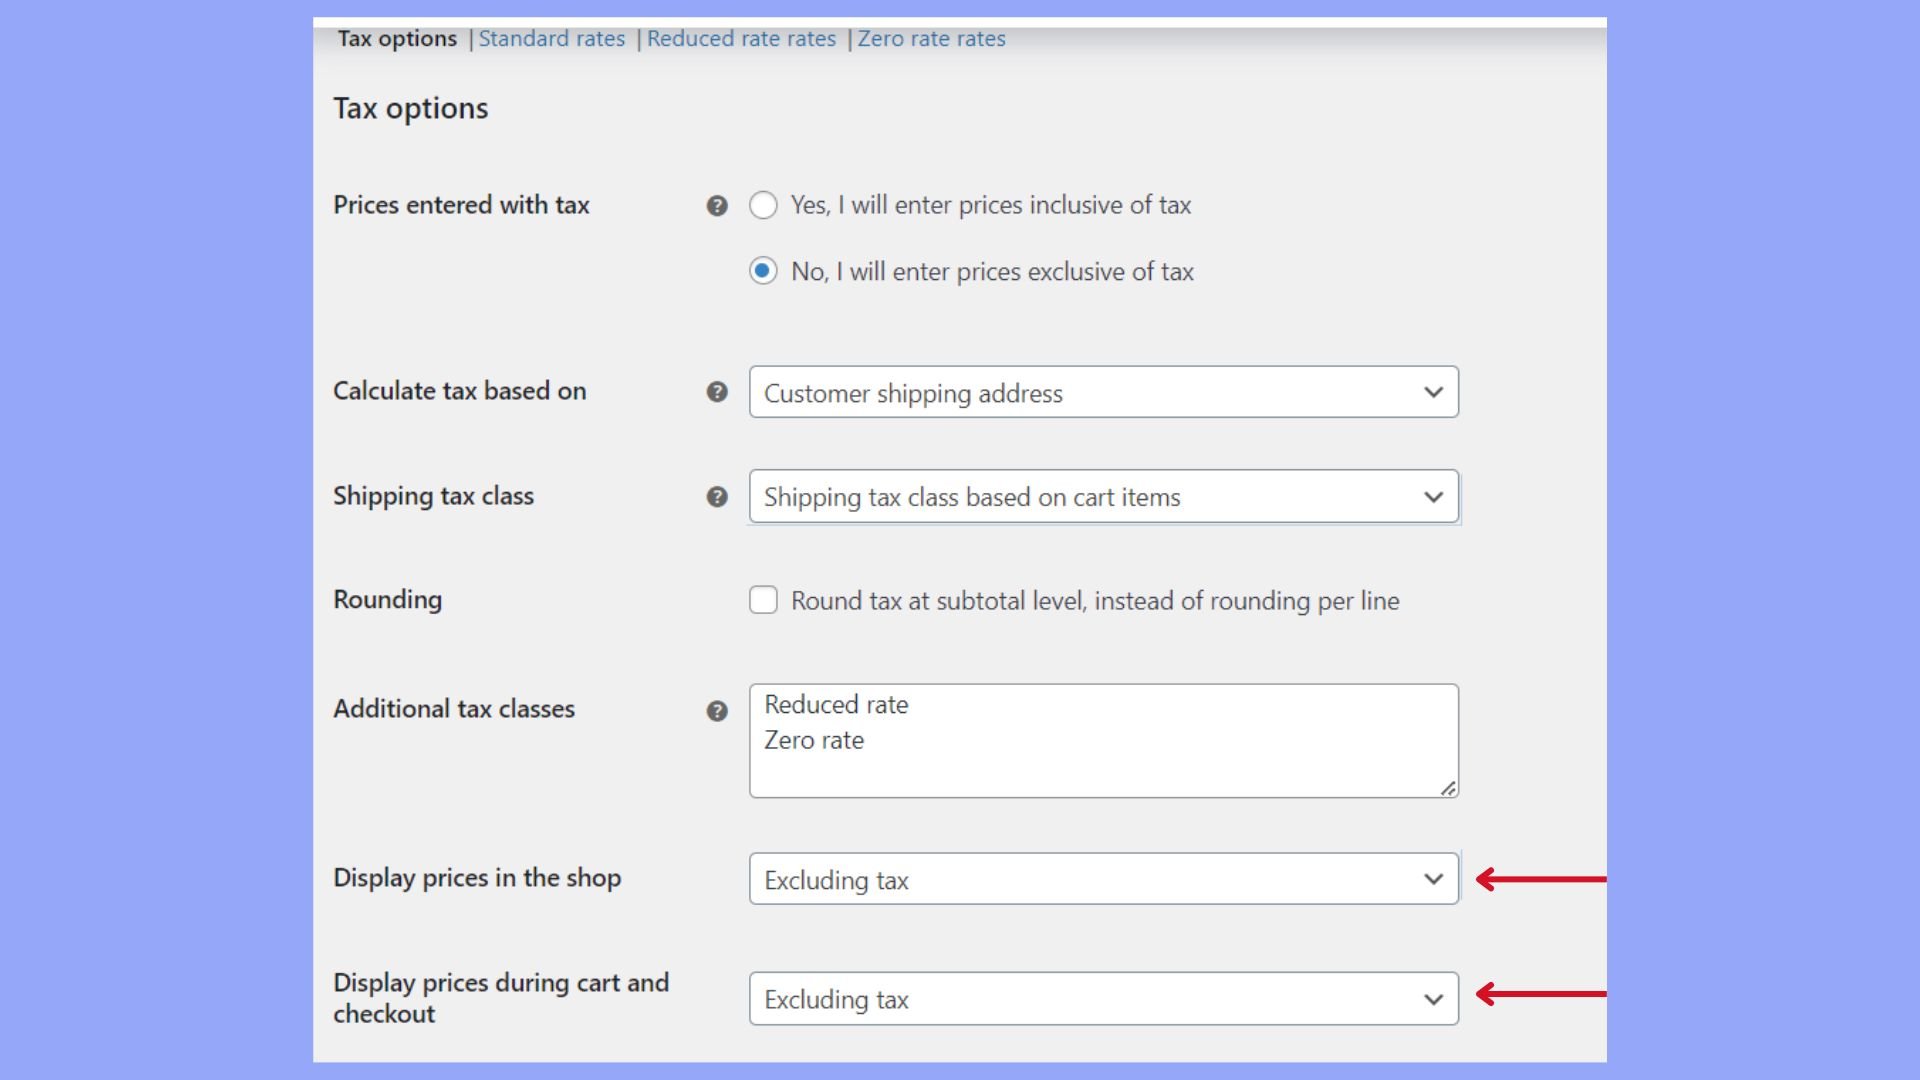
By adjusting these settings, you’ll ensure that the tax totals during checkout are clear and accurate whether you include or exclude taxes in your displayed prices.
Handling international tax rates
When configuring how to add tax in WooCommerce, your setup must account for different tax rates and regulations that apply to international sales. To handle international tax rates effectively, you need a good understanding of local tax laws where your customers are located. WooCommerce allows you to specify tax rates for different regions.
- Go to WooCommerce > Settings > Tax to access the tax settings.
- For each tax class, select Insert row to add a new tax rate for a specific country.
- In the Country Code field, enter the two-letter code for the country.
- Fill out the other fields, such as state code, ZIP/postcode, city, and rate %, as required.
- If necessary, check the Compound option to apply this rate on top of all other taxes.
- Make sure Shipping is checked if the rate applies to shipping as well.
- Click on Save changes.
VAT and compliance in different regions
Meeting VAT requirements and staying compliant with tax laws in various jurisdictions, such as those in the EU, UK, France, or US states like California, is crucial.
- Ensure that you are registered for VAT in jurisdictions where this is required, such as EU member states if your turnover exceeds the threshold.
- Update your WooCommerce settings to include the VAT rates for EU countries, which you can find on official taxation sites.
- For EU VAT rates, go to WooCommerce > Settings > Tax, and enter the appropriate rates in the Standard rates section.
- UK and France have specific VAT obligations, so make sure to check their government websites for current rates and regulations.
- For sales in California and other US states, ensure you’re informed about nexus laws that could affect your tax compliance needs.
Tax management is an ongoing process, and you should check regularly for changes in tax laws and ensure your WooCommerce tax settings are up-to-date.
Create your custom online store in minutes with 10Web AI Ecommerce Website Builder and take your business online. 
Looking to sell online?
Common tax configuration issues and fixes
When you’re learning how to add tax in WooCommerce, you might encounter some issues that can prevent your tax settings from working properly. Here’s how to troubleshoot the most common problems:
Taxes not displaying at checkout: If taxes are not showing up at checkout, ensure that you have the Enable taxes and tax calculations option checked in WooCommerce > Settings > General.
Incorrect tax rates: Make sure you’ve entered the correct tax rates. Go to WooCommerce > Settings > Tax. Here, you can input accurate tax rates for different regions.
Prices displayed incorrectly: If prices are not displaying as you expect, adjust the settings in WooCommerce > Settings > Tax > Tax Options. Set Display prices in the shop and Display prices during cart and checkout to your desired options.
Applying tax based on wrong location: In the same Tax Options, check the Calculate tax based on field to ensure it’s set to the correct address.
Tax not applied to shipping: If you want tax to be applied to shipping costs, verify that you’ve selected Enable taxes on your shipping methods. This can be done within WooCommerce > Settings > Shipping.
Different countries and states have different tax laws and regulations, so it’s important to check that your WooCommerce settings comply with these rules. If problems persist, consulting with a tax professional can be very helpful.
Conclusion
Mastering how to add tax in WooCommerce is vital for running a compliant and transparent online store. This guide has walked you through the essential steps, from enabling and configuring general tax settings to managing international tax rates and handling shipping taxes. By following these instructions, you can ensure accurate tax calculations, adherence to regional tax laws, and a seamless shopping experience for your customers. Regularly reviewing and updating your tax settings will help you stay compliant with evolving tax regulations and maintain the operational efficiency of your WooCommerce store.
Create your custom online store in minutes with 10Web AI Ecommerce Website Builder and take your business online. Create your online store in minutes with 10Web AI Ecommerce Website Builder.
Looking to sell online?
Looking to sell online?
Create your online store in minutes


![]()