Integrating Google Pay with your WooCommerce store simplifies checkout, enhancing customer convenience and security. Google Pay, a widely accessible digital wallet, offers quick, encrypted transactions, leading to higher conversion rates and improved user experience. This guide covers the essentials: setting up accounts, installing plugins, ensuring HTTPS compliance, configuring WooCommerce settings, and testing the integration.
Introduction to Google Pay integration
Integrating Google Pay into your WooCommerce store streamlines the checkout process, offering a quick and secure payment method for your customers.
Understanding Google Pay
Google Pay is a digital wallet platform that allows users to make payments with their mobile devices, both online and in-person. By adding Google Pay to your WooCommerce store, you provide a payment option that is rapidly gaining popularity due to its wide accessibility.
Benefits of adding Google Pay to your store
- Convenience: Customers enjoy a faster checkout experience by using Google Pay, leading to fewer abandoned carts.
- Security: Google Pay uses encrypted payment information, adding an extra layer of security to transactions.
- Increased Conversions: An easy checkout process can potentially increase conversions and sales.
- Enhanced User Experience: Offering a variety of payment options, including Google Pay, improves the overall user experience on your eCommerce site.
Pre-integration checklist
Before you begin integrating Google Pay with your WooCommerce site, it’s important to have the necessary accounts set up, plugins installed, and ensure your website meets security standards. This checklist will guide you through these critical steps to prepare for a smooth integration process.
Creating a Google account and a Stripe account
First things first, you’ll need valid accounts with both Google and Stripe, as they are essential for processing payments through Google Pay. Here are the steps you need to follow:
- Sign up for a Google account if you don’t already have one. This account will be used to manage your Google Pay services.
- Create a Stripe account by going to the Stripe website and providing your business details. Stripe acts as the payment gateway for Google Pay transactions.
Installing necessary plugins
Having the right plugins in place is crucial for integrating Google Pay into your WooCommerce store. WooCommerce operates on WordPress, and the integration will be handled through WordPress plugins.
- Access your WordPress dashboard.
- Navigate to the Plugins section and click on Add New.
- Search for a Google Pay plugin and select Install Now.
- After installation, click on Activate to enable the Google Pay plugin on your site.
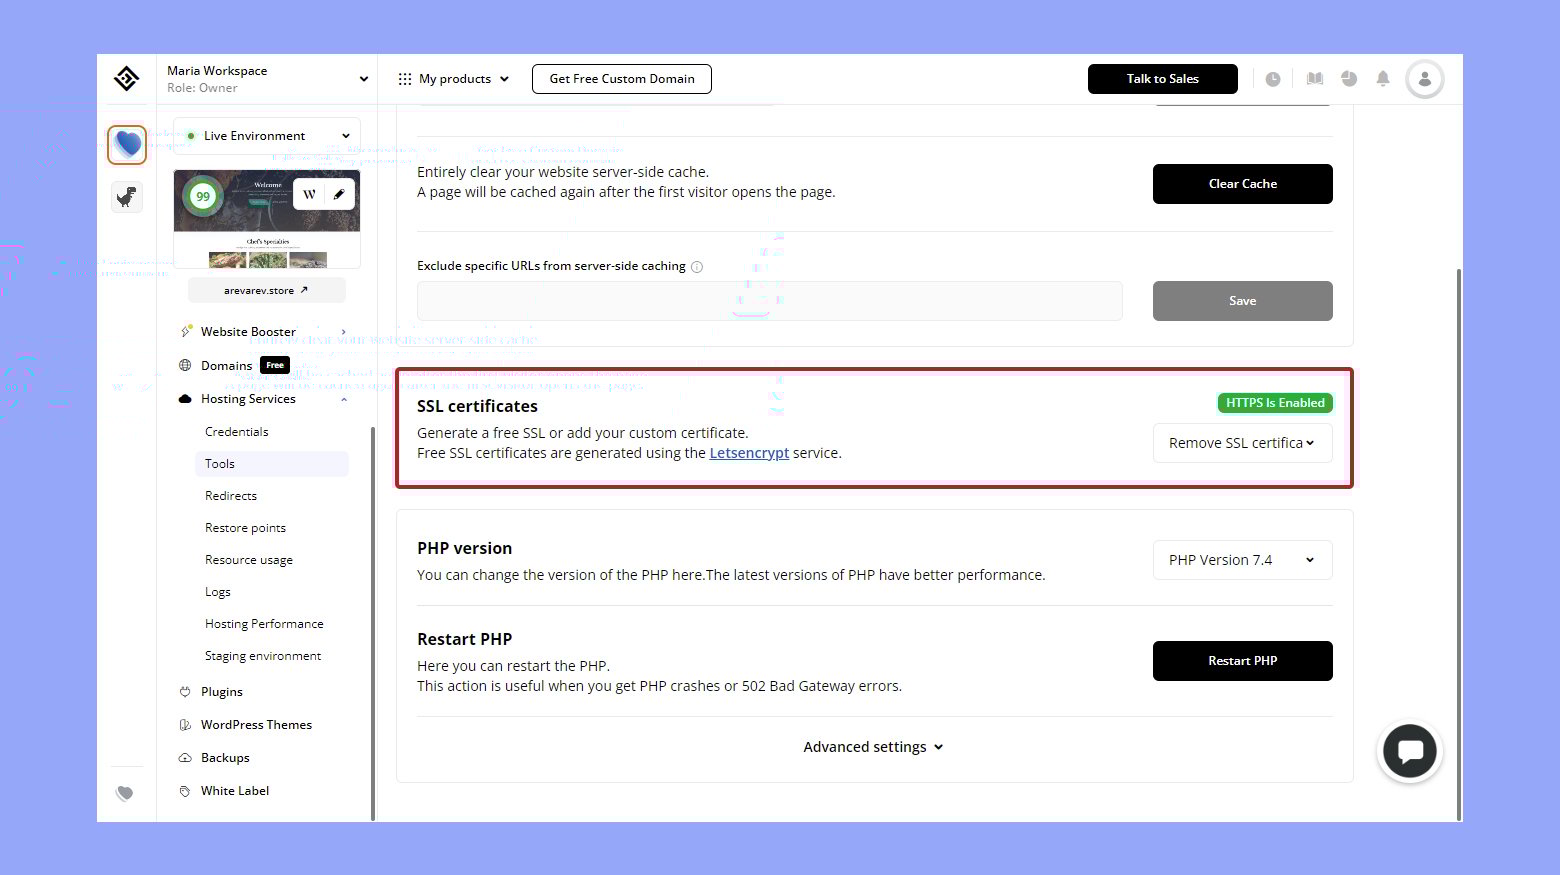
Ensuring HTTPS compliance
For security and compliance, your website must be served over HTTPS to handle transactions safely. Here’s what you need to check:
- Purchase and install an SSL certificate from a reliable authority if you haven’t already.
- Ensure your hosting provider supports HTTPS and has the SSL certificate correctly installed.
- Confirm that your site loads with the “https://” prefix to indicate a secure connection.

Following this checklist will establish the foundational requirements for integrating Google Pay with your WooCommerce platform, making the actual integration process much simpler.
Create your custom online store in minutes with 10Web AI Ecommerce Website Builder and take your business online. 
Looking to sell online?
Configuring WooCommerce settings
Before diving into the specifics, you need to access your WooCommerce account dashboard. From there, setting up payment methods and adjusting checkout processes is straightforward.
Setting up payment gateways
- Log in to your WordPress dashboard and navigate to WooCommerce > Settings.
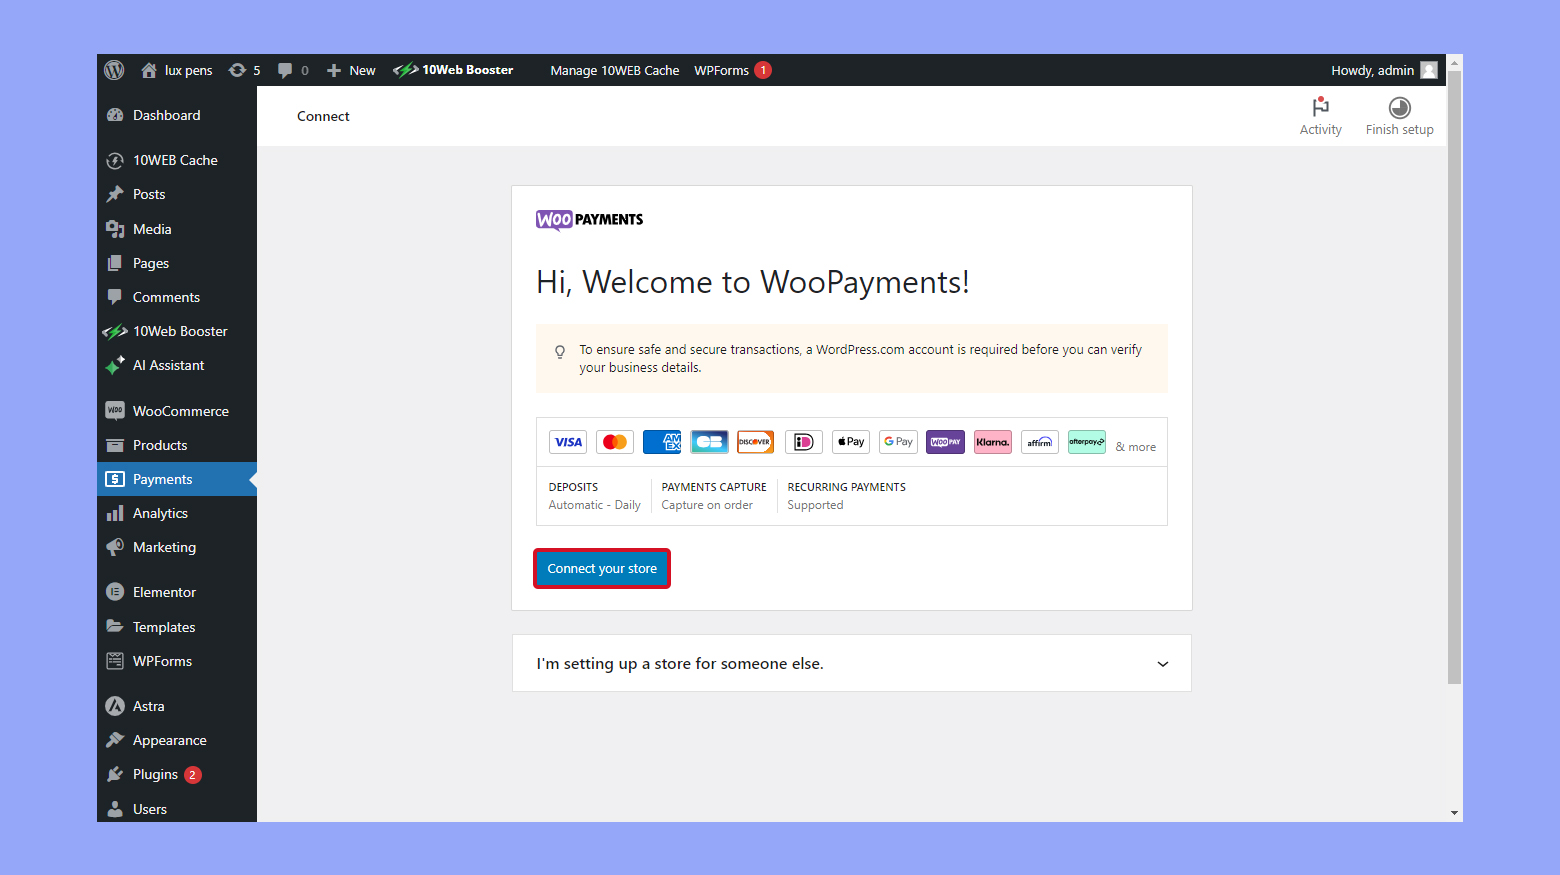
- Click on the Payments tab to see a list of available payment gateways.
- Look for WooCommerce Payments and click on the Set up button to activate this feature if it’s not already active.
- Once activated, you’ll also see options for various payment methods such as Google Pay under the WooCommerce Payments settings.
- Ensure that Google Pay is toggled on and configure any necessary details, such as linking to your merchant account.
- Remember to click Save changes at the bottom of the page to apply your settings.
Adjusting Checkout and transaction settings
- Within the WooCommerce > Settings menu, find the Checkout tab to adjust the checkout experience.
- Here, you can configure aspects like guest checkouts, payment method instructions, and transaction endpoints.
- To ensure a smooth transaction process, verify that the checkout page is correctly set up to display the Google Pay button.
- Under WooCommerce Payments, check the settings for capturing payments immediately or authorizing charges for later capture based on your preferences.
- Once all desired settings have been configured, hit Save changes to ensure your checkout page reflects the new configuration.
Activating Google Pay in WooCommerce
Integrating Google Pay into your WooCommerce store streamlines checkout for your customers. Let’s get started by setting up the API and customizing the Google Pay button for your store.
Connecting Google Pay API
To begin, you need to connect your store to Google Pay using the Stripe payment plugin. The plugin enables your store to process Google Pay transactions by linking it with Stripe’s payment platform.
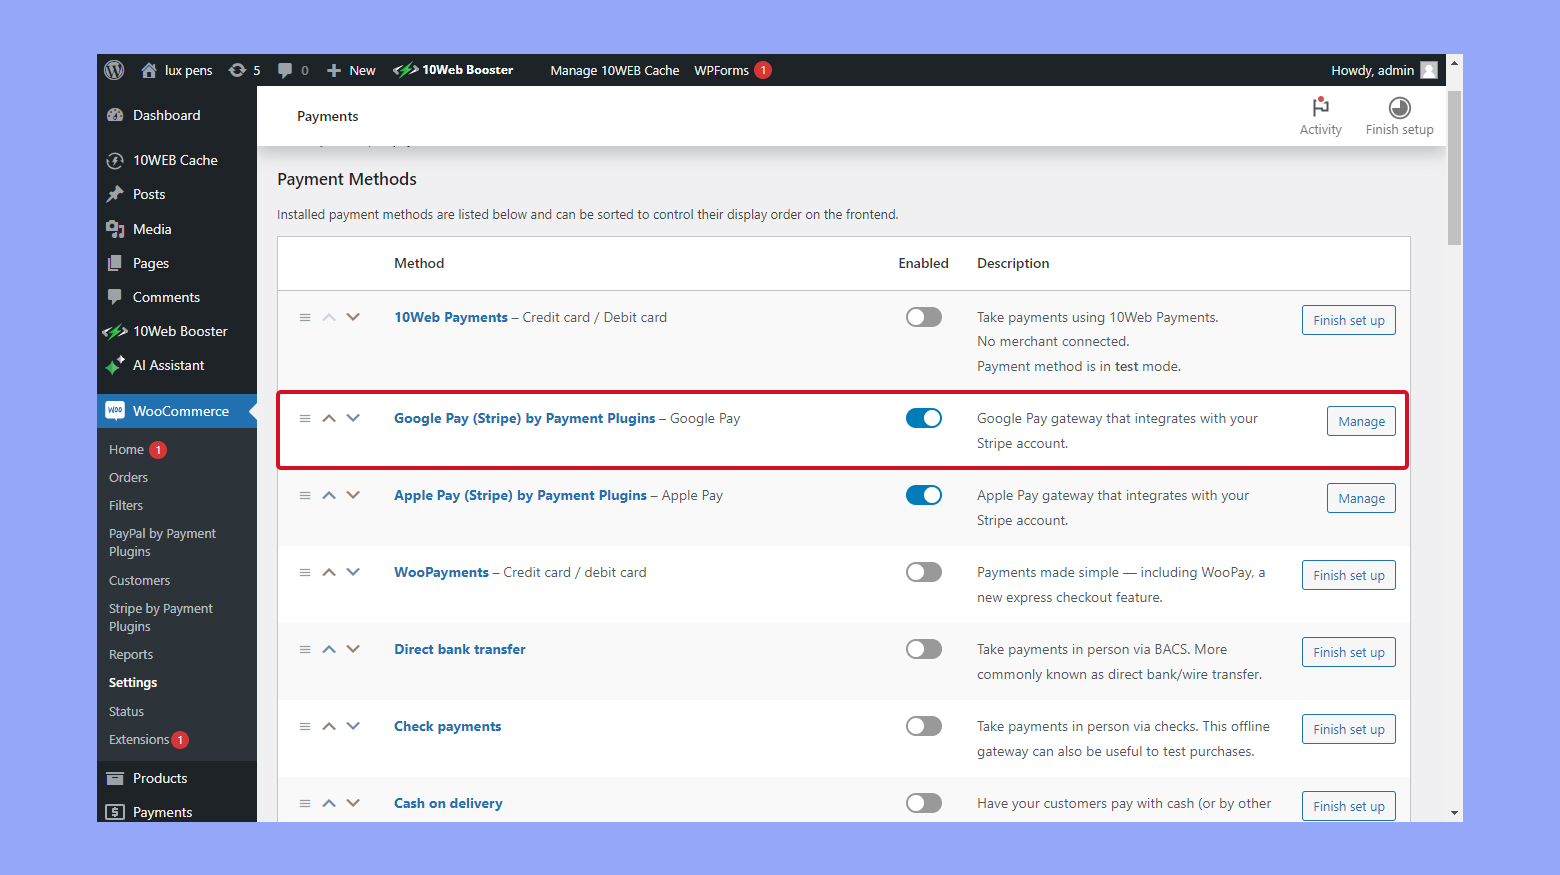
- Ensure you have the Stripe Payment Plugin for WooCommerce installed and activated.
- In your WordPress dashboard, navigate to WooCommerce > Settings > Payments.
- Find Stripe – Google Pay among the payment methods and toggle the option to Enabled.
- Click on Manage to enter the Stripe settings. Here, input your Publishable key and Secret key that you got from your Stripe account.
- Look for a section named Payment Request Button to manage Google Pay settings through Stripe.
- Save your changes.
At this point, you have connected your store’s payment system to the Google Pay API through Stripe. It’s important to have your API keys from Stripe as this is crucial to authenticate and process payments.
Enabling and customizing Google Pay button
Now it’s time to enable the Google Pay button and customize it to fit the aesthetic of your store.
- Within the Stripe settings in WooCommerce, ensure the Payment Request Button is set to “Enabled.”
- Customize the appearance of your Google Pay button by selecting the desired Button type and Theme. You can make the button match your store design for a consistent user experience.
- Confirm the settings so that Stripe knows to apply them for Google Pay.
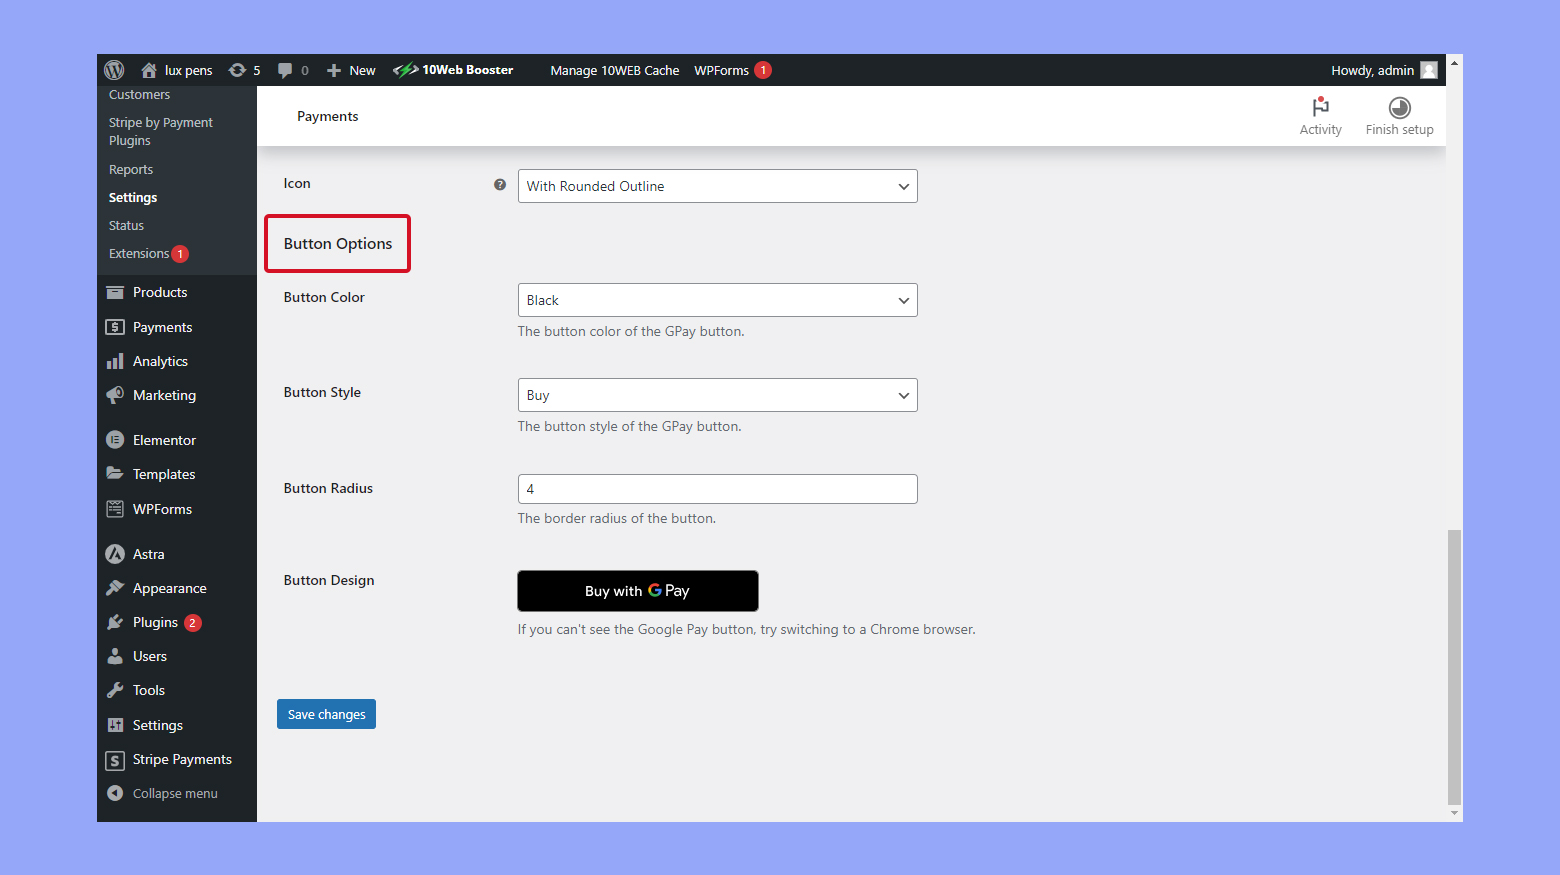
By customizing your Google Pay button, you make sure it’s easily recognizable and encourages users to complete their purchase using Google Pay. Remember to save your changes to ensure the button appears correctly during checkout.
Create your custom online store in minutes with 10Web AI Ecommerce Website Builder and take your business online.
Looking to sell online?
Testing and troubleshooting
Before your customers start using Google Pay on your WooCommerce site, it’s important to ensure everything works smoothly. The following steps help you test the integration and resolve any issues that may arise.
Performing sandbox testing
Ensure that your payment plugin is set to Test Mode in the settings. This allows you to simulate transactions without processing real payments.
- Navigate to the checkout process on your site as if you were a customer.
- Select the Google Pay payment option. Use a test card provided by the payment plugin for sandbox testing – this will mimic a real transaction.
- Complete the checkout process and look out for any error messages or issues.
- Review the transaction in your WooCommerce dashboard to confirm that the test was recorded properly.
- After successful sandbox tests, disable Test Mode to go live.

Handling common issues
- If transactions are not processing, check that the Google Pay API is correctly configured and that there are no errors in the payment plugin settings.
- Ensure your SSL certificate is valid, as secure transactions require HTTPS.
- For issues with the Google Pay button not appearing, verify that the feature is enabled in the Express Checkouts section of your dashboard and that it is activated in the plugin settings.
- If customers report errors during payment, review error codes within the WooCommerce order notes for specific guidance.
By following these steps to test and address common issues, you can help provide a smooth and hassle-free checkout experience for your users.
Enhancing the checkout experience
To deliver a smooth and secure checkout process, focusing on speed, convenience, and trustworthiness is essential. These enhancements not only improve user retention but also increase the likelihood of successful transactions.
Optimizing checkout for speed and convenience
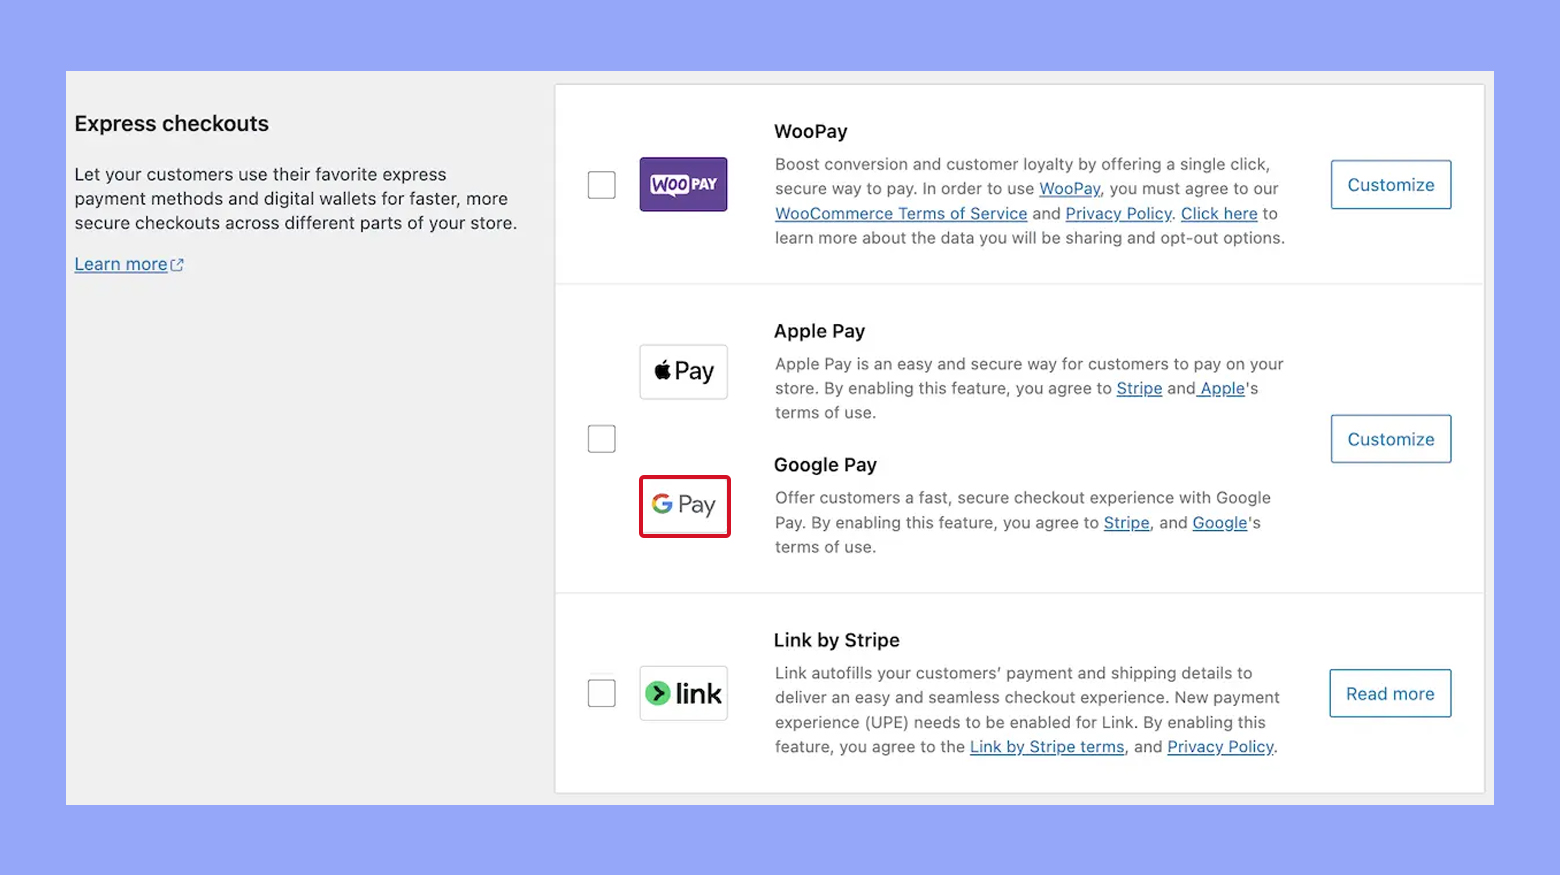
- Integrate Express Checkouts: Utilize express checkout options like Apple Pay, Google Pay, and PayPal to offer faster payment processes. This reduces the time your customers spend entering their payment details.
- Go to Payments > Settings in your WooCommerce dashboard.
- Locate the Express Checkouts section.
- Enable options for Apple Pay / Google Pay by checking the appropriate box.
- Click Save Changes at the bottom of the page.
- Use a Fast Payment Gateway: Select a payment gateway like Stripe that supports quick processing of credit card and debit card transactions. A speedy gateway ensures a swift and seamless payment experience.
- In your dashboard, go to WooCommerce > Settings > Payments.
- Choose Stripe and follow the setup instructions.
Adding security and trust seals
- Implement Advanced Security Infrastructure: Ensure your payment gateways, like Stripe or PayPal, have robust security measures to protect sensitive customer data. This often includes encryption and compliance with industry security standards.
- Check the security features provided by each payment gateway under their respective settings.
- Display Trust Seals: Add visual security badges that reassure customers their transaction is secure. You can get these from your payment gateways or third-party security providers.
- Find and select the option to add trust seals within the payment gateway’s settings.
- Place these seals prominently on the checkout page to be easily noticed.
Implementing these strategies in your WooCommerce store helps create a checkout environment that’s both efficient and secure, encouraging trust and repeat business from your customers.
Additional payment features
When integrating Google Pay into your WooCommerce store, you’re not just limited to one-time payments. You can easily set up subscriptions for recurring payments and manage donations directly through Google Pay.
Setting up subscriptions and recurring payments
Recurring payments and subscriptions are essential for businesses offering membership or subscription-based products. To set these up within Google Pay:
- Ensure your chosen payment plugin supports Google Pay and recurring payments. WooCommerce Subscriptions is a popular plugin that allows this functionality.
- In the WooCommerce dashboard, navigate to Payments > Settings and enable Google Pay.
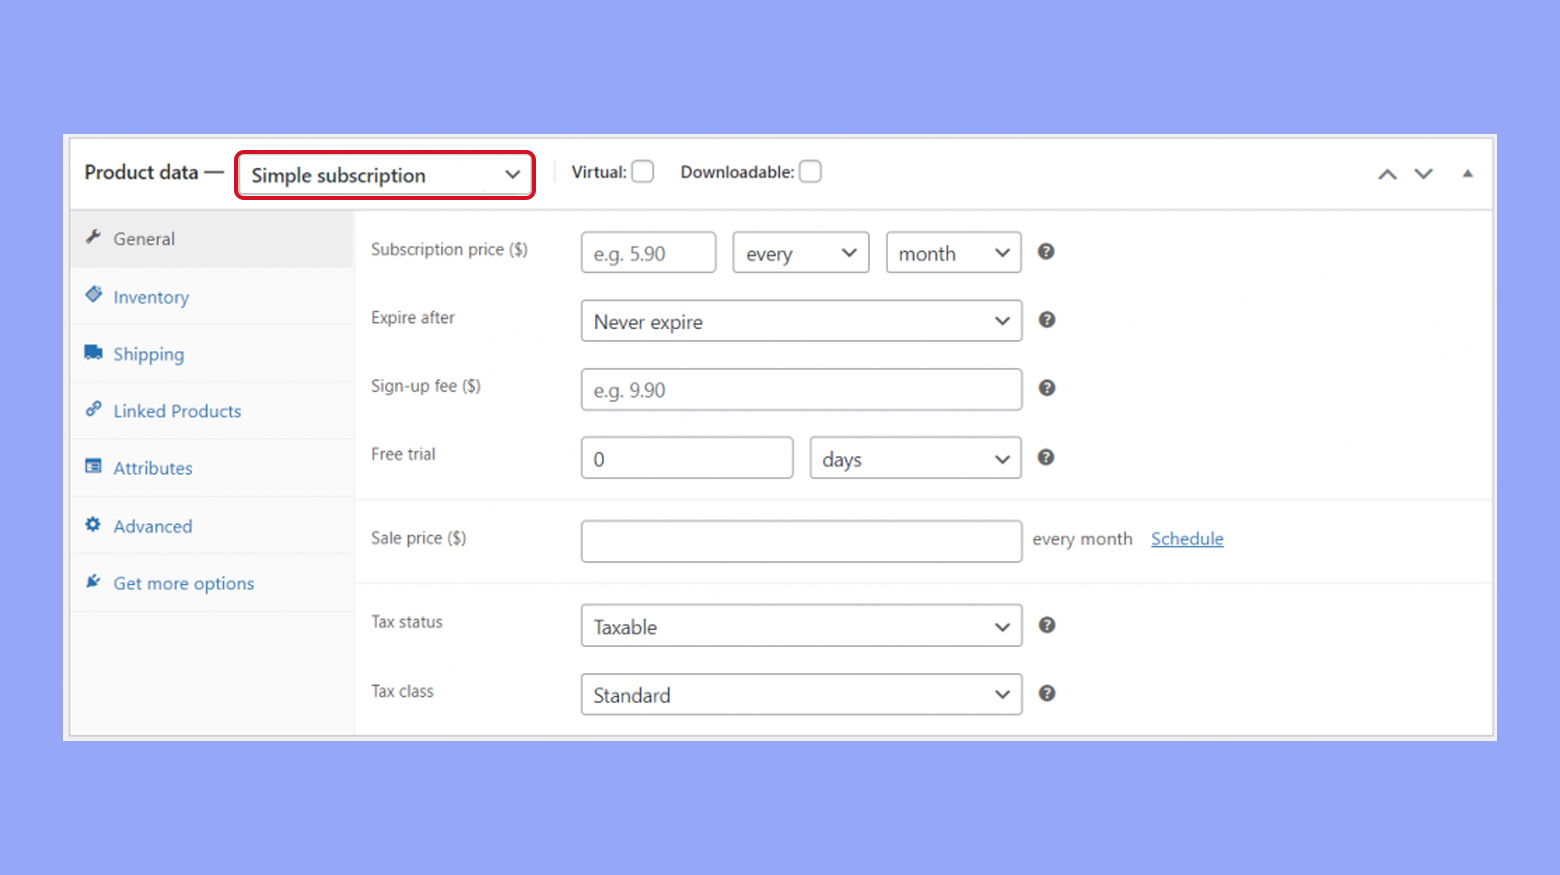
- Set up a product as a subscription by choosing Product data > Simple subscription or Variable subscription for your product.
- Define the subscription terms including billing interval and period.
- You’re now ready to offer subscriptions to your customers which they can pay using their merchant wallets through Google Pay.
Subscriptions will be handled automatically, with customers being charged based on the schedule you have set.
Managing donations through Google Pay
If you’re running a non-profit and want to accept donations through your WooCommerce site, Google Pay can facilitate this process:
- Choose a payment platform or plugin that allows for donations and integration with Google Pay. WooCommerce has extensions for this purpose.
- Ensure Google Pay is enabled in your payment settings.
- Create a donation product on your WooCommerce store or use a plugin dedicated to donations, setting up the suggested amounts or allowing for custom donations.
- Customize your donation checkout experience so your patrons can easily use Google Pay to make a contribution.
Managing donations through Google Pay is efficient and can make the process smoother for you and your donors. By enabling donors to use their own merchant wallets stored in Google Pay, donating becomes a quick and secure transaction.
Conclusion
This guide has covered essential steps such as setting up necessary accounts, installing and configuring plugins, ensuring HTTPS compliance, and customizing payment options. By following these instructions, you’ll provide a seamless and secure payment method that can enhance user experience, increase conversion rates, and boost customer satisfaction. Implementing Google Pay not only simplifies transactions but also builds trust, leading to higher sales and returning customers.
Create your online store in minutes with 10Web AI Ecommerce Website Builder.Looking to sell online?
Create your online store in minutes


![]()