Adding a shipping address to your WooCommerce checkout page not only simplifies the process for your customers but also enhances the efficiency of your ecommerce operations. This guide provides a step-by-step approach to customizing the WooCommerce checkout experience by integrating shipping address fields. Let’s learn how to add shipping address in WooCommerce checkout page, which will ultimately improve your ecommerce site’s functionality and user experience.
FAQ
How to enable shipping address in WooCommerce checkout page?
How do I add shipping details in WooCommerce?
How do I ship to another address in WooCommerce checkout?
How to make shipping address mandatory in WooCommerce?
Customize checkout with a shipping address
Customizing your WooCommerce checkout page can greatly enhance your customers’ shopping experience. Before we learn how to add shipping address in WooCommerce checkout page, let’s go through the details for an insightful start.
To proceed, ensure you’re logged into your WordPress dashboard. It’s here that you’ll access the WooCommerce settings to begin the customization.
Configure shipping address fields
When setting up your WooCommerce store’s checkout process, controlling the shipping address will ensure a smooth experience for your customers. Here’s how you can add new fields and customize address formats to tailor the checkout page to your needs.
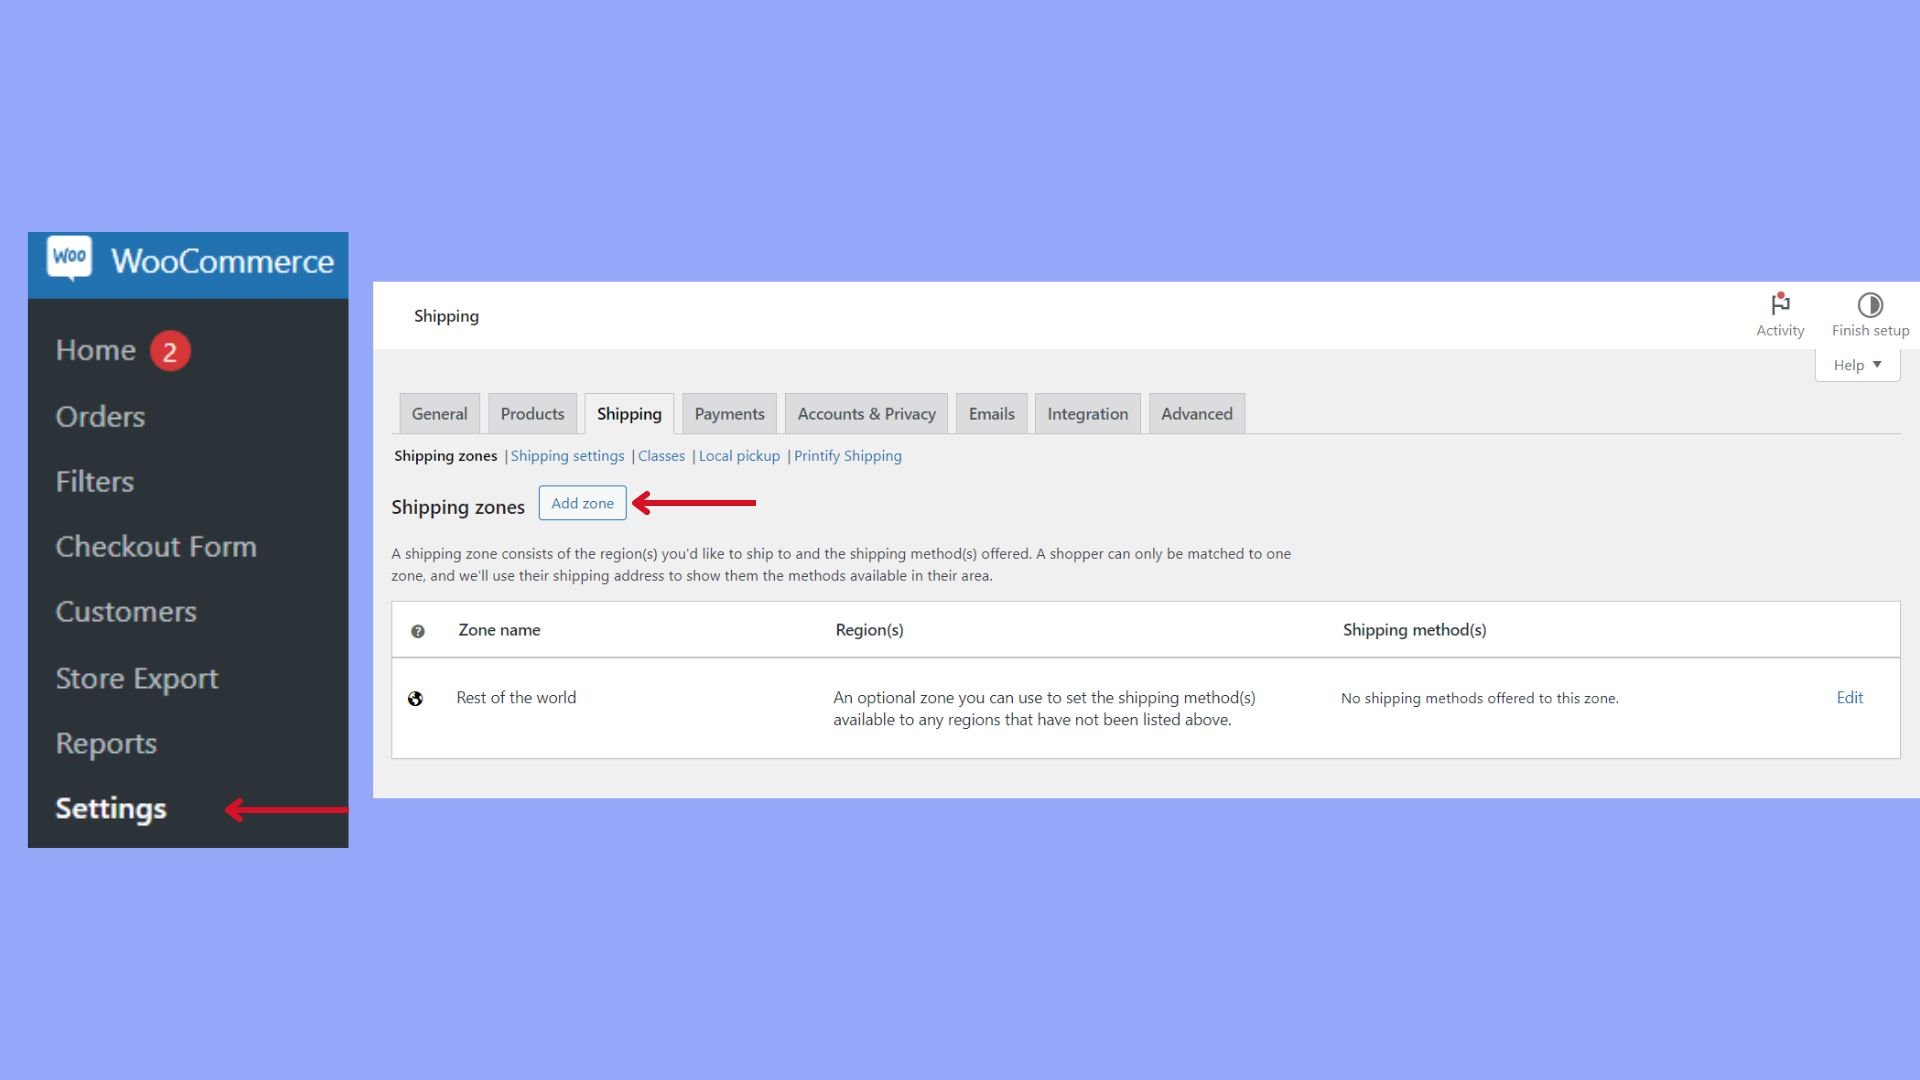
- Go to your WordPress dashboard > WooCommerce > Settings.
- In the settings, click on the Shipping tab.
- Here, you’ll find the option to Add shipping zone–click it to define zones for your customers.

To add more specific fields:
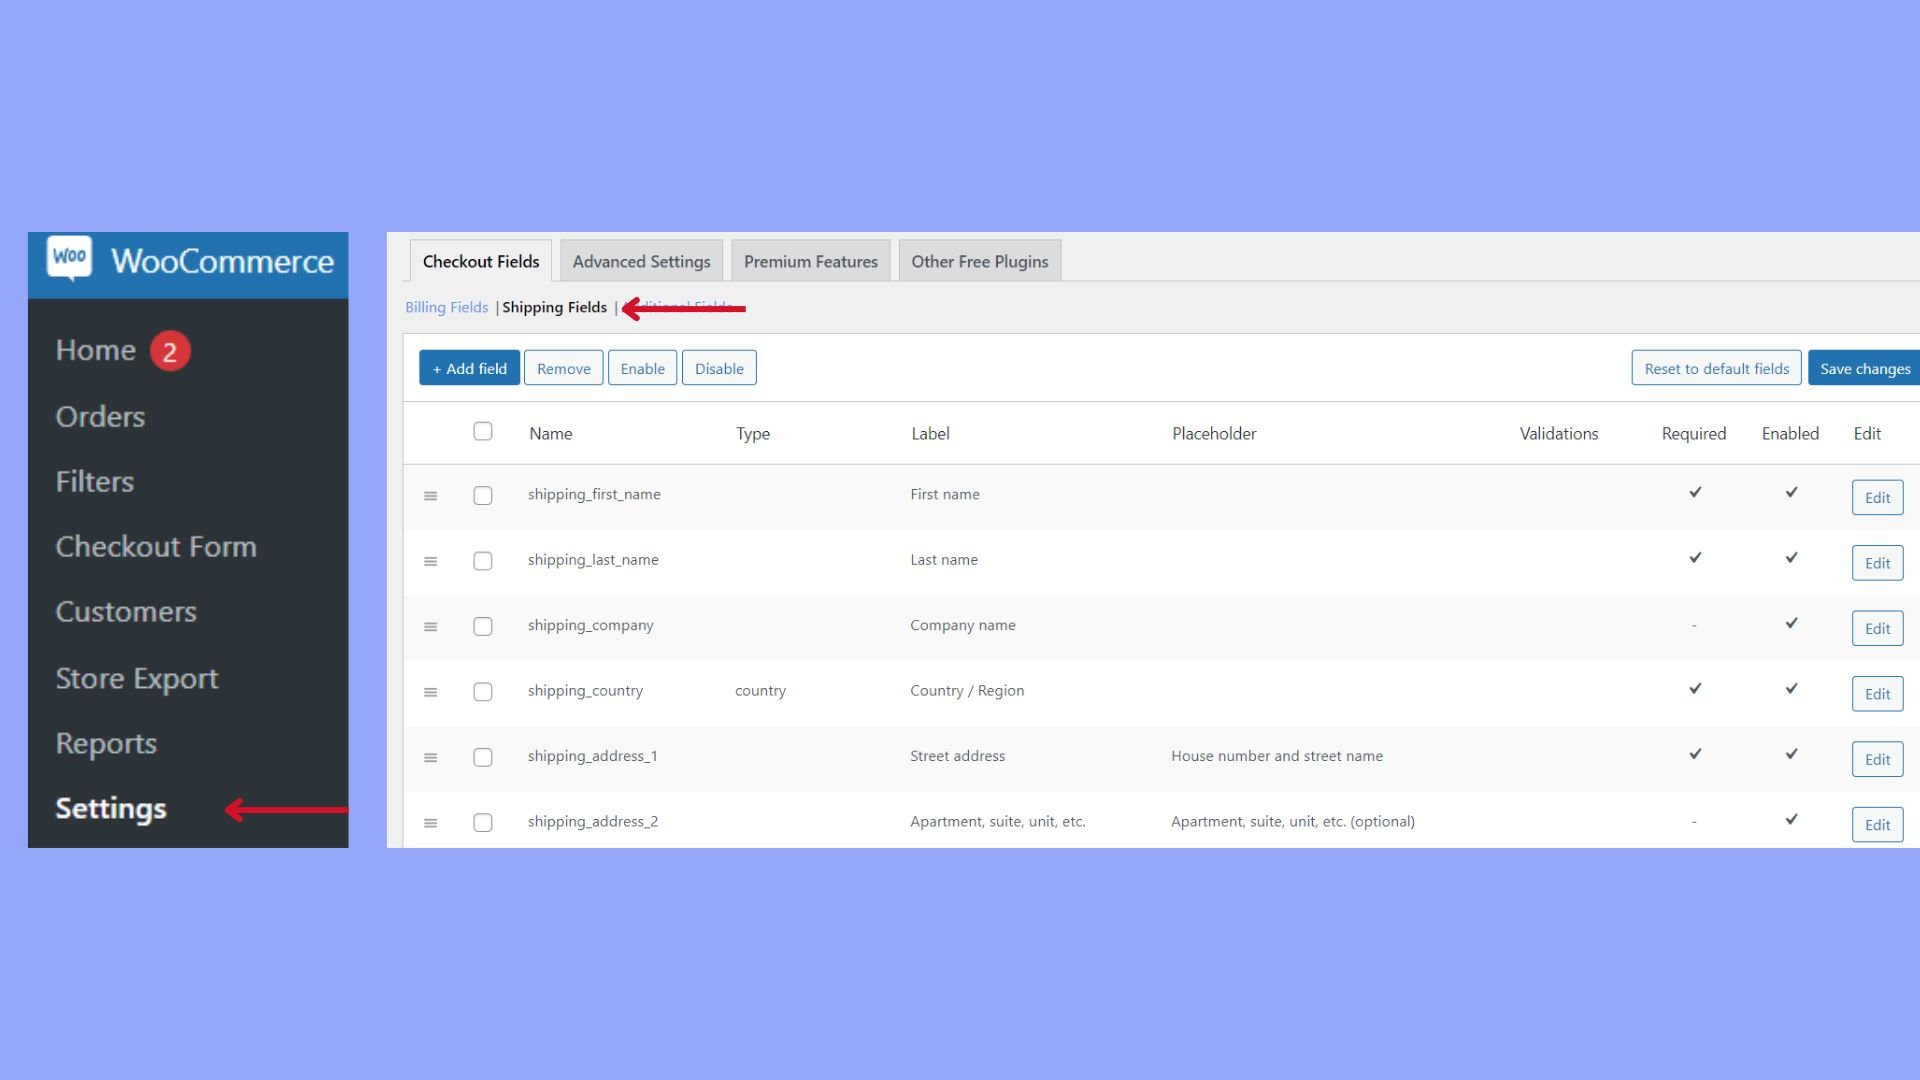
- Head back to the WooCommerce menu but this time, select Checkout Fields.
- You’ll see tabs for different types of fields. Click on the Shipping tab.
- Use the buttons provided to Add field; you can add any additional fields that your shipping process requires, such as “Delivery instructions” or “Door code”.
Customize address formats
To ensure that the shipping address is displayed exactly as you need, you may want to customize the formats:
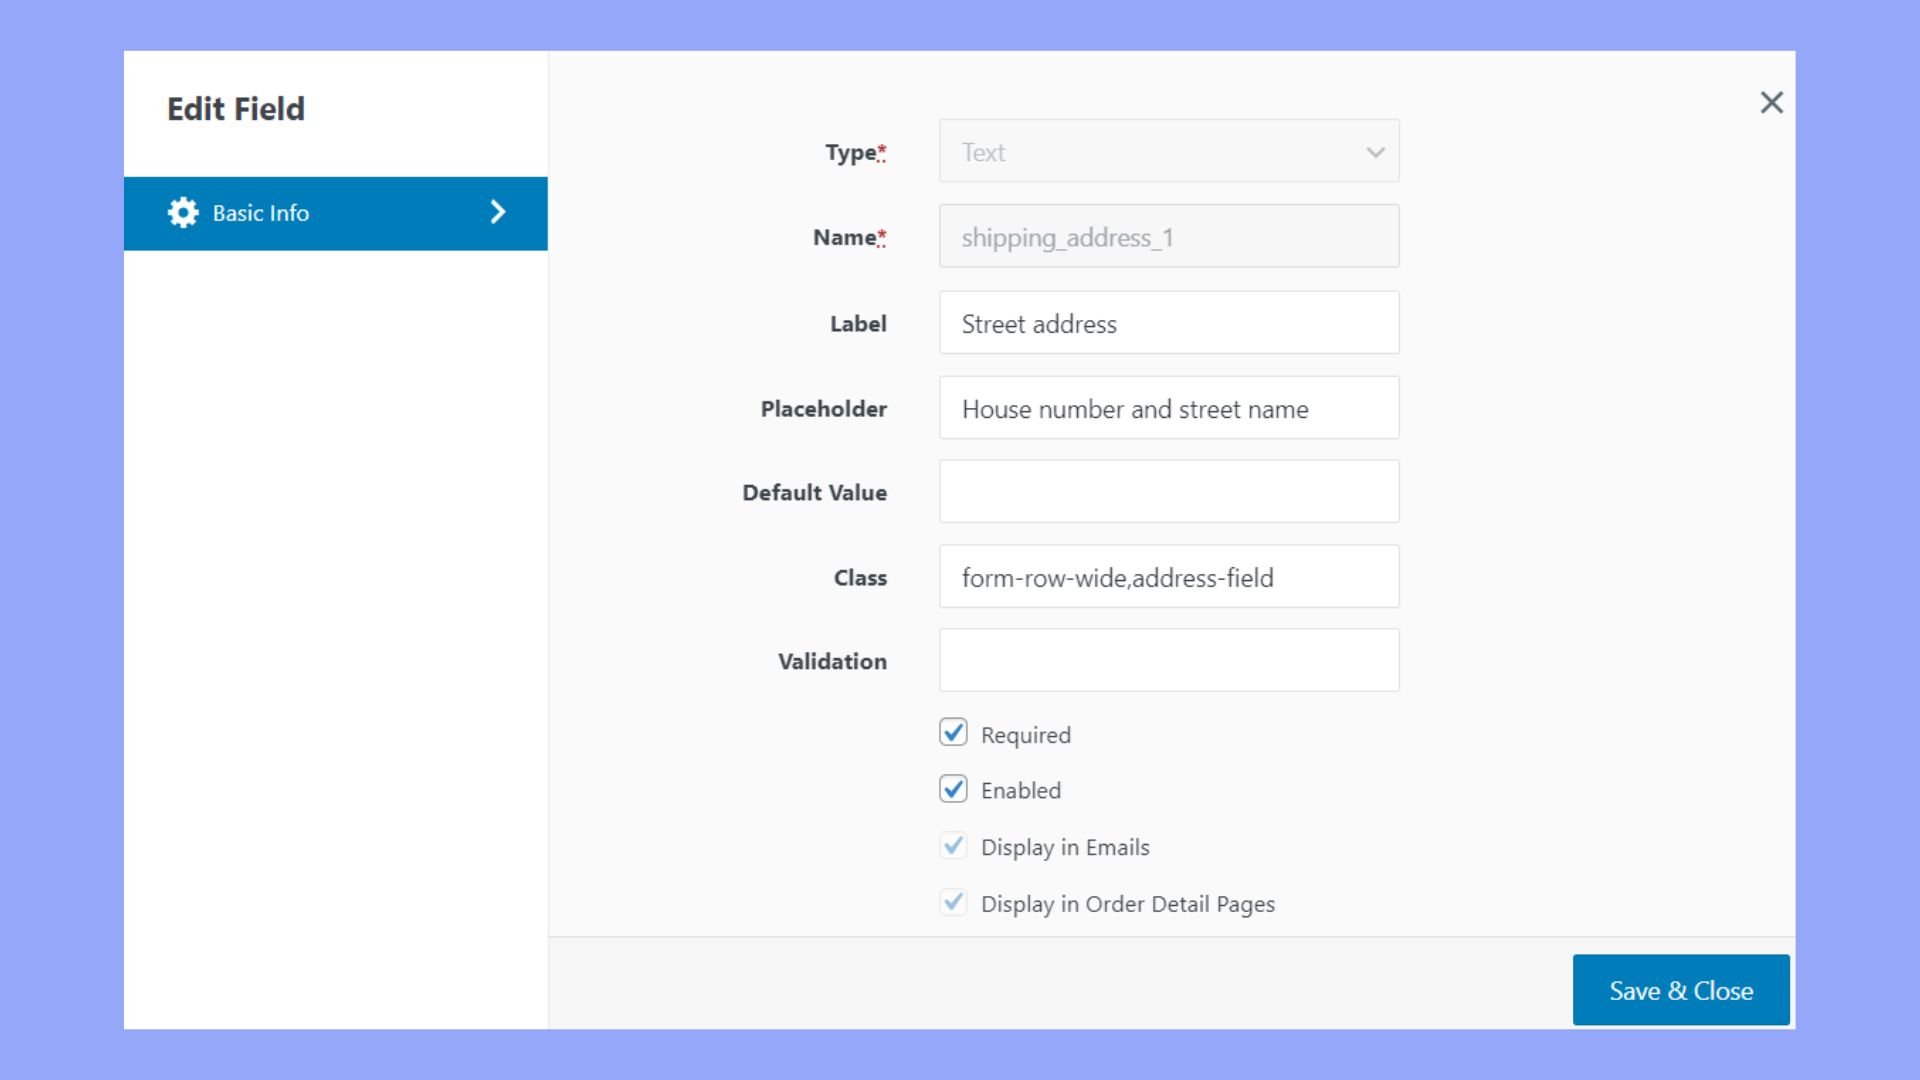
- Still, on the Checkout Fields screen, locate the field you want to customize and click on the Edit option next to it.
- Modify the label, placeholder, and required status as you see fit. Here, you can also rearrange the order of the fields to match how you want them to appear on the checkout page.
Here you go, you have learned how to add shopping address in WooCommerce checkout page easily and simply.
Setting up free shipping
In WooCommerce, adding shipping options like free shipping while managing various shipping zones is a way to control how products reach your customers. You’ll need to set these up in your WooCommerce settings to provide a consistent shopping experience.
Free shipping is an effective way to entice customers to buy more from your WooCommerce store. Here are the steps to set it up:
- Go to WooCommerce > Settings > Shipping in your dashboard.
- Select the Shipping Zones tab.
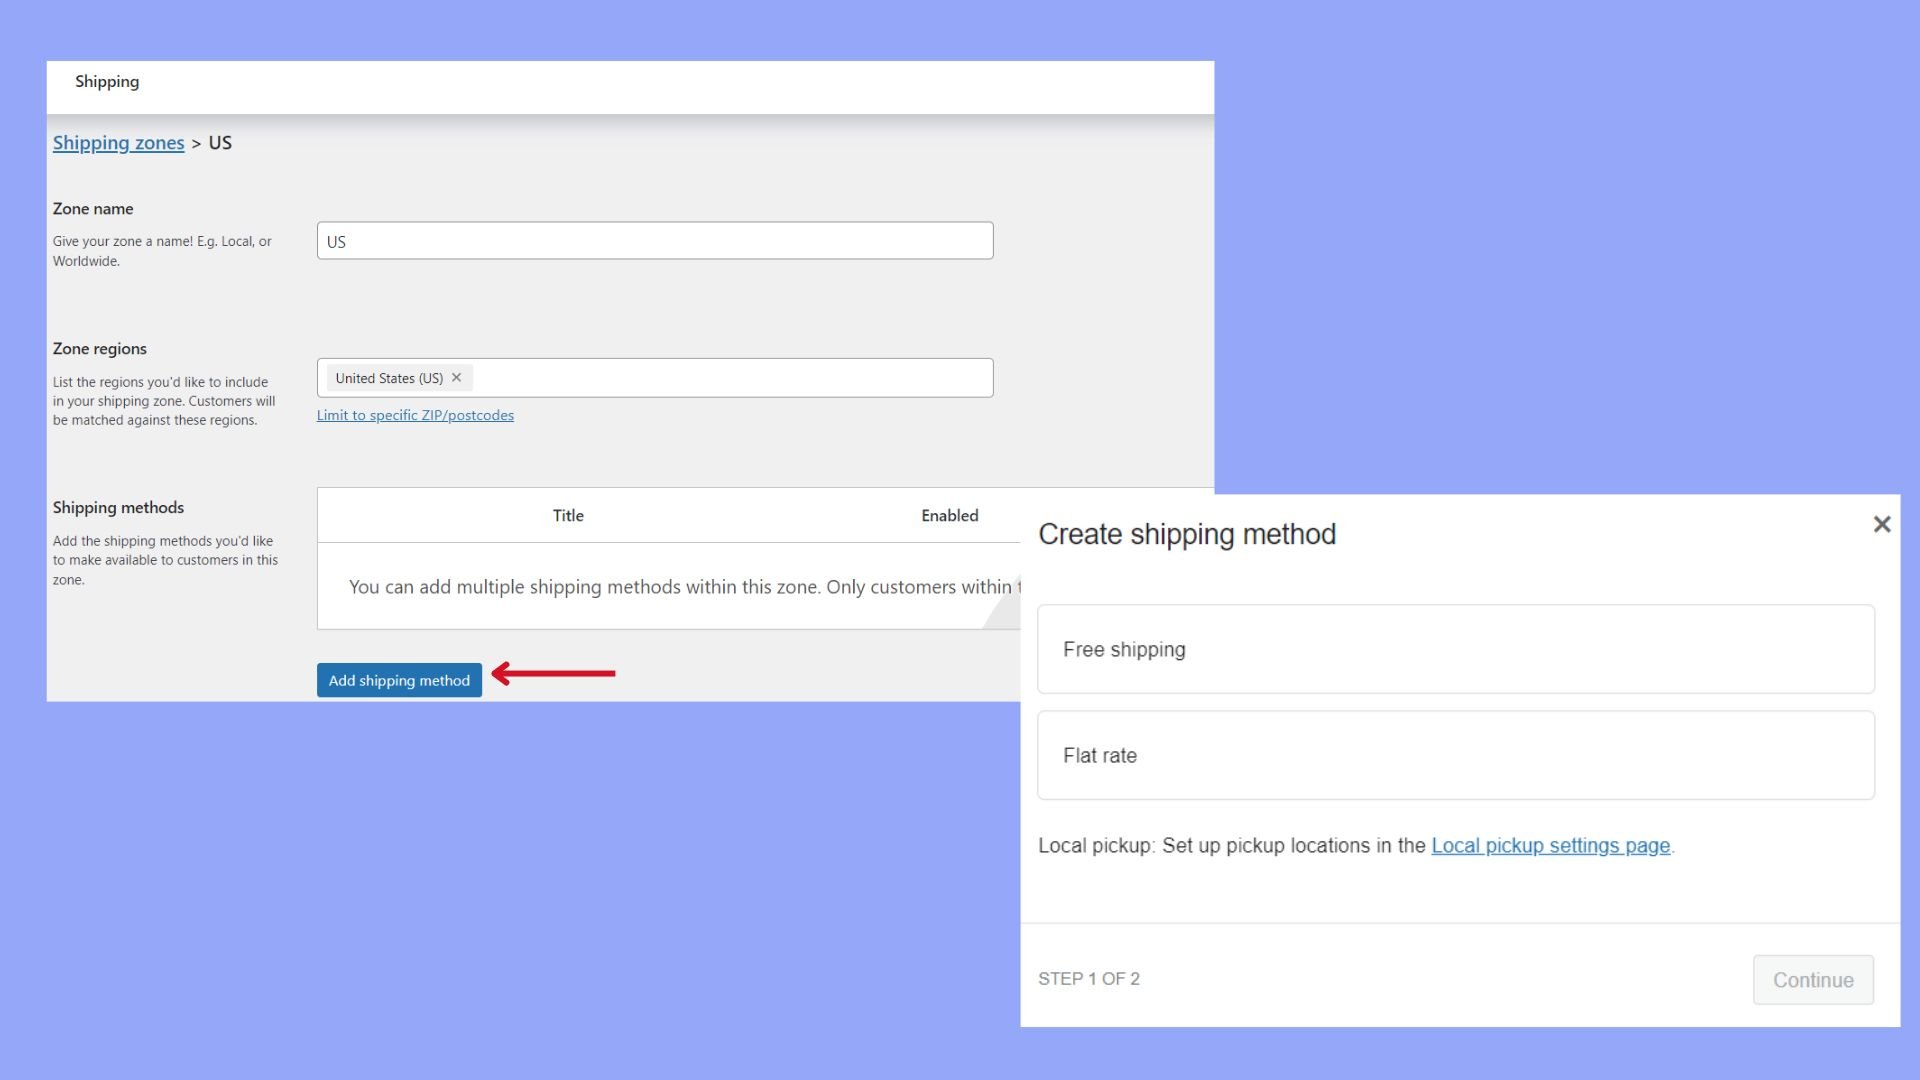
- Choose the zone where you want to offer free shipping or Add shipping zone if it’s not listed.
- Inside the shipping zone, click Add shipping method and select Free Shipping from the dropdown.
- Configure the Free Shipping settings according to your requirements, which might include a minimum order amount or a coupon.
Enhancing checkout experience
Creating a seamless and user-friendly checkout process on your WooCommerce website is key to improving your overall sales conversions and enhancing your customers’ shopping experience. Here’s how you can redesign the checkout page and reduce cart abandonment effectively.
Improving page design
To ensure your WooCommerce checkout page offers a pleasant visual experience, start by accessing the settings in the WooCommerce Advanced tab to find the Checkout Page options. Customize your checkout page layout by selecting a predefined template or using a plugin that allows you to drag and drop elements to create your desired design. It’s important to make the design consistent with your overall website to maintain brand consistency. Ensure to preview changes to ensure the new design is functional before applying it site-wide.
Reducing cart abandonment
To minimize the likelihood of customers leaving their carts without completing a purchase, ensure you enable guest checkout by ticking the box that allows customers to place orders without an account, catering to those who prefer quick and anonymous purchases.
Simplify the required form fields for checkout to only what’s necessary under the Checkout Fields section, streamlining the process and reducing drop-offs. Implement a progress indicator on the checkout page to reassure customers about the number of steps left, encouraging them to complete their purchase.
By focusing on a straightforward layout and a simplified checkout process, you can offer a superior shopping experience, likely boosting conversions and reducing cart abandonment.
How to add shipping address through a plugin
In this section, you’ll learn how to find and install plugins that allow you to add a shipping address on the WooCommerce checkout page.
Another way to add a shipping address is through a plugin. Start by going to the WordPress plugin repository, where you can find a variety of plugins designed to enhance the WooCommerce checkout experience. Look for those that specifically mention functionality related to shipping address options.
To begin, navigate to your WordPress Admin area. Click on Plugins and select Add New. In the search field, type keywords like “WooCommerce shipping address” to locate relevant plugins. Evaluate the search results by checking ratings, reviews, and compatibility with your version of WooCommerce and WordPress.
Once you’ve selected a suitable plugin, install it by clicking on Install Now. After the installation is complete, click Activate to enable the plugin on your site. Finally, go to WooCommerce Settings via your dashboard to configure the plugin as needed.
So, by now you have learned how to add shipping address in WooCommerce checkout page both from the WooCommerce dashboard and via a plugin. Now, you can offer a seamless checkout experience with a customizable shipping address input for your customers. Create your custom online store in minutes with 10Web AI Ecommerce Website Builder and take your business online.

Looking to sell online?
Advanced checkout customizations
Adding advanced customizations to your WooCommerce checkout page allows you to provide a personalized and efficient shopping experience for your customers. You can tailor the checkout process to meet both your business needs and customer preferences with custom code and conditional logic. Let’s look at both ways to discover how to add shipping address in WooCommerce checkout page alternative to the ways we discussed above.
Using custom code
Customizing the WooCommerce checkout page may sometimes require custom code. You can add this code to your theme’s functions.php file, which is a safe and update-proof way to implement changes:
- Access your WordPress site’s files via FTP or your hosting file manager.
- Navigate to wp-content/themes/your-theme/ and locate the functions.php file.
- Make a backup of this file before editing to ensure you can restore the original version if needed.
- Insert your customized code snippets that define and modify shipping address fields based on your requirements.
- Save your changes and upload the file back to the server if you’re using FTP.
After applying custom code, test your checkout page to ensure everything works correctly.
Using conditional logic
Conditional logic adds a dynamic layer to your checkout page, allowing you to display or hide fields based on certain conditions. For example, you may want to ask for a delivery date only if a customer has selected express shipping.
To implement conditional fields:
- Choose a plugin compatible with WooCommerce that supports conditional logic.
- Within the plugin’s settings, find the section specific to your checkout fields.
- Create new fields or edit existing ones with the option to set conditions that dictate when they are visible.
- Define the conditions based on other field values or customer choices during checkout.
- Save your settings and test the checkout process to ensure the conditional logic behaves as expected.
Through these enhancements, your checkout process becomes much more adaptive and user-friendly.
Handling shipping and billing details
When configuring your WooCommerce store, understanding how to properly set up and manage shipping and billing details can significantly streamline your checkout process. Well-handled shipping and billing arrangements foster trust and ease for your customers, ensuring they have a smooth shopping experience.
Separating billing and shipping
Your customers may require different billing and shipping addresses for various reasons, like sending gifts or ordering for corporate purposes. To manage these details:
- Go to your WooCommerce settings from the dashboard.
- Select the Shipping tab to create shipping zones and enable address fields.
- Go to Checkout fields to customize the billing and shipping options.
By default, WooCommerce links the billing address to the payment method and the shipping address to the delivery of the goods. The flexibility of this system ensures that both the payment invoices and the packages reach the correct destinations.
Automating tax calculations
Handling taxes correctly is crucial for your online store:
- Access the WooCommerce settings in your dashboard.
- Click on the Tax tab to configure your tax settings.
- Ensure that your store’s address is correctly entered under General options to automate tax rates based on your location.
- Optionally, use extensions or integrations that automatically calculate taxes based on the customer’s billing or shipping address.
Automated tax calculations remove the burden of manually computing taxes for each transaction. This not only ensures accuracy but also compliance with relevant tax laws, providing both you and your customers with peace of mind.
Optimizing the checkout for mobile users
After learning how to add shipping address in WooCommerce checkout page, it time to optmize the page. Making your WooCommerce checkout page friendly for mobile users is essential as more and more people shop using their smartphones. A responsive design ensures your checkout page adjusts to different screen sizes, providing a user-friendly experience.
Choose a responsive theme: Selecting a responsive theme for your online store will automatically adjust the layout of your checkout page to fit the screen size of the device it is being viewed.
Test your checkout on various devices: Regularly test your checkout page on different mobile devices to ensure it’s working properly. Look for any formatting issues or other obstacles that could hinder the checkout process.
Minimize input fields: Keep the checkout page simple by minimizing the number of input fields. Use autofill options wherever possible to make the process faster and easier for your mobile users.
Use large, easy-to-tap buttons: Enhance the checkout page for fingers on smaller screens by using bold buttons with large touch targets. This reduces the chance of errors and improves navigation.
Customize checkout fields: If necessary, utilize plugins to customize your checkout fields. You can re-order them using a drag-and-drop interface, and ensure all essential fields adjust to the users’ screen size.
Ensuring your checkout page is optimized for mobile users, you create a smoother shopping experience that can lead to increased sales and customer satisfaction.
Conclusion
Mastering how to add shipping address in WooCommerce checkout page is essential in enhancing both the functionality of your ecommerce site and the overall shopping experience for your customers.
By following this comprehensive guide, you can customize your checkout process to include necessary shipping address fields, set up free shipping options, and implement advanced customizations using plugins or custom code. With the steps in this guide, your WooCommerce store will be better equipped to meet the needs of your customers and provide a smooth, efficient checkout experience.
Create your online store in minutes with 10Web AI Ecommerce Website Builder.Looking to sell online?
Create your online store in minutes


![]()