Integrating your WooCommerce store with Facebook makes product management easier and broadens market reach, which is essential for today’s digital marketplace. This guide explains the process of syncing WooCommerce products with Facebook, offering practical steps to enhance visibility and sales.
From setting up necessary accounts and plugins to managing product displays and optimizing marketing strategies, you’ll learn how to sync WooCommerce products with Facebook and drive ecommerce success.
FAQ
Does WooCommerce integrate with Facebook Marketplace?
How do I sync Facebook with WooCommerce?
How do I link my Facebook business to WooCommerce?
How do I post from WooCommerce to Facebook?
Understanding WooCommerce and Facebook integration
Syncing your WooCommerce store with Facebook can substantially widen your online reach and make managing your ecommerce presence more efficient. Here, you’ll learn the essentials of integrating these two platforms, ensuring a seamless connection that can help increase your sales and improve customer engagement.
Basics of WooCommerce
WooCommerce is a plugin for WordPress designed to facilitate ecommerce. It transforms a WordPress site into a fully functional ecommerce store. With WooCommerce, you can manage products, inventory, customers, orders, and shipments—all within the familiar WordPress environment. It’s a scalable solution, whether you’re selling a few items or thousands.
If you have ever looked for a quicker solution, the 10Web AI Ecommerce Website Builder can be employed to streamline website building. Utilizing AI it provides a customized online store, making the process faster and more intuitive.
Create your custom online store in minutes with 10Web AI Ecommerce Website Builder and take your business online. 
Looking to sell online?
Why integrate Facebook with WooCommerce
Integrating Facebook with your WooCommerce store can lead to increased visibility for your products and drive more sales by reaching customers on a platform they already frequent.
It simplifies the question of how to add WooCommerce products to Facebook Shop and could lead to efficient marketing opportunities, such as targeted Facebook ads and insights into customer behavior through Facebook’s analytics tools.
How to sync WooCommerce products with Facebook
Integrating your WooCommerce store with Facebook will expand your online presence and automate product posting. Let’s walk through how to get your products syncing smoothly with Facebook.
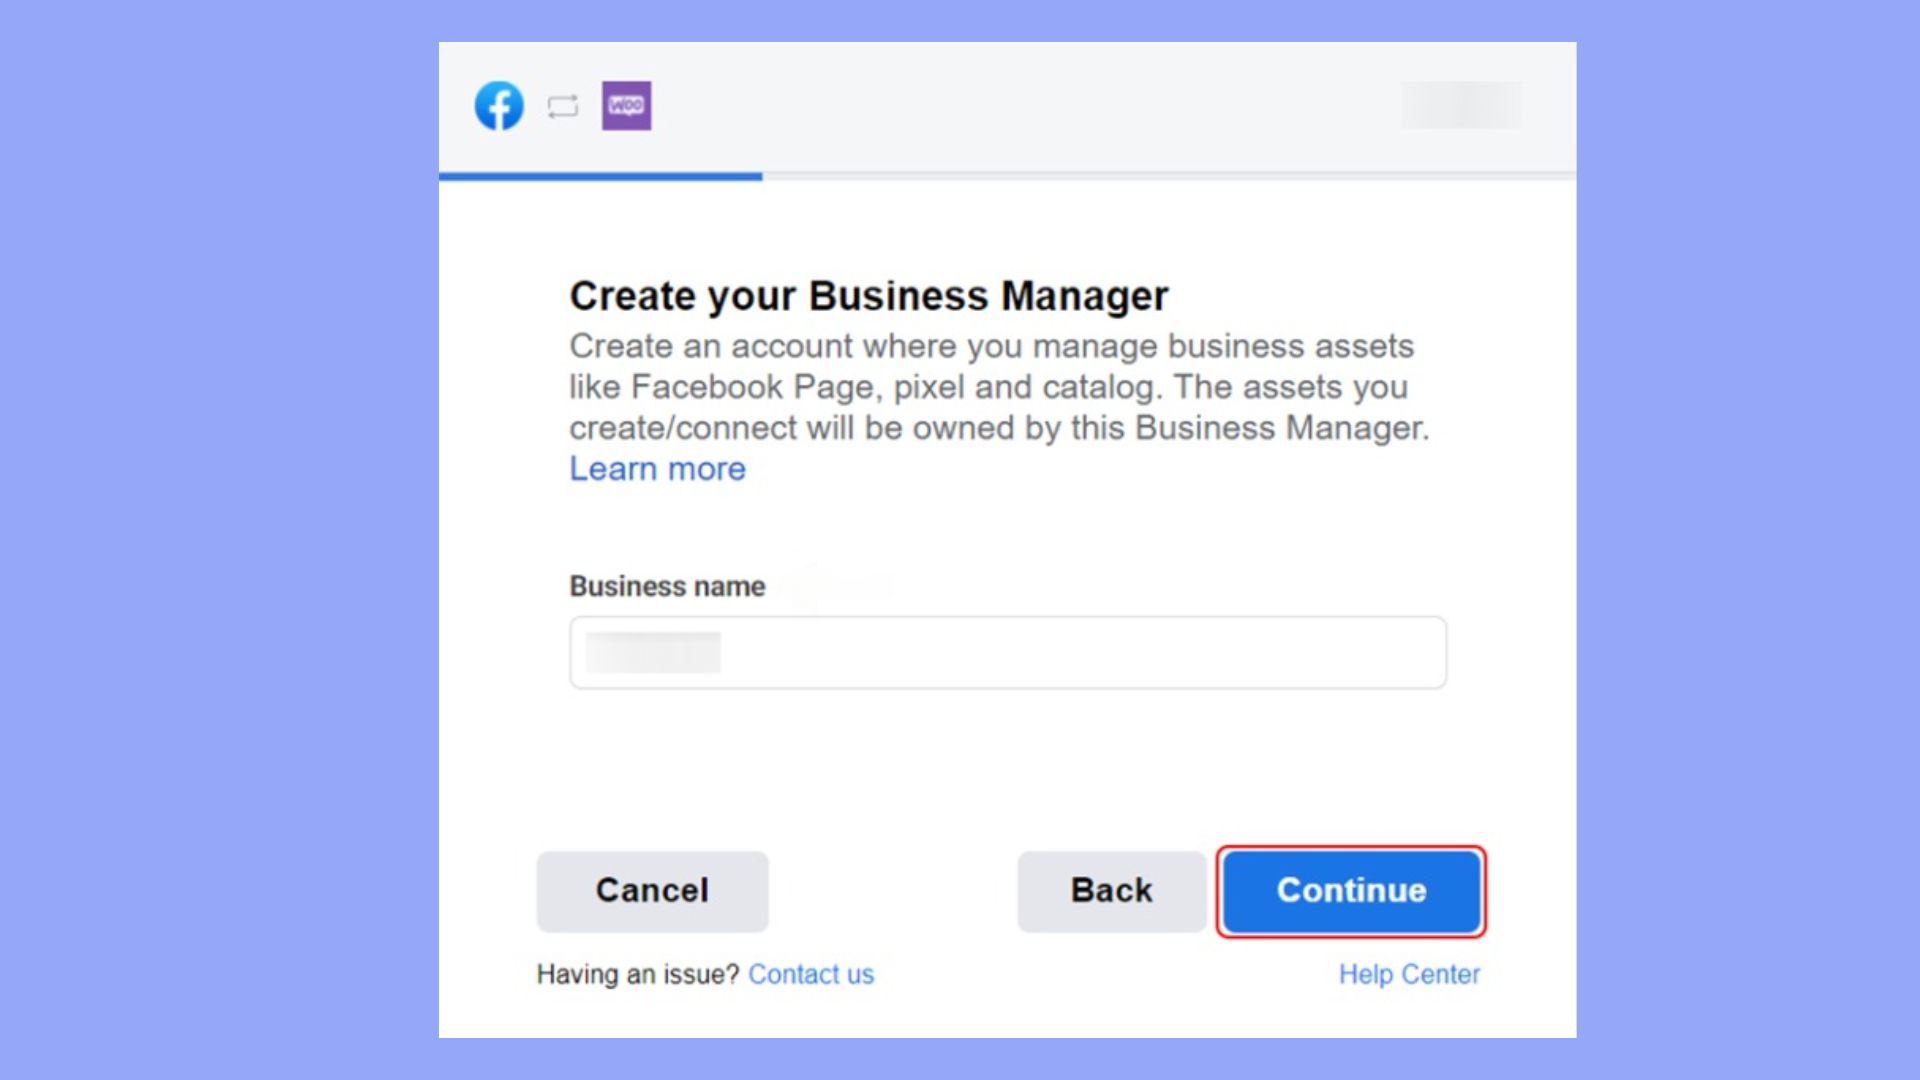
Create your Facebook Business Manager account
First, you need a Facebook Business Manager account to manage your product catalog and Facebook Shop.
- Go to Facebook Business Manager and create an account by following the prompts to input your business details.
- Within Business Manager, add your business’s Facebook Page that will be associated with your WooCommerce store.
- Set up a new product catalog or select an existing one that will be used to sync products from WooCommerce to Facebook.

Install the Facebook for WooCommerce plugin
To make a bridge between WooCommerce and Facebook, you’ll install the Facebook for WooCommerce plugin.
- Go to your WordPress dashboard > Plugins > Add New.
- Search for the Facebook for WooCommerce plugin, download and Activate it.
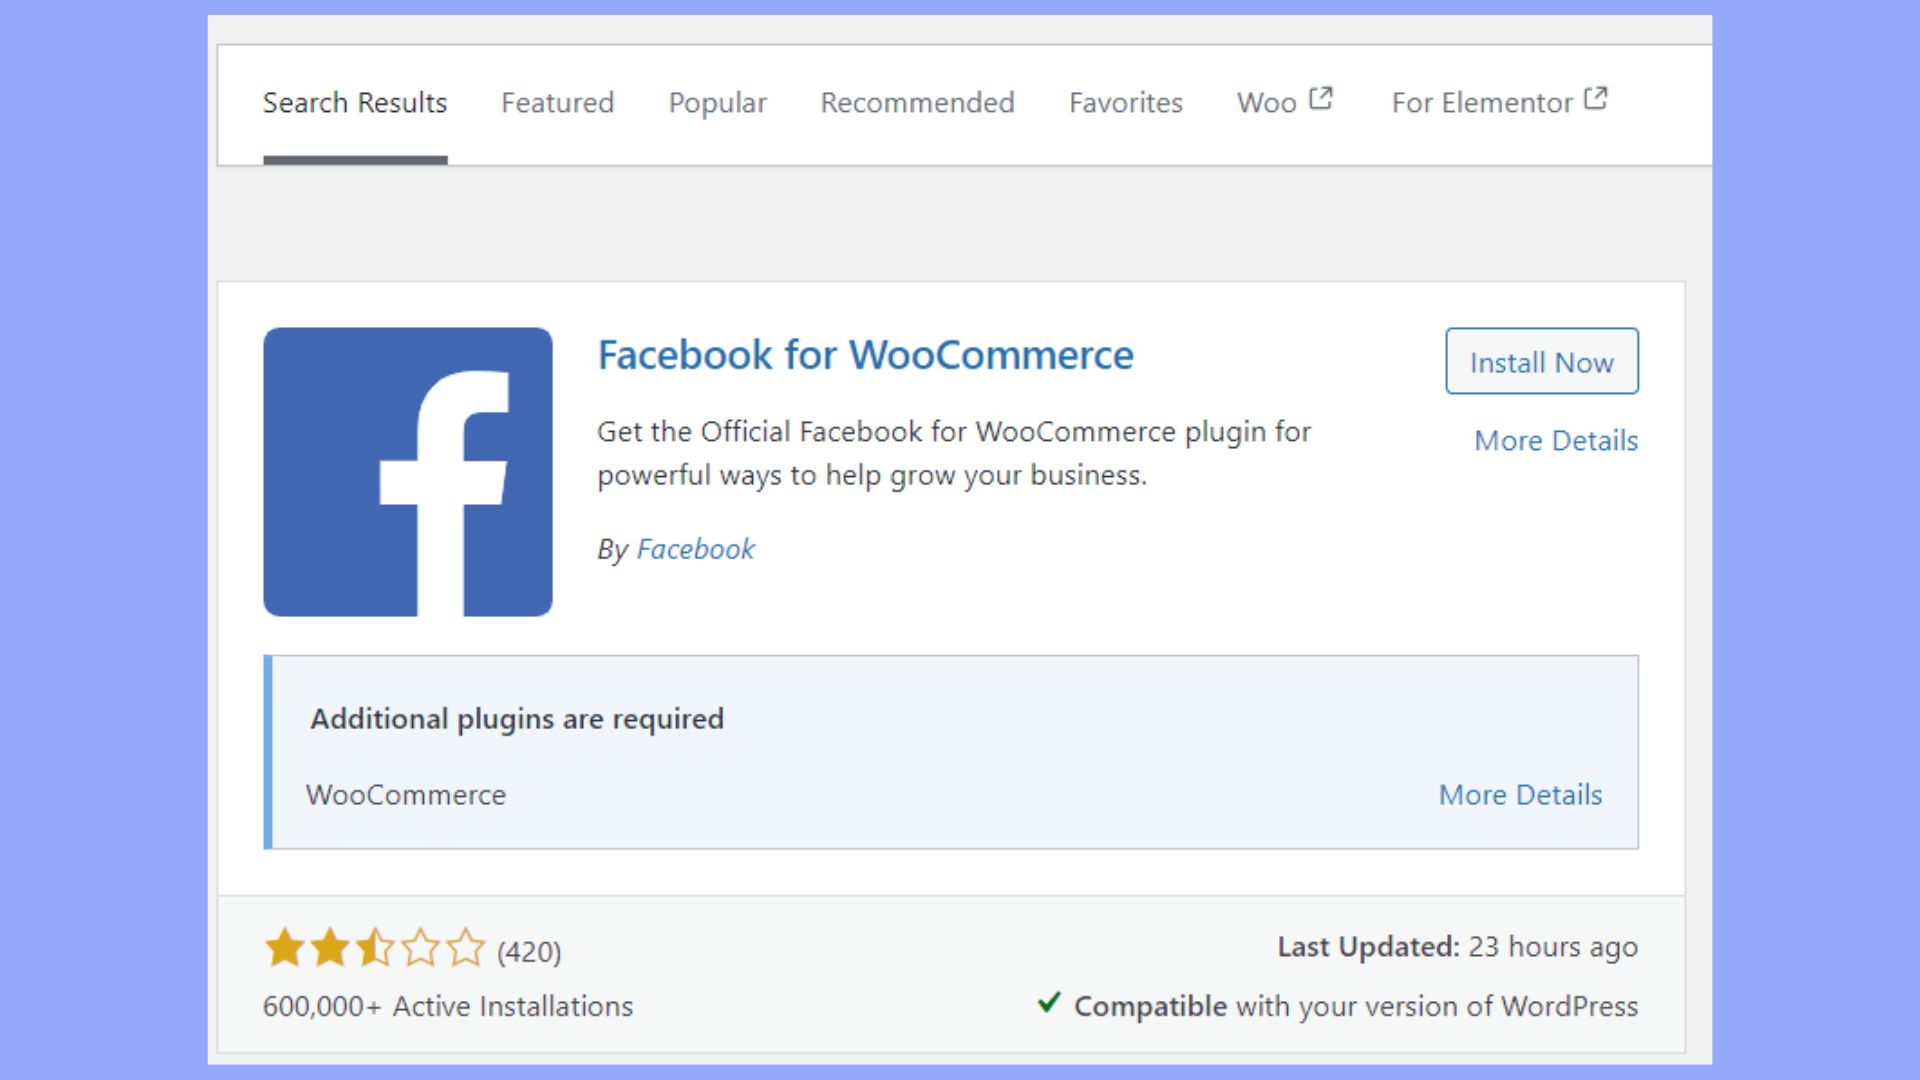
This plugin will help automate the process of how to sync WooCommerce products with Facebook and how to auto-post WooCommerce products to social media.
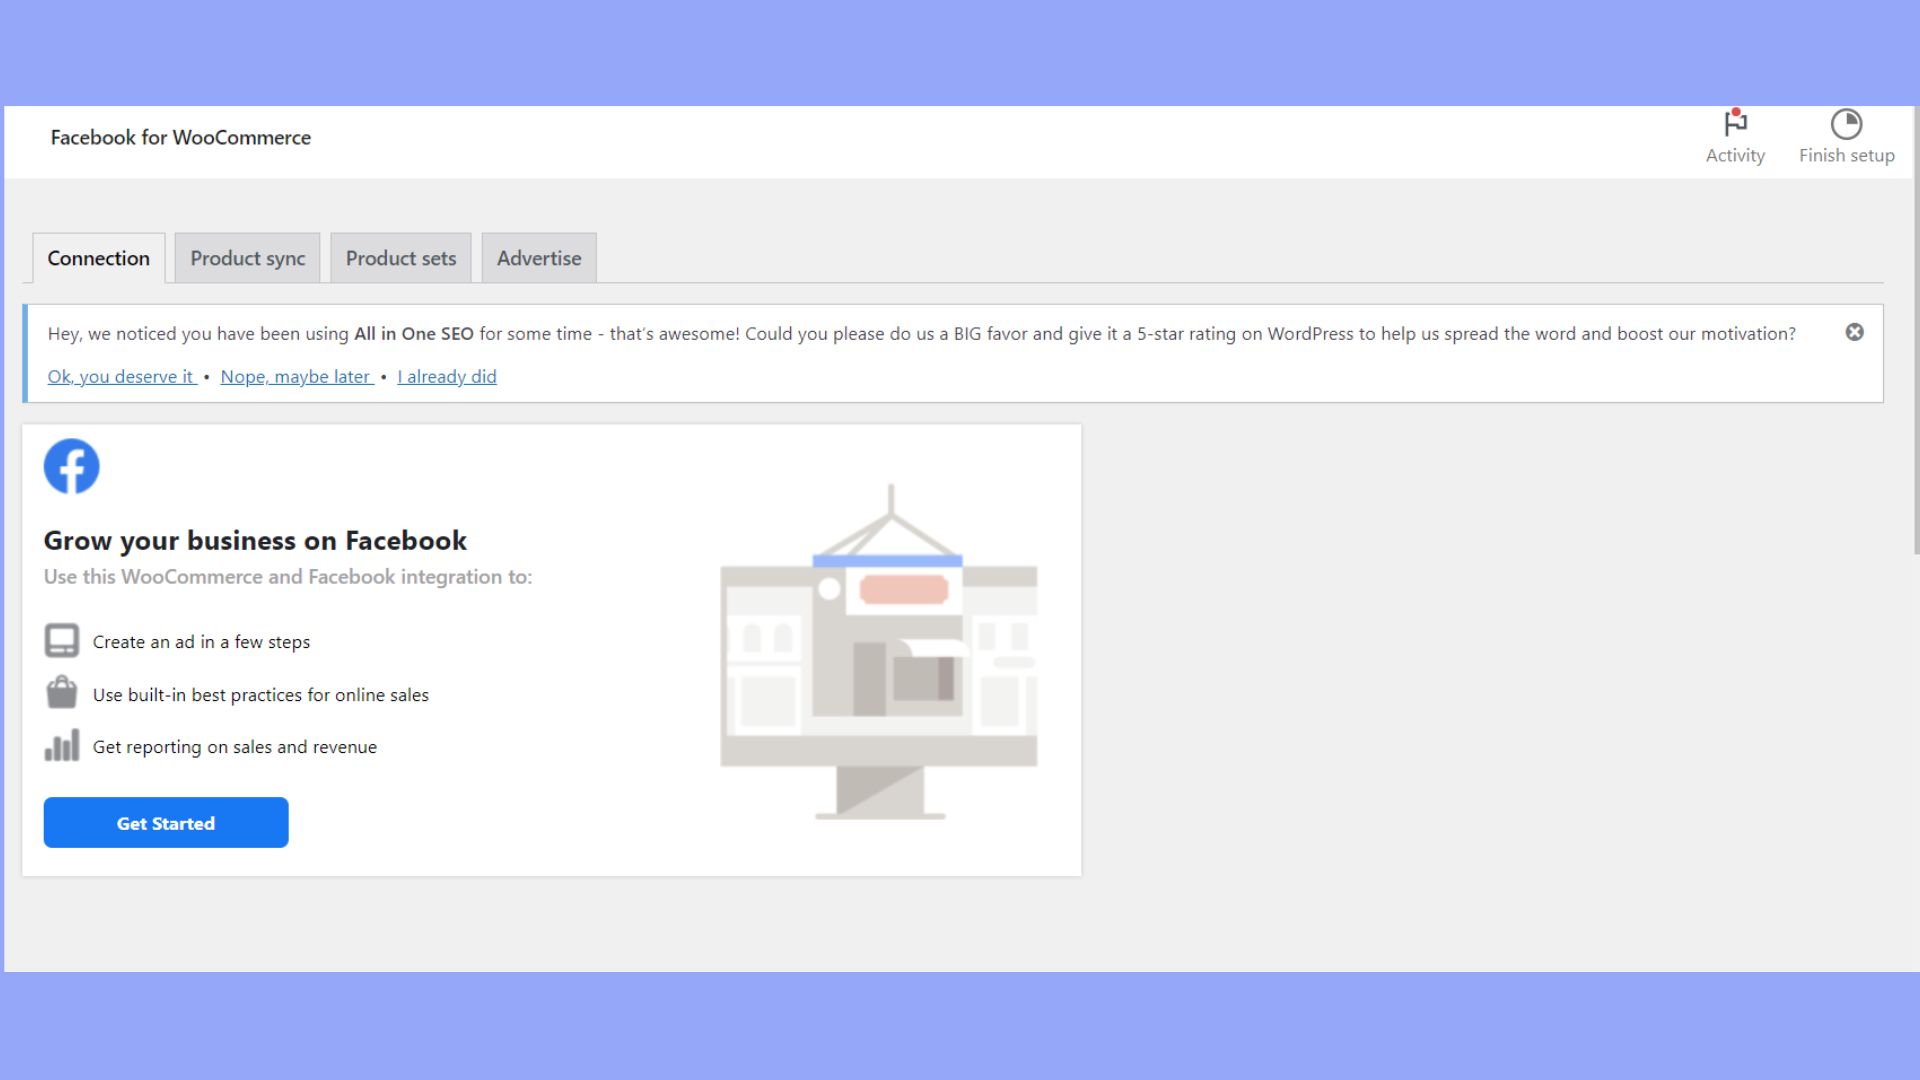
Configure WooCommerce settings
- Go to Marketing > Facebook and click on the Get Started button within the Facebook for WooCommerce settings. You will be redirected to Facebook to log in and authorize the connection between your WooCommerce store and your Facebook account.
- Go to WooCommerce in your WordPress dashboard and select Settings.
- Click on the Integration tab to see Facebook for WooCommerce settings.
Through this setup, you can take advantage of syncing WooCommerce products with Facebook, streamline adding WooCommerce products to your Facebook shop, and automatically post new items to your social media.
Sync your products to Facebook
- Back in the WooCommerce settings under the Facebook tab, choose the product catalog you want to sync with.
- Choose how often you want your product data to sync automatically with Facebook.
- Start the sync process to populate your Facebook Shop with products from your WooCommerce store.
Organize products into collections
After uploading your products, you can organize them into collections for easier navigation and to showcase related items together. In your Facebook Shop, go to the Collections tab and create new collections by grouping products based on certain criteria such as season, sale items, or any category that aligns with your marketing strategies.
This not only improves the shopping experience but also helps in how to auto-post WooCommerce products to social media, making each collection’s promotion targeted and specific.
Manage product data and inventory
Continuously managing product data and inventory ensures that your product information is accurate and up to date on Facebook. Use Facebook’s Commerce Manager to edit product details, adjust pricing, and update inventory levels. Keeping your product data current helps with synchronizing your WooCommerce store automatically, ensuring customers see the correct information which is vital for how to add WooCommerce products to Facebook Shop.
By linking a plugin that supports live sync, such as Facebook for WooCommerce, your WooCommerce product catalog inventory will update in real-time, reflecting accurate stock levels on both your website and Facebook Shop.
Optimizing product displays on Facebook
When you sync your WooCommerce products with Facebook, the presentation of your items can significantly impact customer engagement and sales. Optimizing how your products appear on your Facebook shop is crucial.
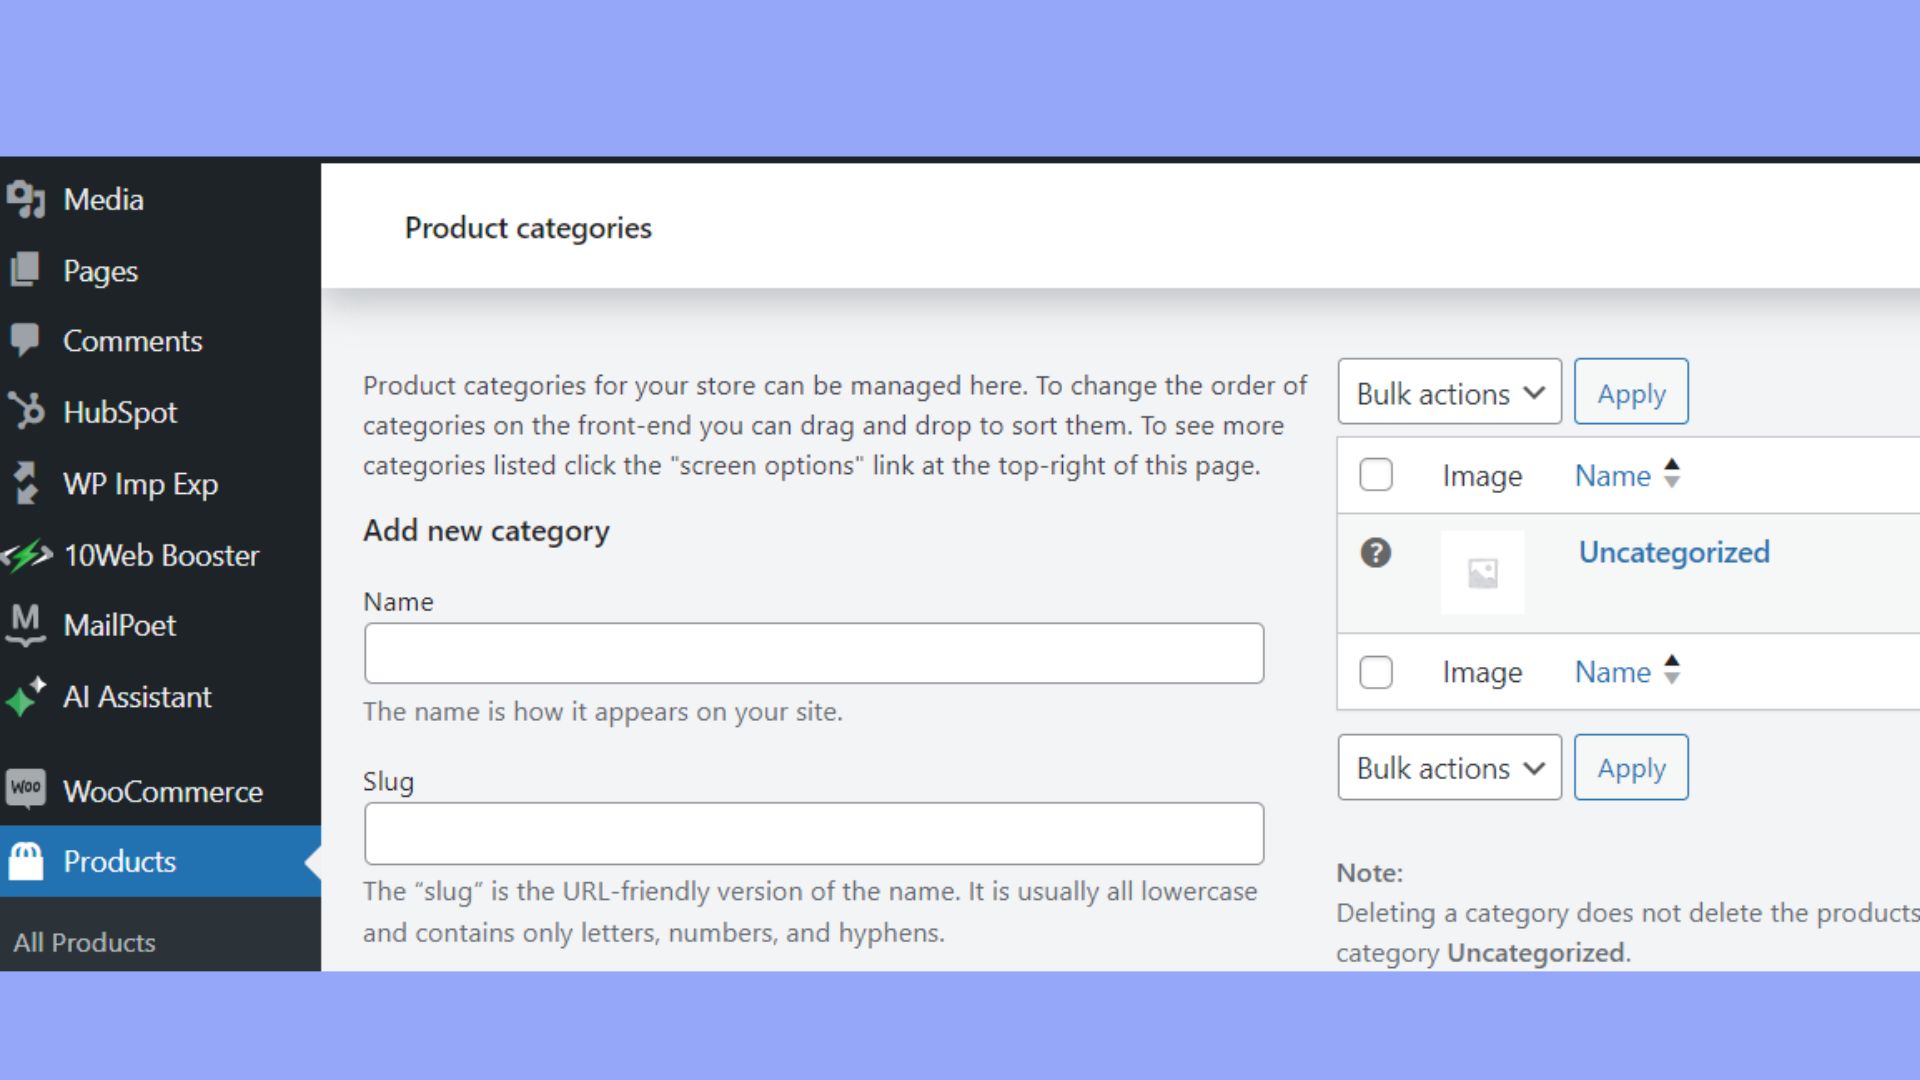
Set up product categories
To begin, you’ll want to ensure your products are organized into Categories on your WooCommerce store. When you sync with Facebook, these categories help shoppers find what they’re looking for with ease. To set these up, follow the steps:
- Go to your WooCommerce dashboard and select Products > Categories.
- Create and assign your products to specific categories, making them more accessible once they appear on Facebook.
Customize product sets
After establishing your categories, it’s time to customize product sets within Facebook. Product sets are organized collections that group your items, giving you control over which products are displayed together. To create a set:
- Go to the Facebook Commerce Manager, click Catalog, then select Sets.
- Click the Create Set button and choose products that fit your marketing or seasonal themes.
This customization is instrumental when learning how to add WooCommerce products to Facebook.
Use high-quality images and descriptions
Finally, representation is a crucial component, so always use high-quality images and detailed descriptions for your products. Clear, well-lit photos showcase your items and encourage clicks, while compelling descriptions with relevant keywords can improve visibility and SEO on Facebook.
For images, ensure you use at least 1024 x 1024 pixels for clarity. When writing descriptions, include key features, dimensions, and any unique selling points. Both of these aspects of your products ensure that when you learn how to auto-post WooCommerce products to social media, your items are presented at their best.
Enhancing marketing with Facebook pixel
Integrating the robust Facebook pixel with your WooCommerce store offers valuable insights into customer behavior and helps enhance your marketing efforts.
Create your Facebook pixel
- Log into your Facebook account and go to the Events Manager.
- In the Events Manager, select Connect Data Sources and choose Web.
- Click Connect, then Create Pixel. Enter a name for your pixel and your website URL to check its connectivity.
- After creating your pixel, you will have the option to install the code manually. Facebook will provide you with a pixel code to be embedded in your website.
Install Facebook Pixel on WordPress
You can install the Facebook Pixel on your WordPress site either manually or using a plugin:
- Using a Plugin: Plugins like ‘PixelYourSite’ or ‘Insert Headers and Footers’ can simplify the process. Install and activate your chosen plugin via the WordPress dashboard.
- Navigate to the plugin settings and enter your Pixel ID (found in your Facebook Pixel’s settings).
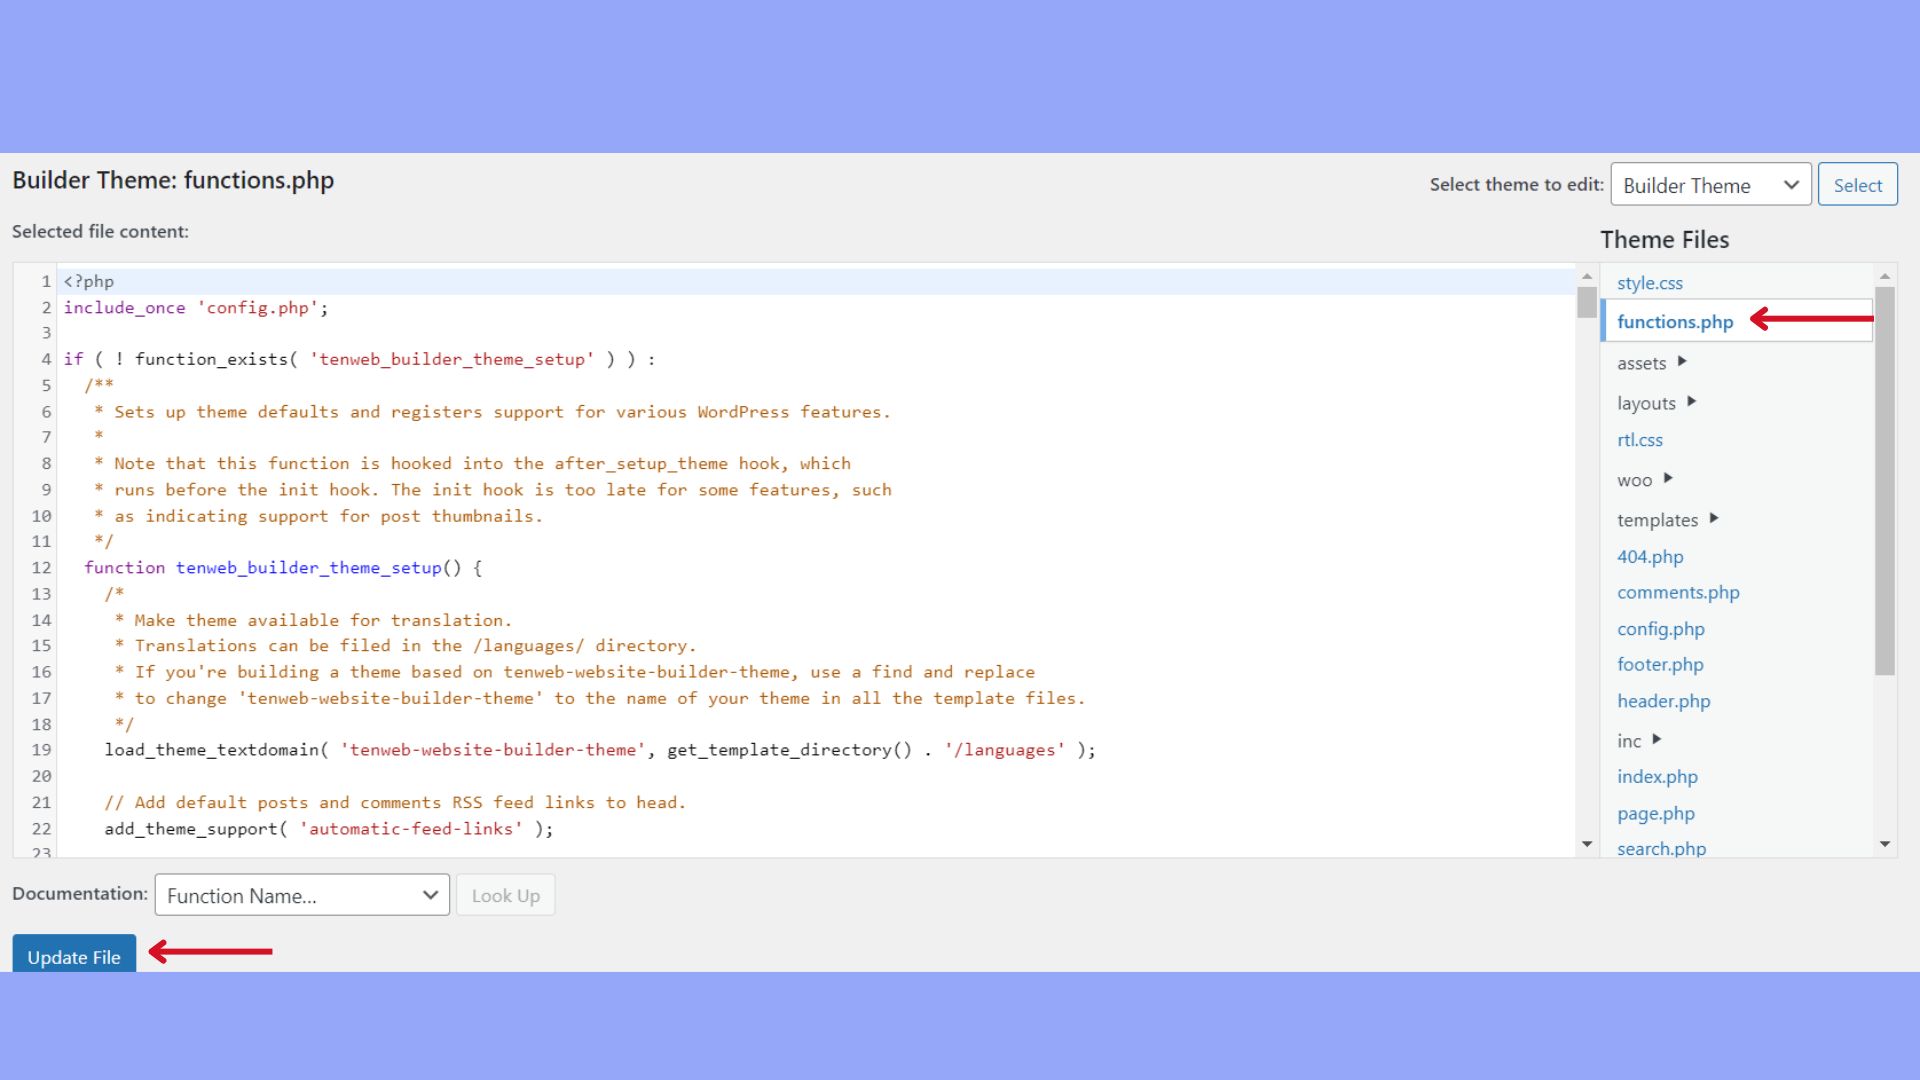
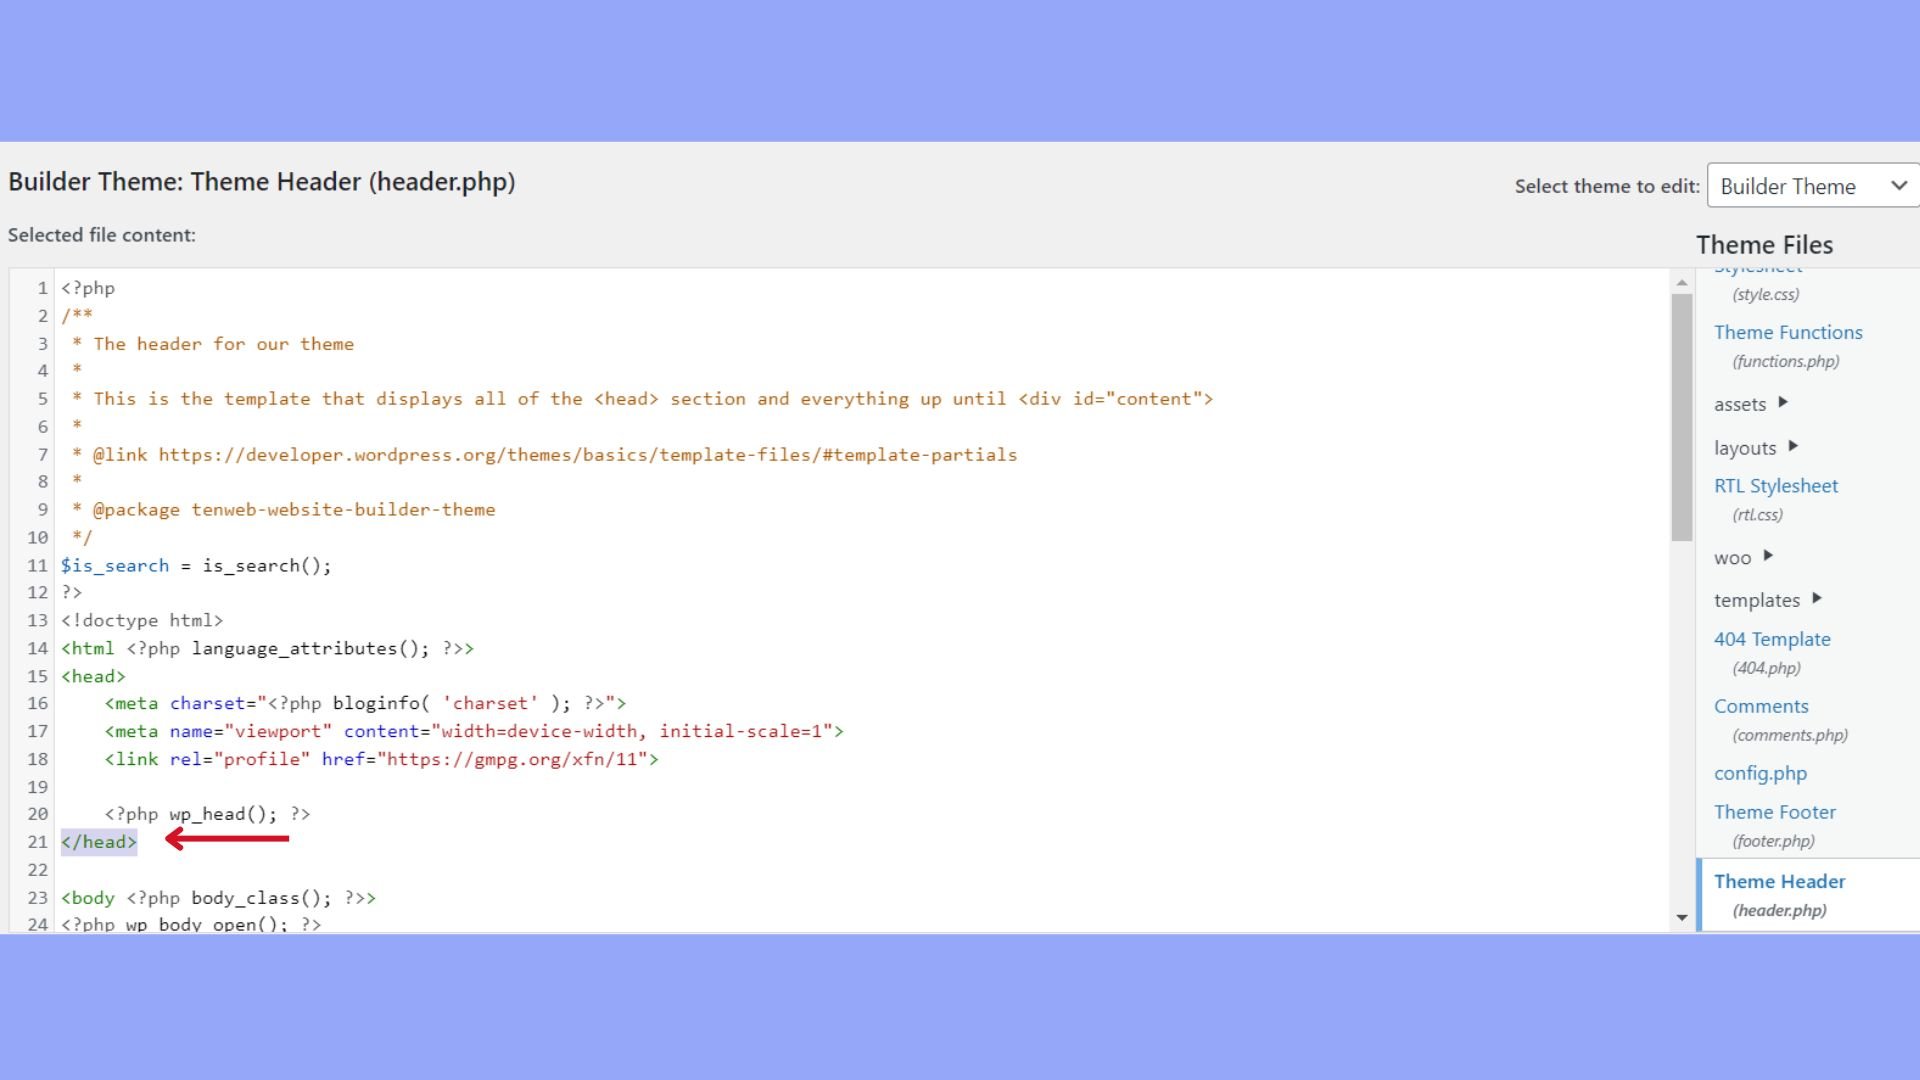
Manually adding the code
- Access your WordPress site’s editor and locate the header.php file under Appearance > Theme Editor.
- Paste the Facebook Pixel code snippet just above the </head> tag.
Verify and configure the pixel
- Use the Facebook Pixel Helper, a Chrome extension, to ensure that the Pixel is active and functioning correctly on your website.
- Manage your pixel settings via the Facebook Events Manager, where you can set up conversion tracking and customize settings like the Conversions API for more detailed data collection.
Track and retarget customers
With the Facebook pixel activated on your store, you can track visitors’ activities and later use this data for retargeting. If someone visits your store but leaves without making a purchase, you can use Facebook ads to showcase the products they viewed, encouraging them to return and complete the purchase—this is a process known as retargeting.
- Initiate the pixel to track events like Page Views, Add to Cart, and Purchases.
- Use the data collected to create custom audiences in your Facebook Ads Manager.
- Create retargeting campaigns to promote your WooCommerce products to those who have shown interest.
Analyze customer engagement
After you learn how to sync WooCommerce products with Facebook, you can analyze customer engagement through tools like Google Analytics in addition to Facebook’s own analytics tools. This will help you understand the impact of your Facebook marketing efforts in more depth.
- Use Facebook Insights to see metrics such as customer reach and how they interact with your posts.
- Correlate Facebook data with Google Analytics for a comprehensive view of your site’s traffic and conversions.
- Adjust your marketing strategies based on this data to improve the return on ad spend (ROAS).
Maximizing ecommerce capabilities
Synchronizing your online store with social platforms can boost growth and provide a smooth shopping experience for your customers. Discover how to expand your ecommerce presence effectively.
New sales channels
Diversifying your sales channels can significantly boost your revenue streams. When you explore how to add WooCommerce products to Facebook shop, you dive into new sales channels like Facebook and Instagram, reaching out to potential customers on platforms where they already spend much of their time.
Going beyond just Facebook, consider how to auto-post WooCommerce products to social media on multiple platforms to maximize visibility and sales potential.
Professional customer experience
A professional customer experience is pivotal, and here’s how syncing your products can help:
- Inventory management: Real-time updates of your inventory across channels prevent overselling.
- Customer support: Integrated messaging features allow for prompt customer service.
- Consistent branding: Your online shop’s aesthetic is carried through all your channels, creating a unified brand experience.
By syncing your products, you make shopping seamless for your customers and ensure they enjoy professional services as they would in a physical store.
Managing ads and promotion
Successfully promoting your WooCommerce store on social media can help attract new customers and increase your sales.
Let’s look at how to sync WooCommerce products with Facebook and manage ad campaigns effectively.
Creating Facebook ad campaigns
Once you’ve added your WooCommerce products to your Facebook shop, you’re ready to start creating ad campaigns. Begin by linking your ad account to your Facebook page. From your Facebook page, go to Ads Manager, and select Create. Choose an objective that aligns with your sales goals, whether it’s brand awareness or conversions.
When designing your ad, consider using the carousel format to showcase multiple products. This allows potential customers to browse a selection of your WooCommerce products directly from the ad.
Linking products for Instagram ads
To promote products through Instagram ads, link your Instagram business profile to your Facebook page. You’ll utilize the Catalog Manager from Facebook to ensure your WooCommerce products are available for Instagram tagging. When creating ads in Ads Manager, select Instagram as your desired placement and use carousel ads to highlight multiple products.
Setting budgets and expectations for ads
Determining your budget is a crucial step. In Ads Manager, set your budget at the campaign, ad set, or ad level. It’s vital to start with a budget you’re comfortable with, and then adjust based on performance.
Setting clear expectations for your advertising outcomes is important. Track ad performance regularly to measure return on investment and adjust your strategies as needed.
Understanding permissions and security
Before you start learning how to sync WooCommerce products with Facebook, it’s vital to ensure you have the correct permissions set up and that your store’s security is robust. These steps will help protect your data and control who has access to your various business tools.
Configuring user roles and permissions
WordPress and WooCommerce come with built-in user roles that allow you to manage permissions within your store. When setting up how to sync WooCommerce products with Facebook, you’ll need to ensure that you have an administrator role in WordPress to make the necessary changes.
You must also have a Facebook Business Manager account, where you’ll manage your sync settings. As the business owner, you can assign specific roles within the Business Manager to control access to your Facebook shop.
- Administrator: Complete control over all settings and products.
- Editor: Can edit the shop, but not change user permissions.
- Analyst: Can view shop insights but not edit the shop.
To manage these permissions, go to Facebook Business Manager > Business settings. You’ll find options there to add people and assign roles based on their responsibilities.
Securing your store with best practices
Keeping your WooCommerce and Facebook integration secure is critical. Follow these best practices to secure your store:
- Keep WordPress, WooCommerce, and any plugins up to date to protect against vulnerabilities.
- Use complex passwords and change them regularly for your WordPress admin and Facebook business manager accounts.
- Regularly review who has access to your Facebook business manager and WooCommerce store and adjust permissions as necessary.
- Enable two-factor authentication for your WordPress and Facebook accounts for additional security.
By implementing these security measures, you’re not only safeguarding your store but also ensuring the safety of your customers’ information when learning how to add WooCommerce products to Facebook shop or looking into how to auto-post WooCommerce products to social media.
Troubleshooting common sync issues
When syncing your WooCommerce products with Facebook, you might encounter several common issues. Let’s walk through the steps to resolve these so you can successfully display your products on Facebook.
Resolving product sync errors
If you’re facing product sync errors, check WooCommerce > Settings > Integration. Ensure that Facebook for WooCommerce is configured correctly. Here’s what to check:
- Ensure you’ve selected the correct catalog in the Facebook for WooCommerce settings. If the catalog is empty or incorrect, remove it by clicking Settings, scrolling down, and selecting Delete.
- Verify your Facebook Shop connection. If needed, reconnect by going to the plugin’s configuration page and clicking on Settings, then Reconfigure.
Handling discrepancies in catalogs
To keep your product information accurate and consistent:
- Review the WooCommerce catalog feed for accuracy. Ensure the product details in WooCommerce match those in Facebook Shop.
- Set up auto-sync by enabling Sync to Facebook in the plugin settings. Choose the right catalog from the dropdown menu for Select Catalog so any changes you make in WooCommerce auto-post to social media.
Fixing pixel installation problems
The Facebook Pixel must be properly installed for sync to work effectively:
- Verify the Pixel ID in your Facebook for WooCommerce settings. It should be the same ID displayed on your Facebook Business Manager.
- Check if the Pixel is firing correctly by using the Facebook Pixel Helper, a browser extension that helps you validate your Pixel implementation.
By attending to these key areas, syncing WooCommerce products with your Facebook shop can be streamlined, allowing customers to see a consistent product catalog across platforms.
Conclusion
Integrating WooCommerce with Facebook using the Facebook for WooCommerce plugin offers a streamlined method to enhance your e-commerce strategy. This integration not only simplifies the management of product listings by syncing them directly with Facebook page but also expands the visibility of your products to a larger, more engaged audience.
Following the detailed steps provided, you can effectively use Facebook’s vast user base to boost sales and enhance customer interaction. With this guide, you have learned how to sync WooCommerce products with Facebook and can now benefit from it.
Create your online store in minutes with 10Web AI Ecommerce Website Builder.Looking to sell online?
Create your online store in minutes


![]()