WooCommerce enables users to transform their site into a dynamic online store. This guide offers a comprehensive, step-by-step approach to adding products, from installation to managing product details. It explores various product types and demonstrates how to optimize settings for inventory, shipping, and promotions. In this article, you will learn how to efficiently organize and enhance your WooCommerce store, ensuring a seamless customer experience and streamlined store management.
Let’s start learning how to add products in WooCommerce step-by-step.
FAQ
How do I add a product to a WooCommerce form?
How do I add products to my WooCommerce home page?
How do I import a product into WooCommerce?
How do I add a custom product to WooCommerce?
Getting started with WooCommerce
Before you jump into learning how to add products in WooCommerce, it’s vital to understand how WooCommerce operates within your WordPress environment and the various types of products you can sell.
WooCommerce is a powerful plugin for WordPress that transforms your site into a fully functional online store. To begin, ensure you have set up a WordPress website. Next, you should install WooCommerce from your WordPress dashboard’s Plugins section.
With WooCommerce activated, you’ll be prompted to set up the WooCommerce, including your store location, currency, payment methods, and shipping options. After completing this process, you can use the WooCommerce settings to further customize your store with various extensions and plugins.
Product types
WooCommerce supports several types of products for a range of ecommerce needs. Some of the common product types you can learn how to add in the WooCommerce store include:
- Simple products: These are straightforward, single items with no options, like a book.
- Variable products: Items with variations, such as a t-shirt available in different colors and sizes.
- Grouped products: A collection of related products that can be purchased individually and only make sense to be sold together, like a set of glasses.
- Virtual products: Non-physical items, such as services or memberships.
- Downloadable products: Products that customers can download, like digital artwork or music.
Each of these products has different settings and options when being added to your store. Select the type that best matches what you’re selling to ensure a seamless customer experience.
How to add products in WooCommerce
You already have your WooCommerce store set up on your WordPress site, it’s time to learn how to add products in WooCommerce. To set up a simple product, follow these steps.
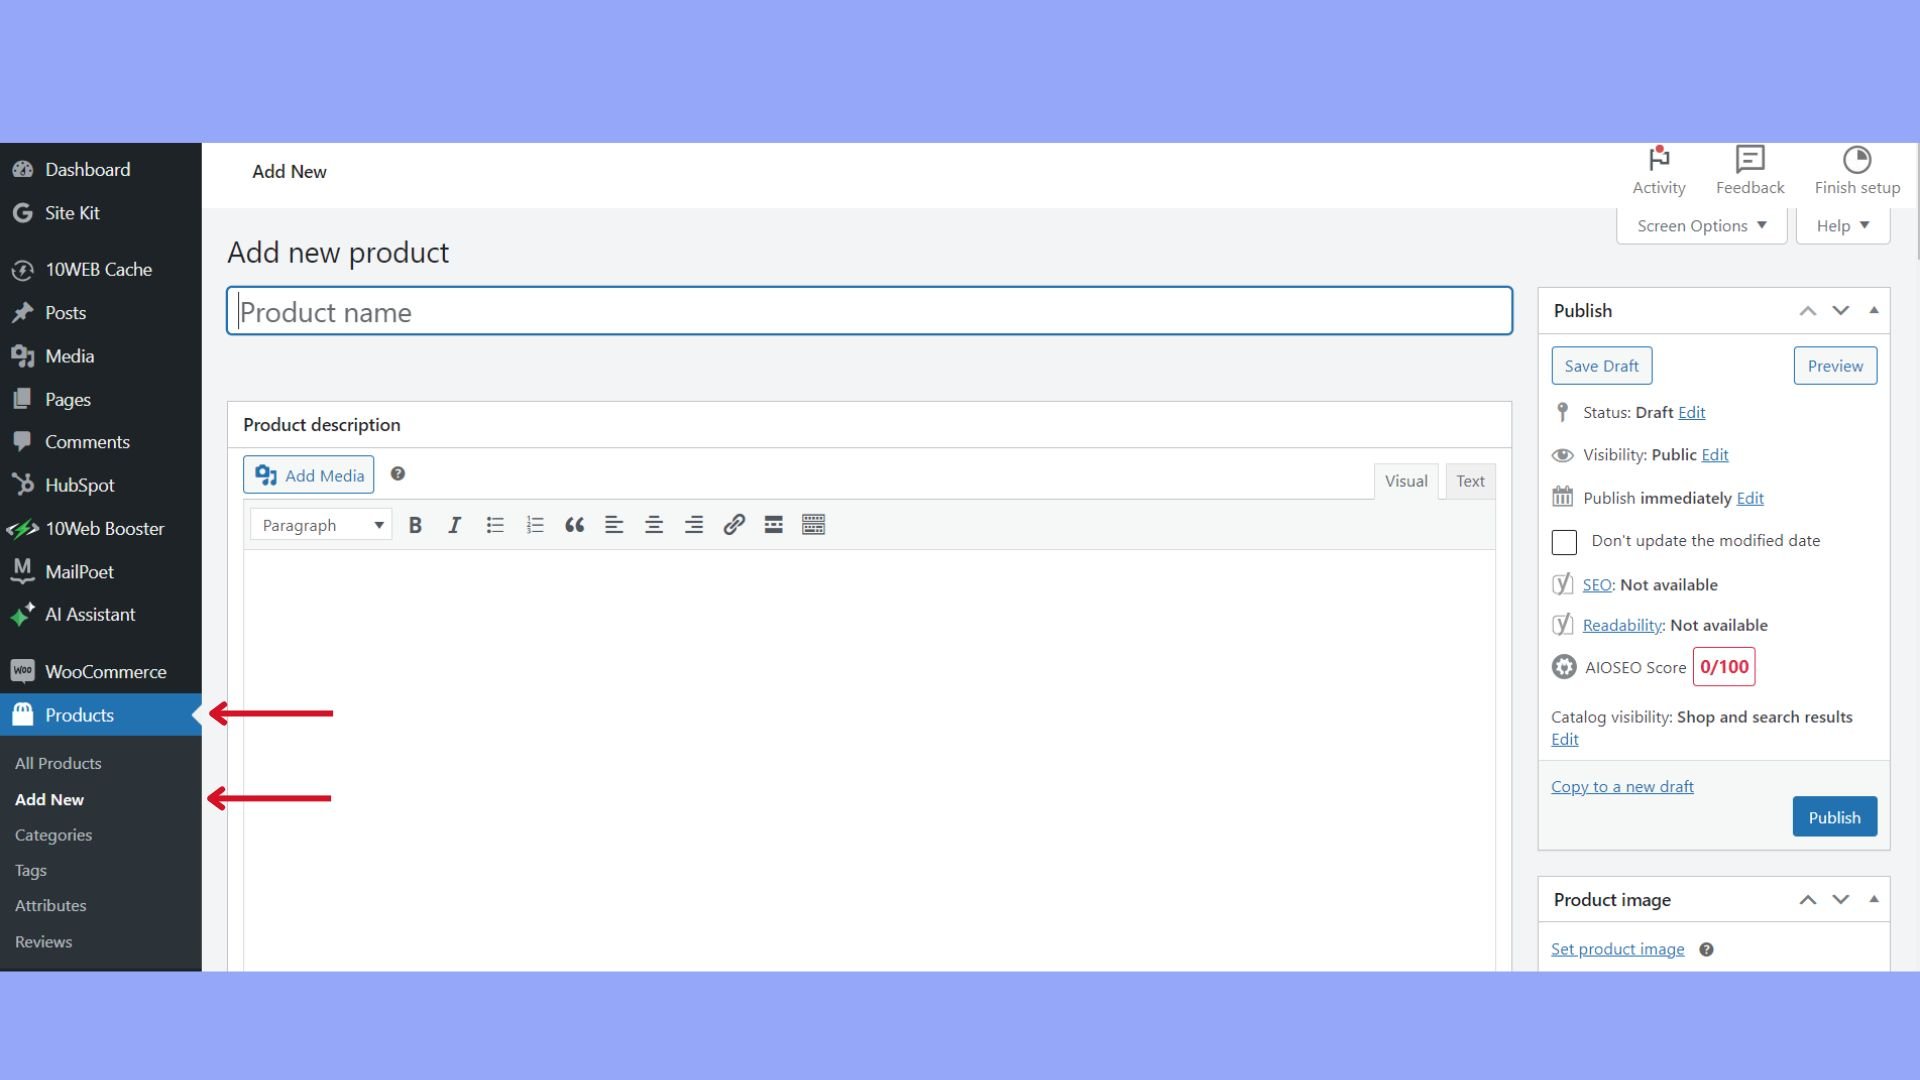
- Go to Products > Add New in your WordPress dashboard.

- Enter the name of your product in the Product name title field.
- Use the WordPress editor to add a detailed description below the title.
- On the same page, locate the box typically on the right for a concise product short description.
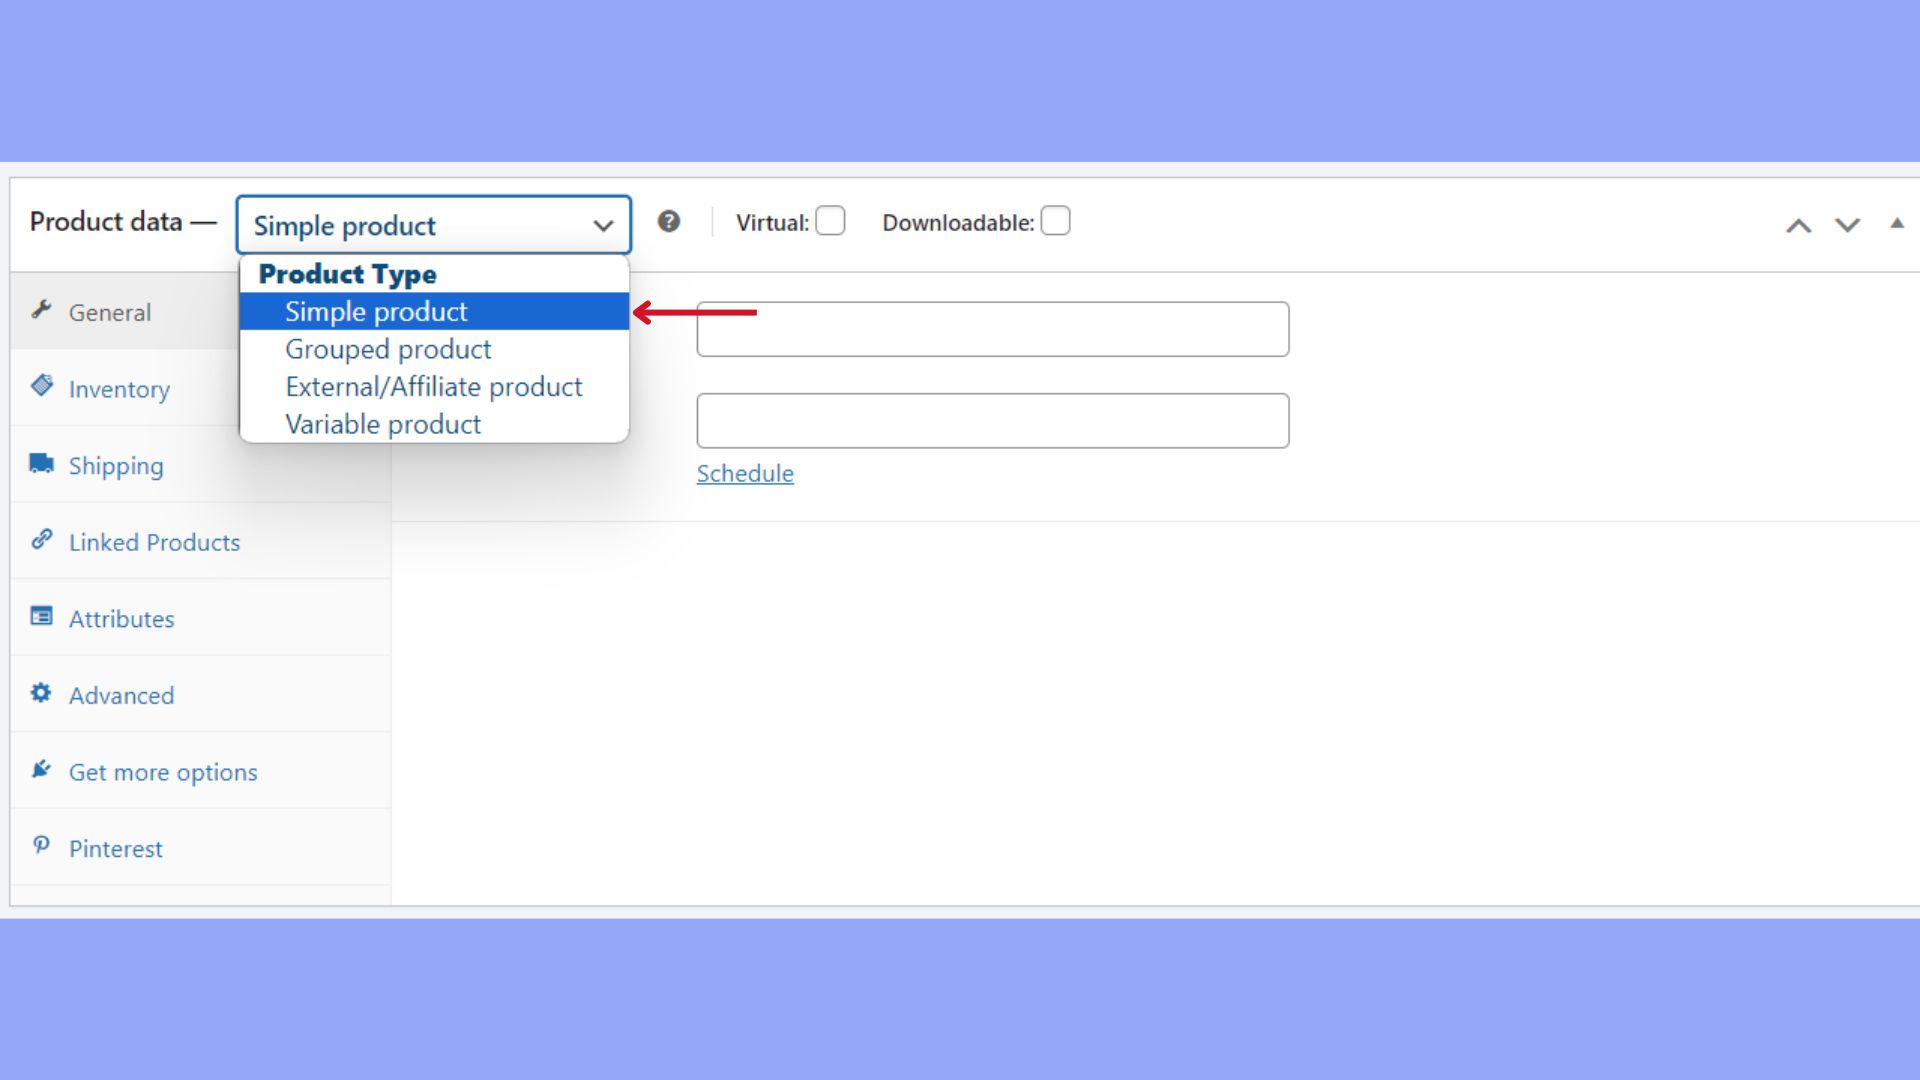
- Below the main text box, find the Product data section, and select Simple Product from the dropdown menu.
- Set your price in the General tab. If offering a discount, enter a sale price.

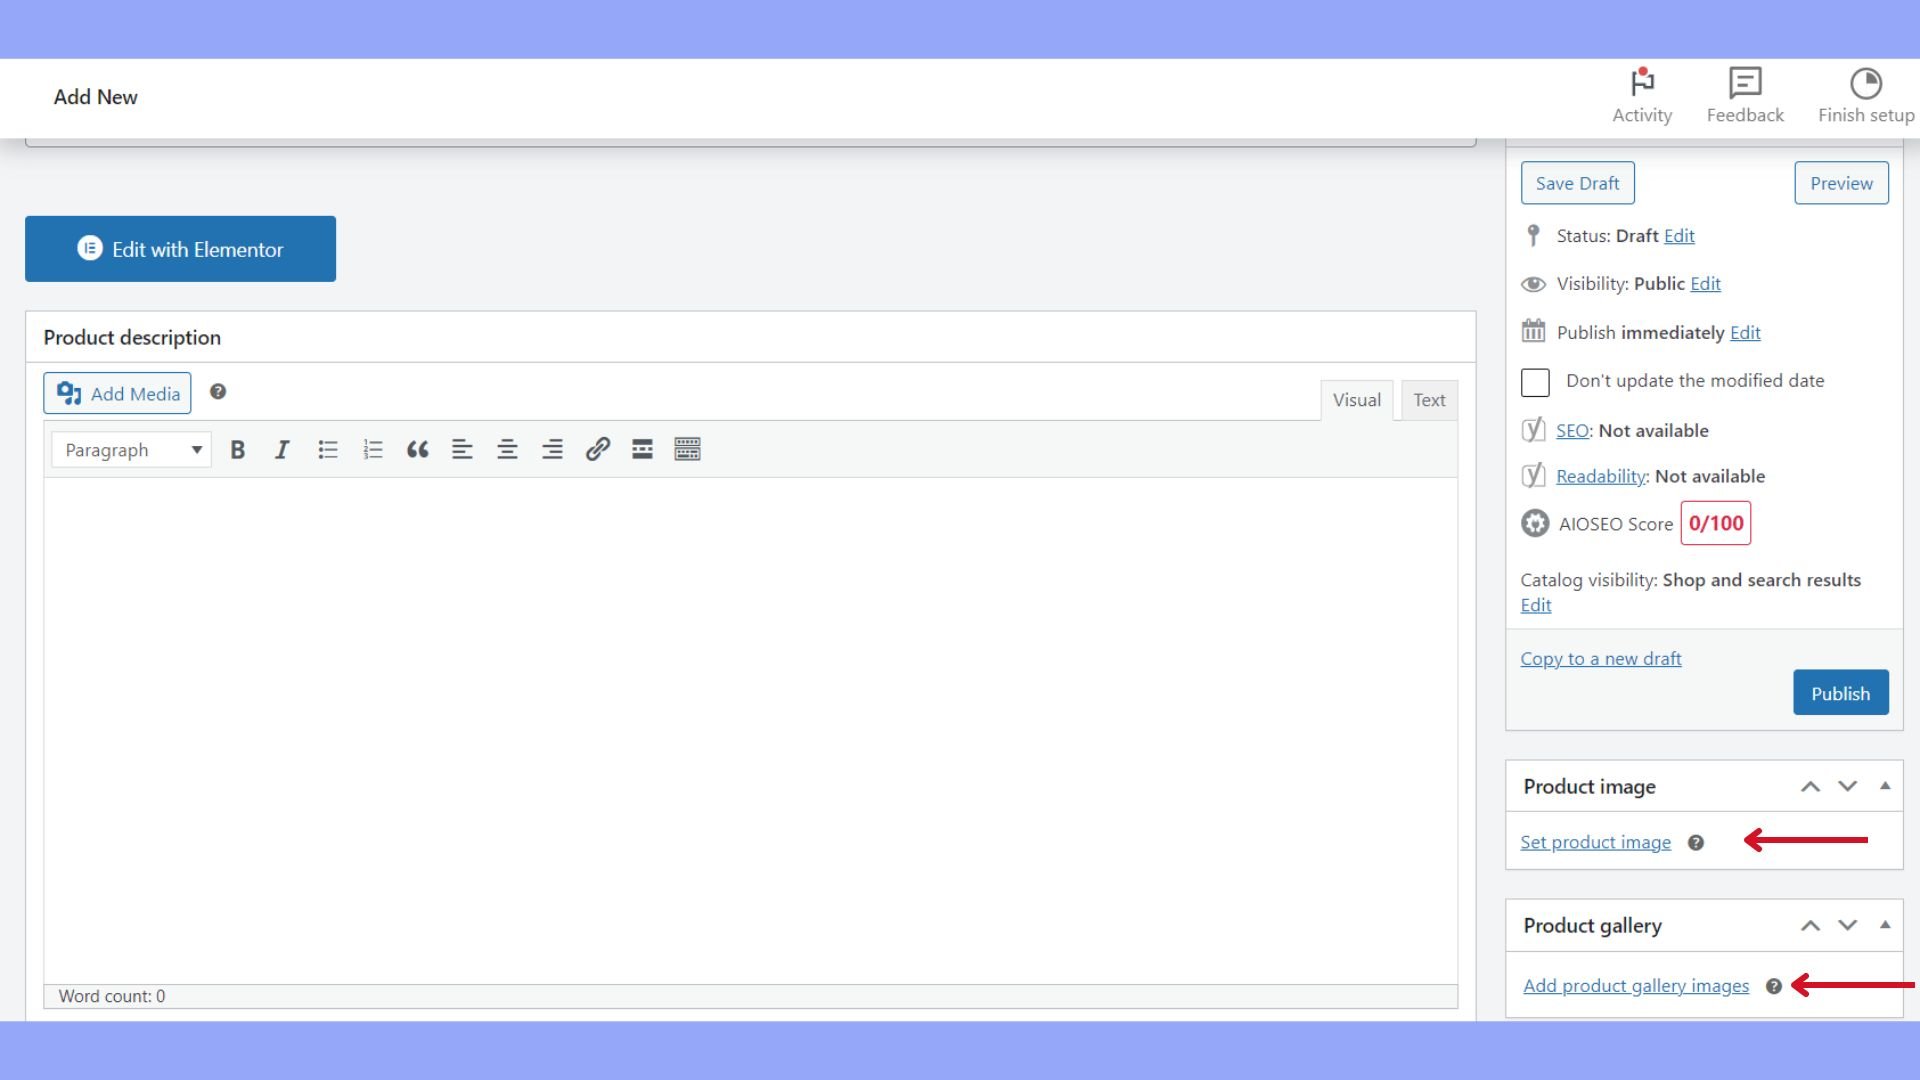
For the product image:
- Add a main image for the product by clicking on Set product image.
- Use Add product gallery images to display additional images.
Don’t forget to assign categories and tags to help customers find your product more easily.
Before you hit the Publish button, make sure to fill in all the necessary information in the fields that apply. For example, the SEO attributes, the linked products, shipping details, product attributes, etc. After finalizing your product setup click Publish to make your product live on your store.
Organizing WooCommerce products
Congratulations you have learned how to add products in WooCommerce and successfully added your first simple product. After publishing many products, it’s important to keep everything organized. Proper categorization and tagging, along with setting up attributes and variations, help your customers find what they’re looking for with ease and improve the store management process.
Add categories and tags
Categories are broad groupings of products that help you sort items and let customers browse your store. You can add a new category in WooCommerce in the following steps.
- Go to Products > Categories, fill in the Name, Slug, Parent if it’s a subcategory and Description.
- To assign a category to a product, check the box beside the category name on the product page.
Tags are more specific and are generally used to describe product details. Tags can be added similarly.
- Go to the Products > Tags, enter a name in the Name field and any relevant details before saving.
- While editing a product, type the tags into the Tags field, if applicable.
Each product can have multiple categories and tags, which enriches the search options for customers.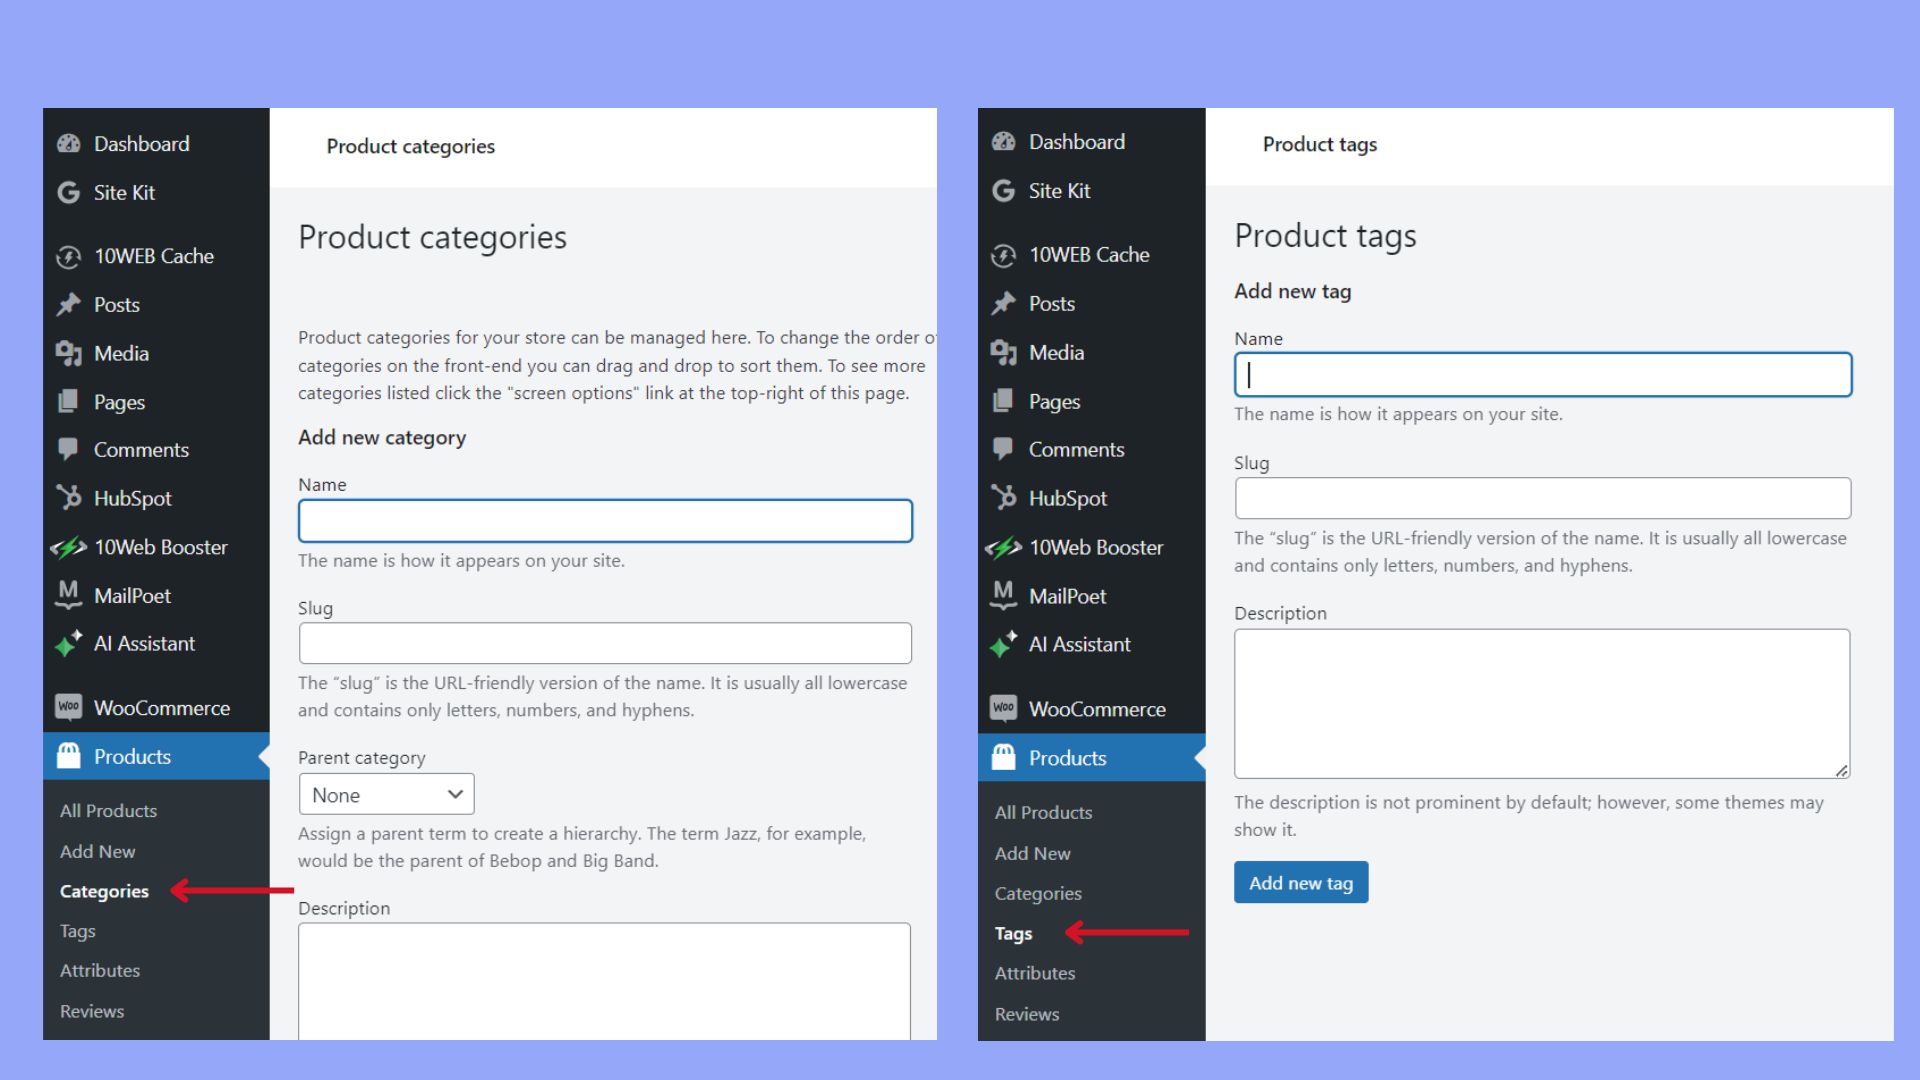
Add attributes and variations
Attributes define extra product data, such as size or color. If you’re selling items with different attributes, you have to first set up these attributes.
- Go to Products > Attributes.
- Click on Add New Attribute, provide a name for the attribute, and then configure terms to add attribute values.
Variations are directly linked to variable products. A variable product uses attributes to define different variations, such as a t-shirt in different sizes and colors.
- From a variable product page, go to the Product data box, and select Variations.
- Add variation from the dropdown menu and click Go.
To organize grouped products, you must create individual products to be grouped and then assign them to a parent-grouped product.
For external/affiliate products, ensure you include the external URL and a button text, allowing customers to purchase the product from an outside source.
Downloadable products and virtual products are types of products that can be assigned specific settings. A downloadable product requires a file path and optionally a download limit and expiry. A virtual product does not have any physical counterpart and often does not require shipping settings.
When organizing all different product types, using a consistent system for attributes, categories, and tags will simplify both setup and customer navigation.
How to manage product data
Managing product data in WooCommerce involves understanding the intricacies of inventory control, shipping, and product relationships. After you have learned how to add products in WooCommerce, you’ll learn how to accurately set up and manage these aspects to ensure your store operates smoothly and efficiently.
Inventory management
In your Product data settings, selecting your product type is just the beginning. Under the Inventory tab, you’ll control various stock elements.
- SKU (Stock Keep Unit): This is your product’s unique identifier.
- Manage stock: Enable this to specify stock quantity, and the system will automatically update available units based on sales.
- Stock status: Set this to indicate if a product is in stock, out of stock, or on backorder.
- Low stock threshold: Define the level that triggers a low stock warning.
- Sold individually: Tick this if you want to limit the purchase to one per order.
Shipping settings
Proper shipping settings are a must for physical goods. Virtual or downloadable products do not require these shipping options. For the physical ones, make sure you have the following details filled in:
- Weight: Specify the weight of the product for shipping.
- Dimensions: Enter the length, width, and height.
- Shipping class: Assign to a shipping class for specific shipping options.
Linked products
Creating connections between your products can influence customer purchasing decisions. Use the following settings to leverage product relationships and drive more sales.
- Upsells are items that you recommend instead of the currently viewed product, usually higher quality or more expensive.
- Cross-sells are products promoted in the cart, encouraging additional purchases.
Creating sales and discounts
Sales and discounts can significantly boost your store’s performance by encouraging customers to complete a purchase. To create a sale:
- Go to the product page and click Edit under the product you want to discount.
- Find the Product data section and click on General.
- Enter the discounted amount in the Sale price field.
How to expand your store’s capabilities
By integrating the right mix of WooCommerce extensions and add-ons, you can significantly enhance the functionality of your online store, reaching new markets and improving customer experience.
WooCommerce extensions and add-ons
To extend the basic ecommerce capabilities of your WordPress site, WooCommerce offers a range of extensions and plugins that suffice various needs. Whether you’re looking to implement dropshipping, manage subscriptions, or strengthen your marketing efforts, there’s likely an extension that can help. Here are some of the most popular ones you can consider:
Yoast WooCommerce SEO: This extension helps improve your site’s SEO by optimizing product pages, improving breadcrumb navigation, and more.
LiveChat: Offers real-time chat support to your customers, integrating seamlessly with WooCommerce.
WooCommerce Subscriptions: Enables you to create and manage products with recurring payments, which is perfect for subscription-based services.
WooCommerce Product Bundles: Helps you create custom product bundles or curated collections, which can be especially useful for promotions and special offers.
WooDropship: Allows you to import and sell AliExpress products on your WooCommerce site with ease, automating much of the dropshipping process.
With the wide range of WooCommerce extensions, you can tailor your store to meet the dynamic needs of your customers and carve out your niche in the online marketplace.
Conclusion
Learning how to add products in WooCommerce is key to transforming your WordPress site into a thriving online store. This guide has walked you through each step, from setting up WooCommerce to managing intricate product details such as inventory and shipping.
With the ability to handle various product types, including simple, variable, grouped, virtual, and downloadable products, WooCommerce offers flexibility and functionality to suffice diverse ecommerce needs. By applying the detailed insights provided in this guide, you are well-equipped to optimize your WooCommerce store for success.
Looking to sell online?
Create your online store in minutes
Create your online store in minutes with 10Web AI Ecommerce Website Builder.


Looking to sell online?
Create your custom online store in minutes with 10Web AI Ecommerce Website Builder and take your business online.