Understanding how to add a custom field in a WooCommerce product page can significantly enhance the functionality and user experience of your online store. This article provides a step-by-step guide to integrating custom fields, allowing for additional product information and personalization options that cater to customer preferences.
From using plugins like Advanced Custom Fields to editing your theme’s PHP files, we explore various methods to efficiently customize and display unique product attributes directly on your WooCommerce product pages. Whether you are a novice or an experienced developer, this guide will equip you with the tools needed to expand your store’s capabilities and offer a more tailored shopping experience.

Looking to sell online?
Create your custom online store in minutes with 10Web AI Ecommerce Website Builder and take your business online.
FAQ
How do I add a custom field to product attributes in WooCommerce?
functions.php file to register the new field and display it on the product page.Can I customize WooCommerce product page?
How do I add a custom code to my WooCommerce product page?
Understanding custom fields in WooCommerce
When managing an online store with WooCommerce on your WordPress site, custom fields allow you to add additional information and personalized options to WooCommerce products. Think of custom fields as extra attributes that you can use to expand the product’s data beyond the standard fields such as name, price, and description.
What are custom fields?
Custom fields in WooCommerce are essentially metadata that store bespoke information about a product. This could range from simple text inputs, such as engraving messages for jewelry, to more complex data types, such as drop-down menus or checkboxes for additional product customization.
Why use custom fields?
Using custom fields can enhance the shopping experience by providing more options and detailed information, allowing customers to tailor their products to their specific needs. This makes your store more interactive and potentially increases customer satisfaction and sales.
How do custom fields work?
Typically, to add a custom field to a WooCommerce product page, you will need a plugin. WooCommerce does not include an out-of-the-box interface for adding custom fields to products. Plugins like Advanced Custom Fields (ACF) or the WooCommerce Product Add-Ons extension can be used to easily create and display extra options.
Looking to sell online?
Create your custom online store in minutes with 10Web AI Ecommerce Website Builder and take your business online.
Setting up the environment
Before you can learn how to add custom field in WooCommerce product page, you’ll need to set up your environment by installing necessary plugins and preparing your theme.
Installing necessary plugins
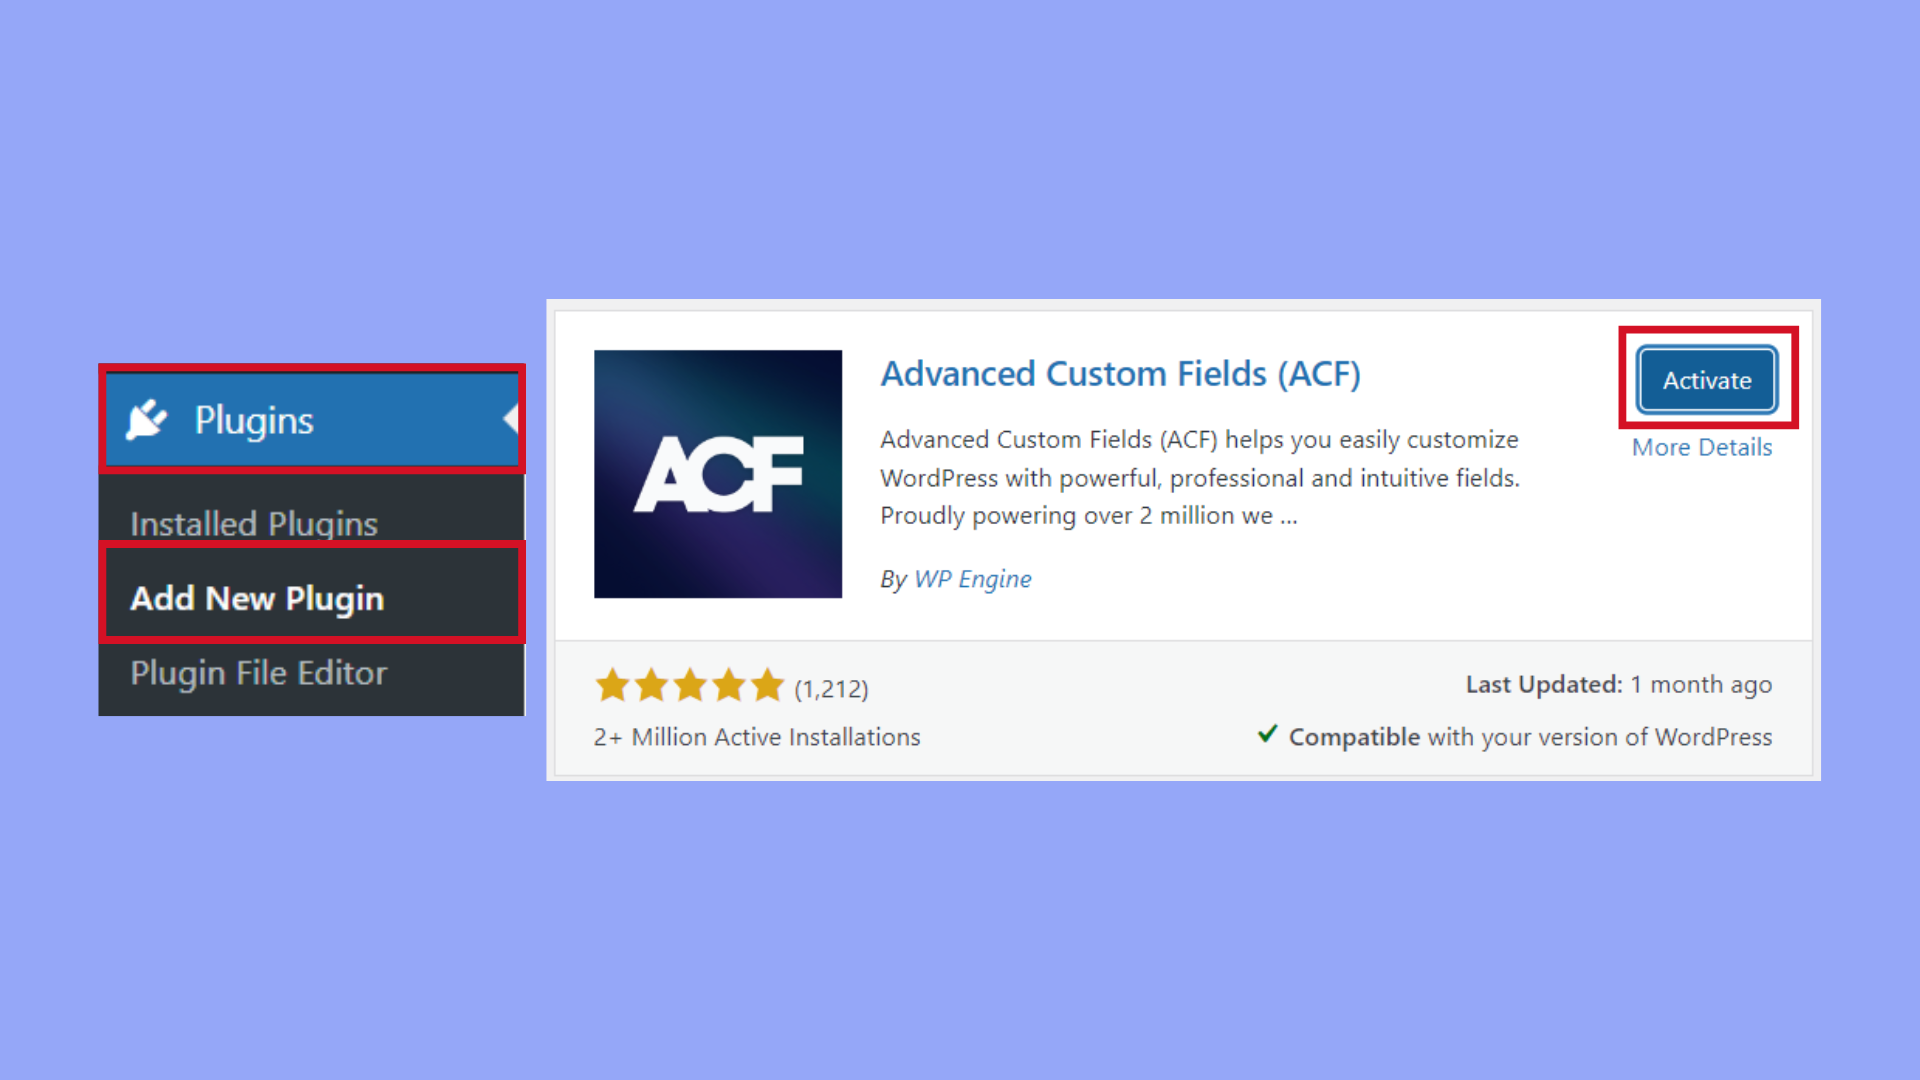
To begin, ensure your WordPress site has the WooCommerce plugin activated, as this is essential for running your WooCommerce store. You’ll also need the Advanced Custom Fields (ACF) plugin, which makes adding and managing custom fields straightforward.
- Go to your WordPress dashboard and navigate to Plugins > Add New.
- In the search bar, type WooCommerce and press Enter.
- Find the WooCommerce plugin in the search results and click Install Now. After installation, click Activate.
- Repeat the search and install process for the Advanced Custom Fields plugin.

Preparing your theme
Creating a child theme is a smart practice to keep your customizations separate from the parent theme. This way, your changes won’t be lost when the parent theme updates.
- Go to Appearance > Themes and check if your theme suggests a child theme. If available, install and activate it.
- If no child theme is suggested, create one manually by going to your site’s files via FTP or file manager, and create a new folder for your child theme in the wp-content/themes directory.
- Inside your child theme folder, create a
style.cssfile and afunctions.phpfile. - In
style.css, add the necessary header information to name your child theme. - Activate your child theme by going back to Appearance > Themes in your WordPress dashboard.
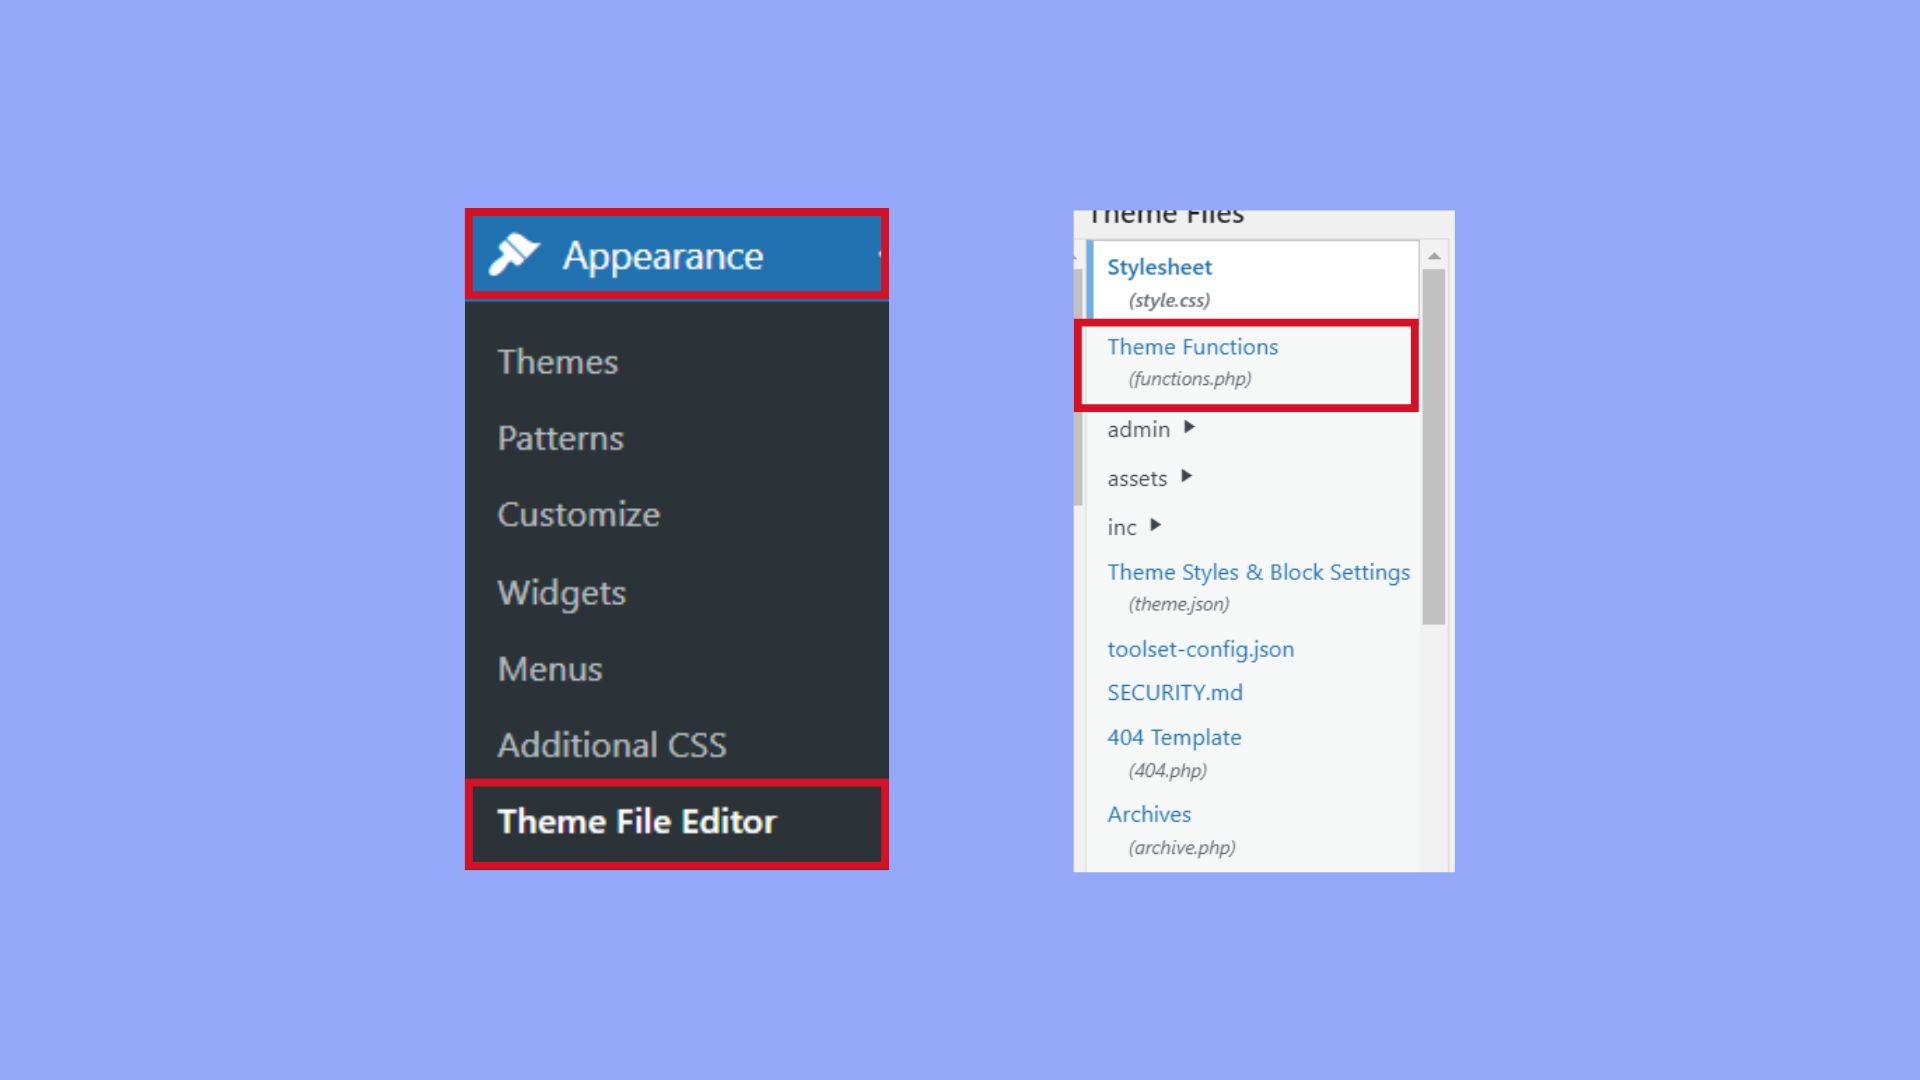
Remember, if adding custom PHP code is necessary for displaying the custom fields on your product pages, you’ll do this in your child theme’s functions.php file to keep your customizations organized and preserve them from any future theme updates.
Creating custom fields
When you want to create custom fields in WooCommerce, it’s about extending the functionality of your product pages by adding additional information that’s relevant to your customers. Here’s how to add custom field in WooCommerce product page to enhance the product experience for your customers.
Choosing field types
The type of field you select will be determined by the kind of data you want to collect or display. WooCommerce and the Advanced Custom Fields (ACF) plugin support a variety of field types, such as text, number, image, and more.
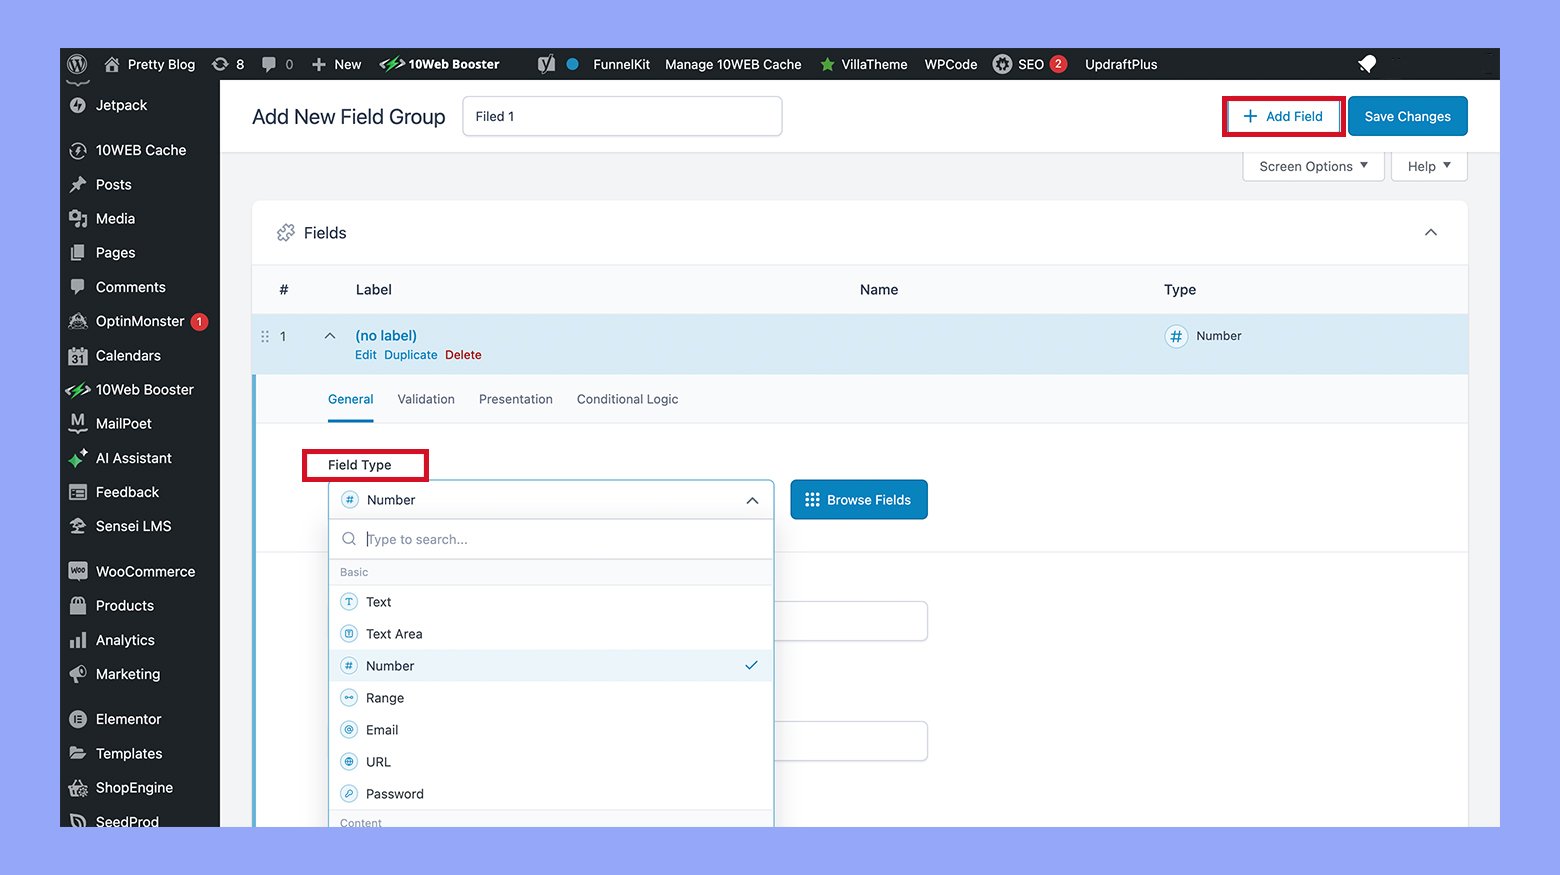
- In the Custom Fields section of your dashboard, click on Field Groups and then Add New to create a new Field Group.

- Choose the appropriate field type from the provided options, such as text, textarea, checkbox, etc.

Adding fields to product pages
Once you’ve selected the field type, the next step is to assign these fields to WooCommerce product pages.
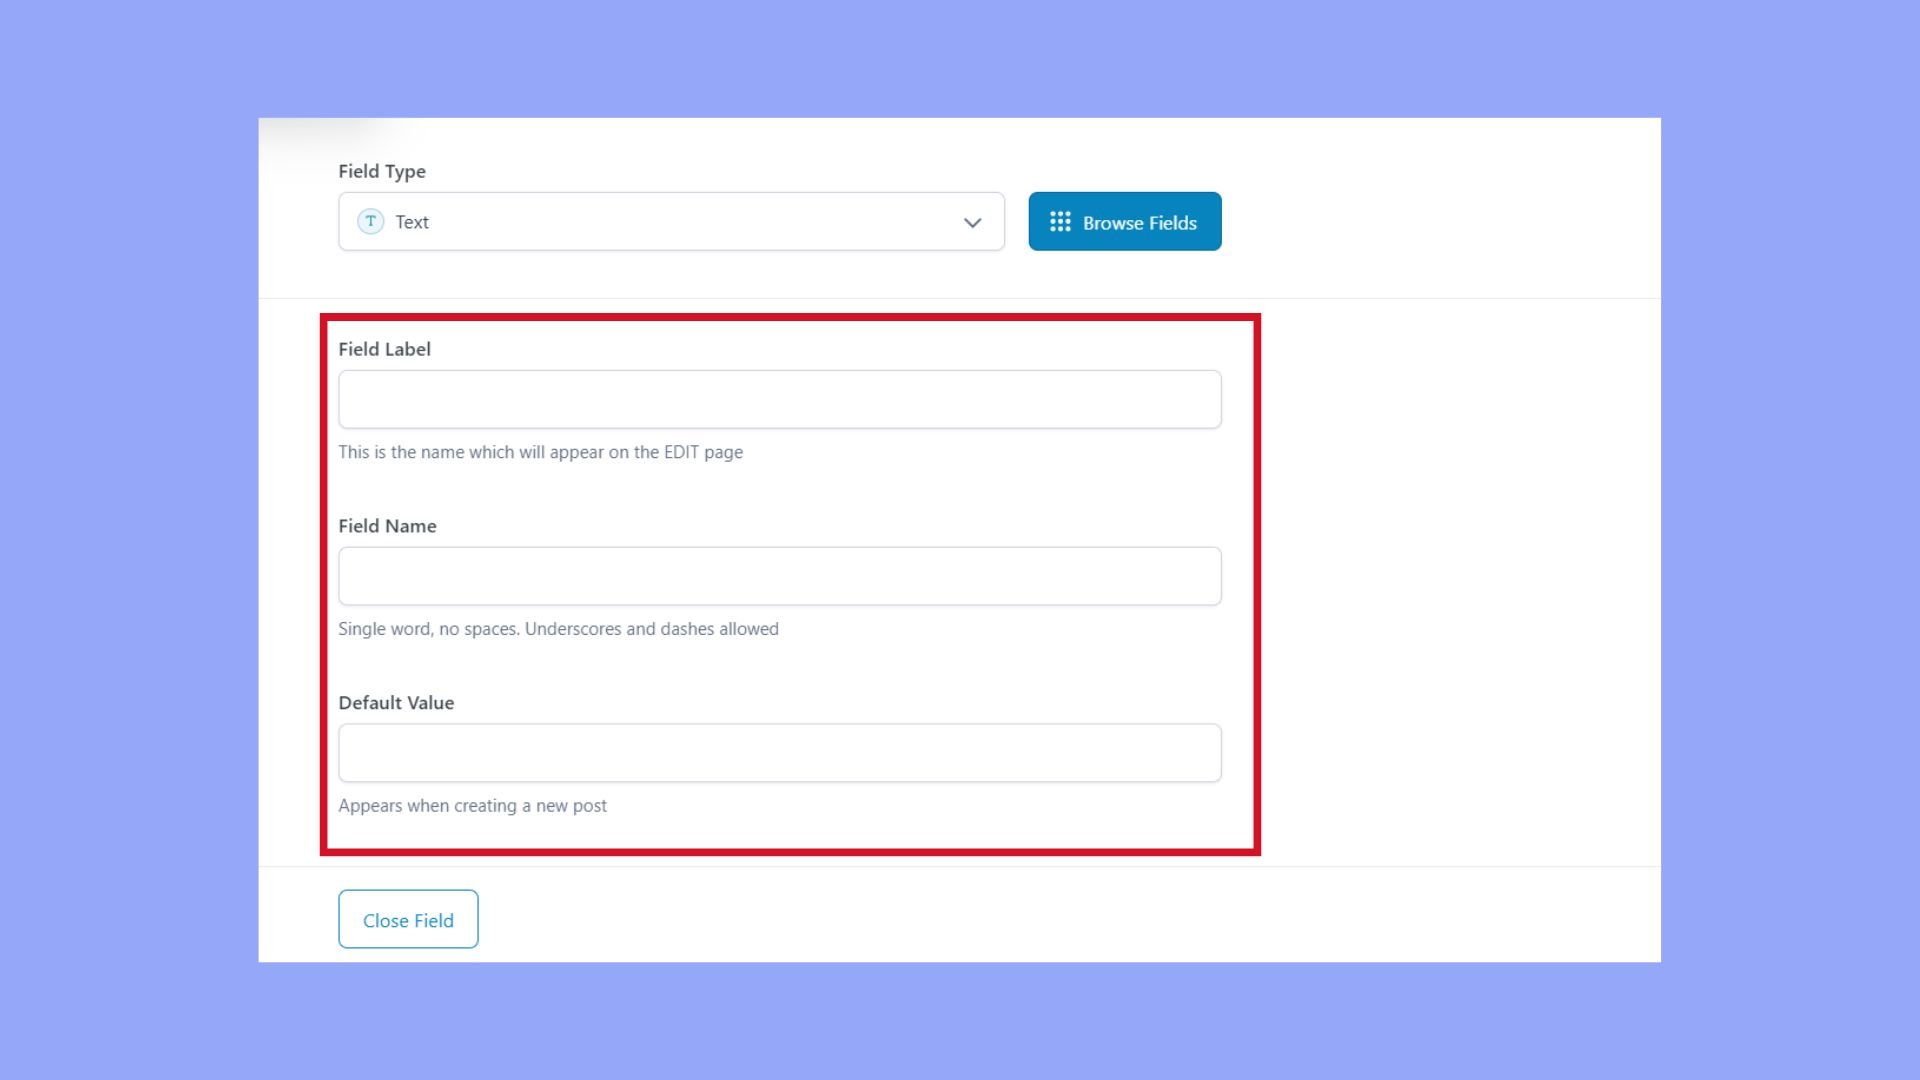
- Under the field group, click on the Add Field button.
- Fill in the field label and field name.
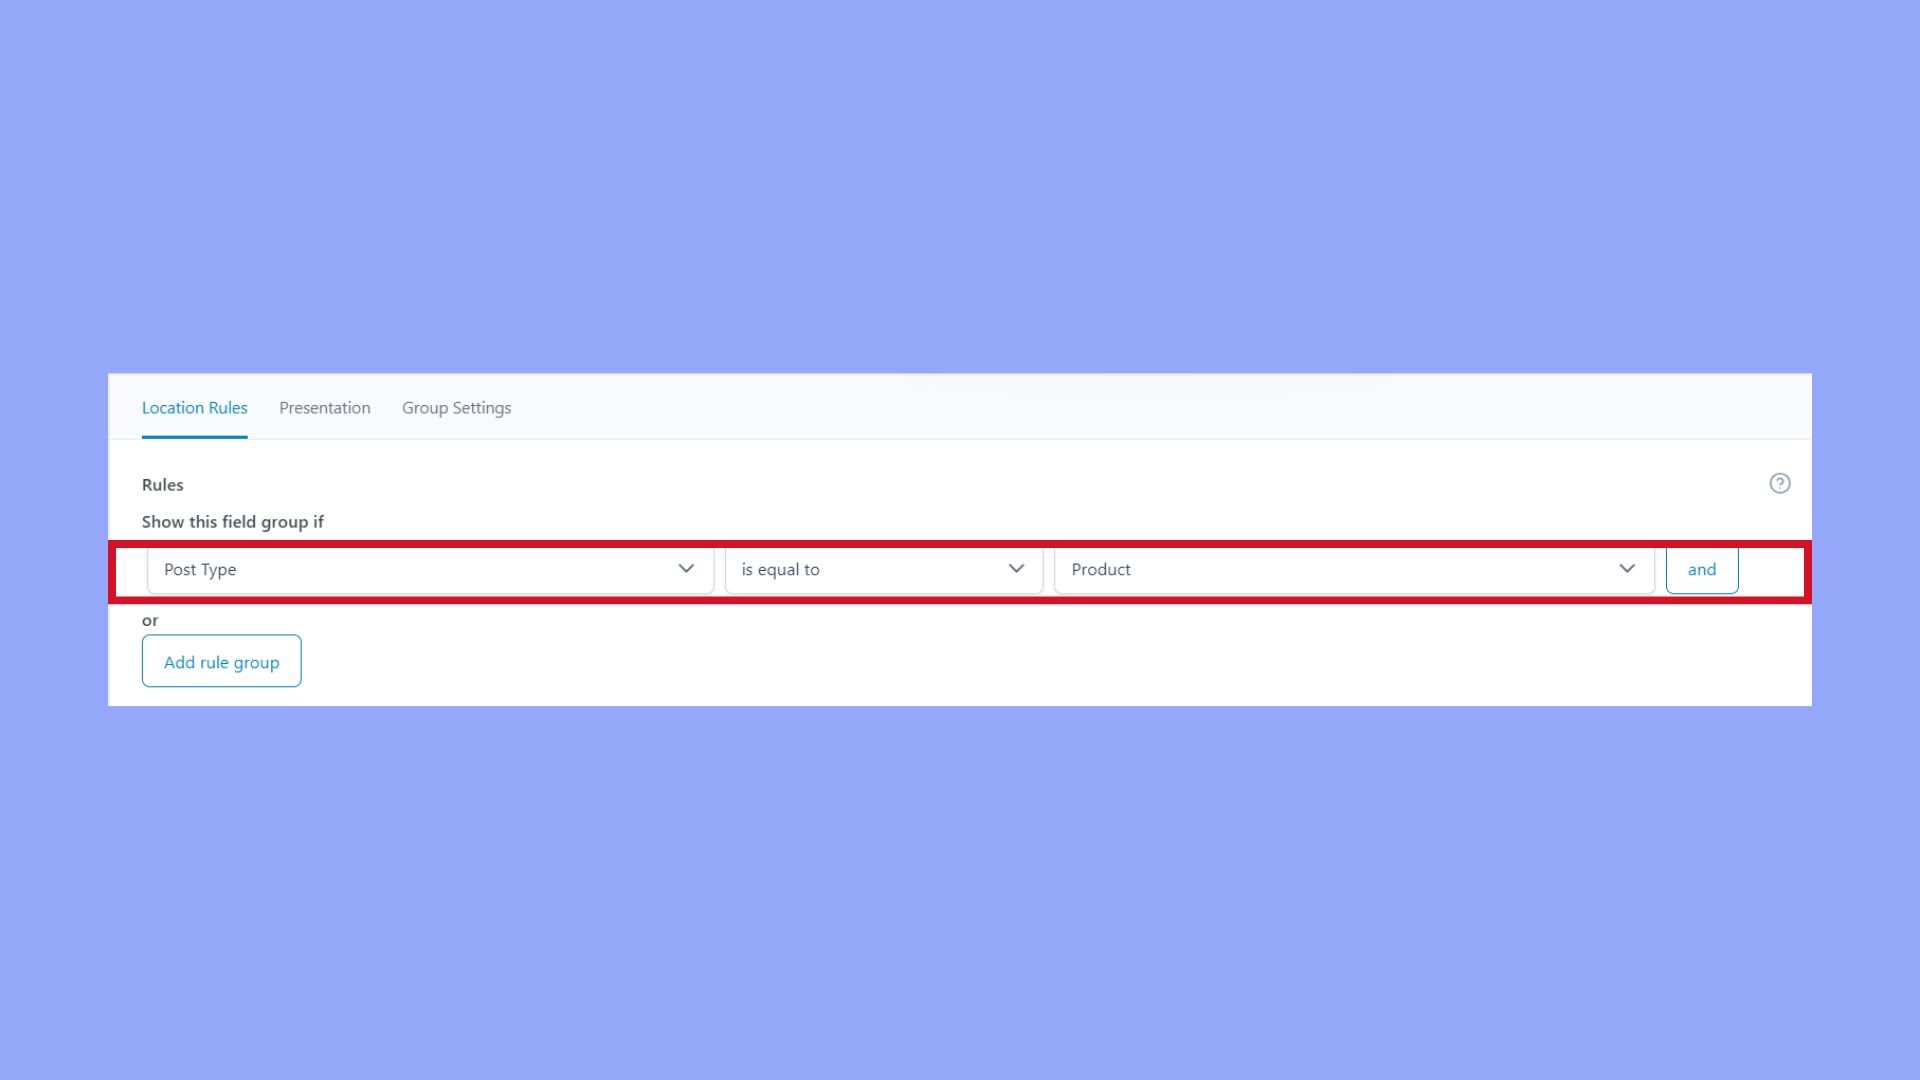
- Set the location rules to show this field group if the Post Type is equal to Product.
- Publish your field group by clicking the Publish button on the right.
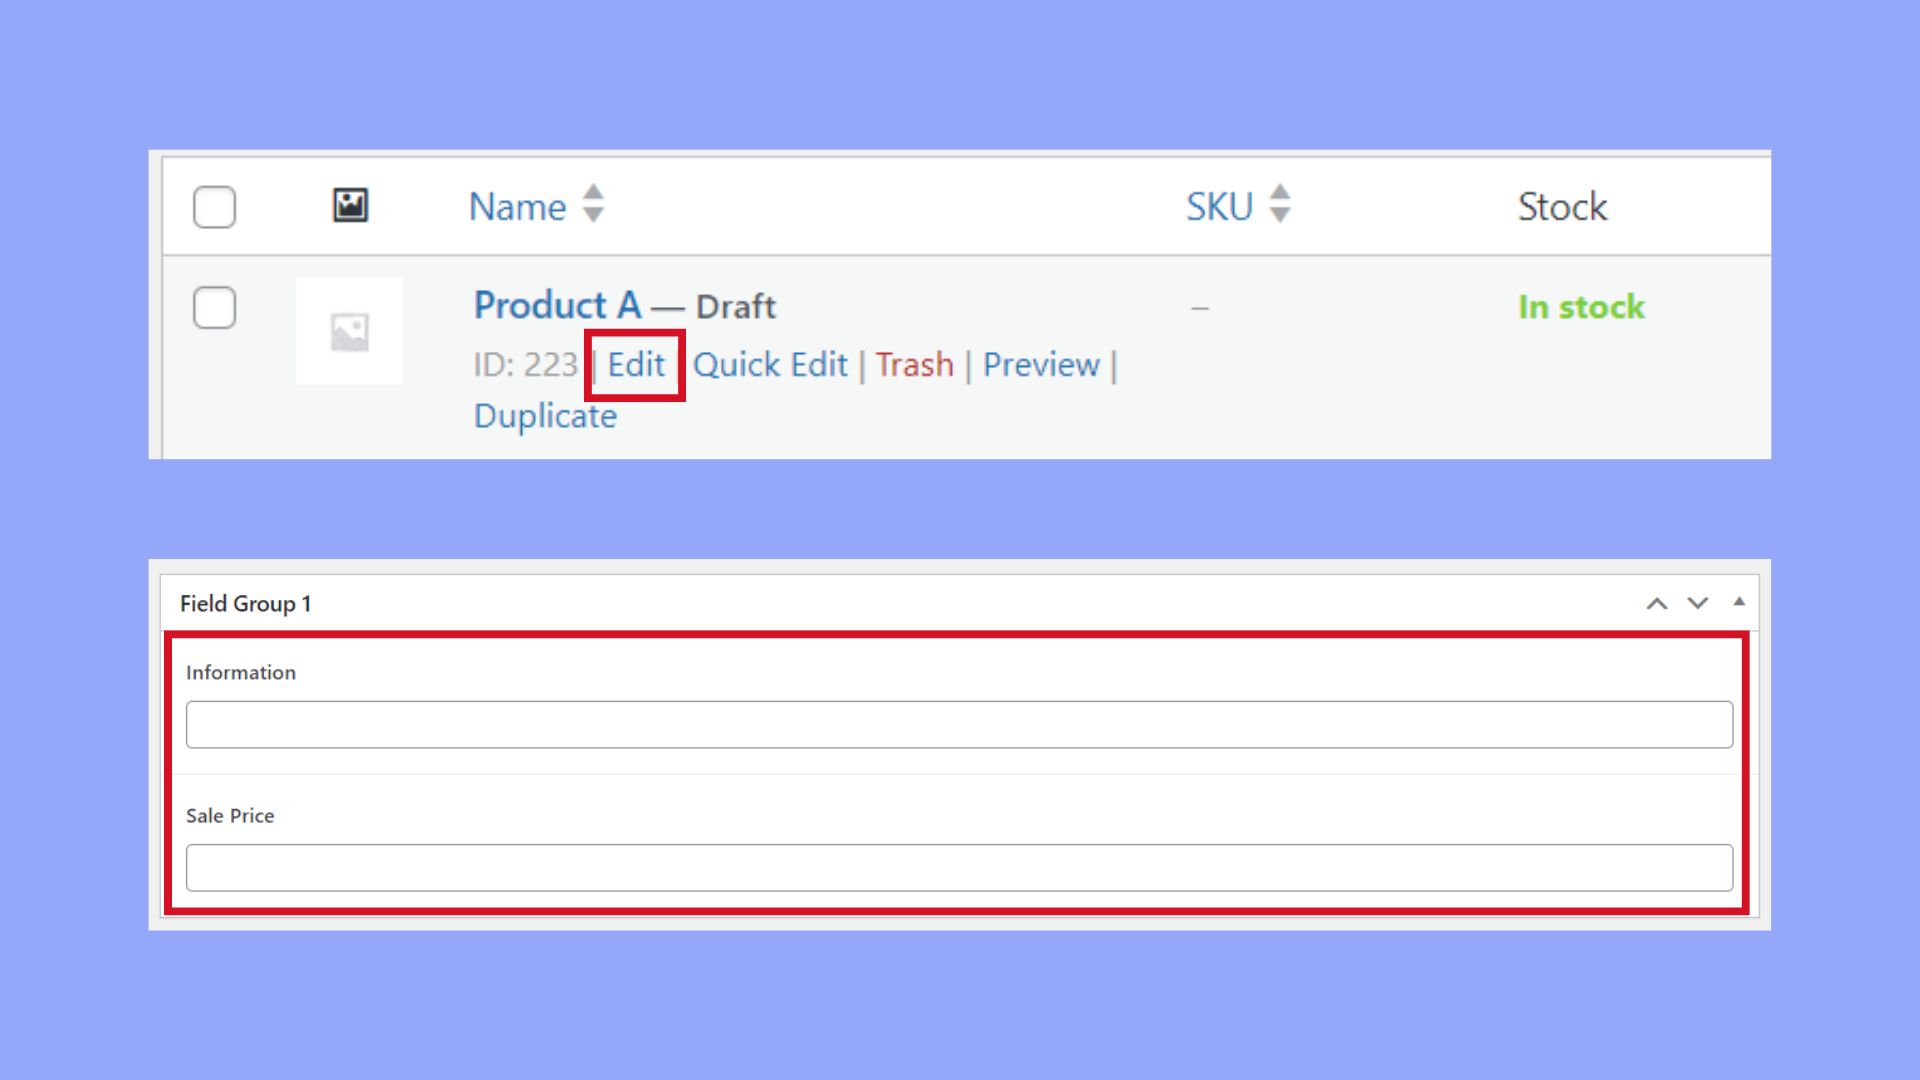
- To add information to a product, go to Products and select a product to edit.
- Scroll down to the new custom fields area that now appears and enter the information for your fields.
Remember, these custom fields are unique to your store and can be used to display additional product information or to gather input from users on the single product page.
Organizing field groups
Effective organization of your custom fields helps to maintain a clear structure and avoid confusion when managing product information.
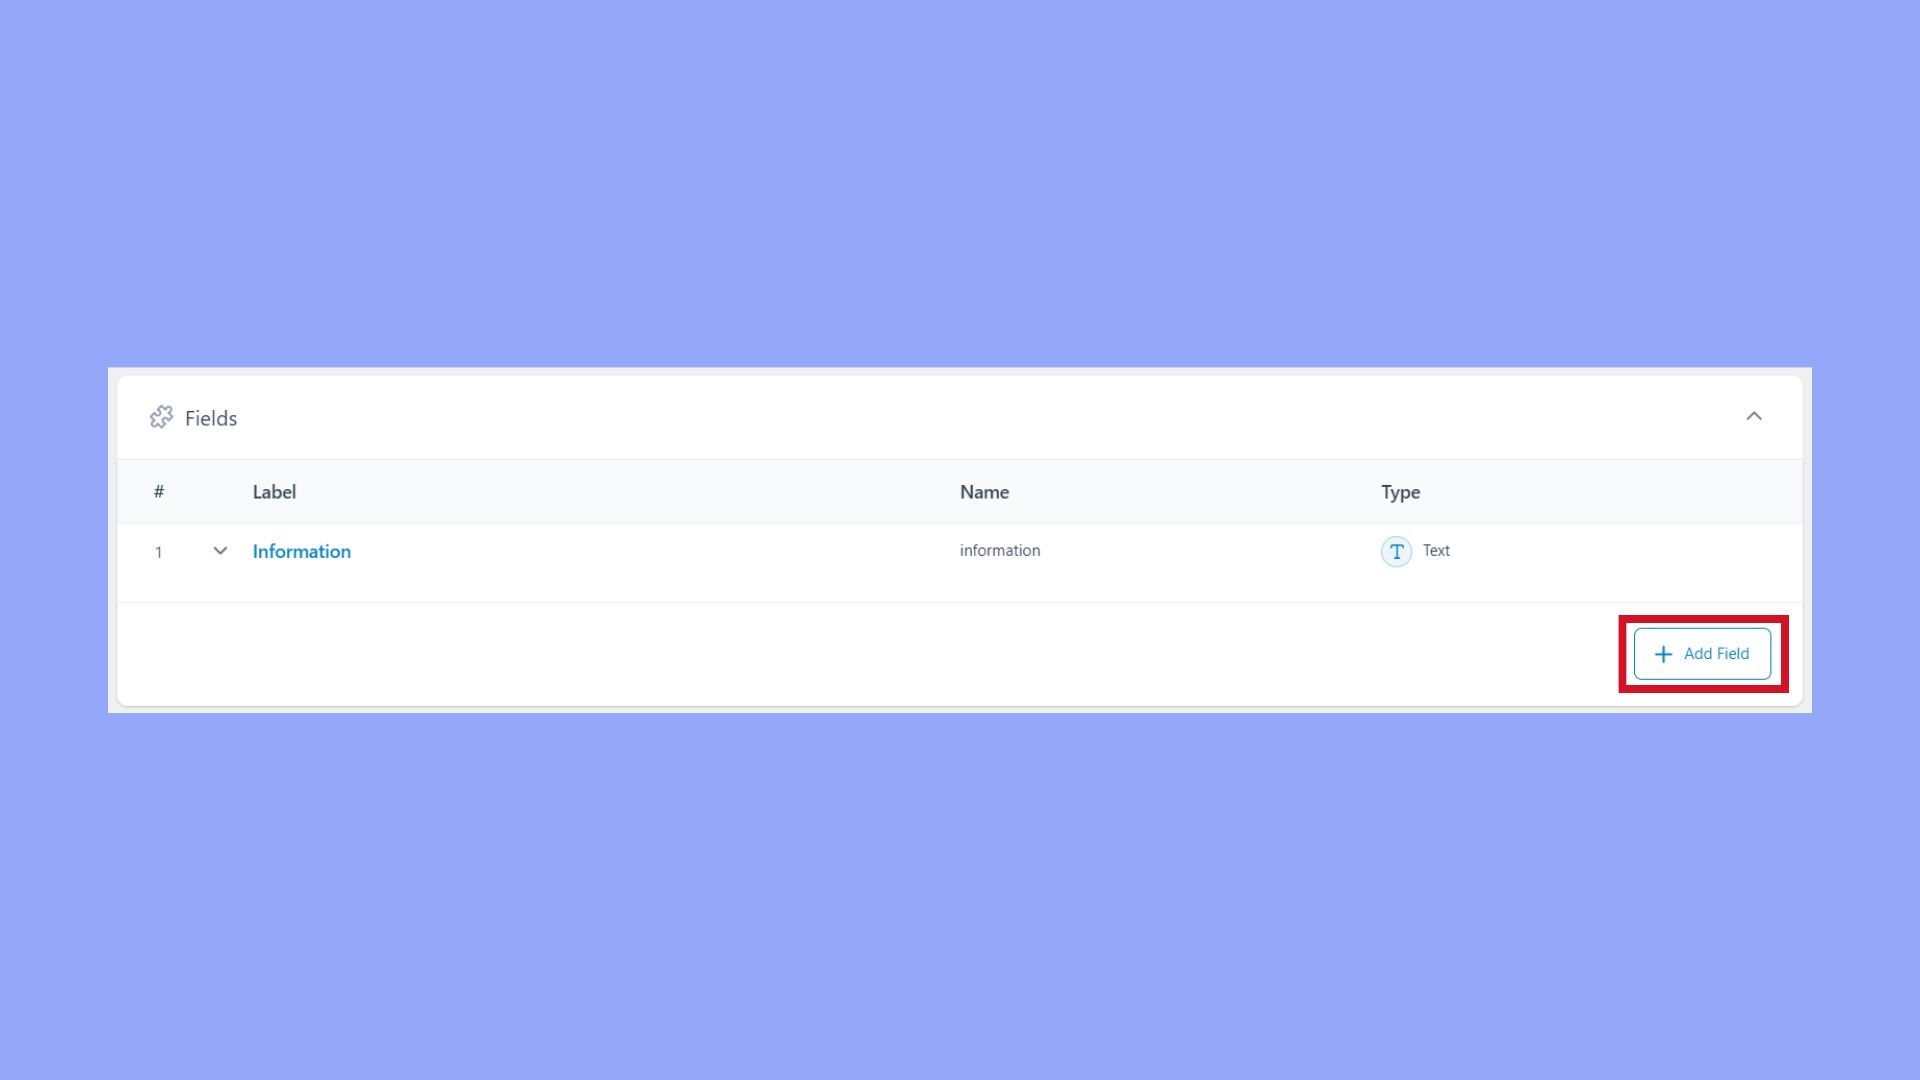
- In the Field Groups section, you can create a new group by clicking Add New.
- Add fields to this group as needed by using the Add Field button.
- Name your field group for easy identification.
- Arrange the order of fields within the group by dragging and dropping them into place.
- To apply the field group to particular products or product categories, use the Location rules to tailor where these field groups appear.
Custom field groups allow you to segment and categorize data fields, making data management more intuitive within your WooCommerce store.
Looking to sell online?
Create your custom online store in minutes with 10Web AI Ecommerce Website Builder and take your business online.
Displaying custom fields on product pages
When you’ve added custom fields to your WooCommerce products, it’s important to know how to display them on the product pages. This will allow your customers to see the extra information you’ve provided, enhancing their shopping experience.
Editing product templates
- First, Navigate to the WooCommerce section of your WordPress dashboard.
- Click on the Products tab and then Edit on the product where you want to show the custom field.
- Scroll down to a section named like your custom field group.
- Add the needed information for that particular product and save.
Alternatively, if you’re comfortable with PHP, you can edit your theme’s product template files to incorporate the custom fields.
- To do this, copy the relevant template file from the WooCommerce plugin to your theme’s folder.
- Access the copied file and insert the following code where you want the custom field to be displayed:
<?php echo get_post_meta( get_the_ID(), 'your_custom_field', true ); ?> - Replace ‘your_custom_field’ with the key name of your actual custom field.
- Save your changes to the template file.
Using shortcodes and hooks
For a code-free solution, you can also use shortcodes and hooks to display custom fields:
- Find the appropriate hook for the location on the product page where you want to display your field, such as
woocommerce_product_options_general_product_data. - Write a function that will output your custom field’s value. Here’s an example:
function display_custom_field() { global $post; $custom_field_value = get_post_meta( $post->ID, 'your_custom_field', true ); if ( ! empty( $custom_field_value ) ) { echo '<p class="custom-field">' . esc_html( $custom_field_value ) . '</p>'; } } - Add the function to your theme’s
functions.phpfile. - Attach the function to the chosen hook with
add_action(). For example:add_action( 'woocommerce_product_options_general_product_data', 'display_custom_field' ); - Your custom field should now be displayed on the frontend of the product page where the hook is located.
By following these steps, you can effectively integrate how to add custom field in WooCommerce product page, offering additional information directly where customers will find it most useful.
Managing custom field data
Adding custom fields to WooCommerce product pages allows you to provide additional product information that can enhance your customers’ shopping experience. Managing this data is crucial to ensure it is saved correctly and can be retrieved for use on your website.
Saving field values
When you’ve decided what extra data you want to add to your products, the next step is how to save these details effectively. Here’s a concise guide:
- Navigate to the Product page or create a new product.
- Scroll down to the Product Data section.
- Enter the field label and value in the designated Custom Fields area.
- Remember to hook into the
woocommerce_process_product_metaaction to save your metadata. - Use a function to handle the saving process:
add_action('woocommerce_process_product_meta', 'save_your_fields');

function save_your_fields($post_id) {
    $custom_field_value = isset($_POST['your_custom_field_name']) ? esc_html($_POST['your_custom_field_name']) : '';
    if( !empty($custom_field_value) ) {
        update_post_meta($post_id, 'your_custom_field_name', $custom_field_value);
    }
}
The function above sanitizes the data using esc_html to ensure only valid HTML is saved, protecting you from potential security issues.
Retrieving and utilizing field data
Once you’ve saved your custom field data, you’ll need to know how to retrieve and display it on the WooCommerce product page.
- Access your WordPress theme’s files to edit.
- Locate the appropriate template file where you want the Custom Field data to appear.
- Use the
get_post_metafunction to fetch the saved data:$custom_value = get_post_meta(get_the_ID(), 'your_custom_field_name', true); if( !empty($custom_value) ) { echo '<p>'.esc_html($custom_value).'</p>'; } - Ensure you display the metadata where it aligns with your site design and enhances the product information for customers.
The above steps make it simple to manage the custom data you’ve added to your WooCommerce products, ensuring each entry is safely stored and displayed where it can best inform and assist your customers.
Enhancing customer experience with custom fields
When shopping on your WooCommerce store, a personalized customer experience can be the difference between a completed sale and an abandoned cart. By utilizing custom fields, you can offer product add-ons that allow customers to customize their purchases to their specific needs.
Adding custom fields is a powerful way to offer product options such as color choices, size variations, and additional product features. To enhance your online store, follow these steps on how to add custom field in WooCommerce product page:
- Install a custom fields plugin: Start by installing a plugin like Advanced Custom Fields which facilitates adding custom data to your WooCommerce products.
- Go to Products in your dashboard.
- Select Add new to create a new product or Edit to modify an existing one.
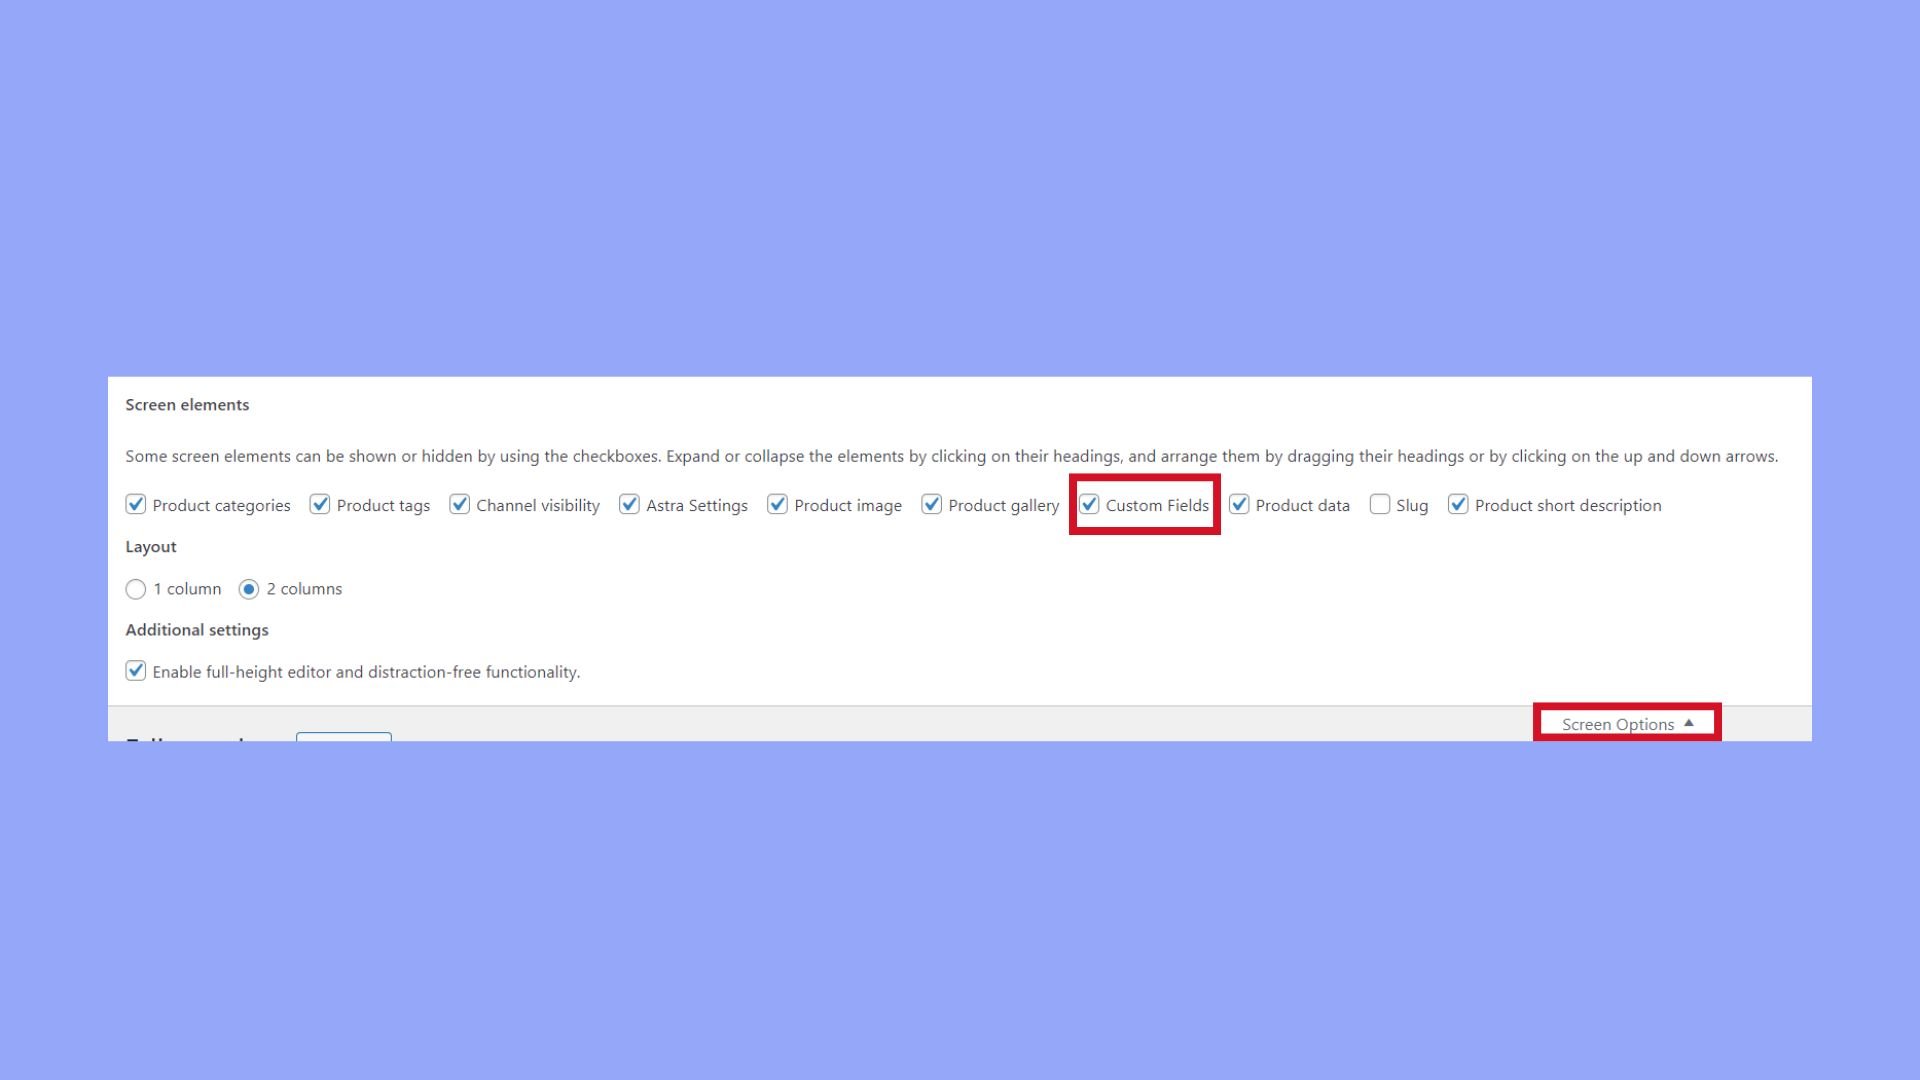
- Click Screen Options at the top right.
- Ensure the Custom Fields checkbox is selected.
- Scroll down to the new Custom Fields section.
- Click Add Field and input the necessary data such as name and value for your custom field.
For a better user interface, consider these elements:
- Checkbox and radio button: For single or multiple choice options like gift wrapping or extended warranty.
- Text area: For personalized messages or engraving details.
- Dropdown menus: For selecting from predetermined choices, saving space on the product page.
Remember, offering a smooth and customizable shopping experience can increase sales and improve customer satisfaction in your WooCommerce store. Custom fields empower customers to tailor their purchase, transforming your individual product offerings and elevating the overall shopping experience.
Conclusion
Learning how to add a custom field in WooCommerce product pages enables you to offer more tailored options and detailed product information, significantly enhancing the shopping experience for your customers. By employing plugins such as Advanced Custom Fields and effectively managing the integration through your theme’s functions, you can now ensure these customizations add value and appeal to your store. This guide provided you with a foundational approach to make your WooCommerce store more dynamic and customer-friendly, keeping you competitive in the ever-evolving ecommerce arena.
Looking to sell online?
Create your online store in minutes
Create your online store in minutes with 10Web AI Ecommerce Website Builder.