Customizing the Add to Cart button text in WooCommerce is a valuable way to enhance user experience and align your store’s branding. This guide will walk you through the steps on how to change Add to Cart button text in WooCommerce, from editing theme files to using plugins, ensuring your online store stands out and effectively guides customers through their shopping journey.

Looking to sell online?
Create your custom online store in minutes with 10Web AI Ecommerce Website Builder and take your business online.
FAQ
How do I customize the Add to Cart button in WordPress?
How to change WooCommerce cart labels?
Understanding the Add to Cart button
The Add to Cart button is a fundamental feature on the product and single product pages in your WooCommerce store. It’s this interaction point where your customers can quickly add products to their shopping cart, facilitating a seamless shopping experience.
When you come across an item on a Product Page, the Add to Cart button beckons to be clicked. It’s an essential element for a high conversion rate, bridging the gap between browsing and purchasing. Each button press signifies a user’s interest in a product, adding it to their cart and nudging them closer to checkout.
The functionality of the Add to Cart button extends beyond a simple click. It integrates with WooCommerce to update the cart contents and reflects it across the user’s session. For store owners, knowing how to change Add to Cart button text in WooCommerce is valuable as it allows for customization that can reinforce brand voice or provide clearer instructions, enhancing the user experience.
Here’s a brief rundown of what happens under the hood:
- You spot a product that you like.
- You click on the Add to Cart button.
- A function is triggered in the WooCommerce framework, adding the item to your cart.
- The page may refresh, or a confirmation message might appear, updating the cart total.
Remember, the text, color, and style of the Add to Cart button can be customized to match your store’s theme and branding, making your store more inviting and user-friendly.

Looking to sell online?
Create your custom online store in minutes with 10Web AI Ecommerce Website Builder and take your business online.
Customization techniques for the Add to Cart button
When looking to personalize your online store, knowing how to change Add to Cart button text in WooCommerce can give your shop a unique touch. Here’s a friendly guide on modifying your WooCommerce cart button:
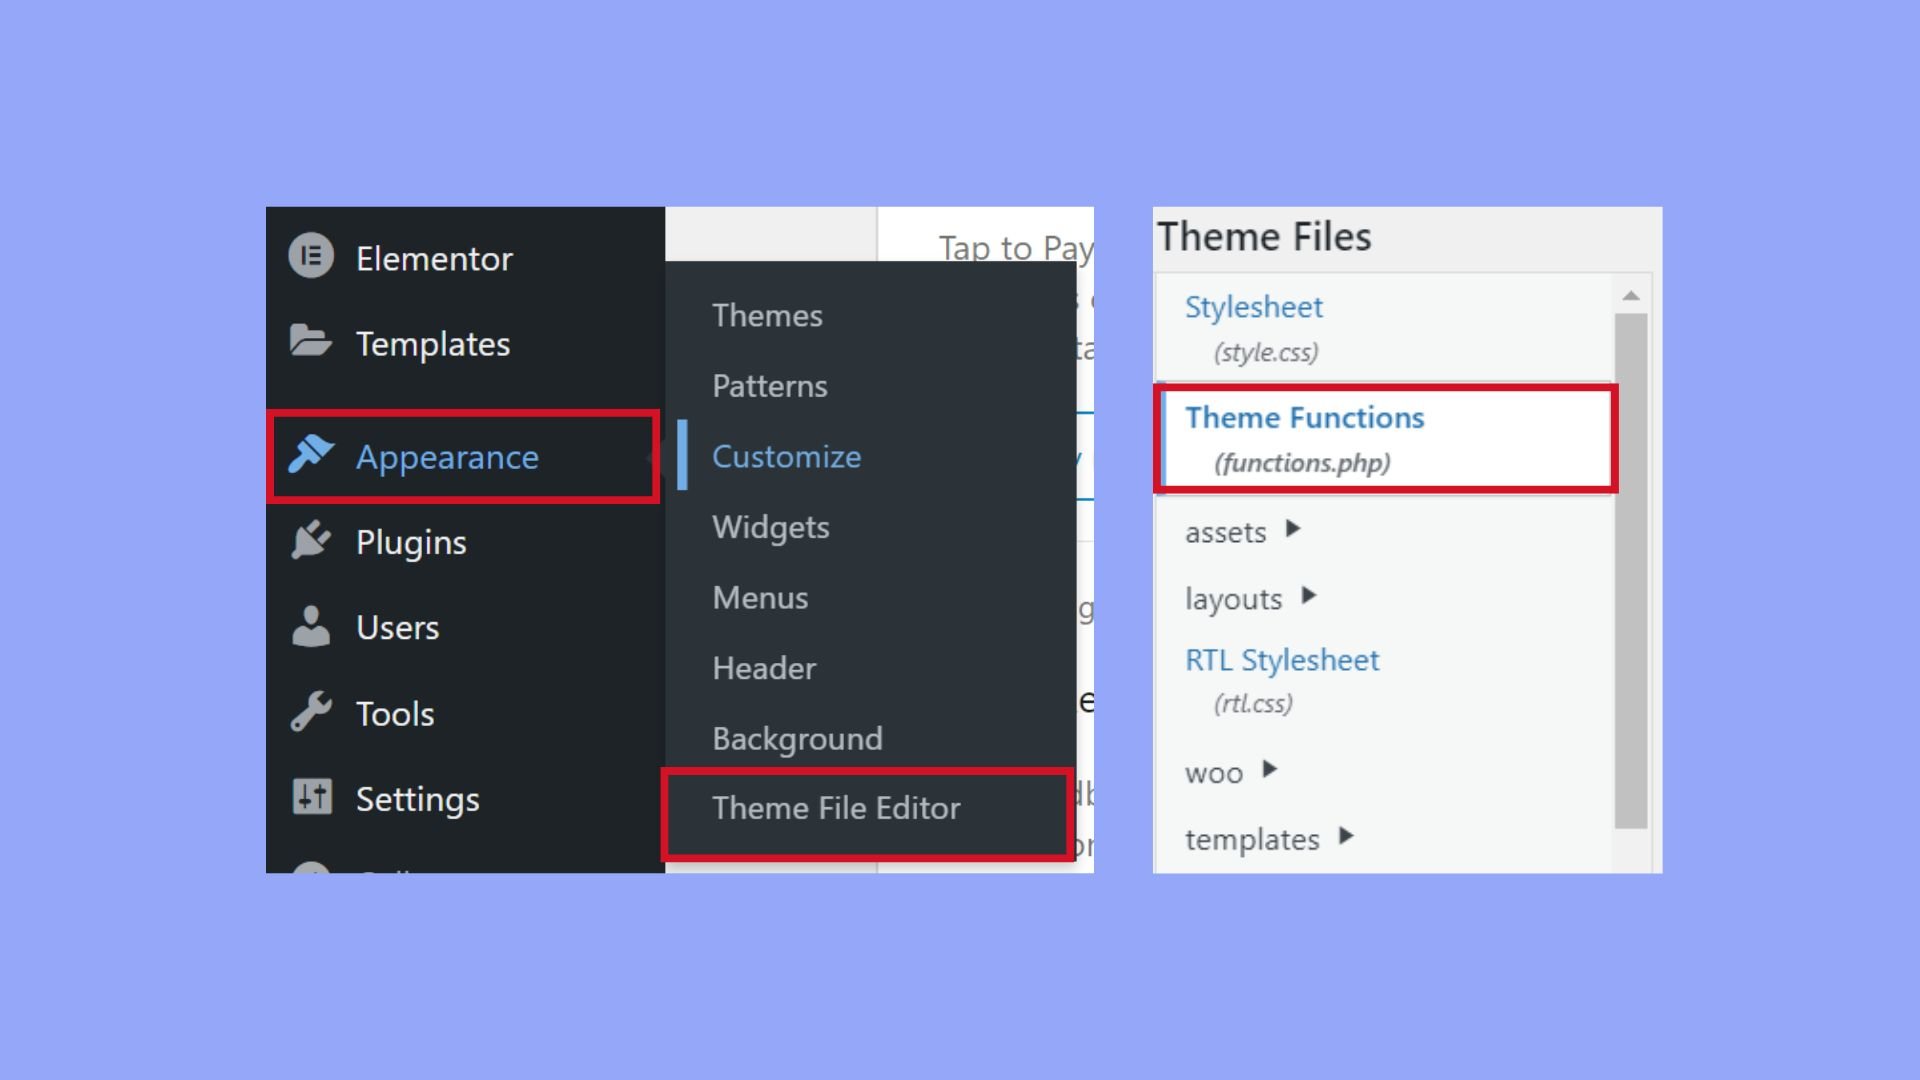
- Always start by setting up a child theme to ensure updates to the parent theme do not overwrite your custom changes.
- Access the functions.php file within your child theme directory.

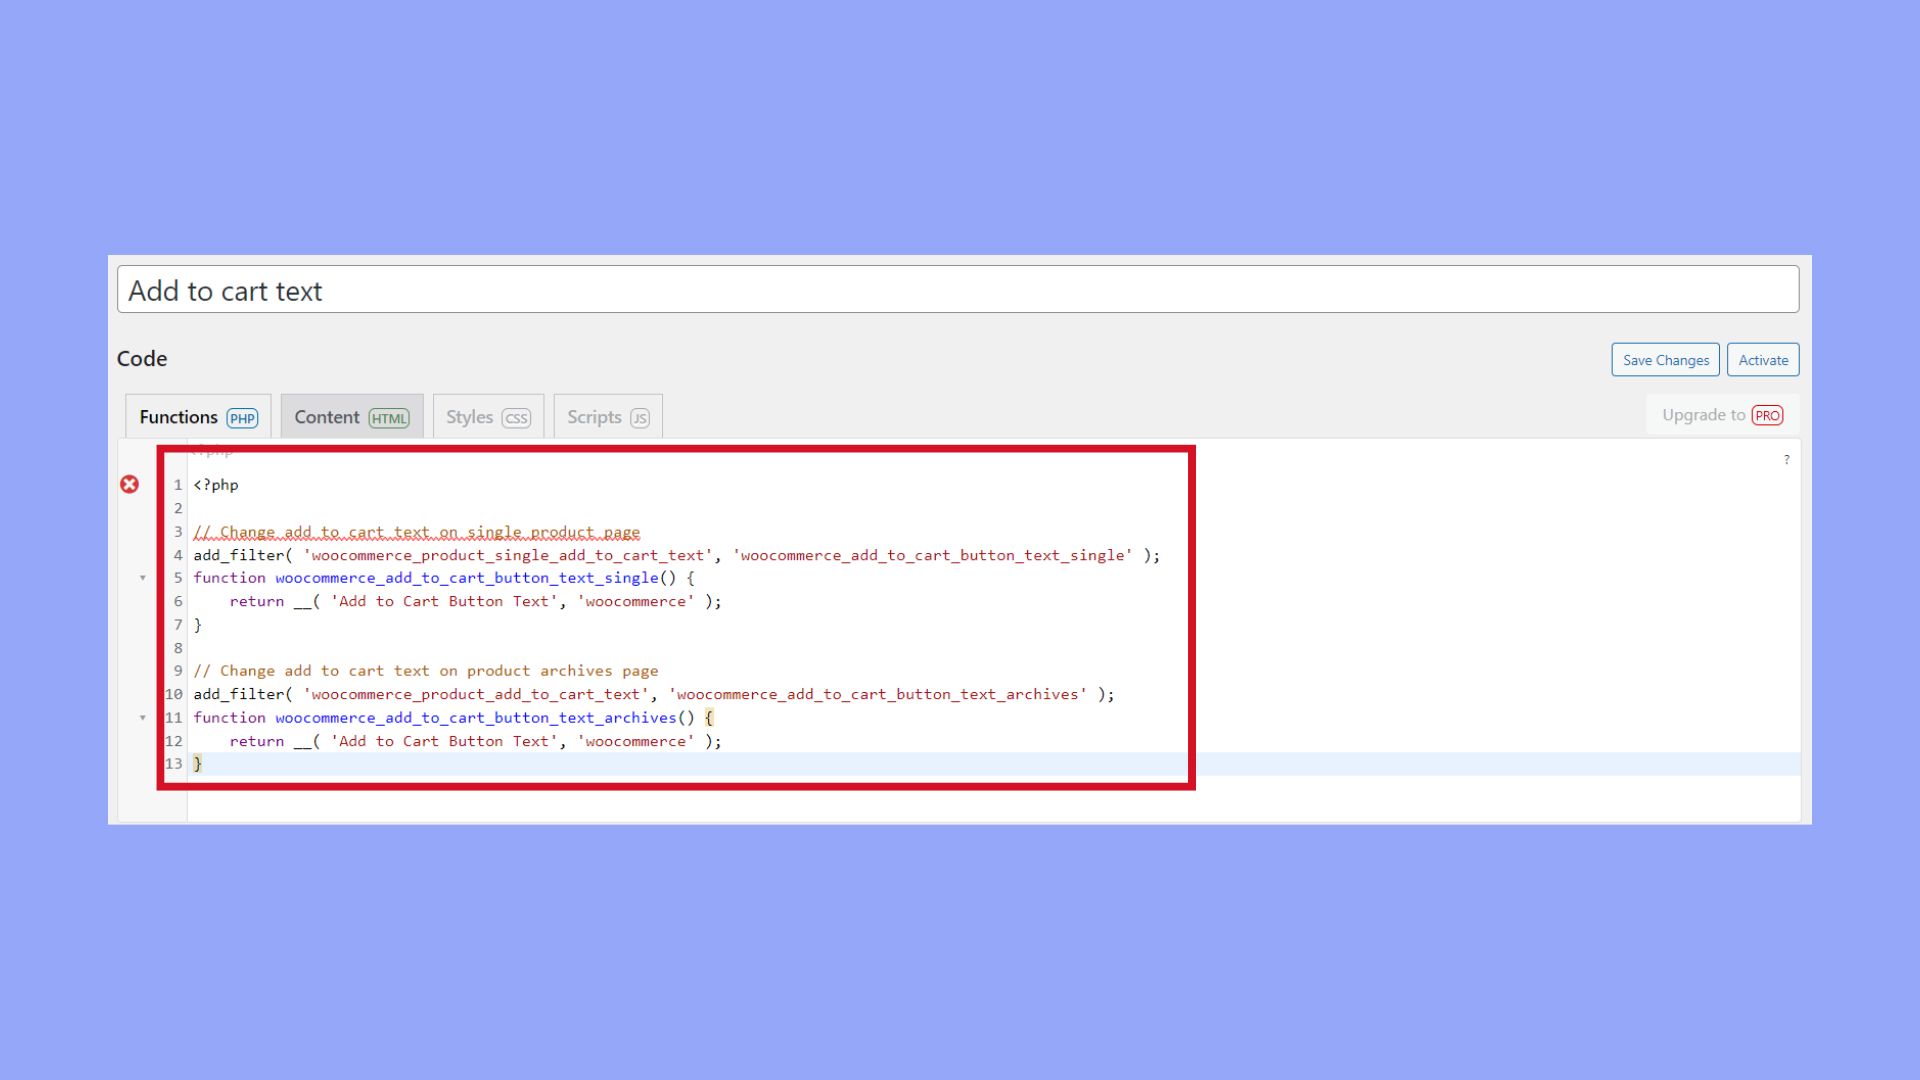
- Add a custom code snippet that hooks into WooCommerce filters. Make sure to define the custom_add_to_cart_text function to return your new button text.
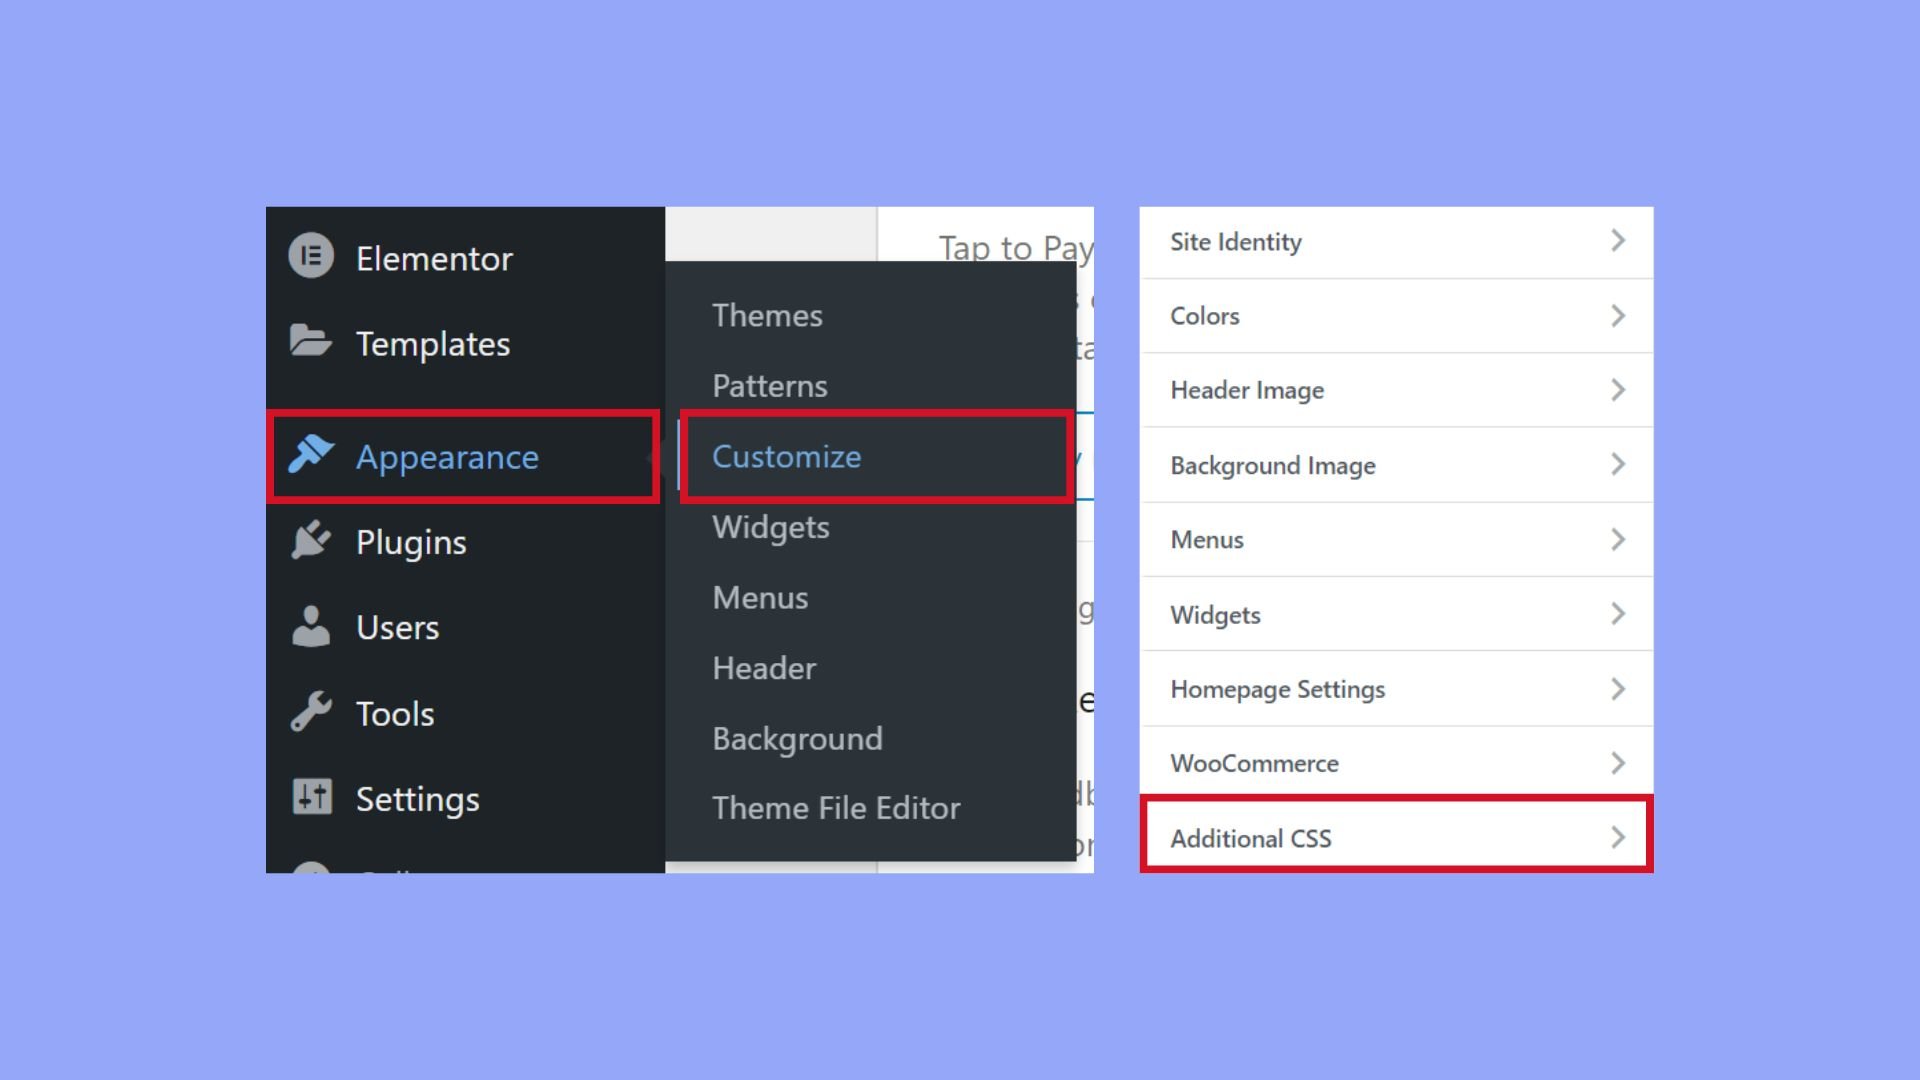
<?php // Change add to cart text on single product page add_filter( 'woocommerce_product_single_add_to_cart_text', 'woocommerce_add_to_cart_button_text_single' ); function woocommerce_add_to_cart_button_text_single() { return __( 'Add to Cart Button Text', 'woocommerce' ); } - Navigate to Appearance and click on Customize.
- Go to Additional CSS.

- Use CSS to style the button. Find the specific CSS selector for the button using your browser’s inspect tool and write your CSS rules. For instance,
.button.alt { font-weight: bold; }to make button text bold. - After you apply your custom code and CSS, clear your site’s cache and refresh your product pages to ensure your new button text and style are displaying correctly.
Remember to use direct, simple code and avoid complexity. Sticking to straightforward customizations ensures better stability for your WooCommerce store.
Using plugins for button customization
To enhance your WooCommerce store, consider using plugins for a seamless experience when customizing your Add to Cart button.
Recommended WooCommerce plugins
If you’re looking to change the text on your Add to Cart button, there are multiple plugins available that can help you with this task without touching a line of code. Here are some top recommendations:
- WooCommerce Custom Add to Cart Button: A simple plugin that allows for customization of the button’s text and appearance.
- WooCommerce Custom Add to Cart Plugin by Plugify: This plugin provides options to alter the button text after purchase and download from your WooCommerce account.
To use these plugins, typically you would:
- Visit your WordPress dashboard and navigate to Plugins > Add New.
- Search for the plugin by its name.
- Click Install Now for the plugin you choose.
- After installation, click Activate to enable the plugin on your site.
- Go to the plugin’s settings to start customizing your Add to Cart button.
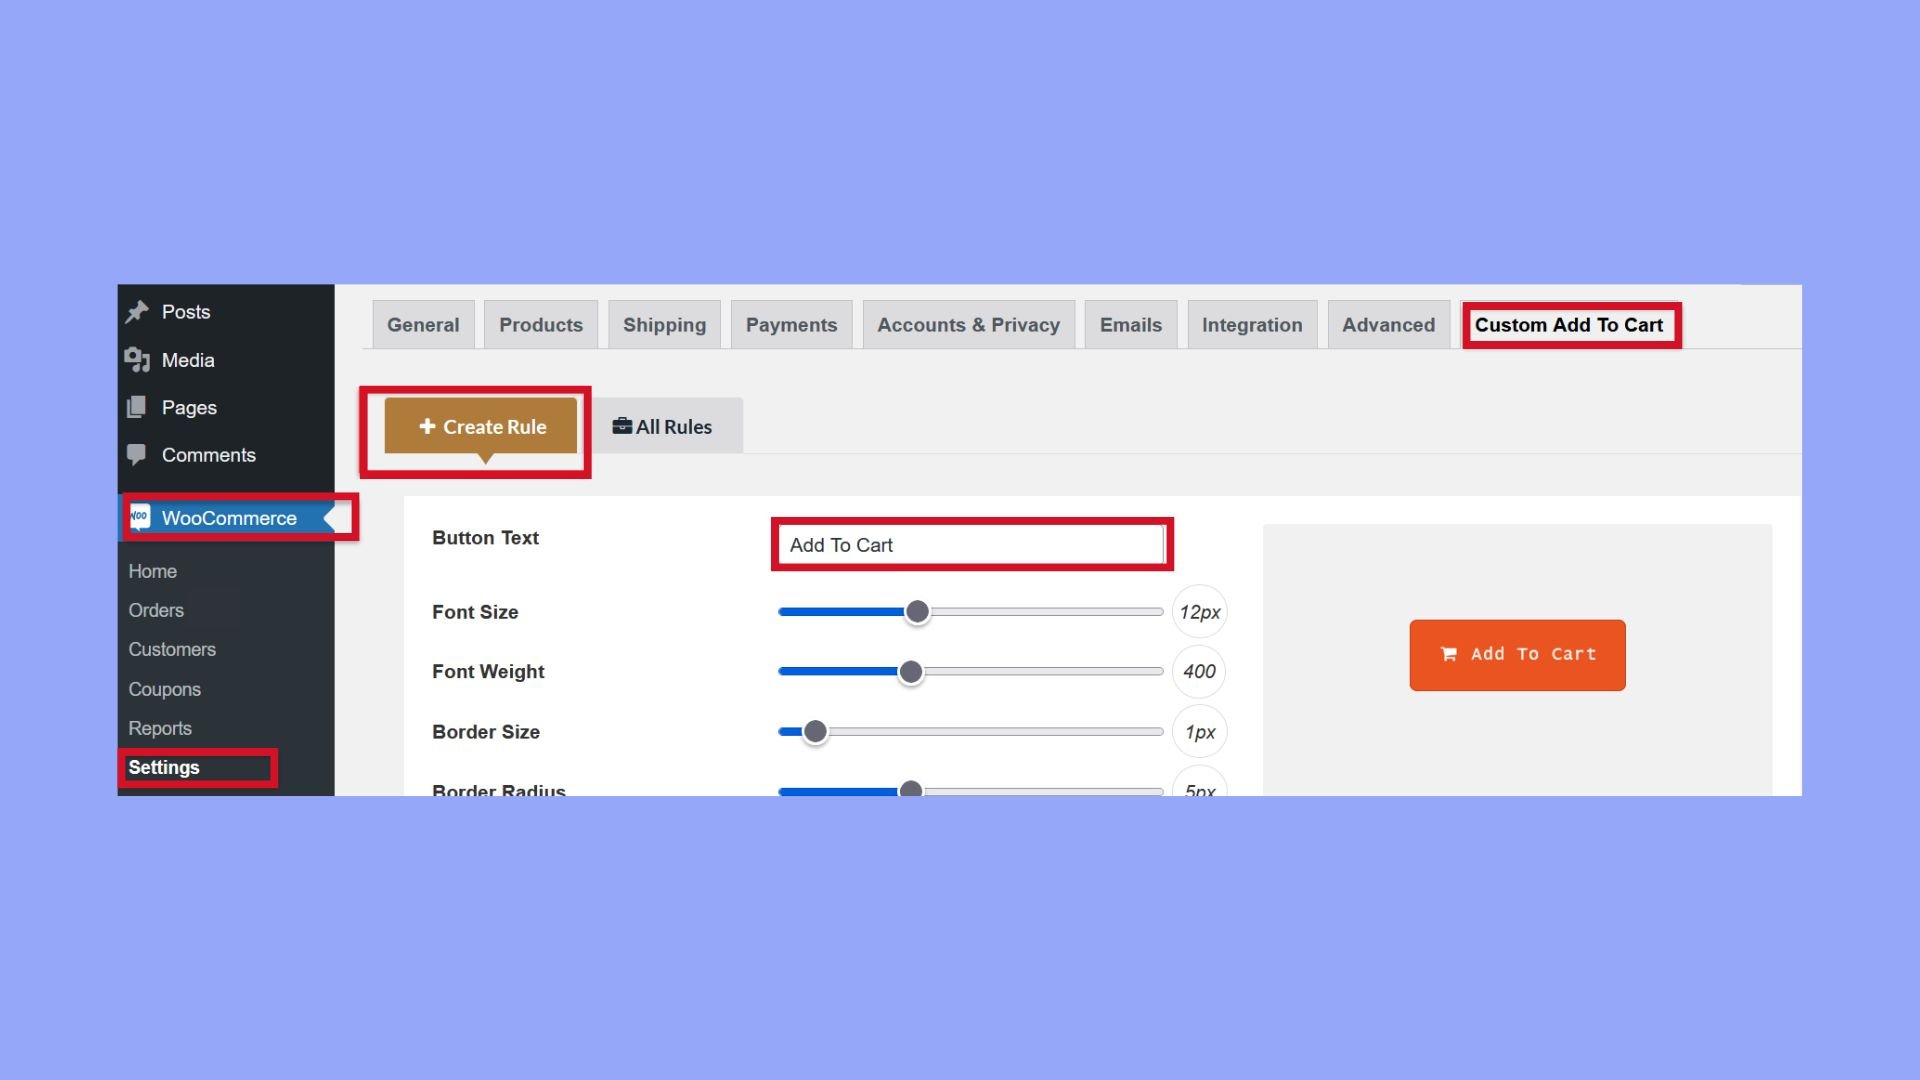
Now let’s review how you can edit the text on your Add to Cart button using the Custom Add to Cart Button for WooCommerce plugin. Follow these simple steps to do so easily:
- After installing the plugin, open your WooCommerce dashboard.
- Navigate to the Settings section.
- Click on Custom Add to Cart Button.
- To customize your button, select Create Rule.
- Enter your desired button text in the Button Text field.

- Preview the changes to ensure accuracy.
- Save your settings to apply the new button text.
Customizing with code snippets via plugins
For those who prefer a bit more control over their button customization, consider using a third-party plugin that allows insertion of custom code snippets.
Code Snippets plugin: A plugin that safely adds custom snippets of PHP to your WooCommerce site without altering core files.
Here’s how to change Add to Cart button text in WooCommerce using such a plugin:
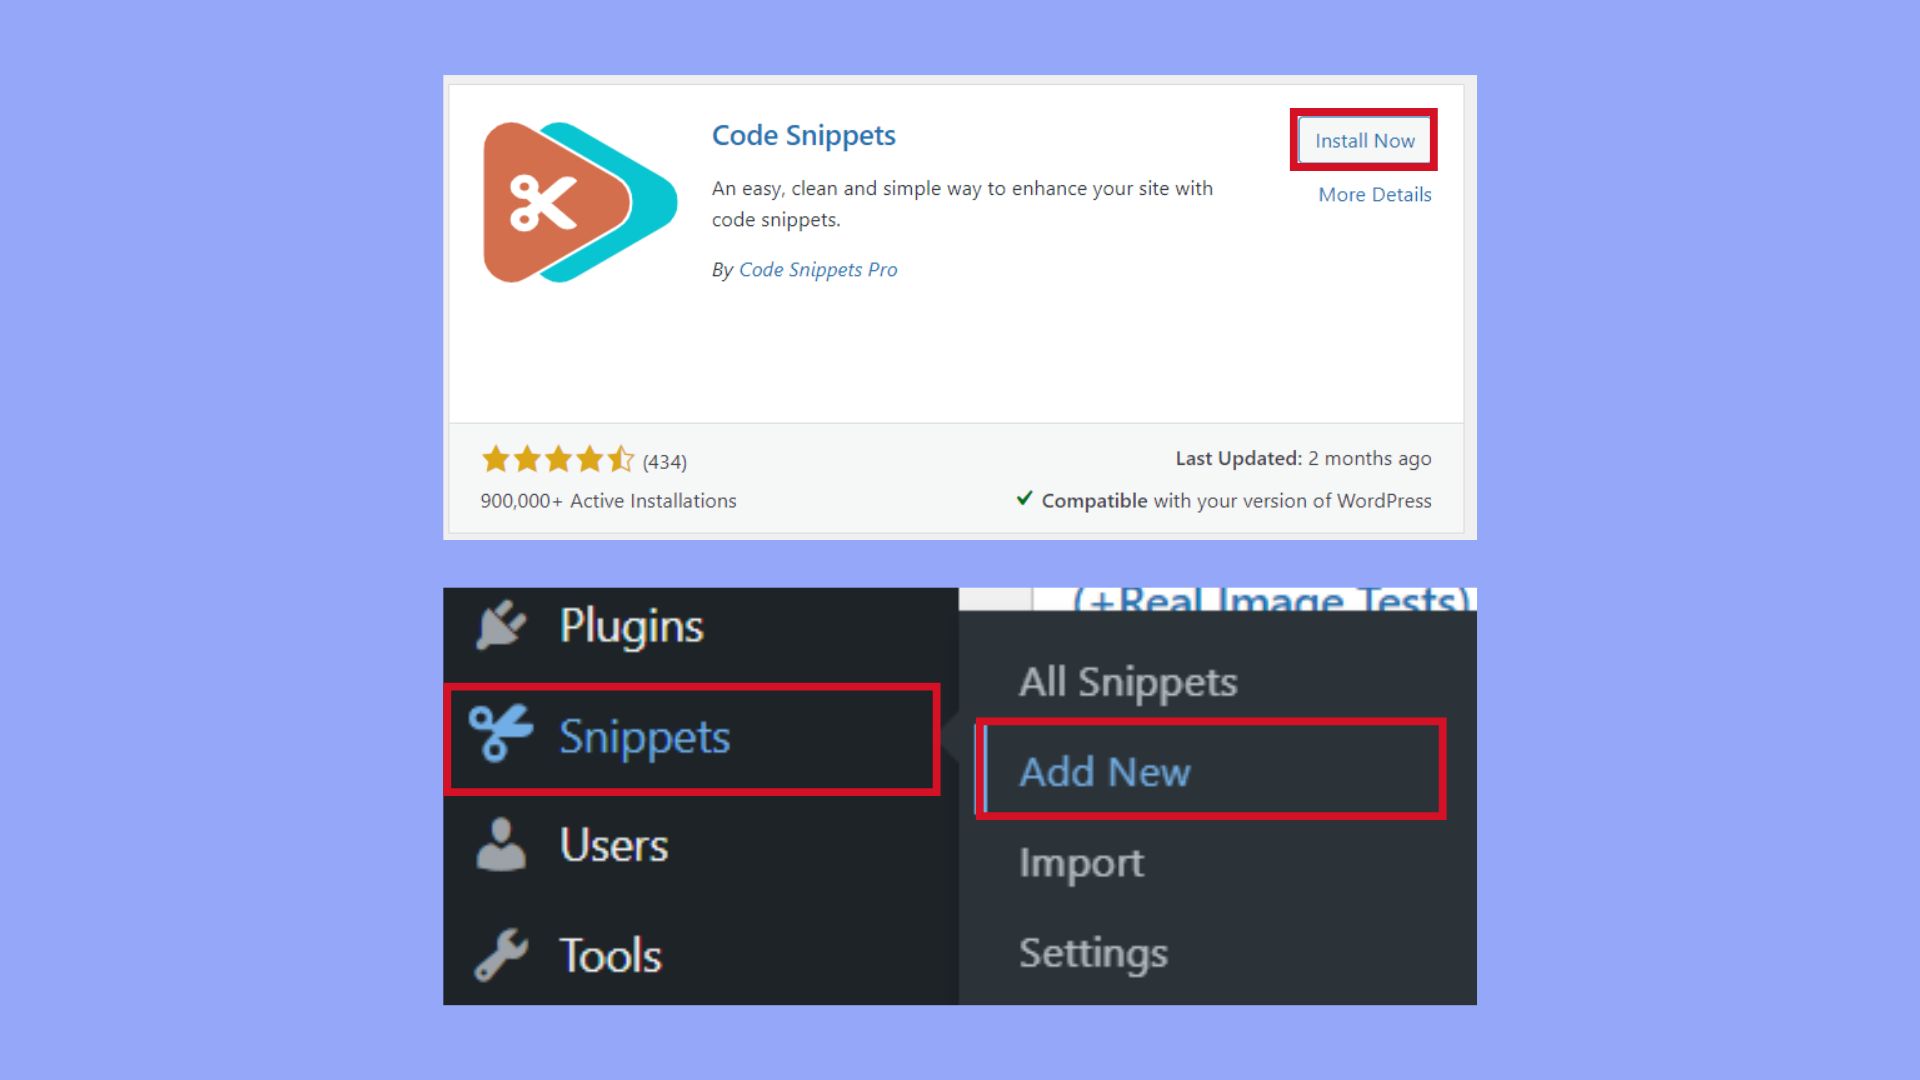
- Install and activate the Code Snippets plugin from the Plugins > Add New section of your WordPress dashboard.
- Navigate to Snippets in your dashboard.
- Create a new snippet and give it a relevant title.

- Insert your PHP code that targets the Add to Cart button text in the provided field.

- Save and activate the snippet. Your changes should now be reflected on your store.
Remember, using plugins for customization tasks keeps your changes intact even after theme updates and is generally safer for those not accustomed to working with code directly.
Styling the Add to Cart button
Changing the appearance of your Add to Cart button in WooCommerce can significantly improve your store’s visual appeal and align it with your brand. Integrating style elements like color and icons helps your button stand out and encourages customers to make a purchase.
Here’s how you can customize the style of your button:
- Locate the additional CSS section
Go to your WordPress Dashboard. Navigate to Appearance and click on Customize. From there, select Additional CSS. - Use CSS for color customization
If you want to change the button color to match your brand, input the following CSS code, replacing#yourColorwith the hexadecimal code of your desired color..woocommerce #respond input#submit, .woocommerce a.button, .woocommerce button.button, .woocommerce input.button { background-color: #yourColor; border-color: #yourColor; } - Add an icon to the button
For adding an icon, you will need to use a CSS trick with pseudo-elements:.woocommerce a.button::before { content: url('iconURL'); padding-right: 5px; }Be sure to replace
iconURLwith the actual URL of your icon image. - Customize the button text style
If you’re wondering how to change Add to Cart button text in woocommerce, it also involves a bit of CSS for stylistic changes. To alter the font style or size, use:.woocommerce a.button, .woocommerce button.button, .woocommerce input.button { font-style: italic; /* change as needed */ font-size: 16px; /* change as needed */ }
Applying these customizations allows you to create a unique and compelling Add to Cart button that resonates with your brand’s style and encourages shoppers to make a purchase. Remember to save your changes before exiting the Customizer.

Looking to sell online?
Create your custom online store in minutes with 10Web AI Ecommerce Website Builder and take your business online.
Advanced Add to Cart button customizations
When managing an online store, you may want to fine-tune the shopping experience by customizing the add-to-cart button text to match your specific product types or create buttons that perform special functions beyond just adding items to the cart.
Modifying button text for different product types
To better align with your product offerings, modifying the button text can be valuable for your product pages and archives. Here’s how to change Add to Cart button text in WooCommerce for various product types:
- Navigate to your theme’s
functions.phpfile. - Depending on the product type, insert the appropriate conditional code. For example, to change the button text for a simple product, use the following:
add_filter( 'woocommerce_product_single_add_to_cart_text', 'custom_add_cart_button_simple_product_text' );
function custom_add_cart_button_simple_product_text( $button_text ) {
    global $product;
    if ( 'simple' === $product->get_type() ) {
        $button_text = 'Buy now';
    }
    return $button_text;
}
- For variable products, you might adjust the filter hook to
woocommerce_product_add_to_cart_text. - Remember to clear your site’s cache to see the changes.
Custom buttons for special functions
Creating buttons with special functions provide a direct and clear action for your customers such as a Buy now button that bypasses the cart.
- Navigate to the
functions.phpfile within your theme directory. - Code your special function. For a “Buy now” button which takes users directly to checkout, first add an action hook:
add_action( 'woocommerce_after_shop_loop_item', 'add_direct_purchase_button', 20 );
- Then, define the button, ensuring it has the right label and a URL that directs straight to the checkout:
function add_direct_purchase_button() {
    global $product;
    echo '<a href="'. $product->add_to_cart_url().'?add-to-cart='.$product->id.'&direct_purchase=true" class="button custom-direct-purchase-button">Buy now</a>';
}
- Use CSS to style your button appropriately in your
style.cssfile or through the customizer.
With these advanced customizations, you give the customer a more tailored shopping experience and potentially streamline the purchasing path. Remember, it is essential to test your changes on a staging site before applying them to your live site to ensure everything works as intended.
Enhancing user interaction and conversion
In the pursuit of increasing sales and revenue, refining the user experience on your shop page is essential. By streamlining the purchase process with intuitive navigation and a seamless checkout experience, you’re more likely to boost your conversion rate.
Direct purchase buttons and improved navigation
Adding direct purchase buttons to your Shop page can significantly shorten the purchase process and improve the user experience. This user-friendly approach allows customers to bypass the Cart page altogether, leading directly to the Checkout page, which can positively impact your sales.
- Identify the products where a direct purchase option would be beneficial.
- Navigate to the WooCommerce settings in your dashboard.
- Modify the button text to something like Buy Now or Purchase Instantly to clearly indicate a direct buying option.
Conclusion
Knowing how to change the Add to Cart button text in WooCommerce can enhance your store’s look and user experience, leading to higher conversions. Customizing the button text, style, and functionality makes shopping more intuitive for customers. Whether you use code, CSS, or plugins, align these changes with your brand to make your WooCommerce store more appealing and efficient, guiding users smoothly from product discovery to purchase.


