
Encountering the “Installation Failed: Could Not Create Directory” error in WordPress can be a stumbling block, especially when you’re excited to roll out new features or themes on your website. This error essentially means WordPress is unable to add new files or directories to your site’s hosting environment during the installation process. It’s a common glitch that can be caused by a variety of factors related to file permissions, hosting configurations, or even your WordPress setup. Let’s dive deeper into what this error signifies in the WordPress ecosystem, why it happens, and, most importantly, how you can fix it.
Understanding the error in WordPress
In WordPress, this error typically surfaces when you’re trying to install or update plugins, themes, or even WordPress core itself. It’s a clear indicator that WordPress lacks the necessary permissions to write new files or create directories on your server. This could be due to a misconfiguration in your hosting environment, incorrect file permissions, or a lack of available storage space. Understanding the underlying cause is crucial for a quick resolution.
Variations of the issue
Depending on what you’re trying to accomplish when the error occurs, it might present itself in several ways:
- Plugin Installation Failed: Could Not Create Directory
- Theme Update Error: Directory Creation Unsuccessful
- WordPress Core Upgrade Failure: Could Not Create Directory
- Error Uploading Media: Unable to Create Directory
Although these messages may vary slightly, they all point to the same underlying issue—a blockage in the process of creating necessary directories and files on your server.
Reasons why this error occurs
Several factors can lead to this error in WordPress. Understanding these can help pinpoint the exact cause and lead to a more effective solution:
Incorrect file permissions: WordPress requires specific permissions to manage files and directories. If permissions are too restrictive, WordPress won’t be able to create or modify directories.
Ownership issues: The files and directories on your server need to be owned by the user under which your web server operates. Incorrect ownership can lead to permission errors.
Disk space limitations: Running out of allocated disk space on your hosting account can prevent WordPress from adding new files or directories.
Server configuration errors: Misconfigurations in your server settings can also lead to directory creation problems. For instance, incorrect settings in your .htaccess file or server restrictions might be at play.
Plugin or theme conflicts: Sometimes, poorly coded plugins or themes can interfere with the WordPress installation process, leading to errors.
How installation, updating, and uploading work in WordPress
To better understand what processes take place on your WordPress site and how they can go wrong during installation, updating, and uploading, let’s take a closer look at each of them.
Installation of new plugins or themes
Your WordPress site operates within a server environment that requires proper permissions to function. These permissions determine who can read, write, or execute files in your site’s directories. When WordPress cannot create a new directory for a theme or plugin, it’s usually because the server’s permissions settings are preventing it from writing to the website’s root directory. This is a common issue, especially on new WordPress installations where default permissions might not be optimized for WordPress’s operational needs.
On the other hand, disk space plays a pivotal role in your site’s ability to grow and accommodate new files. If your server lacks the necessary disk space for new plugins or themes, it’ll trigger the same “could not create directory” error, albeit for a different reason. This scenario often arises from accumulated old backup files or when the existing hosting plan does not provide sufficient storage for your site’s expanding needs.
Updating plugins or themes
Sometimes, when attempting to upgrade a WordPress theme or plugin that’s already installed on your site, you may see an error very similar to the one we’ve described above. This one will typically read, “Update failed: could not create directory.”
This problem occurs for the same reasons as the “Installation failed could not create directory.” error. When you update a WordPress plugin or theme, WordPress needs to rewrite its files on your website’s server. If your permissions settings are incorrect or there is not enough free space, the process will not be able to access the right files or upload new ones.
Since the cause of these two issues is the same, the solutions are identical as well. Any methods for resolving the “Installation failed: could not create directory” error should also work for a stalled update.
Uploading
Server file permissions play a critical role in the security and functionality of your website. They are designed to protect your site by controlling access to its files and directories, preventing unauthorized modifications or access to sensitive information. However, if not configured correctly, these permissions can also become a barrier to routine site management tasks, including installing plugins or themes, updating existing components, or uploading media files to your WordPress site. This misconfiguration can lead to errors such as “Installation failed: could not create directory,” affecting not just plugin or theme installations but also the addition of media content to your wp-content/uploads directory.
File permissions determine who can read, write, or execute files on your server. In the context of a WordPress site:
- Read permissions allow viewing the file’s contents.
- Write permissions allow modifying the file.
- Execute permissions allow running the file as a program.
WordPress needs appropriate permissions to carry out actions like installing plugins or themes and uploading media files. Typically, the web server needs write access to certain directories to perform these tasks.
How to determine if permissions are causing the error
Though this error puts an unexpected halt on your work, it is quite easy to fix. However, to understand the approach needed for troubleshooting, we need to first determine the cause of the error.
Leveraging the WordPress Site Health tool
The Site Health tool introduced in WordPress 5.2 is a robust feature designed to help website owners maintain an optimal site performance and security posture. It automates the process of checking your WordPress site for common issues and provides actionable insights to resolve them. One of the key areas it covers is the file permissions for your WordPress installation, which, as we’ve discussed, play a critical role in your site’s functionality and security.
How to use Site Health to check file permissions

- To start, log into your WordPress dashboard and navigate to Tools > Site Health. This section provides a comprehensive overview of your site’s health status, including performance and security recommendations.
- Once in the Site Health section, you will find two tabs: Status and Info. Click on the Info tab to access detailed information about your WordPress configuration, including server settings, database details, and, crucially, filesystem permissions.
- Scroll down to the bottom of the page until you find the section labeled Filesystem Permissions. Here, WordPress displays the current permission status of crucial files and directories, such as your plugin and theme directories.
- In the Filesystem Permissions section, look for the key directories and files relevant to WordPress operations. Each of these will have a status indicating whether it is Writable or Not writable.
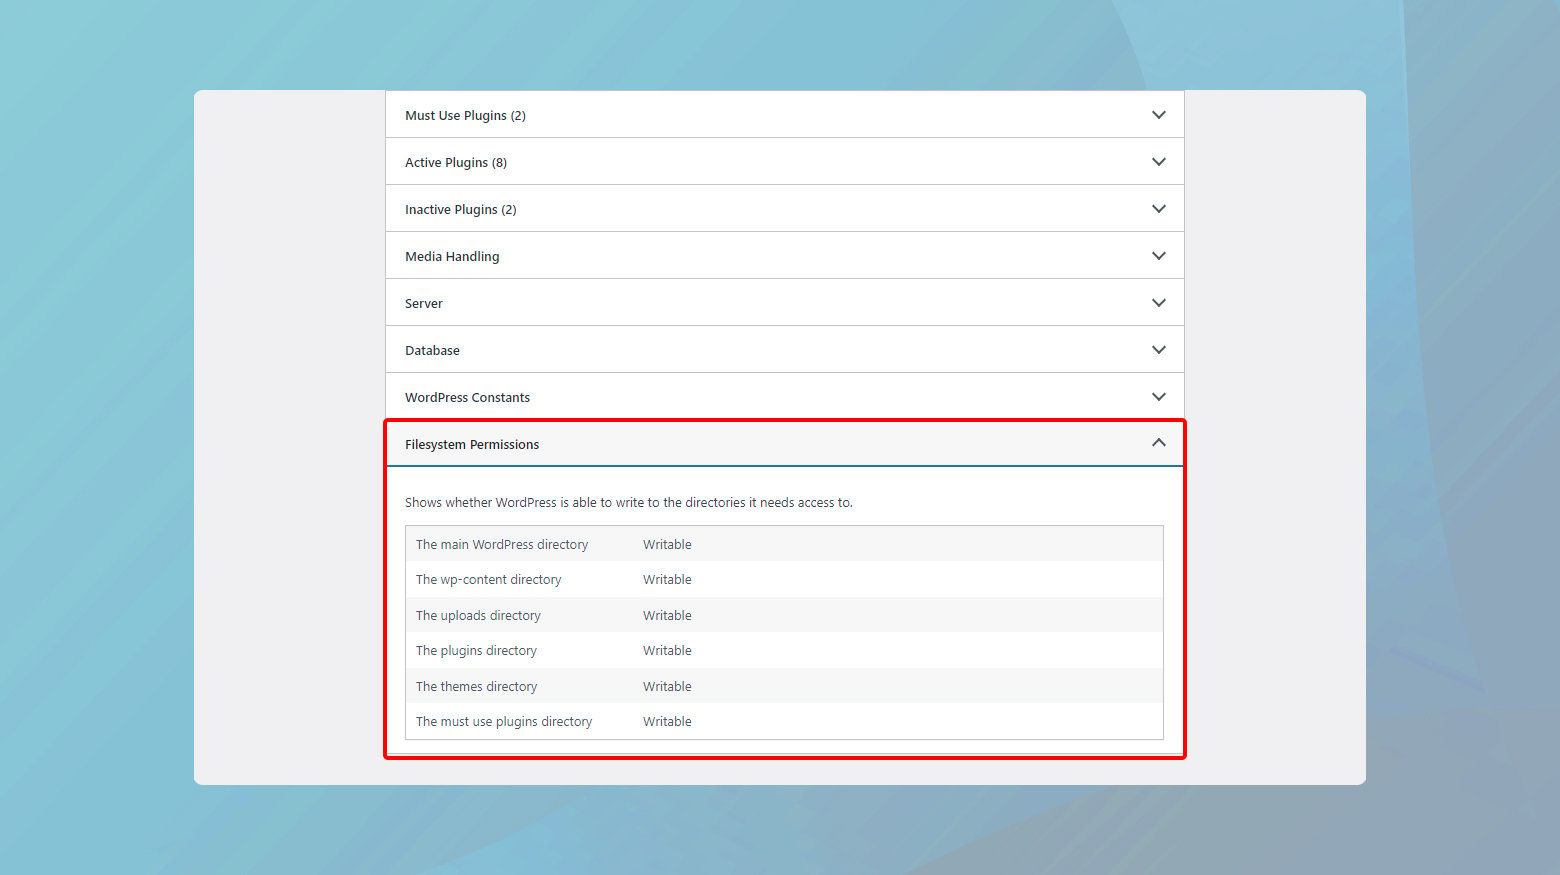
A Writable status means that WordPress has sufficient permissions to modify the directory or file, which is necessary for installing updates, uploading media, and making other changes. Conversely, a “Not writable” status signals a permissions issue that needs addressing.
If Site Health reports that certain directories or files are Not writable, it’s an indication that you need to adjust your file permissions as previously discussed. Correctly setting these permissions is crucial for the security and functionality of your WordPress site.
Check server error logs
Checking your server’s error log is a powerful method for diagnosing issues like the “Installation failed: could not create directory” error. Error logs provide a detailed account of the problems your server encounters, offering insights beyond just file permissions issues. This includes errors related to server configuration, insufficient resources, and more. You can leverage error logs to troubleshoot and resolve issues on your WordPress site. Here is to do that if your site is hosted on 10Web.
- Log in to your 10Web account.
- Click on the website where the error occurred.
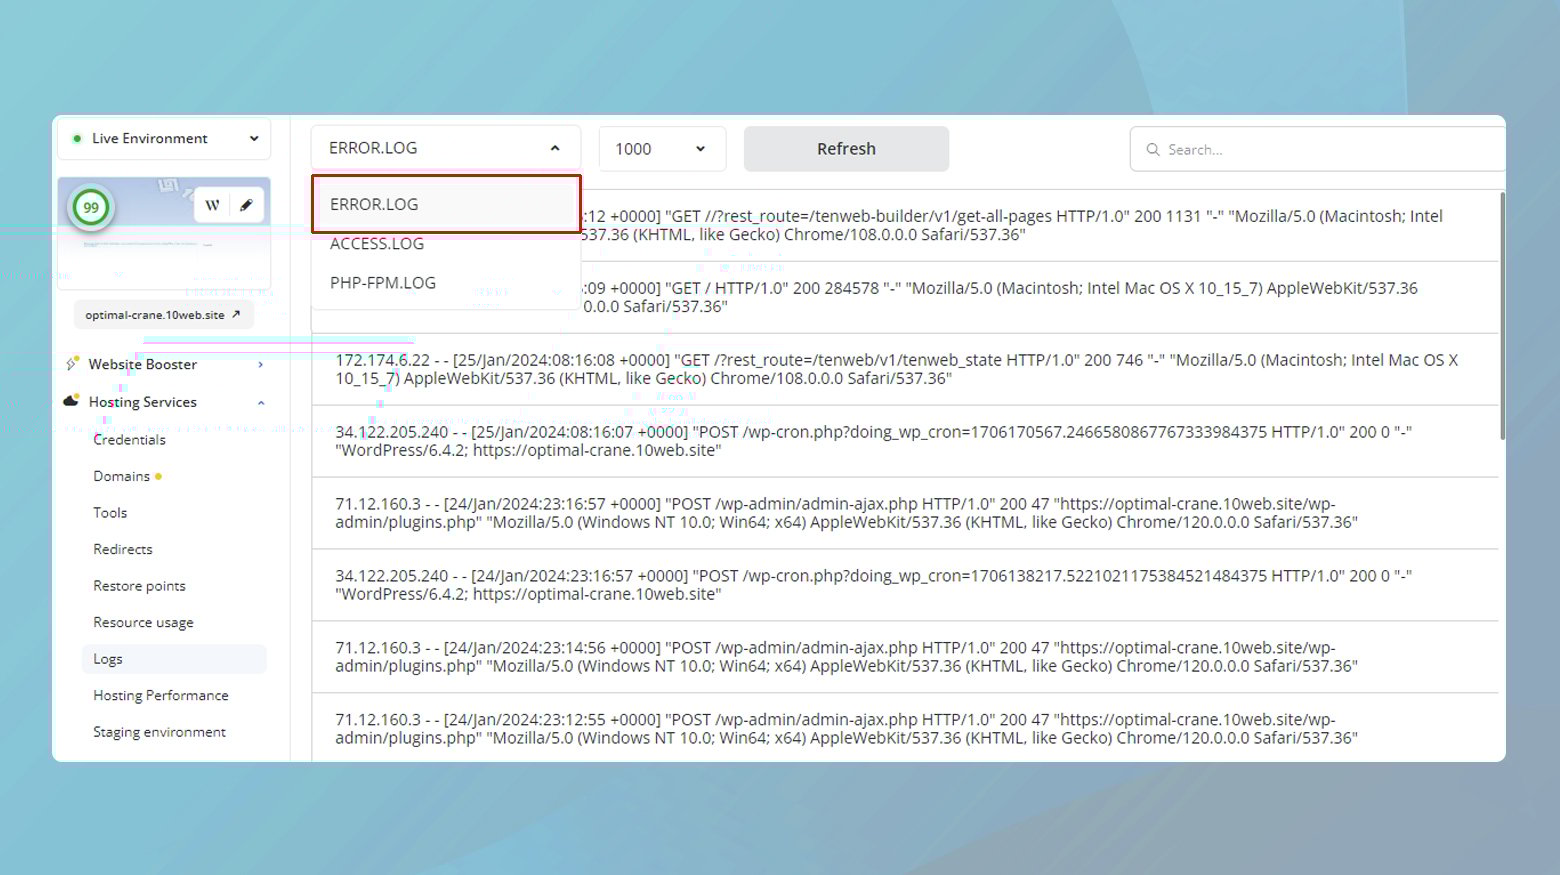
- Go to Hosting Services > Logs.
- Click on the drop down menu and choose the Error logs.
For convenience, you can also use the search field to search for key phrases.
Once you have the error log open, scan through the entries for any recent errors that correspond to the time you experienced the installation issues. Look for messages that directly mention permissions problems or insufficient storage space, as these are common reasons behind the error you’re facing.
Fixing the “Installation Failed: Could Not Create Directory” error
If in the previous steps you have come to the conclusion that the “Installation failed: Could not create directory.” error is because of your site permissions, below is a step by step guide to fixing this error.
Understanding the importance of correct file permissions
File permissions are fundamental to server security and functionality. They dictate what can be done by whom, with regards to files and directories. Incorrect permissions might lock out legitimate users from making necessary updates, or, conversely, leave your site vulnerable to unauthorized access. The permissions are usually represented numerically, with different values indicating different levels of access for the owner, the group, and the public.
How to adjust file permissions via FTP
Before making any changes, it’s crucial to back up your site. This ensures that, should anything go wrong, you can restore your site to its previous state. Most hosting services offer tools to create backups, or you can use a WordPress plugin designed for this purpose.
To adjust file permissions:
- Connect to your site via FTP.
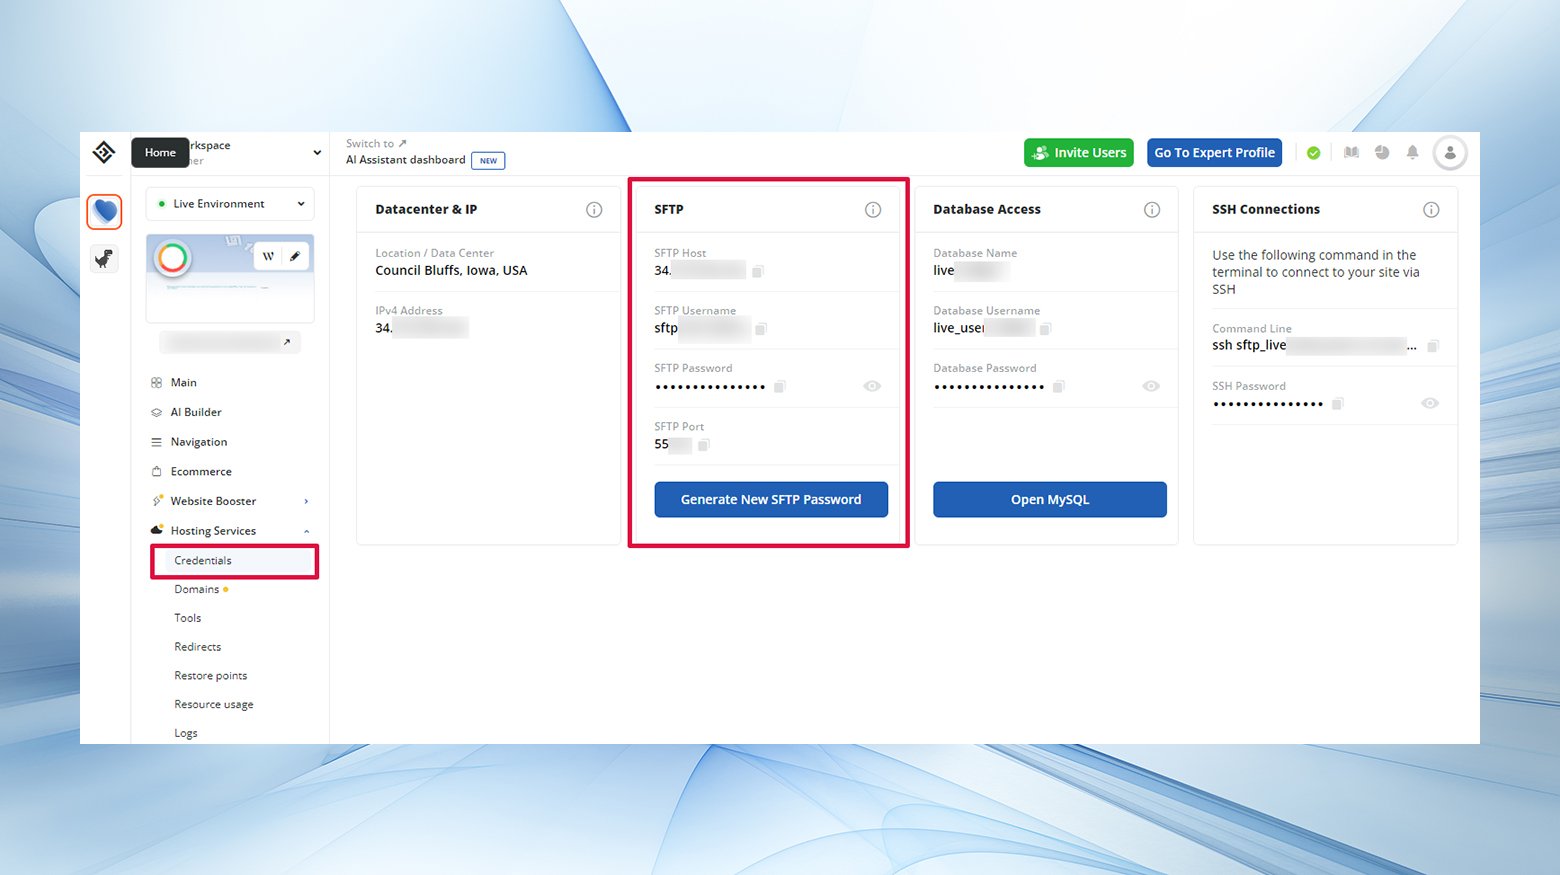
- Access your hosting account to find your FTP login details.
- If you’re a 10Web customer, you’ll find your SFTP credentials under Hosting Services > Credentials.
- Using an FTP client like FileZilla, input your FTP credentials to connect to your server.
- Once connected, navigate to the public_html directory, which houses your WordPress installation.
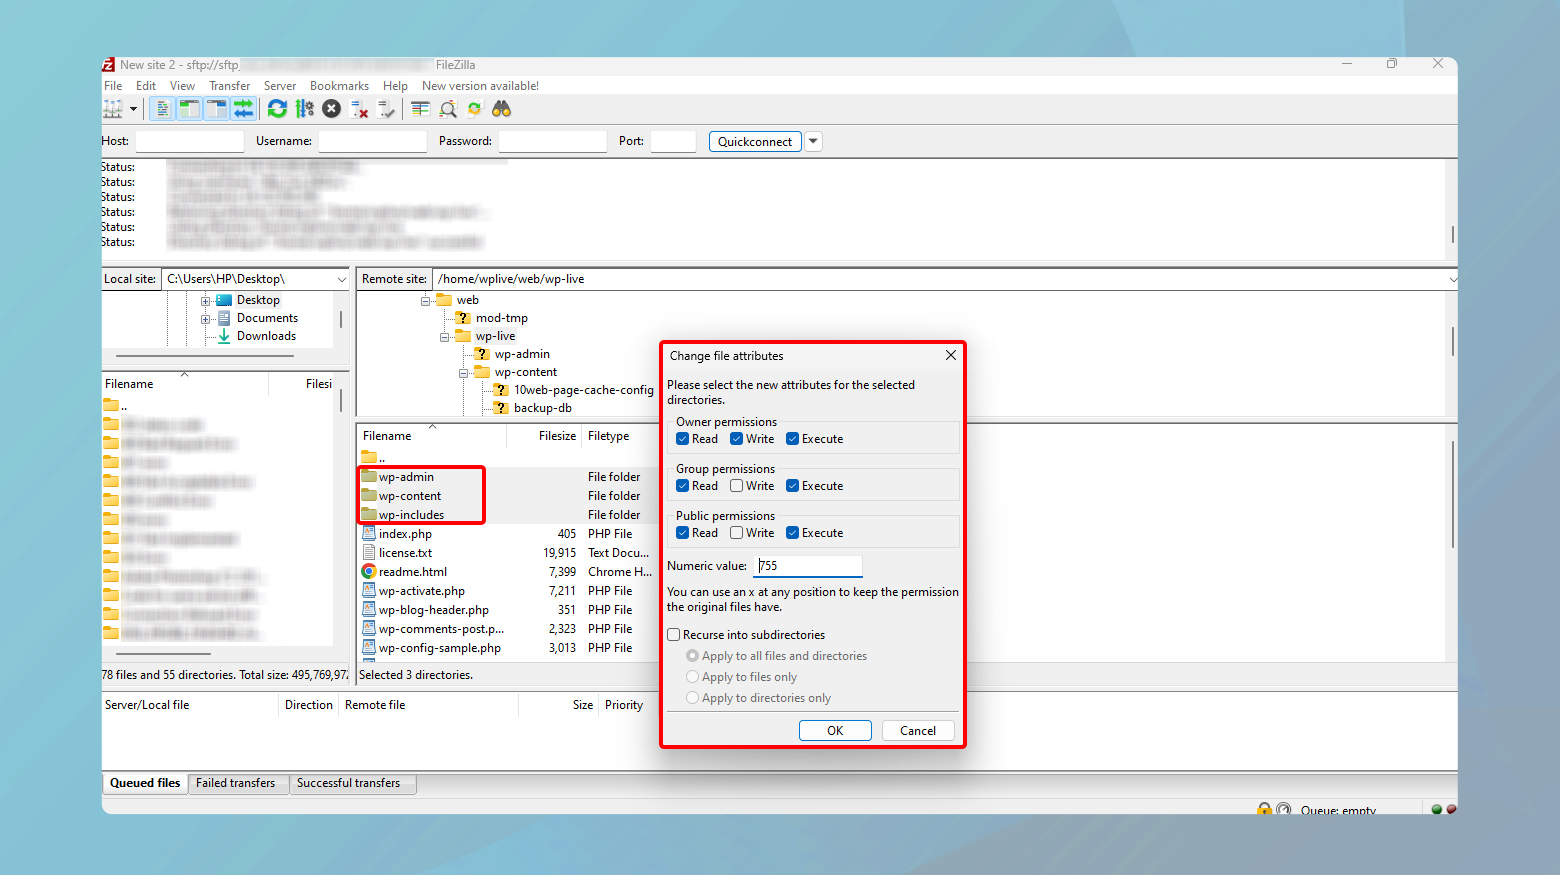
- Locate the wp_content, wp_includes, and wp_admin folders.
- Right-click each folder and select File Permissions.
- In the permissions window, set the numeric value to 755 for the following:
- Owner Permissions to Read, Write, Execute.
- Group Permissions to Read, Execute.
- Public Permissions to Read, Execute.
- Ensure Recurse into subdirectories and Apply to directories only are selected before clicking OK.
After adjusting the permissions, attempt to install or update the plugin or theme again on your site.
If you’re not comfortable using an FTP client or your hosting provider doesn’t support it, you might have access to a File Manager through your hosting dashboard. This tool allows you to modify file permissions directly from your browser, simplifying the process. Look for this option in your hosting account, under the section related to your site experiencing the error.
Closing thoughts
Throughout our blog, we tackled the “Installation Failed: Could Not Create Directory” error, breaking down its causes and providing a comprehensive guide to resolving it through adjusting file permissions via FTP or your hosting provider’s File Manager. We emphasized the importance of backups before making changes, ensuring you can restore your site if needed. By following the outlined steps, you can overcome this common issue, enhancing your site’s functionality and security.
Accelerate your WordPress website creation with AI
Create a custom WordPress website tailored to your business needs 10X faster with 10Web AI Website Builder.
Say goodbye to website errors
Fix all the website errors in one click
Migrate your website to the world's best Managed WordPress Hosting.