
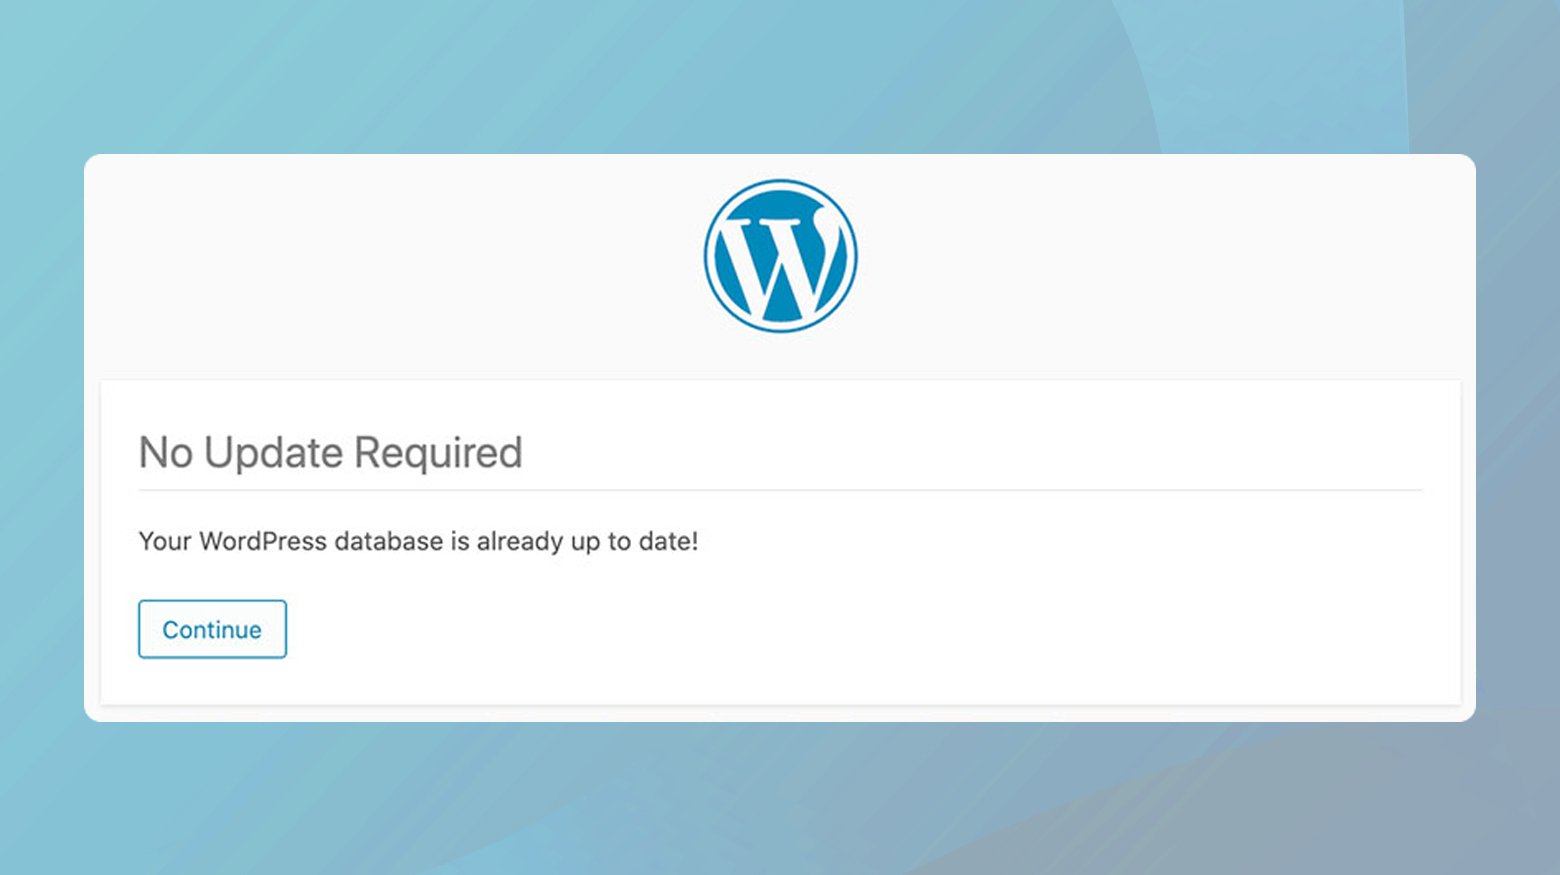
Encountering the message “No update required. Your WordPress database is already up-to-date!” can be a moment of confusion, especially if it locks you out of your admin dashboard unexpectedly. While this notification appears benign, it indicates a glitch in your website’s update process, primarily linked to the caching solutions you’ve employed. Let’s delve deeper into why this happens and how you can smoothly navigate past this hurdle to regain full access to your WordPress site.
The role of object caching
The root of this error often traces back to object caching, a sophisticated form of caching that plays a crucial role in enhancing your website’s performance. Object caching stores the results of database queries, meaning once a webpage’s database queries have been executed and cached, subsequent page loads can retrieve this data from the cache rather than querying the database again. This mechanism significantly reduces server load and accelerates page loading times.
Tools like Memcached, Redis, and WordPress plugins such as W3 Total Cache, which implement object caching, are designed to optimize your site’s efficiency. However, they can also inadvertently cause the “database is already up-to-date” error.
Why the error occurs
During the process of updating, WordPress performs a series of checks to ensure all aspects of your site are compatible with the latest version. One critical step in this process involves verifying whether the site’s database requires an update to match the new WordPress software version. This is done by consulting a specific file within the WordPress installation that records the current version of the database.
Object caching, a mechanism employed to enhance website performance, can inadvertently complicate this process. Object caching works by storing the results of database queries so that subsequent requests for the same data can be served more quickly, without needing to re-query the database. This not only reduces the load on the server but also speeds up the website for the user.
However, if the file that WordPress checks to determine the database version is cached through this system, it may not reflect the actual, current state of the database after an update has been initiated. Instead, WordPress encounters the cached version of this file, which misleadingly indicates that the database is already up-to-date, aligning with the newest version of WordPress. Consequently, WordPress concludes that no further action is required to update the database, since, according to the cached data, everything is already in perfect sync.
This misinterpretation leads to the “No update required. Your WordPress database is already up-to-date!” error message. While the message itself suggests that everything is as it should be, the reality is that this miscommunication between the cached file and the actual state of the WordPress installation can prevent you from accessing the admin dashboard. The system, erroneously believing that all components of the site are current, locks out administrative access under the assumption that no administrator intervention is needed.
Such a situation not only highlights the complexities involved in maintaining a WordPress site but also underscores the importance of managing caching mechanisms thoughtfully to avoid disrupting critical update processes. Understanding how object caching interacts with WordPress’s update checks is essential for diagnosing and resolving issues that may arise, ensuring the smooth operation of your site through updates and beyond.
How to resolve the error and regain access
Getting past this error and back into your WordPress admin dashboard requires a few steps aimed at clearing the miscommunication caused by object caching. Here are several strategies:
Clearing cache
Website
The approach to clearing your site’s cache can vary widely, contingent upon the caching plugin you’ve employed and the hosting service provider managing your site. Most caching plugins come with straightforward options to clear or purge the cache, typically accessible from the WordPress admin dashboard. These options might be directly visible on the admin toolbar or within the settings menu of the plugin. It’s crucial to consult the specific documentation for your caching plugin for guided steps, as each plugin may have its nuances in the cache clearing process.
Server
Clearing the server’s cache might be necessary if purging your site’s cache doesn’t rectify the issue. This step involves more direct interaction with your web hosting environment. Many hosting providers offer tools and options within their control panel for cache management. Again, the exact steps can differ from one host to another, making it essential to refer to your hosting provider’s support documentation or reach out to their customer service for assistance.
Temporary performance impact
It’s important to understand that clearing your site and server’s cache may lead to temporary performance dips. This is because the cache essentially stores ready-to-serve data for your site, reducing the need to regenerate pages from scratch with each visit. Once cleared, this data must be recreated, initially slowing down load times until your site’s pages are re-cached.
10Web Cache
For sites hosted on 10Web, you have two methods to clear your site’s cache, via WordPress or from your 10Web dashboard.
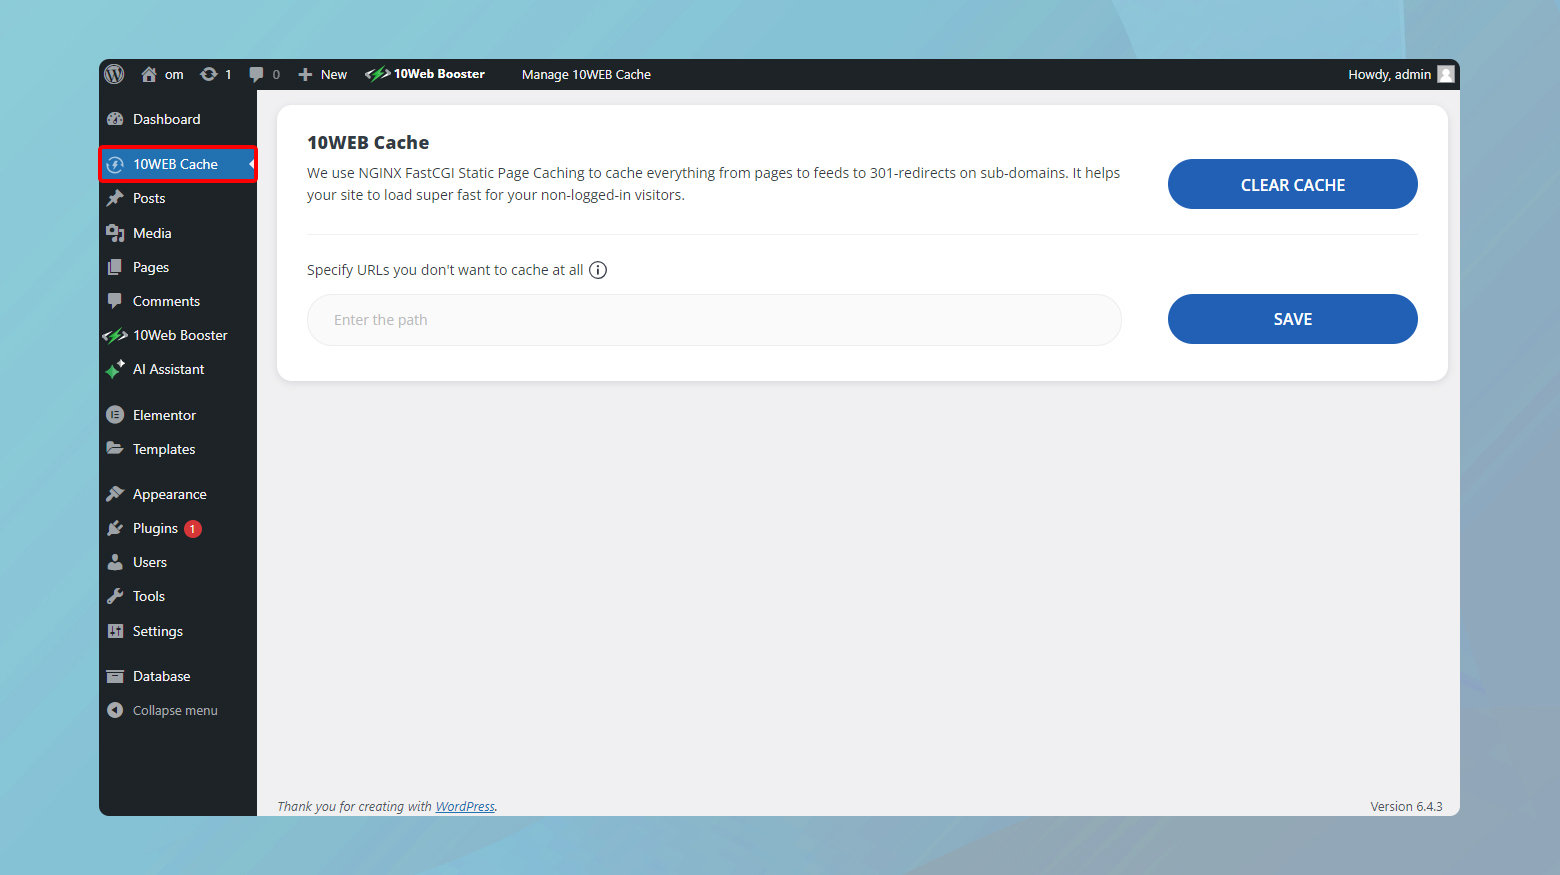
To clear your site cache via WordPress:
- Log in to your site’s WordPress admin panel.
- To the left of the panel find and click 10Web Cache.
- Click on Clear Cache to purge your entire site.
Additionally, for those seeking more control over what gets purged, options like the Specify URLs you don’t want to cache at all, allow for targeted clearing of cache. This feature lets you specify particular URLs you don’t want to purge, enabling a more precise approach to cache management.
To clear cache through the 10Web dashboard:
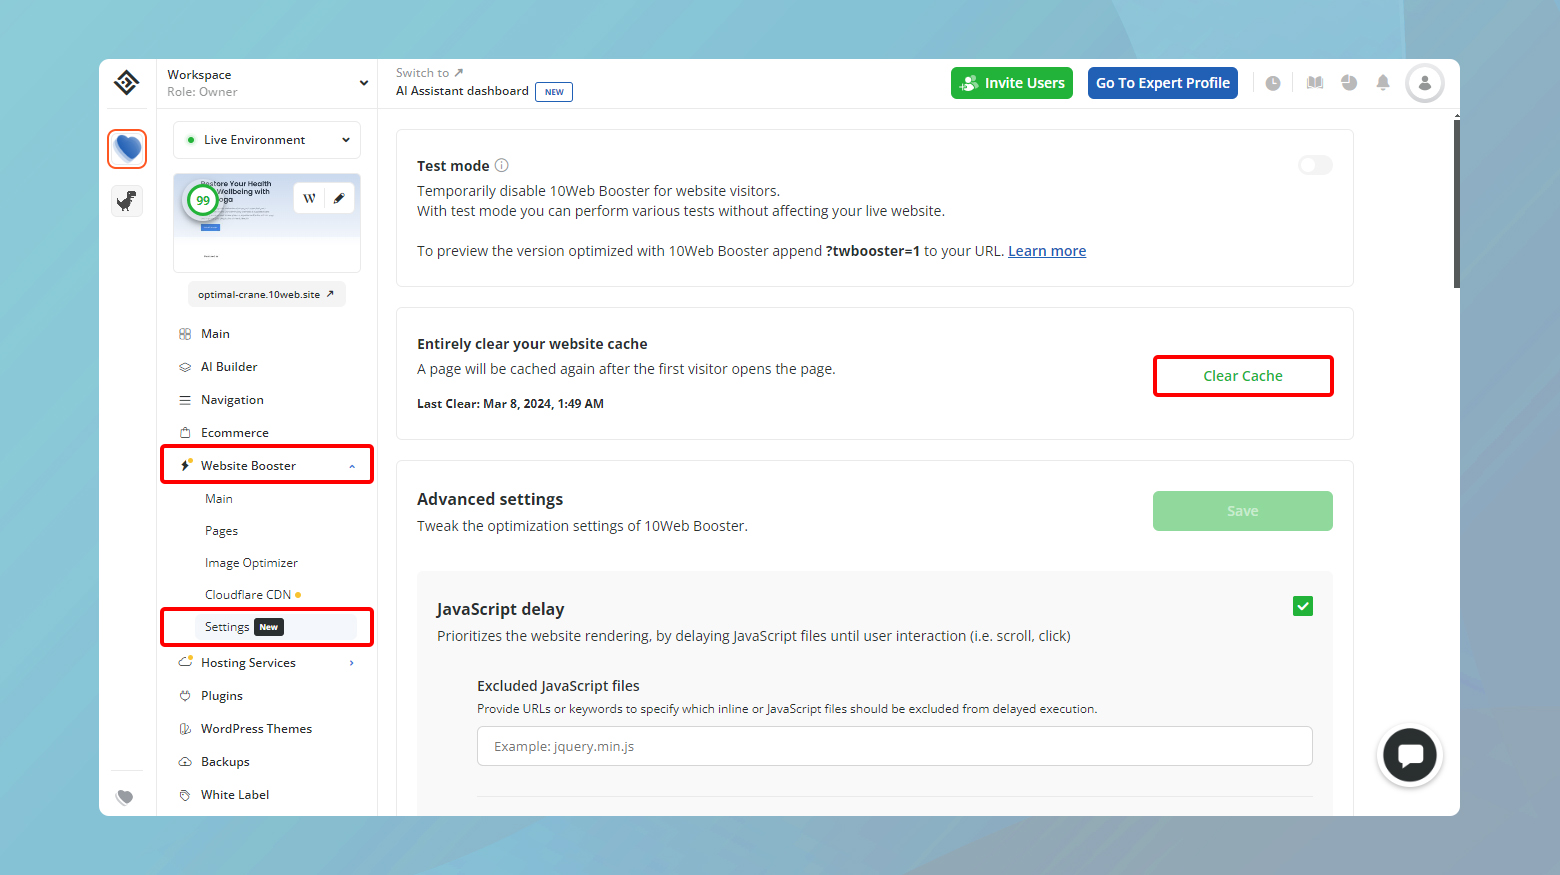
- Log in to your 10Web account.
- Click on the website where you want to clear the cache.
- Navigate to 10Web Booster > Settings > Clear Cache.
While cache clearing is a powerful tool for addressing update-related errors in WordPress, it’s accompanied by a brief period of reduced performance. Understanding the mechanisms of your caching solutions and hosting environment is key to effectively managing your site’s performance and ensuring smooth operation through updates and maintenance activities.
Use WP-CLI to clear cache
Using WP-CLI, the command-line interface for WordPress, to clear your site’s cache is a powerful technique, especially if your web hosting environment supports it—and many do. This approach allows for direct interaction with your site’s backend, offering a straightforward way to flush the cache without navigating through the WordPress admin dashboard or a hosting control panel. Here’s a more detailed walkthrough of the process:
Connect to your site via SSH
Secure Shell (SSH) provides a secure channel for logging into another computer over a network, allowing you to execute commands directly on the remote machine. To begin, you need to establish an SSH connection to your server. The process for doing this varies depending on your hosting provider, but it generally involves obtaining SSH credentials from your hosting account and using a terminal (on Linux or macOS) or an SSH client like PuTTY (on Windows).
For 10Web users, here is how you can find your SSH credentials:
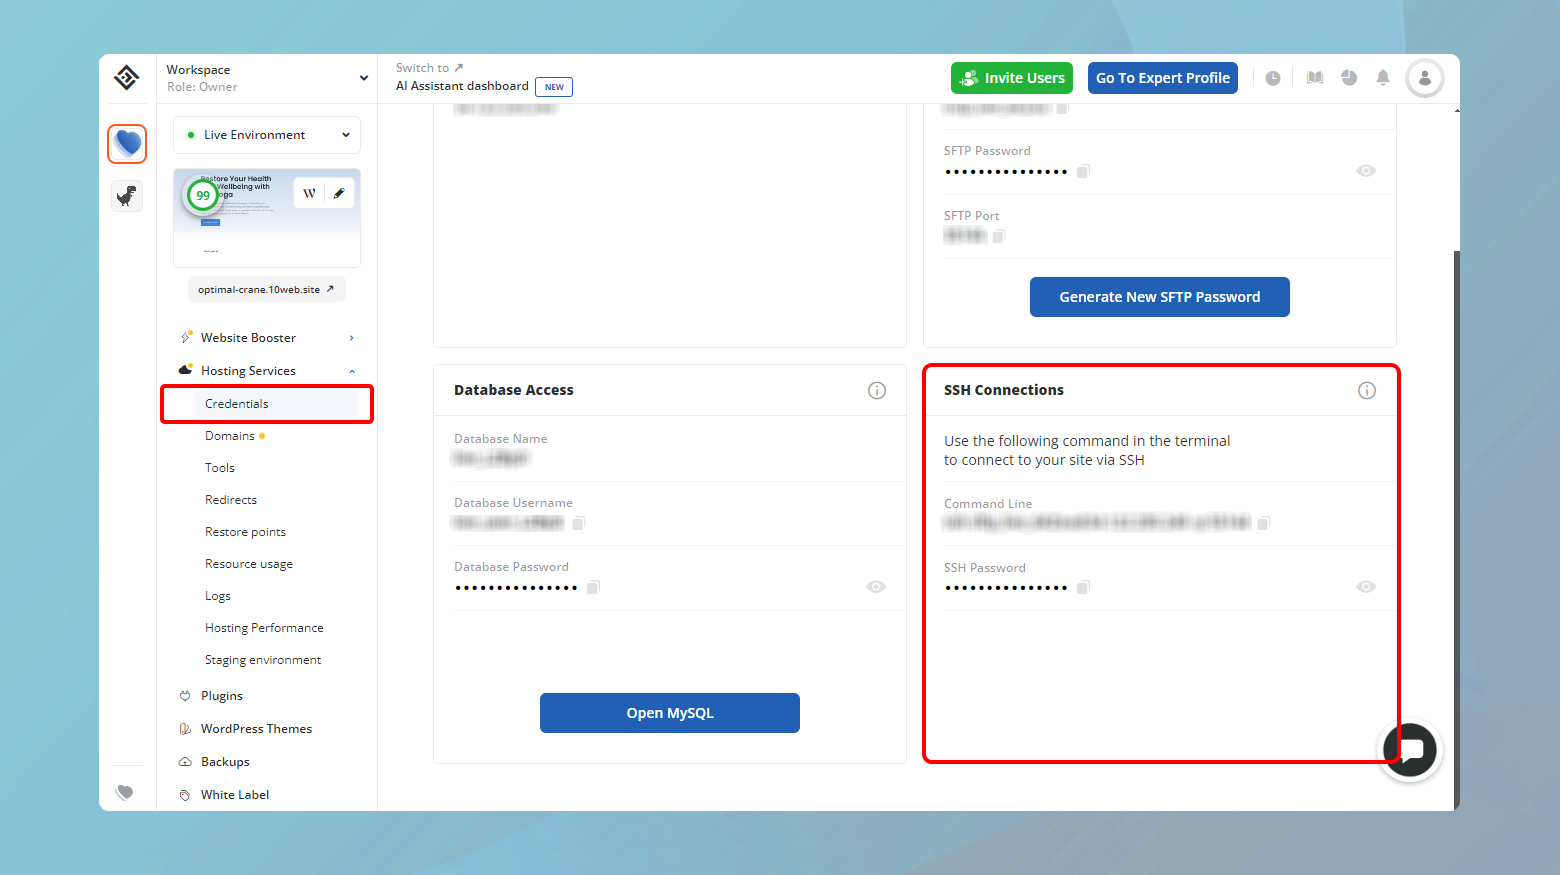
- Log into your 10Web account.
- Click on the site where you will be clearing the cache.
- Navigate to Hosting Services > Credentials.
To connect via SSH:
Open your terminal or SSH client and enter the command provided by your host, typically in the format of:
ssh username@hostname -p portnumber
You’ll need to replace username, hostname, and port number with the details provided by your host.
For specific steps tailored to the 10Web hosting environment, consult How to Connect via SSH at 10Web.
Navigate to your site’s directory
Once connected via SSH, you’ll need to navigate to the directory where your WordPress site is installed. This is done with the cd (change directory) command. The path to your site’s directory can vary based on your hosting setup, but it’s often something like ~/public_html or a specific folder within your user directory.
Use the command
cd ~/path/to/your-site
making sure to replace ~/path/to/your-site with the actual path to your website’s directory.
Flush your site’s cache with WP-CLI
With WP-CLI, flushing your site’s cache is as simple as executing a single command. Ensure that WP-CLI is installed on your server; most WordPress-friendly hosting providers support it.
To flush your site cache, type the following command and hit Enter.
wp cache flush
and hit Enter. This command tells WP-CLI to clear all cached content on your WordPress site.
This process is particularly useful for developers or those comfortable with command-line tools, as it provides a fast and efficient method to clear the cache, especially when dealing with complex sites or when access to the admin dashboard is restricted.
Use SSH to clear your cache
For those who prefer not to use WP-CLI or seek an alternative method to flush their site’s cache directly through SSH, utilizing commands specific to the caching system your site employs is a viable option. Whether your site uses Redis or Memcached for object caching, SSH commands can directly interact with these systems to clear cached data. Here’s a detailed breakdown of how to proceed with each system:
Flushing cache with Redis
Redis, a popular in-memory data structure store, used as a database, cache, and message broker, can be managed directly through SSH.
- Initiate an SSH connection to your server. This can be done using an SSH client or through your hosting provider’s dashboard.
- Once connected, if Redis is your caching solution, you can flush the entire cache by executing:
redis-cli flushall async
This command asynchronously clears all keys from all databases in Redis, effectively resetting your cache without significantly impacting server performance.
Flushing cache with Memcached
Memcached, another widely-used memory object caching system, requires a slightly different approach.
After establishing your SSH connection, connect to your Memcached instance using:
telnet localhost 11211
Replace “localhost 11211” with your specific Memcached server address and port number if they differ. With the connection to Memcached established, you can flush its cache by entering:
flush_all
This command clears all data from Memcached, effectively purging the cache. To complete the process and exit the Memcached session, simply type:
quit
This command closes the connection to the Memcached server.
Important considerations
When managing cache through SSH, whether for Redis or Memcached, it’s crucial to understand the implications of flushing your cache. This action will temporarily affect your site’s performance, as previously cached data must be rebuilt on subsequent visits. However, this impact is typically short-lived and resolves as the cache is repopulated.
Always ensure you have the correct permissions and understand the specific configurations of your caching system before proceeding with these actions. If uncertain, consulting with your hosting provider or a professional can help avoid unintended consequences.
By leveraging SSH to manage your site’s caching system, you gain a powerful tool in maintaining optimal site performance and ensuring your content is delivered efficiently to your audience.
Renaming the object-cache.php file
If you’ve tried clearing your site and server’s cache without success in resolving the “No update required. Your WordPress database is already up-to-date!” error, or if you’re unable to access your WordPress admin dashboard to clear the cache due to this error, renaming the `object-cache.php` file can be an effective solution. This approach can help bypass the issue, potentially restoring access to your site. Here’s a detailed guide on how to do it:
Access your site’s files
To begin addressing the issue, you must first gain access to the object-cache.php file. This can be achieved through several methods, including SSH, SFTP, or directly through your hosting provider’s dashboard.
Sites hosted on 10Web can access all of their website credentials including SSH and SFTP, by:
- Login into your 10Web dashboard
- Clicking on the site you need
- Navigating to Hosting Services > Credentials
Connect to an FTP
With your SFTP credentials at hand, you can use an FTP client such as FileZilla to connect to your server. Enter the credentials (IP Address, Username, Password, and Port) into the respective fields in your FTP client and hit Quick Connect. Follow the link for a more comprehensive guide on how to connect via FTP.
Locate and rename object-cache.php

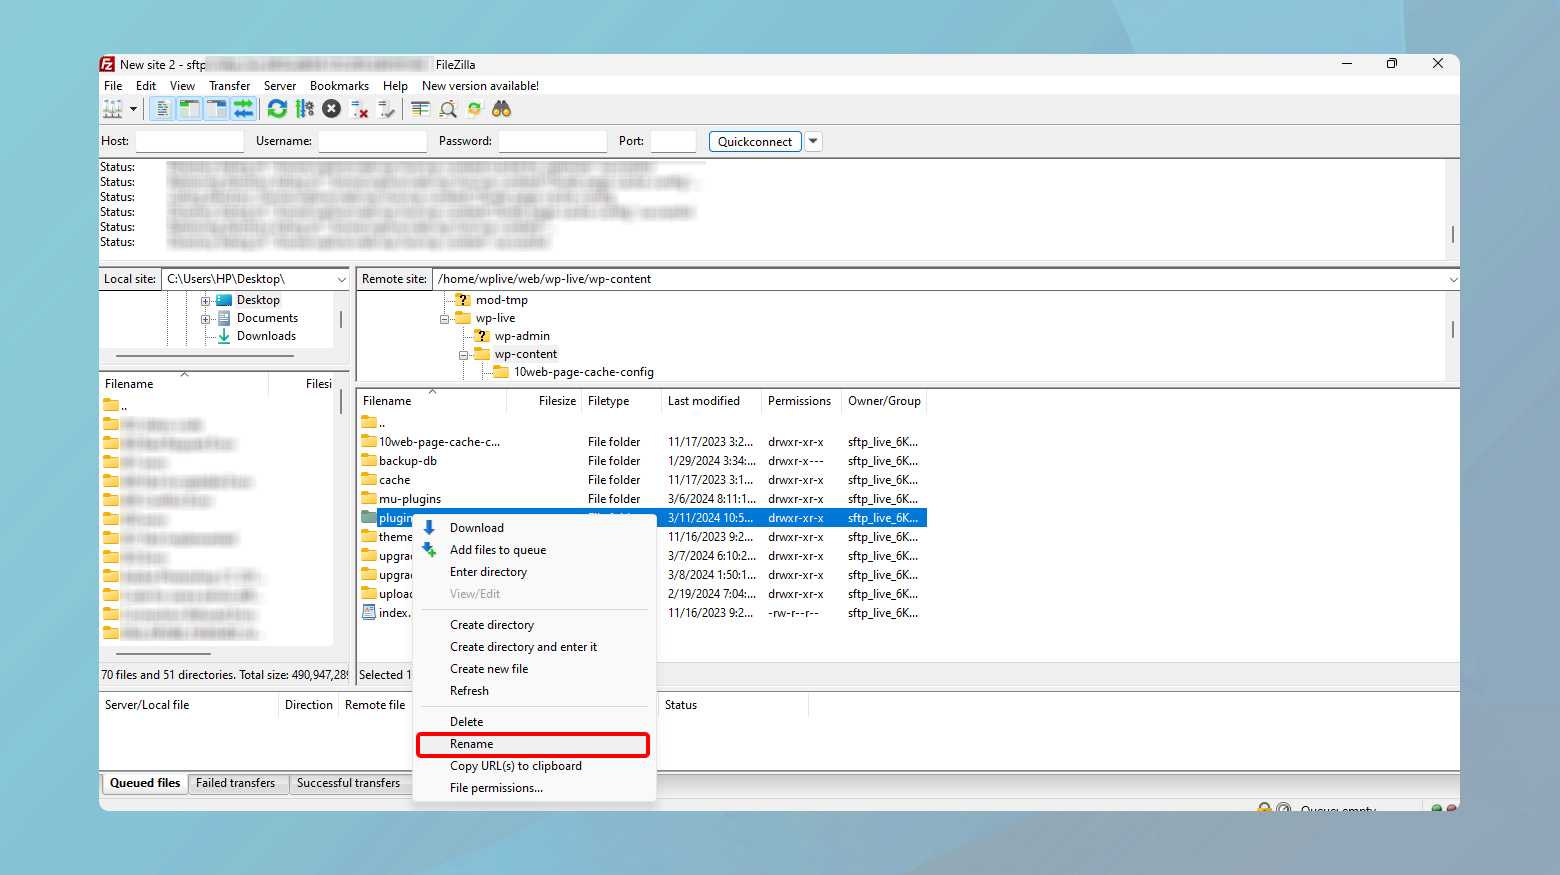
- Navigate to the /wp-content/ directory.
- Locate the object-cache.php file.
- To rename it, click on the file, then right-click and select “Rename” from the context menu. Adding “-old” to the end of the file name (e.g., object-cache-old.php) is a practical approach, making it identifiable and distinguishing it from active files.
- If you encounter issues with hidden files not appearing, consult a guide on displaying hidden files in your FTP client.
After renaming the file, attempt to access your site. If successful, clear your site’s cache using the available method—through a caching plugin or, if hosted on 10Web, using the clear cache in 10Web Cache.
Verify file recreation
Lastly, revisit your FTP client to check if the object-cache.php file has been recreated. This step is crucial for ensuring that your WordPress site continues to function correctly and utilizes object caching effectively.
Renaming the object-cache.php file is a troubleshooting method that can resolve specific issues, including being locked out of the admin dashboard due to update-related errors. However, be mindful that this is a workaround, not a permanent fix.
Deactivate your plugins
This approach can be particularly effective if there’s a possibility of conflict between plugins, such as using multiple caching plugins with overlapping functionalities, or forgetting about a plugin that includes caching features you’re inadvertently activating.
Disable all plugins via SFTP
- Open your preferred FTP client (such as FileZilla) and log in to your server using the SFTP credentials provided by your hosting service.
- Go to the /wp-content/ directory and find the plugins folder.
- Rename the plugins folder to something else (for example, plugins_deactivated).
By renaming the folder, WordPress won’t be able to locate the plugins, effectively disabling them without removing them. It’s a good idea to append a term at the end of the folder name to avoid confusion later on.
Try accessing your WordPress admin dashboard again. If renaming the plugins folder resolved the database is already up-to-date error, you should now be able to log in.
Identify the problematic plugin
- Once you’ve confirmed access to the admin dashboard, rename the plugins_deactivated folder back to plugins. Refresh your admin dashboard to ensure WordPress recognizes the plugins again.
- Perform a cache clearing for your site and server as outlined in earlier steps.
- In the WordPress admin dashboard, navigate to Plugins > All Plugins.
- Reactivate each plugin one at a time, checking for the return of the error after each activation. This step helps isolate the plugin causing the issue.
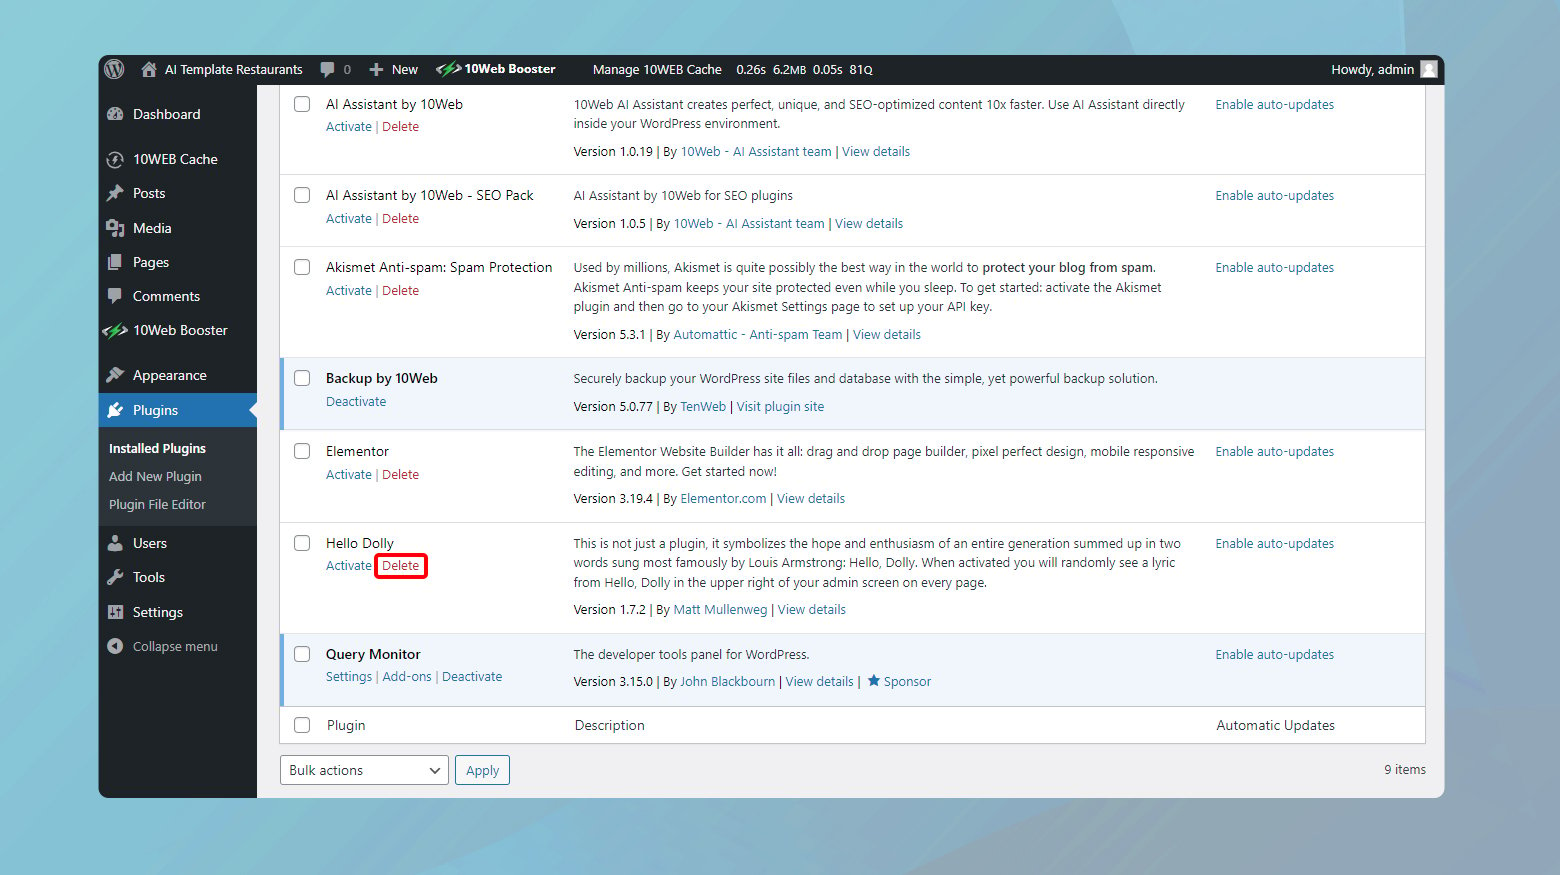
- If you’ve identified the problematic plugin and still have access to the admin dashboard, delete the plugin by clicking the Delete link beneath the plugin’s name.
- If direct access is an issue, use SFTP to access the plugins folder, find the specific plugin’s folder, and rename or delete it.
If you had to use SFTP again, make sure the plugins folder is named correctly as plugins.
With the plugins folder name restored, delete the problematic plugin from the WordPress admin dashboard as previously described.
After removing the problematic plugin, clear your site and server’s cache once more to ensure all changes are effectively applied.
Restarting your server
When all other troubleshooting steps fail to resolve the “No update required. Your WordPress database is already up-to-date!” error, and you’re locked out of your WordPress admin dashboard, restarting your server may be considered a last-resort measure. It’s important to approach this step with caution, understanding the implications it carries for your website’s accessibility and visitor experience. Here’s a closer look at this option, along with preparatory steps to ensure you’ve covered all bases before proceeding.
Understanding the impact of a server restart
A server restart effectively reboots the underlying hardware or virtual machine that hosts your website, interrupting all current processes and connections. This action can resolve issues that are not amendable through application-level troubleshooting, potentially including stubborn caching problems or database inconsistencies. However, during the restart, your site will be temporarily unavailable to visitors, which could impact user experience and site metrics.
Best practices before restarting your server
Evaluate traffic patterns: Plan the restart during off-peak hours when your website experiences the lowest traffic. This minimizes the impact on your visitors and reduces the potential loss of revenue or engagement.
Consult hosting provider’s documentation: Familiarize yourself with the specific procedure for restarting your server as outlined by your hosting provider. The steps can vary significantly between hosts and depending on whether you’re using a shared, VPS, or dedicated hosting environment.
Backup your website: Ensure you have a recent backup of your website, including both files and databases. This is a critical safety net in case the restart leads to unexpected issues.
Notify your host: Before taking action, reach out to your hosting provider’s support team. Provide them with a detailed account of the issue and the steps you’ve already taken to resolve it. They may offer insights or solutions you haven’t considered or handle the restart more safely on their end.
Communicate with your visitors: If possible, inform your visitors of the planned downtime. Use your website’s social media channels or an email newsletter to explain the temporary unavailability and assure them of your efforts to improve the site.
Restarting your server
If, after consulting with your hosting provider, a server restart is deemed necessary, proceed with the operation as per the instructions provided by your host. Monitor your website’s functionality closely following the restart, checking for the resolution of the “database is already up-to-date” error and any potential new issues that may arise.
After the restart
Once your server is back online, verify that your website is functioning correctly:
- Check if the “database is already up-to-date” error has been resolved.
- Ensure that your site is loading properly and that all features and functionalities are operational.
- Clear your site’s cache one more time to ensure that your visitors receive the most recent version of your site.
- Monitor your website’s performance and error logs for any unusual activity following the restart.
Resorting to a server restart is a significant step that can address deep-seated issues affecting your WordPress site. However, it’s crucial to approach this option with thorough preparation and an understanding of the potential impacts, always considering it as a measure of last resort after exhausting all other troubleshooting avenues.
Closing thoughts
Navigating the “No update required. Your WordPress database is already up-to-date!” error involves a series of troubleshooting steps, starting from clearing caches to potentially restarting your server as a last resort. Throughout our discussion, the emphasis has been on methodical problem-solving and the importance of backup before undertaking major changes. Engaging with your hosting provider for insights and prioritizing the least disruptive solutions first can help maintain your site’s integrity and user experience. This journey underscores the balance required in proactive management and reactive troubleshooting to keep a WordPress site running smoothly.
Accelerate your WordPress website creation with AI
Create a custom WordPress website tailored to your business needs 10X faster with 10Web AI Website Builder.
Say goodbye to website errors
Fix all the website errors in one click
Migrate your website to the world's best Managed WordPress Hosting.