WordPress is a very popular and multifunctional content management system that powers 39.6% of websites in 2021. The free and simple functionality of the system makes it possible to create websites regardless of the level of technical knowledge.
WordPress provides tons of features for building an amazing website, and one of the more advanced ones is WordPress multisite. This efficient feature empowers any WordPress user to create their own separate network of subsites for different purposes. WordPress multisite came to replace the multi-user edition which allowed users to securely manage their templates and settings without affecting any other users.
What is a WordPress multisite?
WordPress multisite allows you to build a network of subsites with a single WordPress instance – a good example for this is wordpress.com – and manage them from one dashboard. This feature is integrated into WordPress core, so you don’t need to download extra software to make it work. All you need is to make very easy configurations which we will cover in this article.
Why should you use a WordPress multisite network?
The best use case of WordPress multisite is when you have a network of subsites that share similar functionality with plugins and server configurations. The fact that you have a single WordPress installation allows you to share plugins and custom applications. You shouldn’t use it for websites that vary too much from each other.
Who is WordPress multisite for?
It’s for companies or for individuals who need to have a few dozen similar microsites very fast. Here are 2 examples:
- Different departments of the university
- Different branches of the shop
For instance, if you want to create websites about university departments with WordPress, you should
- have multiple WordPress installations and databases,
- do hosting configurations for each website,
- install plugins in each WordPress site or if you use custom applications add those to each website.
With multisite you do all these actions at once.
Set up WordPress multisite
The steps for setting up WordPress multisite are pretty easy. In this article, we assume that you have already installed WordPress. If not, follow this link and download the latest version which as of the time of writing is 5.6.1.
Enable WordPress multisite
Now, once we have a WordPress fresh installation (for more information about installing a fresh WordPress check How to install WordPress), let’s enable multisite and deep dive to its options.
Follow these steps:
- Open wp-config.php in WordPress root directory,
- Find this comment line
/* That’s all, stop editing! Happy publishing. */ - Add the following constant above that line
define( ‘WP_ALLOW_MULTISITE’, true ); - Save wp-config.php
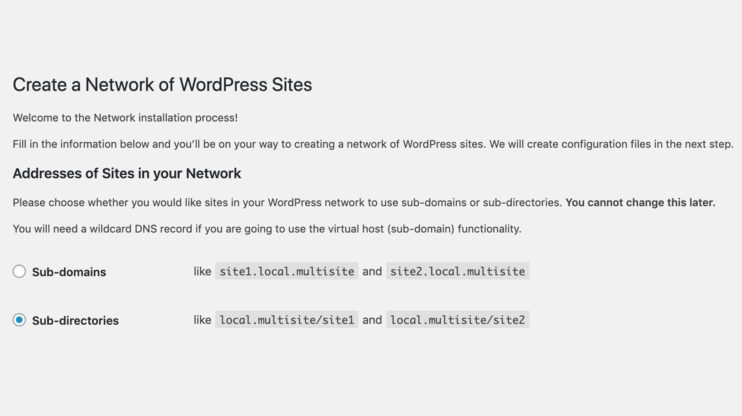
Now you need to log in to your WordPress admin dashboard. Following the previous steps, you’ll find the “Network Setup” submenu under the Tools menu . Go to Tools > Network Setup. Here you are asked to select whether you want sites in your WordPress network to use sub-domains or sub-directories. And note that once you choose an option you can’t change it later.
If you choose subdomains your URLs will look like this: subdomain.example.com, in the case of sub-directories: example.com/subdirectory. Both types are equally acceptable, except that subdomains need extra DNS configuration, which your hosting has to provide (with 10web you can easily manage it) and there will be a need to purchase wildcard SSL (with 10Web you can generate certificates for free for each subdomain). Sub-folder is much easier, you don’t need server-side extra setups.
Note that if you have an existing website with multiple pages and want to enable multisite and allow others to create subsites be careful when choosing sub-directories. If for instance, there is a page with a slug “hello-world” and you create a subsite named hello-world there will be a conflict. So, to avoid these types of conflicts choose a sub-domain for existing sites.
After choosing the network type that will work best for you fill the network title and admin email fields and click the Install button. Now, you are on the Enabling Network screen.
Steps for a sub-directory network type:
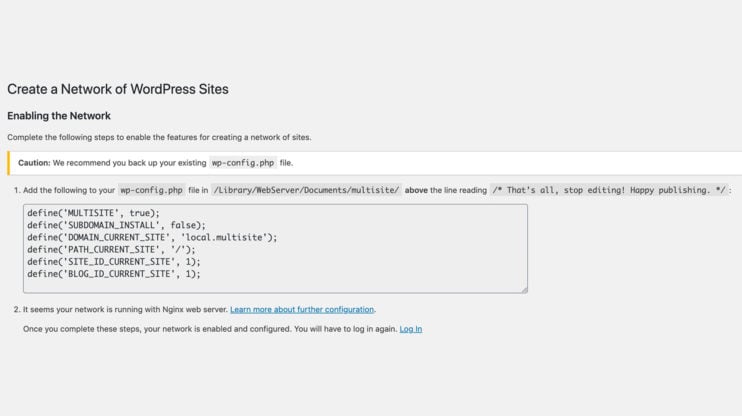
Open wp-config.php and add the following constants above /* That’s all, stop editing! Happy publishing. */, by replacing DOMAIN_CURRENT_SITE with your own.
define('MULTISITE', true);
define('SUBDOMAIN_INSTALL', false);
define('DOMAIN_CURRENT_SITE', 'local.multisite');
define('PATH_CURRENT_SITE', '/');
define('SITE_ID_CURRENT_SITE', 1);
define('BLOG_ID_CURRENT_SITE', 1);
If your network is running with an apache web server, find your .htaccess file (you can find more about this here). If you don’t have it, just create a new one and add the following rewrite rules:
RewriteEngine On
RewriteRule .* - [E=HTTP_AUTHORIZATION:%{HTTP:Authorization}]
RewriteBase /
RewriteRule ^index\.php$ - [L]

# add a trailing slash to /wp-admin
RewriteRule ^([_0-9a-zA-Z-]+/)?wp-admin$ $1wp-admin/ [R=301,L]

RewriteCond %{REQUEST_FILENAME} -f [OR]
RewriteCond %{REQUEST_FILENAME} -d
RewriteRule ^ - [L]
RewriteRule ^([_0-9a-zA-Z-]+/)?(wp-(content|admin|includes).*) $2 [L]
RewriteRule ^([_0-9a-zA-Z-]+/)?(.*\.php)$ $2 [L]
RewriteRule . index.php [L]
If your network is running with an Nginx web server, follow these instructions:
Note that this is for a standalone Nginx setup, where Nginx is a primary server instead of an Apache. To make WordPress work with Nginx you should configure the backend PHP-CGI. Find more information about this in this article: WordPress+Nginx.
This is the Nginx configuration file for the sub-directory network:
# WordPress multisite subdirectory rules.
# Designed to be included in any server {} block.

map $uri $blogname{
    ~^(?P/[^/]+/)files/(.*)   	$blogpath ;
}

map $blogname $blogid{
    default -999;

    #Ref: https://wordpress.org/extend/plugins/nginx-helper/
    #include /var/www/wordpress/wp-content/plugins/nginx-helper/map.conf ;
}

server {
    server_name example.com ;

    root /var/www/example.com/htdocs;
    index index.php;

    location ~ ^(/[^/]+/)?files/(.+) {
        try_files /wp-content/blogs.dir/$blogid/files/$2 /wp-includes/ms-files.php?file=$2 ;
        access_log off; 	log_not_found off; expires max;
    }

    #avoid php readfile()
    location ^~ /blogs.dir {
        internal;
        alias /var/www/example.com/htdocs/wp-content/blogs.dir ;
        access_log off; 	log_not_found off; expires max;
    }

    if (!-e $request_filename) {
        rewrite /wp-admin$ $scheme://$host$request_uri/ permanent;
        rewrite ^(/[^/]+)?(/wp-.*) $2 last;
        rewrite ^(/[^/]+)?(/.*\.php) $2 last;
    }

    location / {
        try_files $uri $uri/ /index.php?$args ;
    }

    location ~ \.php$ {
        try_files $uri =404;
        include fastcgi_params;
        fastcgi_pass php;
    }

    #add some rules for static content expiry-headers here
}
Steps for a sub-domain network type:

Open wp-config.php and add the following constants above /* That’s all, stop editing! Happy publishing. */, by replacing DOMAIN_CURRENT_SITE with your own.
define('MULTISITE', true);
define('SUBDOMAIN_INSTALL', true);
define('DOMAIN_CURRENT_SITE', 'local.multisite');
define('PATH_CURRENT_SITE', '/');
define('SITE_ID_CURRENT_SITE', 1);
define('BLOG_ID_CURRENT_SITE', 1);
To use a subdomain configuration, you must either have a wildcard entry in your DNS or create new domains. A wildcard DNS record is a record in a DNS zone that will match requests for non-existent domain names. It’s specified by using a * as the leftmost label (part) of a domain name, e.g. *.example.com. The exact rules for when a wild card will match are specified in RFC 1034 but the rules are neither intuitive nor clearly specified. With 10Web you can easily add new domains via domain DNS management.
If your network is running with Apache, add these rules to the .htaccess file (you can find more about this here ).
RewriteEngine On
RewriteRule .* - [E=HTTP_AUTHORIZATION:%{HTTP:Authorization}]
RewriteBase /
RewriteRule ^index\.php$ - [L]
# add a trailing slash to /wp-admin
RewriteRule ^wp-admin$ wp-admin/ [R=301,L]
RewriteCond %{REQUEST_FILENAME} -f [OR]
RewriteCond %{REQUEST_FILENAME} -d
RewriteRule ^ - [L]
RewriteRule ^(wp-(content|admin|includes).*) $1 [L]
RewriteRule ^(.*\.php)$ $1 [L]
RewriteRule . index.php [L]
If your network is running with a Nginx web server:
This is the Nginx configuration file for a subdomain network:
map $http_host $blogid {
    default   	-999;

    #Ref: https://wordpress.org/extend/plugins/nginx-helper/
    #include /var/www/wordpress/wp-content/plugins/nginx-helper/map.conf ;

}

server {
    server_name example.com *.example.com ;

    root /var/www/example.com/htdocs;
    index index.php;

    location / {
        try_files $uri $uri/ /index.php?$args ;
    }

    location ~ \.php$ {
        try_files $uri =404;
        include fastcgi_params;
        fastcgi_pass php;
    }

    #WPMU Files
        location ~ ^/files/(.*)$ {
                try_files /wp-content/blogs.dir/$blogid/$uri /wp-includes/ms-files.php?file=$1 ;
                access_log off; log_not_found off;  	expires max;
        }

    #WPMU x-sendfile to avoid php readfile()
    location ^~ /blogs.dir {
        internal;
        alias /var/www/example.com/htdocs/wp-content/blogs.dir;
        access_log off; 	log_not_found off;  	expires max;
    }

    #add some rules for static content expiry-headers here
}
You can find more information about WordPress+Nginx here.
After these steps, you will be asked to log in again. Once logged in, you’ll see a multisite WordPress admin dashboard instead of a regular WordPress admin dashboard. You have successfully set up WordPress multisite. Now let’s explore more of its features.
Managing sites on multisite
Adding new subsites
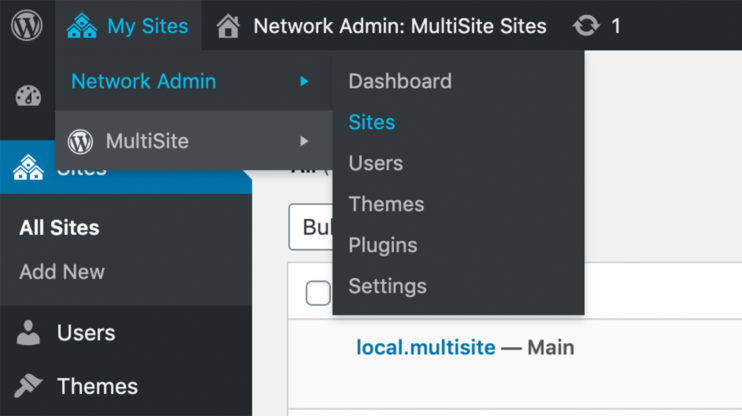
For adding a new subsite to your network go to Network Admin > Sites section.
Click the Add New button and fill the fields for adding a new subsite.
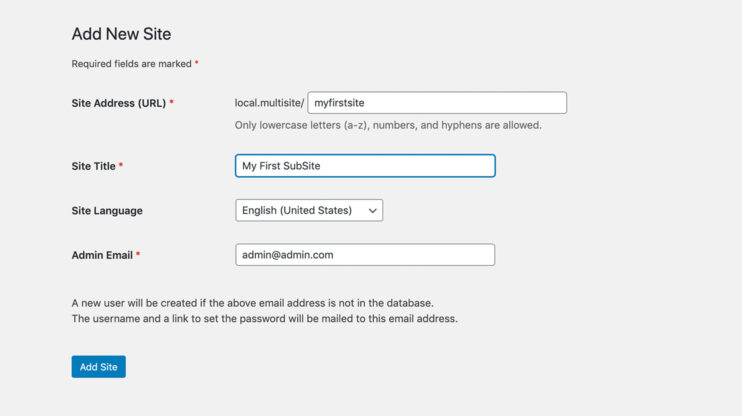
Click the Add Site button. You can find your newly added site in the Sites list.
Installing plugins and themes
Installing plugins and themes in WordPress multisite is similar to installing them in a regular WordPress site, except that you have to do it via Network Admin > Plugins and Network Admin > Themes accordingly.
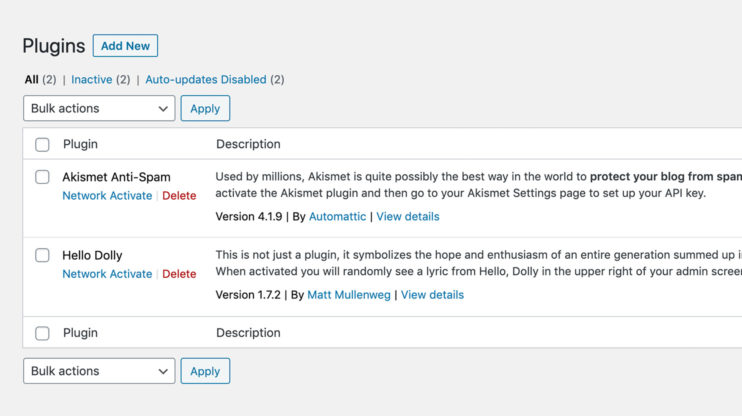
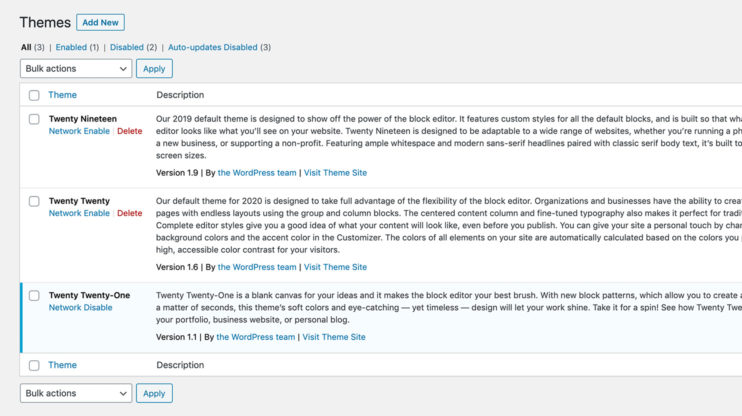
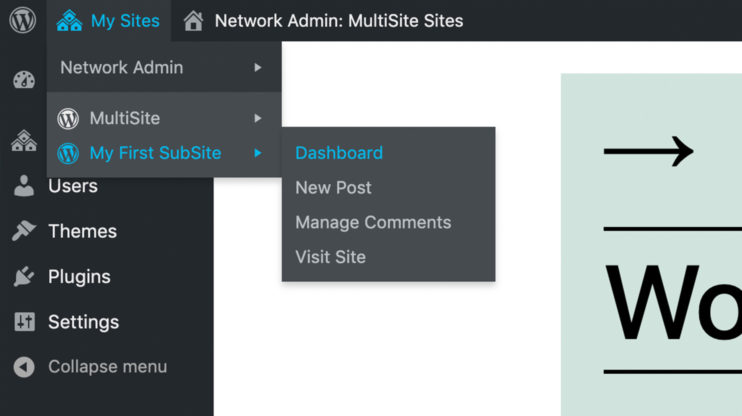
By clicking on the Network Activate link, you activate a plugin or theme for the entire network. You can also activate/deactivate plugins or themes for individual subsites from their individual dashboards. You can visit the individual subsite’s dashboard from the My Sites menu by choosing your preferred subsite.
User Management
Every regular WordPress installation has five user roles: Administrator, Editor, Author, Contributor, Subscriber. With multisite, there’s an additional Super Admin role. The super admin has administrator privileges for all subsites in a multisite network. It also has permission to add new sites and manage network settings.
For allowing new user registrations in your network, go to Network Settings, scroll to Registration Settings, and for the ‘Allow new registrations’ setting enable ‘User accounts may be registered’ option:
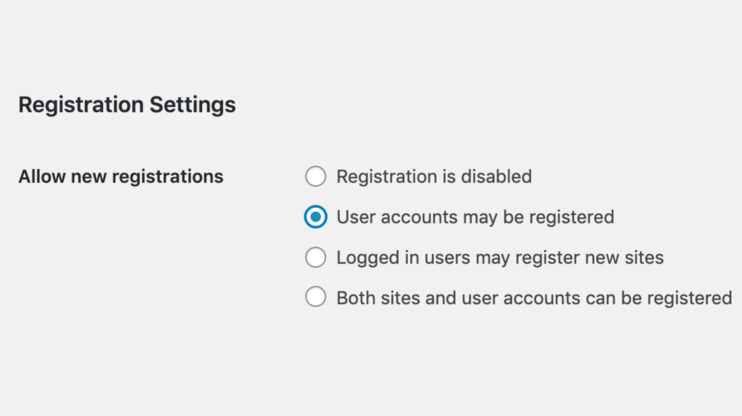
When a user registers on one individual subsite of the network, they are registered for all sites within the network. This means that they can easily navigate through your subsites and have access to all pages that require authentication. This way they don’t need to create a separate account for every site in your multisite network.
You can add different users to the same subsite. For this go to Network Admin > Sites. Then pick a subsite for which you want to add a user then click the > Edit > Users tab.
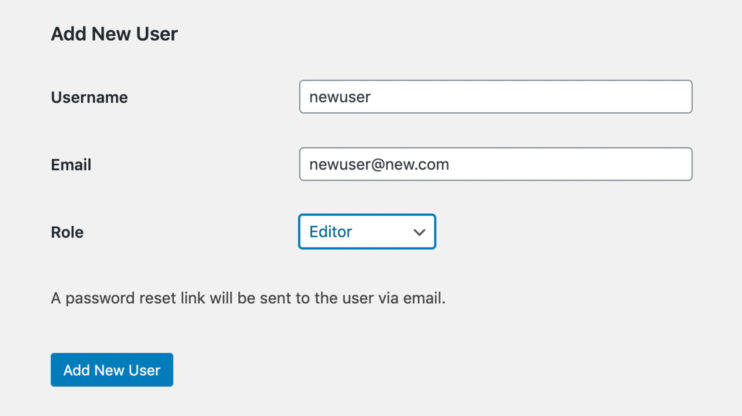
You can select from existing users:
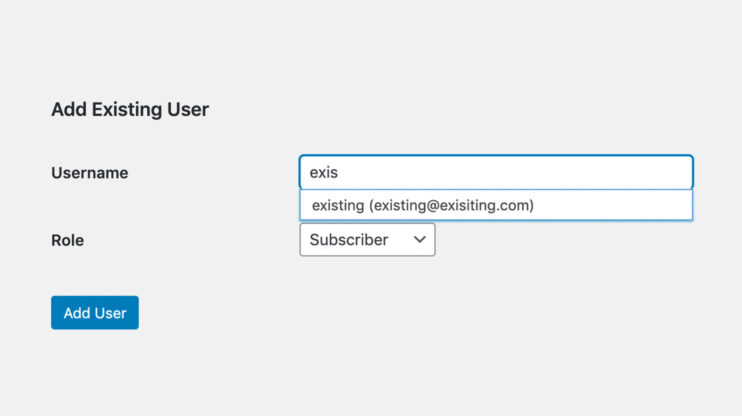
Or you can create a new one.
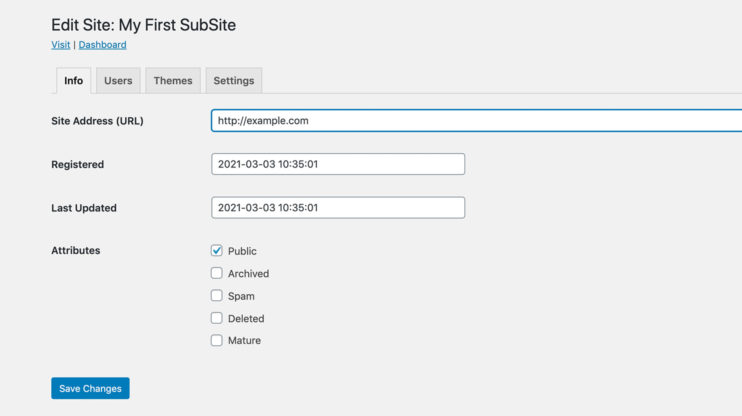
Adding different domains for each subsite
First, your domain name has to be pointed to your hosting server. For this, you have to use DNS configurations. Then you can open your preferred subsite settings and edit the Site Address (URL).
Multisite database and filesystem structure
Now, let’s have a look at the file system and database changes after enabling WordPress multisite. As we told you, WordPress multisite uses a single WordPress installation, which means that your plugins and theme files are the same for all network subsites. The same goes for the database. You have a single database with multisite-related new tables and new tables with numbered prefixes for each subsite.
File system changes
Compared to regular WordPress installations, the only difference in the file system are changes in wp-config.php. We added them according to the above described configurations and structure of uploads directory. After adding a new subsite in the network the new directory named as subsite numerical id is created under the uploads/sites subdirectory.
Database changes
After multisite activation, there are 6 new tables and some changes in existing ones.
The new tables are:
wp_blogs – records all the subsites in the network.
- blog_id – unique numeric id for each blog.
- site_id – the website id that the blog belongs to. (Reference to the wp_site table.)
- domain – base domain name of the blog.
- path – path of the blog.
- registered – the blog registration date and time.
- last_updated – the blog last update date and time.
- public – 0 or 1, shows if the blog is public.
- archived – 0 or 1, shows if the blog is archived.
- mature – 0 or 1, shows if the blog is for mature users.
- spam – 0 or 1, shows if the blog is spammed.
- deleted – 0 or 1, shows if the blog is deleted.
- lang_id – blog language id.
wp_blogs_versions – records the database version of each blog.
- blog_id – the blog’s numeric id. (Reference to the wp_blogs table.)
- db_version – the current WordPress database revision.
- last_updated – the last upgrade date and time.
wp_registartion_log – records the user who registers a new site once it has been activated.
- ID – unique number id.
- email – user’s email address.
- IP – user’s IP Address.
- blog_id – the blog’s numeric id. (Reference to the wp_blogs table.)
- date_registered – the blog registration date and time.
wp-signups – records signed up for but not activated blogs data. When the blog is activated the record is deleted from this table and created in wp_blogs.
- signup_id – unique number.
- domain – the base domain of the blog.
- path – the path of the blog.
- title – the title of the blog.
- user_login – user’s username who registered the blog.
- user_email – user’s email.
- registered – registration date and time.
- activated – activation date and time.
- active – 0 or 1, shows if the blog is active.
- activation_key – activation key used in emails to active the blog.
- meta – metadata about the signup.
wp_site – records one network for the installation and the table is structured in a way that allows having multiple networks in a single database, but this feature was never implemented.
- id – unique number id.
- domain – the base domain of the site.
- path – the path of the site.
wp_sitemeta – this table is similar to the wp_option table with the difference that it’s for network configuration.
- meta_id – unique number.
- site_id – id of the site. (Reference to the wp_site table.)
- meta_key – a key name for the options.
- meta_value – the options data.
The data of the main site is stored in existing unnumbered tables, while the data of additional sites is stored in new numbered tables. More information about the multisite database structure can be found here.
Things to remember when creating a multisite-ready plugin
Don’t hard code table names in your plugin code
As we know WordPress multisite uses a single database with numbered tables for each subsite. Let’s assume we have a network of 2 subsites. In that case, for a table of posts we will have wp_posts and wp_2_posts (if the database prefix is wp_, i.e. the default one). This means that we have to use the global $wpdb object, which has a prefix member property. So, instead of this
$posts = $wpdb->get_results(“SELECT * FROM wp_posts”);
write
$posts = $wpdb->get_results(“SELECT * FROM “ . $wpdb->prefix .”posts”);
Use the switch_to_blog and restore_current_blog functions
Use these functions for different subsite-specific operations in your network. Find more here switch_to_blog and restore_current_blog.
Create tables for each subsite
If your plugin creates tables, make sure that those tables are created for each site. For that, you can use this code when activating your plugin:
if (is_multisite()) {
if (is_plugin_active_for_network(__FILE__)) {

$blog_ids = $wpdb->get_col(“SELECT blog_id FROM”.$wpdb->prefix .“blogs”);

foreach ($blog_ids as $blog_id) {

switch_to_blog($blog_id);

// create tables for each site

create_tables($blog_id);

restore_current_blog();

}
}
}
Correctly store options
Store subsite-specific configurations in subsite options tables (wp_options, wp_2_options, …) and network-specific configurations in wp_site_meta tables.
Automated multisite management with 10Web
10Web provides an easy way to automatically enable and manage your multisite in our dashboard. You can easily add/delete subsites in your network and point different domain names to them.
Create WordPress multisite with 10Web’s dashboard
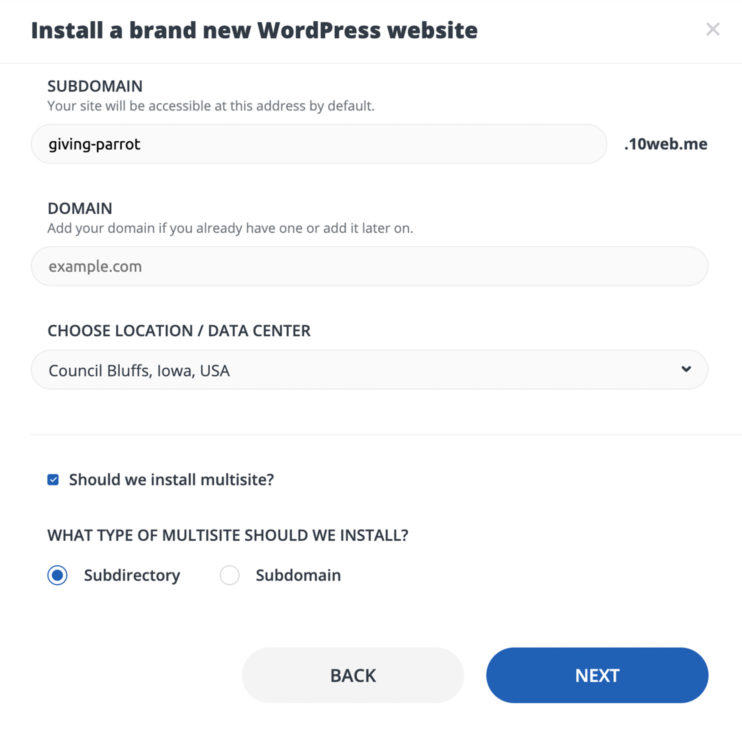
With 10Web, you can automatically create WordPress multisite without any manual configurations. All you need to do is check the checkbox “Should we install multisite?” on the Install New Website prompt and then choose your preferred multisite type: subdomain or subdirectory.
Managing WordPress multisite with 10Web’s dashboard
You can easily add, remove and manage subsites form 10Web’s dashboard via the Network: My Sites list.
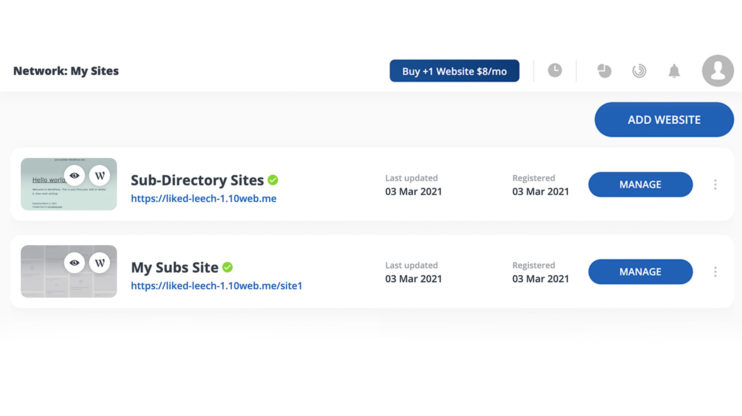
For adding a new subsite just enter the site address URL, site title, select a language for your subsite, and set an admin email. You can either use the existing WordPress user email or set a new one. The new user will then be created. After filling out the fields click the Add Site button and you’re done!

10Web services for WordPress multisite
10Web provides the same services for WordPress multisite as for regular WordPress sites. You can create backups, optimize images, run security scanners, point domain names, generate certificates, use SEO services, the 10Web builder, and, finally, install plugins and themes for your network.
As we already know, subsites of the multisite network share the same filesystem and database. And since we provide backup and security services for the entire network you can find them in the Multisite Network screen as shown in the pictures below.
Below you’ll find the subdirectory case,
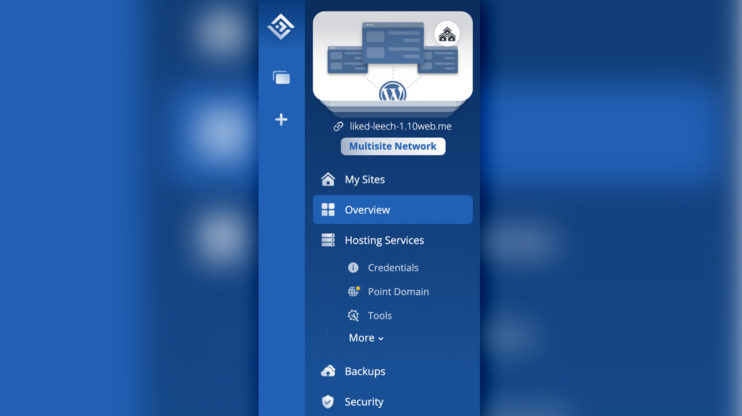
while here there’s the subdomain case.

You can perform image optimizations, use SEO services, install/activate/deactivate plugins and themes, and build a subsite with the 10Web builder for individual subsites. In the picture below you’ll find the subdirectory case:
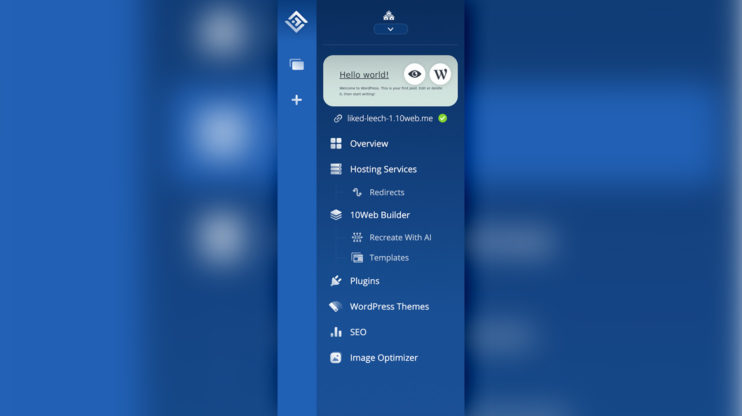
And here the site subdomain case:

For hosting services – depending on the multisite type (subdirectory or subdomain) – you can manage them either for individual sites or the entire network. For example, for a subdomain multisite you should point a domain for each subsite, but in the case of a subdirectory you should point a domain from the Multisite Network screen for the entire network.
Fully Automated WordPress Hosting
Test 10Web for free, and enjoy all the benefits of a secure Google Cloud Partner hosting and website building with AI.
Fully Automated WordPress Hosting
Test 10Web for free, and enjoy all the benefits of a secure Google Cloud Partner hosting and website building with AI.

Point domains
The procedure of pointing domains is similar to the one for a regular WordPress site. For a subdirectory multisite you can point a domain by going to Multisite Network > Hosting Services > Point Domain. For a subdomain multisite, you have to choose the preferred subsite from the My Sites list and go to Hosting Services > Point Domain. You have to follow the steps as described in this article: How to point your domain to 10Web.
Conclusion
As you can see, WordPress multisite is an amazing and advanced feature with lots of benefits. We hope that after reading this article you can easily create and manage your own network.
If you have any questions, you know the drill!
Simplify WordPress with 10Web
Simplify WordPress with 10Web
Skip and automate manual work with 10Web Managed WordPress Hosting and the 10Web AI Website Builder.