Integrating Printify with WooCommerce simplifies the sale of custom print-on-demand products through your online store. This guide outlines the necessary steps, from configuring WooCommerce settings to installing the Printify plugin in a simple setup.
By following this comprehensive approach, you will learn how to connect Printify to WooCommerce, ultimately expanding your ecommerce offerings, enhancing product customization, and streamlining order fulfillment. Whether you have just started or are an experienced ecommerce merchant, this guide provides all the tools needed to successfully connect Printify with your WooCommerce platform.
FAQ
Can you link Printify to WooCommerce?
How do I add Printify to my WordPress site?
Can you integrate Printful with WooCommerce?
Can I integrate Printify with my website?
Getting started with Printify and WooCommerce
Integrating Printify with your WooCommerce store is a straightforward process that can expand your ecommerce capabilities by allowing you to sell custom print-on-demand products. Here’s how to get started, if you want to learn how to connect Printify to WooCommerce:
Configure WooCommerce settings
To integrate WooCommerce with external services like Printify, your store settings need to be properly configured.
- Log in to your WordPress dashboard.
- Navigate to WooCommerce and select Settings.
- Click on the Permalinks tab – it’s essential to have the right permalink structure as it allows API calls to be correctly processed.
- Choose a common permalink setting (for example, ‘Post name’) to ensure your URLs are SEO-friendly and accessible by Printify.
Install the Printify plugin
After configuring your WooCommerce settings, you’ll need to install the Printify plugin to your WordPress site. Here are the steps you should follow:
- Navigate to your WordPress dashboard and select Plugins from the menu.
- Click on the Add New button at the top of the page.
- In the search field, type in Printify for WooCommerce and press Enter.
- Locate the Printify plugin in the search results and click on the Install Now button beside it.
- Once the plugin is installed, you’ll see the Activate button appear in place of the Install button. Click on Activate to enable the plugin on your WordPress site.
The Printify plugin is now installed and activated, ready for you to connect with your Printify account and start adding your custom products to your WooCommerce store.
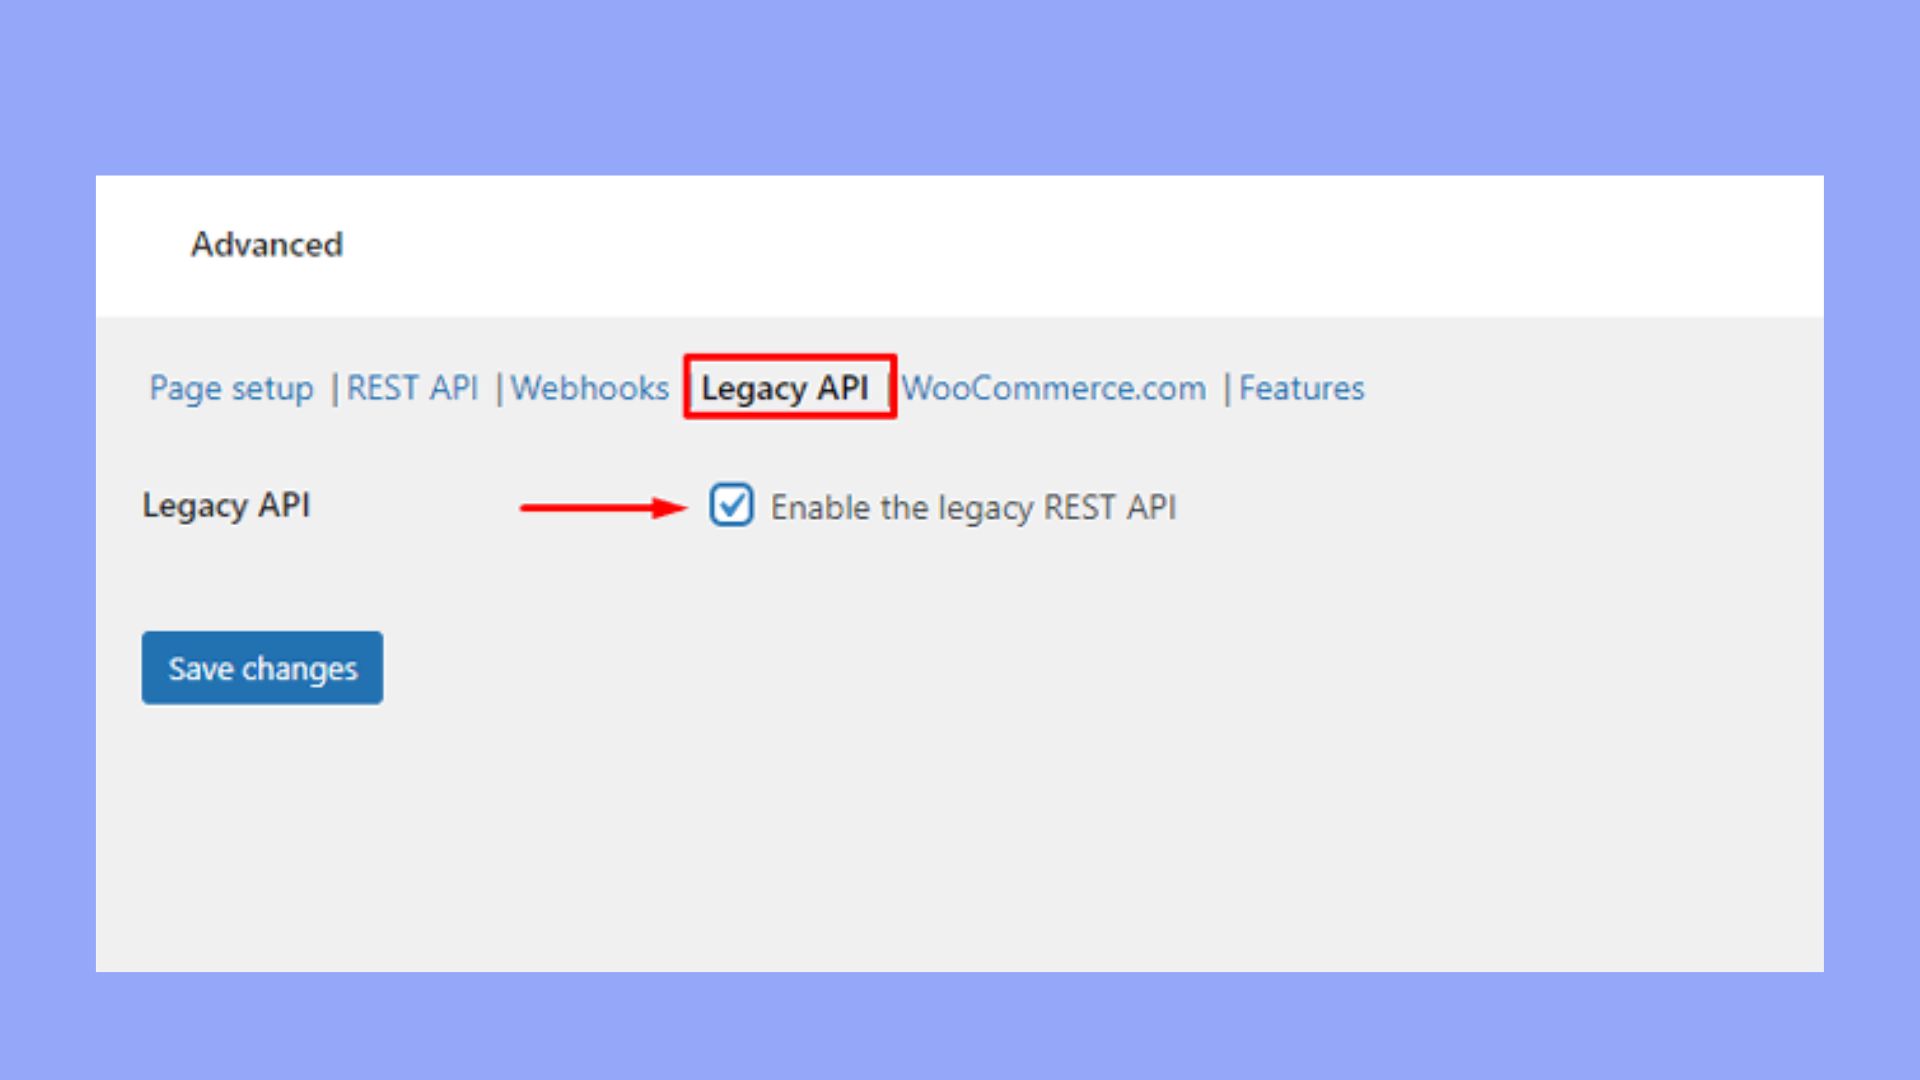
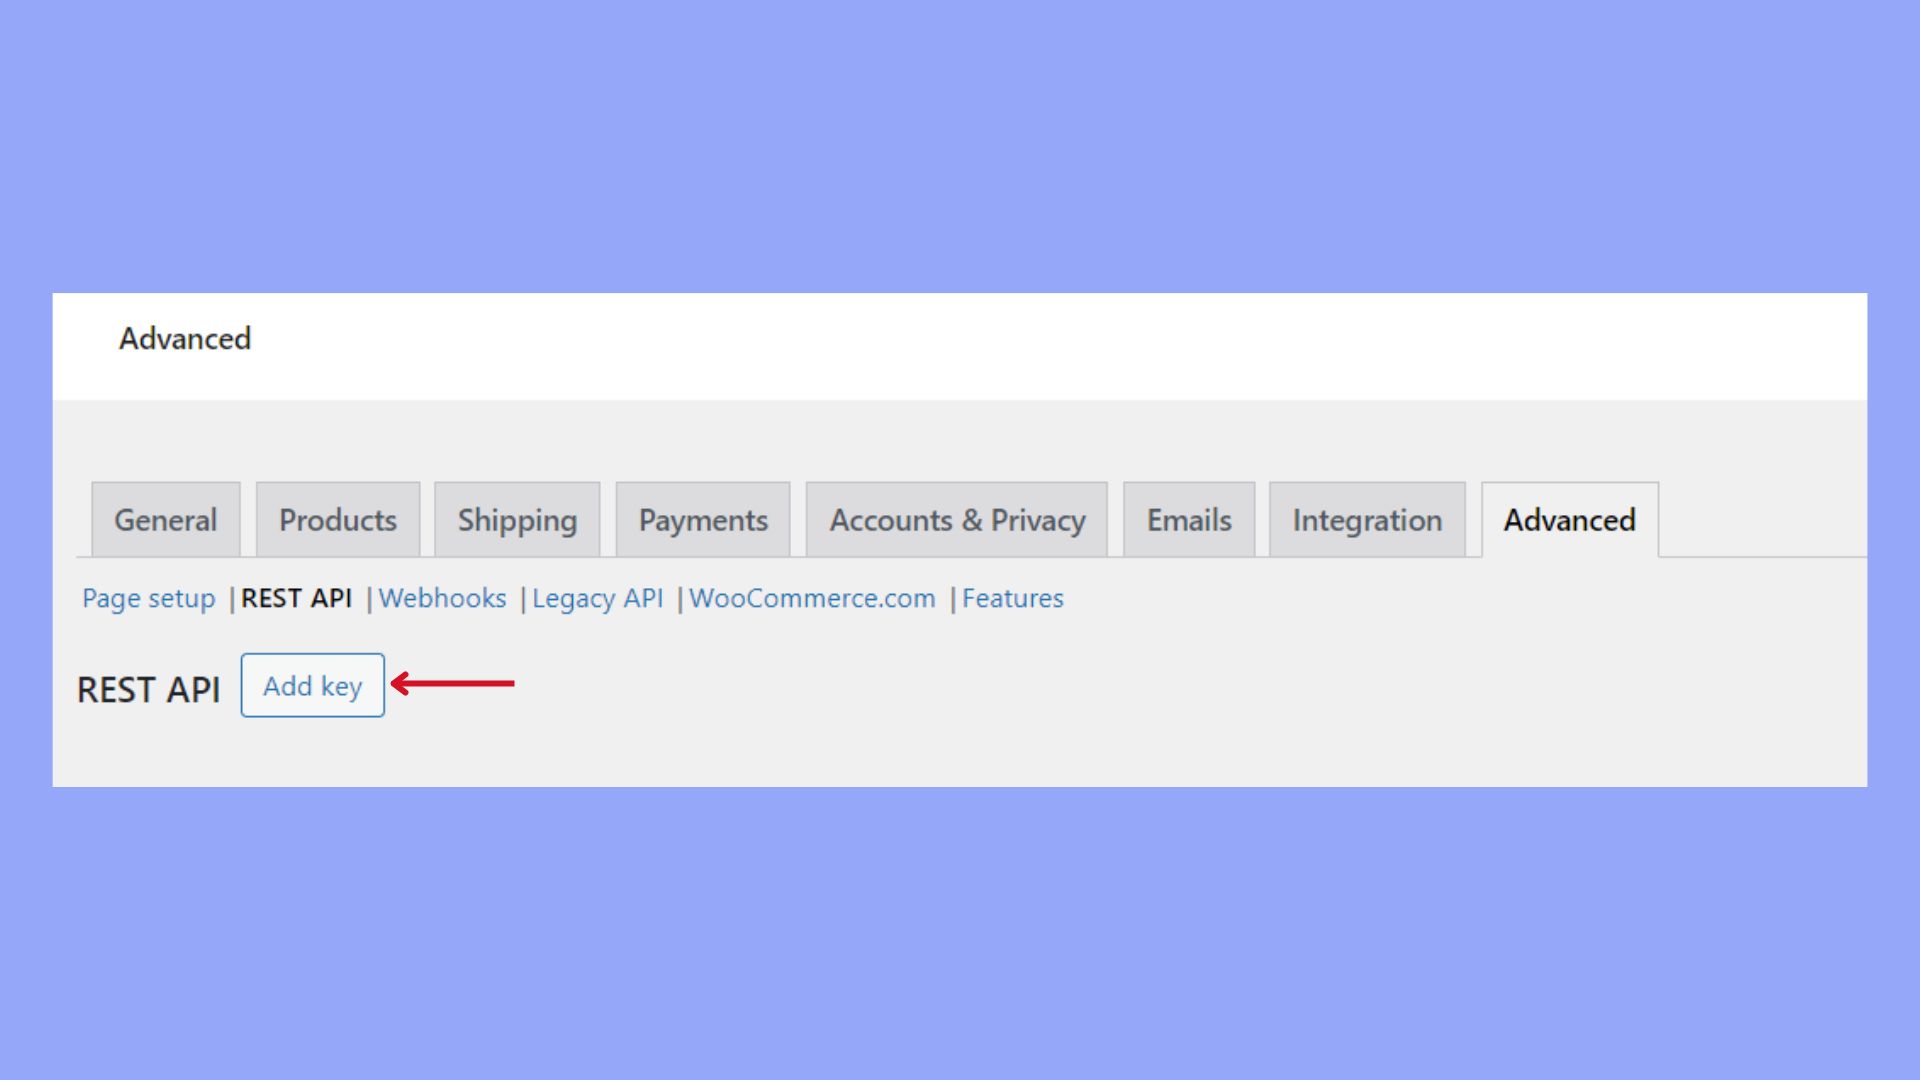
Manage API credentials
The API is the bridge between WooCommerce and Printify, allowing both systems to communicate.
- Go back to the WooCommerce settings.
- Click on the Advanced tab to access the API management area.
- Under the Legacy REST API, make sure to activate the Enable the Legacy REST API option.

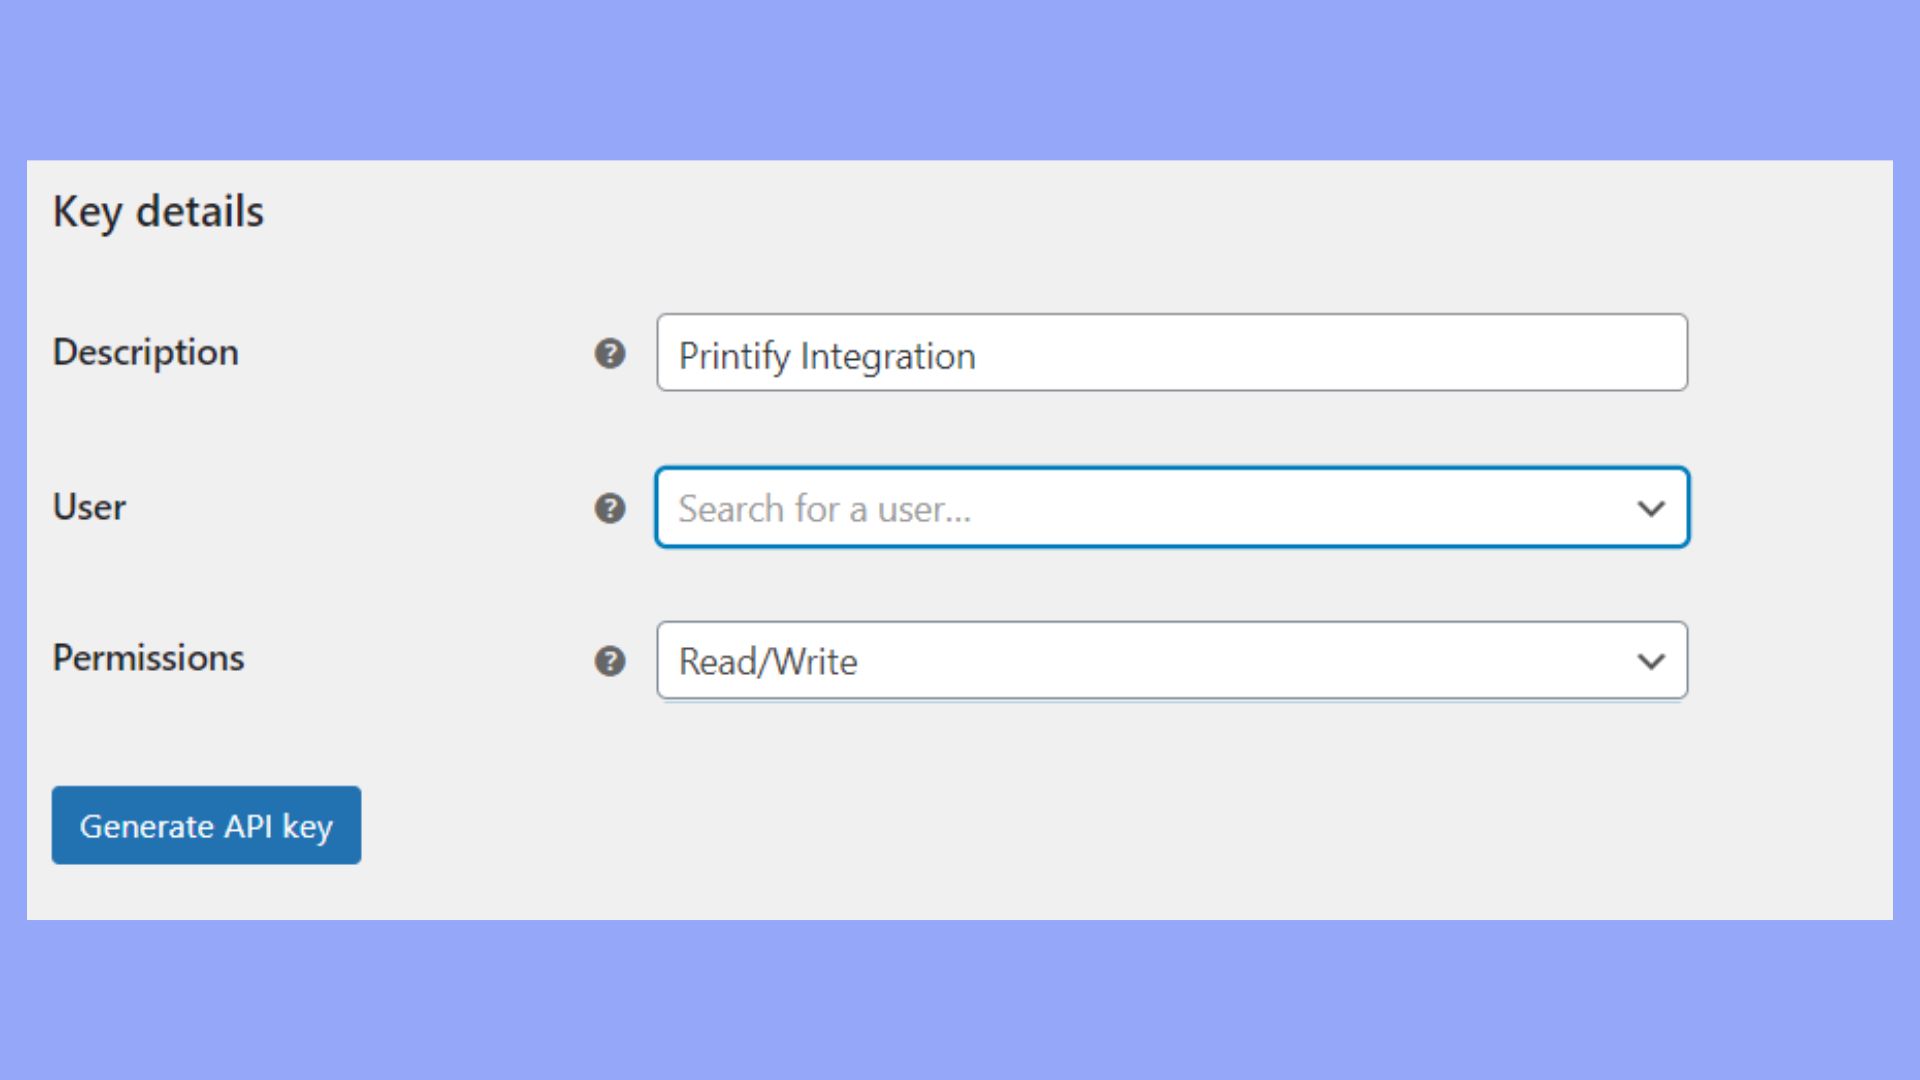
- To manage your keys, go to the REST API and select Add key.
- Input a description (such as ‘Printify Integration’), choose a user, and set permissions to Read/Write.
- Select Generate API key; this will provide you with your consumer key and Consumer Secret. Keep these safe, as they are crucial for connecting to Printify.
By ensuring the correct settings and API credentials are in place, you’re setting the foundation for a seamless integration process with Printify.
Connect Printify to WooCommerce
- Sign up or log in to your Printify account.
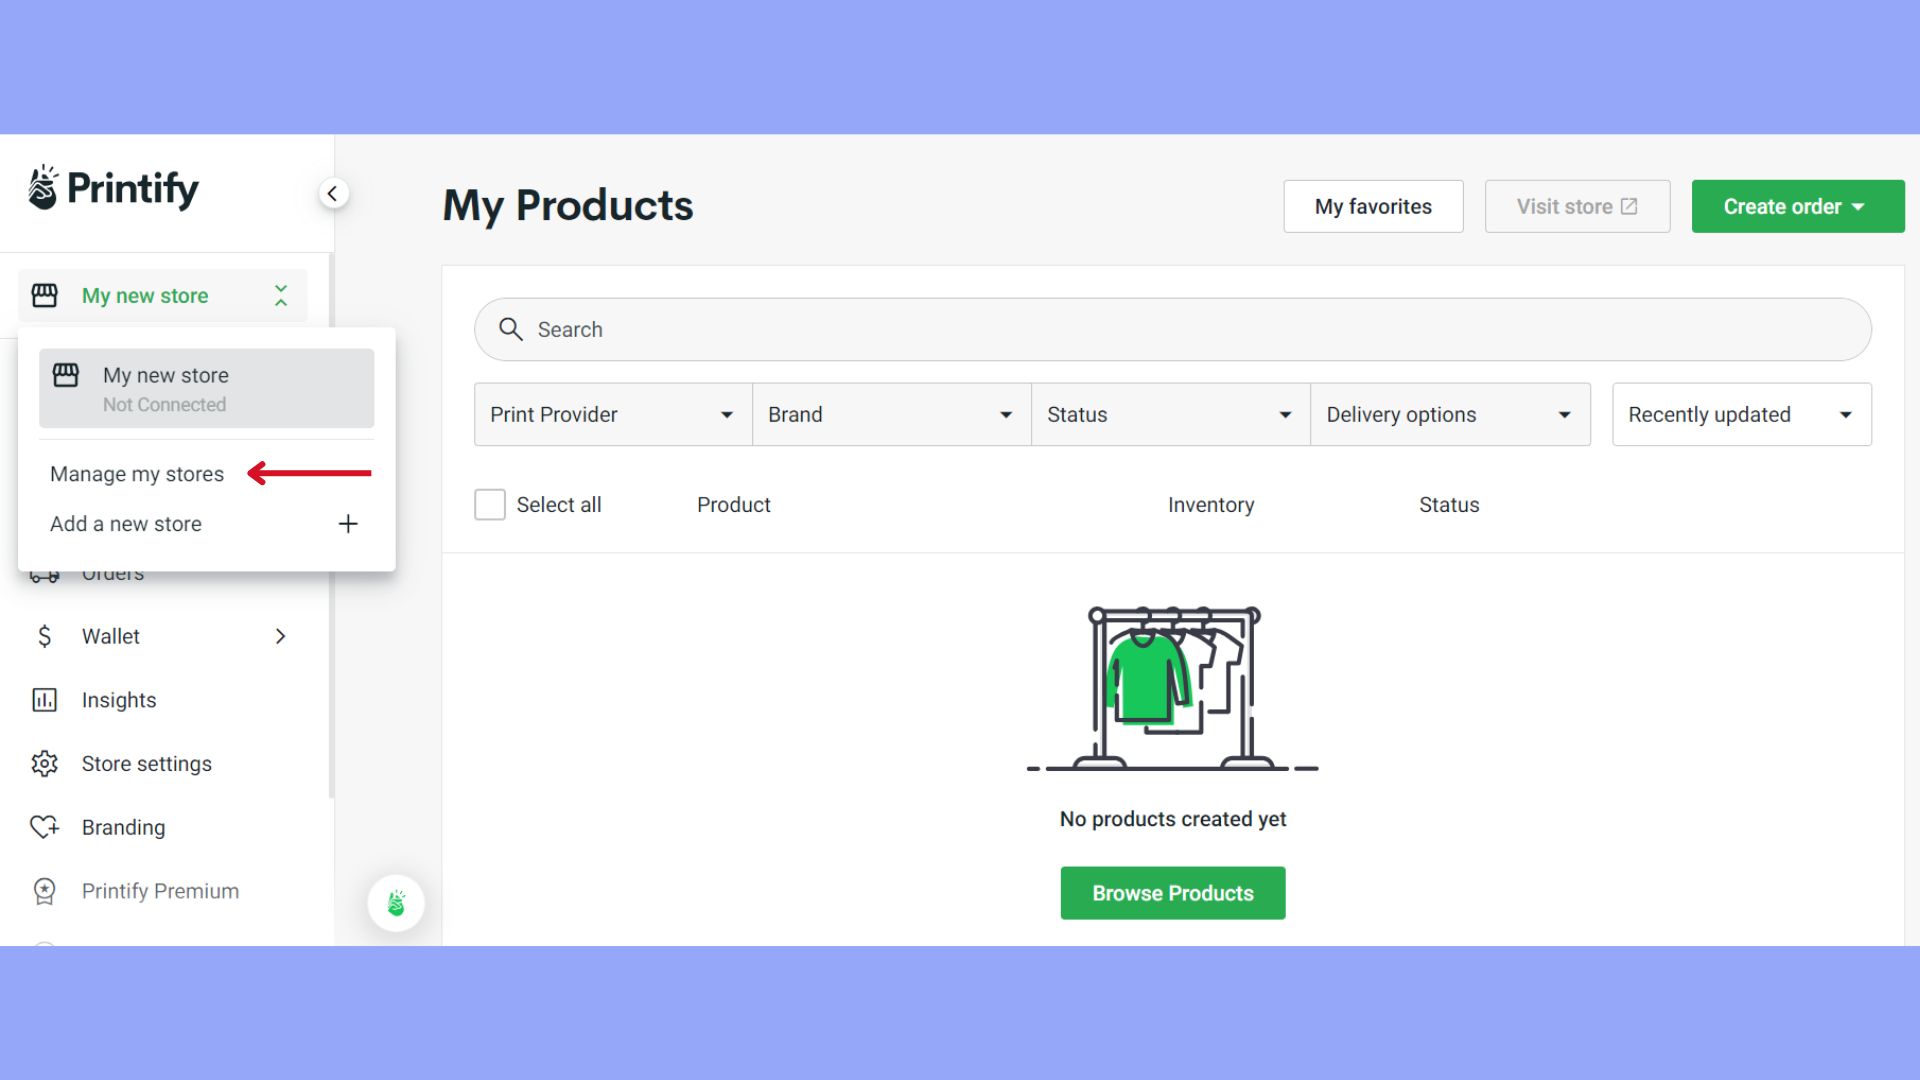
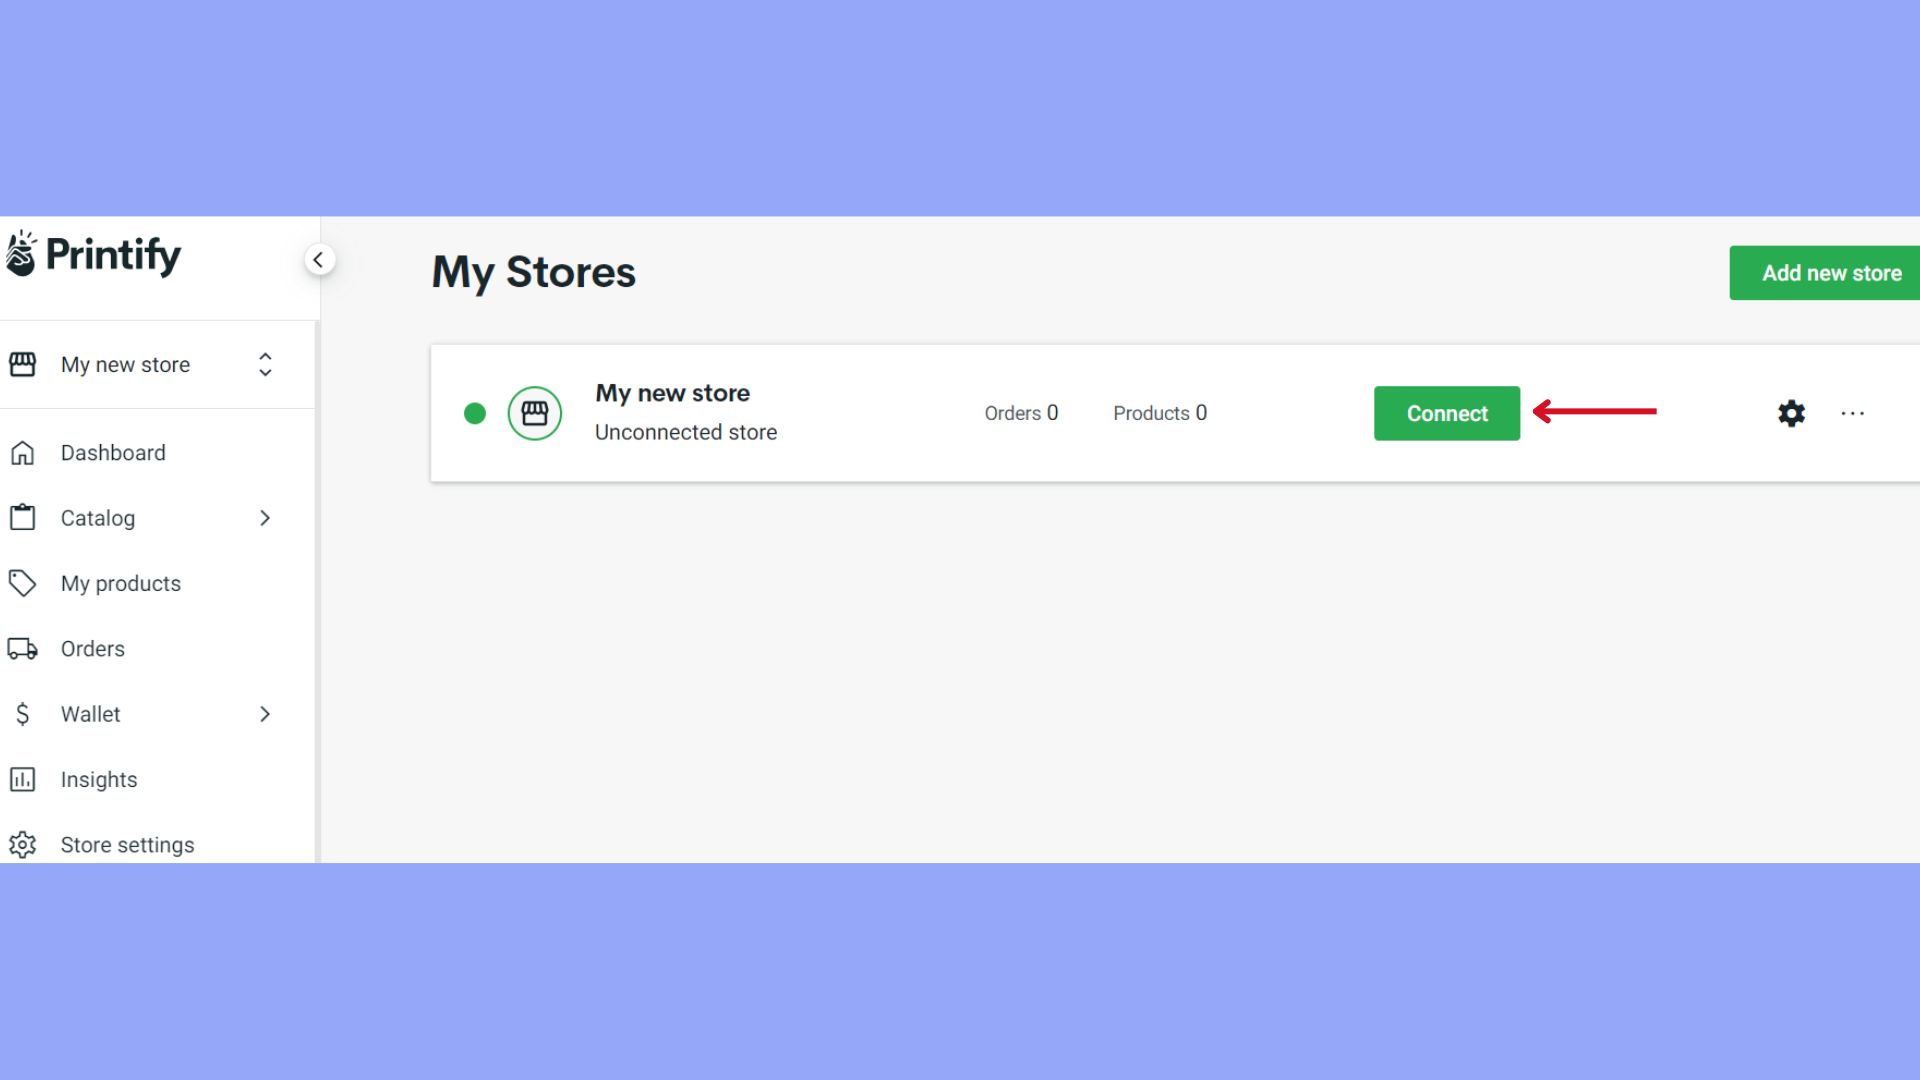
- Navigate to the Manage my stores section from the dropdown menu in the top-left corner of your Printify dashboard.
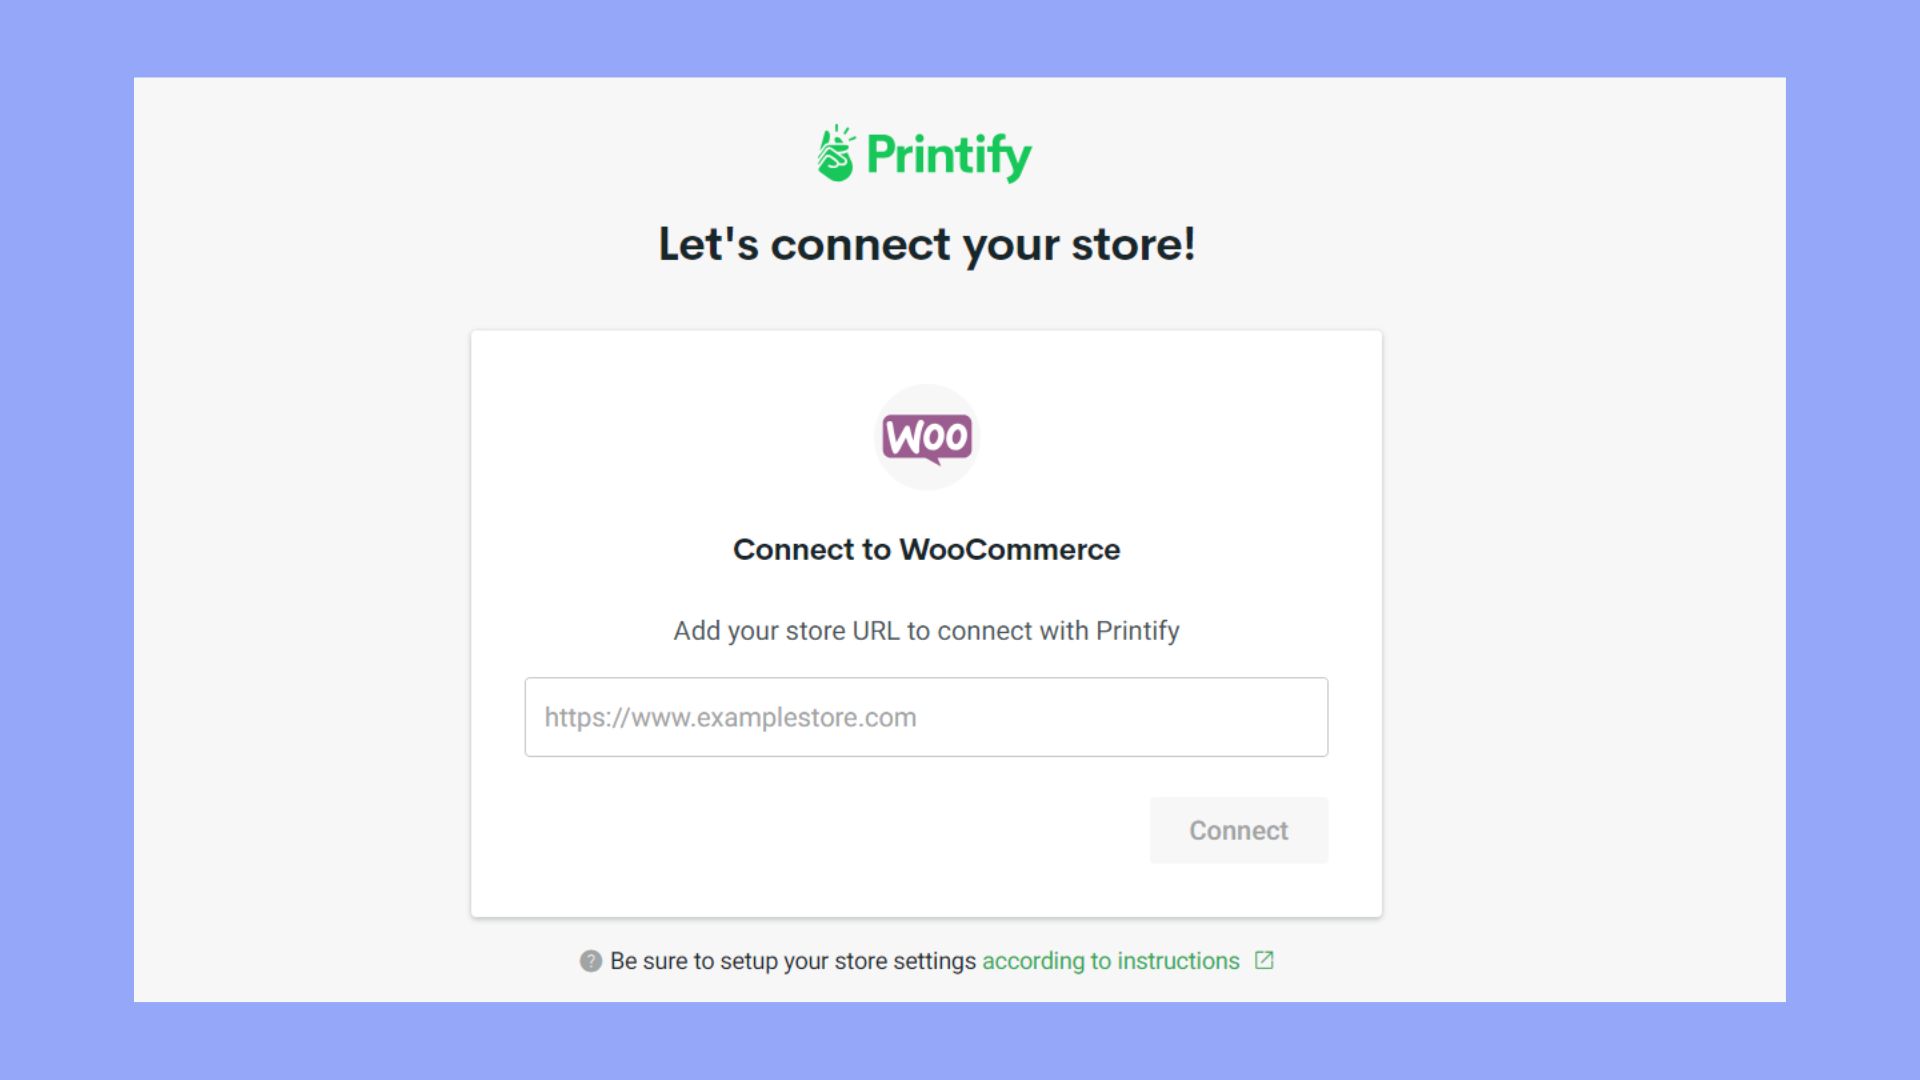
- To link your first WooCommerce store, click on Connect and select WooCommerce from the options provided.
- For users who are adding an additional store, choose Add a new store and select the WooCommerce option.
- Enter your WooCommerce store URL into Printify to initiate the connection process.

By following these steps, you should have a fully integrated system where you can manage your print-on-demand products. Make sure to double-check your settings in both Printify and WooCommerce to ensure a seamless integration process.
Creating and publishing products
When you’re ready to bring your designs to life and showcase them to your customers, the process of creating and publishing your custom products is simple.
Designing print-on-demand products
To start designing your print-on-demand products, choose a product you’d like to create from Printify’s catalog. You have a wide range of items to select from, ensuring that you can find the perfect canvas for your designs. Once you’ve made your choice:
- Go to My Store and select Add Product.
- Choose a product that matches your vision.
- Customize the product by selecting colors and sizes that you want to offer.
- Save the selections and move on to creating your design with the mockup generator.
Using the mockup generator
The mockup generator is a powerful tool that enables you to see your products come to life before they go to market. Make use of it to add your custom designs to the products you’ve selected:
- Upload your design files to the mockup generator.
- Position your artwork on the product and adjust as needed.
- Once you’re satisfied with how your product looks, set your pricing and select Publish.
- Your customized product will then sync with your WooCommerce store, complete with high-quality images for your customers to view.
That’s it! Now your product is live in your store, ready for customers to purchase. With Printify handling your inventory and shipping, you can focus on creating more amazing designs for your store.
Managing orders and fulfillment
Understanding how to efficiently manage orders and fulfillment is crucial when connecting Printify with WooCommerce. Sales and orders from your store can be processed and fulfilled globally, with various shipping options tailored to your needs.
Automating order processing
When your WooCommerce store is integrated with Printify, order processing can become a seamless part of your sales funnel. Here’s how you can automate this process:
- Verify that your WooCommerce store and Printify account are fully connected.
- In your Printify dashboard, navigate to your store settings and select Settings. From there, activate the Automatic order fulfillment option.
- Check that all Printify products are correctly synced to your WooCommerce store.
- Orders will automatically be sent to Printify for fulfillment after customer purchase. You can track the status within your Printify dashboard under the Orders tab.
Setting up shipping rates
To set proper shipping rates and offer a reliable delivery service, follow these steps:
- In your WooCommerce dashboard, go to WooCommerce > Settings > Shipping.
- If you are only selling Printify products, Printify’s shipping rates can automatically sync with your store.
- For a more customized solution, especially if you offer non-Printify products, you might need to set up manual shipping rates. Click on Add Shipping Zone and define the regions and corresponding shipping methods.
- Remember to account for different shipping rates applicable for international fulfillment if you are selling to customers outside your home country.
By setting up your WooCommerce store effectively, you can ensure that orders are processed quickly and shipping rates are in line with your fulfillment strategy.
Conclusion
If you run an ecommerce store and merchandise branded goods, integrating Printify with WooCommerce is a valuable step. The detailed steps outlined in this guide taught you how to connect Printify to WooCommerce seamlessly, manage inventory and orders efficiently, and automate fulfillment processes. This integration not only simplifies your workflow but also enhances your store’s offerings, providing customers with a wide range of customizable products.
Whether you are new to ecommerce or looking to optimize your existing store, the Printify and WooCommerce integration is a powerful solution for achieving your business goals. Follow the steps above to make the integration possible in the easiest way possible.
Create your custom online store in minutes with 10Web AI Ecommerce Website Builder and take your business online. 
Looking to sell online?
Looking to sell online?
Create your online store in minutes
Create your online store in minutes with 10Web AI Ecommerce Website Builder.


![Featured image for How to Add CAPTCHA to WooCommerce Checkout [2 Methods] article](https://10web.io/blog/wp-content/uploads/sites/2/2024/04/add_captcha_to_woocommerce_checkout-742x416.jpg)