When managing an online store, providing detailed product information is essential for enhancing customer experience and driving sales. In WooCommerce, attributes play a crucial role in differentiating products and providing customers with vital details such as color, size, material, and brand. This guide will walk you through the process of adding and managing product attributes in WooCommerce, ensuring you learn how to add product attributes in WooCommerce.
Getting started with attributes in WooCommerce
When you’re dealing with a WooCommerce store, attributes play a key role in differentiating products. Think of attributes as characteristics that help describe your products to the customers. These can range from simple factors like color and size to more complex ones like material and brand.
To start adding attributes to your WooCommerce products, first access your WordPress dashboard. From there, navigate to Products and then to Attributes. Here, you’ll find the options to configure the attributes that you can later assign to your products.
Creating a new attribute:
- Click on Add new attribute to create a new one.
- Enter a Name for the attribute.
- If needed, fill in the Slug; otherwise, it will be automatically generated.
- Optionally, you can select an Attribute type. This will be Select by default, allowing you to choose from dropdowns or create variations.
- Decide if you want to enable Archives. If checked, this will create a dedicated archive page for products that have this attribute.
- Click Add attribute button to save your new attribute.
Once the attribute is created, you’ll want to configure the terms associated with it. For instance, if your attribute is Color, the terms would be the actual colors available like red, blue, or green.
Adding terms to your attribute:
- Find the attribute you’ve just created and click on Configure terms.
- Here, you can Add new terms associated with that attribute.
Remember, you can add and configure as many attributes as you need. Properly utilized attributes enhance your customers’ shopping experience by making it easier to find what they’re looking for. Moreover, they simplify inventory management on your part. Friendly advice: Keep your attributes systematized and straightforward to maintain a clean and efficient store.
Creating global attributes in WooCommerce allows you to define characteristics that apply to multiple products, making your store’s management more efficient and user-friendly.
Defining attribute names
First, you will need to define the name of your attribute. Go to your Products > Attributes in the dashboard. In the Name field, input the attribute you want to apply globally, like Size or Color. Names are how you and your customers will identify the attribute on your store.
Configuring attribute slug
After naming your attribute, you’ll need to assign a Slug; this is the URL-friendly version of the name. It should be in lowercase and typically is a simplified version of the name, such as size or color. It helps keep your website organized and makes it easier for customers to find what they’re looking for.
Organizing attribute terms
The next step is to configure terms for your attribute. These are the specific options within an attribute, like Small or Blue. After saving your attribute, click on Configure terms. Here you can add as many terms as needed, each with its own slug. Terms help sort and filter products, enhancing the shopping experience on your site.

Looking to sell online?
Create your custom online store in minutes with 10Web AI Ecommerce Website Builder and take your business online.
How to add product attributes in WooCommerce?
When you’re ready to give your WooCommerce products more details and diversity, adding custom product attributes will be a critical step. This will allow you to offer more information and choice for your customers, whether that’s size, color, or any other customizable aspect of your products.
Configuring custom attributes
To get started, you’ll navigate to Products in your WordPress dashboard. Here, you’ll find the option to add new attributes by selecting Attributes. Think of each attribute as a characteristic of your product, such as a color or size.
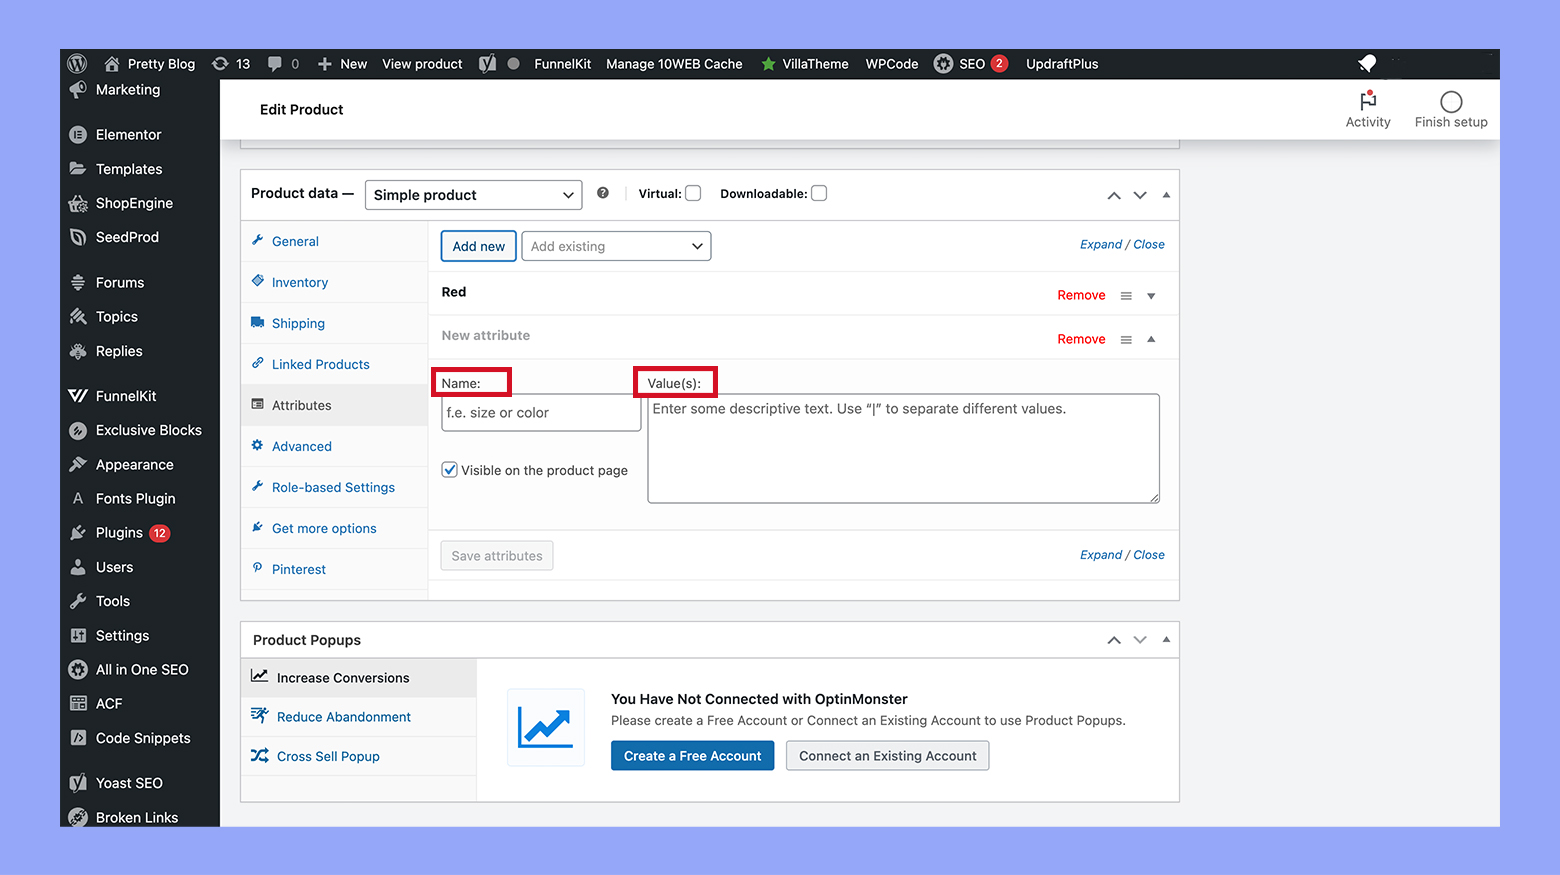
- Click on Add new to create your custom product attribute. This is where you’ll define the attribute’s label, which is the name that will be shown on the product page.

- You can assign a name to your attribute which dictates how it will be displayed to customers. For variable products, which have variations like size or color, this is particularly important.
- Once you’ve named your attribute and chosen its type, you can define the value(s). Value(s) are the specific options within the attribute, such as red or green for color.
- After you’ve input your label and type, remember to click on Add attribute to save your new custom attribute before moving on.
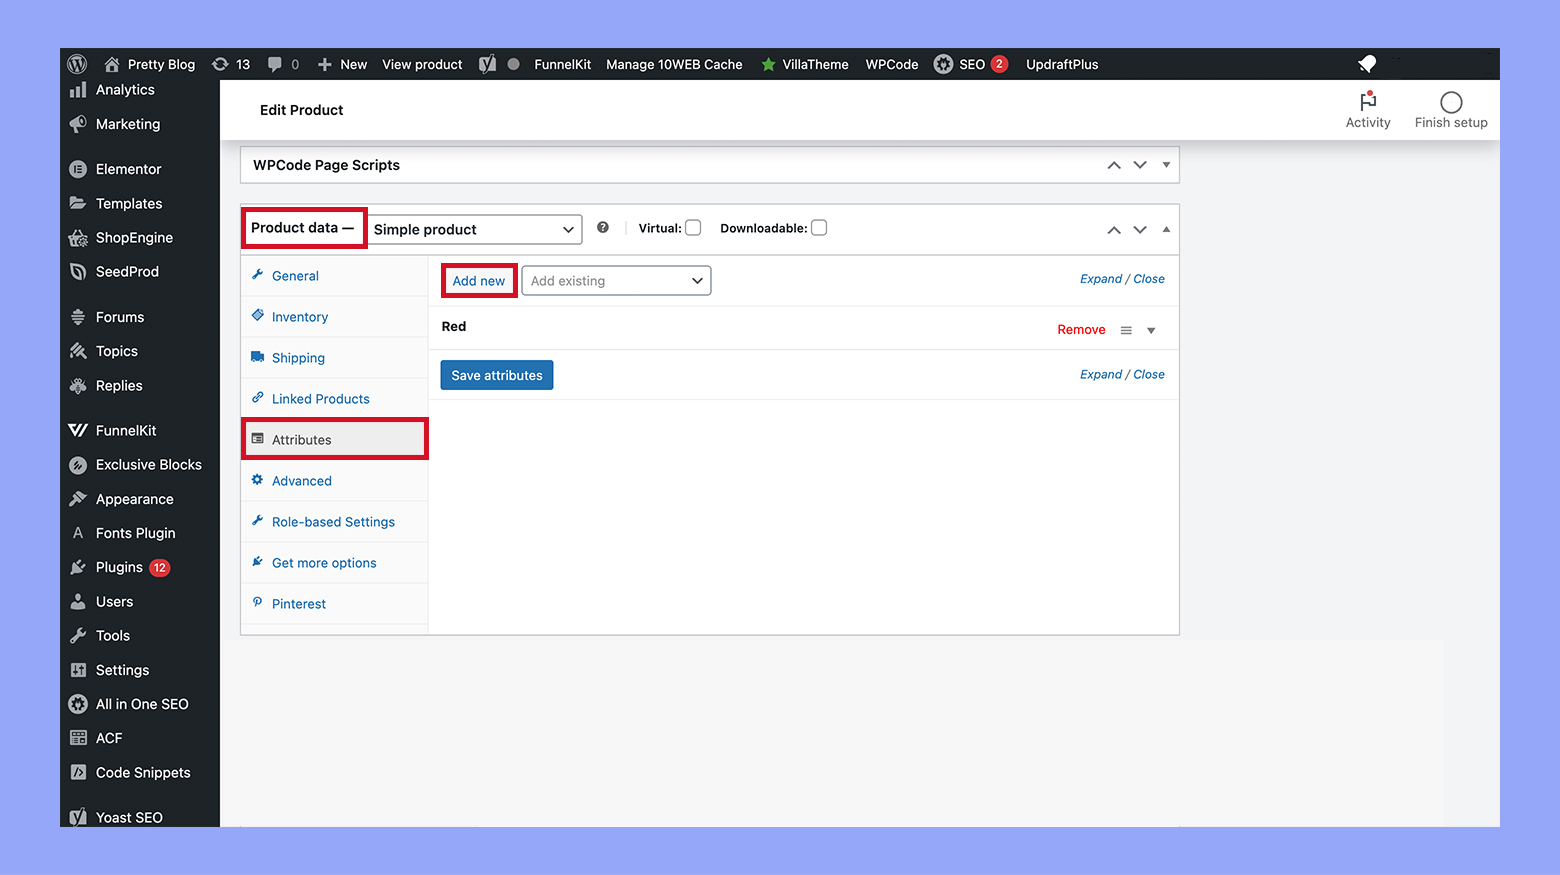
- Next, you’ll need to connect these attributes to your products. You can do this by editing an individual product, scrolling to the Product data section, and selecting the Attributes tab.
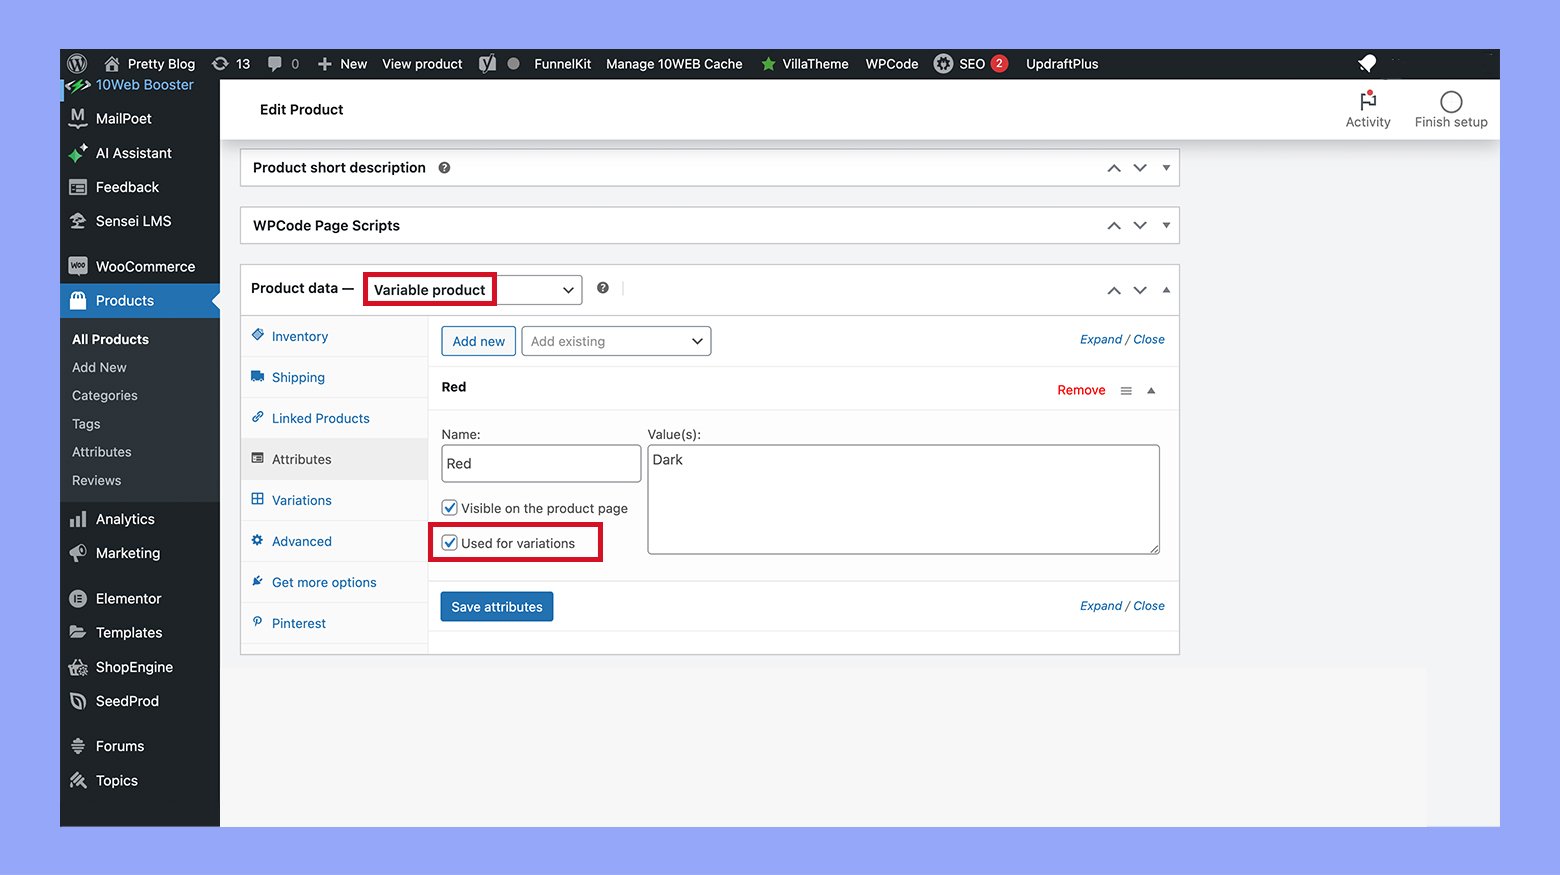
- If you have a variable product, you’ll need to set up attributes for each variation. After adding the attribute, click on Used for variations to ensure customers can select different options.
- Be sure to Save attributes when you’re done to retain your changes.
Remember that attributes are what sets your products apart and help customers make purchasing decisions. By carefully configuring your custom attributes, you’re enhancing your store’s user experience and proudly showcasing the diversity of your products.
Editing product data
To assign attributes to your products, start by opening your WooCommerce store dashboard. Navigate to Products and either add a new product or edit an existing one. Within the edit screen, find the Product data section. Here, click on the Attributes tab to access where you can begin assigning attributes.
- Select the desired attribute from the Add dropdown menu.
- Fill in the value(s) for the attribute; for example, if your attribute is size, then you might add Small, Medium, Large.
- Click Save attributes when you’re done to apply them to the product.
Remember to check the Visible on the product page box if you want the attributes to be seen by customers.
Setting up variations
If you’re dealing with variable products, such as a shirt available in different colors and sizes, you’ll need to create variations based on the attributes you’ve just assigned.
- Go to the Attributes tab and ensure that the attribute you want to use for variations is set to Used for variations.
- Switch to the Variations tab from the Product data section.
- Choose Create variations from all attributes to automatically generate all possible combinations.
For each variation, you can set specific details such as price, SKU, and inventory status. Don’t forget to click Save changes to finalize your variations. By taking these steps, your WooCommerce store will now be able to showcase products with multiple options, enhancing your customers’ shopping experience.
How to use attributes effectively
When setting up your online store, the way your customers navigate and filter products can drastically improve their shopping experience. Let’s look at how to use product attributes effectively.
Filtering by attributes
Attributes in WooCommerce aren’t just for show; they empower your customers to find exactly what they’re looking for. By adding product attributes, such as size or color, you enable filtering options on your shop pages. Consider utilizing attributes to allow customers to filter products and hone in on their choice. For example, a customer could select all shirts in a medium size or reveal all shoes in a specific color. This level of user experience optimization ensures customers can easily sort products based on their preferences.
- Navigate to the Products > Attributes.
- After creating an attribute, click on Configure terms to add the specific details.
- Ensure the Enable archives checkbox is ticked to make the attribute filterable.
Using attributes in navigation
Incorporating attributes into your online store’s navigation streamlines the shopping process. You can add attribute-based filters to your menus or create specialized pages that automatically group products with certain characteristics. This effectively lays out the virtual aisles of your store, guiding your customers through an intuitive shopping journey.
- Create a new menu in Appearance > Menus.
- Use the Product attributes to add filterable attributes to the menu.
- Arrange and Save menu to update your store’s navigation.
Smart use of attributes can make your shop more user-friendly and significantly enhance your customers’ ability to find what they’re searching for, leading to a more enjoyable shopping experience.
Managing attributes and categories
In WooCommerce, effectively managing your product categories and attributes is crucial to creating a user-friendly shopping experience. Categories help customers navigate your store, while attributes provide detailed information and facilitate the comparison of products.
To maintain a well-structured ecommerce site, it’s vital to organize your product categories wisely. Start by navigating to Products > Categories in your dashboard. Here, you can Add new category, entering a name and, optionally, a slug that becomes the URL-friendly version of the category name. Once created, you can delete or edit each category as needed.
Tags add another layer of organization, allowing customers to find products by specific details or features. While editing a product, enter relevant tags in the Product tags box, then click Add. This will help shoppers locate items based on these distinct tags when they visit your store. Remember to click Publish or Update to save your changes, ensuring that these tags get properly applied to the products.
Optimizing attributes for SEO
When you’re adding product attributes in WooCommerce, optimizing for search engines is crucial. To start, navigate to the Attributes tab within the Product data section on your product page. Here you can add attributes that not only serve functional purposes but also contribute to your SEO strategy.
For each attribute, consider how your customers might search for your product. Use relevant keywords that are specific and descriptive. For example, if you’re selling T-shirts, instead of using just size, use shirt size or clothing size to give search engines more context.
Here’s a simple table to help you organize your attributes:
| Attribute Type | Keywords | Example |
| Color | [Color] T-shirt | Red T-shirt |
| Size | [Size] clothing | Medium |
| Material | [Material] apparel | Cotton |
Remember, the goal is to help search engines understand your products better. By doing so, your products are more likely to appear in relevant search queries.
Attributes also offer a chance to outshine competitors in search results. Smart use of keywords in attributes can set you apart and attract more clicks. Just keep it authentic and avoid keyword stuffing.
In short, when setting up your product attributes:
- Use the Attributes tab effectively.
- Think of keywords that match search intent.
- Be specific and clear in your attribute descriptions.
- Avoid overusing keywords to prevent penalties from search engines.
By following these guidelines, you’ll make sure that your WooCommerce store is set up for SEO success!
Conclusion
Effectively adding and managing product attributes in WooCommerce is essential for creating a seamless and informative shopping experience for your customers. We hope this guide answers your question on how to add product attributes in WooCommerce. By following the steps outlined, you can enhance your product listings with detailed attributes, making it easier for customers to find exactly what they’re looking for. Additionally, optimizing attributes for SEO will ensure your products reach a wider audience, driving more traffic to your site.
Looking to sell online?
Create your online store in minutes
Create your online store in minutes with 10Web AI Ecommerce Website Builder.