WordPress categories – also known as parent categories – help organize content, making it quicker for users to find what they’re looking for. This improves the overall experience for visitors and boosts your site’s SEO by grouping similar posts together.
With categories, your website becomes more structured, helping search engines understand and rank your site better. After reading this article, you will be able to understand how to add categories in WordPress and even subcategories by following a couple of easy steps.
FAQ
How to add categories in WordPress menu?
- From your WordPress dashboard, go to Appearance > Menus.
- Select the menu you want to edit from the dropdown menu and click Select.
- On the left side, you’ll see a box titled Categories.
- Select the categories you want to add to the menu by checking the boxes next to them and click Add to Menu.
- You can drag and drop the categories to rearrange their order in the menu.
- Click Save Menu to apply your changes.
How do you add a category block in WordPress?
- While editing a post or page, click the + button to add a new block.
- Search for the Categories block in the block library.
- Click the Categories block to add it to your page.
- You can customize the block settings in the right sidebar, like showing post counts or displaying as a dropdown.
What are categories in WordPress?
WordPress categories are a key feature for anyone looking to organize their website’s content effectively. They help in grouping related posts together, making it easier for readers to find what they’re interested in. Categories improve not just the user experience by simplifying navigation but also play a crucial role in enhancing a site’s SEO performance.
Understanding how to add categories in WordPress and use them efficiently can significantly impact your website. They allow for a structured approach to content organization, benefiting both your site’s visibility in search engines and how visitors interact with your content. Whether you’re setting up a blog, a business site, or a portfolio, using WordPress categories is an essential step toward creating a more organized, user-friendly website.
Simplify WordPress with 10Web
Automate manual work with 10Web Managed WordPress Hosting and 10Web AI Website Builder. Optimize your WordPress website effortlessly.
What are the benefits of adding categories to your website?
Adding categories to your website, particularly if you’re using a platform like WordPress, offers several significant benefits that can enhance both the user experience and your site’s overall performance. Here are some of the key advantages:
Improved navigation
Categories make it easier for users to navigate your website and find the content they’re interested in. By organizing posts into clear, topic-based categories, visitors can quickly locate related content, enhancing their experience and encouraging them to spend more time on your site.
Enhanced SEO
Properly categorized content helps search engines understand the structure and content of your site, which can improve your visibility in search results. Categories allow for the creation of more focused, keyword-rich URLs, titles, and meta descriptions, which can boost your SEO efforts.
Better content organization
As your website grows, so does the amount of content. Categories help keep your site organized, making it easier for both you and your visitors to manage and find content. A well-structured site is more appealing to visitors and can help keep your content relevant and accessible.
Increased engagement
Categories can lead to increased user engagement by making related content easily accessible. When visitors find content that interests them, they’re more likely to explore further if similar articles or posts are readily available. This can lead to longer visit durations and a lower bounce rate.
Effective content strategy
Using categories allows you to plan and implement a more effective content strategy. By understanding the categories that are most popular or engaging, you can tailor your future content to match your audience’s interests, driving more traffic and engagement.
Archives and feeds
Categories in WordPress come with their own archive pages, providing a one-stop location for all posts within a specific category. This can be particularly useful for readers interested in a specific topic. Additionally, categories can be used to create custom RSS feeds based on topics, further enhancing content distribution.
Facilitates content discovery
Categories help in the discovery of older posts. Without categories, older content can become buried and hard to find. By categorizing posts, you’re essentially creating multiple entry points to older content, which can continue to attract views and engagement long after being published.
Simplify WordPress with 10Web
Automate manual work with 10Web Managed WordPress Hosting and 10Web AI Website Builder. Optimize your WordPress website effortlessly.
How to add categories in WordPress?
Creating categories in WordPress is a straightforward process. Here’s a step-by-step guide to help you set up categories and start organizing your content more effectively:
1. Access the WordPress dashboard
First, log in to your WordPress Dashboard. This is where you manage all aspects of your WordPress site.
2. Navigate to categories
In the Dashboard menu, find and hover over Posts, then click on Categories in the submenu that appears. This will take you to the Categories page where you can manage and create new categories.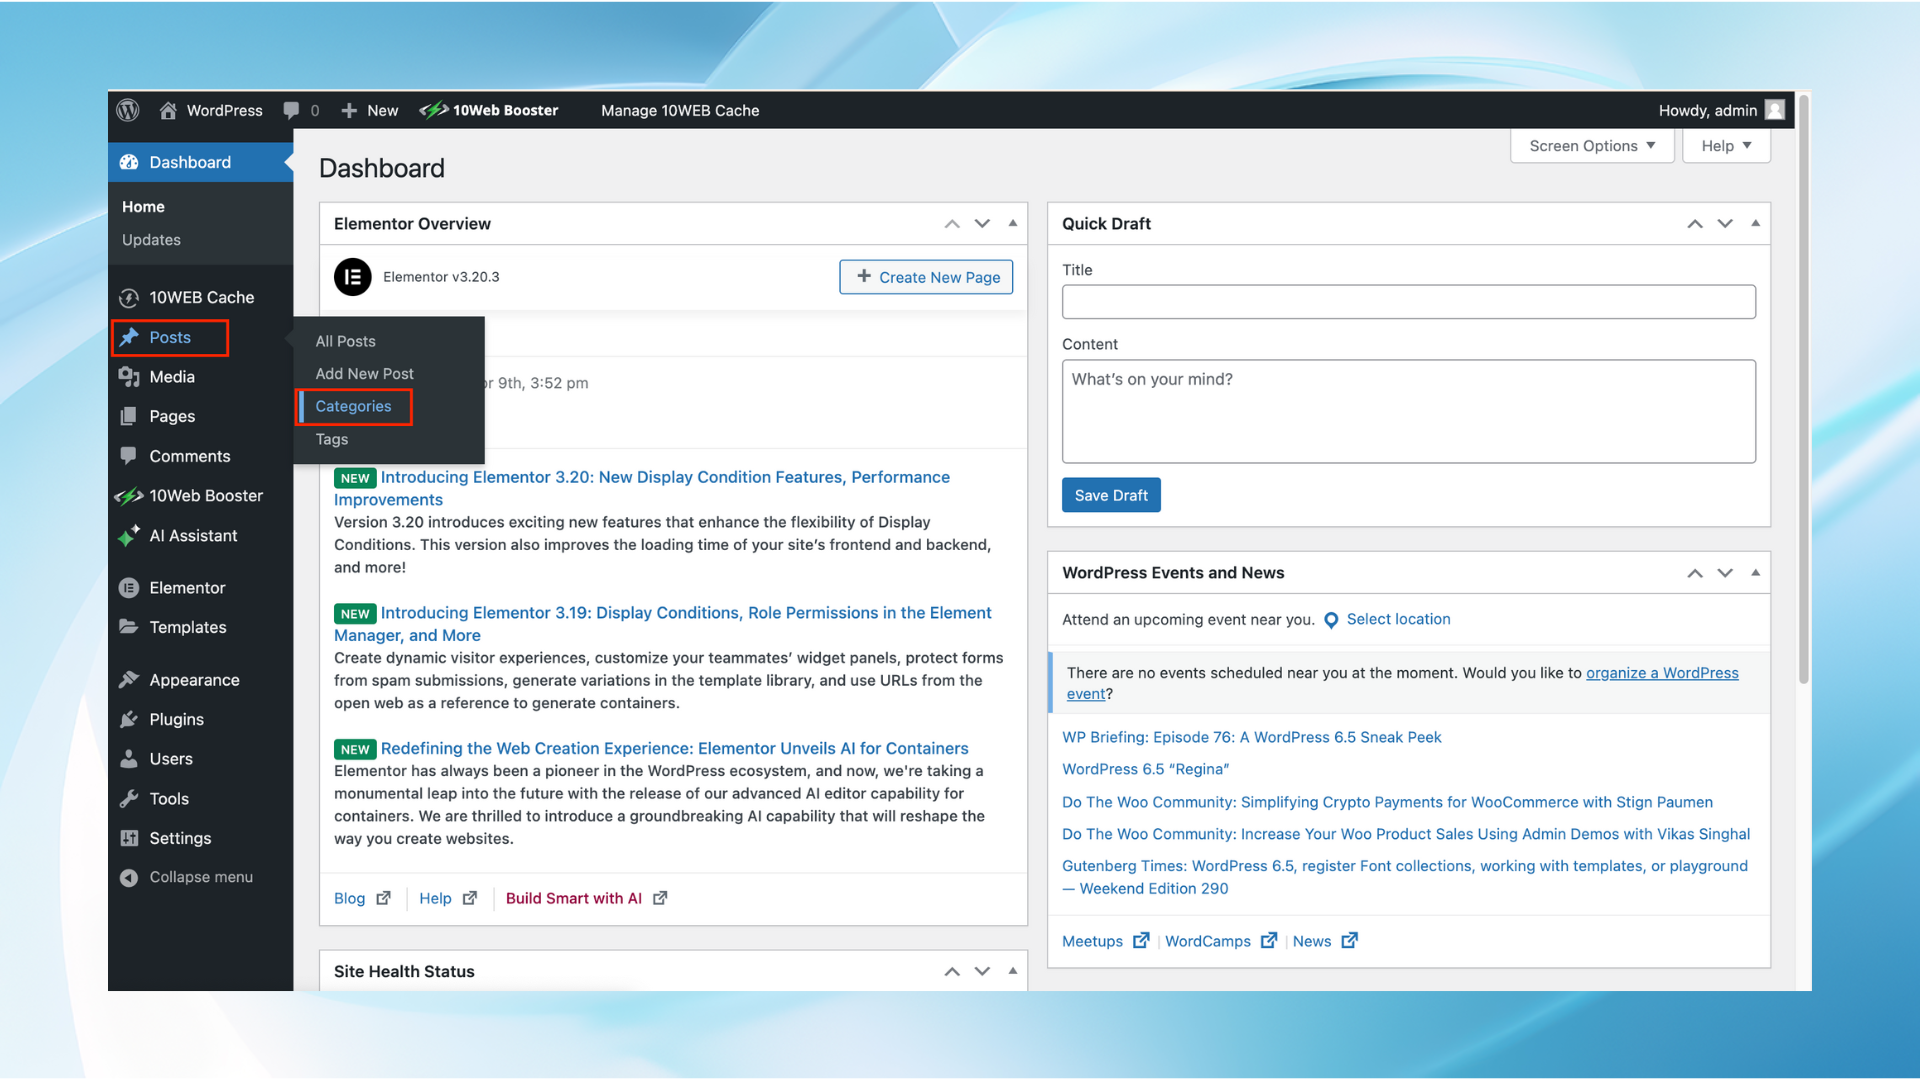
3. Add a new category
On the Categories page, you’ll see a form to add a new category on the left side and a list of existing categories on the right side. To create a new category, you’ll need to fill out the form on the left.
4. Fill out the category details
Here are the details you’ll typically need to fill out:
- Name: The name of the category as you want it to appear on your site.
- Slug: The URL-friendly version of the name. It is usually all lowercase and contains only letters, numbers, and hyphens.
- Parent category: If you’re creating a subcategory, select the parent category from this dropdown. If it’s a main category, you can leave this as None.
- Description: This is optional. Some themes display category descriptions, so you can add one if you like.


5. Add the category
Once you’ve filled out the form, click the Add New Category button. Your new category will now be created and will appear in the list on the right side of the page.
Simplify WordPress with 10Web
Automate manual work with 10Web Managed WordPress Hosting and 10Web AI Website Builder. Optimize your WordPress website effortlessly.
What are subcategories in WordPress?
Subcategories in WordPress are a type of category used to create a more detailed and hierarchical organization of content on your website. They function as more in-depth categories under a broader parent category, allowing you to structure your posts in a more organized manner. This hierarchical structure is particularly useful for websites with a wide range of topics or those that cover topics in significant depth.
In practice, ensure each subcategory has enough content to justify its existence and avoid creating subcategories for one or two posts unless you plan to expand those areas significantly. The goal is to enhance the user experience and site structure, not to complicate it.
They provide a way to logically and efficiently structure large amounts of content, making your website more accessible and easier to navigate for your audience.
How to add subcategories in WordPress?
1. Navigate to the categories page
Once in the Dashboard, hover over the Posts menu item on the left-hand side, then click on Categories in the submenu that appears. This will take you to the page where you manage all your categories.
2. Add a new category as a subcategory
- On the Categories page, you’ll see a form on the left side to add a new category and a list of existing categories on the right.
- To create a subcategory, you start by filling out this form. Enter the name of your subcategory in the Name field.
- The Slug field is where you put a URL-friendly version of the name, typically lowercase and separated by hyphens.
Important: To designate the new category as a subcategory, you must select a parent category from the Parent Category dropdown menu. Choose the category under which you want this new subcategory to appear.
- You can also add a description for your subcategory in the Description field, though this is optional and not all themes display it.

3. Add the new subcategory
After filling out the form, click the Add New Category button. Your new subcategory will now be created and listed under the selected parent category on the right side of the page.
Simplify WordPress with 10Web
Automate manual work with 10Web Managed WordPress Hosting and 10Web AI Website Builder. Optimize your WordPress website effortlessly.
Additional tips
After understanding how to add categories in WordPress, and even subcategories, here are some streamlined tips to keep everything organized and user-friendly:
- Plan ahead: Think about your site’s structure before creating subcategories. A clear plan helps visitors navigate your site more easily and makes your content more accessible.
- Assign posts properly: Make sure to assign your posts to the right subcategories. This keeps your site organized and makes it easier for visitors to find what they’re looking for.
- Edit when needed: You can always change subcategories later—whether it’s their name, parent category, or description—to better fit your content or correct mistakes.
- Avoid empty subcategories: Only create subcategories if you have enough posts for them. Having many subcategories with few posts can make your site look sparse and disorganized.
- Keep it simple: Aim for a balance in your site’s structure. Too many subcategories can confuse visitors, so it’s best to keep things straightforward and intuitive.
Conclusion
In conclusion, effectively using WordPress categories and subcategories is key to organizing your website’s content and enhancing user navigation. Learning how to add categories in WordPress not only improves SEO by creating a structured, easy-to-understand site layout, but it also encourages visitors to explore more content, boosting engagement and retention. By mastering these features, website owners can significantly improve their site’s performance and user experience.
Simplify WordPress with 10Web
Simplify WordPress with 10Web
Skip and automate manual work with 10Web Managed WordPress Hosting and the 10Web AI Website Builder.