When you manage a WordPress website, integrating Google Tag Manager is a strategic step to track and analyze your site’s analytics. With Google Tag Manager, you gain the ability to deploy and update your website tags without having to modify the code directly. It enables a smooth implementation of tracking tools and site analytics.
This powerful system simplifies the process of adding scripts to your website, letting you manage tags. Setting up Google Tag Manager on your WordPress website involves a few simple steps. In this detailed guide, we are going to learn how to install Google Tag Manager on WordPress easily. But, first, let’s understand the essence of the system and how you can benefit from it.
FAQ
Where can I find the Google Tag Manager plugin for WordPress?
What is the best plugin for Google Tag Manager in WordPress?
Can Google Tag Manager be integrated with WordPress using Elementor?
How do I add Google Tag Manager code to WordPress Elementor?
How do I manage and use my Google Tag Manager ID within WordPress?
What’s Google Tag Manager
Google Tag Manager is a free tool that allows you to manage and deploy tracking codes and related code snippets on your website. You can use it to track user behaviors, such as clicks, form submissions, or page views.
GTM functions via a container that hosts various tags for analytics, remarketing, and conversion tracking. You insert a small segment of code into your WordPress website, which then communicates with your GTM container to trigger the appropriate tags when specified actions occur.
The benefits of using GTM on WordPress
If you are wondering why the Google Tag Manager is a worthwhile system to integrate, here are the benefits of using it on your WordPress website.
- Ease of management: GTM simplifies the management of your tracking codes. You can add, edit, or remove any tag without the need to directly edit your site’s code.
- Improved site performance: By loading tags asynchronously, GTM can improve your site’s loading times, which is beneficial for both user experience and SEO.
- Versatility: It can be used to deploy a wide range of tags for Google Analytics, Google Ads, and third-party services.
- Debug options: Built-in tools like Preview and Debug modes allow you to test and troubleshoot tags to ensure they are firing as expected.
- User permissions: GTM allows you to set varying levels of access for different users, providing you with control over who can make changes to your tags.
- Automation: GTM can handle complex tag configurations, including firing sequences and triggers based on user interactions, freeing you from repetitive tasks.
By using GTM on your WordPress site, you streamline your tracking management, which saves time and reduces potential errors. It will help you make informed decisions based on user data.
Automate manual work with 10Web Managed WordPress Hosting and 10Web AI Website Builder. Optimize your WordPress website effortlessly. ![]()
Simplify WordPress with 10Web
Prerequisites for integrating Google Tag Manager easily
Before diving into it and understanding how to install Google Tag Manager on WordPress, it’s essential to set up accounts that will help you track and manage your website data effectively. There are a few prerequisites you need to address to ensure a smooth integration. By meeting these prerequisites, you will make the way for a hassle-free installation.
Meet the WordPress site requirements
If you want to learn how to install Google Tag Manager on WordPress, first you should check if your WordPress site meets certain criteria to support the integration. Here is the list of those requirements.
- WordPress version: Ensure that you are running a recent version of WordPress to maintain compatibility with new plugins and security features.
- Administrator access: You need to have administrative privileges to install plugins and edit theme files.
- Plugin installation: Be prepared to either install a plugin or manually insert code into your WordPress theme’s header.
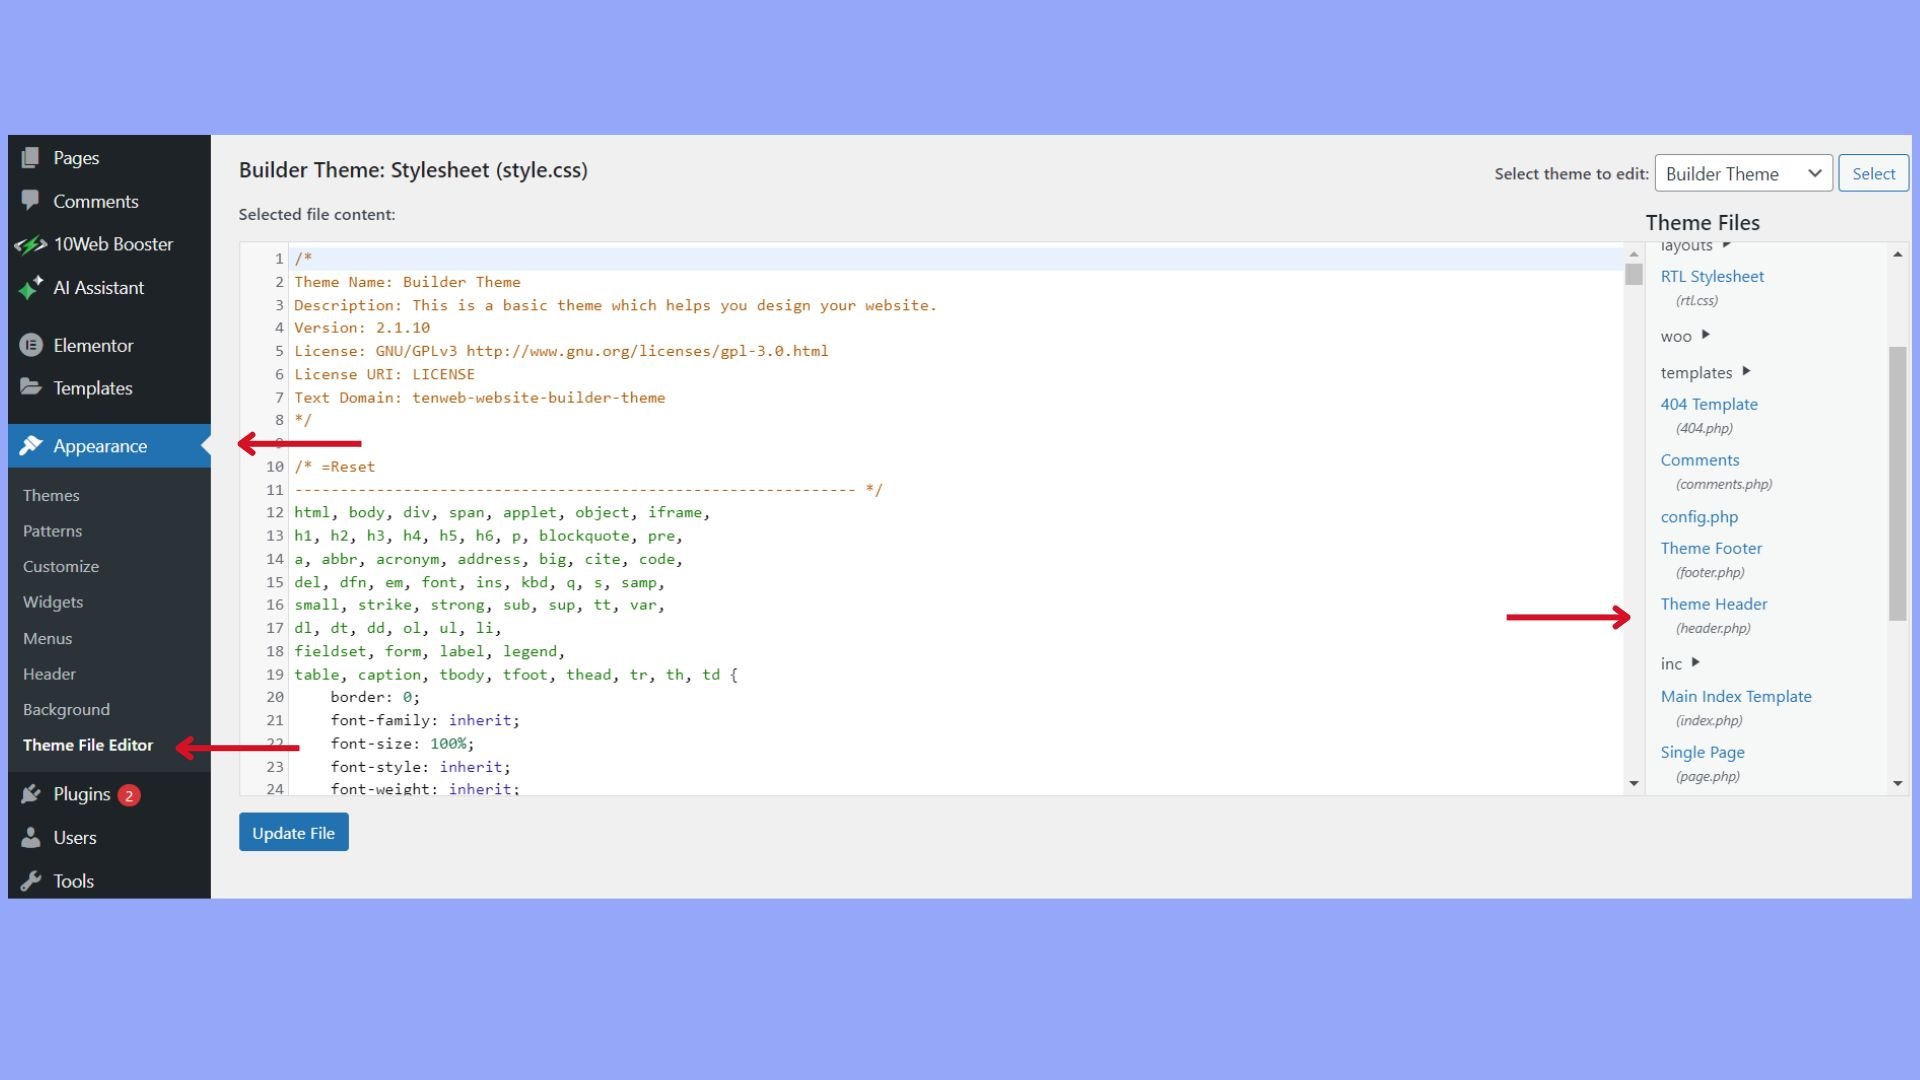
- Theme file editing: If you choose to manually insert code, ensure you can access and edit the theme’s header file (often named header.php) through the Appearance > Theme File Editor in your WordPress dashboard.
Create a Google Tag Manager account
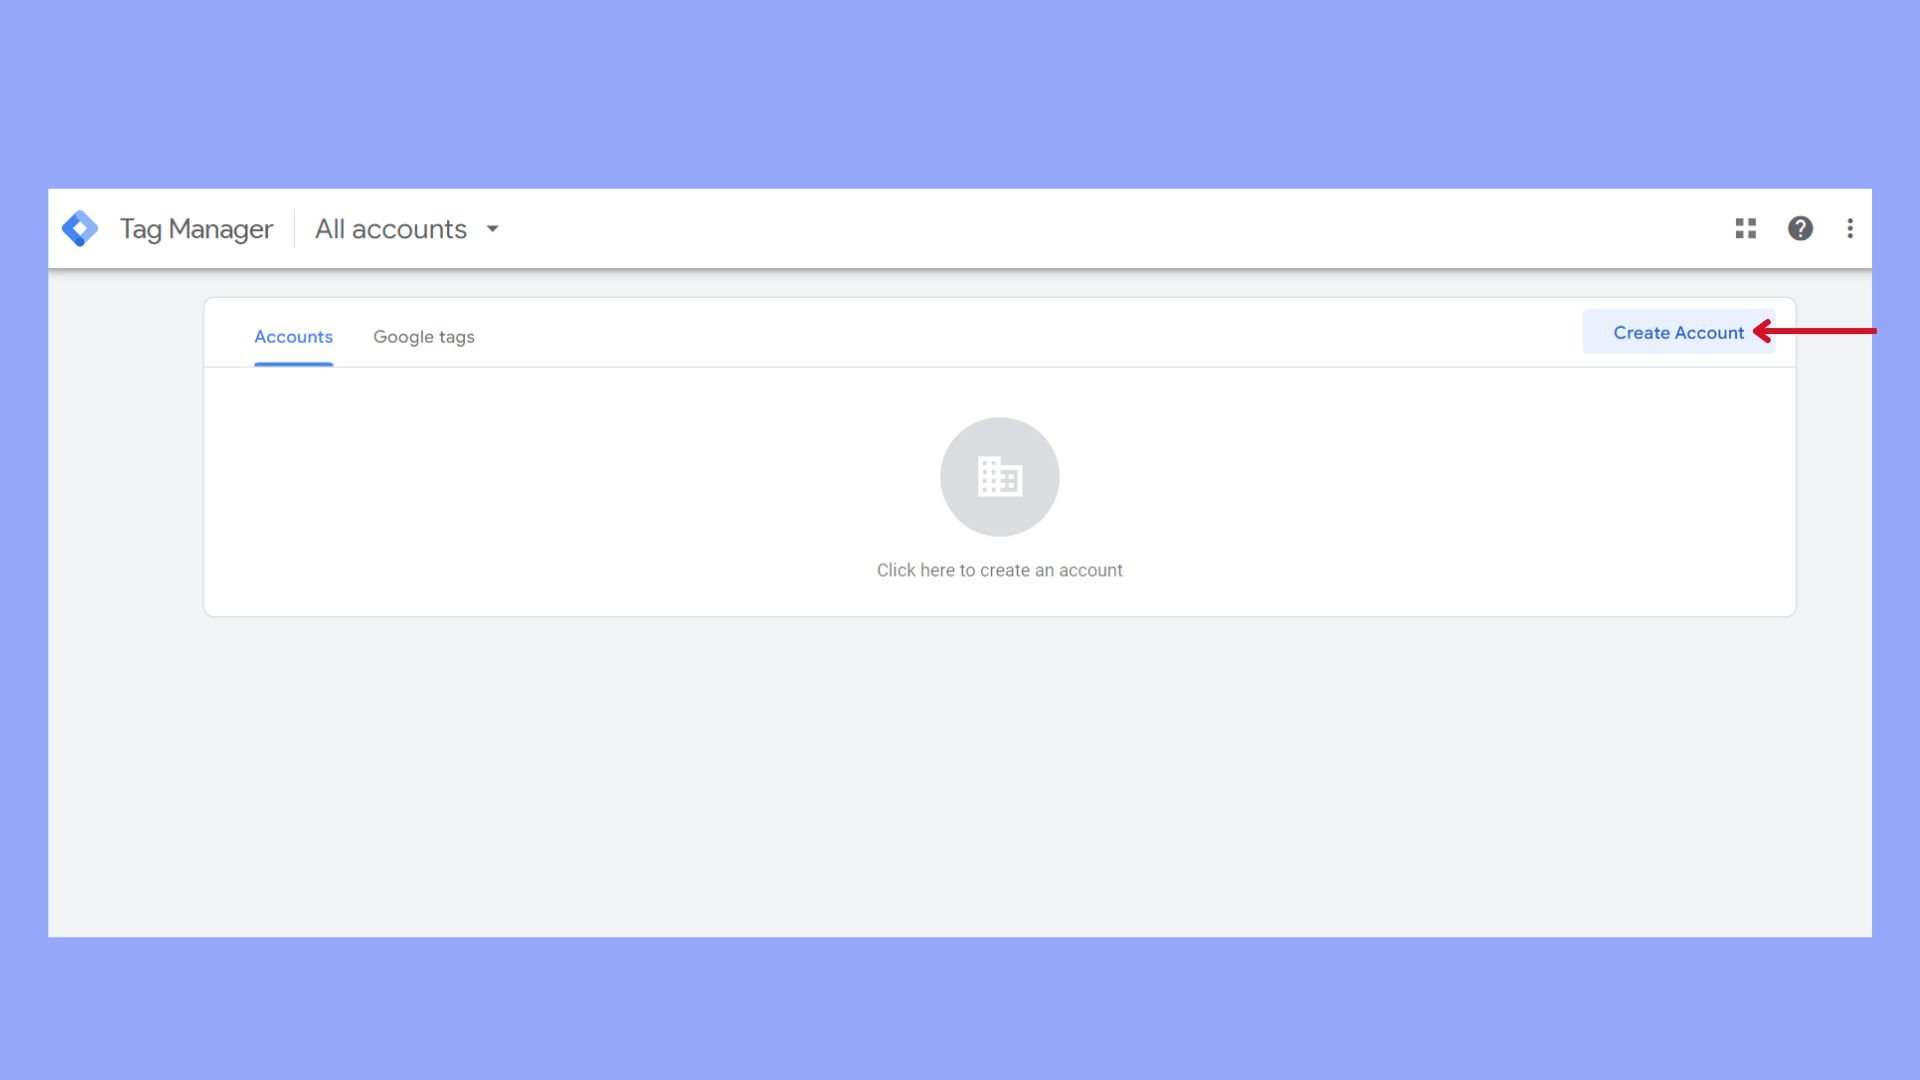
The first step involves creating an account on Google Tag Manager. Follow the instructions to set one up.
- Go to the Google Tag Manager website > select Start for free > sign up using your Google account.

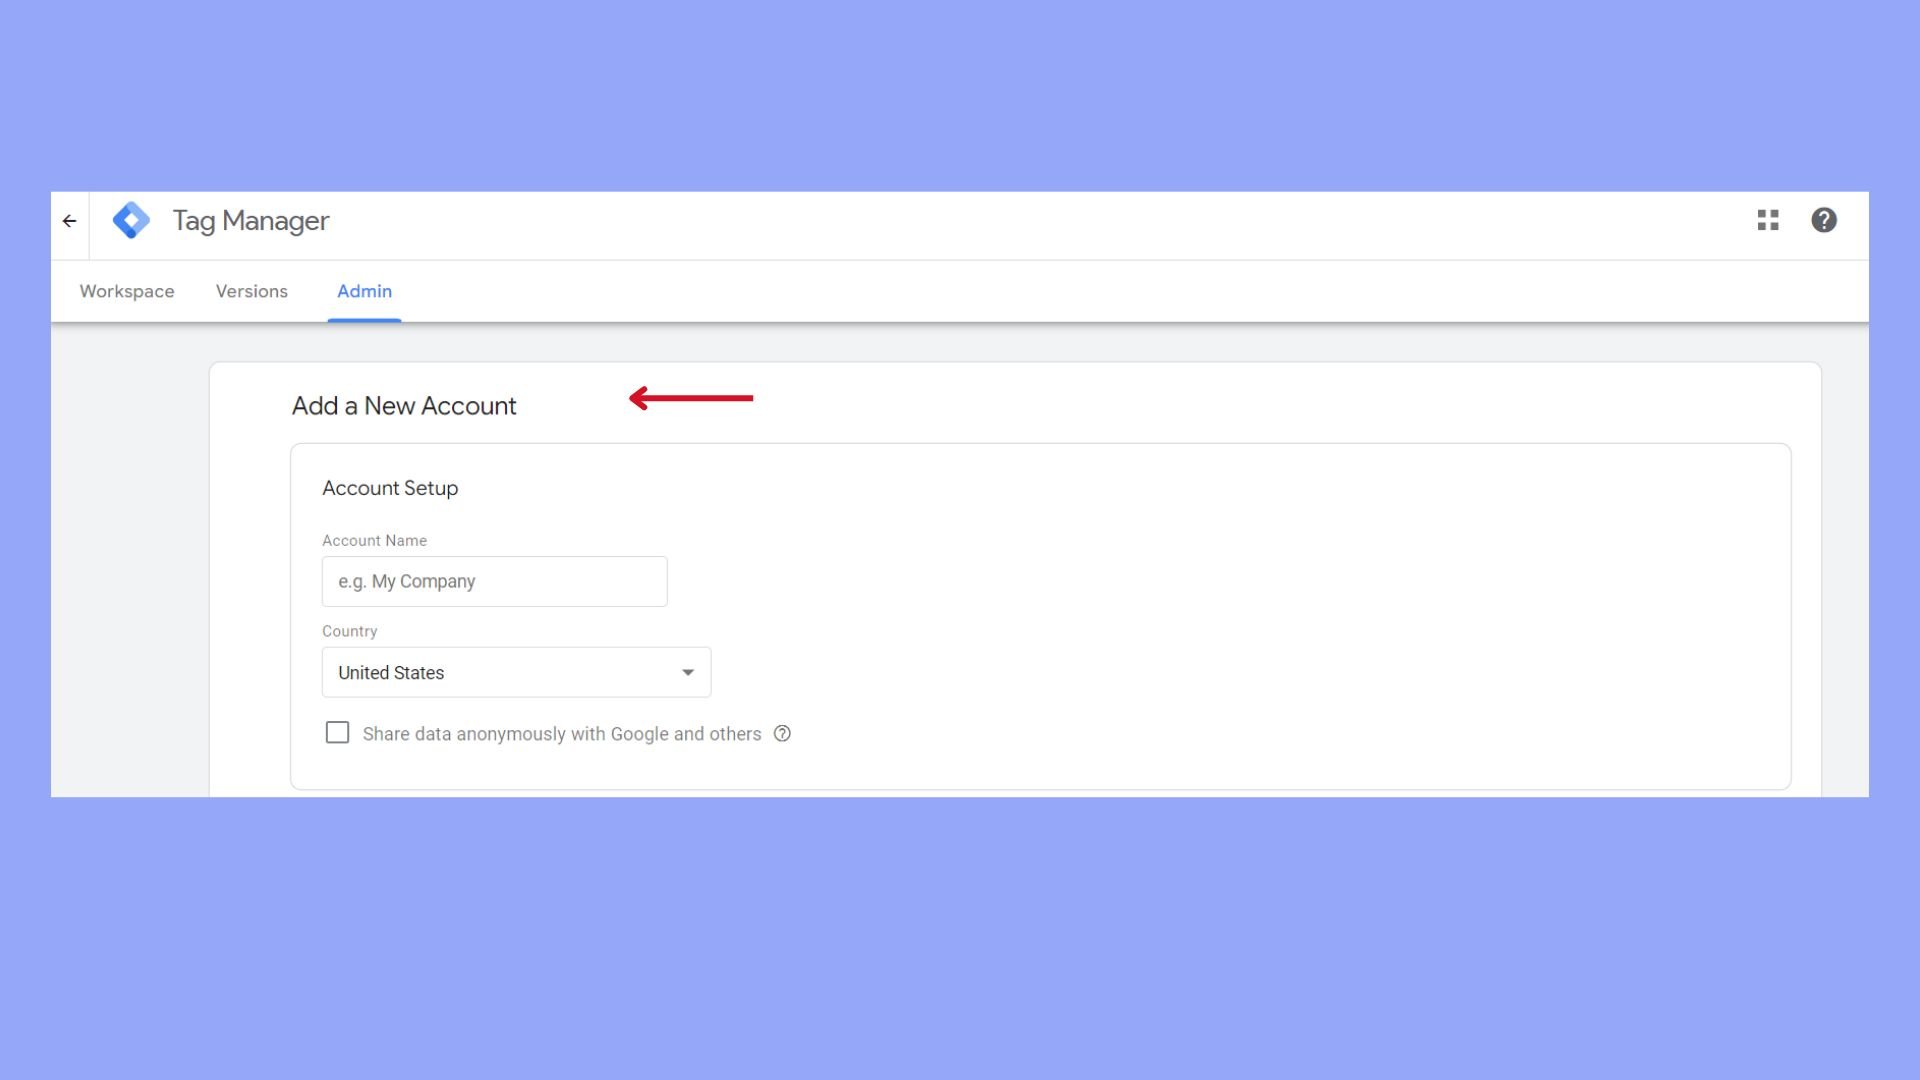
- Enter your account name and choose your country from the dropdown list.
Set up the GTM container
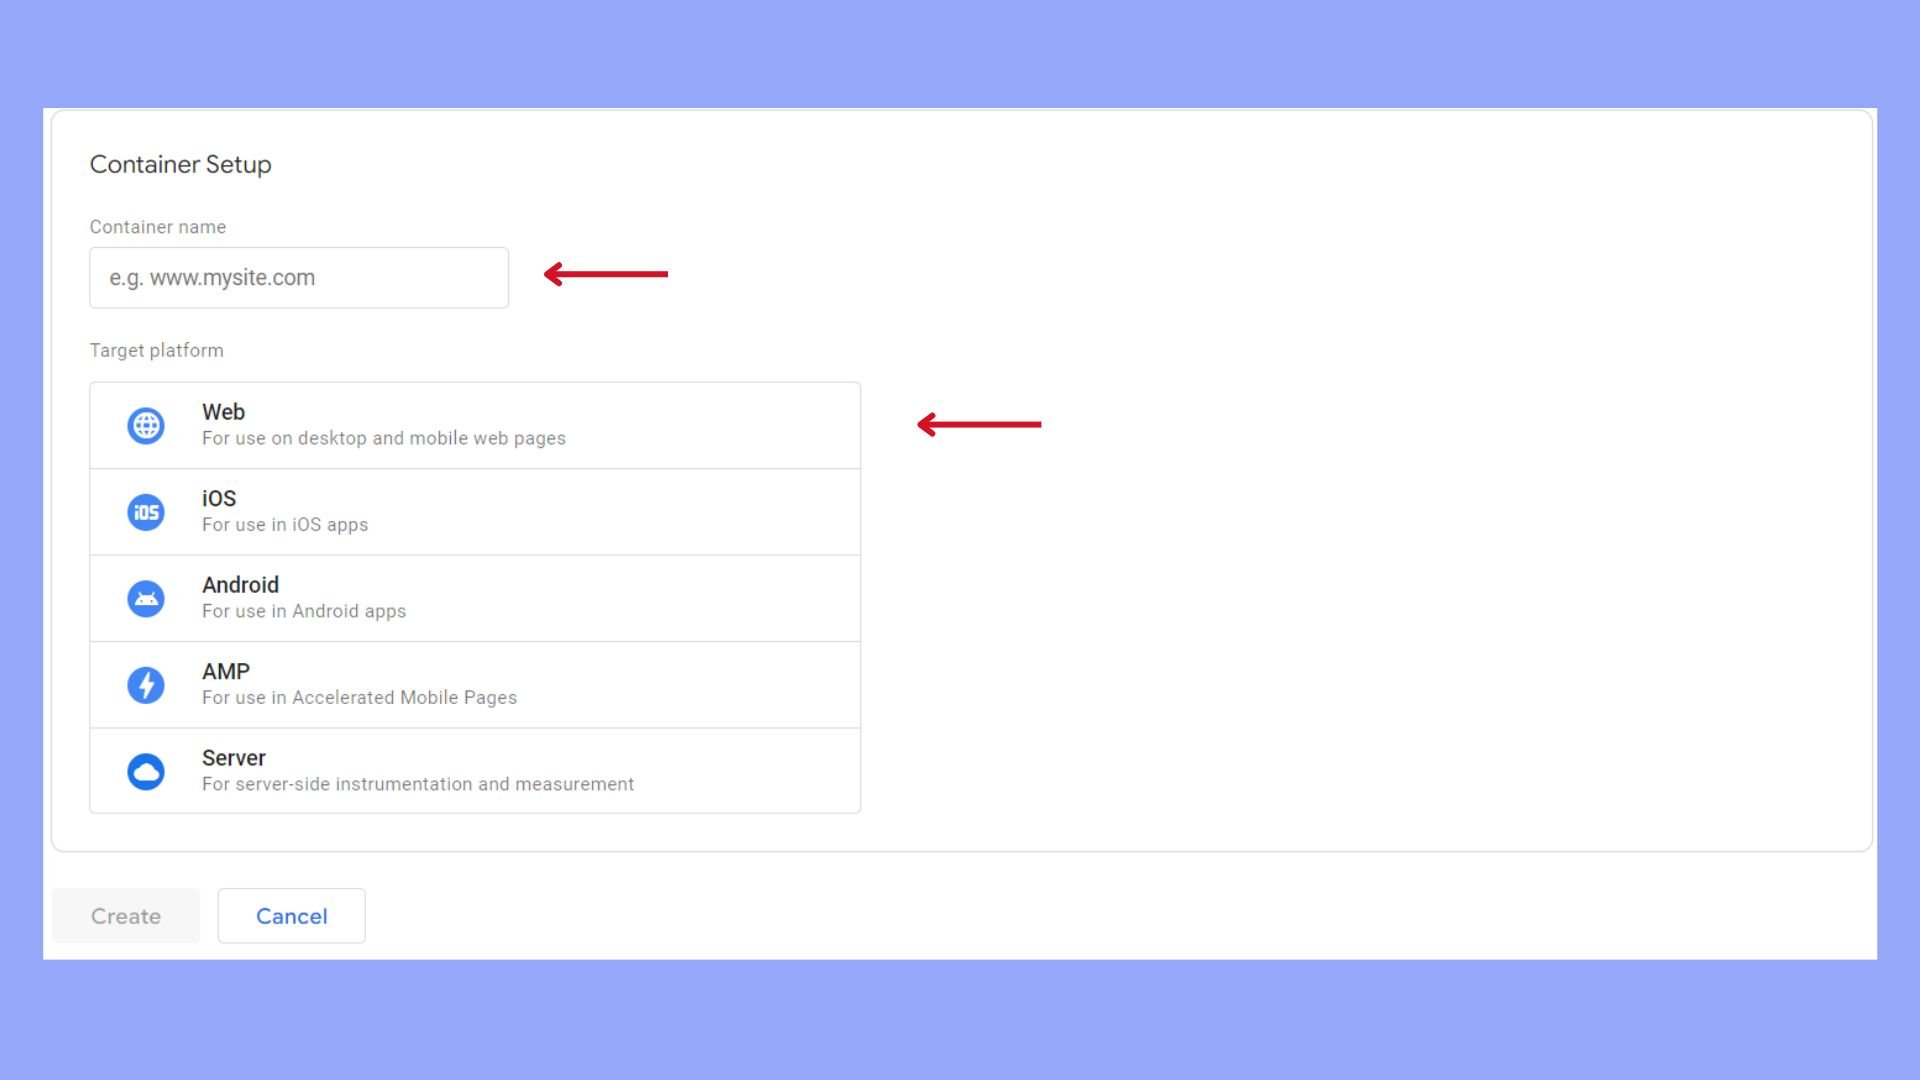
Before integrating Google Tag Manager with WordPress, you must create and configure your GTM container:
- Create a new container for your website by providing a name and selecting the target platform as Web.
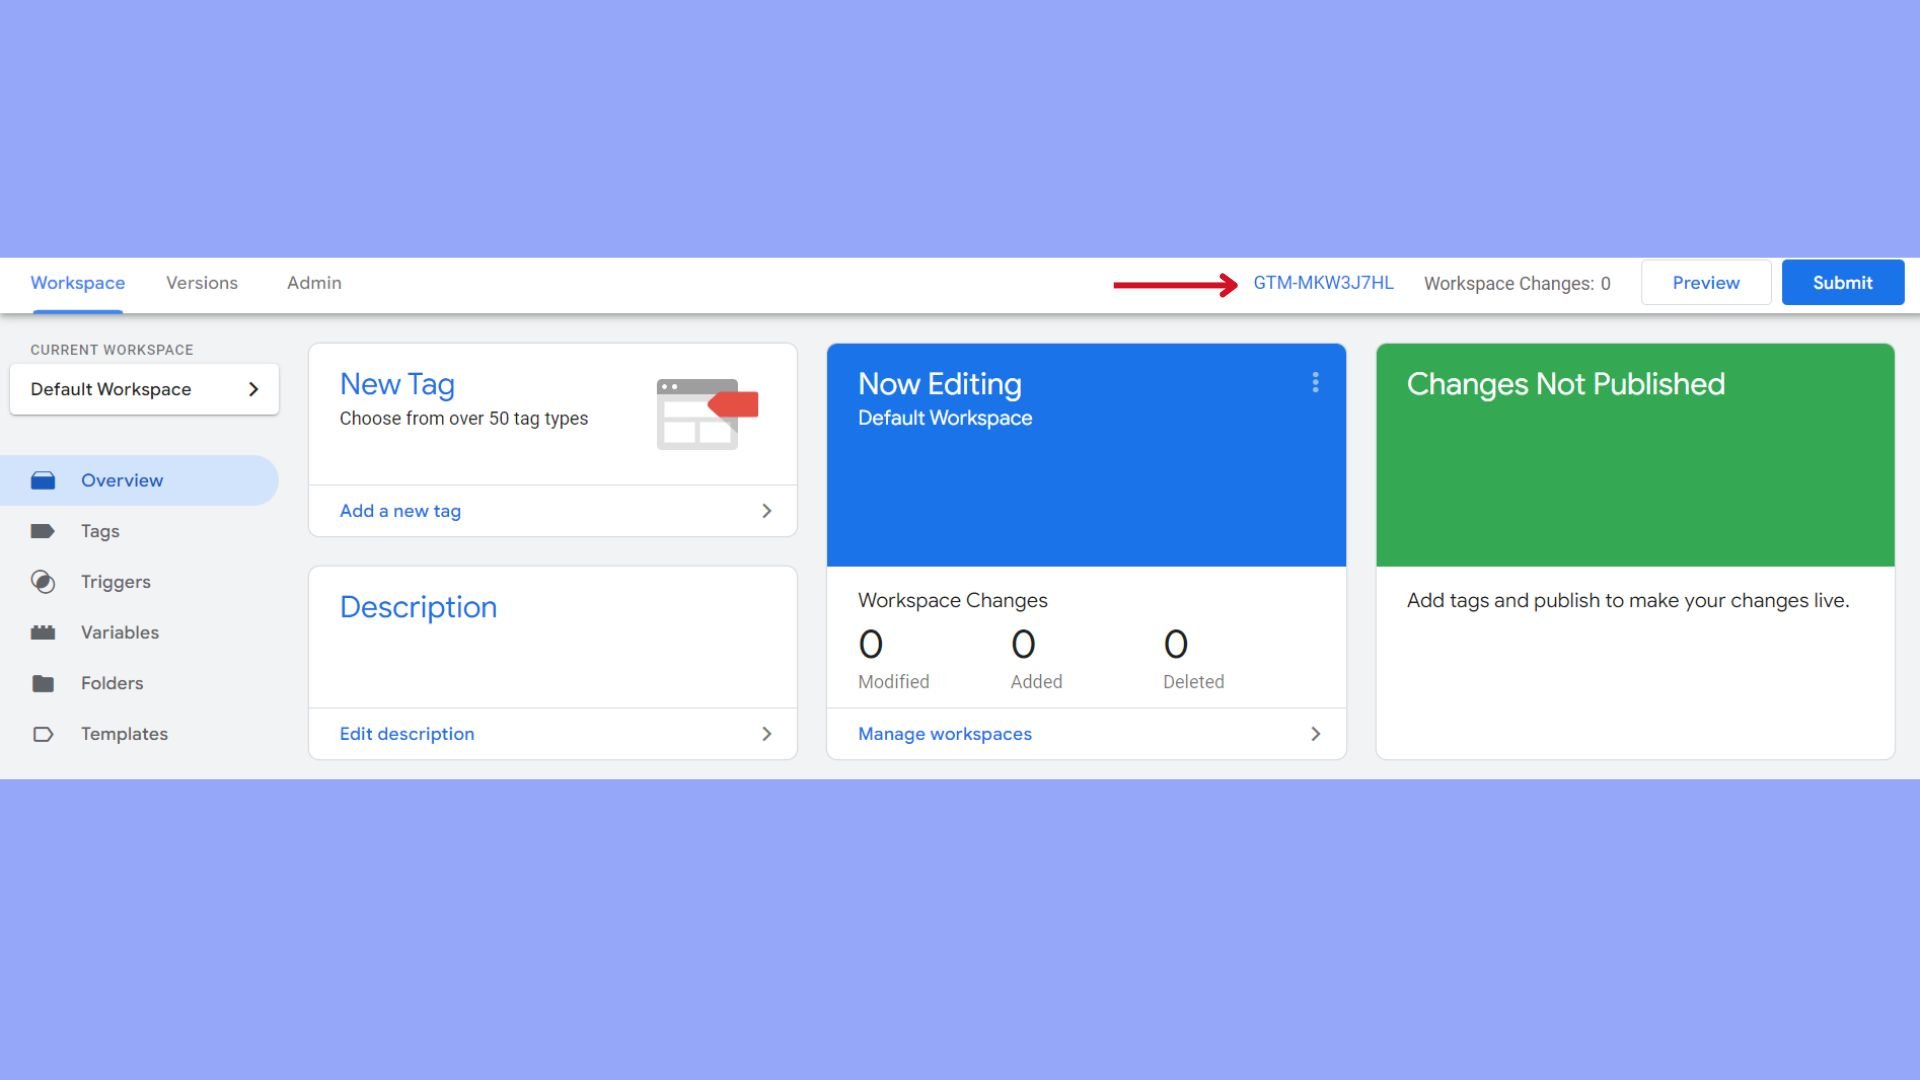
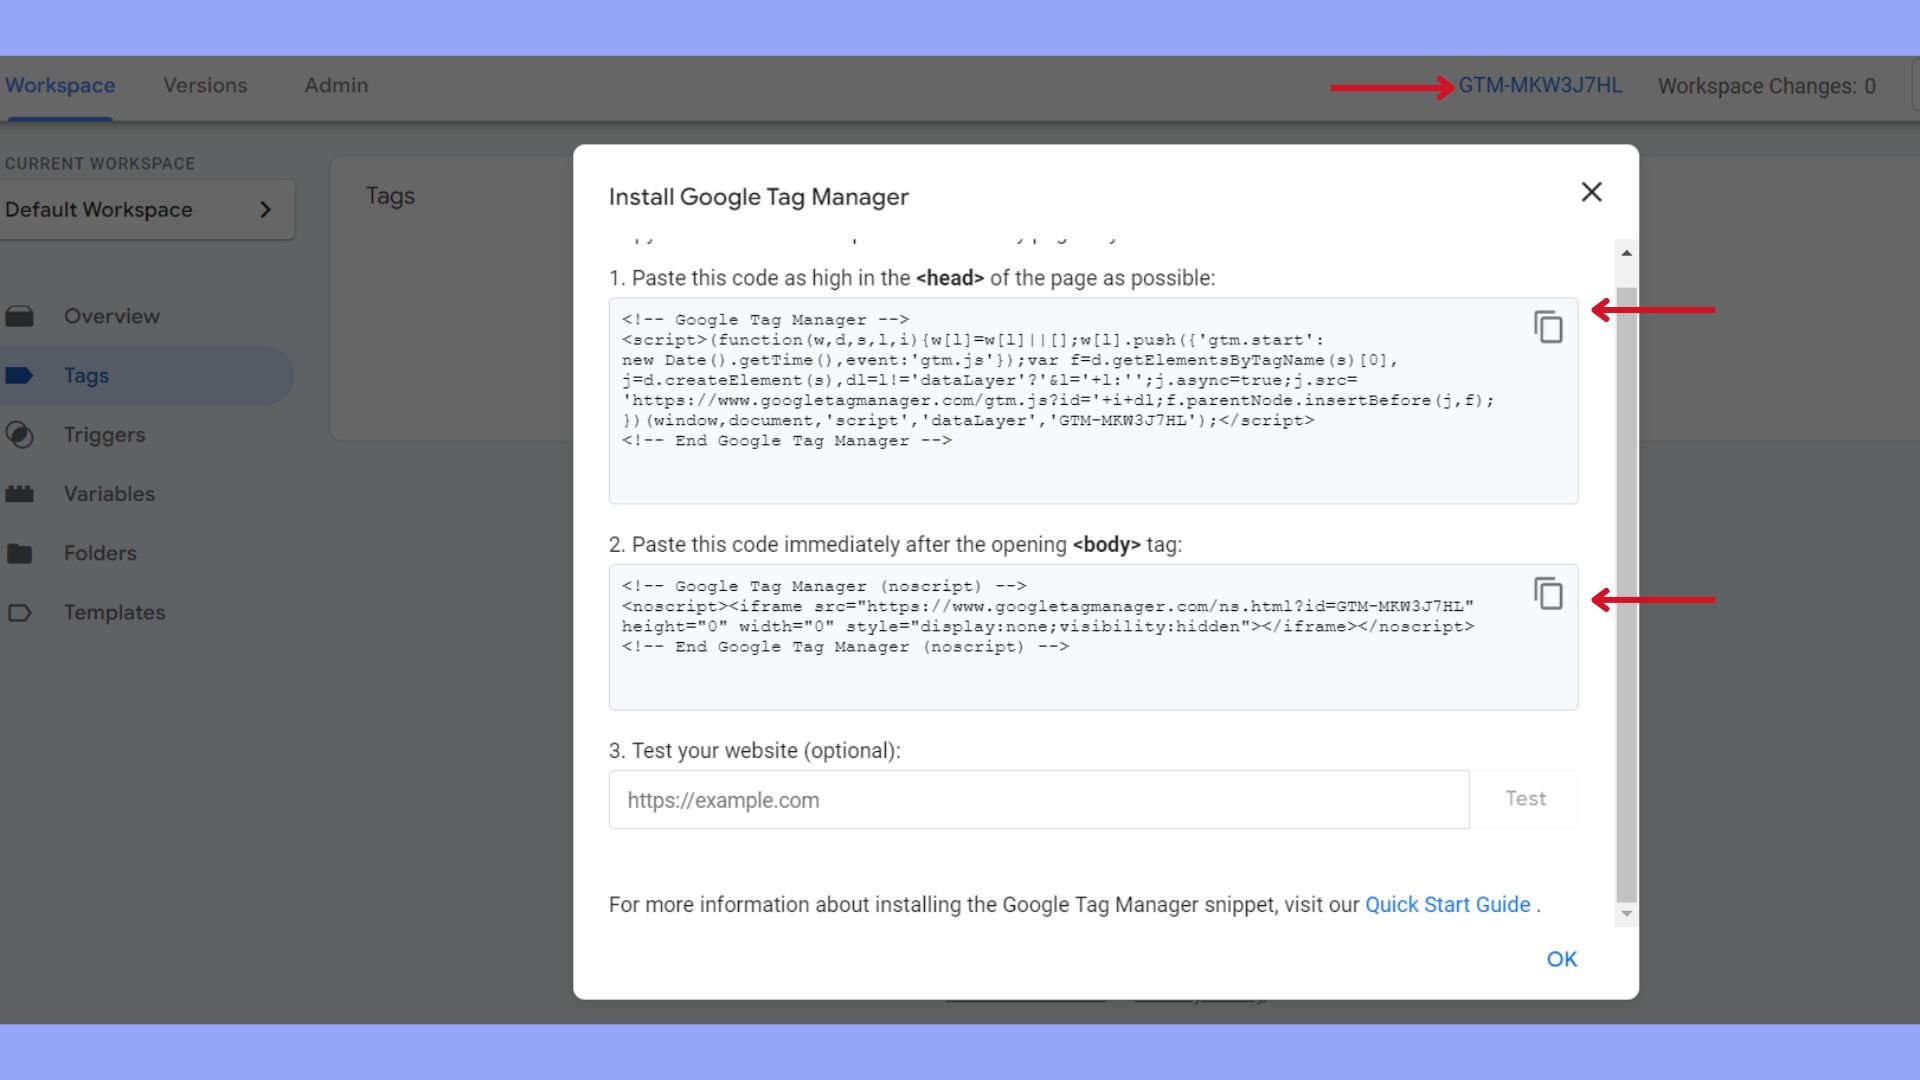
- Record the GTM ID: Once created, your container will generate a unique GTM ID (e.g., GTM-XXXX), which is vital for the integration process.
- Keep the GTM code snippet handy, as you will need to insert this into your WordPress site, either via the plugin settings or directly into the code.
Automate manual work with 10Web Managed WordPress Hosting and 10Web AI Website Builder. Optimize your WordPress website effortlessly. ![]()
Simplify WordPress with 10Web
Set up a Google Analytics account
Next, set up your Google Analytics account by visiting the Google Analytics website. If you do not have an account, click on Start for free and follow the registration process. With Google Analytics 4, the latest iteration, you’ll ensure accurate data collection and be able to take advantage of more detailed reporting features.
Initiate the process by clicking on Admin, then under the Account column, click on Create Account. Follow the setup process, fill in your website details, and ensure the Create a Google Analytics 4 property option is selected for future-proofing your analytics setup.
How to install Google Tag Manager on WordPress
Installing Google Tag Manager on WordPress is a setup that can be approached manually or by utilizing plugins. The latter usually offers a simplified process.
How to install Google Tag Manager on WordPress manually
After you have created your account and received a GTM container code, follow these steps for integration.
- Log in to your WordPress dashboard.
- Go to Appearance > Theme Editor > header.php file.
- Open it for editing.
- Paste the GTM container code snippet just after the <body> tag begins.
- Similarly, insert the second part of the code snippet just before the closing </body> tag in footer.php.

Note: Direct code edits may be overwritten on theme updates. Ensure to back up files before making changes.
Automate manual work with 10Web Managed WordPress Hosting and 10Web AI Website Builder. Optimize your WordPress website effortlessly. ![]()
Simplify WordPress with 10Web
How to install Google Tag Manager on WordPress via plugins
The name indicates that to install Google Tag Manager via plugins, you need to install a plugin. There are options, some of which we will discuss. The Insert Headers and Footers plugin or WPCode plugin can be installed from the WordPress plugin repository. Site Kit by Google is also an option for a more integrated solution.
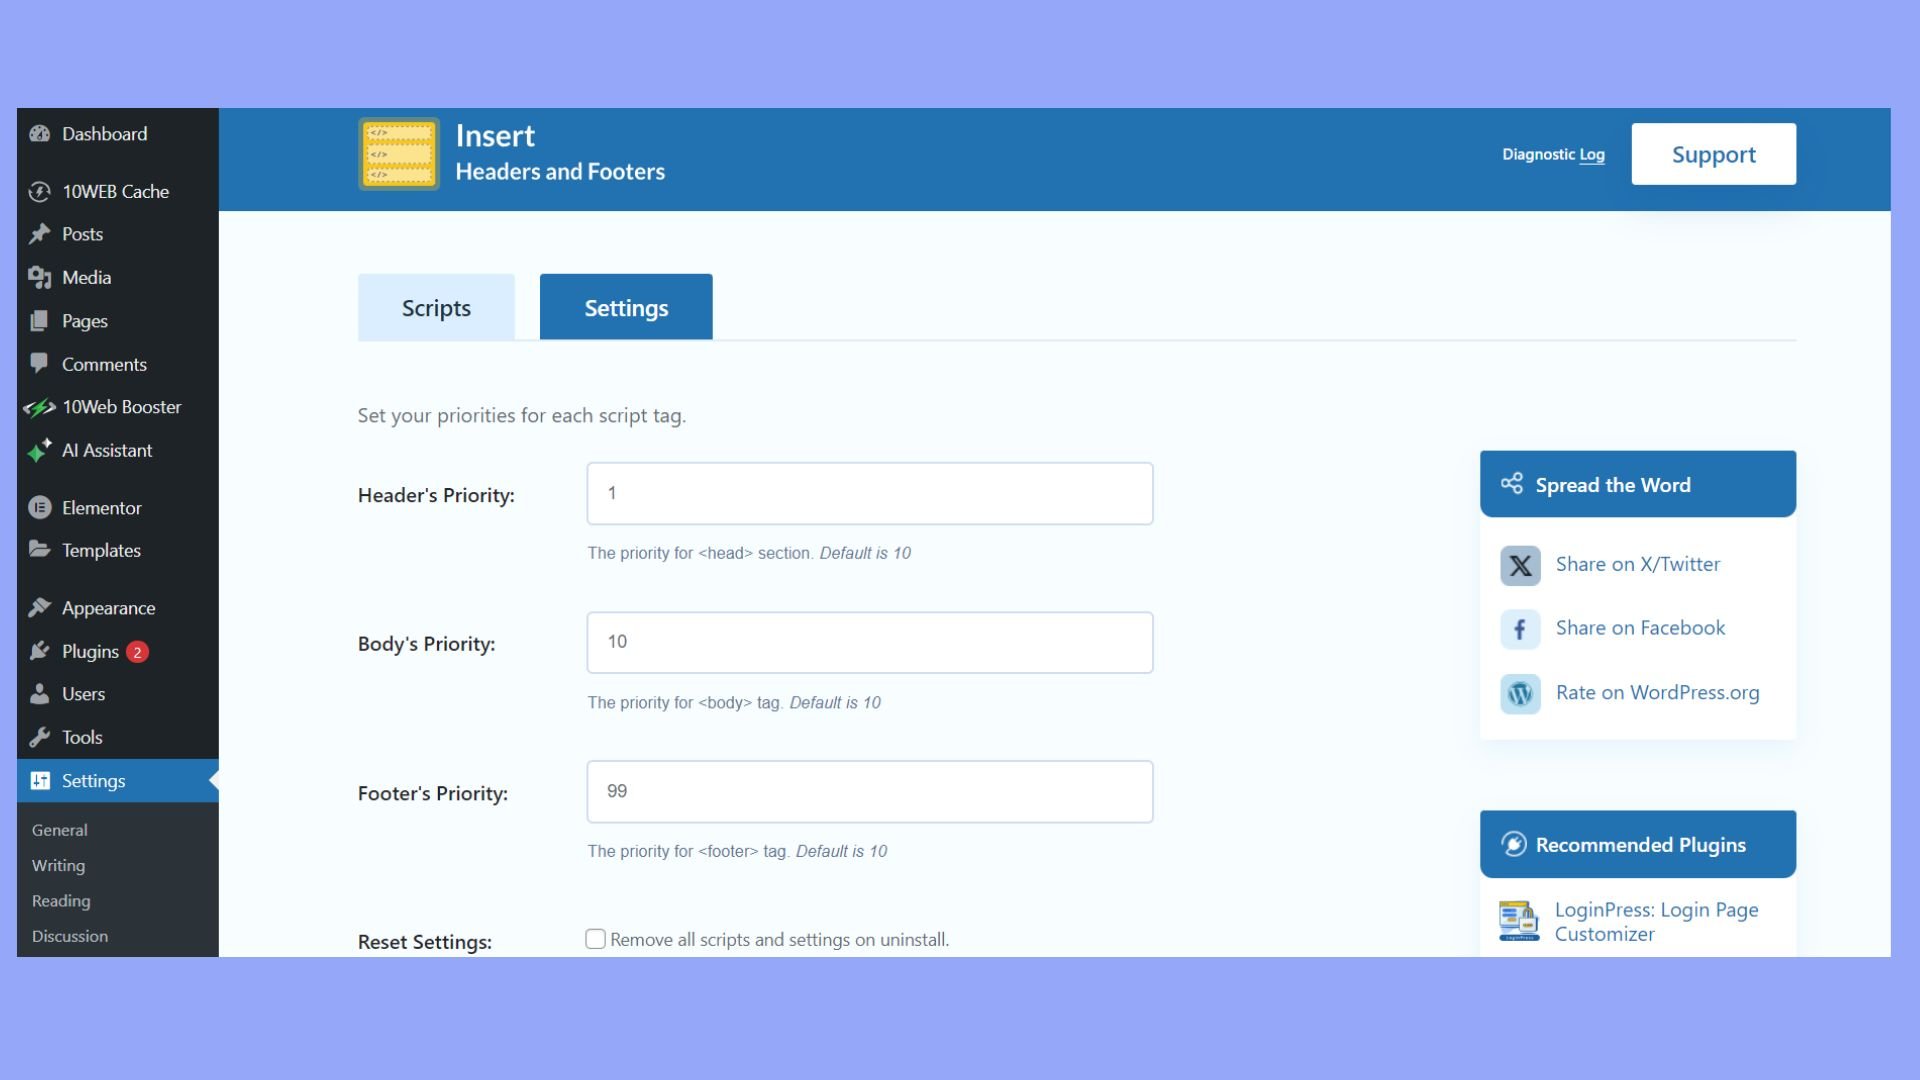
For the Insert Headers and Footers plugin
- Install and activate the plugin.
- Access the plugin’s settings under Settings > Insert Headers and Footers.
- Paste the GTM container code snippet into the headers or footers fields as required.
- Find the necessary code information by accessing your GTM account > click GTM ID.
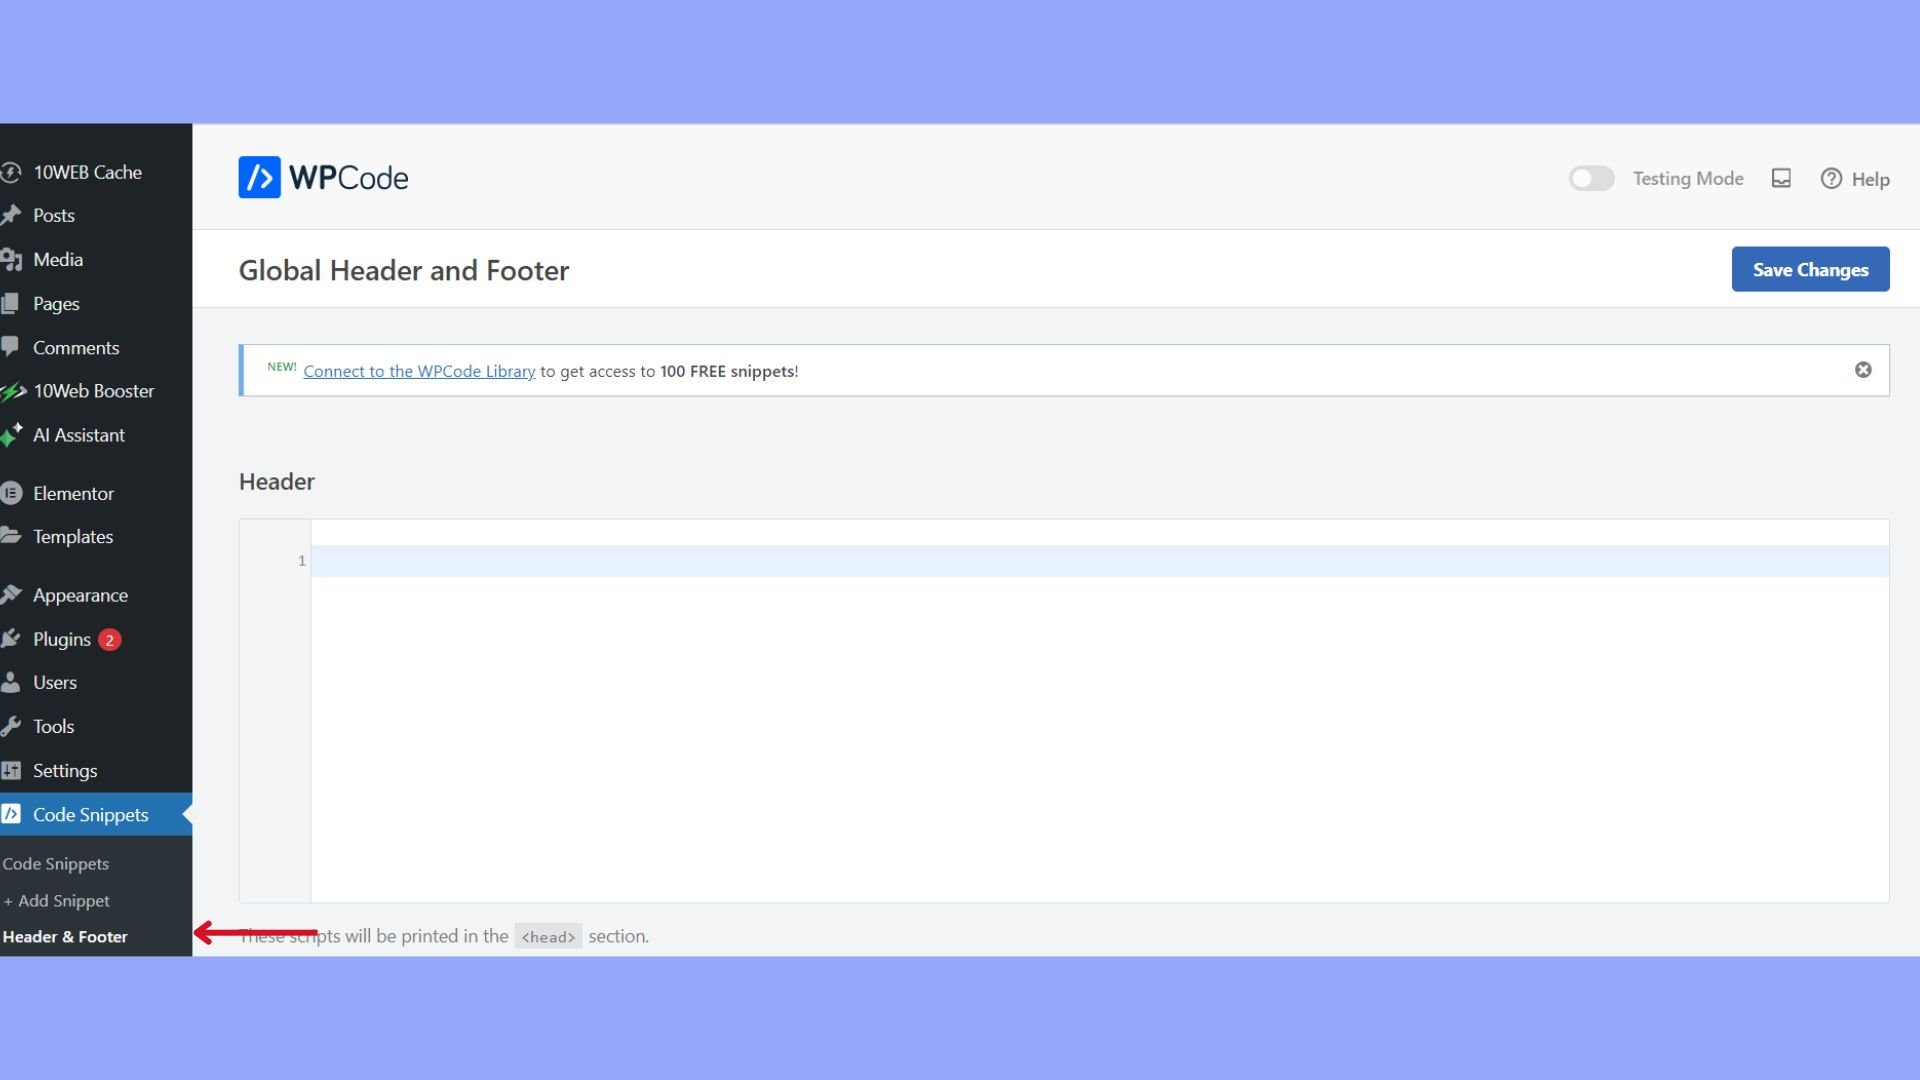
For WPCode plugin
- Install and activate the WPCode plugin.
- Add a new custom code snippet through the plugin’s interface.
- Insert the GTM code in the appropriate section for header or footer output.
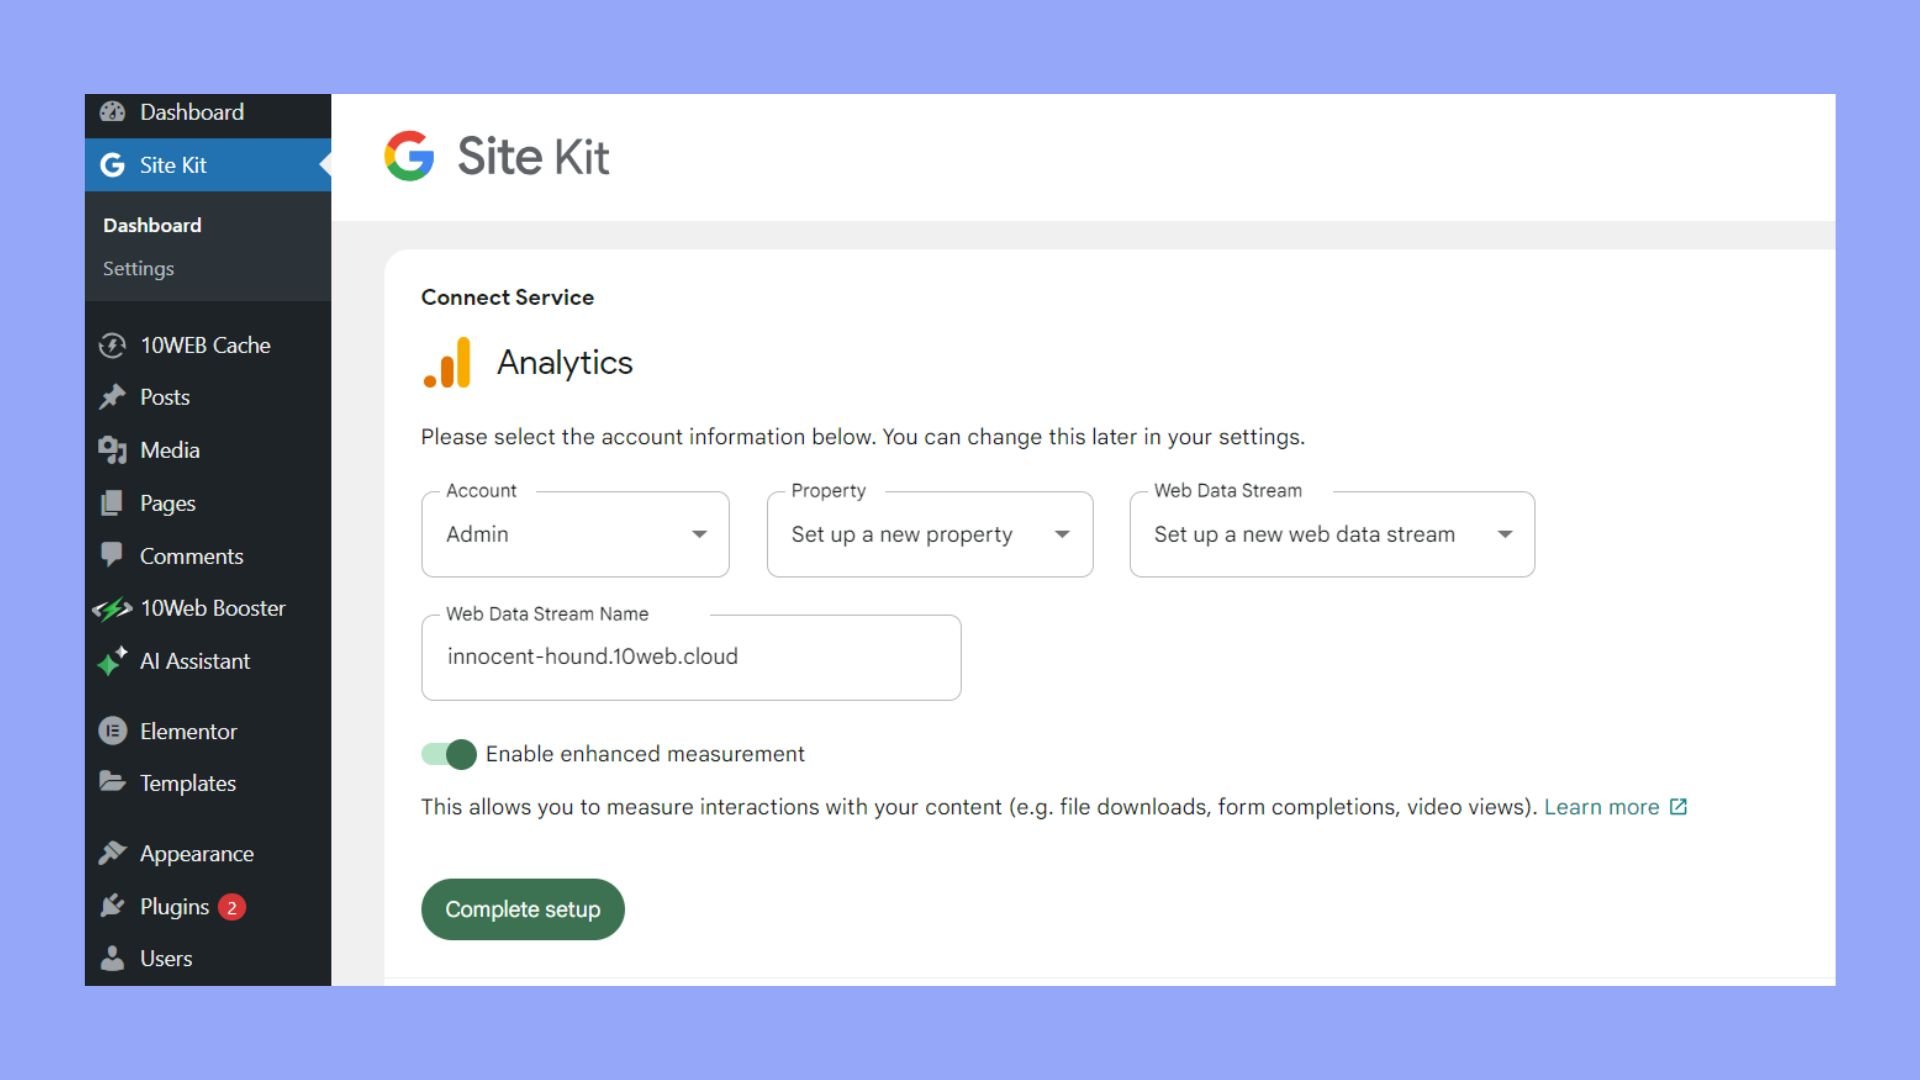
For Site Kit by Google
- Install and activate Site Kit.
- Connect the plugin with your Google account.
- Follow the prompts within the Site Kit to complete the setup for Google Tag Manager.
Tip: always keep your plugins updated to avoid security vulnerabilities or conflicts with other WordPress features or plugins.
Configure and test Google Tag Manager
After you have learned how to install Google Tag Manager and successfully included Google it on your WordPress site, the next step is configuring your tags and triggers, followed by verifying the installation to ensure it’s tracking properly.
Set up tags and triggers
Tags are snippets of code or tracking pixels from third-party tools that tell Google Tag Manager what to do. Examples include Google Analytics tracking codes or Facebook pixel codes.
- To set up a new tag, go to the Tags section in your GTM dashboard, and click New.
- Choose a tag type, such as Universal Analytics for Google Analytics.
- Configure the tag with the required information, such as the Tracking ID from your analytics service.

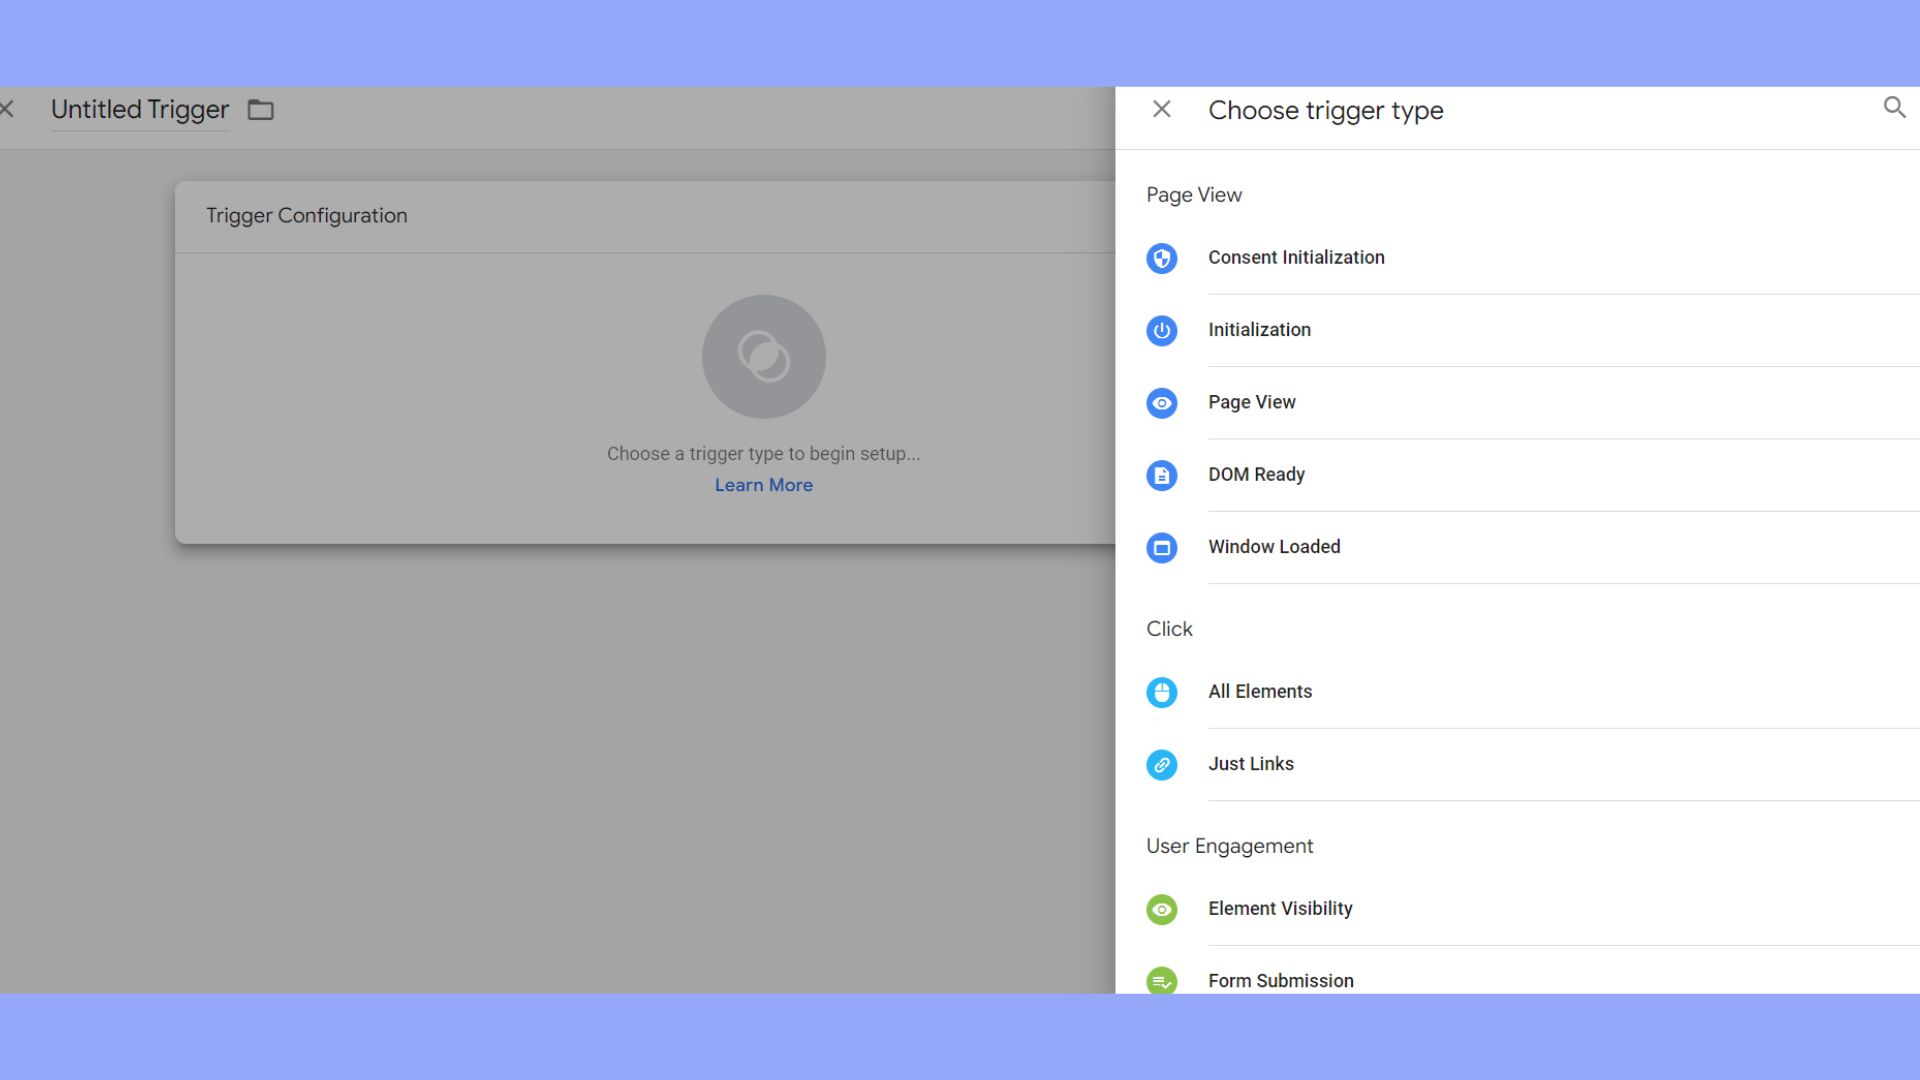
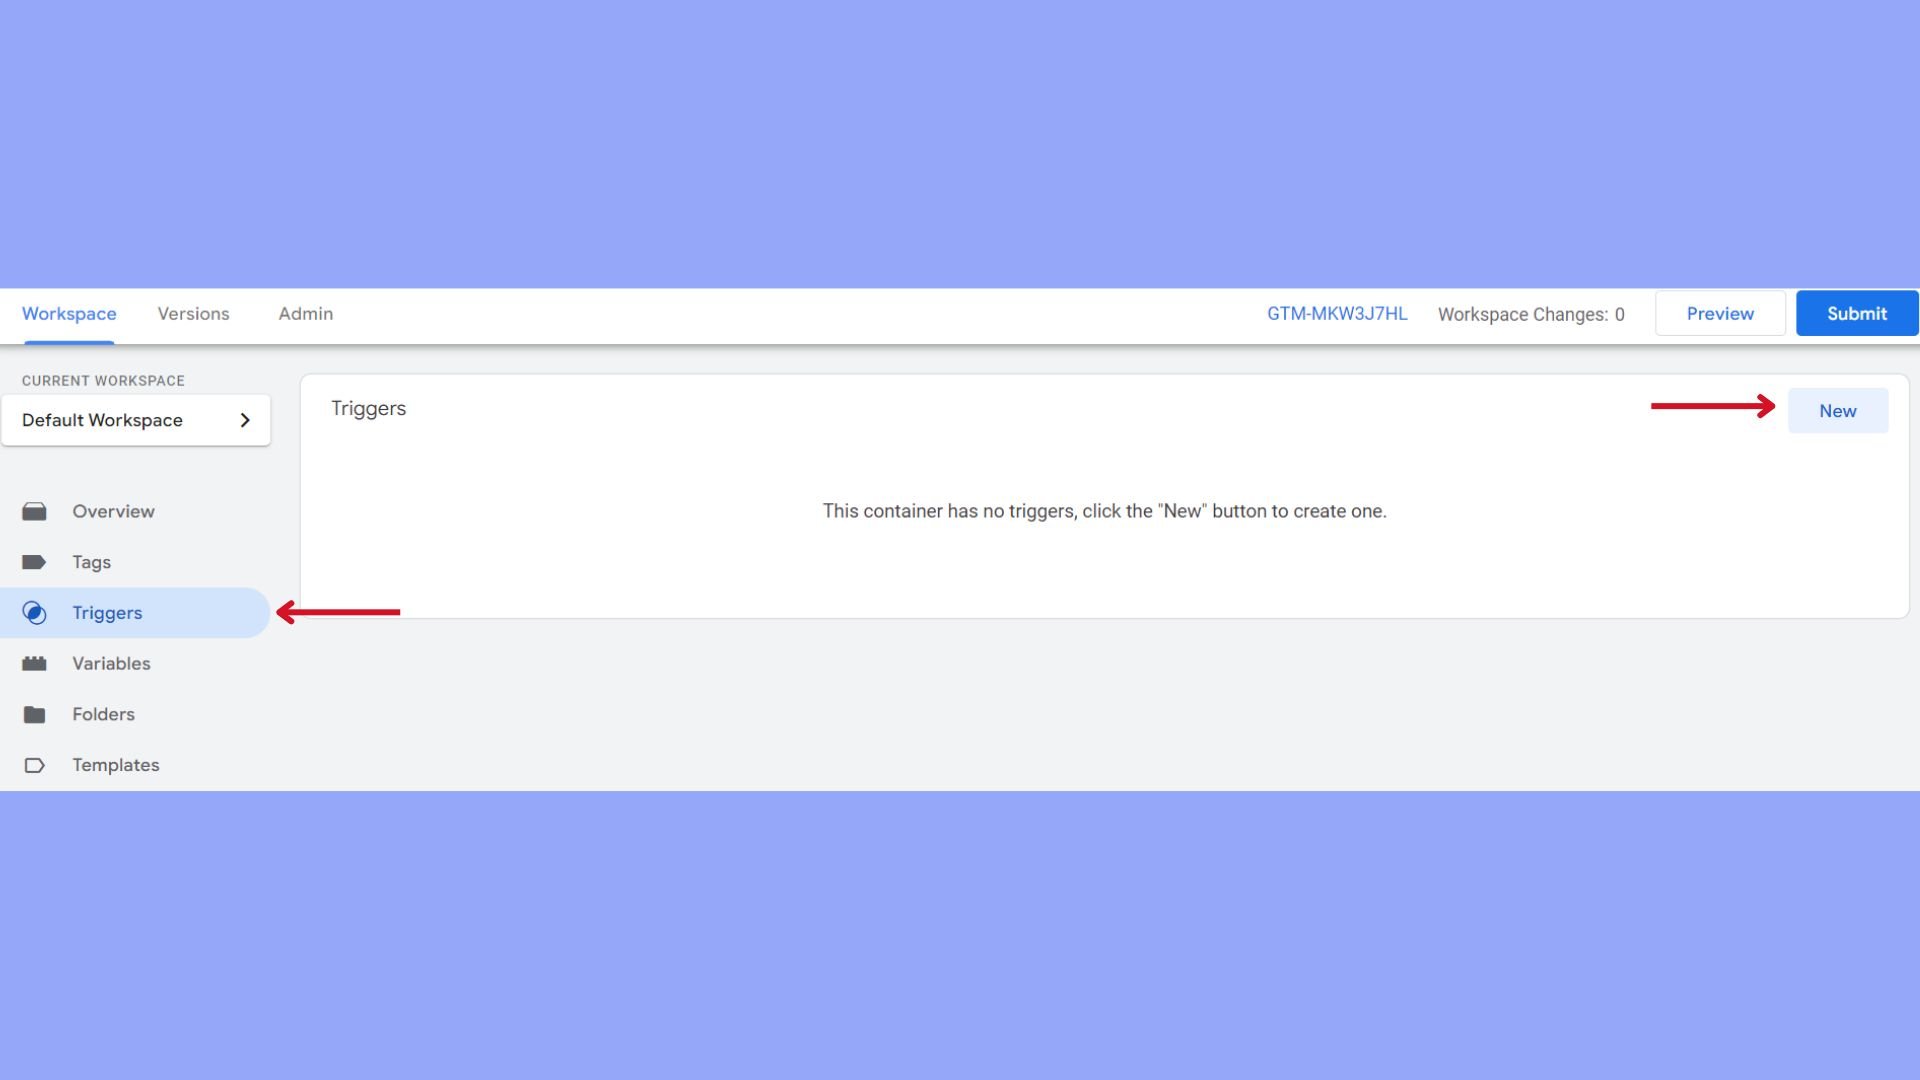
Triggers define when your tags should fire. A trigger could be based on specific events, like clicks, form submissions, or page views.
- To create a trigger, go to the Triggers section and click on New.
- Select a trigger type, such as Page View to activate your tag when a page is viewed.
- Set the trigger rules by specifying conditions, like a URL or user engagement behavior.
Verify installation and debugging
Once you’ve set your tags and triggers, it’s crucial to test them to make sure they work as expected. Testing ensures accurate data collection and can help you troubleshoot common issues.
- Open your website in your browser and enable GTM’s Preview mode from your GTM dashboard to verify which tags are firing and when.
- Observe the tag statuses in the overlay at the bottom of your browser window. They should say Firing for successfully loaded tags or Not fired if the trigger conditions haven’t been met.
- Troubleshoot by reviewing trigger configurations if you find a tag that doesn’t fire when it’s supposed to.
- Use the built-in debugging tools in GTM and your browser’s developer console to inspect and rectify any errors.
Integrate with analytics and advanced tracking
Before you hurry to track the insights, understand that integrating Google Analytics allows you to monitor website performance, while advanced tracking options enable you to track specific user interactions like clicks and form submissions. Now that you know how to install Google Tag Manager on WordPress and use it effectively, it’s time to integrate advanced features.
Google Analytics integration
Integrating Google Analytics with Google Tag Manager (GTM) on your WordPress site allows you to track website analytics comprehensively. First, you need to create a Google Analytics property and obtain your Measurement ID. Once you have your ID, go into GTM and add a New Tag.
- Choose Google Analytics: GA4 Configuration as the tag type.
- Enter your Measurement ID in the configuration settings.
- Trigger this tag on All Pages for site-wide tracking.
This setup records page views, but additional configuration is needed for enhanced tracking such as events and ecommerce.
Advanced tracking options
Within GTM, Advanced Tracking captures more granular user actions like button clicks, link clicks, form submissions, and ecommerce transactions. Here’s how to set up some advanced tracking options:
Button clicks
- Add a new tag with the Tag Type set to Google Analytics: Universal Analytics.
- Set Track Type to Event.
- Configure Category, Action, and Label to describe the button interaction.
Ecommerce tracking
- Utilize a Google Analytics tag with tracking.
- Define Ecommerce parameters corresponding to user purchases and interactions.
Form submissions
- Create a trigger for Form Submission events.
- Link this trigger to an analytics tag to capture the submission data.
To use A/B testing, integrate Google Optimize using its dedicated tag type. For conversion tracking, use dedicated conversion linker tags and set up goals in Google Analytics.
When connecting to Google Ads, ensure that both Google Analytics and Google Ads accounts are linked and that conversion actions are properly configured to attribute conversions from ads. Remember to Save your tags and Publish your container to make these tracking features live on your site.
Using third-party integrations
GTM becomes particularly powerful when you integrate it with third-party tools. You can easily install and manage pixels for advertising platforms such as the Facebook Pixel, without the need to edit your site’s code directly. This becomes invaluable for tracking conversions from Facebook ads, retargeting visitors, and creating lookalike audiences.
For businesses, integrating LinkedIn’s Insight Tag through GTM can provide valuable insights into the effectiveness of your advertising and content marketing on the platform by tracking conversions, website demographics, and more.
Adding Facebook Pixel
- Create a new tag with a custom HTML tag type in GTM (Script code provided by Facebook).
- Set up triggers for specific events like Page View or Form Submission.
Adding LinkedIn Insight Tag
- Similarly, use a custom HTML tag in GTM.
- Assign triggers based on your conversion tracking goals.
Moreover, you can enable scroll tracking and form conversion tracking – vital for understanding user engagement and lead generation effectiveness.
Final thoughts
Integrating Google Tag Manager on your WordPress website offers a lot of benefits that can enhance the performance and management of your site. This system saves time and significantly reduces the potential for errors. Whether you choose to install GTM manually or through plugins, the process is straightforward, ensuring that even those new to website management can achieve a successful integration.
The combination of Google Tag Manager and Google Analytics enhances your ability to track and understand user behavior in depth, allowing for refined marketing strategies and improved site functionalities.
GTM integration equips site administrators with powerful tools to monitor detailed interactions and optimize the user experience effectively. By now, you have learned how to install Google Tag Manager on WordPress manually and automatically through plugins, so happy tracking.
Skip and automate manual work with 10Web Managed WordPress Hosting and the 10Web AI Website Builder.Simplify WordPress with 10Web
Simplify WordPress with 10Web

![]()
![]()